Campbell Hausfeld TL140289 User manual

Please read and save these instructions. Read carefully before attempting to assemble, install, operate or maintain the product described.
Protect yourself and others by observing all safety information. Failure to comply with instructions could result in personal injury and/or
property damage! Retain instructions for future reference.
For parts, product & service information
visit www.chpower.com
REMINDER: Keep your dated proof of purchase for warranty purposes!
Attach it to this manual or file it for safekeeping.
IN738200AV 1/12
See Warranty on page 6 for important information about commercial use of this product.
Operating Instructions TL140289
© 2012 Campbell Hausfeld/Scott Fetzer
Impact
Wrenches
Table of Contents
Description ......................1
Unpacking .......................1
Safety Guidelines .................1
General Safety Information .......1-2
Operation .......................2
Storage .........................3
Troubleshooting Chart . . . . . . . . . . . . .4
Warranty ........................6
Description
Impact wrenches are air tools designed
for removing and installing nuts and
bolts. Impact wrenches have different
impact mechanism types such as rocking
dog, pin clutch and twin hammer
(double jumbo).
The rocking dog and pin clutch types
are used as general purpose tools by
DIY’ers and hobbyists. Twin hammer
wrenches are for use by the professional
in tire shops, assembly line applications
and for removing high torque bolts.
Unpacking
When unpacking this product, carefully
inspect for any damage that may have
occurred during transit. Make sure any
loose fittings, bolts, etc., are tightened
before putting this product into service.
READ & FOLLOW ALL INSTRUCTIONS
SAVE THESE INSTRUCTIONS
DO NOT DISCARD
Safety Guidelines
This manual contains information
that is very important to know and
understand. This information is
provided for SAFETY and to PREVENT
1. Read all manuals included
with this product
carefully. Be thoroughly
familiar with the controls
and the proper use of the
equipment.
2. Only persons well acquainted with
these rules of safe operation should
be allowed to use the air tool.
Do not
exceed
maximum operating pressure
of the air tool (90 PSI). The air
tool could explode and result
in death or serious personal injury.
3. Do not exceed any pressure rating of
any component in the system.
4. Disconnect the air tool from air
supply before changing tools or
attachments, servicing and during
non-operation.
Safety
glasses
and ear protection must be
worn during operation.
5. Do not wear loose fitting clothing,
scarves, or neck ties. Loose clothing
may become caught in moving parts
and result in serious personal injury.
6. Do not wear jewelry when operating
any tool. Jewelry may become
caught in moving parts and result in
serious personal injury.
7. Do not depress trigger when
connecting the air supply hose.
8. Always use attachments designed
for use with air powered tools.
Do not use damaged or worn
attachments.
Do not use hand
tool sockets. Use
impact quality sockets only. Hand
tool sockets are “glass-hard” and will
shatter and can cause serious personal
injury if used with air tools.
EQUIPMENT PROBLEMS. To help
recognize this information, observe the
following symbols.
Danger indicates an
imminently
hazardous situation which, if not
avoided, WILL result in death or serious
injury.
Warning indicates a
potentially
hazardous situation which, if not
avoided, COULD result in death or
serious injury.
Caution indicates a
potentially
hazardous situation which, if not
avoided, MAY result in minor or
moderate injury.
Notice indicates
important
information, that if not followed, may
cause damage to equipment.
NOTE: Information that requires special
attenion
General Safety Information
CALIFORNIA PROPOSITION 65
You can
create
dust when you cut, sand, drill
or grind materials such as
wood, paint, metal, concrete,
cement, or other masonry. This dust
often contains chemicals known to
cause cancer, birth defects, or other
reproductive harm. Wear protective
gear.
GENERAL SAFETY
This product is a part of a high pressure
system and the following safety
precautions must be followed at all
times along with any other existing
safety rules.
MANUAL
REGISTER YOUR PRODUCT ONLINE NOW! http://www.chpower.net/reg

2
Operating Instructions
www.chpower.com
General Safety
Information (Continued)
IMPACT MECHANISM LUBRICATION
Lubricate the impact mechanism
monthly. See the enclosed yellow flyer.
Disconnect the
impact wrench from
the air supply before lubricating.
1. Disconnect the impact wrench from
the air supply.
2. Remove the slotted screw or allen
head screw from the oil port hole
(Refer to replacement parts list for
tool features).
3. Squeeze approximately 1 ounce of
Campbell Hausfeld air tool oil in the
oil port hole. Replace the screw.
4. Reconnect the air supply to the
impact wrench and run for 20 to 30
seconds. Lubricate the entire impact
mechanism by rotating the tool
upside down and sideways while
running the tool.
5. Remove the screw and hold the oil
port hole over a suitable container
to allow excess oil to drain.
Sometimes triggering the tool when
dumping the oils helps to force out
the excess oil.
6. If the oil is dirty, repeat the
procedure above until the oil comes
out clear. Install the screw and
tighten. The residual oil remaining
in the impact mechanism chamber
is all that is needed for proper
lubrication.
9. Never trigger the tool when
not applied to a work object.
Attachments must be securely
attached. Loose attachments can
cause serious injury.
10. Protect air lines from damage or
puncture.
11. Never point an air tool at oneself
or any other person. Serious injury
could occur.
12. Check air hoses for weak or worn
condition before each use. Make
sure all connections are secure.
Release
all
pressure from the system
before attempting to install,
service, relocate or perform
any maintenance.
13. Keep all nuts, bolts and screws tight
and ensure equipment is in safe
working condition.
14. Do not put hands near or under
moving parts.
Do not misuse
this product.
Excessive exposure to vibration, work in
awkward positions, and repetitive work
motions can cause injury to hands and
arms. Stop using any tool if discomfort,
numbness, tingling, or pain occur, and
consult a physician.
Operation
LUBRICATION
Proper lubrication is the owner’s
responsibility. Failure to lubricate the air
tool properly will dramatically shorten
the life of the tool and will void the
warranty.
This impact wrench
requires lubrication
BEFORE the initial use and BEFORE and
AFTER each additional use.
Impact wrenches require lubrication
throughout the life of the tool and
must be lubricated and or greased in
two separate areas: the air motor and
the impact mechanism. Follow the
outlined procedures and refer to parts
manual for tool features. Campbell
Hausfeld air tool oil (ST127000AV) is
recommended because this oil cleans,
lubricates and inhibits rust all in one
step.
AIR MOTOR LUBRICATION
The motor must be lubricated daily. An
air motor cannot be oiled too often.
Disconnect the
impact wrench from
the air supply before lubricating.
1. Disconnect the impact wrench from
the air supply.
2. Turn the impact wrench upside
down.
3. While pulling the trigger, squeeze
approximately a 1/4 oz. of Campbell
Hausfeld airtool oil in the air inlet.
Then, push the forward and reverse
button in both directions.
After an air tool
has been lubricated,
oil will discharge through the exhaust
port during the first few seconds of
operation. Thus, THE EXHAUST PORT
MUST BE COVERED WITH A TOWEL
before applying air pressure. FAILURE
TO COVER THE EXHAUST PORT CAN
RESULT IN SERIOUS INJURY.
4. Connect the impact wrench to the
air supply and cover the exhaust port
with a towel (Refer to replacement
parts manual for tool features).
Run the impact wrench in both the
forward and reverse directions for
20 to 30 seconds. Oil will discharge
from the exhaust port when air
pressure is applied.

3
TL140289
www.chpower.com
Operation (Continued) SPEED ADJUSTMENT
The impact wrench should never
be used to set torque. Use a torque
wrench to set the torque. All models
are equipped with regulators for speed
adjustment (Refer to parts manual for
tool features).
To remove lugs or bolts, set the
regulator to the maximum setting.
When installing, always use a torque
wrench to attain the proper torque of
the lugs or bolts.
When reassembling
be careful not to
overtighten. Bolts may fail or cause a
hazardous condition. Be sure to set the
regulator to the minimum setting then
use a torque wrench to set torque.
AIR TOOL SET-UP
NOTE: It is not recommended to install
a quick coupler between the tool and
the whip hose.
Using fittings or air hoses which are
too small can create a pressure drop
and reduce the power of the tool. For
3/8, 1/2 and 3/4 inch impact wrenches
use 3/8 inch (I.D.) fittings with 1/4 inch
NPT threads. Most compressors are
shipped with a short, 1/4 inch I.D. hose.
For proper performance and more
convenience, use a 3/8 inch I.D. hose.
Hoses longer than 50 feet should have a
1/2 inch I.D.
For 1 inch impact wrenches use 1/2 inch
(I.D.) fittings with 1/2 inch NPT threads
and a 1/2 inch I.D. hose. Hoses longer
than 50 feet should have a 1 inch I.D.
Never carry a tool
by the hose or
pull the hose to move the tool or a
compressor. Keep hoses away from
heat, oil and sharp edges. Replace any
hose that is damaged, weak or worn.
Storage
The impact wrench must be lubricated
before storing. Follow the air motor
lubrication instructions with an
exception to step 4. Only run the impact
wrench for 2 to 3 seconds instead of 20
to 30 seconds because more oil needs
to remain in the impact wrench when
storing.
TECHNICAL SERVICE
For information regarding the
operation or repair of this product,
please call 1-800-543-6400.
REPLACEMENT PARTS INFORMATION
For information regarding where to
order replacement parts, call toll free
1-800-543-6400.
Please provide the following
information:
• Model number
• Stamped code
• Part number and description
Address parts correspondence to:
Campbell Hausfeld
100 Production Drive
Harrison, Ohio 45030 U.S.A.
RECOMMENDED HOOKUP
The illustration below shows the
recommended hookup for the tool.
1. The air compressor
must be able to
maintain a minimum
of 60 PSI when the
tool is being used. An inadequate air
supply can cause a loss of power and
inconsistent driving.
2. An oiler can be
used to provide oil
circulation through
the tool. A filter can
be used to remove liquid and solid
impurities which can rust or “gum
up” internal parts of the tool.
3. Always use air supply hoses with
a minimum working pressure
rating equal to or greater than the
pressure from the power source if a
regulator fails, or 200 PSI, whichever
is greater. Use 1/4 inch air hose for
runs up to 50 feet. Use 3/8 inch air
hoses for 50 foot run or longer.
4. Use a pressure regulator on the
compressor, with an operating
pressure of 0 PSI - 125 PSI. A pressure
regulator is required to control
the operating pressure of the tool
between 60 PSI and 90 PSI.
Recommended Hookup
Quick Coupler
(Optional)
Quick
Coupler
Air Hose
Lubricator
Quick Plug
(Optional)
Regulator
Filter
200 PSI or greater
3/8 inch I.D.
60 PSI
Min.
90 PSI
Max.
Quick
Plug

4
Operating Instructions
www.chpower.com
General Troubleshooting Guide
Symptom Possible Cause(s) Corrective Action
Tool runs slowly or will
not operate
1. Grit or gum in tool
1. Flush the tool with Campbell Hausfeld air tool oil, gum
solvent, or an equal mixture of SAE 10 motor oil and
kerosene. If Campbell Hausfeld oil is not used, lubricate the
tool after cleaning
2. No oil in tool 2. Lubricate the tool according to the lubrication instructions
in this manual
3. Low air pressure 3. a. Adjust the regulator on the tool to the maximum
setting
b. Adjust the compressor regulator to tool maximum while
the tool is running free
c. For PL2602, the regulator should be turned so the
indicator points to a number on the tool
4. Air hose leaks 4. Tighten and seal hose fittings if leaks are found
5. Pressure drops 5. a. Be sure the hose is the proper size. Long hoses or tools
using large volumes of air may require a hose with an
I.D. of 1/2 inch or larger depending on the total length
of the hose
b. Do not use a multiple number of hoses connected
together with quick connect fittings. This causes
additional pressure drops and reduces the tool power.
Directly connect the hoses together
6. Worn rotor blade in motor 6. Replace rotor blade
7. Worn ball bearing in motor 7. Remove and inspect bearing for rust, dirt and grit or worn
race. Replace or clean and regrease bearing with bearing
grease
Moisture blowing out
of tool
1. Water in tank 1. Drain tank. (See air compressor manual). Oil tool and run
until no water is evident. Oil tool again and run 1-2 seconds
2. Water in the air lines/hoses 2. a. Install a water separator/filter. NOTE: Separators
only work properly when the air passing through the
separator is cool. Locate the separator/filter as far as
possible from the compressor.
b. Install an air dryer
Impact Mechanism Troubleshooting Guide
Symptom Possible Cause(s) Corrective Action
Impacts slowly or will
not impact
1. Lack of lubrication 1. Lubricate the air motor and the impact mechanism.
(SeeLubrication section of this manual)
2. Tool regulator set in wrong
position
2. a. Adjust the regulator on the tool to the maximum setting
b. For twin hammer impact, the regulator should be turned
so the indicator points to a number on the tool
3. In-line regulator or compressor
regulator set too low
3. Adjust regulators in the air system
Impacts rapidly but
will not remove bolts
1. Worn impact mechanism 1. a. Replace worn impact mechanism components
b. Return impact wrench to Authorized Campbell Hausfeld
Service Center for repair
Does not impact 1. Broken impact mechanism 1. a. Replace worn impact mechanism components
b. Return impact wrench to Authorized Campbell Hausfeld
Service Center for repair

5
TL140289
Notes
www.chpower.com

6
Operating Instructions
www.chpower.com
Limited Warranty
1. DURATION: From the date of purchase by the original purchaser as follows: one (1) year.
2. WHO GIVES THIS WARRANTY (WARRANTOR): Campbell Hausfeld / Scott Fetzer Company, 100 Production Drive, Harrison,
Ohio, 45030, Telephone: (800) 543-6400.
3. WHO RECEIVES THIS WARRANTY (PURCHASER): The original purchaser (other than for purposes of resale) of the Campbell
Hausfeld product.
4. WHAT PRODUCTS ARE COVERED BY THIS WARRANTY: This Campbell Hausfeld impact wrench.
5. WHAT IS COVERED UNDER THIS WARRANTY: Substantial defects in material and workmanship which occur within the
duration of the warranty period with the exceptions below.
6. WHAT IS NOT COVERED UNDER THIS WARRANTY:
A. Implied warranties, including those of merchantability and FITNESS FOR A PARTICULAR PURPOSE ARE LIMITED FROM
THE DATE OF ORIGINAL PURCHASE AS STATED IN THE DURATION. If this product is used for commercial, industrial
or rental purposes, the warranty will apply for ninety (90) days from the date of purchase. Some States do not allow
limitation on how long an implied warranty lasts, so the above limitations may not apply to you.
B. ANY INCIDENTAL, INDIRECT, OR CONSEQUENTIAL LOSS, DAMAGE, OR EXPENSE THAT MAY RESULT FROM ANY DEFECT,
FAILURE, OR MALFUNCTION OF THE CAMPBELL HAUSFELD PRODUCT. Some States do not allow the exclusion or
limitation of incidental or consequential damages, so the above limitation or exclusion may not apply to you.
C. Any failure that results from an accident, purchaser’s abuse, neglect or failure to operate products in accordance with
instructions provided in the owner’s manual(s) supplied with product. Accident, purchaser’s abuse, neglect or failure to
operate products in accordance with instructions shall also include the removal or alteration of any safety devices. If
such safety devices are removed or altered, this warranty is void.
D. Normal adjustments which are explained in the owner’s manual(s) provided with the product.
E. Items or service that are normally required to maintain the product, e.g. o-rings, springs, gaskets, packings or seals,
lubricants, motor vanes, impact mechanism, or any other expendable part not specifically listed. These items will only
be covered for ninety (90) days from date of original purchase. Underlined items are warranted for defects in material
and workmanship only.
7. RESPONSIBILITIES OF WARRANTOR UNDER THIS WARRANTY: Repair or replace, at Warrantor’s option, products or
components which are defective, have malfunctioned and/or failed to conform within the duration of the specific
warranty period.
8. RESPONSIBILITIES OF PURCHASER UNDER THIS WARRANTY:
A. Provide dated proof of purchase and maintenance records.
B. Call Campbell Hausfeld (800-543-6400) to obtain your warranty service options. Freight costs must be borne by the
purchaser.
C. Use reasonable care in the operation and maintenance of the products as described in the owner’s manual(s).
9. WHEN WARRANTOR WILL PERFORM REPAIR OR REPLACEMENT UNDER THIS WARRANTY: Repair or replacement will be
scheduled and serviced according to the normal work flow at the servicing location, and depending on the availability of
replacement parts.
This Limited Warranty applies in the United States, Canada and Mexico only and gives you specific legal rights. You may also
have other rights which vary from state to state or country to country.

Sírvase leer y guardar estas instrucciones.Lea con cuidado antes de tratar de armar, instalar, manejar o darle servicio al producto descrito en
este manual. Protéjase Ud. y a los demás observando todas las reglas de seguridad. El no seguir las instrucciones podría resultar en heridas y/o
daños a su propiedad. Guarde este manual como referencia.
7 Sp
RECORDATORIO: ¡Guarde su comprobante de compra con fecha para fines de la garantía!
Adjúntela a este manual o archívela en lugar seguro.
IN738200AV 1/12
Ver la Garantía en página 12 para información importante sobre el uso comercial de este producto.
Instrucciones de Funcionamiento TL140289
© 2012 Campbell Hausfeld/Scott Fetzer
Pistola de
Impacto
Índice
Descripción ......................7
Desempaque . . . . . . . . . . . . . . . . . . . . .7
Medidas de Seguridad .............7
Informaciones Generales
de Seguridad .................7-8
Funcionamiento ..................8
Almacenamiento..................9
Guía de Diagnóstico de Averías.....10
Garantía Limitada ................12
Descripción
Las llaves de impacto son herramientas
neumáticas diseñadas para quitar
y poner tuercas y pernos. Estas
herramientas pueden tener diferentes
tipos de mecanismos tales como rocking
dog, embrague de espijas y martillos
dobles.
Los dos primeros se utilizan en el diseño
de herramientas para usos domésticos
no profesionales. El mecanismo de
martillos dobles se utiliza para diseñar
llaves para uso profesional tales como
cambiar llantas en talleres, líneas de
ensamblaje y para aflojar pernos muy
apretados.
Para Desempacar
Al desempacar este producto, revíselo
con cuidado para cerciorarse de
que no se haya dañado durante el
envio. Cerciórese de apretar todas
las conexiones, pernos, etc. antes de
comenzar a usar este producto.
LEA Y SIGA TODAS LAS
INSTRUCCIONES
GUARDE ESTAS INSTRUCCIONES –
NO LAS DESECHE
Medidas de Seguridad
Este manual contiene información
que es muy importante que sepa
y comprenda. Esta información se
la suministramos como medida de
SEGURIDAD y para EVITAR PROBLEMAS
2. Esta herramienta neumática sólo
debe ser usada por personas que
estén bien familiarizadas con las
reglas de seguridad de manejo.
Nunca
exceda la
capacidad máxima de presión
de la herramienta neumática
6,2 bar. La herramienta
neumática podría explotar y ocasionarle
la muerte o heridas graves.
3. Nunca exceda ninguna de las
presiones máximas indicadas para
los componentes del sistema.
4. Desconecte la herramienta
neumática de la fuente de aire
antes de cambiar de herramientas
o accesorios, darle servicio o al no
estar funcionando.
Se
deben
utilizar lentes y protección
para los oídos durante el
funcionamiento.
5. No se ponga ropa muy holgada,
bufandas o corbatas. La ropa
holgada se le puede enredar en la
herramienta y ocasionarle heridas
graves.
6. Quítese las joyas para operar
cualquier herramienta. Las joyas se
le pueden enredar en la herramienta
y ocasionarle heridas graves.
7. No oprima el gatillo mientras esté
conectando la manguera de la
fuente de aire.
8. Siempre use accesorios diseñados
para usarse con herramientas
neumáticas. No use accesorios
dañados o deteriorados.
No use dados
para herramientas
manuales. Sólo use dados para llaves de
impacto. Los dados para herramientas
manuales son “tan fuertes como el
vidrio” y se romperán ocasionándole
heridas graves.
CON EL EQUIPO. Debe reconocer los
siguientes símbolos.
Ésto le indica que
hay una situación
inmediata que LE OCASIONARIA la
muerte o heridas de gravedad.
Ésto le indica
que hay una
situación que PODRIA ocasionarle la
muerte o heridas de gravedad.
Ésto le indica
que hay una
situación que PODRIA ocasionarle
heridas no muy graves.
Ésto le indica una
información
importante, que de no seguirla, le
podría ocasionar daños al equipo.
NOTA: Información que requiere
atención especial.
Informaciones Generales de
Seguridad
PROPOSICIÓN DE CALIFORNIA 65
Cuando
corta
lija, taladra o pule materiales
como por ejemplo madera,
pintura, metal, hormigón,
cemento, u otro tipo de mampostería se
puede producir polvo. Con frecuencia
este polvo contiene productos químicos
que se conocen como causantes de
cáncer, defectos congénitos u otros
daños reproductivos. Use equipo de
protección.
INFORMACIONES GENERALES DE
SEGURIDAD
Este producto es parte de un sistema
de alta presión y en todo momento
debe seguir las siguientes medidas de
seguridad al igual que otras reglas de
seguridad establecidas.
1. Lea con cuidado los
manuales incluídos
con este producto.
Familiarícese con los
controles y el uso
adecuado del equipo.
MANUAL
¡REGISTRE SU PRODUCTO EN LÍNEA AHORA MISMO! http://www.chpower.net/reg

8 Sp
Manual de Instrucciones de Operación
Informaciones Generales de
Seguridad (Continuación)
30s. Saldrá aceite por el orificio de
salida al aplicarle presión de aire.
LUBRICACION DEL MECANISMO DE
IMPACTO
Lubrique el mecanismo de impacto
mensualmente. Vea la página amarilla
adjunta.
Desconecte la llave
de impacto de la
fuente de aire antes de lubricarla.
1. Desconecte la llave de impacto de la
fuente de aire.
2. Saque el tornillo plano o tipo allen
del orificio de lubricación (Vea la
descripción de la herramienta en el
manual de repuestos).
3. Añádale aproximadamente 29,6 ml
(1 onza) de aceite Campbell Hausfeld
para herramientas neumáticas en el
orificio de lubricación. Cóloquele el
tornillo.
4. Reconecte la fuente de aire a la
llave de impacto y déjela funcionar
por 20s a 30s. Lubrique todo el
mecanismo de impacto volteando la
herramienta en todos los sentidos
mientras que la herramienta esté
funcionando.
5. Quítele el tornillo, sostenga la
herramienta sobre un envase
adecuado y drene el exceso de
aceite. Algunas veces, oprimir el
gatillo, cuando está vaciando el
aceite, le ayuda a expulsar el exceso
de aceite.
6. Si el aceite está sucio, repita el
procedimiento anterior hasta que
el aceite salga limpio. Coloque el
tornillo y apriételo. El residuo de
aceite que quede en la cámara del
mecanismo de impacto es todo lo
que se necesita para una lubricación
adecuada.
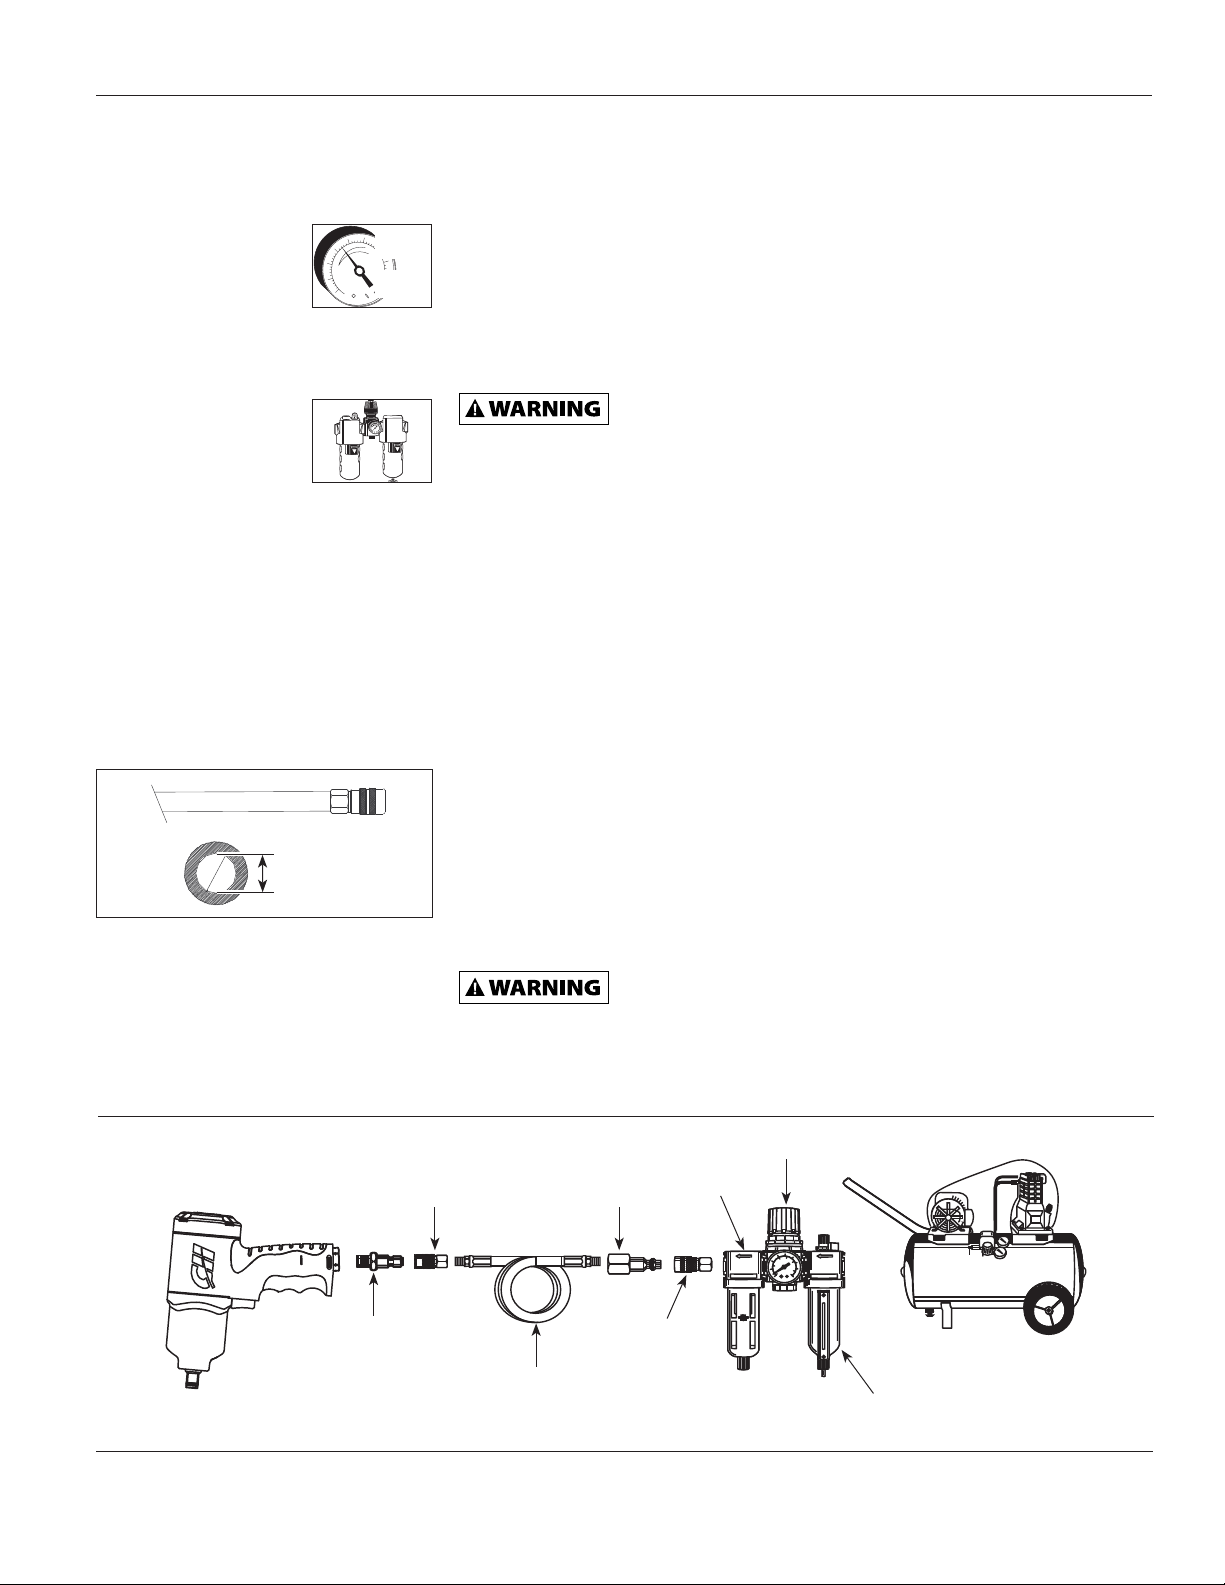
CONEXION RECOMENDADA
La ilustración de abajo le muestra
la conexión recomendada para la
herramienta.
1. El compresor de
aire debe tener
la capacidad de
suministrar un
mínimo de 4,1 bar
cuando la herramienta esté en
uso. Si el suministro de aire es
inadecuado podría haber pérdida de
potencia y falta de consistencia en el
funcionamiento.
9. Nunca oprima el gatillo a menos
que la herramienta esté apuntada al
área de trabajo. Cerciórese de que
los accesorios estén bien apretados.
De lo contrario, podrían ocasionarle
heridas graves.
10. Proteja las lineas de aire contra
daños o perforaciones.
11. Nunca apunte la herramienta
neumática hacia Ud. u otras
personas. Esto podría ocasionarle
heridas graves.
12. Antes de cada uso revise las
mangueras para ver si están
deterioradas. Cerciórese de que
todas las conecciones estén bien
apretadas.
Libere
toda la
presión del sistema antes
de tratar de instalar, darle
servicio, reubicar o darle
mantenimiento.
13. Mantenga todas las tuercas, tornillos
y pernos bien apretados y cerciórese
de que el equipo esté en buenas
condiciones de funcionamiento.
14. No coloque las manos cerca o debajo
de las partes que se mueven.
No haga mal uso
de este producto.
La exposición a vibraciones excesivas,
el trabajar en posiciones anormales y
los movimientos repetitivos del trabajo
pueden causar daños a las manos y
los brazos. Si siente incomodidad,
pérdida de sensación, hormigueo o
dolor, suspenda el uso de cualquier
herramienta y consulte a un médico.
Funcionamiento
LUBRICACION
La lubricación adecuada del equipo
es la responsabilidad del propietario.
El no lubricarlo adecuadamente
reducirá drásticamente la duración
de la herramienta y descontinuará la
garantía.
Esta llave de
impacto REQUIERE
lubricación ANTES de usarla por primera
vez y DESPUES de cada uso adicional.
Las llaves de impacto requieren
lubricación durante toda la vida útil
de la herramienta y deben lubricarse
y/o engrasarse en dos áreas separadas:
el motor neumáticoy el mecanismo
de impacto. Siga los procedimientos
descritos a continuación y vea la
descripción de la herramienta en el
manual de repuestos. Se recomienda el
uso del aceite Campbell Hausfeld para
herramientas neumáticas (ST12700AV)
porque este aceite limpia, lubrica y evita
el óxido al mismo tiempo.
LUBRICACION DEL MOTOR
NEUMATICO
El motor debe ser lubricado
diariamente. Este tipo de motor nunca
será lubricado en exceso.
Desconecte la llave
de impacto de la
fuente de aire antes de lubricarla.
1. Desconecte la llave de impacto de la
fuente de aire.
2. Voltéela de modo que la entrada de
aire esté hacia arriba.
3. Oprima el gatillo y vierta
aproximadamente 7,4 ml (1/4 onza)
de aceite Campbell Hausfeld para
herramientas neumáticas en la
entrada de aire. Después, mueva el
botón para cambiar el sentido en
ambas direcciones.
Después que
una herramienta
neumática ha sido lubricada expulsará
aceite por el orificio de salida
durante los primeros segundos de
funcionamiento. Por lo tanto, DEBERA
CUBRIR EL ORIFICIO DE SALIDA CON
UNA TOALLA antes de aplicar presión
de aire. DE LO CONTRARIO, PODRIA
OCASIONARLE HERIDAS GRAVES.
4. Conecte la llave de impacto a la
fuente de aire y cubra el orificio
de salida con una toalla (Vea la
descripción de la herramienta en
el manual de repuestos). Haga
funcionar la llave de impacto en
ambas direcciones por unos 20s a
4,1 bar
Min.
6,2 bar
Max.

9 Sp
TL140289
Para sacar tuercas de llantas de
automóviles o pernos, coloque el
regular en lo máximo. Para colocarlos,
siempre use un torquímetro para
apretarlos adecuadamente.
Cuando desee
apretar pernos
cerciórese de no apretarlos en exceso.
Los pernos pueden romperse o crear
una situación peligrosa. Cerciórese de
fijar el regulador en lo mínimo y use un
torquímetro para fijar el torque.
CONEXION DE LA HERRAMIENTA
NEUMATICA
NOTA: No es recomendable instalar
un acoplador rápido entre la llave
de impacto y la manguera flexible
principal.
El usar conecciones o mangueras de
aire que sean muy pequeñas podría
crear una baja de presión y reducir la
potencia de la herramienta. Para los
modelos de 9,5 mm (3/8 pulg.), 12,7
mm (1/2 pulg.) y 19,1 mm (3/4 pulg.) se
recomienda el uso de conecciones de
9,5 mm (3/8 pulg.) de diámetro interno
con roscas de 6,4 mm (1/4 pulg.) NPT. La
mayoría de los compresores se envian
con una manguera corta de 6,4 mm
(1/4 pulg.) de diámetro interno. Para un
funcionamiento adecuado y para mayor
conveniencia, use una manguera de 9,5
mm (3/8 pulg.) de diámetro interno. Las
mangueras de más de 15,24 m (50 pies)
de longuitud deben tener un diámetro
interno de 1 2,7 mm (1/2 pulg.).
Para los modelos de 2,54 cm (1 pulg.)
se recomienda el uso de conectores de
12,7 mm (1/2 pulg.) de diámetro interno
con roscas de 12,7 mm NPT (1/2 pulg.
NPT) y una manguera de 12,7 mm (1/2
pulg.). Las mangueras de más de 15,24
m (50 pies) de longuitud deben tener
un diámetro interno de 12,7 mm (1/2
pulg.).
Nunca cargue una
herramienta por
la manguera o hale la manguera para
mover la herramienta o un compresor.
Mantenga las mangueras alejadas
del calor, aceite o puntas afiladas,
reemplace cualquier manguera que esté
dañada, deteriorada o desgastada.
Almacenamiento
La llave de impacto se debe lubricar
antes de almacenarla. Siga las
instrucciones de lubricación excepto
el paso 4. Sólo déjela funcionar 2s a 3s
segundos en vez de 20s a 30s ya que
debe almacenar la con más aceite en el
mecanismo de impacto.
SERVICIO TÉCNICO
Para mayor información referente
al funcionamiento o reparación de
este producto comúniquese con el
distribuidor de Campbell Hausfeld más
cercano a su domicilio.
INFORMACIÓN SOBRE REPUESTOS
Para obtener información con respecto
a piezas de repuesto pedidas, llame sin
costo al 1-800-543-6400.
Sírvase suministrarnos la siguiente
información:
• Número del Modelo
• Código estampado
• Número y descripción del repuesto.
Puede escribirnos a:
Campbell Hausfeld
100 Production Drive
Harrison, Ohio 45030 U.S.A.
2. Puede utilizar
un lubricador
para lubricar la
herramienta.
Igualmente, puede
utilizar un filtro para remover las
impurezas líquidas y sólidas que
podrían oxidar u obstruir las partes
internas de la herramienta.
3. Use siempre mangueras de
suministro de aire, con una presión
mínima de funcionamiento con
clasificación igual o mayor que la
presión de la fuente de energía si
falla un regulador, o 13,8 bar, lo que
sea mayor. Use mangueras de aire
de 6,4 mm (1/4 pulg.) para distancias
de hasta 15,24 m (50 pies). Use
mangueras de aire de 9,5 mm (3/8
pulg.) para distancias de 15,24 m
(50 pies) ó más.
4. Use un regulador de presión (de 0
bar - 8,6 bar) en el compresor. Se
necesita un regulador de presión
para controlar la presión de
operación de la herramienta entre
4,1 bar y 6,2 bar.
AJUSTE DE VELOCIDAD
La llave de impacto nunca se debe
usar para fijar el torque. Use una
herramienta adecuada (torquímetro)
para fijar el torque. Todos los modelos
tienen reguladores para ajustar la
velocidad (Vea la descripción de
la herramienta en el manual de
repuestos).
Funcionamiento
(Continuación)
Conexión Recomendada
Acoplador rápido
(Opcional)
Acoplador
rápido
Manguera de aire
Lubricador
Conector rápido
(Opcional)
Regulador
Filtro
Conector
rápido
13,8 bar o más
9,5 mm (3/8 in) I.D.

Manual de Instrucciones de Operación
10-Sp
Guide De Dépannage Du Mécanisme De Choc
Problema Causa(s) Posible(s) Accion a tomar
El impacto es muy
lento o no ocurre
1. Le falta lubricante
2. El regulador de la herramienta
no está fijado correctamente
3. El regulador de la línea o el
del compresor están fijados a
un nivel muy bajo
1. Lubrique el motor neumático y el mecanismo de impacto.
(Lea las instrucciones de lubricación de este manual)
2. a. Ajuste el regulador de la herramienta a lo máximo
b. En los modelos con mecanismo de martillos dobles, el
regulador se debe fijar de modo que indique directa-
mente hacia uno de los números de la herramienta
3. Ajuste los reguladores en el sistema de aire
Hace impacto
rápidamente pero no
saca los pernos
1. El mecanismo de impacto está
desgastado 1. a. Reemplace el mecanismo de impacto
b. Envíelo a un Centro Autorizado de Servicio de Campbell
Hausfeld para que lo reparen
No hace impacto 1. El mecanismo de impacto está
roto 1. a. Reemplace el mecanismo de impacto
b. Envíelo a un Centro Autorizado de Servicio de Campbell
Hausfeld para que lo reparen
Guía General de Diagnóstico de Averías
Problema Causa(s) Posible(s) Accion a tomar
La herramienta
funciona lentamente o
no funciona
1. Hay acumulación de arenillas o
goma 1. Utilice aceite para herramientas neumáticas Campbell
Hausfeld, un solvente adecuado o una mezcla de aceite
SAE 10 y kerosene para limpiar la herramienta. Si no utiliza
aceite Campbell Hausfeld, lubrique la herramienta después
de haberla limpiado.
2. La herramienta no tiene aceite 2. Lubrique la herramienta según las instrucciones de
lubricación
3. La presión de aire es muy baja 3. a. Aumente la presión del regulador a lo máximo
b. Aumente la presión del compresor a lo máximo
mientras la herramienta funciona libremente
c. En los modelos PL2602, el regulador se debe fijar de
modo que indique directamente hacia uno de los
números en la herramienta
4. Hay una fuga de aire en las
mangueras 4. De haber fugas en las mangueras apriete bien las
conecciones
5. Ocurre una baja de presión 5. a. Cerciórese de que la manguera sea del tamaño
adecuado. Las mangueras largas o herramientas
que estén usando grandes volumenes de aire tal vez
necesiten una manguera con un diámetro interno de
12,7 mm (1/2 pulg.) o más según la longitud total de la
manguera
b. Nunca conecte varias mangueras con conectores rápi-
dos. Ésto ocasiona bajas de presión adicionales y reduce
la potencia. Conecte las mangueras directamente
6. Una de las aletas del rotor del
motor está desgastada 6. Reemplace la aleta del rotor
7. Uno de los baleros del motor
está desgastado 7. Saque los baleros y revíselos a ver si están oxidados, tienen
impurezas o los anillos están desgastados. Reemplácelos o
límpielos y lubríquelos con grasa para baleros
La herramienta expulsa
residuos de agua
1. Hay agua en el tanque 1. Drene el tanque (Lea el manual del compresor de aire).
Póngale aceite a la herramienta y déjela funcionar hasta
que no expulse más agua. Una vez más póngale aceite a la
herramienta y déjela funcionar por unos 1s a 2s
2. Hay agua en las líneas de aire/
mangueras 2. a. Instale un filtro/ separador de agua. NOTA: Los
separadores funcionan bien sólo cuando el aire que
está circulando está frío. Coloque este filtro separador
lo más lejos posible del compresor
b. Instale un secador de aire

11-Sp
Notas
TL140289

12 Sp
Manual de Instrucciones de Operación
Garantía Limitada
1 DURACION: A partir de la fecha de compra por el comprador original tal como se especifica a continuación: un (1) año.
2. QUIEN OTORGA ESTA GARANTIA (EL GARANTE: Campbell Hausfeld / The Scott Fetzer Company 100 Production Drive,
Harrison, Ohio 45030 Teléfono: (800) 543-6400.
3. QUIEN RECIBE ESTA GARANTIA (EL COMPRADOR): El comprador original (que no sea un revendedor) del producto
Campbell Hausfeld.
4. PRODUCTOS CUBIERTOS POR ESTA GARANTIA: Esta herramienta neumática Campbell Hausfeld.
5. COBERTURA DE LA GARANTIA: Defectos importantes en el material y la mano de obra que ocurran durante la duración
del período de garantía con las excepciones que se mencionan a continuación.
6. LO QUE NO ESTA CUBIERTO POR ESTA GARANTIA:
A. Las garantías implícitas, incluyendo aquellas de comercialidad E IDONEIDAD PARA FINES PARTICULARES, ESTAN
LIMITADOS A LO ESPECIFICADO EN EL PARRAFO DE DURACION. Si este producto es empleado para uso comercial,
industrial o para renta, la garantía será aplicable por noventa (90) días a partir de la fecha de compra. En algunos
estados no se permiten limitaciones a la duración de las garantías implícitas, por lo tanto, en tales casos esta limitación
no es aplicable.
B. CUALQUIER PERDIDA DAÑO INCIDENTAL, INDIRECTO O CONSECUENTE QUE PUEDA RESULTAR DE UN DEFECTO, FALLA
O MALFUNCIONAMIENTO DEL PRODUCTO CAMPBELL HAUSFELD. En algunos estados no se permite la exclusión o
limitación de daños incidentales o consecuentes, por lo tanto, en tales casos esta limitación o exclusión no es aplicable
C. Cualquier falla que resulte de un accidente, abuso, negligencia o incumplimiento de las instrucciones de
funcionamiento y uso indicadas en el (los) manual(es) que se adjunta(n) al producto. Dichos accidentes, abusos
por parte del comprador, o falta de operar el producto siguiendo las instrucciones del manual de instrucciones
suministrado también debe incluir la desconexión o modificación de los instrumentos de seguridad. Si dichos
instrumentos de seguridad son desconectados, la garantía quedaría cancelada.
D. Los ajustes normales explicados en el(los) manual(es) suministrado(s) con el producto.
E. Los artículos o servicios que son necesarios normalmente para mantener el producto, p. ej. anillos en O, resortes,
juntas, empaquetaduras o sellos, lubricantes, paletas del motor, mecanismos de impacto o cualquier otra pieza fungible
no mencionada específicamente. Estos artículos solamente estarán cubiertos durante noventa (90) días a partir de la
fecha de compra original. Los artículos subrayados están garantizados únicamente por defectos en el material y la
mano de obra.
7. RESPONSABILIDADES DEL GARANTE BAJO ESTA GARANTIA: Según elija el Garante, la reparación o el reemplazo del
producto o los componentes que estén defectuosos, que hayan funcionado en forma inadecuada y/o que no hayan
cumplido con su función dentro de la duración del período específico de la garantía.
8. RESPONSABILIDADES DEL COMPRADOR BAJO ESTA GARANTIA:
A. Suministrar prueba fechada de compra y la historia de mantenimiento del producto.
B. Llame a Campbell Hausfeld (800) 543-6400 por sus opciones de servicio incluidas en la garantía. Los costos de flete
correrán por cuenta del comprador.
C. Seguir las instrucciones sobre operación y mantenimiento del producto, tal como se indica(n) en el (los) manual(es) del
propietario
9. CUANDO EFECTUARA EL GARANTE LA REPARACION O REEMPLAZO CUBIERTO BAJO ESTA GARANTIA: La reparación o
reemplazo dependerá del flujo normal de trabajo del centro de servicio y de la disponibilidad de repuestos.
Esta garantía limitada es válida sólo en los EE.UU., Canadá y México y otorga derechos legales específicos. Usted también
puede tener otros derechos que varían de un Estado a otro. o de un país a otro.
Table of contents
Languages:
Other Campbell Hausfeld Impact Driver manuals

Campbell Hausfeld
Campbell Hausfeld TL050289 User manual

Campbell Hausfeld
Campbell Hausfeld XT002000 User manual

Campbell Hausfeld
Campbell Hausfeld CL0060 User manual

Campbell Hausfeld
Campbell Hausfeld XT001000 User manual

Campbell Hausfeld
Campbell Hausfeld Impact Driver User manual

Campbell Hausfeld
Campbell Hausfeld CL15 SERIES User manual

Campbell Hausfeld
Campbell Hausfeld PL1502 User manual