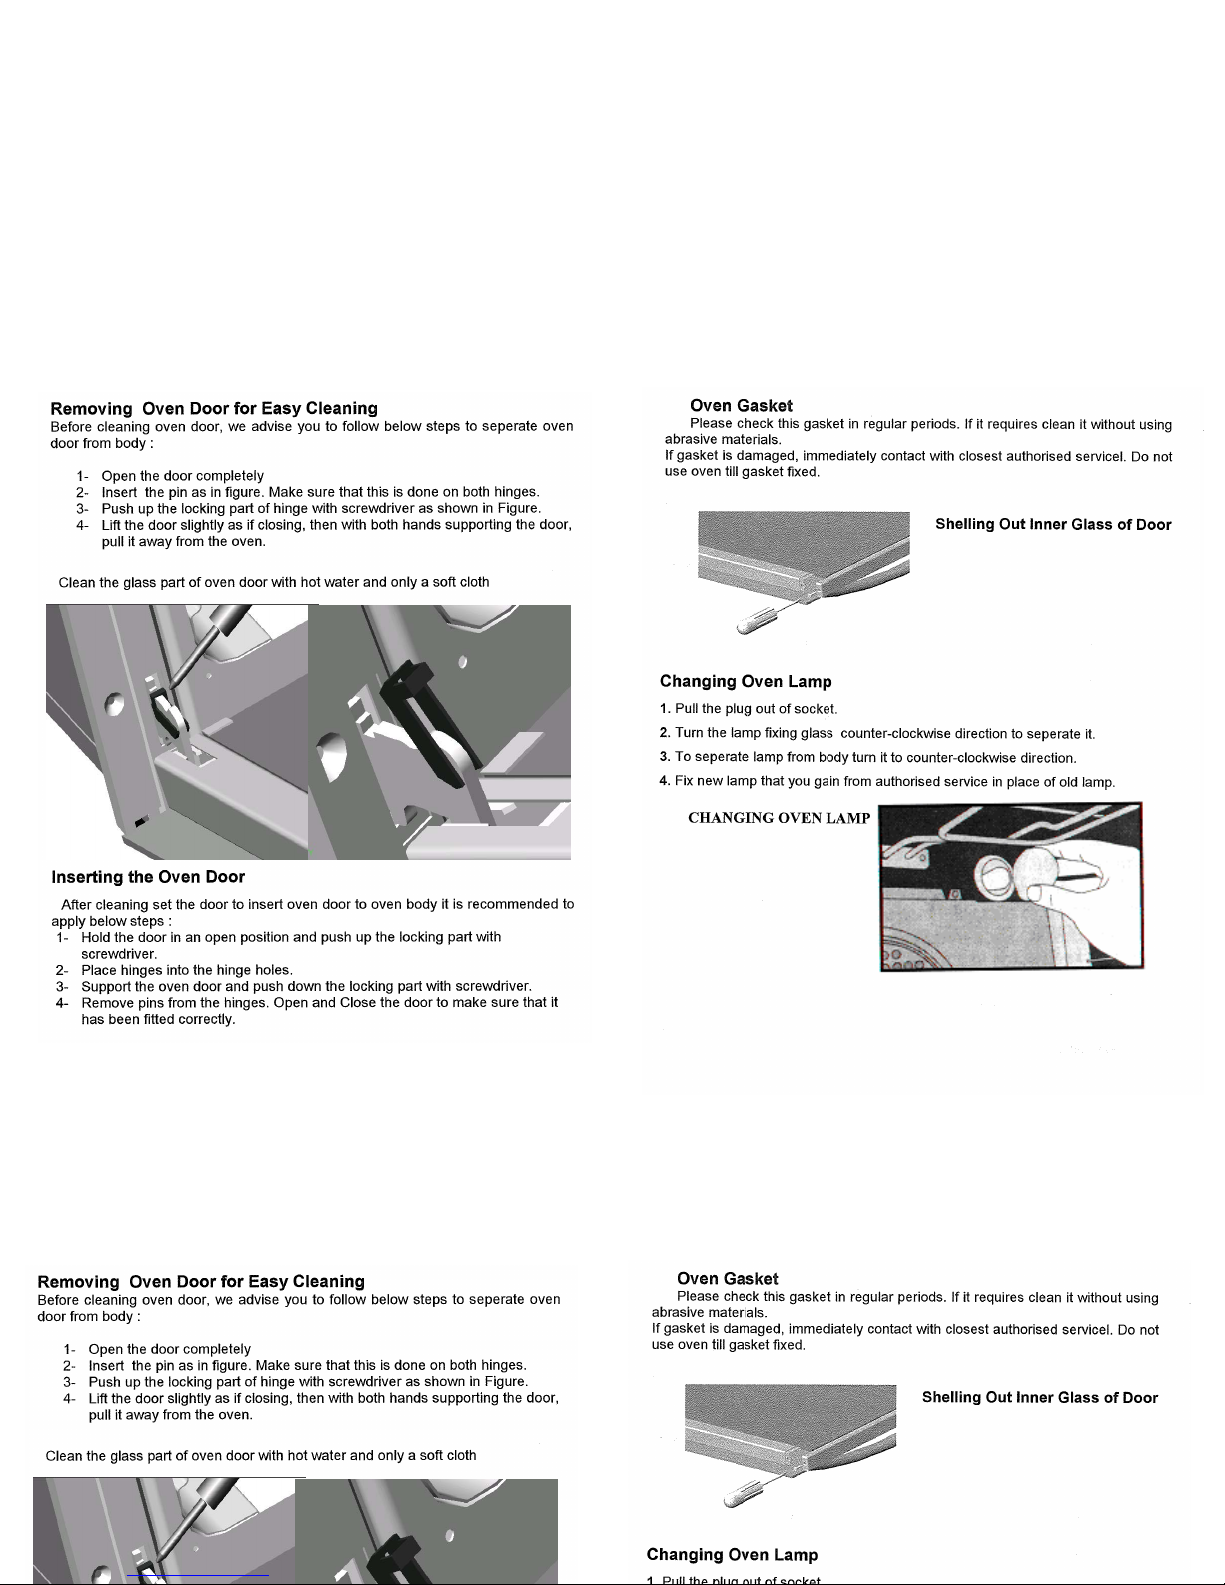
Campomatic C64WTI User manual

4 GAS BURNERS GAS OVEN
C64WTI - C64SGTI
C64FSTI - C64FWTI
C64WTI - C64SGTI
C64FSTI - C64FWTI
Please read these instructions carefully before attempt to install or use this product.
It is advisable to keep these instructions in a safe place for future reference.
Please read these instructions carefully before attempt to install or use this product.
It is advisable to keep these instructions in a safe place for future reference.


-3-
-3-
Dear Client,
Thank you about buying our product. You can tru t our product . Thi i a
detailed U er’ Manual which you can read it to u e your product ea ier and better.
You can find afety information in page 2. Plea e check your product that it
ha got any failure or lacking. If you find a damage ourced by tran portation,
plea e contact with ale department that you bought product or region tore that
ent product to you.
We h pe y u use y ur ven in g d days.
INDEX:
Secti n 1
Technical Specification & Section of Oven
Secti n 2
Important Safety Notice
Secti n 3
In tallation of Oven
Secti n 4
Introduction of Control Panel & U age of Hotplate
Secti n 5
U age of Oven
Secti n 6
Rotatin Grill (Optional)
Secti n 7
Maintenance & Cleaning
Secti n 8
Information About Tran portation
Secti n 9
Trouble hooting
Secti n 10
Mechanical Timer

-4-
Injector Diameters of Cooker Burner
Gas Type
Small Burner
Medium Burner
Big Burner
G 20 20 mBar
G 25 25 mBar
G 30 30 mBar
G 31 37 mBar
G 30 50 mBar
Natural Gas
Consumpon (kW/h)
LPG Consumpon
(gr/h)
0,72
0,72
0,50
0,50
0,43
1
73
0,97
0,97
0,65
0,65
0,58
1,75
127
1,15
1,15
0,85
0,85
0,75
3
218
Oven Burner
1,15
1,15
0,85
0,85
0,75
3
218
Grill Burner
1,15
1,15
0,85
0,85
0,75
3
218
SECTION 1 TECHNICAL FEATURES of OVEN
/ INOX
/ -
/ 7 FUNCTIONS
SECTION 1 TECHNICAL FEATURES of OVEN
/ INOX
/ -
/ 7 FUNCTIONS

-5-
-5-

-6-
-6-

-7-
-7-

-8-
SECTION 4 INTRODUCTION of CONTROL PANEL &
USAGE OF COOKER
SECTION 6 ADJUSTMENT of TIMER
A) Adjustment of Mechanical Timer :
Mechanical Timer can be adjusted by its button on front panel. Timer must
be adjusted to start the oven cooking. Cooking time can be adjusted between 5 to
90 minutes with mechanical timer. You should position the button to ‘ON’ manually
if cooking time will exceed 90 minutes.

-9-
-9-
SECTION 7 ROTATING GRILL ( OPTIONAL)
SECTION 8 MAINTENANCE & CLEANING

-10-
-10-
CHANGING OVEN LAMP
Changing Oven Lamp
1. Pull the plug out of socket.
2. Turn the lamp fixing glass counter-
clockwise direction to seperate it.
3. To seperate lamp from body turn it to
counter-clockwise direction.
4. Fix new lamp that you gain from
authorised service in place of old lamp.
This appliance is marked according to the European directive 2002/96/EC on Waste
Electrical and Electronic Equipment (WEEE).
By ensuring this product is disposed of correctly, you will help prevent potential
negative consequences for the enviroment and human health, which could
otherwise be caused by inappropriate waste handling of this product.
The symbol on the product indicates that this product may not be treated as
household waste. İnstead it shall be handed over to the applicable collection point
for the recycling of electrical and electronic equipment.
Disposal must be carried out in accordance with local enviromental regulations for
waste disposal.
For more detailed information about treatment, recovery and recycling of this product, please contact
your local city office, your household waste disposal service or the shop where you purchased the
product.
Removing Oven Door for Easy Cleaning
Before cleaning oven door, we advise you to follow below steps to seperate oven
door from body :
1- Open the door completely
2- Insert the pin as in figure. Make sure that this is done on both hinges.
3- Push up the locking part of hinge with screwdriver as shown in Figure.
4- Lift the door slightly as if closing, then with both hands supporting the door, pull
it away from the oven.
Clean the glass part of oven door with hot water and only a soft cloth.
Inserting the Oven Door
After cleaning set the door to insert oven door to oven body it is recommended to
apply below steps :
1- Hold the door in an open position and push up the locking part with
screwdriver.
2- Place hinges into the hinge holes.
3- Support the oven door and push down the locking part with screwdriver.
4- Remove pins from the hinges. Open and Close the door to make sure that it
has been fitted correctly.

-11-
Inserting the Oven Door
After cleaning set the door to insert oven door to oven body it is recommended to
apply below steps :
1- Hold the door in an open position and push up the locking part with
screwdriver.
2- Place hinges into the hinge holes.
3- Support the oven door and push down the locking part with screwdriver.
4- Remove pins from the hinges. Open and Close the door to make sure that it
has been fitted correctly.
Shelling Out Inner Glass of Door
Oven Door and Gasket
Before cleaning oven door, we advise you to follow below steps to seperate oven
door from body :
1. Open the oven door to the end;
2. Find hinges that bound door to body;
3. Make free two forelegs on hinges and turn them;
4. Close the door halfly to the oven by holding it from left and right;
5. Slowly lift the door and put it into a rough place.
Clean the glass part of oven door with hot water and only a soft cloth.
After cleaning set the door to oven body by applying above steps in opposite
order.
Proper work of oven provided by a gasket surrounded on inner body of oven.
-Check this gasket in regular periods. If it requires clean it without using
abrasive materials.
-If gasket is damaged, immediately contact with closest authorised service. Do
not use oven till gasket fixed.
Shelling Out Inner Glass of Door
-11-
SECTION 9
SECTION 9
SECTION 10
SECTION 10

This appliance/fitting is marked according to the European directive
2002/96/EC on Waste Electrical and Electronic Equipment (WEEE). By
ensuring this product is disposed of correctly, you will help prevent potential
negative consequences for the environment and human health, which could
otherwise be caused by inappropriate
waste handling of this product.
The symbol on the product, or on the documents accompanying the product,
the Crossed Out Wheelie Bin symbol, indicates that this appliance/fitting may
not be treated as household waste. Instead it shall be handed over to the
applicable collection point for the recycling of electrical and electronic
equipment. Disposal must be
carried out in accordance with local environmental regulations for waste
disposal. For more detailed information about treatment, recovery and
recycling of this product, please contact your local authority, your household
waste disposal service or the retailer where you purchased the product.
This manual suits for next models
3
Table of contents
Other Campomatic Oven manuals
Popular Oven manuals by other brands

Teka
Teka HLC 847 SC user manual

Range Master
Range Master RMB9048BL/SS User guide & installation & service instructions

Elite Products
Elite Products ERO-2008S Owner's manual & recipes

Frigidaire
Frigidaire FES367CES Specifications

Chefwave
Chefwave CW-AF12V2 user manual

Alto-Shaam
Alto-Shaam 500-TH-II/D Installation operation & maintenance