P¹ÓïÖïuÁÁ¡u¹ïé½Þïã¡®ï¹ïÖï{½½ª®Öïu¹ïÀÈïuÓï´½®ïuï{uï½¹Öu¹¡¹ï6ï
ïé½ÞïuàïÖ½ïu¹ïÖïÖéÁï½ïuÓ6ï¹ãï§ÖÓïÈïÖïuÓï´½uÖ½¹Óï =ÞÖu¹ïKuÓïK%ï"1%ï´{uÈï½Èï^ȽÁu¹ïKuÓïK%%.ï´{uÈ
½Èï½¹¹Ö½¹ï{éïÓ½ÚïÈÞ{{ÈïÖÞ{ï u¹ï¹ïÁï½ÈïZuÖÞÈuïKuÓïu¹ïu¹ï¹ïÁ¡ïÈï=ÞÖu¹ï½Èï^ȽÁu¹ïuÓïã¡ÖïÓu
cC8AïiNCïQZgicn>iQ\Zgï>8cCHnUWïi\ïX8TCïiNCï
X\giï\Hïs\ncï8^^UP8Z>Cï
qïȽ´´¹ïé½ÞïªÁïÖÓÖÈÞÖ½¹ÓïÀÈï¹ÓÖu®uÖ½¹ïu¹ï
ÞÓïÀÈïuÖÈïÈȹïu¹ï{Èï¹ÓÖu®¡¹ïÖïuÁÁ®u¹ï¹½Öï
¡ÖÓïÓÈ¡u®ï¹Þ´{Èï{®½ãï¹ïuÓïé½Þï¹ïÖ½ïÖïÁïȽ´ïÖï
uÈïÓuÓïÓÈàï
LLLLLLLL
#!# # ##
#
# ##
"#
LLLLLLLLL
K 8DL@-8D2"L$6B>D@BLB-$L+@L/6@B22B/86L8)LI8D>L::2/6 $L6"
/B@L$2$ B>/ 2L 866$ B/86LB8L6L::>8F$"L/6@B22$>L8>LB$ -6/ /6
G/B-L@/4/2>L<D2/)/ B/86@
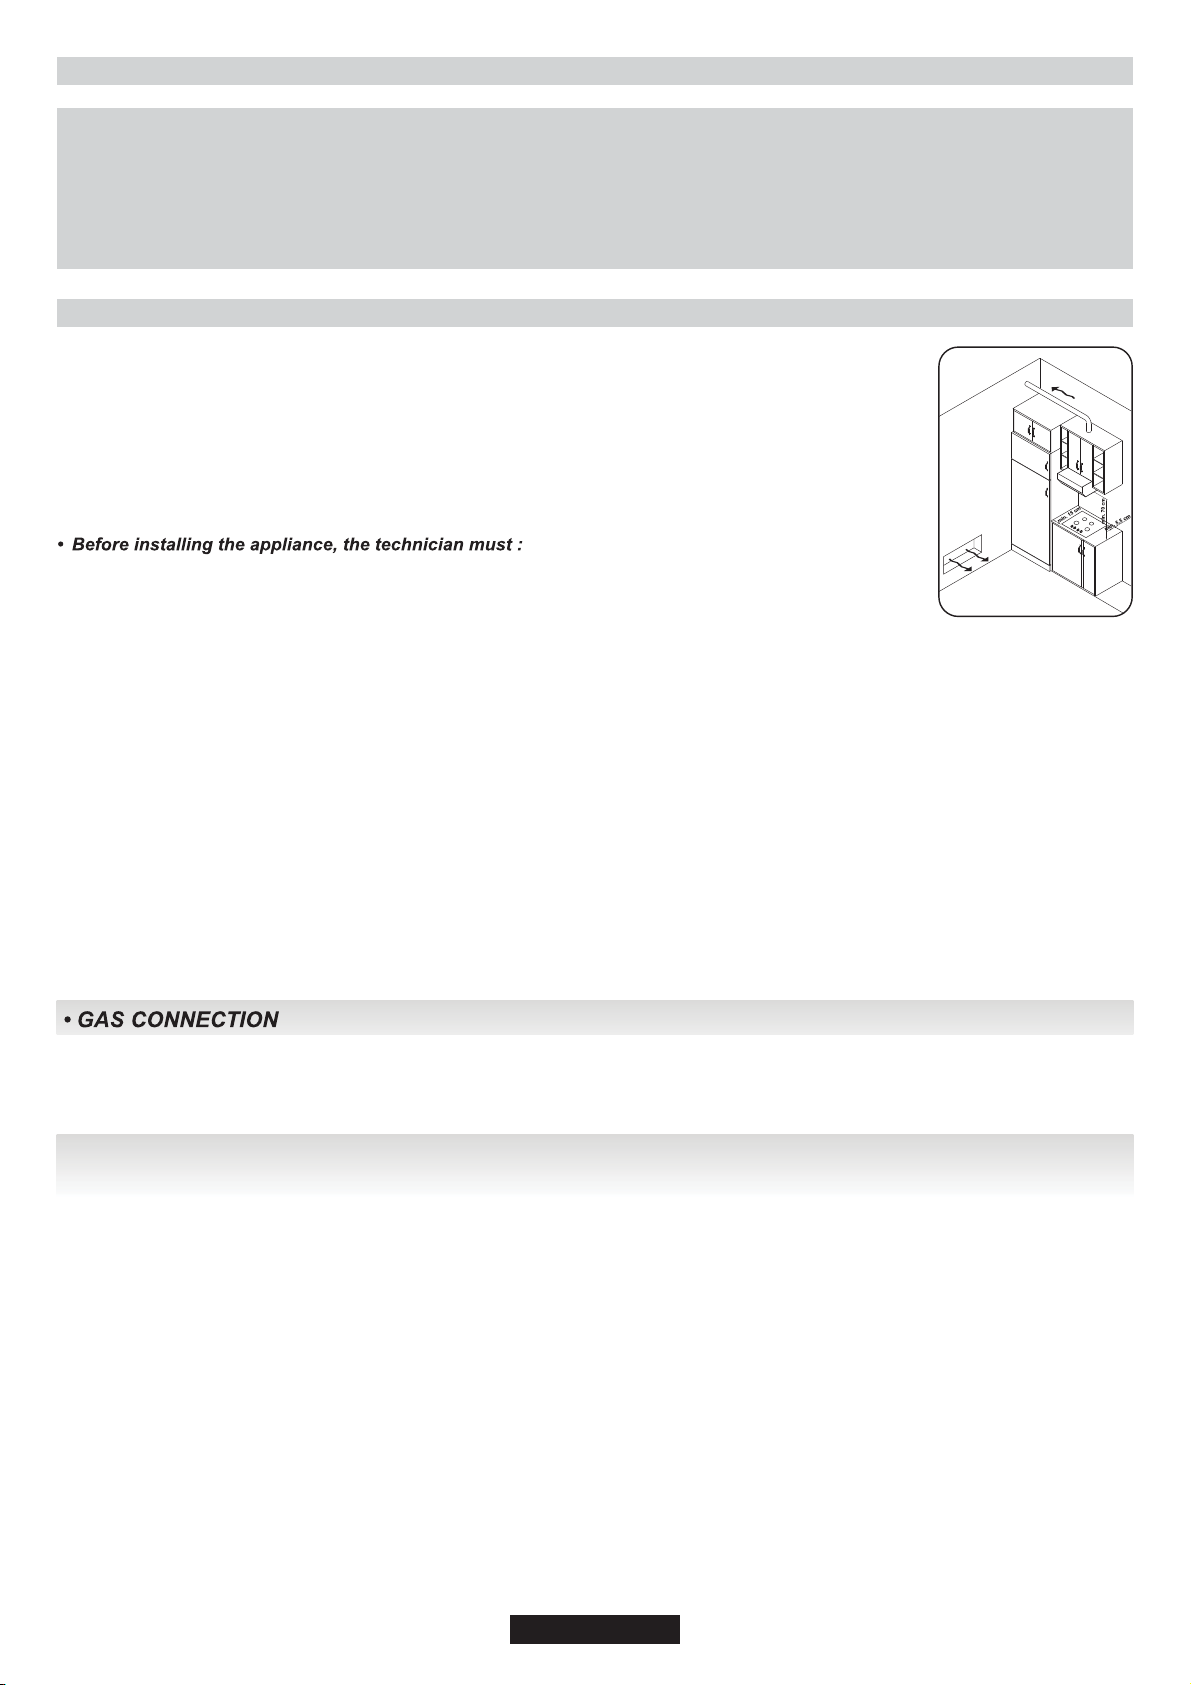
îïjïjÈ¡½ï ½ºÓ¡ÓÜï½ïÖÈ﮵¹ÛÕïvï½|ï vºï½áºïvºïvïÓävÓÉï
I½ÈïÓu×éïÈuÓ½¹ÓïÞ¹Èï¹½ïÈÞµÓÖu¹ÓïÓ½Þ®ïu¹êïµ½¡¡uÖ¡½¹Óï
{ïuÈÈ¡ï ½ÞÖï Ö½ïÖ¡Óï uÁÁ®u¹
îïjÓï uÁÁ®¡u¹ï ¡Óï Ó¡¹ï ½Èï ½´ÓÖï ÞÓï ½¹®é
î Pï ÖïiȽï Ó½ãÓï à¹ï Öï Óµu®®ÓÖïÖï ½ï ¹½Öï½¹¹Öï Ö
AÓ½¹¹Öï Ƚ´ï Öï Á½ãÈï ÓÞÁÁ®éï u¹ï ´´uÖ®éï ½¹ÖuÖï u¹
uÁÁȽàïÓÈà¡ïu¹Ö
î Pï Öï ÓÞÍvï ¡ÓïÈuªï Óã¡Öï ½ï Öï uÁÁ®¡u¹ï Ö½ï uà½ï Ö
Á½ÓÓ¡{¡®Öéï½ï®ÖÈ¡ïÓ½ª
A½ï¹½Öïu¹ï½¹ïÖï½½ÈÓï½Èï¹½Öïu½ãȹïÖ½ï½ïÓ½
îï9ÚÈïuïÞÓïãïȽµ´¹ïÖuÖïÓ½´ïu¹¹ï½ïÖïiÈ¡½ï ¡Óï
Þ¹ÈÖuª¹ïi¡ÓïÂÈà¹ÖÓïÖïuÞµÞ®uÖ¡½¹ï½ï¡ÈÖï½ÈïÈuÓï ãï
×ÓïȽ½ªïu¹ï|ÞȹÓï¹ÈvÖ¡¹ï޹®uÓv¹ÖïÓµ®®Óïu¹ïÓµ½ªï
îïA½ï¹½ÖïÓÖ½Èï®u´µu{®ï ÂȽÞÖÓïÖïiÈ¡½ïuÓïÖéïu¹ïuÖïÈï
¡ïÖïuÁÁ¯¡u¹ï ÓuàÍÖ°u¹ÖéïÓãÖï½¹
î P¹ï uÓï ½ïN½{Óï ¡¹½È½ÈvÖ¡¹ïNu½¹ï ®uµÂÓï ½ï ¹½Öï ÓÖuÈï Ö
Á¯uÖÓïÞÈ¢¹ïÞÓ
î nÓï½à¹ï½àÓïã¹ïÂu¹ï½ÈïÈ´½à¡¹ïuï¡ÓïȽ´ïÖï½à¹
îïA½ï¹½ÖïÖï½à¹ïãu®®Óïã¡Öïu®Þ´¡¹¡Þ´ï®ï½ÈïÓ¹®ÞÓï½à¹
ÁȽÖÖ½ÈÓï uàu¡®u{ï Ƚµï Ó½´ï ÓÖ½ÈÓï 8®Þ´¡¹¡Þ´ï ½Èï u¹éï ½ÖÈ
ÁȽÖÖ¡½¹ï ¡¹ï¡ÈÖï½¹ÖuÖïãÖïÖï½Öï¹u´®ïÈÓªÓïµÖ¡¹ïÖ
¹uµ®ï ½Èï uÞÓ¡¹ï ÖȽÈuÖ¡½¹ï Ö½ï Öï ¹Ó
îïq¹ï ½½ª¡¹ï ã¡Öï vÖÓï½È。Óï u®ãuéÓï Öuªï uÈï Ö½ïãuÖï Ö
½½ª¡¹ï ÁȽÓÓï uÓï uÖï uÖÓï u¹ï ½¡Óïu¹ï uÖï¡Èï ÈuÁ¡®é
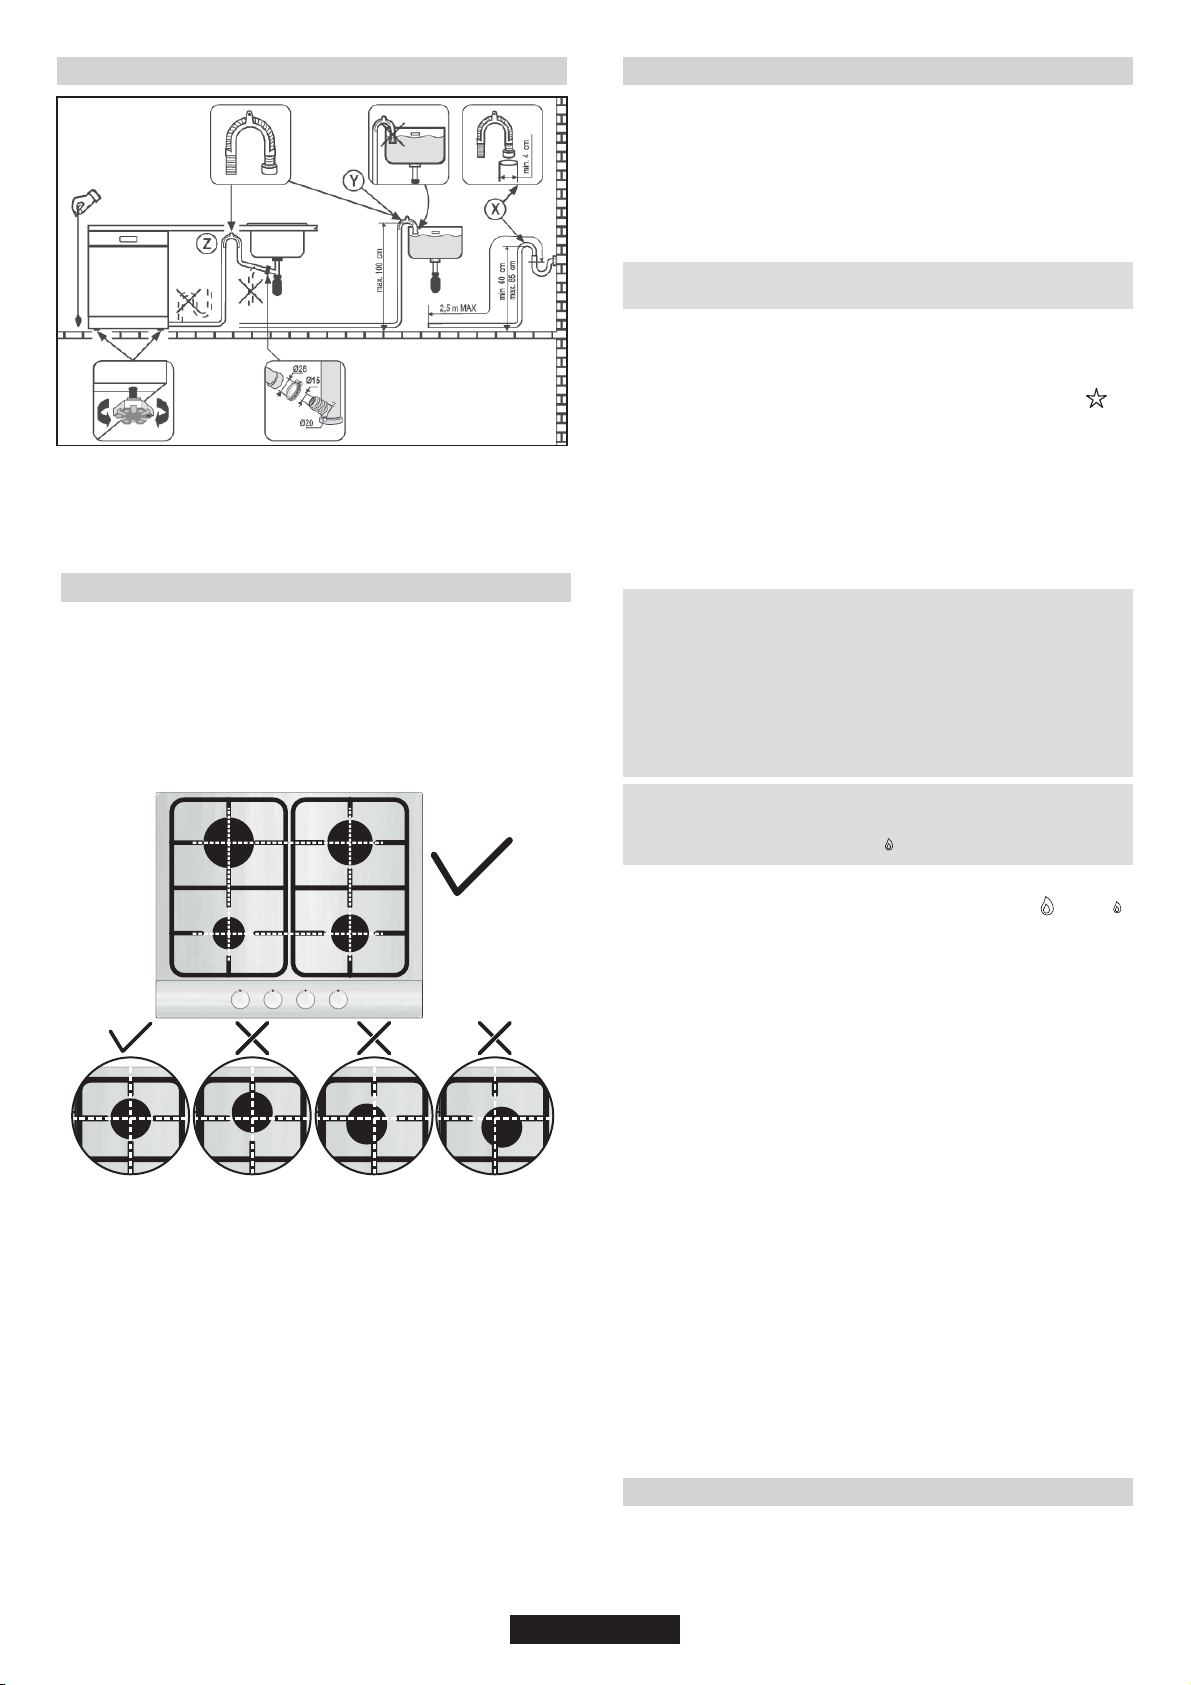
î iï½{ﮡïÈïuÓï´½®7
qï Öï½½ªÈï ¡Óï ¡¹ï ÞÓï ªÁïÖï ®¡ï ¹ï Öï ÞÁÈ¡Öï Á½Ó¡Ö¡½¹
{Èï ½Á¹¹ï Öï ®¡ï ȵ½àï u¹êï ¡Ö´Óï Ƚµï ¡Öï Ö½ï uཡï u¹ê
ÓÁ¡®®u
{È﮽ӹïÖï®ï®Öïu®®ïÖï½ÖïÁuÈÖÓï½ïÖï½½ªÈï½½ï ½ã¹
½ï¹½ÖïÓÖ½Èïuàéï½ÈïµÖu®®¡ï½|¨×Óï½¹ïÖﮡ
î Pïé½Þïã¡ÓïÖ½ï¡Ó½Óï½ïu¹ï½ïÓãuÓÈï{ïuÈÞ®ïÖ½ïÈ´½à
Öï½½Èïֽ﮴¡¹uÖïÖïÈÓªï½ï®È¹ï|½´¡¹ïÖÈuÁÁï¹Ó¡
¡Ö
îïjï ¢ÓãuÓÈï uÓï |¹ï µuï Ƚ´ï µuÖÈ¢u¯Óïã¢ï uºï |
ÈéïÓ½ïÖuÖï¡Öïu¹ï{ï¡Ó½Óï½ï¹ïu¹ï¹à¡È½¹´¹Öu®®éïȹ®éï
ãuéï
îïC¹ÓÞÈï ÖuÖï Öï ¡ÓãuÓÈï ½Óï ¹½Öï ÈÞÓï Á½ãÈï u{®Ó
îïQ×ïÓï¹½×ïwà¡Óu{®ï×½ïÞÓïwuÁ×½ÈÓï´Þ×Á®ïÁÞÓïu¹½Èïæ×¹Ó½¹
w{Ó
î8¹éïÆÞÈÓïÈuÈ¡¹ï×ïÁ½ãÈïÓÞÁÁéï½ÈïÓ½Þï{ïÈÈÈ
×½ï8×Èïgw®ÓïgÈà¡ï½ÈïuïÆÞuï×¹¡¡u¹
î q¹ï×ïuÁÁ®w¹ïÓ﮽u×ï½¹ïuïuÈÁ×ï½½Èïu××¹×½¹ï´ÞÓ×
{ïÁwï×½ï¹ÓÞÈï×u×ï×Èï¡Óï¹½ï½{Ó×ÈÞס½¹Óï×½ï×ï{½Ý½´ïà¹×Óï
7JL *03E?%L C9L *9339HL C.%L 9F%L #F0!%L 5JL .F%L A%?09EAL
!97A%=E%7!%AL*9?LC.%LA*%CJL9*LC.%L;;307!%L
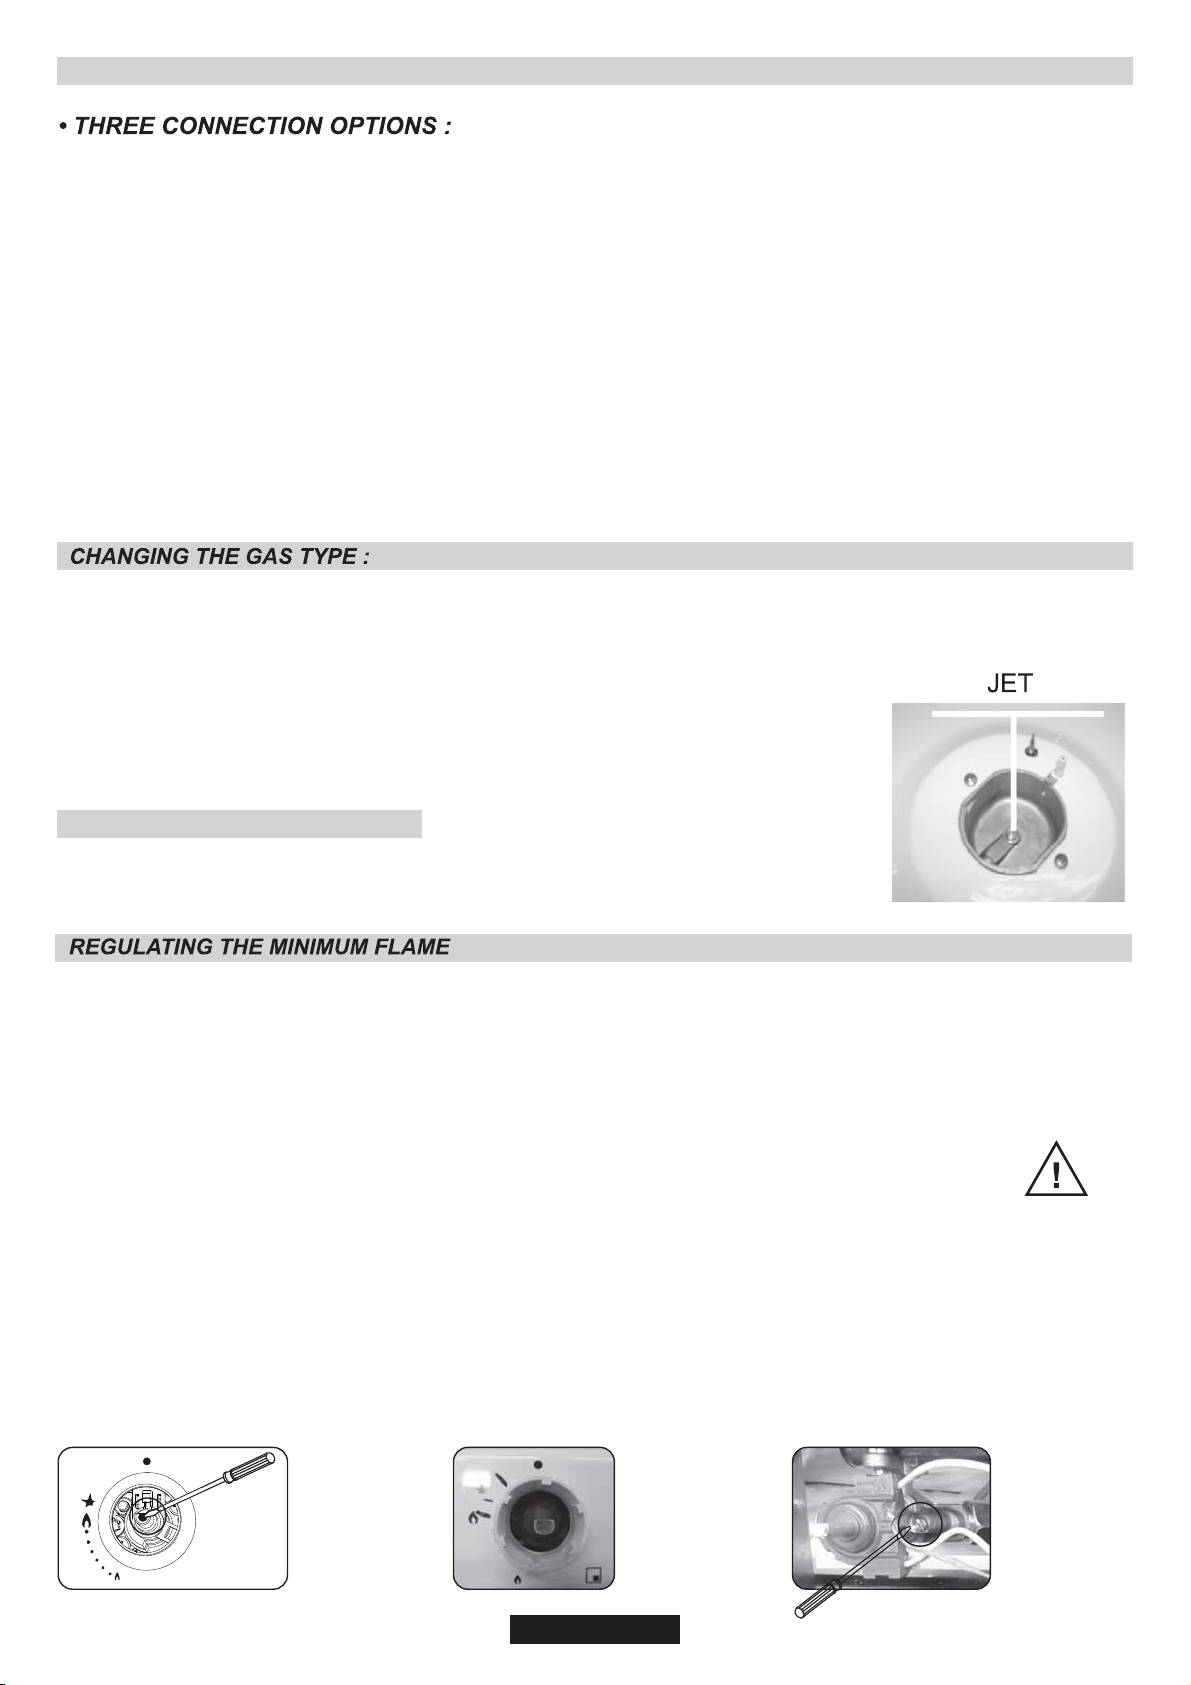
P¹ï½ÈÈï׽ÁȽàï×ïÆÞw®×éï½ï×ïÁȽÞ×Óï?:ZAsï´uéïuÈÎéï
½Þ×ï´½¡u×½¹Ó﮹ªï×½ï×¹uï´ÁȽഹ×Óï
i¡ÓïÆÞÁ´¹×ï ¹ï×ïÁuÐÓ׹ï׽エï¹×½ï½¹×u×ïã¡×ï
½½ï ½´Á¡Óïã¡×ï×ïÈÞ®u×½¹Óïw¡ï½ã¹ï ¹ïDD>ï ¡ÈסàÓï
14!4ï
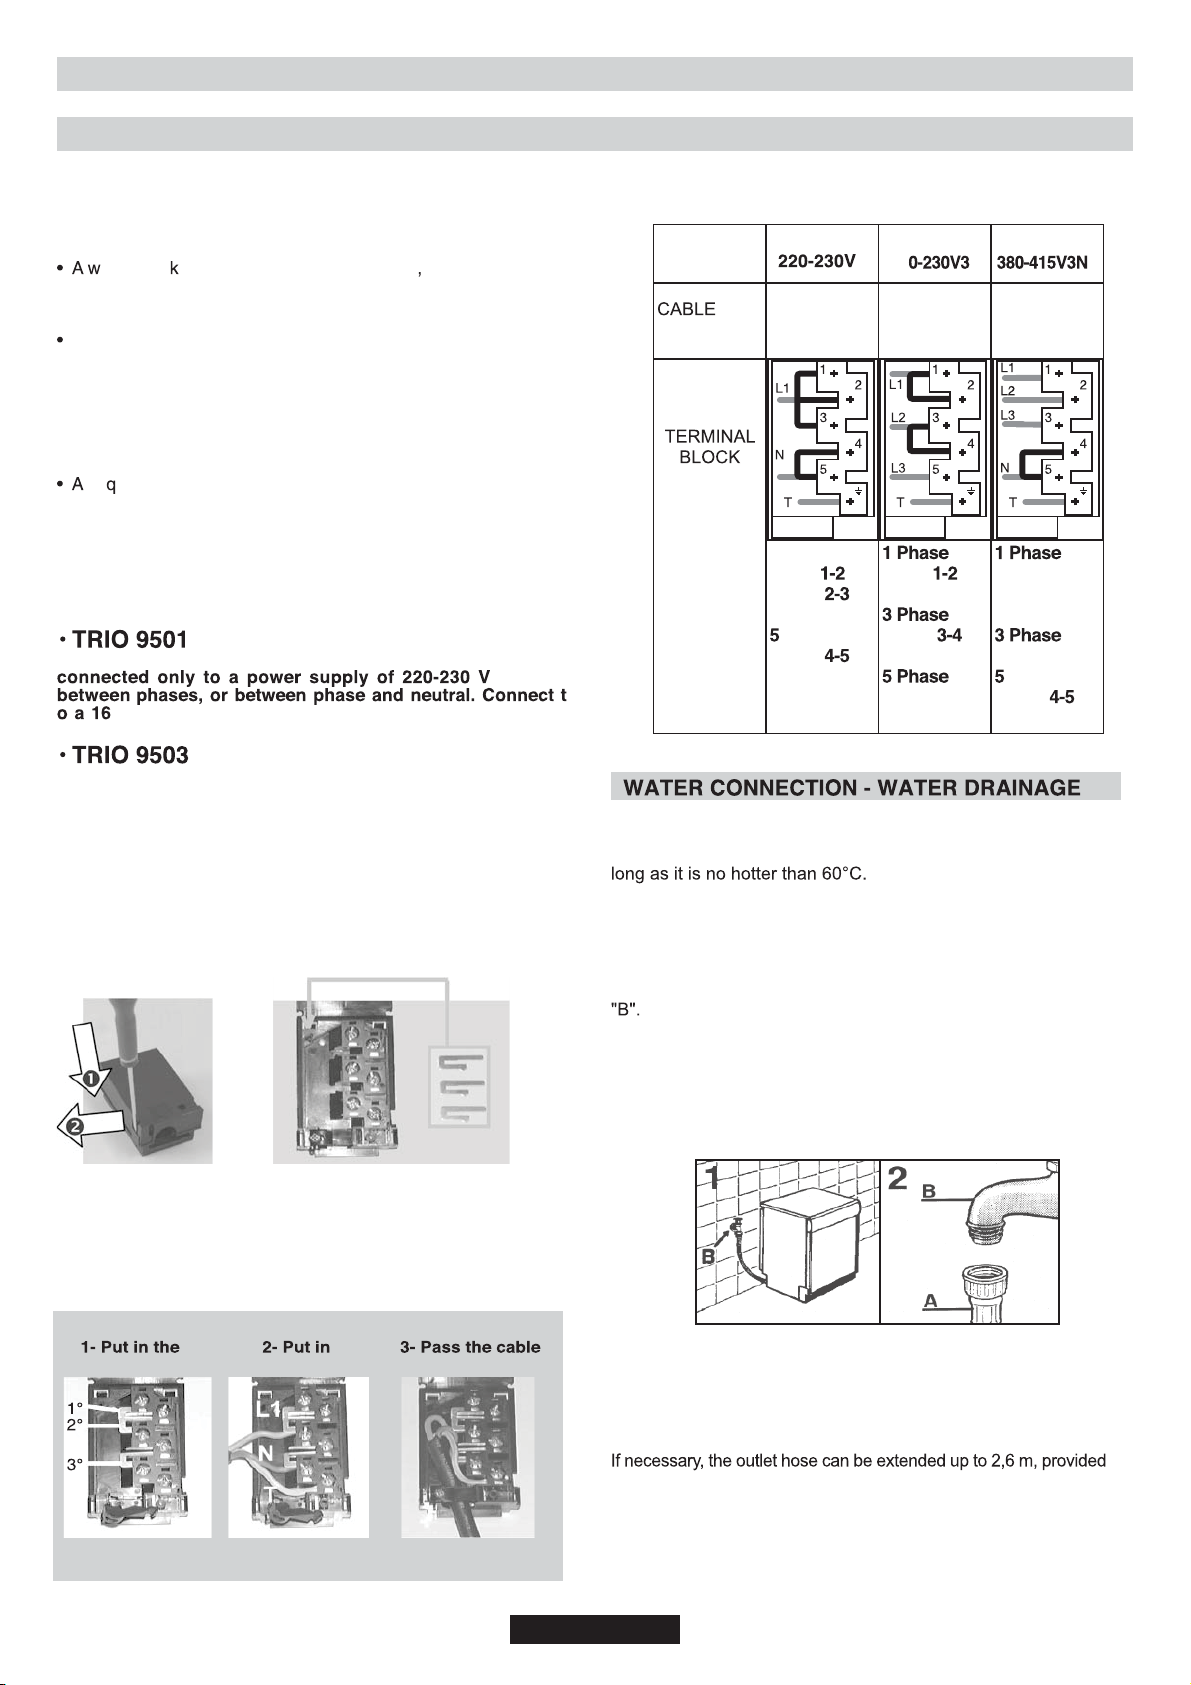
kï xÃñ£x»ï ¾¶Ã±£Ôï å¤ØïEßʾÃx»ïB¤ÊØ£âï#5'#E@ï L;Bï
x»ïÔØxÑ£»ïʾ¶ï#'#2ïå£ØïLxÔï;Ãñ£x»Ôïdß±xØ£¾»ï#-'#-ï
L;dï
JL;3!07,LC.%L 4?1L97LC-0AL;?9#E!CLH%L>%L!97*0?407,L
!94;307!%L C9L 33L ?%3%F7CL E?9;%7L A*%CJL .%3C.L 7#L
%7F0?974%7C3L?(E0?%4%7CALH-0!.L?&L;;30!3%L07L3'0A3C097L
*9?LC.0AL;?9#E!CL
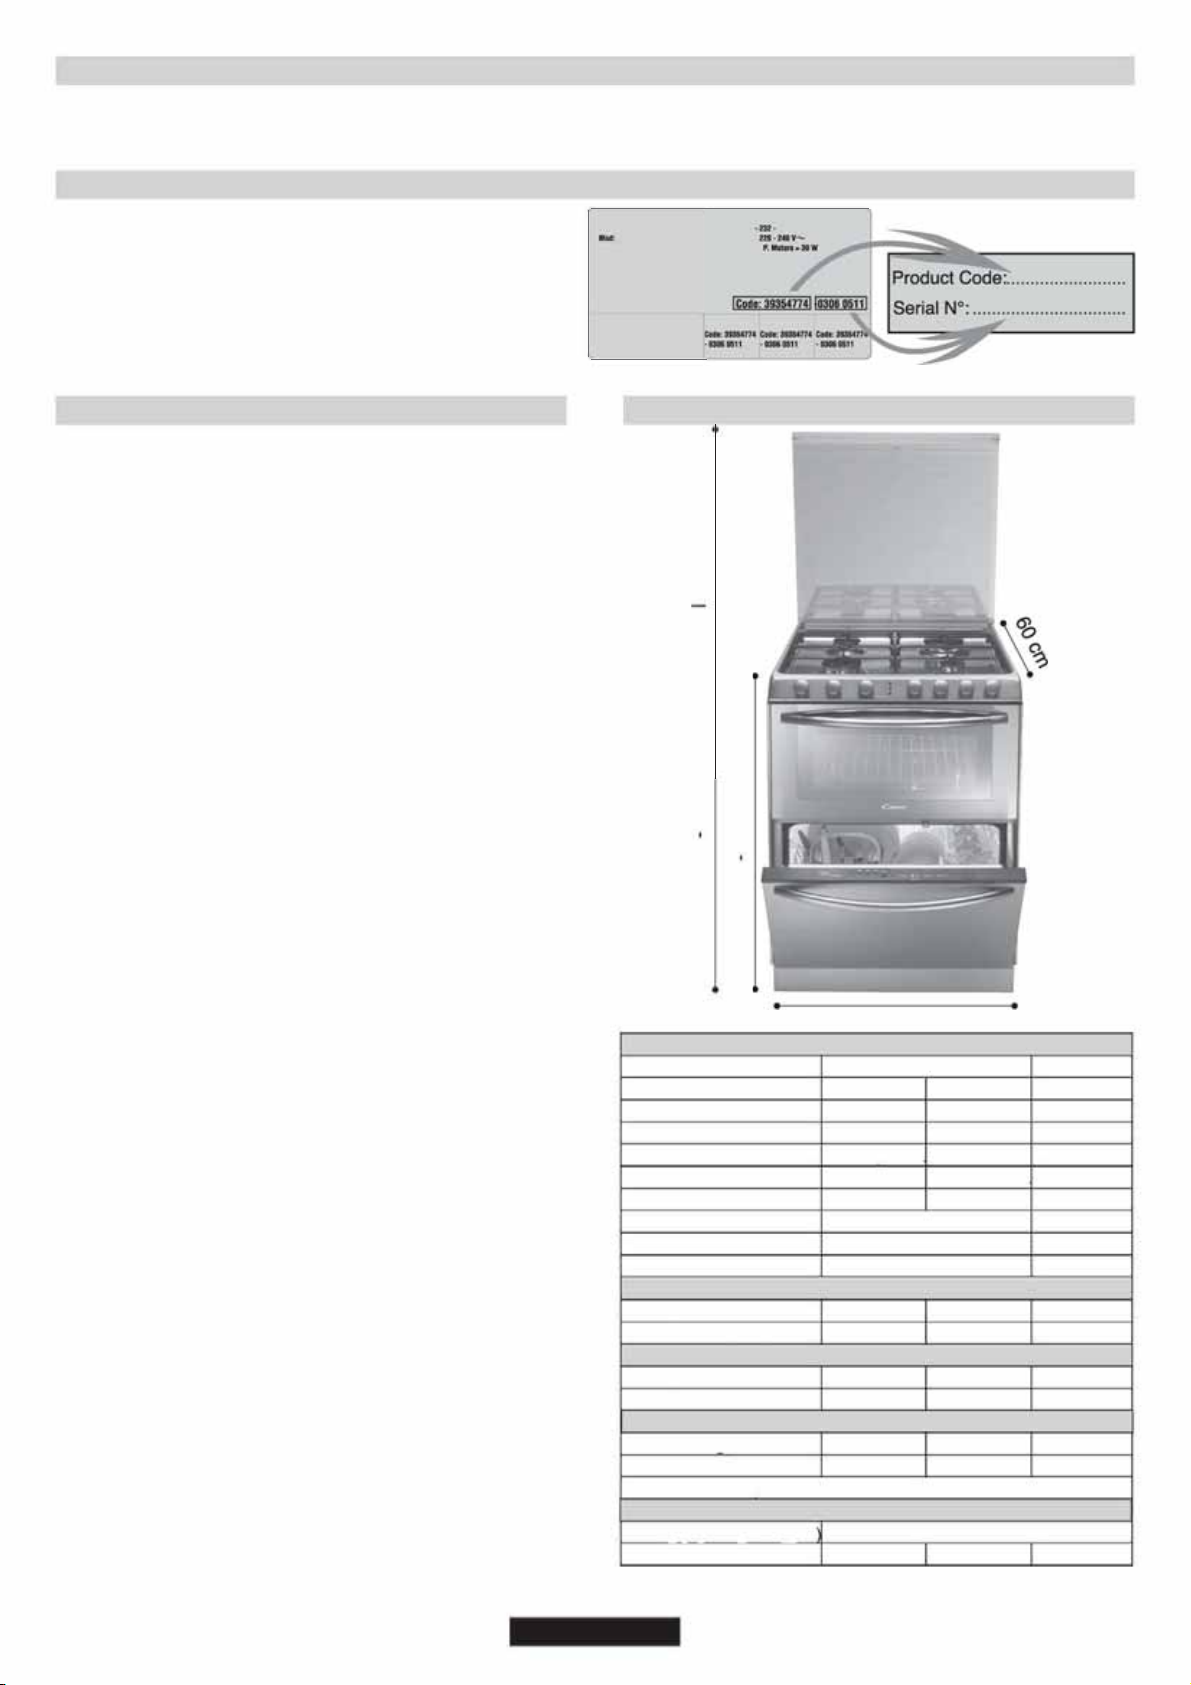
leR]ï
m_FïeË»ï leRï)*ï leRï )ï
' LxÔï &ïLxÔïïEVï 'ïEVï
`¾Ô£Ø£¾»ï
JÏ»Øï±ï fyÄ¥ï}ß˼Ëï fyĦï}ß˼Ëï ¥²¦Ùï3ï
dxÈï¯ï h·¥ïËyŦï}ßËï ïGaï3ï ¥²¦Ùï$$ï
dxÊïÈ£Øï o³ÙÌyïËyÄï}ßËï o³ÙËyïÌyĦï}ßËï ¥²¦Ùï(ï
Jʾ»ØïÊ¢Øï <ß祲yÒï}ßËï <ß祲yÒï}ßËï ¥²¦Ùï(ï
J¯x¶ï£¯ßÊïâ£ï tÔï
S»¢Ø¢¾»ï tÔï
S»ÔØx¯¯xØ¢¾»ï¯xÔÔï #ïÔß~±xÔÔïï»ïï
S»ÔØx±±ïxÔïØëÂï¾åÊï
LxÔïþåÊï«rï 2/+ï /ï
L#ï#¶~xÊï[LïRï 2&&ï ---ï
;±ØÈ»xØ£â©Ø¾Êï«£ØïÈïV`LïxÔïxâx£±x~±ï£»ïØïÂx¬x£»ï
LxÔïþåÊï«rï 2/+ï /ï
M&L& ï#2&&0ï¸~xÊïï -&-ï +5ï
B£ÔåxÔÈï
`±xïÔØØ£»zïE[+#'#ï -ï -ï -ï
rxØÊï¾»Ô߶ÃØ¢¾»ï 2ï 2ï 2ï
rxØÊï¿ÊÔÔßÊﶣ»ï2ï ¶xèï2ïY`xï
dxØïþåÊÃßØï
p¾¯Øxbïp JÊÇß»ìOíï ###'ïpï +ïOí
E¯ØÈ¢x¯ïþåÈï #ï &-ï 2/ï
kï±ç£~±ïØß~ïÔx³±ï~ï¤ØØïÔßïxïåxëïØxØï¾Ô﻾ØïÃxÔÔïØÏßï
x»ëïÔÃxïåÊï£Øï¶xëï~¾¶ïÊßÔ«£»«ï¾Êïx¶xïx»ëïåxëï
-ïK=ï