Care Fusion Children's Health LTV User manual

Date: 02/17 Author: TRACh Team
© 2017 Children’s Health. All rights reserved.
This information is not intended as a substitute for professional medical care. Always follow your healthcare professional's instructions.
LTV VENTILATOR MANUAL

TRACh Team 2
WHAT IS A VENTILATOR?
A ventilator is a small, portable machine that moves air in and out of the lungs of children who have trouble
breathing on their own. Ventilators connect to your child through plastic tubing, called the ventilator circuit.
This ventilator circuit then connects to their trach.
The ventilator is used to help your child with breathing. The length of time your child stays on the ventilator
will depend on their condition; some children need support for only a few hours of the day, some children need
support only during the night, and some children need the ventilator for 24 hours a day.
The LTV or/and ReVel ventilator images(s) is/are © 2016 CareFusion Corporation; Used with permission.

TRACh Team 3
NOTE PAGE
__________________________________________________________________________________________
__________________________________________________________________________________________
__________________________________________________________________________________________
__________________________________________________________________________________________
__________________________________________________________________________________________
__________________________________________________________________________________________
__________________________________________________________________________________________
__________________________________________________________________________________________
__________________________________________________________________________________________
__________________________________________________________________________________________
__________________________________________________________________________________________
__________________________________________________________________________________________
__________________________________________________________________________________________
__________________________________________________________________________________________
__________________________________________________________________________________________
__________________________________________________________________________________________
__________________________________________________________________________________________
__________________________________________________________________________________________
__________________________________________________________________________________________
__________________________________________________________________________________________
__________________________________________________________________________________________
__________________________________________________________________________________________

TRACh Team 4
THE FRONT PANEL OF THE LTV
It is important to know where key buttons are located on your child’s ventilator. See below for the front panel
display.
Airway Pressure
Display
Display Window
Patient Effort
Indicator
Power Source
Alarm
Settings
Power
Button
Mode & Breath
Selection
Set Value
Knob
PEEP
Alarm Silence
Reset
Control Buttons

TRACh Team 5
THE RIGHT SIDE OF THE LTV
It is important to know where to connect the ventilator circuit. See below for circuit connections.
The LTV or/and ReVel ventilator images(s) is/are © 2016 CareFusion Corporation; Used with permission.
Bacterial filter/Ventilator Circuit
3 clear lines
(color coded for attachment)

TRACh Team 6
LEFT SIDE OF THE LTV
It is important to know where the filters are located so that they can be removed and cleaned. The battery and
oxygen connector are also located on the left side of the ventilator.
The LTV or/and ReVel ventilator images(s) is/are © 2016 CareFusion Corporation; Used with permission.
How To Clean The Air Filters:
1. Remove the filters from the ventilator.
2. Wash the filters in warm water and mild soap.
3. Rinse thoroughly with clean water.
4. Allow to air dry.
5. Replace back into the ventilator.
6. If you notice your filters are beginning to break down,
contact your DME Company for a replacement.
doctor
Remove & clean your
filters at least
once every week.
Replace your entire filter
once every 6 months.
Battery Connector
Oxygen Connector
Inlet Filter
Fan Filter

TRACh Team 7
THE LTV FRONT PANEL-VENTILATOR SETTINGS
Your child’s doctor will order the ventilator settings. They are ordered based on your child needs. We will teach
you the settings you will need to know for your child’s ventilator. Don’t feel like you need to memorize these
definitions this page is for your reference.
1. Breath Rate: the number of breaths per minute your child will get from the ventilator.
2. Tidal Volume: the amount of air that goes into your child’s lung each breath.
3. Pres. Control: the amount of pressure that is applied to the lungs when your child breathes in.
4. Insp.Time: this is the amount of time the pressure is applied to the lung.
5. Pres. Support: the amount of pressure that the ventilator applies to the lungs during a breath your child
takes on their own.
6. Sensitivity: this is how easy it is for your child to get a breath from the ventilator.
7. Alarm Limits: these are limits that protect your child from too much and/or too little pressure from the
ventilator.
8. Mode: this is ordered by your child’s doctor and will be a pressure or volume mode.
PEEP: this is a constant pressure that still flows even when your child breaths out.
Use this picture and fill in the ordered ventilator settings for your child with the help of your respiratory
therapist. This will help you remember your settings when you go home. We suggest you write these settings in
pencil and bring this picture to vent clinic and also change the settings on the picture when you change them
on the ventilator.
1 2 3 4 5 6 7
89
Your child’s doctor will order any changes made to the settings on the ventilator.

TRACh Team 8
THE LTV DISPLAY SCREEN-MONITORING
Information about your child’s breathing can be found on the ventilator. Just press the Select Button. The data
located on this screen is based on how your child is breathing. These readings can be helpful in assessing your
child. Useful readings that can be found here are: total respiratory rate (f), tidal volume (Vte), and peak
pressures (PIP).
Select Button f, Vte and PIP are shown here
•fon the monitoring screen is the total respiratory rate or the number of breaths your child is given by
the ventilator in one minute.
•Vte on the monitoring screen is the tidal volume or the amount of volume returning to the ventilator
from your child’s lungs.
•PIP is the peak pressures or the amount of pressure delivered to your child’s lungs during a breath.

TRACh Team 9
THE VENTILATOR CIRCUIT
The ventilator circuit connects the ventilator to your child’s trach. This lets air travel from the ventilator to your
child’s lungs.
The LTV ventilator circuit has 2 pieces of tubing. The first is a short piece of tubing that connects from the
ventilator to the water chamber. The second piece of tubing is longer and connects from the water chamber to
your child’s trach. The longer tubing has two sections an inspiratory section which takes air from the ventilator
to your child and an expiratory section which lets air come out of your child’s lungs and enter the room through
the exhalation valve. The long tubing also has 3 clear lines attached, these 3 lines monitor your child’s
breathing.
Clearing Condensation from the Circuit
Water in the tubing is normal. It is usually seen in the longer tubing. If you notice water in the tubing, it is
important to empty the water. You do not want the water to enter your child’s trach. You can empty the water
by quickly disconnecting the tubing from your child’s trach tube and drain the extra water out onto a towel or
wastebasket. Be careful not to touch the tubing to any surfaces that can get it dirty. Then, reconnect the tubing
to your child.
The LTV or/and ReVel ventilator images(s) is/are © 2016 CareFusion Corporation; Used with permission.
Wye - Connects to your
child’s trach
3 clear lines that
attach to the right
side of the
ventilator
Exhalation Valve
Inspiratory Section
Expiratory Section

TRACh Team 10
CHANGING THE VENTILATOR CIRCUIT
The ventilator circuit will be supplied by the Durable Medical Equipment (DME) Company that you choose prior
to discharge home. The DME Company will instruct you on how often to change the circuit after you discharge
home. The circuit may need to be changed more often if you notice a hole in the circuit, the circuit tears or it is
dirty. We will practice connecting the ventilator circuit to the ventilator here in the hospital before you go
home.
If you have a backup ventilator, place your child on the backup ventilator while you change the circuit on the
ventilator that needs a clean circuit. If you do not have a backup ventilator, one person will give breaths to
your child using the self-inflating bag while you change the circuit. If your child is only on the ventilator while
sleeping then change the circuit while your child is awake and not on the ventilator.
Supplies Needed
•Clean ventilator circuit
•Bacterial filter
•New or clean water chamber
•Self-inflating bag
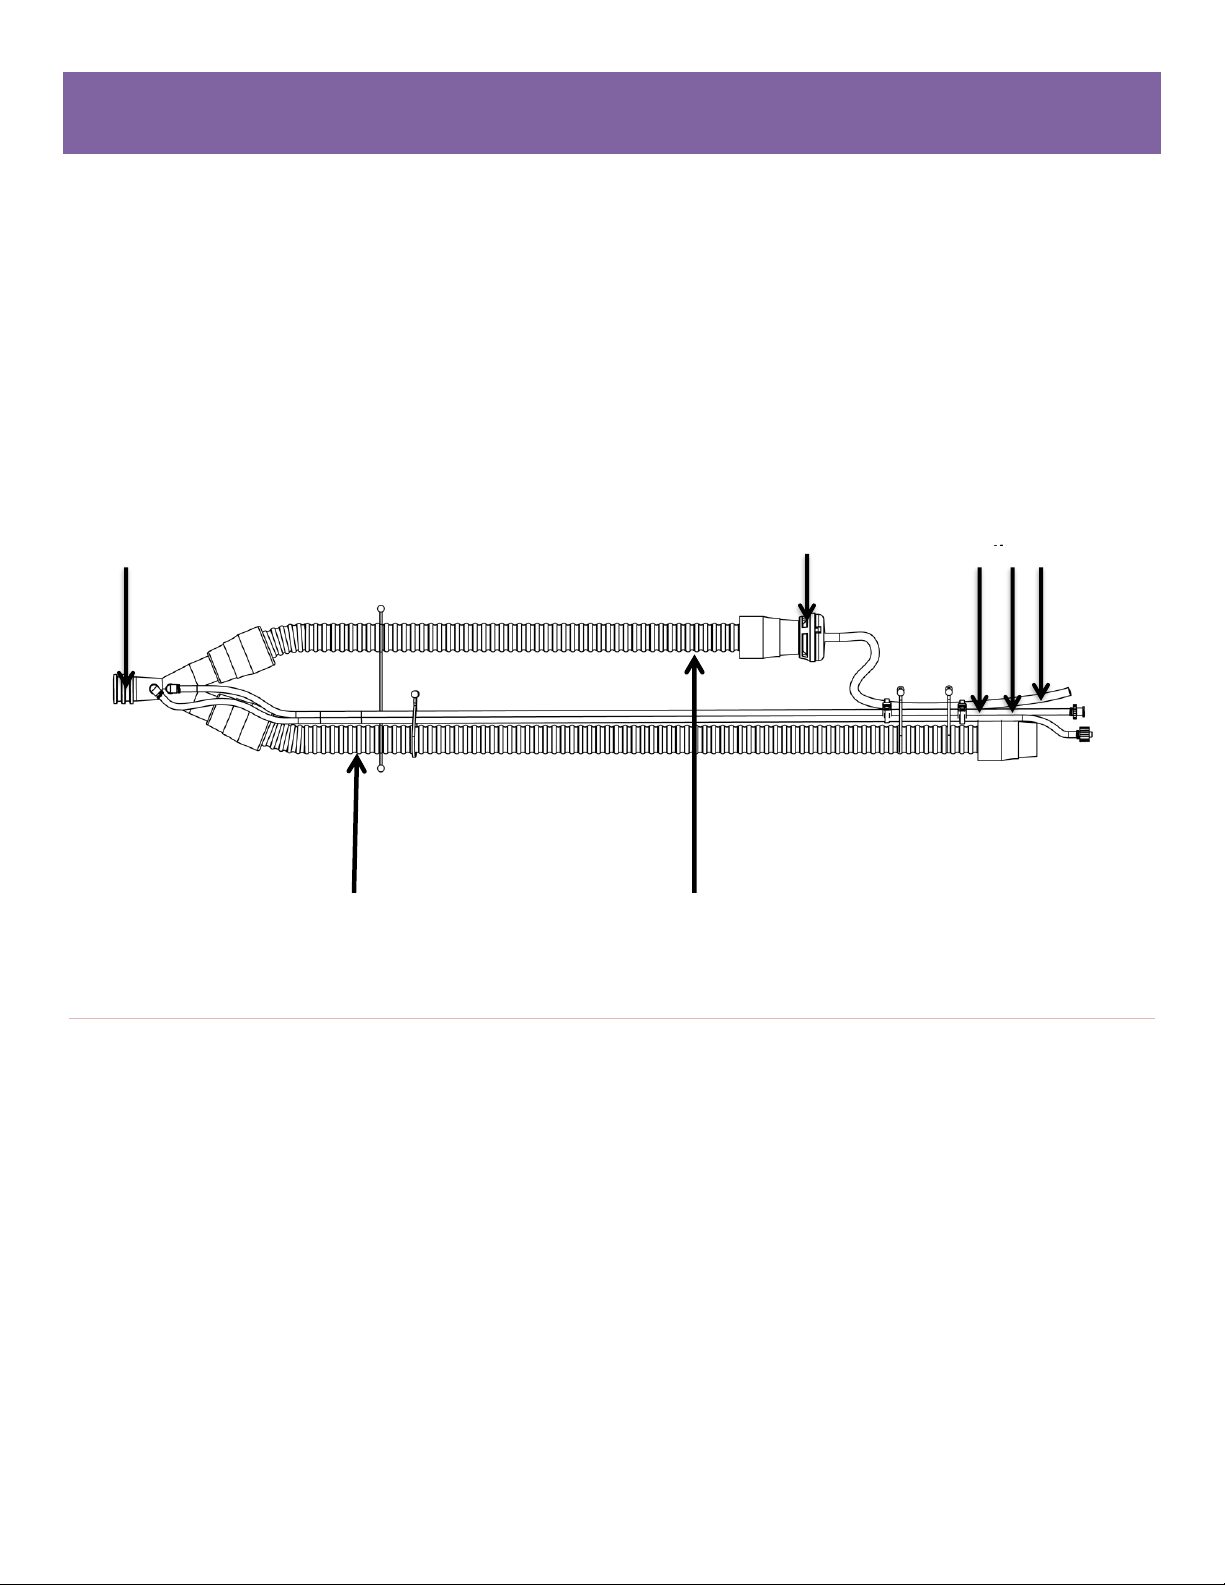
Steps for Assembling & Changing the Circuit
1. Wash your hands with soap and water for 15 seconds and dry your hands with a clean towel.
2. Gather your supplies.
3. Open the new circuit and lay it out on a clean surface.
4. Check the new circuit to make sure you have all of the circuit
pieces needed.
5. Remove the existing circuit from the trach and ventilator.
6. Remove the heater wire from the dirty circuit.
7. Place your child on the backup ventilator or ask a
second person to begin giving breaths to your child using
the self-inflating bag.
8. Turn ventilator off.
9. Attach the clean bacterial filter to the ventilator.
10. Connect one end of the short tubing to the bacterial
filter that connects to the ventilator.
11. Connect the other end of the short tubing to the
water chamber.
12. Connect the angled end of the long tubing to the water
chamber.
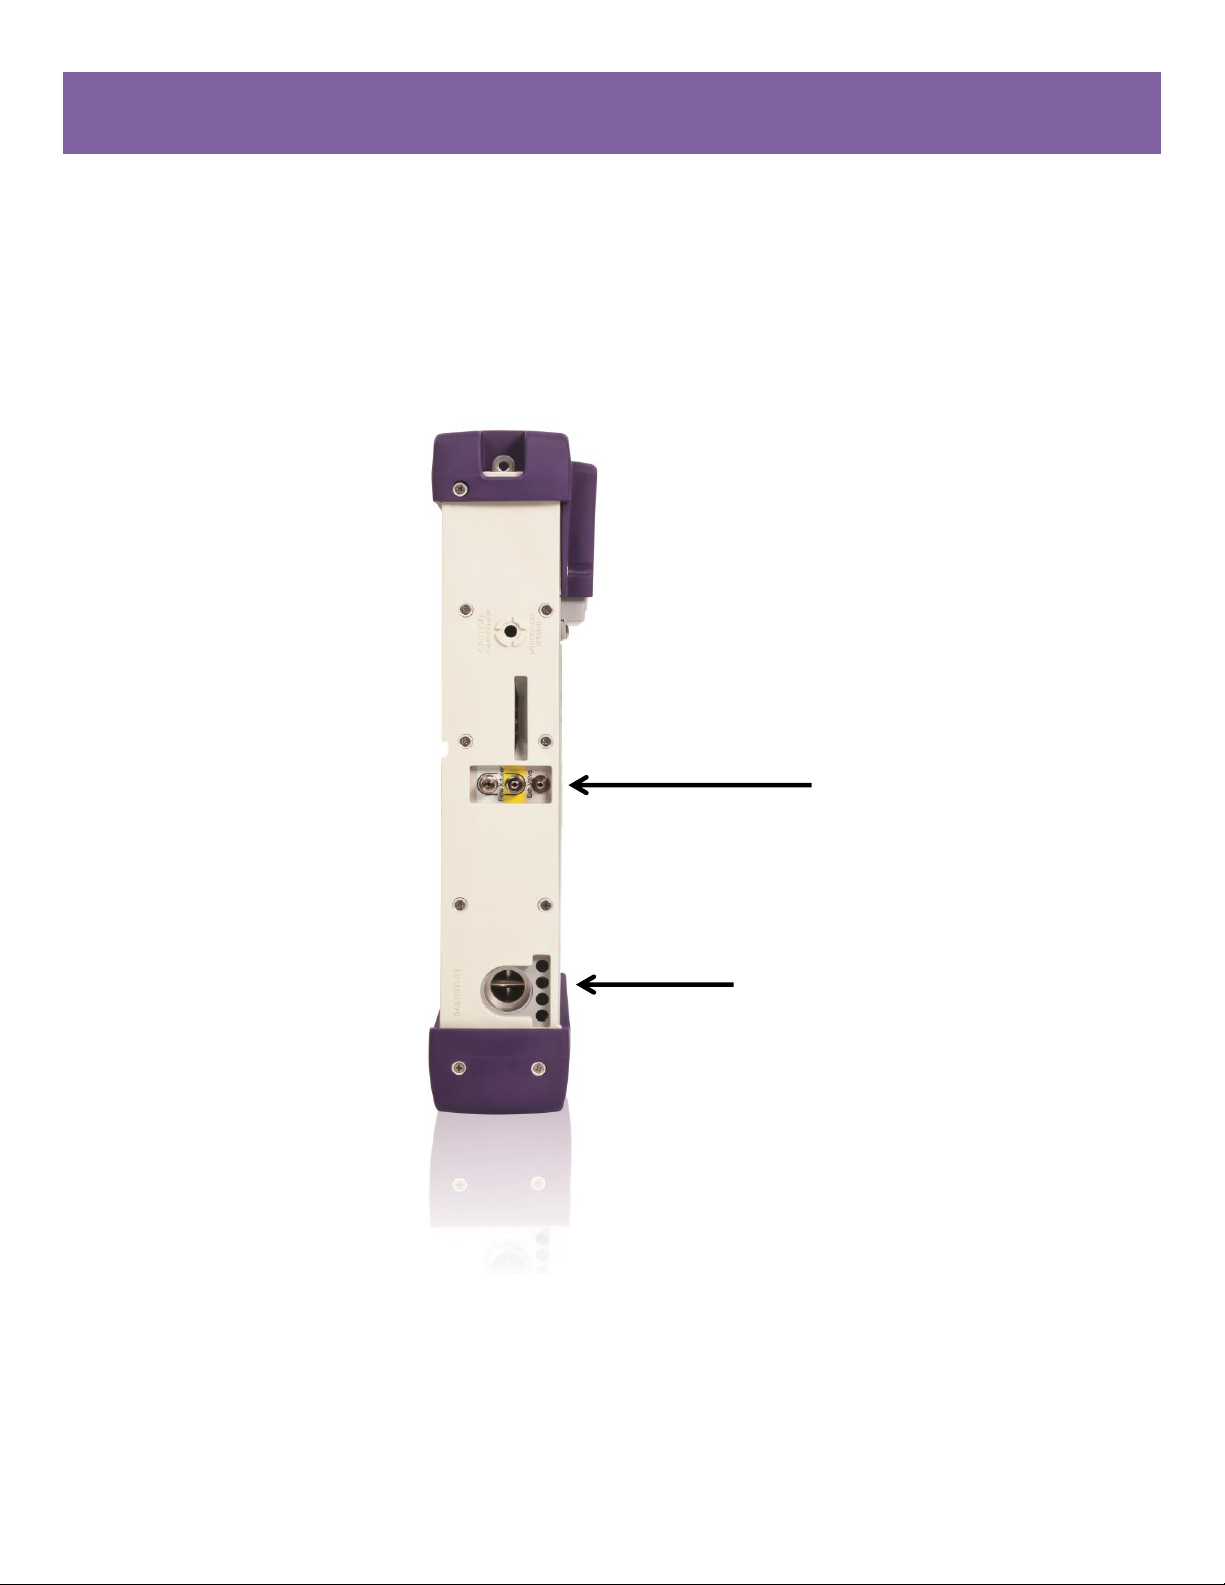
13. Connect the two exhalation flow transducer sense lines
to the ports marked Flow Xducer and the exhalation valve
driver line to the port marked Exh Valve on the right side of
the ventilator.
14. Insert the heater wire probes into the correct temperature probe ports on the circuit.
The LTV or/and ReVel ventilator images(s) is/are © 2016 CareFusion Corporation; Used with permission.

TRACh Team 11
15. Perform a leak test before placing your child back on the ventilator.
a) Press and hold the on/standby button and the select button at the same time for 3-5 seconds.
b) Keep holding these buttons until the summary screen says ”remove patient”.
c) Press the silence/reset button.
d) The summary screen will read “vent check”.
e) Press the select button.
f) The summary screen will now read “ALARM”.
g) Turn the wheel clockwise (to the right) until the summary screen says “Leak”.
h) Block the ventilator circuit at the Wye (the end that connects to your child’s trach tube) with
your hand.
i) Press the select button this will begin the leak test; this usually takes 20 seconds.
j) The summary screen should read “PASS”.
k) If screen reads “Fail”, check the ventilator circuit connections and repeat the leak test.
l) Press the control lock button 3 times; this will take you back to the ventilator settings.
m) The summary screen will read “same patient”. Press the select button to return to your child’s
ordered ventilator settings.
16. Turn the ventilator on and reconnect your child to the circuit.
17. Briefly check your child for chest rise to make sure the ventilator is working correctly.

TRACh Team 12
OXYGEN ADMINISTRATION
Supplies Needed
•Oxygen concentrator
•Oxygen tanks
•Oxygen tubing
•Oxygen connector (this should be attached to your home ventilator)
Steps for administering oxygen
1. Make sure the connector is attached to the left side of the LTV.
2. Attach oxygen tubing to the oxygen concentrator.
3. Attach oxygen tubing to the oxygen connector.
4. Turn the oxygen concentrator on and change to the prescribed oxygen liter flow.
5. If your child needs more oxygen you can turn up the liter flow on the concentrator.
6. If your child needs more oxygen than the oxygen concentrator can provide switch the oxygen
tubing to the oxygen tank and adjust the liter flow.
The LTV or/and ReVel ventilator images(s) is/are © 2016 CareFusion Corporation; Used with permission.
Oxygen Connector

TRACh Team 13
VENTILATOR ALARMS
Ventilators have many alarms that sound for different reasons. The ventilator will alarm to let the caregiver(s)
know there is a problem. Most of the time the problem is easy to fix and an emergency can be stopped from
happening. We will help you with learning what to do when the ventilator alarms.
The following table lists the alarm, why the alarm happens and what to do. Each time the ventilator alarms
you must look at your child to be sure they are ok. If your child is having trouble breathing, begin giving your
child breaths using the self-inflating bag. You may need to call 911 for help if your child is not doing well. If
your child is breathing ok on the ventilator while it is alarming use the table below to try and figure out what to
do to stop the alarm. If you are not able to find out why the ventilator is alarming contact your DME Company
immediately.
Alarm
Why the alarm happens
What to do
HIGH PRESS
The circuit pressure is higher than the High
Pressure Limit alarm setting. Your child may
be coughing, sneezing or crying or have extra
mucus or a mucus plug in the trach. Check
the circuit because it may be kinked or there
may be a lot of water in the tubing.
Suction the trach tube. If you are not able
to pass the suction catheter, change the
trach tube. If there is water, empty the
water from the circuit. If there is a kink in
the tubing, straighten the tubing
immediately.
LOW PRESS
The peak inspiratory pressure is less than the
Low Pressure alarm setting. Your child’s trach
tube may have come out or the cuff maybe
deflated which would cause an air leak.
There could be a hole or tear in the tubing or
the circuit could be loose or come off
Check your child’s trach to make sure it is
properly in place. Check the cuff to make
sure the balloon is properly inflated to the
correct volume. Check the circuit for a hole
or tear and make sure it is connected
properly.
LOW MIN VOL
The low minute volume is less than the Low
Minute Vol alarm setting. Your child may
have more air leaking due to decreased cuff
inflation or if your child is sleeping their
airway may be relaxed. Your child’s
respiratory rate may be decreased if they are
sleeping or if they are taking sedation
medicines. There could also be a hole or tear
in the tubing.
Check the cuff to make sure the balloon is
properly inflated to the correct volume.
Move your child around to reduce an air
leak if they are sleeping. Check the circuit
for a hole or tear and make sure it is
connected properly.
DISC/SENSE
A piece of the circuit or a pressure line has
come off. It can also be caused if a pressure
line has become pinched or blocked.
Check the circuit and pressure lines to make
sure they are connected properly. Check the
pressure lines for water and try to clear
them using your suction machine.
APNEA
Your child is not breathing on their own
greater than the Apnea Interval setting.
Check to see why your child is not breathing
on their own (i.e. sedation medication). The
alarm will shut off when your child starts to
breath on their own higher than the Apnea
Interval setting, otherwise it will continue to
deliver a respiratory rate of 12 breaths per
minute.

TRACh Team 14
Alarm
Why the alarm happens
What to do
HIGH f
Your child's respiratory rate is more than the
High f alarm setting.
Find the cause for the increased respiratory
rate. Does your child need to be moved
around, suctioned, or given more oxygen?
The alarm will shut off when your child’s
respiratory rate is less than the High f alarm
setting.
HIGH PEEP
The circuit positive end expiratory pressure
(PEEP) is greater than the High PEEP alarm
setting. The circuit and or exhalation valve
may be blocked.
Clean and check the circuit and exhalation
valve.
LOW PEEP
The circuit positive end expiratory pressure
(PEEP) is less that the Low PEEP alarm
setting. The circuit and or exhalation valve
may have a leak.
Clean and check the circuit and exhalation
valve.
RESET OR
RESET 1
The ventilator restarts following a condition
other than being shut down by pressing the
On/Standby button. The ventilator will do a
self-test if no problems are detected the
ventilator will continue to operate.
Repeated Reset or Reset 1 alarms mean
there is a problem with the ventilator.
Switch your child to the backup ventilator
and contact your DME Company. If your
child does not have a backup ventilator
begin giving breaths to your child with a
self-inflating bag and call 911.
REMOVE PTNT
The ventilator is powered up in the Ventilator
Checkout or Ventilator Maintenance mode.
This happens when you are turning the
ventilator on to complete a Leak Test. The
ventilator is not delivering gas.
Make sure your child is taken off the
ventilator. Complete the Leak Test before
placing your child back on the ventilator.
LOCKED
The control buttons are locked. If a button is
pressed this message will display on the front
panel screen.
Press the Control Lock button to unlock the
control buttons.
BAT LOW
The ventilator is running from the internal
battery power and the battery charge level is
low.
Plug the ventilator into an electrical outlet
or attach a fully charged battery.
BAT EMPTY
The ventilator is running from the internal
battery power and the battery charge level is
dangerously low.
Plug the ventilator into an electrical outlet
or attach a fully charged battery.
POWER LOW
The ventilator is running on external power
and the voltage drops to the low level.
Plug the ventilator into a different electrical
outlet or attach a fully charged external
battery.
POWER LOST
The ventilator is turned on without an
external source of power, or is running on
external power and switches to the internal
battery.
check to see if the internal battery is fully
charged and attach a fully charged external
battery.

TRACh Team 15
Alarm
Why the alarm happens
What to do
INOP
The ventilator detects any condition that
makes it unsafe for your child to be on the
ventilator.
Switch your child to the backup ventilator
and contact your DME Company. If your
child does not have a backup ventilator
begin giving breaths to your child with a
self-inflating bag and call 911.
HW Fault
The ventilator detects a problem with the
ventilator hardware.
Switch your child to the backup/travel
ventilator and contact your DME Company.
If your child does not have a backup
ventilator begin giving breaths to your child
with a self-inflating bag and call 911.
NO CAL DATA,
NO CAL
The ventilator detects invalid or missing
calibration records on power up.
Switch your child to the backup/travel
ventilator and contact your DME Company.
If your child does not have a backup
ventilator begin giving breaths to your child
with a self-inflating bag and call 911.
DEFAULTS
The ventilator detects invalid settings during
the power on self-test.
Switch your child to the backup/travel
ventilator and contact your DME Company.
If your child does not have a backup
ventilator begin giving breaths to your child
with a self-inflating bag and call 911.
DEFAULTS SET
The SET DEFAULTS option has been used to
reset all controls and extended features
setting to the factory-set default values.
Check all Controls, Alarms and Extended
Features options and return them to the
correct settings.
XDCR FAULT
The ventilator detects a problem when
warming up or there is an environmental
change. If the ventilator cannot correct the
problem the alarm will continue.
Switch your child to the backup/travel
ventilator and contact your DME Company.
If your child does not have a backup
ventilator begin giving breaths to your child
with a self-inflating bag and call 911.

TRACh Team 16
VENTILATOR BATTERIES
Your ventilator will be plugged into an electrical outlet once you are home. During car trips and outings your
child’s ventilator will use a detachable (battery that comes off and on) or external battery. You will need to
know the amount of time the battery will last. Some ventilators have car adapters so they can be plugged in
during a car trip. When you are planning to leave the home, always make sure your battery is fully charged.
Always have your back-up battery with you as well.
AC Power/Internal Battery
•AC Power charges the internal and detachable battery.
•The internal battery is made for use during short periods.
The length of time the ventilator will operate on internal power
(up to 60 minutes) depends on settings, charge level and condition
of the battery.
•If the battery dead, it takes up to 8 hours to re-charge.
Detachable Battery (Sprint Pack)
External battery
•The LTV can work from a 12V DC Free Standing
car battery using the external battery cable connector
or using a DC car adaptor.
•The External Battery Packs can only be recharged using
the CareFusion External Battery Charger.
The LTV or/and ReVel ventilator images(s) is/are © 2016 CareFusion Corporation; Used with permission. CareFusion Corporation. (2016).
•If the LTV is not connected to a power source or
external battery, it will work on the detachable battery.
•The detachable battery (includes 2 lithium batteries)
will work the LTV up to 5 hours.
•When the LTV is connected to an electrical outlet, it
automatically charges the detachable battery.

TRACh Team 17
VENTILATOR BATTERY CHARGE STATUS/LEVEL
The External Power indicator shows the level of external power while the ventilator is operating from an external power
source. When the ventilator is running form the internal battery, the External Power indicator is off. See below:
The Charge Status indicator shows the charge state of the internal battery. This LED is on when the ventilator is plugged
in to a power source and the internal battery is being charged. See below:
The Battery Level indicator shows the level of internal battery power while running from the internal battery. When the
ventilator is running from an external power source, the Battery Level indicator is off. The length of time the ventilator
will work on internal power (up to 60 minutes) depends on settings, charge level and condition of the battery.
See below:
LED Color
Charge Status
Green
The external battery charge level is acceptable.
Amber
The external battery charge level is low.
LED Color
Charge Status
Flashing Amber
The ventilator is going through a pre-charge test of the
battery before starting the charge process.
Green
The internal battery is fully charged.
Amber
The internal battery is being charged but has not
reached a full charge level.
Red
The ventilator has found a charge internal battery fault
and cannot be charged.
LED Color
Battery Level
Approximate Battery
Time
Green
Internal battery level is acceptable
45 minutes
Amber
Internal battery level is low
10 minutes
Red
Internal battery level is critically
low
5 minutes

TRACh Team 18
EMERGENCY PREPARDNESS
Packing Your Emergency Bag
When you are traveling or simply just at home with your child, an emergency bag of equipment should always
be ready for you to use. Accidents can happen. We want you to be ready. Your emergency bag should be large
enough to have all the supplies in 1 bag. As you get close to going home, we want you to bring a bag to the
hospital.
Travel supplies/equipment
•Same size trach and obturator
•Smaller size trach and obturator
•Suction catheters
•Self- inflating bag WITH face mask
•Normal saline
•Extra trach ties
•Lubricating jelly
•Scissors
•Syringe if your child has a cuffed trach
•HME’S
•Phone list of emergency contacts and physicians
•Ventilator
•Feeding Pump
•Portable Suction Machine
•Pulse Oximeter Machine
•Oxygen Tank
•Nebulizer (if necessary)
Be sure to take all electrical cords for equipment in case you need to plug equipment into an electrical outlet
when you reach your destination.
•Fully charged back-up battery
•Car adapter for your battery

TRACh Team 19
PREPARING FOR TRANSPORT
Steps for Assembling the Circuit for transport
1. Wash your hands with soap and water for 15 seconds and dry your hands with a clean towel.
2. Gather your supplies.
3. Turn heater off.
4. Remove the heater wires from the temperature probe ports on the circuit.
5. Remove the short tubing from the bacterial filter that connects to the ventilator.
6. Remove the angled end of the long tubing from the water chamber and connect to the bacterial filter.
7. Briefly check your child for chest rise to make sure the ventilator is functioning correctly.
The LTV or/and ReVel ventilator images(s) is/are © 2016 CareFusion Corporation; Used with permission.
Be sure to attach a HME in line with
the ventilator circuit for transport.
Attach angled end of ventilator circuit to the bacterial filter.
Attach the 3 clear tubes to the right side of the ventilator.

TRACh Team 20
SAFETY
Safety Precautions
•Be sure to organize your child’s equipment (ventilator, suction machine, etc.) so it is easily available to
you or your home health nurse.
•Never put the ventilator in water.
•Never plug the ventilator in if it is wet.
•Do not store any liquid on or near the ventilator.
•Do not store your child’s ventilator near any fire hazards (stoves, fireplaces, open flames) where it could
catch on fire.
•Never plug the ventilator into an electrical outlet that is being used to power to another appliance. Plug
the vent into an electrical outlet that has no other appliance attached to it.
•Always plug your ventilator directly into an electrical outlet or use a power strip provided by your DME
Company.
•Never try to fix the ventilator. Contact your DME Company to schedule any repairs needed for your
child’s ventilator.
•Take extra care to see that younger children do not play with the ventilator screen and accidentally
change your child’s ventilator settings.
•Always have a working phone with you in case an emergency should happen.
Oxygen Safety
•Oxygen tanks should be secured so that they will not tip over.
•Oxygen tanks should be stored away from things that can
cause fires like a fireplace, space heater, or kitchen stove.
•Do not use aerosol sprays around your child.
•Always plug your oxygen concentrator directly into an
electrical outlet or use a power strip provided by your
DME Company.
•You should never smoke around your child or oxygen.
Remember to keep oxygen
away from open flames!
Table of contents
Other Care Fusion Fan manuals