Carl's Place Pro Enclosure Kit Owner's manual

Pro Enclosure Kit
Assembly Instructions & User Manual

Page | 2
Thank you for purchasing a golf simulator impact screen and enclosure kit from
Carl’s Place! In this guide you will find everything you need to complete your kit
assembly, plus a few tips to help you make the best use of it.
Materials List
Literature
•
Assembly Manual & User Guide
•
Frame Assembly Sheet
Frame Components
•
(1) Kit of pipe connector fittings
•
(1) Kit of pre-cut and marked pipes
OR self-sourced, if pipes were not
purchased
Fasteners
•
(1) Bundle of ball bungees
•
Zip ties
Fabric Panels
•
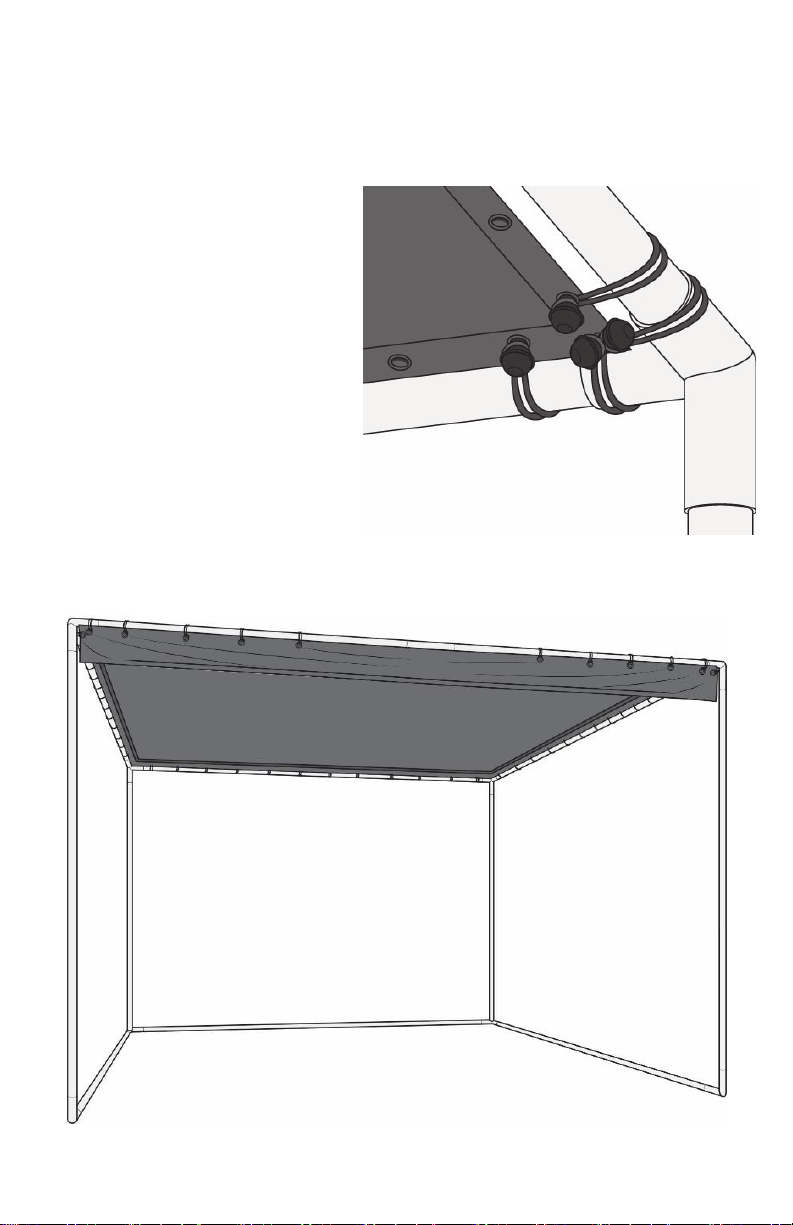
(1) Ceiling panel (or split design)
•
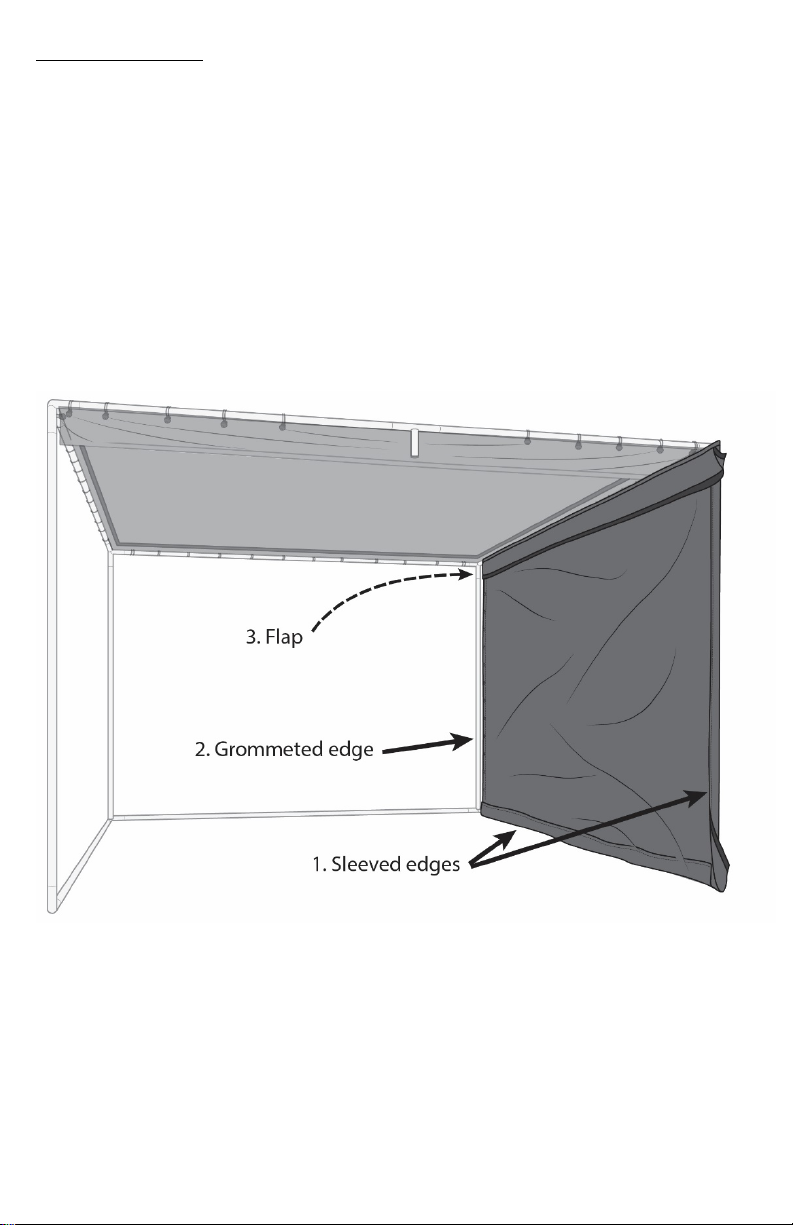
(2) Wall panels (left and right)
•
(1) Impact screen
Safety Cushions
•
(1) Large bottom foam cushion
•
(1) Top foam cushion
•
(2) Side foam cushions
Optional Accessories
•
Projector/Electronics Mount(s)
•
Ceiling Baffle(s)
Tools Needed
•
6mm Hex Bit Socket and Ratchet
(recommended) or Hex Key
•
Step Ladder (8-ft recommended)
Assembly Overview
1. Assemble Frame
2. Attach Ceiling Panel
3. Attach Electronics Mount(s)
(if applicable)
4. Attach Baffles (if applicable)
5. Attach Wall Panels
6. Attach Impact Screen
7. Attach Safety Cushions
Scan the QR code to see our full
assembly video.

Assemble Frame
Using the Frame Assembly Sheet included in this manual, construct your frame.
If you bought a pipe kit from Carl’s Place, simply insert the pipes fully into the
connectors and tighten. If you did not buy a pipe kit from Carl’s Place, you must
source your own pipes, cut to the specifications shown on the Frame Assembly
Sheet.
Start by putting together the bottom base of the frame, using a
rubber mallet to make sure the pipes are completely inserted into
the fittings. Then, work bottom to top, back to front.

Page | 4
Attach Ceiling Panel
The ceiling is the panel without any sewn sleeves on the sides.
Orient the
ceiling panel so
that the front
flap is on the
underside of
the panel,
facing down.
Attach the
ceiling panel to
the frame using
ball bungees.
Using Ball Bungees
Throughout the installation, you will use ball bungees to attach panels and
the screen to the frame.
1. Insert the loop end of the
bungee into a grommet.
2. Thread it through until the
ball stops it.
3. Wrap the cord loop around
the frame tubing.
4. Hook it over the ball to
create a loop.

Pro Enclosure Kit Assembly Instructions & User Manual -V06
Working diagonally, use ball bungees to begin attaching the ceiling to the frame
only at the four corners.
Use two bungees in each corner
grommet (one connecting in each
direction). Attach the next two
closest grommets as well, for a
total of four bungees per corner.
Now that the panel is attached in
the corners, and centered,
continue to alternate from corner
to corner, adding more bungees
down the sides. By alternating
where you place the bungees,
you’ll keep the panel centered, until finishing at the middle of each side.

Page | 6
Alternative Design: Split Panel Ceiling
If your golf enclosure has a split
panel ceiling design, follow these
color-coded directions to install.
Each of the panels is designed by
a colored tab. Orient the colored
tab to the rear of the enclosure,
with the loop fasteners facing
down and in.
1. Green – rear
ceiling panel
nearest impact
screen (has no
flaps)
2. Yellow – front
ceiling panel
(has flaps on two
sides)
3. Red – right-hand
wall (as you face
the screen)
4. Blue – left-hand
wall (as you face
the screen)
Connect the flaps in the center of
the ceiling panel using the hook
and loop fasteners.

Pro Enclosure Kit Assembly Instructions & User Manual -V06
Check Spacing
You should see an equal amount of space between the edge of the ceiling panel
and the pipe frame all the way around (approx. 1-2”).
If you have pulled it too far to one side, adjust it now.
Zip ties are
provided and
can be used to
pull the panel
one way or the
other or to
close gaps
between
panels and the
frame.
Use a zip tie anywhere the gap is over 2-inches for a better fit. This should only be necessary at
the corners of a panel, if needed at all.

Page | 8
Attach Ceiling Panel Flaps
Fold the attached flap
over the front of the
frame.
Attach it to the top of
the ceiling panel using
the integrated hook-
and-loop strips.

Pro Enclosure Kit Assembly Instructions & User Manual -V06
Install (Optional) Electronics Mount
If you need to attach electronics to your enclosure frame, now is the time to do
so.
Install (Optional) Baffles
If you did not purchase baffles, skip this step.
Baffles attach to the top of the
frame. Insert a bungee through the
loop of cord on the baffle and attach
the bungee around the frame.
Baffles can be spaced at any
preferred distance away from the
screen. 1 - 1.5 ft apart is common.
Hang the baffles with the
matte side facing the front
of the enclosure and stretch
them to the top of the frame
using one bungee on each
side.
Zip-ties can be used to apply
extra tension if needed.

Page | 10
Attach Wall Panels
The wall panels are marked with colored tabs. The red colored tab marks the
panel for the right wall (as you face the screen). The blue colored tab marks the
left wall. Pictured example shows the right wall panel.
Before attaching the wall panels, orient the panels so that:
1. The sleeved edges are closest to the bottom and front pipes
2. The grommeted edge is closest to the rear pipe
3. The edge with flaps and grommets can be lifted to top of the frame

Pro Enclosure Kit Assembly Instructions & User Manual -V06
To attach the wall panel, you need to slide the sleeved wall panel edges onto
the pipe frame.
First, un-install the “L” fitting at the bottom front of
the frame.
Check for burs – you don’t want to rip the
enclosure material on any sharp ends of the
pipes.
Slide the bottom sleeved edge of
the wall panel onto the bottom
pipe.
Place a block of wood under the
frame to prop it up while sliding the
sleeve on.

Page | 12
Then, slide the front sleeved edge of the wall
panel upward onto the front vertical pipe.
Once the wall panel material is over
both the bottom and front pipes, re-
install the “L” fitting.
Tighten the connector, then attach the
hook-and-loop fasteners that wrap
around corner.
Once the “L” fitting is
reinstalled, slide the
front sleeve to the top of
the frame and secure
with one bungee.
Stretch the bottom
sleeve to the back of the
frame, then up to the top
and secure with one
bungee.

Pro Enclosure Kit Assembly Instructions & User Manual -V06
Secure the corner grommets to the frame using
additional bungees (one connecting in each
direction.)
Alternating from top to side, add more bungees
to continue stretching the panel equally, until all
grommets are attached with bungees.
Check the spacing and use zip ties to straighten
out any sharply curving edges.
Repeat by installing the second wall panel.
Place the bungee ball on the inside for a
clean look once it is fully assembled.

Page | 14
Attach Wall Panel Flaps
It is important to attach the wall panels flaps in the right order.
First, from inside the
enclosure, secure the
wall panel flaps to the
ceiling panel using the
hook-and-loop fasteners.
Next, from the outside of
the enclosure, wrap the
wall panel flap around the
frame and attach it to the
top of the ceiling panel.
When attaching the flaps start in the middle of the pipe and work out.

Pro Enclosure Kit Assembly Instructions & User Manual -V06
Lastly, stretch and smooth
down the corners of the
flaps around the front corner
of the frame.
Check the fit. If you need to
make adjustments to
achieve a smooth corner,
do so now.

Page | 16
Attach the Impact Screen
Orient the impact screen with the hook-and-loop strips facing the inside and
front of the enclosure.
1. Prepare by inserting additional ball
bungees through the screen
grommets with the balls on the back
of the screen.
2. Attach the impact screen to the
frame, beginning with two ball
bungees (one connecting in each
direction) in each of the top two
corners.
3. Secure the bottom two corners.
4. Make any adjustments needed to center the screen.
5. Secure each bungee around the frame, alternating from corner to corner to
keep the screen centered in the frame.
Remember the block
of wood you used to
slide the sleeve on
the pipe?
It comes in handy
here when wrapping
the bungees around
the bottom pipe.
Your Carl’s Place impact screen is designed so that you can remove or add
bungees to adjust the tension for bounceback. Check out the Tips and Tricks in
the back of this manual for more info.

Pro Enclosure Kit Assembly Instructions & User Manual -V06
Install Safety Cushions
There are three different sizes of foam safety cushions included with the
enclosure (bottom – largest, top, and sides – smallest).
Attach the bottom cushion (the one
with the logo) using hook-and-loop
fasteners.
Attach the top cushion.
Attach and tuck in the side cushions (the
two with mitered ends). They cover the
edges between the screen and the wall
panels.
Smooth, nip, tuck, and that’s it!
You’ve got a cushioned golf enclosure!

Page | 18
You’re ready to practice!
Anything else we can help you with?
info@carlofet.com
(608) 352-0002, Monday-Friday, 8am-4pm CT
Scan the QR mountain climber to see our full
walkthrough assembly video.

Pro Enclosure Kit Assembly Instructions & User Manual -V06
Tips and Tricks
How To Minimize Bounceback
Maintain a buffer space. Keep enough space both behind and in front of your
impact screen.
•Place the screen at least 12-16” away from the wall behind it.
•Stand a minimum of 10-12 feet away from the screen.
Adjust for tension. The screen is designed with flexibility in mind. Add or remove
ball bungees as needed, to achieve your desired amount of tension and minimal
bounceback.
Add safety baffles. Our optional safety baffles hang down from the ceiling to
help catch and knock down high-angle shots.
Expect some bounceback. You want the golf ball to gently return to you after
hitting. Find the right balance of tension and minimal bounceback.
Extending the Life of an Impact Screen
Carl’s Place impact screens are heavy-duty fabrics designed to withstand the
high impact of golf balls, however, like any material, they will show wear. Many
of our golf screens are used in commercial facilities, struck all day long. The
frequency of use, as well as the style and ability of the user will all contribute to
the life of a screen.
Prevent your screen from getting dirty.
•Use white balls without dirt, grass or
marker on them.
•Clean your clubs often.
For more information on cleaning and caring for
your screen, scan the QR mop and bucket.

Page | 20
Share Your Setup
Got a sec? We love to feel loved.
If you love your new golf simulator, let’s see it!
Scan the QR code or go to www.carlofet.com/share-with-us to share your new
setup! Pics. Videos. Rave reviews. Or even recommendations.
More of a social creature?
Tag us and throw a quick #mycarlsplace on your post.
We just may feature your golf simulator in our next campaign.
Customers who do not follow the assembly, instructions and tips in this manual increase
their risk of injury. Take proper safety precautions to protect ceilings, walls, windows,
cars and neighboring homes. Keep children, pets and spectators out of swing range. By
using any Carl’s Place product(s), you agree the Terms and Conditions, as well as the
Privacy Policy and any policies referenced on www.carlofet.com.
Thank you for your business!
Carl’s Place LLC, 1650 Putman Pkwy, Milton, WI 53563
Questions? Comments? We welcome your feedback!
www.carlofet.com | info@carlofet.com | (608) 352-0002
Other manuals for Pro Enclosure Kit
2
Table of contents
Popular Enclosure manuals by other brands

Hubbell
Hubbell Killark SJIC Series INSTALLATION, OPERATION & MAINTENANCE DATA SHEET

StarTech.com
StarTech.com RK1219WALH instruction manual

VIPowER
VIPowER VPA-5010KP2F installation guide

ZALMAN
ZALMAN TNN 500AF user manual

LEGRAND
LEGRAND On-Q ENP3050 installation instructions

Peavey
Peavey VB -3 Specification sheet