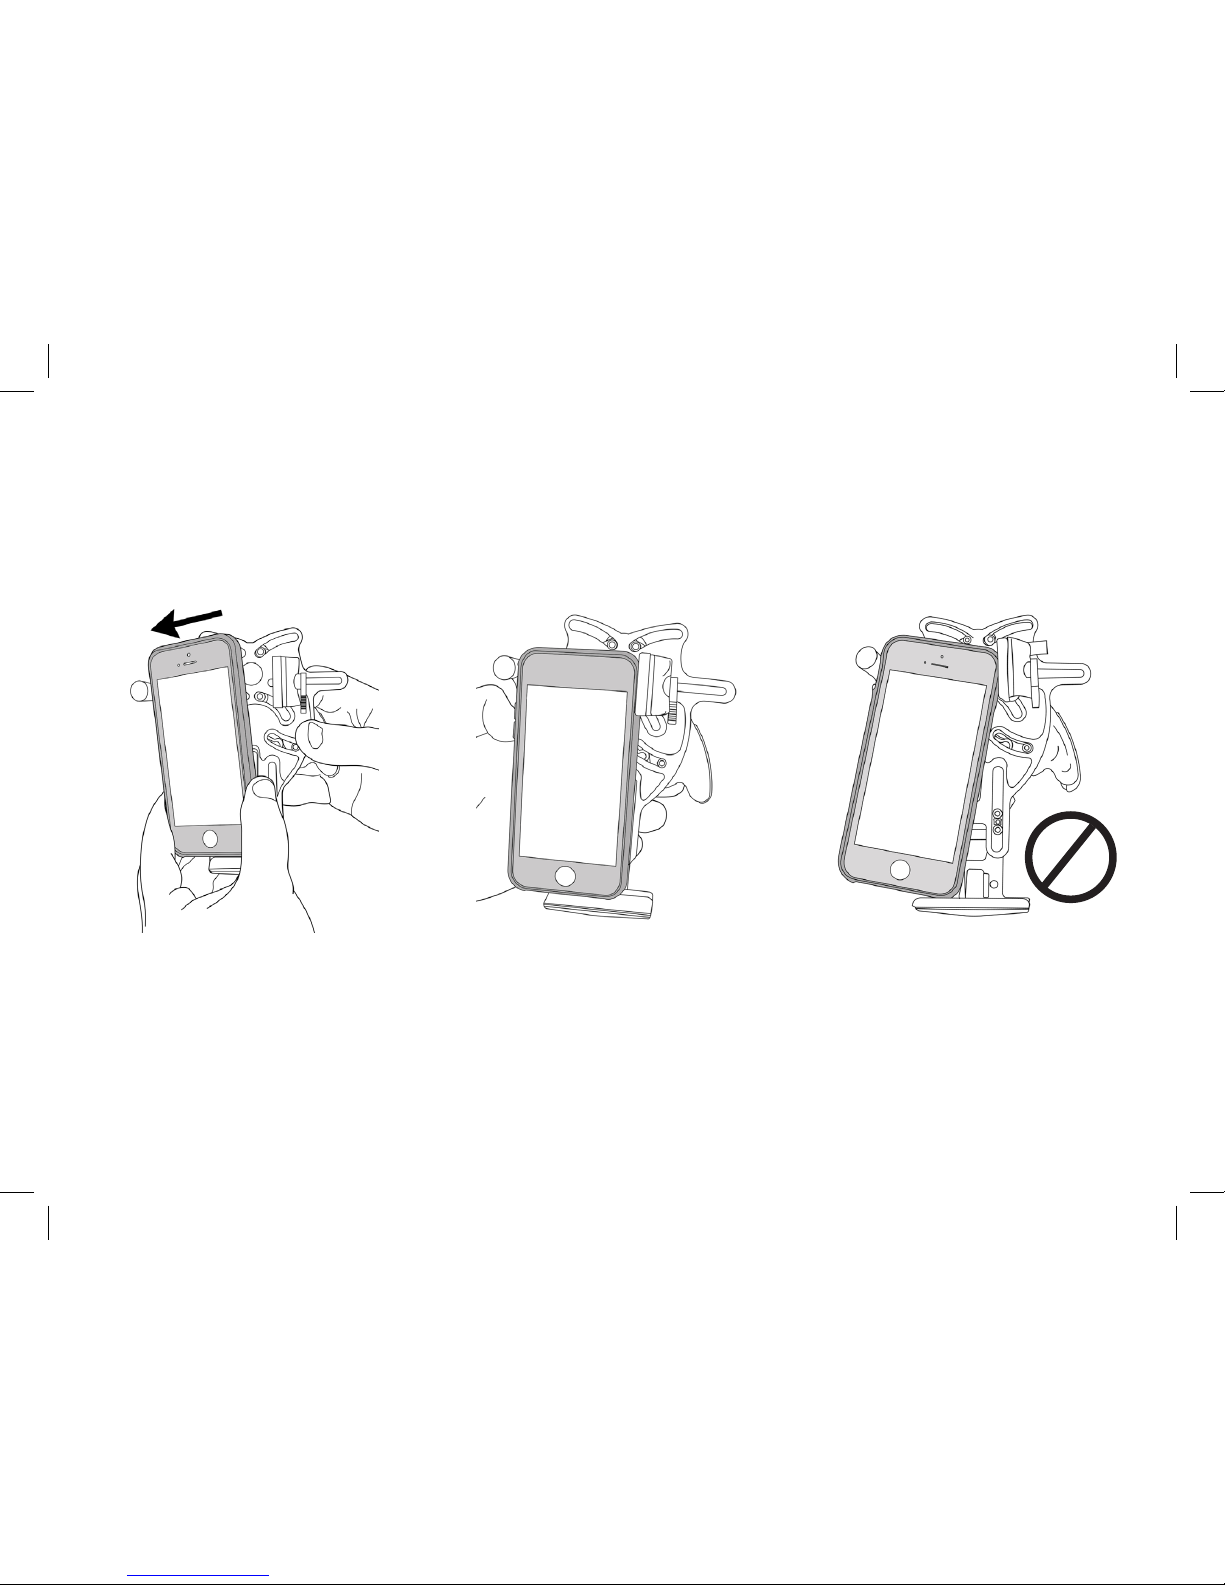
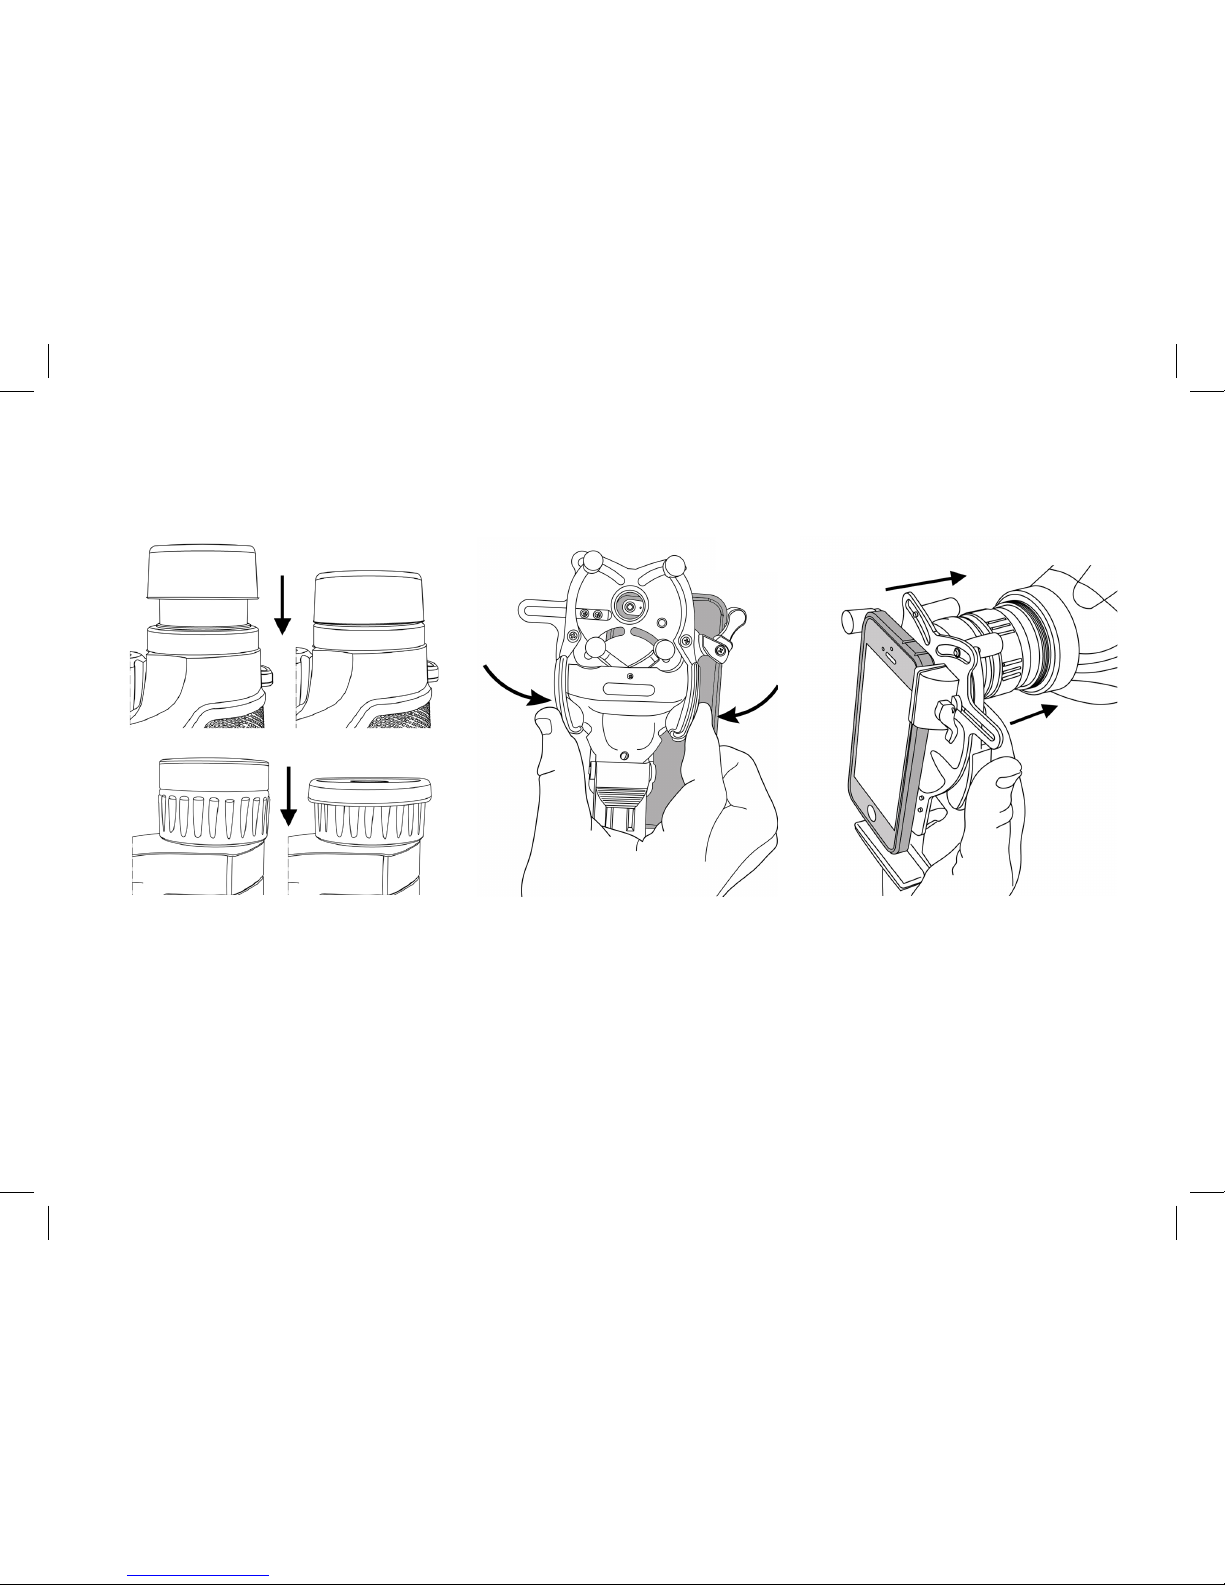
Carson IS-100 User manual

UNIVERSAL
SMARTPHONE OPTICS ADAPTER
Instructions for use
IS-100
Visit www.carson.com/universal
to view our IS-100 tutorial video.
IS-100
IS-100

Table of Contents
Front View Diagram
Rear View Diagram
Inserting Phone
Align & Lock
Attaching to Optic
Troubleshooting
Helpful Usage Tips
Storage / Cleaning Information
Other Uses
Specications
Customer Service
Circular Camera
Cutout
Front View
Left Spring
Loaded Arm
Right
Phone Clamp
2
3
4-5
6-8
9-12
13
14
15
15
15
16
2

Rear View
Circular Camera
Cutout
Optics
Clamp
Bottom Phone
Clamp
Curved Arm
Optics Clamp
Release
Right
Phone Clamp
3

Inserting Phone
Side and bottom of phone should
be ush and parallel to side/bottom
clamps.
Fig. 3 shows the incorrect
phone position.
Place phone into device as
shown in Fig. 1, using left side
of phone to push against left
spring loaded arm.
4
Fig.1 Fig.2 Fig.3

Inserting Phone (cont.)
Fig. 3 shows the incorrect
phone position.
5
Position phone / case as ush
as possible to adapter as
shown in Fig. 4.
Fig.5 shows the incorrect
phone position.
Fig.4 Fig.5

Align & Lock
Center the camera with the center of the
circular cutout on the back of the adapter.
Pull side clamp up to unlock
and adjust.
Push clamp down to lock into place.
6
Fig.6 Fig.7 Fig.8

Align & Lock (cont.)
Pull bottom clamp up to unlock
and adjust.
Center the camera in the circular cutout
on the adapter.
Push clamp down to lock into place.
7
Fig.9 Fig.10 Fig.11

Align & Lock (cont.)
To make sure camera is centered
properly, turn on the camera app.
You should see four green circles in
the outer four corners of your image
as shown in Fig. 14.
Make slight adjustments until camera is
centered in the circular cutout on the
adapter (as shown in Fig. 12).
Figure 13 shows a properly
aligned camera.
8
Fig.1
Fig.12 Fig.13 Fig.14

Attaching to Optic
Once opened, insert eyepiece
of optic into center of grips ush
to adapter and release (see Fig. 17).
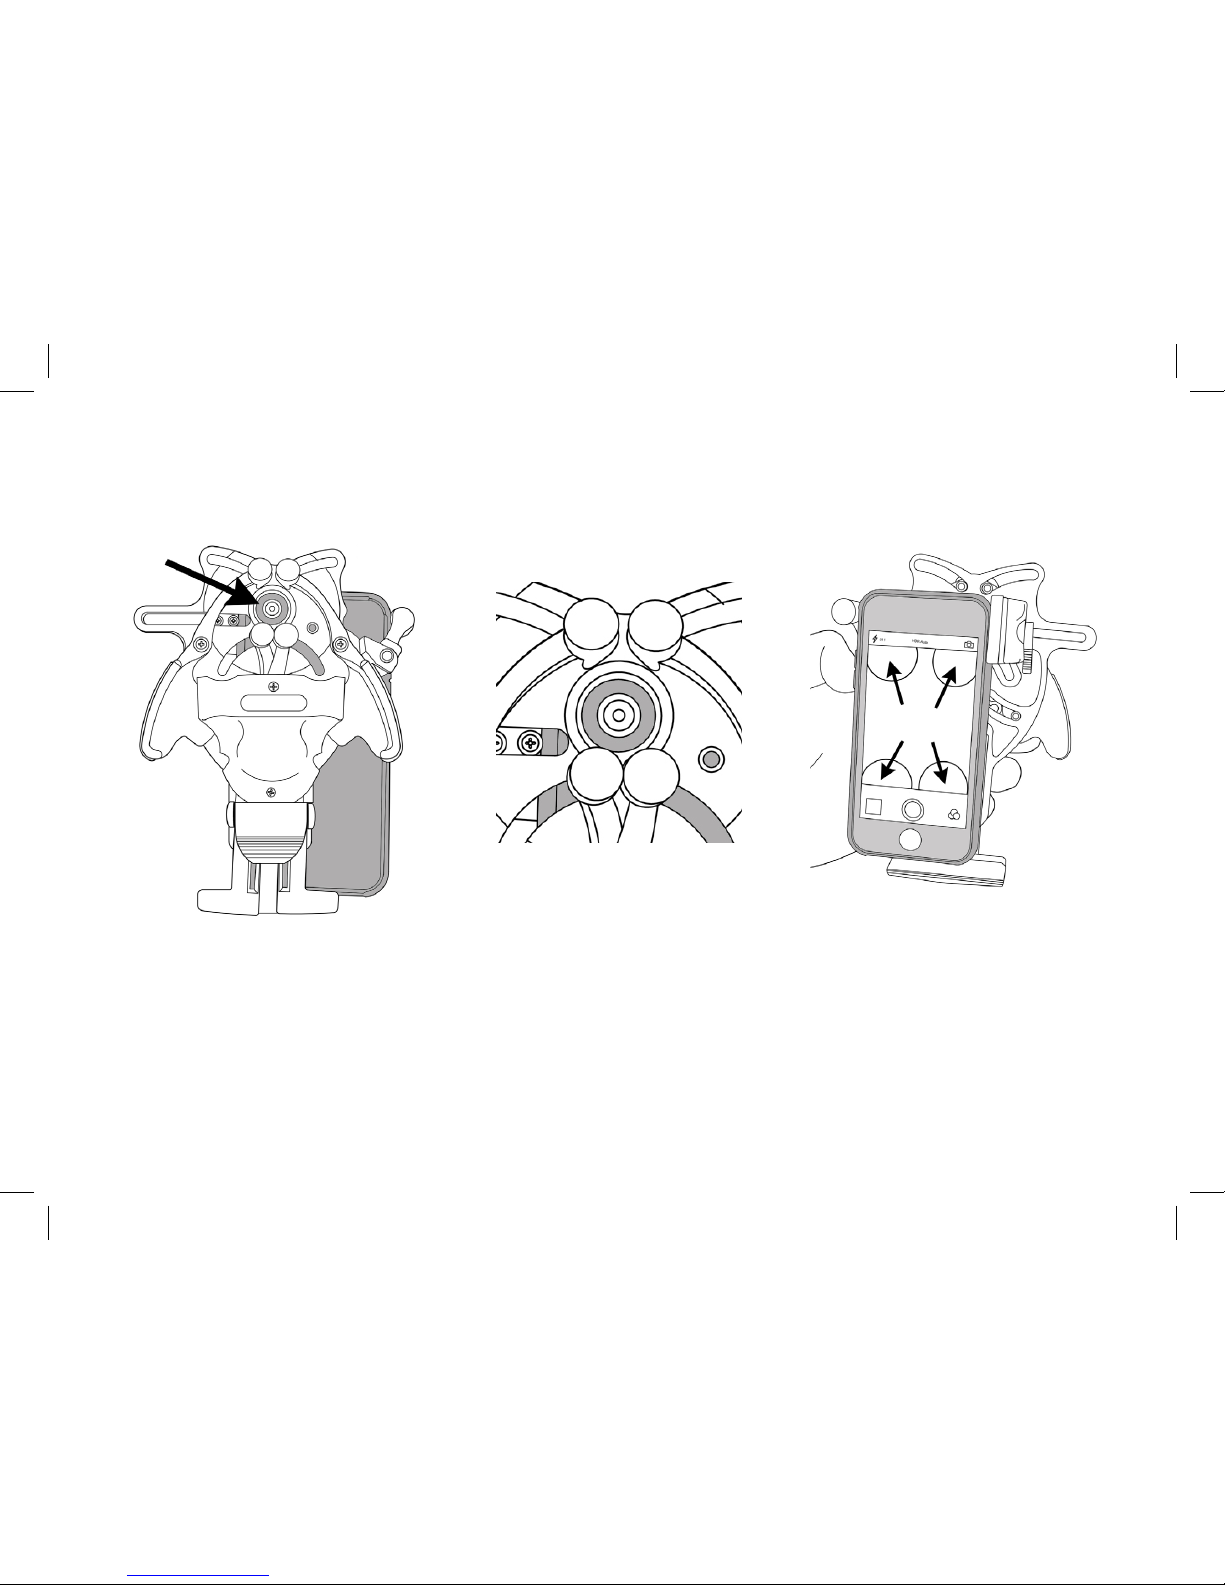
The grips will hold the phone securely to
the optic and centered to the camera.
Make sure adapter is pushed ush to the
eyepiece of your optic.
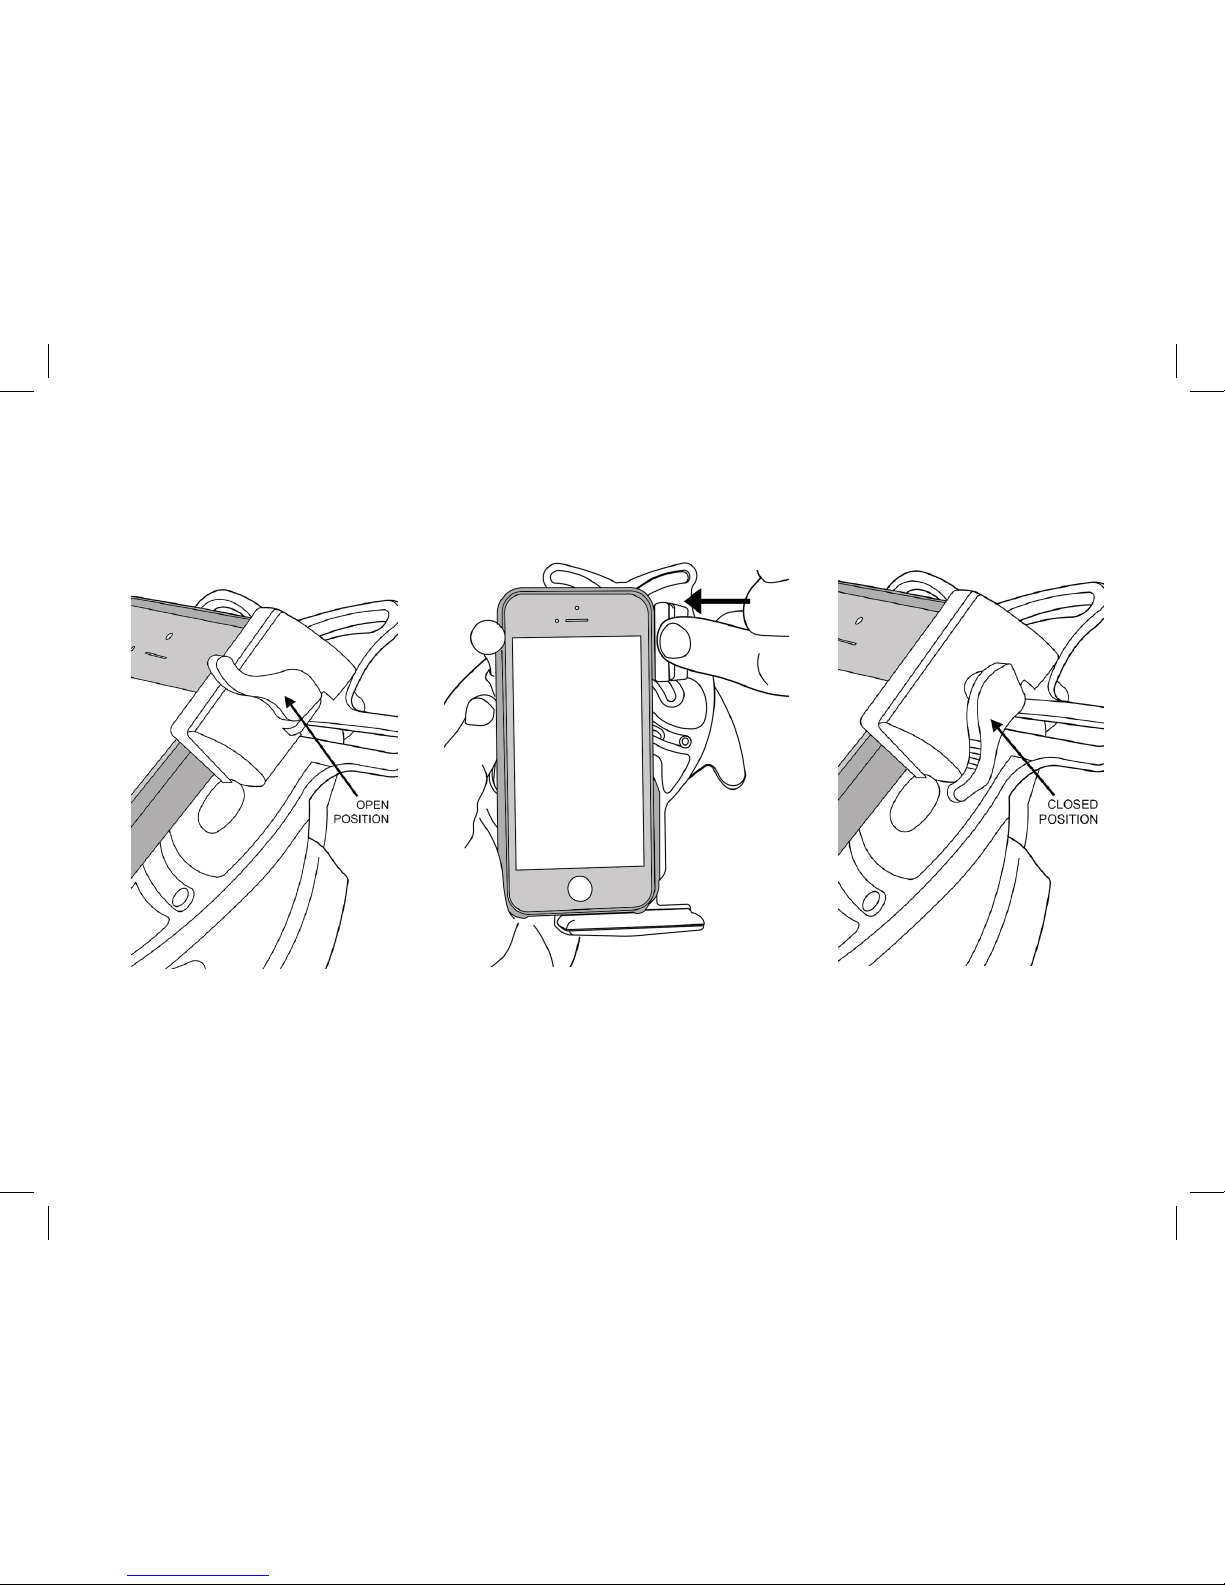
Press curved arms together to open grip
as shown in Fig. 16.
Before attaching to optic, make sure
eyepiece is twisted down to lowest
position. If your optic has roll down
eyecups, remove eyecup completely (if
possible) or roll down the eyecup before
attaching adapter.
9
Fig.16Fig.15 Fig.17

Make sure adapter is ush to the
eyepiece of your optic (as shown in
Fig. 19).
Fig. 20 shows an adapter that is NOT ush
to the eyepiece.
Fig.19
Attaching to Optic (cont.)
Fig.20
10
If your hand is around the phone
while pressing the curved arms you
may inadvertently push the camera
out of alignment (see Fig. 18).
Fig.18

Attaching to Optic (cont.)
Once the optic is attached and the camera is turned on, the image may not
take up the entire screen (see Fig. 22). This is normal and can be corrected by
enlarging the image on the screen digitally or by inserting the included lens
spacer into the adapter.
Phone can be positioned in either portrait or
landscape mode as shown in Fig. 21.
Fig.21 Fig.22
11

Attaching to Optic (cont.)
If your optic has long eye relief it may be necessary to increase the distance
between the camera and the optic to maximize the image size on your screen.
To do so, insert the included lens spacer into the adapter, snap into place
(as shown in Fig. 22) and reattach to optic.
To zoom in your image digitally, pinch and
enlarge the phone screen (as shown in Fig. 21)
until the image lls up your entire screen. For
best image switch your phone to video mode.
12
Fig.21 Fig.22

13
Troubleshooting
TROUBLESHOOTINGGUIDE
PROBLEM POSSIBLECAUSE POSSIBLESOLUTIONS
•IS100adapterisdepressingside •Leftsideclampiscomingintocontact •Useaphonecasewheresidebuttonsarerecessed.
buttonsonyourphone. withsidebuttons. •Adjustsidebuttonsettings(ifpossible).
•Imageonyourscreenisobscured •Opticmaynotbeflushtoadapter. •Makesureopticisflushtoadapter.
bydarkcrescentshape. •Adapterisnotproperlyalignedtophone. •Followinstructionstoproperlyalignadaptertophone.
•Adapterwithphonerotateswhen •Rotatingeyepieceonopticisextended. •Retracteyepieceanduseincludedlensspacerifneeded.
placedinlandscapemodeon •Eyepieceisnotfixedtotubeofoptic. •Trytolocateasetscrewtolockdowneyepiece.Ifnot
optic. available,useapieceoftapetosecuretheeyepieceto
theitembodytopreventitfrommoving.
•Rotatethephone180°topositionitinreverselandscape
mode.Youmayneedtorotateyourphoneorvideo
usingeditingsoftwareonyourcomputer.
•Phonedoesn'tfitinadapter. •Phoneorcaseislargerthan3.8"wide •Ifphoneistoolong,removecaseandtryagain.Ifthat
and5.5"long. doesnotwork,youmayunscrewandremovethe
•Positionofcameracannotalignwith bottomclampandtryagain.
adapter. •Ifyourphoneistooshort,placethephoneinacaseand
•Youhaveaphablet. tryagain.Ifthisdoesn'twork,tryplacingthephonein
thecasewithoutusingthebottomclamp.
•Ifyoustillhaveanissue,pleasecontactourcustomer
supportbyemailorphoneandletusknowwhatphone
modelyouhave.
•TheIS100isnotcompatiblewithphabletphones(ex.
SamsungGalaxyNote).
•TheIS100adapterdoesnotfit •Thedepthofyoureyepieceislessthan •Foreyepiecesbetween14mmand20mmindepth,try
ontheeyepieceofyouroptic. 20mm. insertingthelensspacerbeforeuse.Thisitemcannot
•Youreyepieceistaperedorirregularin securelyattachtoeyepieceslessthan14mmindepth.
shape. •Althoughtherubbergrippingtipsaredesignedtocontour
totheshapeofmosteyepiecesitisrecommendedthat
youtesttheadapterfirsttomakesurethegripsattach
securelybeforeattemptingtouseit.
•Therearereflectionsorbright •Theflashonyourphoneison. •Turnofftheflashfunctiononyourcamera.
spotsinyourphotosandvideos.

Helpful Usage Tips
Phone Tips:
• When attaching adapter to optic, hold adapter from the back by the curved arms only. If your hand is around the phone while pressing the curved
arms you may inadvertently push the camera out of alignment.
• If the eyepiece of your optic has a rubber ap, fold the ap down over the eyepiece or remove if possible.
• If your optic has a twist-up eyepiece, twist the eyepiece down before attaching the adapter.
• Adapter ts many sizes of cases, including some very thick cases and charging cases.
• Long viewing sessions may drain your phone battery. Try a charging case to extend your battery life.
Photography Tips:
• Tap your phone screen on your object of interest to manually force the auto-focus function.
• For videos, you may want to set and lock your focus on your viewing object. For iPhone users, tap and hold the screen where you want to focus
and “AE/AF lock”will be shown on the top of your screen.
• There are many great Apps that will enhance the photographic capabilities of your phone through optics. Apps that allow you to set exposure
and focus manually can expand the potential of the adapter. This is especially helpful for telescopes to set longer exposure times to get the best
images of sky objects.
• Bright light conditions make it hard to see your screen. If your optic has two eyepieces you can put the adapter on one eyepiece and use the
other eyepiece as a viewnder to see your subject better.
• In low light conditions, such as imaging through a telescope or night vision scope, the rubber parts glow in the dark making it easier to use the
adapter. To preserve your own night vision, and maximize the glow in the dark eect, turn your phone screen brightness to its lowest level.
• External vibrations might cause your screen image to shake. For best results mount your optic to a tripod or place on a stable surface.
• Many phones have image stabilization features. Check your phone and turn on this feature if available. If not, there are camera Apps with stabili-
zation features.
• If tapping your screen is causing vibration, you can use a remote shutter to take the photo. For Apple phones, if you attach headphones with a
volume control, you can use the volume buttons on the headphones to operate the camera shutter.
14

Storage/Cleaning Information:
• To avoid damage, always store adapter in protective case when not in use.
• For longest life of springs/plastic, store in dry area at room temperature.
• Do not leave item permanently attached to optical device as this may weaken the springs over time.
• Adapter should be cleaned with soft, damp cloth only. Do not use any chemicals or abrasives.
Other Uses:
Use as a Digital Viewnder:
As a digital viewnder for your optic.
For remote sharing of your video via FaceTime or an equivalent program.
Turn a magnier or loupe into a digital magnier.
Specications
Phones:
• Fits all popular iPhone and Samsung smart phones. Does not t phablet type phones (ex. – Samsung Galaxy Note).
Please go to www.carson.com/universal to view the most recent compatibility list.
• Designed to work best with most phone cases. You do not need to remove your phone from its case.
• Holds most phones up to 3.8” wide and up to 5.5” long (full compatibility depends on camera location of phone model).
• Fits on other similarly sized devices with cameras such as iPods.
Optics:
• Fits optics with outer eyepiece diameter of 20 – 58mm. Eyepieces must be at least 14mm in depth.
• Fits on spotting scopes, binoculars, microscopes, telescopes, night vision devices, borescopes, endoscopes, magniers, loupes, lenses, etc.
• Does not work with riescopes (due to their long eye relief).
15

Customer Service:
We will be happy to help you with any problems you may experience with your Universal Smartphone Optics Adapter.
CarsonOptical•20705thAvenue•Ronkonkoma,NY11779
Tel:631-963-5000Fax:631-427-6749
iPhone® and iPod® are registered trademarks of Apple, Inc., registered in the U.S. and other countries. Samsung® is a registered trademark of Samsung, registered in the U.S. and other countries.
Table of contents
Other Carson Cell Phone Accessories manuals