Caterham Caterham kit User manual

ASSEMBLY GUIDE
EDITION 1.0

ASSEMBLY GUIDE i
Welcome to your new Caterham kit
Building your own Caterham is immensely rewarding and satisfying. Of course, it should be remembered
that you are building a high performance sports car, not a flat-pack wardrobe, so it will be a little challenging
from time to time; but we’ve set out to make it as easy as possible for anyone, whatever their skill level and
help is just a phone call away.
But before you do anything else, pop the kettle on or pour yourself a G&T with a slice; and
READ THE NEXT THREE PAGES – THEY ARE REALLY IMPORTANT
No, they will not be very exciting unfortunately, but they are important nonetheless and you will regret it later
if you don’t.
ASSEMBLY GUIDE
EDITION 1.0
Your feedback and comments are welcome: assemblyguide@caterham.com

ASSEMBLY GUIDE ASSEMBLY GUIDE
ii iii
So there are four important things we need to think about NOW before
picking up a spanner:
• This isn't the only guide you'll need
• When to apply for an IVA test
• Photography (no, really)
• Arranging a post build check
Although we have made this guide as comprehensive as possible, the requirements of IVA change from
time to time and even from test centre to test centre. Therefore, it MUST be read in conjunction with the ‘IVA
Checklist Guide’, the latest version of which can be downloaded from the Caterham website. You’ll find the
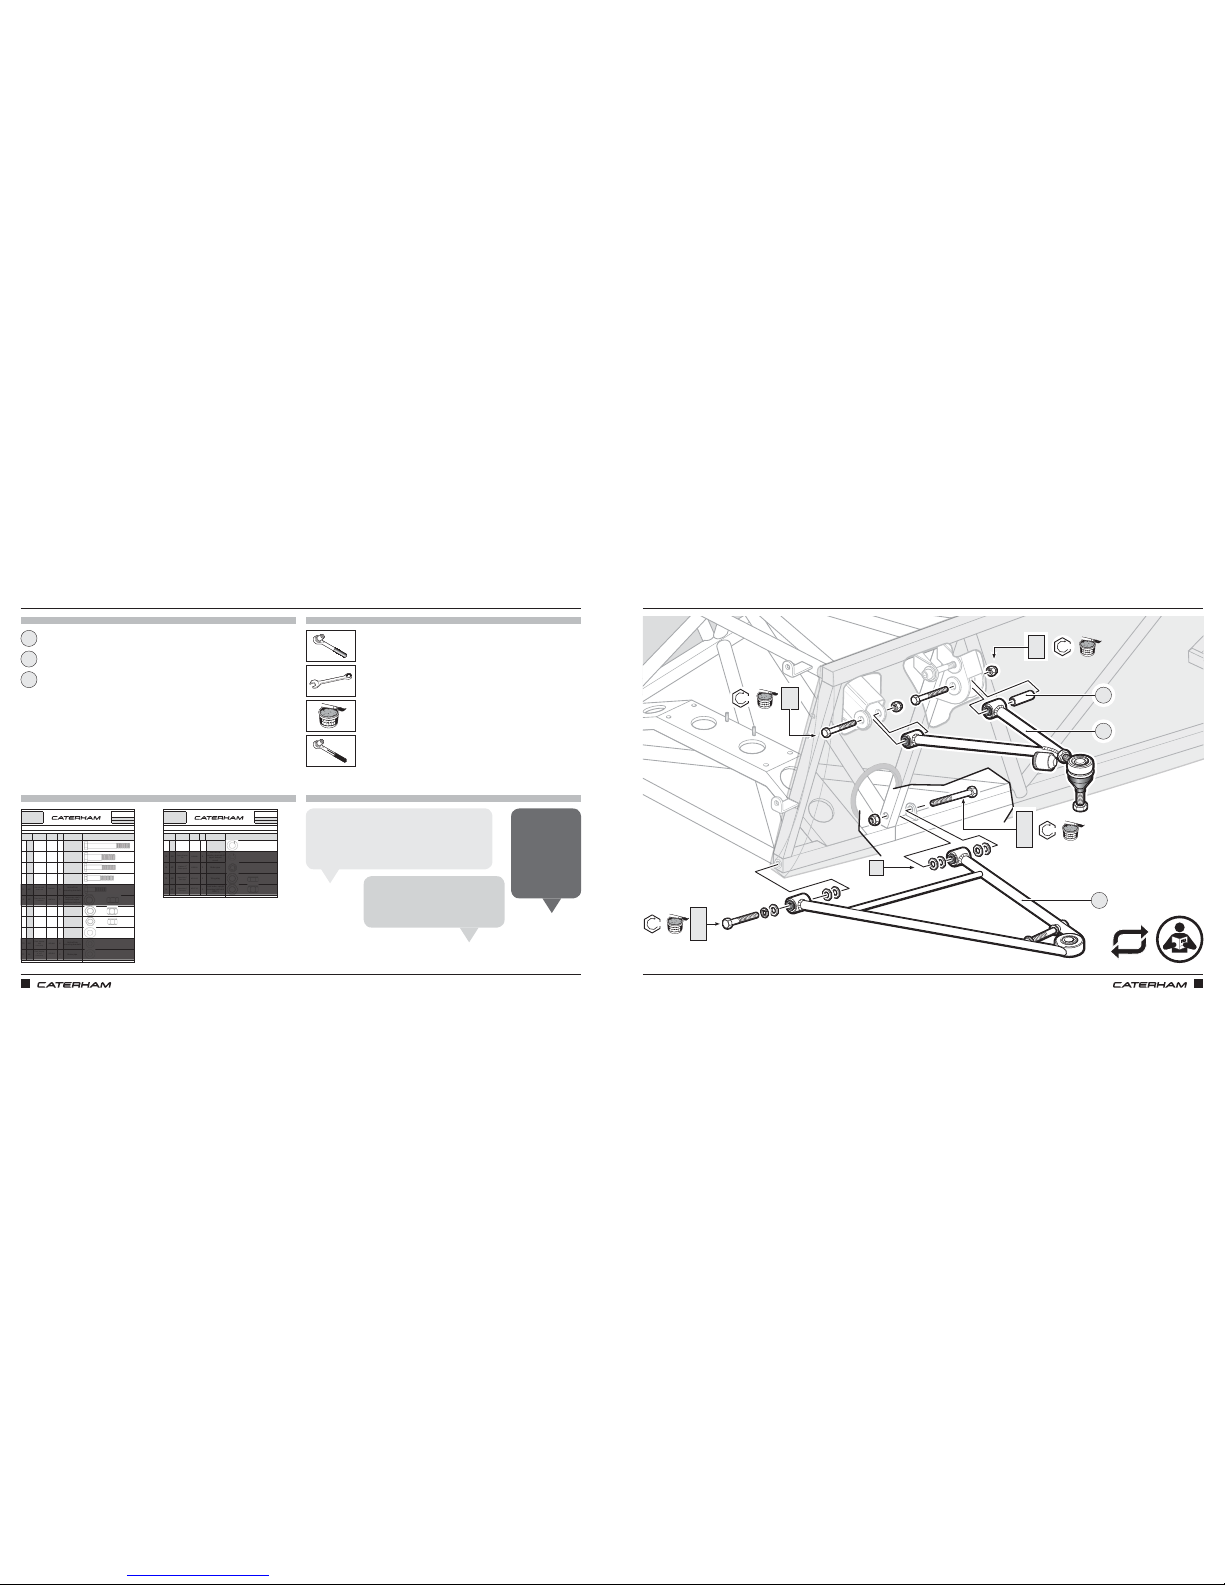
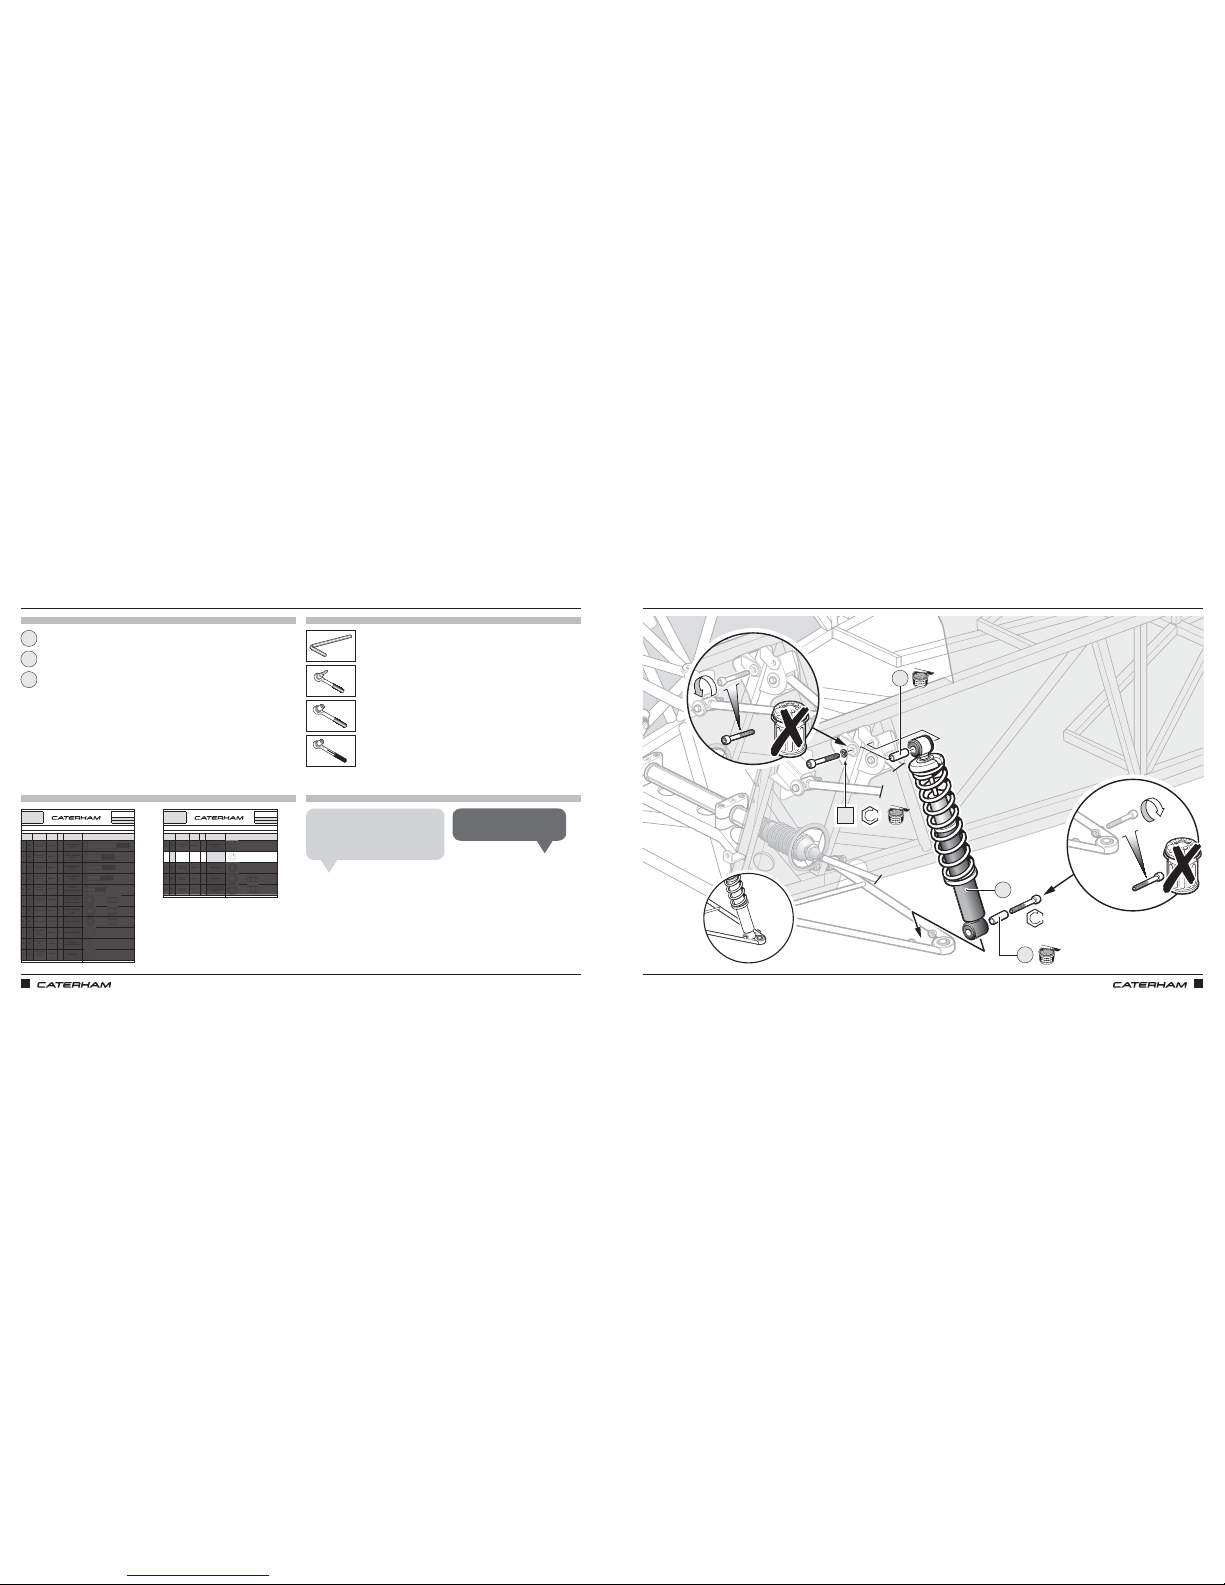
refer-to-IVA-manual symbol in the bottom of each illustration where attention is required. Reading through
it now, will save pain later! Don’t assume that because you’ve found a reference to one item relating to that
page, it is the only one…
Once you have completed the assembly of your Seven, you are required by law to present it for an ‘Individual
Vehicle Approval’ test (better known as IVA), which is conducted by the Vehicle and Operator Services
Agency (VOSA) at a regional test centre.
We STRONGLY recommend that you apply for your IVA appointment at least a month before you think you
will complete your build, to allow for the application form to be processed at the snail’s pace of bureaucracy.
Once accepted, your IVA application is valid for 6 months and test dates can be changed up to a minimum
of 3 working days prior to your appointment with VOSA (any later and you may incur a charge).
The application form and a guide on how to complete it, is contained within an envelope of documents
provided with your kit and which is probably acting as a coaster for your g&t at the moment. Take this
moment to find it and remove it from the garage and place it somewhere safe (and memorable).
VOSA and the DVLA are a suspicious bunch and in order to register your car, you will need to provide proof
that it is amateur built. When you apply for registration, you will need to include photos from various stages
of you build, which will demonstrate to them that it is an ‘amateur build’.
Recruiting a few extras (your kids, your spouse, the cat, etc.) and some props (last year’s Xmas tree, a radio
from the 1980’s and a rusty bike) will all contribute to a more authentic home-garage feel; proving that no
professional help (i.e. commercial workshop/garage) was involved in the build. Of course, feel free to have
yourself working away on the kit in the photos if one of your ‘extras’ can be trusted with the camera (not the
cat; they never get the exposure right).

ASSEMBLY GUIDE
iv v
ASSEMBLY GUIDE
Finally, we know you haven’t started yet, but we need to tell you about the Post Build Inspection now, due to
availability at our service centres and the time it takes to get you a slot. Plan ahead!
What is the Post Build Inspection? This is a free service oered by all Caterham service centres which we
wholeheartedly recommend you take up on prior to your IVA test. It ensures that your car is correctly
assembled and is road-worthy. All safety and operational aspects of your Seven will be checked, concluding
in a road test. This will enable us to advise you of any corrective work that may be required (which we will be
happy to carry out for you*). It is important to note that this is not the same as the IVA test and whilst every
eort will be made to ensure your car passes, there is NO GUARANTEE of a first time IVA pass.
*Obviously any additional work is not for free, but we will speak to you first so you can decide whether you
want to pay us to do the corrections or you want to do them yourself.
REMEMBER: Post Build Inspection slots are in high demand at our service centres and there may be a
two-month lead time at busy times, so please check on availability and book ahead!
All our service centres will be able to oer you a Post Build Inspection and IVA service, where they take the
car to IVA on your behalf. This tends to increase the likelihood of a first time pass and means you don’t need
to take a day out to endure the test, which is beyond dull.
As a guide, the Post Build Inspection through to registration can take around 6 weeks to complete.
That’s it, we’re ready to start assembly
ENJOY

ASSEMBLY GUIDE
vi
MY BUILD NOTES
1
HINTS & TIPS
When using a torque wrench, listen/feel the click
and then stop. It does not need to be any tighter
and you might actually weaken the fixing by
‘over‑torquing’ it. Always wind your torque wrench
setting back to free when you’ve finished with it.
John K
A ‘caphead bolt’ has a circular head with a hexagonal drive
inside it. It is tightened with an allen key or hex drive socket.
Capheads are useful where there is limited space around
the head for a spanner or socket. They look nice too!
Richard T
Generally, metric Nyloc nuts have a
blue nylon insert and imperial ones a
white nylon insert.
Grant P
You can tell if you have ‘wide track suspension’ car by looking at the front
dampers. Wide track has a 25mm long hexagonal spacer between the top
spring retainer and the mounting bush.
Matt T
A bolt size is described by its diameter (e.g. M10=10mm)
by the length not including the head (e.g. 65mm).
James A
A ‘spring washer’ has a split in it and squashes up
closed when a fixing is tightened. It is usually used
under a bolt head to help resist it coming undone.
John S
A ‘nyloc’ nut is one with a nylon insert that gets cut by the bolt
thread, making it resistant to unwinding itself. This means that
they should not be repeatedly re‑used.
Chris B
Thread lock is used to stop
something coming undone, but
it only needs a little drop on
the thread to be effective.
Jamie A
Teabag, boiling water, then the milk, in that order.
Simon L
Left and right are as viewed
from the driver’s seat.
Harrison P
1Nm of torque equals 0.736lbft.
Mick F
When using a spanner, always use the ring end wherever
possible. The open end is really only for those times that access
is too limited for a ring spanner or socket.
Mick A
ASSEMBLY GUIDE
Download the IVA Checklist Guide: www.caterhamcars.com
Book IVA Test
Take plenty of photos
Arrange post build check
This was more fun than I ever expected!

ASSEMBLY GUIDE ASSEMBLY GUIDE
2 3
TOOLS
KEY KEY
SYMBOLS
Repeat on other side
Required torque (where applicable)
S3 / S5 chassis specific instructions
S Pack / R Pack
specific instructions
Fixing item
Item number Advice from factory
professionals
Now is a good time to take
some photos
Reminder to apply for your IVA test
Refer to IVA Checklist Guide
Spanner
Scissors
Grease
Latex gloves
Junior hacksaw
Long nose pliers
Pop rivet gun
Muscle
Pozidrive
screwdriver
Power adhesive
Flat head
screwdriver
Thread lock /
LocTite
LOCTITE
LOCTITE
Tape
Torx
Tape measure
Trolley jack
Torque wrench
WD40
Ruler
Side cutters
Silicon gun
Silicon
Socket wrench
Spray adhesive
Spray lube
Socket wrench
(allen)
Stanley knife
Spirit level
AA
AJ
AM
S3
S5
35
mm
35
mm
Nm
1
FIXINGS
PART
NUMBER QTYUSEDON
1AABM12X100 2Lower wishbone
rear
2ABBM12X652Lower wishbone
front
3ACBM10X65 2Upper wishbone
rear
4ADBM10X60 2Upper wishbone
front
5AEBM8X40 4Anti-roll bar
mounting brackets
6AFNMPH14 1
Temporary use to
help lock upper
wishbone ball joint
7AGNMYF12 2Lower wishbone
rear
8AHNMYF10 4Upper wishbone
9AJWPCM12 18 Lower wishbone
10 AK WPHM84Anti-roll bar
mounting brackets
11 AL WPH3/8 2Brakepipe
Drawings are for illustrative purposes only and are not to scale.
ASERIAL
NUMBER 44
Pack PACKNUMBER
30F015B
FRONT SUSPENSION DeDION CARS (METRIC)
This pack may include extra fasteners to cover different options
ITEM BASIC
DESCRIPTION ILLUSTRATION
BoltM12 x 100
Grade10.9
BoltM12 x 65
Grade10.9
BoltM10 x 65
Grade10.9
BoltM10 x 60
Grade10.9
BoltM8 x 40
Grade10.9
PlainNut M14
x1.5 thread
NylocNut M12
PlainWasher
⅜"x ¾"
Heavyduty
Page 1 of 2
NylocNut M10
PlainWasher
M12
Chamfered
PlainWasher
M8
Heavyduty
PART
NUMBER QTYUSED ON
1AABM12X100 2Lower wishbone
rear
2ABBM12X652Lower wishbone
front
3ACBM10X65 2Upper wishbone
rear
4ADBM10X60 2Upper wishbone
front
5AEBM8X40 4Anti-roll bar
mounting brackets
6AFNMPH14 1
Temporary use to
help lock upper
wishbone ball joint
7AGNMYF12 2Lower wishbone
rear
8AHNMYF10 4Upper wishbone
9AJWPCM12 18 Lower wishbone
10 AK WPHM84Anti-roll bar
mounting brackets
11 AL WPH3/8 2Brake pipe
Drawings are for illustrative purposes only and are not to scale.
ASERIAL
NUMBER 44
Pack PACK NUMBER
30F015B
FRONT SUSPENSION DeDION CARS (METRIC)
This pack may include extra fasteners to cover different options
ITEM BASIC
DESCRIPTION ILLUSTRATION
Bolt M12 x 100
Grade 10.9
Bolt M12 x 65
Grade 10.9
Bolt M10 x 65
Grade 10.9
Bolt M10 x 60
Grade 10.9
Bolt M8 x 40
Grade 10.9
Plain Nut M14
x 1.5 thread
Nyloc Nut M12
Plain Washer
⅜" x ¾"
Heavy duty
Page 1 of 2
Nyloc Nut M10
Plain Washer
M12
Chamfered
Plain Washer
M8
Heavy duty
x4 (Indicates number of each fixing required)
(Greyed out area indicates fixings are not
required for current step)
Drill bit
Axle stand
Combination
spanner
Allen key
Engine hoist
Copper grease
Drill
Cable tie
Assistance
+
REPEAT

ASSEMBLY GUIDE ASSEMBLY GUIDE
4 5
LET’S GET READYLET’S GET READY
PAR TS
FIXINGS
TOOLS
TIPS
x3
When deciding how high your axle stands
should be (the higher the better for working
on), don’t forget that a complete car will
need to come down off them, so make sure
your trolley jack can reach and lift the
height you set them too!
Mick F
Some tape or foam on the
top of the axle stands will
stop them scratching the
chassis.
Matt T

ASSEMBLY GUIDE ASSEMBLY GUIDE
6 7
START WITH THE SUSPENSION WISHBONESSTART WITH THE SUSPENSION WISHBONES
PAR TS
FIXINGS
TOOLS
TIPS
PART
NUMBER QTYUSEDON
1AABM12X100 2Lower wishbone
rear
2ABBM12X652Lower wishbone
front
3ACBM10X65 2Upper wishbone
rear
4ADBM10X60 2Upper wishbone
front
5AEBM8X40 4Anti-roll bar
mounting brackets
6AFNMPH14 1
Temporary use to
help lock upper
wishbone ball joint
7AGNMYF12 2Lower wishbone
rear
8AHNMYF10 4Upper wishbone
9AJWPCM12 18 Lower wishbone
10 AK WPHM84Anti-roll bar
mounting brackets
11 AL WPH3/8 2Brakepipe
Drawings are for illustrative purposes only and are not to scale.
ASERIAL
NUMBER 44
Pack
PACKNUMBER
30F015B
FRONT SUSPENSION DeDION CARS (METRIC)
This pack may include extra fasteners to cover different options
ITEM BASIC
DESCRIPTION ILLUSTRATION
BoltM12 x 100
Grade10.9
BoltM12 x 65
Grade10.9
BoltM10 x 65
Grade10.9
BoltM10 x 60
Grade10.9
BoltM8 x 40
Grade10.9
PlainNut M14
x1.5 thread
NylocNut M12
PlainWasher
⅜"x ¾"
Heavyduty
Page 1 of 2
NylocNut M10
PlainWasher
M12
Chamfered
PlainWasher
M8
Heavyduty
94
PART
NUMBER QTYUSEDON
12 AM WSHM12 2Lower wishbone
front
13 AN WSHM86
Anti-roll bar
mounting brackets &
upper damper
mount
14 AP WSS3/8 2 Brake pipe
15 AR NFYH1/22Wingstay
16 AS NFYF1/22
Front brake, upright
mounting (std track
ONLY)
Drawings are for illustrative purposes only and are not to scale.
ASERIAL
NUMBER 44
Pack PACKNUMBER
30F015B
FRONT SUSPENSION DeDION CARS (METRIC)
This pack may include extra fasteners to cover different options
ITEM BASIC
DESCRIPTION ILLUSTRATION
SpringWasher
M12
NylocNut ½"
Fullheight
Page 2 of 2
SpringWasher
M8
Washer⅜"
Shake-proof
NylocNut ½"
Halfheight
x2
x2
x2
x2
x2
x4
x14
x2
17mm
19mm
Lower wishbone
Wishbone bush sleeve
Upper wishbone
17mm
19mm
1
3
2
For now, only tighten the nuts/bolts lightly and then
torque them up when the car is finished and on the
ground. This sets the bushes correctly and ensures
the best handling.
Harrison P
The big washers are chamfered and
the chamfered side should be towards
the wishbone.
Alex H
Leave bolt AD
loose for now,
as we have to
take it back out
again to put
the headlight
bracket on later.
John K
35
mm
35
mm
81Nm
AB
AJ
AM
1
2
3
AJ
35
mm
35
mm
81Nm
AA
AJ
AG
35
mm
35
mm
47Nm
35
mm
35
mm
47Nm AD
AH
AC
AH
REPEAT

ASSEMBLY GUIDE ASSEMBLY GUIDE
8 9
NOW FOR THE STEERING RACKNOW FOR THE STEERING RACK
PAR TS
FIXINGS
TOOLS
TIPS
PART
NUMBER QTYUSEDON
1BABMCH6X70 4Rack clamps
2BBBF1/4X1.1/2 2Columnclamp
3BCBM8X35 2Column to rack
universal joint
4BDNFYH1/21Steeringwheel boss
5BENFPF1/22Track rod lock nut
6BFNFPFH7/161Column clamp
grubscrew locknut
7BGNMYF8 2Column to rack
universal joint
8BHNMYF6 4Steering rack
clamps
9BJWPH1/2 1Steering wheel boss
10 BK WPH1/4 6Rack clamps and
column clamp
11 BL WSH1/4 2Column clamp
Drawings are for illustrative purposes only and are not to scale.
BSERIAL
NUMBER 55
Pack PACKNUMBER
30S003B
STEERING DeDION CARS (METRIC)
This pack may include extra fasteners to cover different options
ITEM BASIC
DESCRIPTION ILLUSTRATION
CapheadBolt
M6x 70
DIN912
Bolt¼" x 1½"
BoltM8 x 35
Grade8.8
NylocNut ½"
Half height
PlainNut ½"
PlainNut ⁷⁄ ₁₆"
Half height
NylocNut M8
SpringWasher ¼
Heavyduty
Page 1 of 1
NylocNut M6
PlainWasher
½" x 1⅛"
Chamfered
PlainWasher
¼"
Heavyduty
x4
x2
x2
x2
x4
x4
10mm
13mm
Steering rack
Column universal joint
Rack clamps
IVA cover
Track rod end
5mm
13mm
22mm
¾"
1
3
2
5
4
Finding the right IVA cover isn’t
obvious because it is effectively
a long cap. To use it, you cut the
closed end off.
Jamie A
The trackrod end needs to screw on
about 12 turns (it will be properly set
later when the tracking is done).
Matthew H
35
mm
35
mm
11Nm
BE
3
5
35
mm
35
mm
20Nm
BC
BG
BH
BK
BA
2
1
4

ASSEMBLY GUIDE ASSEMBLY GUIDE
10 11
PART
NUMBER QTYUSEDON
1AABM12X100 2Lower wishbone
rear
2ABBM12X652Lower wishbone
front
3ACBM10X65 2Upper wishbone
rear
4ADBM10X60 2Upper wishbone
front
5AEBM8X40 4Anti-roll bar
mounting brackets
6AFNMPH14 1
Temporary use to
help lock upper
wishbone ball joint
7AGNMYF12 2Lower wishbone
rear
8AHNMYF10 4Upper wishbone
9AJWPCM12 18 Lower wishbone
10 AK WPHM84Anti-roll bar
mounting brackets
11 AL WPH3/8 2Brakepipe
Drawings are for illustrative purposes only and are not to scale.
ASERIAL
NUMBER 44
Pack
PACKNUMBER
30F015B
FRONT SUSPENSION DeDION CARS (METRIC)
This pack may include extra fasteners to cover different options
ITEM BASIC
DESCRIPTION ILLUSTRATION
BoltM12 x 100
Grade10.9
BoltM12 x 65
Grade10.9
BoltM10 x 65
Grade10.9
BoltM10 x 60
Grade10.9
BoltM8 x 40
Grade10.9
PlainNut M14
x1.5 thread
NylocNut M12
PlainWasher
⅜"x ¾"
Heavyduty
Page 1 of 2
NylocNut M10
PlainWasher
M12
Chamfered
PlainWasher
M8
Heavyduty
94
PART
NUMBER QTYUSEDON
12 AM WSHM12 2Lower wishbone
front
13 AN WSHM86
Anti-roll bar
mounting brackets &
upper damper
mount
14 AP WSS3/8 2 Brake pipe
15 AR NFYH1/22Wingstay
16 AS NFYF1/22
Front brake, upright
mounting (std track
ONLY)
Drawings are for illustrative purposes only and are not to scale.
ASERIAL
NUMBER 44
Pack PACKNUMBER
30F015B
FRONT SUSPENSION DeDION CARS (METRIC)
This pack may include extra fasteners to cover different options
ITEM BASIC
DESCRIPTION ILLUSTRATION
SpringWasher
M12
NylocNut ½"
Fullheight
Page 2 of 2
SpringWasher
M8
Washer⅜"
Shake-proof
NylocNut ½"
Halfheight
7
7
AND THEN THE DAMPERSAND THEN THE DAMPERS
PAR TS
FIXINGS
TOOLS
TIPS
6mm
Spring / damper
Upper damper eyelet
Lower damper eyelet
6mm
6mm
1
3
2
Put the top of the damper on first
and be careful not to let it swing into
the side of the chassis.
Grant P
The bottom can be a tight fit!
Mick F
x2
Fixings not contained in the pack will be
supplied loosely fitted to the chassis and
the wishbone
35
mm
35
mm
25Nm
1
2
3
35
mm
35
mm
25Nm
AN

ASSEMBLY GUIDE
12 13
PART
NUMBER QTYUSEDON
1AABM12X100 2Lower wishbone
rear
2ABBM12X652Lower wishbone
front
3ACBM10X65 2Upper wishbone
rear
4ADBM10X60 2Upper wishbone
front
5AEBM8X40 4Anti-roll bar
mounting brackets
6AFNMPH14 1
Temporary use to
help lock upper
wishbone ball joint
7AGNMYF12 2Lower wishbone
rear
8AHNMYF10 4Upper wishbone
9AJWPCM12 18 Lower wishbone
10 AK WPHM84Anti-roll bar
mounting brackets
11 AL WPH3/8 2Brakepipe
Drawings are for illustrative purposes only and are not to scale.
ASERIAL
NUMBER 44
Pack
PACKNUMBER
30F015B
FRONT SUSPENSION DeDION CARS (METRIC)
This pack may include extra fasteners to cover different options
ITEM BASIC
DESCRIPTION ILLUSTRATION
BoltM12 x 100
Grade10.9
BoltM12 x 65
Grade10.9
BoltM10 x 65
Grade10.9
BoltM10 x 60
Grade10.9
BoltM8 x 40
Grade10.9
PlainNut M14
x1.5 thread
NylocNut M12
PlainWasher
⅜"x ¾"
Heavyduty
Page 1 of 2
NylocNut M10
PlainWasher
M12
Chamfered
PlainWasher
M8
Heavyduty
94
PART
NUMBER QTYUSEDON
12 AM WSHM12 2Lower wishbone
front
13 AN WSHM86
Anti-roll bar
mounting brackets &
upper damper
mount
14 AP WSS3/8 2 Brake pipe
15 AR NFYH1/22Wingstay
16 AS NFYF1/22
Front brake, upright
mounting (std track
ONLY)
Drawings are for illustrative purposes only and are not to scale.
ASERIAL
NUMBER 44
Pack PACKNUMBER
30F015B
FRONT SUSPENSION DeDION CARS (METRIC)
This pack may include extra fasteners to cover different options
ITEM BASIC
DESCRIPTION ILLUSTRATION
SpringWasher
M12
NylocNut ½"
Fullheight
Page 2 of 2
SpringWasher
M8
Washer⅜"
Shake-proof
NylocNut ½"
Halfheight
ASSEMBLY GUIDE
1 x ⅛
IT’S TIME FOR THE WINGSTAYSIT’S TIME FOR THE WINGSTAYS
PAR TS
FIXINGS
TOOLS
TIPS
19mm
22mm
¾"
22mm
Wingstay
Front brake & upright assembly
x2
x2
1
2
WIDE
TRACK
35
mm
35
mm
54Nm
35
mm
35
mm
81Nm
35
mm
35
mm
61Nm
AS
AR
STANDARD TRACK
Some of the fixings
required and shown
on the drawings,
such as the ball
joint nut, are already
on the part and not
in the fixing pack.
Anthony L
Use the plain
nut to pull the
top ball joint
home before
using a nyloc,
otherwise the
thread will spin.
Chris N
The drilled hole is for the side repeater earth that we’ll fit later. It’s easier to
drill from the top and down through both sides of the tube, rather than through
one side from the bottom (where the earth will be fixed).
Tiago O
Put the ‘upright’ into the lower
wishbone joint then attach
the steering before tightening
the bottom nut. This stops it
all swinging around hitting the
side of the chassis.
John S
1
2
"
REPEAT
35
mm
35
mm
54Nm

ASSEMBLY GUIDE
14 15
Have you applied for your IVA yet?Now is a good time to take some photos
ASSEMBLY GUIDE

ASSEMBLY GUIDE ASSEMBLY GUIDE
16 17
LET THERE BE LIGHTS
7
7
LET THERE BE LIGHTS
PAR TS
FIXINGS
TOOLS
TIPS
PART
NUMBER QTYUSED ON
1CA71080 6Indictor assembly to
indicator pod
2CB71077 2Side repeater earth
on wingstay
3CC71079 4Rear light cluster
upper fixing
4CD71078 4Rear light cluster
lower fixing
5CENMYF6 2
Horn bracket to
steering rack
platform
(160/270/310)
6CFWPH1/4 2
Horn bracket to
steering rack
platform
(160/270/310)
7CGBM8X50 1
Through steering
rack platform &
spacer
(420)
8CHWPH5/162Bolt head/nut
9CINMYF8 1Horn bolt
Drawings are for illustrative purposes only and are not to scale.
BASIC
DESCRIPTION ILLUSTRATION
Screw10 x ¾"
BlackSupaflange
Page 1 of 1
Screw12 x 1"
Selftapping
Screw8 x ½"
BlackSupaflange
Screw12 x 1½"
Selftapping
LIGHTING & HORNS
ITEM
Pack 45
SERIAL
NUMBER
PACKNUMBER
30L002B
C
NylocNut M6
PlainWasher
¼"
Heavyduty
BoltM8 x 5
Grade8.8
PlainWasher
5/16"
NylocNut
M8
x6
Headlight assembly
Indicator assembly
Indicator pod
17mm
24mm
17mm
1
3
2
The wiring for the headlights is attached to the chassis when
you receive your kit. The wires go through the hole in the end
of the headlight bracket and out of the other hole in order to
go up into the headlight and over to the indicator.
Jamie A
Headlight bracket
4
1
2
3
4
CA
REPEAT

ASSEMBLY GUIDE ASSEMBLY GUIDE
18 19
PART
NUMBER QTYUSEDON
1AABM12X100 2Lower wishbone
rear
2ABBM12X652Lower wishbone
front
3ACBM10X65 2Upper wishbone
rear
4ADBM10X60 2Upper wishbone
front
5AEBM8X40 4Anti-roll bar
mounting brackets
6AFNMPH14 1
Temporary use to
help lock upper
wishbone ball joint
7AGNMYF12 2Lower wishbone
rear
8AHNMYF10 4Upper wishbone
9AJWPCM12 18 Lower wishbone
10 AK WPHM84Anti-roll bar
mounting brackets
11 AL WPH3/8 2Brakepipe
Drawings are for illustrative purposes only and are not to scale.
ASERIAL
NUMBER 44
Pack
PACKNUMBER
30F015B
FRONT SUSPENSION DeDION CARS (METRIC)
This pack may include extra fasteners to cover different options
ITEM BASIC
DESCRIPTION ILLUSTRATION
BoltM12 x 100
Grade10.9
BoltM12 x 65
Grade10.9
BoltM10 x 65
Grade10.9
BoltM10 x 60
Grade10.9
BoltM8 x 40
Grade10.9
PlainNut M14
x1.5 thread
NylocNut M12
PlainWasher
⅜"x ¾"
Heavyduty
Page 1 of 2
NylocNut M10
PlainWasher
M12
Chamfered
PlainWasher
M8
Heavyduty
94
PART
NUMBER QTYUSEDON
12 AM WSHM12 2Lower wishbone
front
13 AN WSHM86
Anti-roll bar
mounting brackets &
upper damper
mount
14 AP WSS3/8 2 Brake pipe
15 AR NFYH1/22Wing stay
16 AS NFYF1/22
Front brake, upright
mounting (std track
ONLY)
Drawings are for illustrative purposes only and are not to scale.
ASERIAL
NUMBER 44
Pack PACKNUMBER
30F015B
FRONT SUSPENSION DeDION CARS (METRIC)
This pack may include extra fasteners to cover different options
ITEM BASIC
DESCRIPTION ILLUSTRATION
SpringWasher
M12
NylocNut ½"
Fullheight
Page 2 of 2
SpringWasher
M8
Washer⅜"
Shake-proof
NylocNut ½"
Halfheight
LAST PART OF THE FRONT SUSPENSION: CONNECTING THE TWO SIDES TOGETHERLAST PART OF THE FRONT SUSPENSION: CONNECTING THE TWO SIDES TOGETHER
PAR TS
FIXINGS
TOOLS
TIPS
x4
x4
13mm
Anti-roll bar
Anti-roll bar rubber
Anti-roll bar bracket
Anti-roll bar dust cover
Anti-roll bar ball
x4
LOCTITE
LOCTITE
1
3
2
5
4
Getting the assembled anti‑roll
bar fully into both cups on the
upper wishbone can be a bit of a
fight. It’s made of springy stuff,
so don’t worry that you are
bending it.
Jamie A
Use four small cable
ties to secure the
dust cover.
Mick F
Grease the balls and cups generously.
Matt T
Check that the colour of the
mounting rubbers matches the
colour spot on the bar.
John K
1
2
3
4
5
AE
AK
AN
35
mm
35
mm
20Nm
LOCTITE
LOCTITE
REPEAT

ASSEMBLY GUIDE ASSEMBLY GUIDE
20 21
PART
NUMBER QTYUSEDON
1AABM12X100 2Lower wishbone
rear
2ABBM12X652Lower wishbone
front
3ACBM10X65 2Upper wishbone
rear
4ADBM10X60 2Upper wishbone
front
5AEBM8X40 4Anti-roll bar
mounting brackets
6AFNMPH14 1
Temporary use to
help lock upper
wishbone ball joint
7AGNMYF12 2Lower wishbone
rear
8AHNMYF10 4Upper wishbone
9AJWPCM12 18 Lower wishbone
10 AK WPHM84Anti-roll bar
mounting brackets
11 AL WPH3/8 2Brakepipe
Drawings are for illustrative purposes only and are not to scale.
ASERIAL
NUMBER 44
Pack
PACKNUMBER
30F015B
FRONT SUSPENSION DeDION CARS (METRIC)
This pack may include extra fasteners to cover different options
ITEM BASIC
DESCRIPTION ILLUSTRATION
BoltM12 x 100
Grade10.9
BoltM12 x 65
Grade10.9
BoltM10 x 65
Grade10.9
BoltM10 x 60
Grade10.9
BoltM8 x 40
Grade10.9
PlainNut M14
x1.5 thread
NylocNut M12
PlainWasher
⅜"x ¾"
Heavyduty
Page 1 of 2
NylocNut M10
PlainWasher
M12
Chamfered
PlainWasher
M8
Heavyduty
94
PART
NUMBER QTYUSEDON
12 AM WSHM12 2Lower wishbone
front
13 AN WSHM86
Anti-roll bar
mounting brackets &
upper damper
mount
14 AP WSS3/8 2 Brake pipe
15 AR NFYH1/22Wing stay
16 AS NFYF1/22
Front brake, upright
mounting (std track
ONLY)
Drawings are for illustrative purposes only and are not to scale.
ASERIAL
NUMBER 44
Pack PACKNUMBER
30F015B
FRONT SUSPENSION DeDION CARS (METRIC)
This pack may include extra fasteners to cover different options
ITEM BASIC
DESCRIPTION ILLUSTRATION
SpringWasher
M12
NylocNut ½"
Fullheight
Page 2 of 2
SpringWasher
M8
Washer⅜"
Shake-proof
NylocNut ½"
Halfheight
7
7
PAR TS
FIXINGS
TOOLS
TIPS
Brake hose
1
FITTING THE BRAKE HOSES FITTING THE BRAKE HOSES
13mm (x2)
⁄"
The hose will want to curve once fitted.
Make sure the curve points towards
the front of the car.
Khalfani D
Brake hoses come in
packs of 3: 2 front, 1 back.
Anthony L
1
x2
x2

ASSEMBLY GUIDE ASSEMBLY GUIDE
22 23
1 x 8mm
PAR TS
FIXINGS
TOOLS
TIPS
10mm
Horn kit (x2)
Bolt for spacer
Spacer (miscellaneous box)
13mm
6mm
1
3
2
LET'S MAKE SOME NOISE
1 x 8mm
LET'S MAKE SOME NOISE
Miscellaneous box
270/310/360 420
1
3
1
1 x 8mm
2

ASSEMBLY GUIDE ASSEMBLY GUIDE
24 25
PAR TS
FIXINGS
TOOLS
TIPS
PART
NUMBER QTYUSED ON
1DABM8X50 1 Expansion tank
bracket to chassis
2DBSF1/4X3/4 1Expansion tank to
bracket
3DCSM6X20 4SV radiator bracket
4DD30Z1072A 4Fanbrackets to fan
5DESPHM6X164Fan to radiator
cowling - SV only
6DFNMYF6 8
x4 Fan to radiator
x4 SV radiator
bracket
7DGNMPF8 8Radiator bobbi n
8DHNFYF1/41Expansion tank
bracket
9DIWPH1/4 13
8 x SV rad bracket
4 x Fan fixings
1 x Expansion tank
braket
10 DJ WPH5/164Radiatorbobbin
back
11 DK WPH5/17X7/84Radiatorbobbin
front
Drawings are for illustrative purposes only and are not to scale.Page 1 of 2
BoltM8 X 50
Grade8.8
PlainWasher
5/16"
Heavyduty
NylocNut 1/4"
PlainWasher 1/4"
Heavyduty
PlainWasher
5/16"X 7/8"
Heavyduty
SetscrewM6X16
PanheadPozi
NylocNut M6
PlainNut M8
SetscrewM8X20
Grade8.8
COOLING SIGMA
This pack may include extra fasteners to cover different options
ITEM BASIC
DESCRIPTION ILLUSTRATION
BoltM6 X 16 wi th
squaresection
Setscrew 1/4"
X3/4"
DSERIAL
NUMBER 44
Pack PACKNUMBER
30C047B
PART
NUMBER QTYUSED ON
12 DL WPH1/4X7/8 1Expansion tank
bracket
13 DM WSH5/1798 x Radiator bobbin
1 x Expansion tank
14 DN SGT25-40 6
2x U shape hose to
water rail
2x Top radiator hose
2x Bottom radiator hos e
15 DO SGT23-35 2
1 x Engine outlet to
big T piece
1 x Engine outlet to
heater inlet
16 DP SGT16-25 18
6x Heater inlet/outlet
3x Big T-piece
1x Expansion tank
2x Modine
4x Dry Sump
2x Submarine
17 DQ SGT8-16 6Expansion tank
small T-piece
18 DR 1610-01015 12 Cowlingflap
Drawings are for illustrative purposes only and are not to scale.Page 1 of 2
PlainWasher
1/4"X 7/8"
Heavyduty
Page 1 of 2
Rivet- Black
5/32"X 0.47"
HoseClip
17- 25mm
HoseClip
8- 16mm
HoseClip
30- 40mm
HoseClip
23- 35mm
COOLING SIGMA
This pack may include extra fasteners to cover different options
ITEM BASIC
DESCRIPTION ILLUSTRATION
SpringWasher
5/16"
Heavyduty
DSERIAL
NUMBER 44
Pack PACKNUMBER
30C047B
x4
x4
x8
x4
x4
x4
13mm
10mm
Radiator
Fan
Fan brackets (x2)
Radiator bobbins (x4)
13mm
x8
1
3
2
4
FITTING THE RADIATOR ON THE STANDARD CHASSIS FITTING THE RADIATOR ON THE STANDARD CHASSIS
The fan may have four
plastic legs or feet
that slot into it.
Vincent M
DD
42
1
DJ
3DF
DI
DG
DM
DK
270/310/360
STANDARD CHASSIS
The fan may have a
'flat' section on the
rim. This should be
at the top.
James S
Be careful to tighten
the fan on gently
and just with a nip.
Lloyd D

26 27
PART
NUMBER QTYUSED ON
1DABM8X50 1 Expansion tank
bracket to chassis
2DBSF1/4X3/4 1Expansion tank to
bracket
3DCSM6X20 4SV radiator bracket
4DD30Z1072A 4Fanbrackets to fan
5DESPHM6X164Fan to radiator
cowling - SV only
6DFNMYF6 8
x4 Fan to radiator
x4 SV radiator
bracket
7DGNMPF8 8Radiator bobbi n
8DHNFYF1/41Expansion tank
bracket
9DIWPH1/4 13
8 x SV rad bracket
4 x Fan fixings
1 x Expansion tank
braket
10 DJ WPH5/164Radiatorbobbin
back
11 DK WPH5/17X7/84Radiatorbobbin
front
Drawings are for illustrative purposes only and are not to scale.Page 1 of 2
BoltM8 X 50
Grade8.8
PlainWasher
5/16"
Heavyduty
NylocNut 1/4"
PlainWasher 1/4"
Heavyduty
PlainWasher
5/16"X 7/8"
Heavyduty
SetscrewM6X16
PanheadPozi
NylocNut M6
PlainNut M8
SetscrewM8X20
Grade8.8
COOLING SIGMA
This pack may include extra fasteners to cover different options
ITEM BASIC
DESCRIPTION ILLUSTRATION
BoltM6 X 16 wi th
squaresection
Setscrew 1/4"
X3/4"
DSERIAL
NUMBER 44
Pack PACKNUMBER
30C047B
PART
NUMBER QTYUSED ON
12 DL WPH1/4X7/8 1Expansion tank
bracket
13 DM WSH5/1798 x Radiator bobbin
1 x Expansion tank
14 DN SGT25-40 6
2x U shape hose to
water rail
2x Top radiator hose
2x Bottom radiator hos e
15 DO SGT23-35 2
1 x Engine outlet to
big T piece
1 x Engine outlet to
heater inlet
16 DP SGT16-25 18
6x Heater inlet/outlet
3x Big T-piece
1x Expansion tank
2x Modine
4x Dry Sump
2x Submarine
17 DQ SGT8-16 6Expansion tank
small T-piece
18 DR 1610-01015 12 Cowlingflap
Drawings are for illustrative purposes only and are not to scale.Page 1 of 2
PlainWasher
1/4"X 7/8"
Heavyduty
Page 1 of 2
Rivet- Black
5/32"X 0.47"
HoseClip
17- 25mm
HoseClip
8- 16mm
HoseClip
30- 40mm
HoseClip
23- 35mm
COOLING SIGMA
This pack may include extra fasteners to cover different options
ITEM BASIC
DESCRIPTION ILLUSTRATION
SpringWasher
5/16"
Heavyduty
DSERIAL
NUMBER 44
Pack PACKNUMBER
30C047B
ASSEMBLY GUIDEASSEMBLY GUIDE
PAR TS
FIXINGS
TOOLS
TIPS
x4
x4
x8
Brackets
1
3
2
5
4
THE RADIATOR MOUNTING FOR THE WIDE-BODIED CHASSIS IS SLIGHTLY DIFFERENTTHE RADIATOR MOUNTING FOR THE WIDE-BODIED CHASSIS IS SLIGHTLY DIFFERENT
Radiator
Fan
Fan brackets (x2)
Radiator bobbins (x4)
13mm
10mm
10mm
13mm
270/310/360
WIDE CHASSIS
5
1
DG
DM
DK
DD
4
2
DF
DI
3
DJ
DC
DI
DF

PART
NUMBER QTYUSED ON
1DABM8X50 1 Expansion tank
bracket to chassis
2DBSF1/4X3/4 1Expansion tank to
bracket
3DCSM6X20 4SV radiator bracket
4DD30Z1072A 4Fanbrackets to fan
5DESPHM6X164Fan to radiator
cowling - SV only
6DFNMYF6 8
x4 Fan to radiator
x4 SV radiator
bracket
7DGNMPF8 8Radiator bobbi n
8DHNFYF1/41Expansion tank
bracket
9DIWPH1/4 13
8 x SV rad bracket
4 x Fan fixings
1 x Expansion tank
braket
10 DJ WPH5/164Radiatorbobbin
back
11 DK WPH5/17X7/84Radiatorbobbin
front
Drawings are for illustrative purposes only and are not to scale.Page 1 of 2
BoltM8 X 50
Grade8.8
PlainWasher
5/16"
Heavyduty
NylocNut 1/4"
PlainWasher 1/4"
Heavyduty
PlainWasher
5/16"X 7/8"
Heavyduty
SetscrewM6X16
PanheadPozi
NylocNut M6
PlainNut M8
SetscrewM8X20
Grade8.8
COOLING SIGMA
This pack may include extra fasteners to cover different options
ITEM BASIC
DESCRIPTION ILLUSTRATION
BoltM6 X 16 wi th
squaresection
Setscrew 1/4"
X3/4"
DSERIAL
NUMBER 44
Pack PACKNUMBER
30C047B
PART
NUMBER QTYUSED ON
12 DL WPH1/4X7/8 1Expansion tank
bracket
13 DM WSH5/1798 x Radiator bobbin
1 x Expansion tank
14 DN SGT25-40 6
2x U shape hose to
water rail
2x Top radiator hose
2x Bottom radiator hos e
15 DO SGT23-35 2
1 x Engine outlet to
big T piece
1 x Engine outlet to
heater inlet
16 DP SGT16-25 18
6x Heater inlet/outlet
3x Big T-piece
1x Expansion tank
2x Modine
4x Dry Sump
2x Submarine
17 DQ SGT8-16 6Expansion tank
small T-piece
18 DR 1610-01015 12 Cowlingflap
Drawings are for illustrative purposes only and are not to scale.Page 1 of 2
PlainWasher
1/4"X 7/8"
Heavyduty
Page 1 of 2
Rivet- Black
5/32"X 0.47"
HoseClip
17- 25mm
HoseClip
8- 16mm
HoseClip
30- 40mm
HoseClip
23- 35mm
COOLING SIGMA
This pack may include extra fasteners to cover different options
ITEM BASIC
DESCRIPTION ILLUSTRATION
SpringWasher
5/16"
Heavyduty
DSERIAL
NUMBER 44
Pack PACKNUMBER
30C047B
2928
Lower hose 110mm (cut from long length)
4
PAR TS
FIXINGS
TOOLS
TIPS
x2
10mm
7mm
19mm
Heater
Heater cable
Valve
Upper hose 120mm (cut from long length)
x4
1
3
2
5
THINGS ARE HEATING UP THINGS ARE HEATING UP
Remember to remove bungs
from heater.
Jamie A
It’s worth re‑tightening after a couple
of uses of car.
John S
3
1
DP
44
DE
2
Use 7mm for jubilee clips but not
too tight!
Chris B
5
ASSEMBLY GUIDEASSEMBLY GUIDE

ASSEMBLY GUIDE ASSEMBLY GUIDE
30 31
KEEPING THE AIR CLEANKEEPING THE AIR CLEAN
PAR TS
FIXINGS
TOOLS
TIPS
Air box
Rubber mounts
Air filter
Trim
8mm
1
3
2
4
2
1
4
3
Bobbins are screwed into
the car by hand.
John K
Unmarked bag:
• M5 (x6)
• Spring (x6)
• Flats (x6)
• Nylocs M5 (x3)
• ⁄ washers (x3)
• ¾ washers (x3)
• Screws (x20)
Table of contents
Other Caterham Automobile manuals