Certa CT18VRECSWA User manual


Table of Contents
General Tool Safety Warnings......................................................................................................2
Work Area........................................................................................................................................2
Electrical Safety.............................................................................................................................2
Personal Safety..............................................................................................................................2
Power Tool Use and Care..........................................................................................................3
Battery Tool Use and Care........................................................................................................3
Safety Warnings for Reci rocating Saw.............................................................................4
Im ortant Safety Instructions for Battery Charger........................................................4
Im ortant Safety Instructions for the Battery Pack.......................................................5
Symbols.................................................................................................................................................6
Product Information.........................................................................................................................6
Layout................................................................................................................................................7
Charging Battery Pack.....................................................................................................................7
Reci rocating Saw O erations....................................................................................................8
Lock-Off Button.............................................................................................................................8
Variable S eed Controlled Switch Trigger.........................................................................8
Blade Clam Trigger....................................................................................................................8
General Cutting..............................................................................................................................8
Plunge Cutting...............................................................................................................................9
Metal Cutting..................................................................................................................................9
Maintenance and Servicing............................................................................................................9
Troubleshooting...............................................................................................................................10
1

General Tool Safety Warnings
Save all warnings and instructions for future reference.
The term “ ower tool” refers to your mains o erated (corded) ower tool or
battery-o erated (cordless) ower tool.
Work Area
1. Kee your work area clean and well lit. Cluttered benches and dark areas
invite accidents.
2. Do not o erate ower tools in ex losive atmos heres, such as in the
resence of flammable liquids, gases, or dust. Power tools create s arks
which may ignite the dust or fumes.
3. Kee bystanders and children away while o erating a ower tool.
Distractions can cause you to lose control.
Electrical Safety
1. Power tool lugs must match the outlet. Never modify the lug in any
way. Do not use any ada ter lugs with earthed (grounded) ower tools.
Unmodified lugs and matching outlets will reduce risk of electric shock.
2. Avoid body contact with grounded surfaces such as i es, radiators,
ranges and refrigerators. There is an increased risk of electric shock if your
body is grounded.
3. Do not ex ose ower tools to rain or wet conditions. Water entering a
ower tool will increase the risk of electric shock.
4. Do not abuse the cord. Never use the cord to carry the tools or ull the
lug from an outlet. Kee cord away from heat, oil, shar edges or moving
arts. Re lace damaged cords immediately. Damaged cords increase the
risk of electric shock.
5. When o erating a ower tool outdoors, use an extension cord suitable for
outdoor use. Use of a cord suitable fir outdoor use reduces the risk of
electric shock.
6. If o erating a ower tool in a dam location is unavoidable, use a Ground
Fault Circuit Interru ter (GFCI) rotected su ly. Use of a GFCI reduces
the risk of electric shock.
Personal Safety
1. Stay alert, watch what you are doing and use common sense when
o erating a ower tool. Do not use tool while tired or under the influence
of drugs, alcohol, or medication. A moment of inattention while o erating
ower tools may result in serious ersonal injury.
2. Use ersonal rotective equi ment. Always wear eye rotection. Safety
equi ment such as dust mask, non-skid safety shoes, hard hat, or hearing
rotection used for a ro riate conditions will reduce ersonal injuries.
3. Prevent unintentional starting. Ensure the switch is in the off- osition
before connecting to ower source and/or battery ack, icking u or
carrying the tool. Carrying ower tools with your finger on the switch or
2

energizing ower tools that have the switch on invites accidents.
4. Dress ro erly. Do not wear loose clothing or jewellery. Kee your hair,
clothing, and gloves away from moving arts. Loose clothes, jewelry, or
long hair can be caught in moving arts.
5. Remove adjusting keys or wrenches before turning the tool on. A wrench
or a key that is left attached to a rotating art of the tool may result in
ersonal injury.
6. Do not overreach. Kee ro er footing and balance at all times. The
enables better control of the ower tool in unex ected situations.
7. Only use safety equi ment that has been a roved by an a ro riate
standards agency. Una roved safety equi ment may not rovide
adequate rotection. Eye rotection must be ANSI-a roved and
breathing rotection must be NIOSH-a roved for the s ecific hazards in
the work area.
Power Tool Use and Care
1. Do not force tool. Use the correct tool for your a lication. The correct
tool will do the job better and safer at the rate for which it is designed.
2. Do not use tool if switch does not turn it on or off. Any ower tool that
cannot be controlled with the switch is dangerous and must be re aired.
3. Disconnect the lug from the ower source and/or the battery ack from
the ower tool before making any adjustments, changing accessories, or
storing the tool. Such reventive safety measures reduce risk of starting
the tool accidentally.
4. Store idle ower tools out of the reach of children and other untrained
ersons. Power tools are dangerous in the hands of untrained users.
5. Maintain tools with care. Check for misalignment or binding of moving
arts, breakage of arts and any other condition that may affect the
ower tool’s o eration. If damaged, have the ower tool re aired before
use. Many accidents are caused by oorly maintained ower tools.
6. Kee cutting tools shar and clean. Pro erly maintained tools with shar
cutting edges are less likely to bind and are easier to control.
7. Use only accessories that are recommended by the manufacturer for your
model. Accessories that may be suitable for one tool may become
hazardous when used on another tool.
Battery Tool Use and Care
1. Ensure the switch is in the off osition before inserting battery ack. Insert
the battery ack into ower tools that have the switch on invites
accidents.
2. Recharge only with the charger s ecified by the manufacturer. A charger
that is suitable for one ty e of battery ack may create a risk of fire when
used with another battery ack.
3. Use ower tools only with s ecifically designated battery acks. Use of
any other battery acks may create a risk of injury and fire.
4. When battery ack is not in use, kee it away from other metal objects
like a er cli s, coins, keys, nails, screws, or other small metal objects that
can make a connection from one terminal to another. Shorting the battery
3

terminals together may cause burns or a fire.
5. Under abusive conditions, liquid may be ejected from the battery, avoid
contact. If contact accidentally occurs, flush with water. If liquid contacts
eyes, additionally seek medical hel . Liquid ejected from the battery may
cause irritation or burns.
Safety Warnings for Reciprocating Saw
•Hold t e tool by t e insulated gripping surfaces w en performing an
operation w ere t e cutting tool may contact idden iring or its own
cord. Contact with a “live” wire will make ex osed metal arts of the tool
“live” and shock the o erator.
•Use extra caution w en cutting over ead and pay particular attention to
over ead wires w ic may be idden from view. Antici ate the ath of
falling branches and debris ahead of time.
•Keep ands away from cutting area. Never reac underneat material for
any reason. Hold the front of the saw by gras ing the contoured gri ing
area. Do not insert fingers or thumb into the vicinity of the reci rocating
blade and blade clam . Do not stabilise the saw by gri ing the shoe.
•Keep blades s arp. Dull blades may cause the saw to swerve or stall
under ressure.
•Avoid prolonged contact wit dust from power sanding, sawing,
grinding, drilling and ot er construction activities. Wear rotective
clothing and wash ex osed areas with soa and water. Allowing dust to
get into the eyes and mouth or to lay on the skin may romote the
absorbtion of harmful chemicals.
•WARNING: Use of t is tool can generate and/or disperse dust, w ic
may cause serious and permanent respiratory issues. Always use
NIOSH/OSHA a roved res iratory rotection a ro riate for the dust
ex osure. Direct articles away from the face and body.
•CAUTION: Wear appropriate earing protection during use. Under some
conditions and durations of use, noise from this roduct may contribute to
hearing loss.
•WARNING: Do not operate t is tool for long periods of time. Vibrations
caused by the o eration action of this tool may cause ermanent injury to
fingers, hands and arms. Use clothes to rovide extra cushioning, take
frequent rest breaks and limit the amount of use er day.
Important Safety Instructions for Battery C arger
•Before using battery c arger, read all instructions and cautionary
markings on battery c arger, battery pack, and product using battery.
•Use only t e c arger w ic accompanied your product or direct
replacement. Do not substitute any other charger. Use only same su lier
a roved chargers with your roduct.
•Do not disassemble c arger or operate t e c arger if it as received a
s arp blow, been dropped or ot erwise damaged in any way. Incorrect
reassembly may result in a risk of electric shock, electrocution or fire.
•Do not rec arge battery in damp or wet environment. Do not expose
c arger to rain or snow. If battery case is cracked or ot erwise damaged,
4

do not insert into c arger. Battery short or fire may result.
•C arge only same supplier approved rec argeable batteries. See
Functional Descri tion and S ecifications. Other ty es of batteries may
burst causing ersonal injury and damage.
•C arge battery pack in temperatures above 0ºC and below 45ºC. Store
tool and battery pack in locations w ere temperatures will not exceed
49ºC. This is im ortant to revent serious damage to the battery cells.
•Pull by plug rat er t an cord w en disconnecting c arger or w en
disconnecting cords using t e daisy c ain feature. This will reduce risk of
damage to electric lug and cord.
•Make sure t at cord is located so t at it will not be stepped on, tripped
over, or ot erwise subjected to damage or stress.
•Do not use an extension cord unless it is absolutely necessary. Use of
im ro er extension cord could result in risk of fire, electric shock, or
electrocution.
•Do not operate c arger wit damaged cords or plugs — have them
re laced immediately.
•Disconnect t e c arger from t e outlet before attempting any cleaning.
T is will reduce t e risk of electric s ock. Removing the battery ack will
not reduce this risk.
Important Safety Instructions for t e Battery Pack
•Do not incinerate t e battery pack even if it is severely damaged or is
completely worn out. The battery ack can ex lode in a fire. Toxic fumes
and materials are created when lithium ion battery acks are burned.
•Do not c arge or use battery in explosive atmosp eres, suc as in t e
presence of flammable liquids, gases or dust. Inserting or removing the
battery from the charger may ignite the dust or fumes.
•If battery contents come into contact wit t e skin, immediately was
area wit mild soap and water. If battery liquid gets into the eye, rinse
water over the o en eye for 15 minutes or until irritation ceases. If medical
attention is needed, the battery electrolyte is com osed of a mixture of
liquid organic carbonates and lithium salts.
•Contents of opened battery cells may cause respiratory irritation.
Provide fresh air. If sym toms ersist, seek medical attention.
•C arge t e battery packs only in t e c arger w ic accompanied your
product.
•DO NOT splas or immerse in water or ot er liquids. This may cause
remature cell failure.
•Do not store or use t e tool and battery pack in locations w ere t e
temperature may reac or exceed 40°C (suc as outside s eds or metal
buildings in summer).
•W en batteries are not in tool or c arger, keep t em away from metal
objects.
•DO NOT put batteries into fire or expose to ig eat. They may ex lode.
5

Symbols
The following symbols or initials may be used on the tool. Please see below to
learn their meaning. Pro er inter retation of these symbols will allow you to
o erate the tool better and safer.
Symbol Name Designation/Explanation
V Volts Voltage
A Am eres Current
Hz Hertz Frequency (cycles er second)
Kg Kilograms Weight
Min Minutes Time
s Seconds Time
Ø Diameter Size of drill bits, grinding wheel etc..
noNo load s eed Rotational s eed at no load
…/min Revolutions or
reci rocation er minute
Revolutions, strokes, surface s eed,
orbits etc.. er minute
0 Off osition Zero s eed, zero torque...
Arrow Action in the direction of the arrow
Direct current Ty e or a characteristic of current
Read manual symbol Alerts user to refer to the manual
Wear eye rotection Alerts user to wear eye rotection
Class II construction Double insulated construction tools
Product Information
Rated Voltage 18V
No Load S eed 0 – 2800/min
Blade Stroke 7/8 inch (22mm)
Blade Change Toolless
Battery Pack 18V 1000mAh Li-ion Battery Pack
Charging Time 1 hour
Charger Ada ter In ut: 100-240V 50-60Hz
Out ut: 21V 2A
6
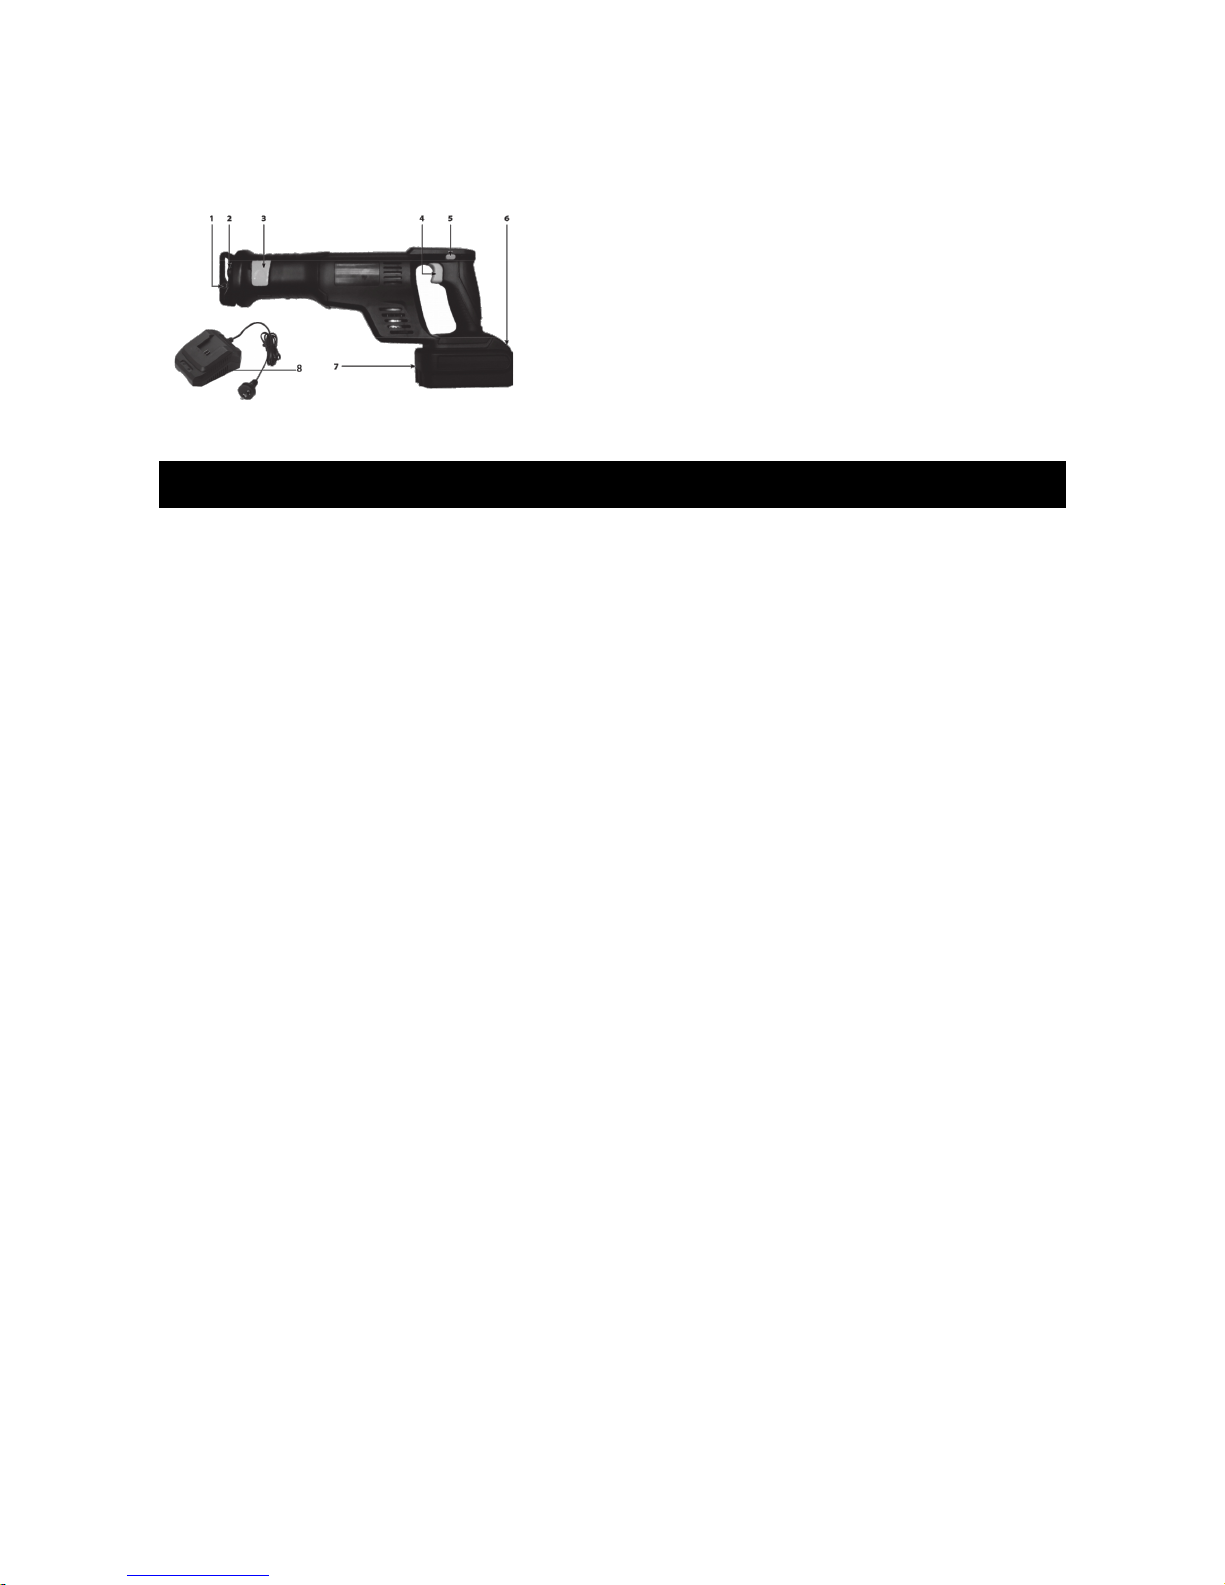
Layout
1. Shoe (Base) 2. Blade Holder
3. Blade Clam Trigger 4. Switch Trigger
5. Lock-off Button 6. Battery Release Button
7. Battery Pack 8. Battery Charger
C arging Battery Pack
1. Remove the battery ack (7) from the handle, ressing the ush lock
button (6) downwards to do so.
2. Check that your mains voltage is the same as that marked on the rating
late of the battery charger. Plug the mains lug of the charger into the
mains socket outlet, turn on the ower the green LED will illuminate.
3. Push the battery ack onto the battery charger. The green LED
extinguishes and the red LED will illuminate,which indicate that the
battery ack is being charged.
4. When the charging eriod is com leted after a rox 1 hour, the green
LED will illuminate and the red LED will extinguish.
5. The tem erature of the battery ack may rise slightly during the charging
o eration. This is normal. If the green LED extinguishes during charging,
the tem erature is either above or below the erfect charging
tem erature. In this case, ull the lug of the charger and charge the
battery in an environment in which the tem erature is either warmer or
colder.
If the battery ack fails to become charged, lease check
•whether there is voltage at the socket-outlet
•whether there is ro er contact at the charging contacts on the charger.
If the battery continues to fail charging, lease contact the Kogan customer
su ort team.
To ensure that the battery ack rovides long service you should take care to
recharge it rom tly.
You must recharge the battery ack when you notice that the ower of the
cordless screwdriver dro s.
Never fully discharge the battery ack. This will cause the battery ack to
develo a defect.
7

Reciprocating Saw Operations
To revent serious injury from accidental o eration, turn the Power Switch of
the tool to the “OFF” osition and disconnect the battery ack from the tool
before assembly or making any adjustments to the tool.
Always wear eye rotection when using this tool
Lock-Off Button
Your saw is equi ed with a lock-off button (5) which reduces the ossibility of
accidental starting. The lock-off button is located on the handle above the
switch trigger (4). You must de ress the lock-off button in order to ull the
switch trigger.
The lock resets each time the trigger is released.
Note: You can de ress the lock-off button on either the left or right side.
Variable Speed Controlled Switc Trigger
This tool has a variable s eed switch (4) that delivers higher s eed with
increased trigger ressure.
S eed is controlled by the ressure you a ly to the trigger.
To turn your saw ON, de ress the lock-off button and ull the switch trigger
down. Release the switch trigger to turn your saw OFF.
Blade Clamp Trigger
WARNING: Always remove the battery ack before inserting or removing a
blade. Failure to remove the battery ack from the saw could result in
accidental starting, causing ossible serious ersonal injury.
To install the blade into the saw:
1. O en blade clam trigger to its fully o en osition.
2. Insert blade shank from the front, aligning the hole in the
shank of the blade and blade clam with the in in the
saw bar.
3. Close the blade clam trigger.
To remove the blade from the saw:
1. O en the blade clam trigger to its full o en osition.
2. Remove blade.
General Cutting
CAUTION: Before cutting any ty e of material, be sure it is firmly anchored or
clam ed to revent sli ing.
•Hold your saw firmly in front of, and clearly away from you.
•Make sure the saw blade is clear of any foreign material. Be sure the
material to be cut is held firmly. Small work ieces should be clam ed in a
vice or with clam s to the work bench or table. Mark the line to cut clearly.
8
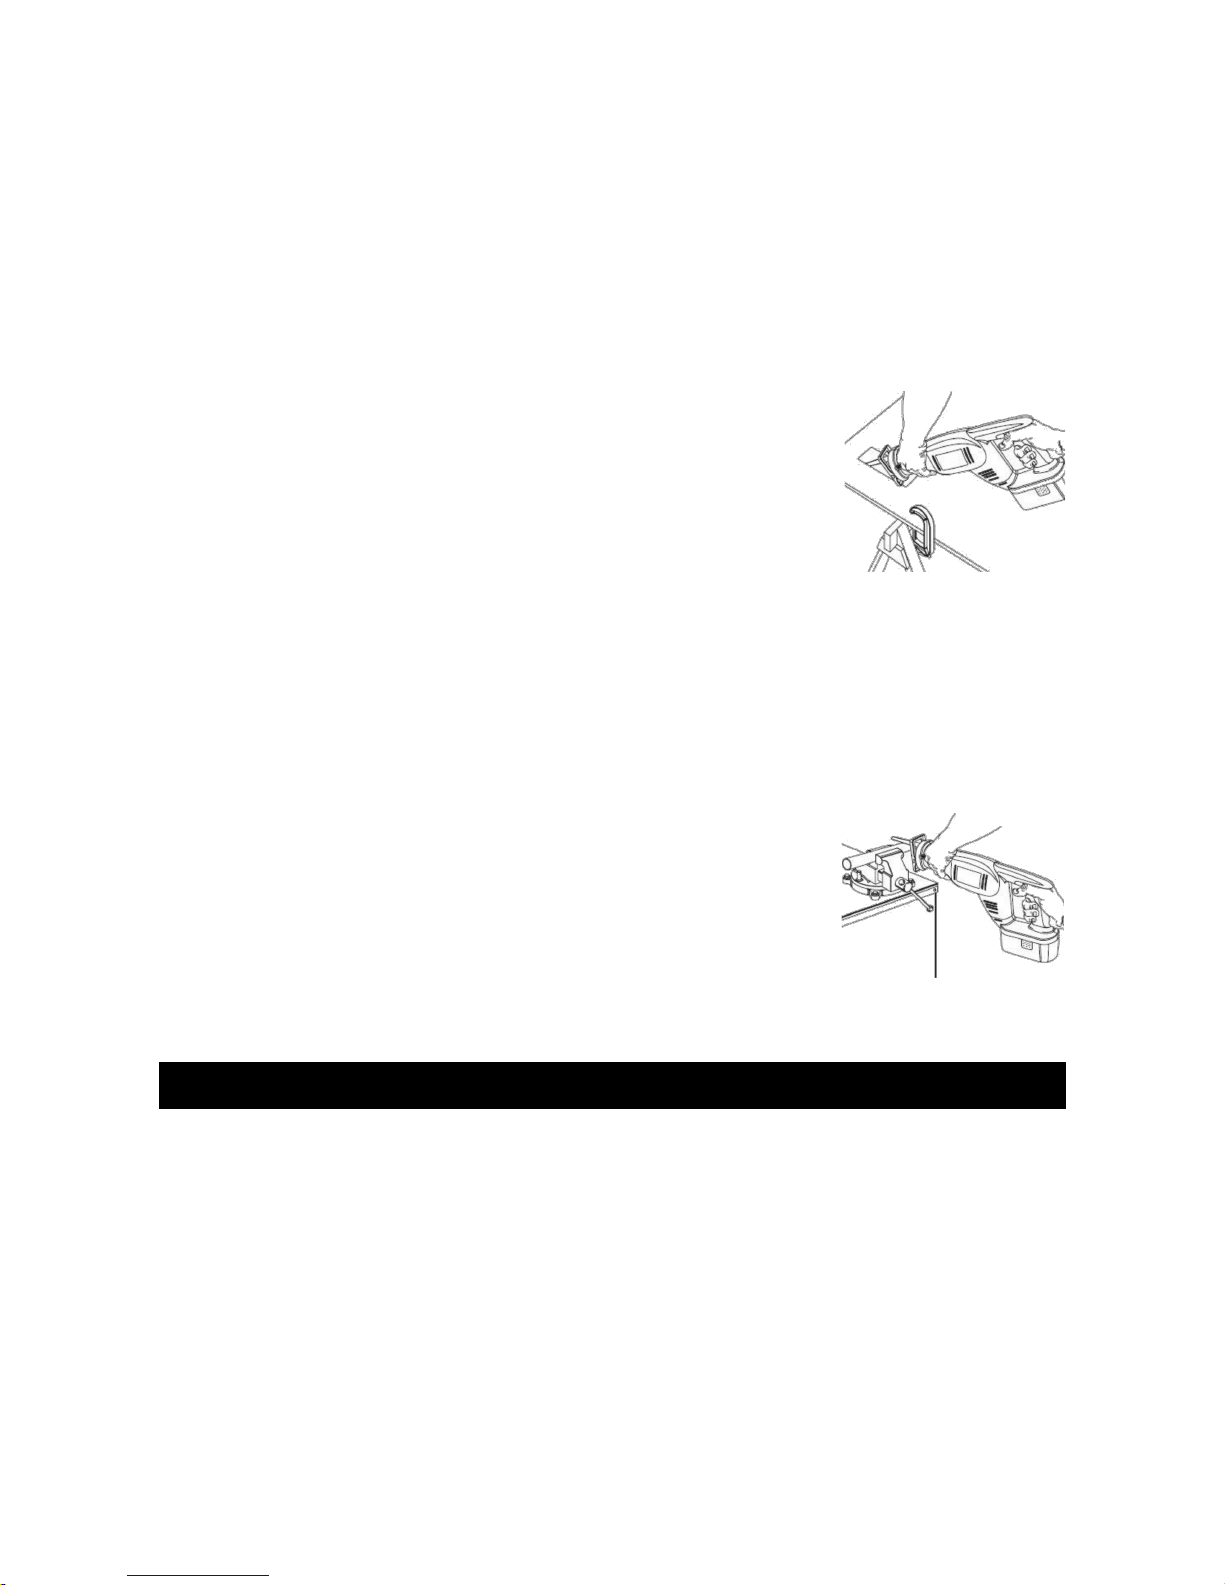
De ress the lock-off button, then ull the switch trigger to start the
cutting action.
•Place the shoe (base) assembly (1) against the work, then move the blade
into the work. DO NOT FORCE.
•Use only enough ressure to kee the saw cutting. Let the blade and saw
do the work.
•Use of excessive ressure that causes bending or twisting of the blade
may result in broken blades.
Plunge Cutting
Mark the cut line clearly. Choose a convenient starting oint
inside the area to by cut out, and lace the ti of the blade
over that oint. Rest the front edge of the shoe (base)
assembly on the work and hold firmly in osition. De ress
the lock-off button, then ull the switch trigger to start the
cutting action.
With the saw blade at full cutting s eed, slowly tilt the saw
downward until the ti of the blade starts cutting. After the blade has
enetrated the work, tilt the saw until the blade is er endicular to the work.
Metal Cutting
Metals such as sheet steel, i e, steel rods, aluminium, brass and co er may be
cut with your saw. Be careful not to twist or bend the saw blade. Do not force!
We recommend cutting oil when cutting most soft metals and steel. Cutting oil
will also kee blades cool, increase the cutting action and rolong the life of the
blade.
Never use gasoline, as the normal s arking of the motor
may ignite fumes. Clam the work firmly and cut close to
the clam ing oint to eliminate vibrations of the work
being cut. When cutting conduit i e or angle iron, clam
the work in a vice if ossible and cut close to the vice. To
cut thin sheet metal, “sandwich” the material between
hardboard or lywood, then clam the layers to eliminate vibration and material
tearing.
Maintenance and Servicing
To prevent serious injury or deat from accidental operation, turn t e Power
Switc of t e tool to its “OFF” position and disconnect battery pack from tool
before performing any inspection, maintenance, or cleaning procedures.
•Clean out dust and debris from vents and electrical contacts by blowing
with com ressed air. Always wear safety goggles when cleaning tools
with com ressed air.
•Kee tool handles clean, dry and free of oil or grease.
•Use only mild soa and a dam cloth to clean the tool, kee ing away from
all electrical contacts.
9

Note: Certain cleaning agents and solvents are harmful to lastics and other
insulated arts. Some of these include gasoline, tur entine, lacquer thinner,
aint thinner, chlorinated cleaning solvents, ammonia and household detergents
containing ammonia.
Tool maintenance must only be erformed by qualified re air ersonnel. If the
tool is not working ro erly, do not attem t to re air it yourself. Contact the
Kogan customer su ort team.
Troubles ooting
Problem Possible Causes Likely Solutions
Tool will not start. •Battery ack not
installed ro erly.
•Battery ack not
charged.
•Check battery ack
installation.
•Check battery ack
charging requirements.
Battery ack will not
charge.
•Battery ack not
inserted into charger.
•Charger not lugged in.
•Surrounding air
tem erature.
•Battery ack too hot or
too cold.
•Insert battery ack into
charger until red LED
a ears.
•Plug charger into a
working outlet. Refer to
“Im ortant Charging
Notes” for more details.
•If chargers are daisy
chained together check all
connections.
•Check current at
rece tacle by lugging in
a lam or other a liance.
•Check to see if rece tacle
is connected to a light
switch which turns ower
off when you turn out the
lights.
•Move charger and battery
to a surrounding air
tem erature of above
4.5°C or below 40.5°C.
•The charger will not
charge a battery ack if
the cell tem erature is
below a roximately 0°C
or above 60°C.
•The battery ack should
be left in the charger and
the charger will begin to
charge automatically
when the cell tem erature
warms u or cools down.
10
Other Certa Saw manuals


Popular Saw manuals by other brands


Elektra Beckum
Elektra Beckum UK 220 operating instructions

Craftsman
Craftsman 137.212150 Operator's manual

EINHELL
EINHELL bavaria BFS 600 E operating instructions

DeWalt
DeWalt D28700 instruction manual

EINHELL
EINHELL TC-SB 305 U Original operating instructions

Craftsman
Craftsman 137.218300 Operator's manual

Bolton Tools
Bolton Tools BS-128DR Operation manual

Makita
Makita LS1040 instruction manual

Scheppach
Scheppach PCS4-20ProS Translation of original instruction manual

GreenWorks Tools
GreenWorks Tools 3600107a user manual

DeWalt
DeWalt DCS369 instruction manual

6K Products
6K Products DH0614 Operation and parts manual