CG CAPTIVA 7 User manual

CG Captiva 7 Owner’s Handbook
CG CAPTIVA 7
CG CAPTIVA 7
holden.com.au
Captiva MY10 white bkgd with 145Page 1 7/09/2009 1:26:19 PM

GM Holden Ltd, ABN 84 006 893 232 (hereinafter Holden)
Change of name, address or ownership
In the event of a Safety Recall, or for various reasons,
Holden may need to contact you as the owner of this vehicle.
If you have recently changed your address, or name, or purchased this
vehicle second-hand, please help us to help you by taking a few minutes
to ll in and mail the forms at the beginning of the Service/warranty booklet.
For information about GM Holden’s privacy policy or to update owner
details online, please visit Holden’s website at www.holden.com.au
Note Please refer to the inside front cover of the Service/warranty
booklet for the Vehicle Identication Certicate.
Printed in Australia
Part No. 92242250
October 2010 (MY10 CG Captiva. Print 4)
© 2010 GM Holden Ltd
Reproduction in whole or part is prohibited
without written approval from GM Holden Ltd,
ABN 84 006 893 232
MY10_Captiva 7_IFC.indd 1 21/10/2010 2:50:51 PM

CHAPTERS
Dashboard ........................................... 1A
Audio system ....................................... 1B
Locks ......................................................2
Know your vehicle ..................................3
Driving ....................................................4
Fuel .........................................................5
Emergencies ...........................................6
Weekly checks ........................................7
Specications .........................................8
Tow and load ..........................................9
Cleaning ...............................................10
Index
MY10_CG_Captiva 7(C100)_book.ind1 1 5/4/2010 2:40:29 PM

We thank you for choosing Holden and want to
assure you of our continuing interest in your
driving pleasure and satisfaction.
This handbook applies to the current Captiva model.
Therefore, due to different models and options, you may
nd reference in this handbook to some equipment
not tted to your own vehicle.
Please note that all information, illustrations and
specications in this handbook are based on the latest
production information available at the time of printing.
Holden reserves the right to make changes at any time
without notice and without incurring any obligation.
MY10_CG_Captiva 7(C100)_book.ind2 2 5/4/2010 2:40:29 PM

Chapter 1A – Dashboard
Dashboard layout
Instrumentation
Warning/reminder indications
Driver Information Display (DID)3
Steering, horn, hazard warning
Wipers and washers
Lights
Cruise control
Ventilation system
Manual heating,
air conditioning3
Climate control3
Chapter 1B – Audio
Audio
Overview
Steering wheel remote controls
Important information
Audio settings
Radio operation
Playing CDs
CD operation
6 CD operation3
Notes on compact discs
Glossary of terms
Navigation system3
Overview
User instructions
Getting started
Selecting a destination
Route plan
Navigating
Settings
Trip computer
Appendix
Chapter 2 – Locks
Keys
Ignition/switch
Door locks
Tailgate
Bonnet lock
Security
Chapter 3 – Know your vehicle
Seats
Restraints
Supplemental restraint system
Power windows
Mirrors
Interior lamps
Assist grips and sun visors
Storage compartments
Power socket
Sunroof3
Retained accessory power (RAP)
CONTENTS
3The asterisk signies equipment options not
in all vehicles, model variants, engine options,
optional equipment and Genuine Holden
Accessories (and Parts).
ESP®is a registered trademark of Daimler Chrysler AG.
MY10_CG_Captiva 7(C100)_book.ind3 3 5/4/2010 2:40:29 PM

CONTENTS cont.
Chapter 4 – Driving
Safety
Driving precautions
Reverse camera3
4X4 Driving precautions
Park brake
Park Assist3
Engine starting
Transmission operation
Automatic transmission3
Shift lock control system3
Manual transmission3
Active safety systems
Anti-lock Brake System (ABS)
Electronic Stability Program
(ESP®)
Descent Control System (DCS)
All Wheel Drive system (AWD)3
Add on equipment
Chapter 5 – Fuel
Fuel
Emission control
Reducing fuel consumption
Chapter 6 – Emergencies
Customer assistance – Australia
Customer assistance – New Zealand
Flat tyre
Changing a at tyre
Towing a disabled vehicle
Engine overheating
Flat battery
Diesel fuel lter3
Fuse replacement
Bulb replacement
Chapter 7 – Weekly checks
Exterior checks
Under bonnet checks
Battery
Chapter 8 – Specications
Specications – petrol engines
Specications – diesel engines
General specications
Identication labels
Chapter 9 – Tow and load
Loading the vehicle
Towing
Chapter 10 – Cleaning
Interior cleaning
Exterior cleaning
Index
MY10_CG_Captiva 7(C100)_book.ind4 4 5/4/2010 2:40:29 PM

Dashboard
CHAPTER
1A
Page
Dashboard layout ........................1A-2
Instrumentation............................1A-3
Warning/reminder indications......1A-6
Driver Information
Display (DID)3...........................1A-12
Steering, horn,
hazard warning..........................1A-15
Wipers and washers..................1A-16
Lights.........................................1A-18
Cruise control ............................1A-22
Ventilation system......................1A-24
Manual heating,
air conditioning3.........................1A-25
Climate control3.........................1A-29
3The asterisk signies equipment options not
in all vehicles, model variants, engine options,
optional equipment and Genuine Holden
Accessories (and Parts).
MY10_CG_Captiva 7(C100)_book.ind1 1 5/4/2010 2:40:29 PM
1A-2 Chapter 1A
DASHBOARD
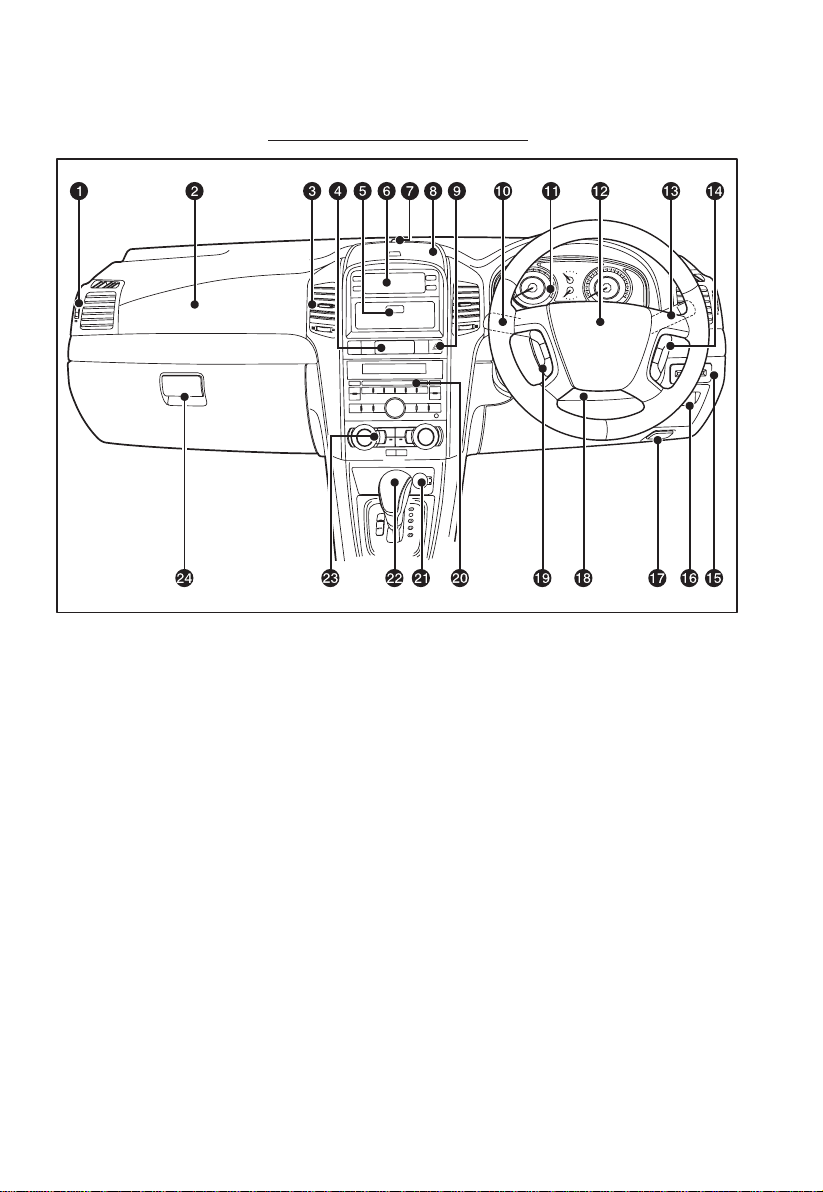
DASHBOARD LAYOUT
Page
1Side vent outlet........................1A-24
2Front passenger airbag...............3-13
3Centre vent outlet.....................1A-24
4Digital clock................................1A-5
5Centre storage compartment3....3-24
6Driver Information
Display (DID)3..........................1A-12
Navigation system3
not shown.................................1B-21
7Sunlight sensor........................1A-32
8Upper storage compartment.......3-24
9Hazard warning asher
button.......................................1A-15
:Lever for wipers
and washers.............................1A-16
;Instrumentation..........................1A-3
<Driver airbag ...............................3-13
=Lever for:
• turn signal...........................1A-21
• high/low beam.....................1A-19
• fog lamps............................1A-20
Page
>Cruise control switches............1A-22
?Card holder.................................3-23
@Coin storage................................3-24
ABonnet release lever...................2-10
BTilt steering lever......................1A-15
CSteering wheel
remote controls............................1B-6
DAudio system .............................1B-2
EPower socket ..............................3-28
FGear shift lever
• automatic3.............................4-14
• manual3.................................4-18
GControls for:
• climate control3...................1A-29
• manual heater3...................1A-25
HGlovebox.....................................3-23
0
20
34
5
6
40
60 80 100 120140
160
180
200
220
0
C100_1A061
MY10_CG_Captiva 7(C100)_book.ind2 2 5/4/2010 2:40:30 PM

1A-3
Chapter 1A
DASHBOARD
INSTRUMENTATION
0
C100_1A063
E F
20
1
120
km/h
234
5
6
40
60 80 100 120140
160
180
200
220
0
C H
r
TRIP A
ODO B
Tachometer
The tachometer indicates the engine
speed in revolutions per minute (RPM).
The red zone of the tachometer indicates
critical engine speed.
WARNING
Never operate the vehicle with
the tachometer needle in the red
zone. Continued operation with the
tachometer needle in the red zone
will lead to serious engine damage.
C100_1A067
0
1
2
345
6
7
8
C100_1A066
0
1
234
5
6
Petrol engine
Diesel engine
MY10_CG_Captiva 7(C100)_book.ind3 3 5/4/2010 2:40:32 PM

1A-4 Chapter 1A
DASHBOARD
Fuel gauge
The fuel gauge indicates the level of fuel
within the fuel tank when the ignition
switch is turned to the ON position. F
represents full and E represents empty.
The needle in the fuel gauge falls to E
when the ignition switch is turned to the
LOCK position.
An arrow on the fuel gauge symbol
indicates the side of the vehicle the fuel
door is on.
Refer to Fuel in chapter 5 for refuelling
instructions.
Note Avoid letting the tank run empty;
this can cause damage to the catalytic
converter.
Diesel engines: if run dry, the fuel system
must be bled. Refer to Diesel fuel lter in
chapter 6.
Refer to Specications in chapter 8, for
fuel tank capacity.
Temperature gauge
The temperature gauge indicates the
temperature of the engine coolant when
the ignition switch is turned to the ON
position.
Stop-start driving in heavy trafc, driving at
high speed in warm weather, hill climbing
or towing may cause the temperature to
increase. This is normal, and is no cause
for concern.
WARNING
Do not continue driving with the temperature gauge needle in the red area, the
engine is too hot. Continued operation of an overheated engine will result in
severe engine damage. Refer to Engine overheating in chapter 6.
INSTRUMENTATION cont.
C100_1A069
C H
C100_1A068
E F
MY10_CG_Captiva 7(C100)_book.ind4 4 5/4/2010 2:40:34 PM

1A-5
Chapter 1A
DASHBOARD
Speedometer
The speedometer indicates the vehicle’s
speed in kilometres per hour (km/h).
Odometer and tripmeter
Asmall window under the speedometer is
used for the odometer and tripmeter.
The odometer records the distance
travelled since the vehicle was built, and
thetripmeterrecordsthedistancetravelled
on a particular journey. The tripmeter can
keep a record of two different journeys at
the same time. The two trip odometers
are distinguished as TRIP A and TRIP B.
The trip odometer reset button is located at the lower right-hand side of the
speedometer dial.
With the ignition switched on, push the trip odometer reset button to change the display
between the odometer, TRIP A and TRIP B. If the trip odometer reset button is pressed
and held, the tripmeter resets to zero.
Clock
With the ignition switch in the ACC
(accessory) or ON position, the digital
clock displays the time. The digital clock
has three adjusting buttons.
H: hour button:
• To advance 1 hour, press the Hbutton.
• To advance more then 1 hour, press
and hold the Hbutton until you reach
the desired hour.
M: minute button:
• To advance 1 minute, press the Mbutton.
• To advance more than 1 minute, press and hold the Mbutton until you reach the
desired minute.
S: set button:
• To reset the time to the nearest hour, press the Sbutton.
• If you press this button when the time is between 8:00 and 8.29 for example, the
display will reset to 8:00.
• If you press this button while the time is between 8:30 and 8:59 for example, the
display will reset to 9:00.
Note If the power supply to the clock is interrupted, then the clock will need to
be reset.
INSTRUMENTATION cont.
C100_1A017
H
M
S
C100_1A065
20
40
60 80 100 120140
160
180
200
220
0
C100_1A064
TRIP A
ODO B
MY10_CG_Captiva 7(C100)_book.ind5 5 5/4/2010 2:40:35 PM

1A-6 Chapter 1A
DASHBOARD
Anti-Lock Brake System (ABS)
TheABS warning lamp illuminates when the ignition switch is turned to
the ON position, and goes out after approximately 4 seconds.
If the lamp:
• Does not ash or stays on when the ignition is in the ON position.
• Stays on after several ashes.
• Flashes while driving.
• Stays on continuously while driving.
Carefully stop the vehicle and switch off the engine. If the lamp still
exhibits a fault condition while driving, contact your Holden Dealer
immediately.
Note This lamp indicates the anti-lock braking system is not operating
although the vehicle’s brake system will still operate conventionally.
Refer to Anti-lock brake system in chapter 4.
Airbag and Supplemental Restraint System (SRS)
To check if the warning lamp is working, the SRS warning lamp
ashes several times when the ignition switch is rst turned to the ON
position.
If the lamp:
• Does not ash or stays on when the ignition is in the ON position.
• Stays on after several ashes.
• Flashes while driving.
• Stays on continuously while driving.
If the SRS warning lamp exhibits any of the above conditions while
driving, it indicates the airbag system or seat belt pretensioner system
may not function correctly, especially in an accident. Contact your
Holden Dealer immediately.
WARNING/REMINDER INDICATIONS
C100_1A070
0
E F
20
1
120
km/h
234
5
6
40
60 80 100 120140
160
180
200
220
0
C H
r
TRIP A
ODO B
MY10_CG_Captiva 7(C100)_book.ind6 6 5/4/2010 2:40:37 PM

1A-7
Chapter 1A
DASHBOARD
WARNING/REMINDER INDICATIONS cont.
Brake
The brake warning lamp illuminates when the ignition is switched to
the ON position and goes out after approximately 4 seconds.
The lamp also displays when the park brake is engaged. The lamp
extinguishes when the park brake is released.
If the brake warning lamp displays while you are driving and the park
brake is fully released, you should stop the vehicle as soon as possible
and contact your Holden Dealer immediately.
WARNING
Driving with the brake warning lamp on can lead to an accident.
Have the brake system checked immediately if the brake warning
lamp stays on.
Battery
The battery warning lamp illuminates when the ignition is switched to
the ON position and goes out after approximately 4 seconds.
If the lamp illuminates when driving, this may indicate the alternator
is not charging the battery. If the alternator drive belt is intact, there is
a problem in the charging system. Contact your Holden Dealer.
Oil pressure
The oil pressure warning lamp illuminates when the ignition is switched
to the ON position and goes out after approximately 4 seconds.
If the oil pressure lamp illuminates while driving, this indicates the oil
pressure is dangerously low. Stop the vehicle as soon as possible and
check the engine oil level. Refer to Engine oil level in chapter 7. Do
not drive the vehicle with the oil pressure indicator lamp illuminated.
Contact your Holden Dealer.
Malfunction indicator lamp
The Malfunction Indicator Lamp (MIL) monitors the emission control
system. This lamp illuminates when the ignition switch is in the
ON position and the engine is not running. If it stays illuminated or
illuminates while driving, there may be a problem with the system.
Contact your Holden Dealer.
The MIL will also illuminate to indicate that there is a malfunction in
the Diesel Particle Filter (DPF). If this happens, contact your Holden
Dealer. Refer to Emission control in chapter 5.
WARNING
If you keep driving your vehicle with the malfunction indicator
lamp illuminated, after a while, your emission control system
may not work as well, your fuel economy may not be as efcient
and your engine may not run as smoothly. This could lead to
costly repairs.
MY10_CG_Captiva 7(C100)_book.ind7 7 5/4/2010 2:40:40 PM

1A-8 Chapter 1A
DASHBOARD
Winter mode indicator (automatic transmission only)
The winter mode indicator illuminates when the winter mode button
is pressed, use this mode to drive away smoothly during icy and
slippery road conditions.
Shift select position indicator
(automatic transmission only)
Displays the position of the automatic transmission shift select
lever.
Front fog lamp indicator3
Illuminates when the front fog lamps are switched on.
Rear fog lamp indicator
Illuminates when the rear fog lamps are switched on.
Driver’s seat belt reminder
When the ignition switch is switched to the ON position, the seat belt
reminder lamp illuminates to remind the driver to fasten the seat belt,
if the seat belt is not fastened after the engine has been started the
lamp will ash for approximately 90 seconds and then stay illuminated
continuously until the driver’s seat belt is fastened.
When the vehicle is driven away and the speed is above 22 km/h the
lamp will ash again and a warning chime will sound for approximately
90 seconds, after which the lamp will stay illuminated continuously
until the driver’s seat belt is fastened.
If the driver’s belt is buckled, neither the chime nor the lamp will
illuminate.
Turn signals
When the turn signal switch or hazard warning lamp switch is
switched on, the turn signal indicator lamp (within the instrument
panel) ashes to indicate operation of the turn signal lamps or hazard
warning lamps.
High beam
This indicator lamp is illuminated when the headlamps high beams
are in use.
Park Assist3
When the ignition switch is turned to the ON position, the Park Assist
indicator illuminates for approximately 4 seconds.
If the Park Assist warning lamp illuminates while driving, it indicates
there is a problem with the Park Assist system. Consult your Holden
Dealer.
Note The Park Assist warning lamp illuminates when a trailer lighting
plug is connected to the vehicle. This reminds the driver that the Park
Assist system is deactivated.
WARNING/REMINDER INDICATIONS cont.
TRIP A
ODO B
r
MY10_CG_Captiva 7(C100)_book.ind8 8 5/4/2010 2:40:44 PM
1A-9
Chapter 1A
DASHBOARD
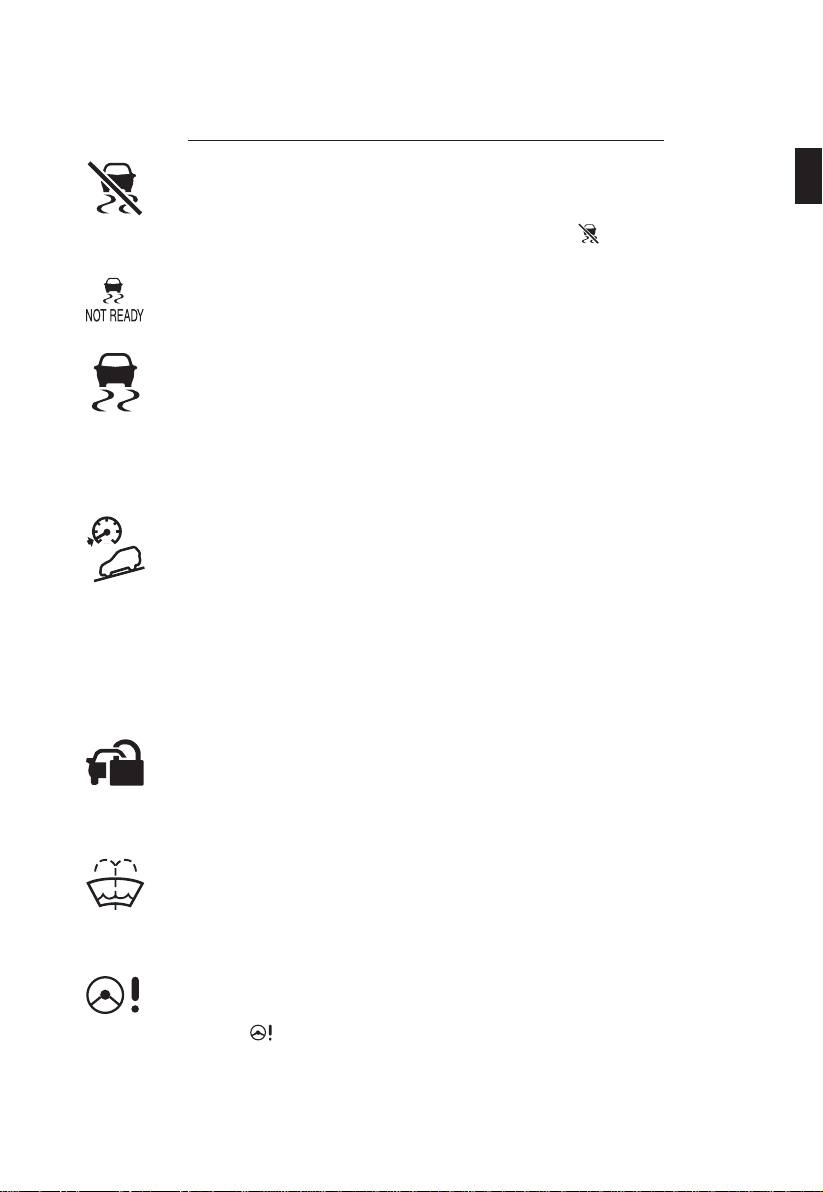
Electronic stability program (ESP®) off indicator
Whenthe ignitionswitchisturnedto theON position,theESP®indicator
illuminates for approximately 4 seconds.
The ESP®off indicator will illuminate after the button on the centre
of the instrument panel has been pressed.
Electronic stability program (ESP®) not ready indicator
TheESP®notreadyindicatorilluminatestoindicatetheESP®isnotready
for operation. Refer to Electronic stability program in chapter 4.
Electronic stability program (ESP®) active
and warning lamp
Whenthe ignitionswitchisturnedto theON position,theESP®indicator
illuminates for approximately 4 seconds.
This lamp ashes while ESP®is actively helping the vehicle with road
grip and stability. If the lamp illuminates constantly, this indicates there
is a malfunction in the system. Consult your Holden Dealer.
Descent control system (DCS) active
and not ready warning lamps
When the ignition switch is turned to the ON position, the DCS lamp
illuminates for approximately 4 seconds.
• Thegreen DCS lampilluminates whenDCSis activatedbypressing
the DCS button in the centre of the instrument panel and ashes
while DCS is active.
• The amber DCS lamp indicates the DCS is not ready or there is a
malfunction in the system. Consult your Holden Dealer.
Refer to Active safety systems in chapter 4.
Immobiliser system
When the ignition switch is turned to the ON position, the immobiliser
indicator illuminates for approximately 4 seconds.
If this lamp illuminates constantly, there is a malfunction in the system.
Consult your Holden Dealer.
Low windscreen washer uid
When the ignition switch is turned to the ON position, the low washer
uid indicator illuminates for approximately 4 seconds.
If this lamp illuminates constantly, the uid in the washer reservoir is
low and must be relled.
Speed Sensitive Power Steering (SSPS) lamp3
(Diesel vehicles only)
The warning lamp illuminates when the ignition is switched on
and extinguishes when the engine is started to check that the lamp
is working. If the lamp does not illuminate, does not extinguish or
illuminates while driving, contact your Holden Dealer as soon as
possible. Refer to Driving precautions in chapter 4.
WARNING/REMINDER INDICATIONS cont.
ESP®is a registered trademark of Daimler Chrysler AG.
MY10_CG_Captiva 7(C100)_book.ind9 9 5/4/2010 2:40:48 PM

1A-10 Chapter 1A
DASHBOARD
Service vehicle soon (SVS)
When the ignition switch is turned to the ON position, the SVS indicator
illuminates for approximately 4 seconds.
The service vehicle soon lamp will constantly illuminate if a malfunction
exists in the non-emission related components or the related sub
systems. Consult your Holden Dealer.
WARNING
If you keep driving your vehicle with the service vehicle soon lamp
on, damage may result in the non-emission related components
or related sub systems. This could lead to costly repairs.
Engine coolant temperature
When the ignition switch is turned to the ON position, the coolant
temperature indicator illuminates for approximately 4 seconds.
If the engine coolant warning illuminates while driving, it indicates the
engine coolant temperature is excessively hot. It is advisable to stop
thevehicleas soon asitis safe todoso. If thelampdoes not extinguish,
consult your Holden Dealer.
WARNING
Do not continue driving with the temperature gauge needle in
the red area, the engine is too hot. Continued operation of an
overheated engine will result in severe engine damage. Refer to
Engine overheating in chapter 6.
Door ajar warning
Illuminates when a door is open or not securely latched.
Tailgate ajar warning
The tailgate ajar warning lamp illuminates when the ignition is switched
to the ON position and goes out after approximately 4 seconds.
Illuminates when the tailgate or the tailgate window is open or not
securely latched.
Cruise control indicator
Illuminates when the cruise control has been set and extinguishes
when cruise control is turned off.
Refer to Cruise control further on in this chapter.
All Wheel Drive system (AWD)3
When the ignition switch is turned to the ON position, theAWD indicator
illuminates for approximately 4 seconds.
The lamp ashes when the AWD system is temporarily disabled. The
lamp remains on continuously when there is a malfunction in the AWD
system. Consult your Holden Dealer.
WARNING/REMINDER INDICATIONS cont.
MY10_CG_Captiva 7(C100)_book.ind10 10 5/4/2010 2:40:50 PM

1A-11
Chapter 1A
DASHBOARD
Low fuel
Illuminates when the ignition is switched to the ON position and goes out
after approximately 4 seconds.
The low fuel indicator lamp displays when the fuel tank is approaching
empty. When the low fuel lamp illuminates add fuel as soon
as possible.
Note If diesel engines run empty, the fuel system must be bled. Refer to
Diesel fuel lter in chapter 6.
Glow plug indicator3 (Diesel preheating system)
Illuminates when the ignition is switched to the ON position and will
stay illuminated until the engine is sufciently warmed. Refer to Engine
starting in chapter 4.
Note Preheating system switches on only if outside temperature is low.
Diesel particle lter (DPF)3 (Diesel engine only)
Flashing (in vehicles with diesel particle lter): previous driving conditions did
not allow the automatedcleaning processtotakeplace.Assoonas the road
and trafc situations permit it, increase speed to more than 40 km/h without
dropping engine speed below 2,000 rpm. This procedure runs automatically
and can take up to 25 minutes. The control indicator goes off as soon as
cleaning is complete. Refer to Emission control in chapter 5.
Note Turning the ignition off while the lamp is illuminated or ashing
may result in increased fuel consumption and a reduction in engine oil
life will occur.
Refer to Emission control in chapter 5.
Water in fuel lter3 (Diesel engine only)
Illuminates when the water level in fuel lter is excessive. If this occurs,
drain the water from fuel lter as soon as possible. Refer to Diesel fuel
lter in chapter 6.
The warning lamp will extinguish when draining is completed.
Note
• Before starting the engine after draining, a priming operation must be
performed. Refer to Diesel fuel lter in chapter 6.
• The diesel fuel lter will be drained by your Holden Dealer when the
vehicle is serviced. Refer to the Service/warranty booklet.
Front passenger seat belt reminder3
When the ignition switch is turned to the ON position, the front passenger
seat belt indicator illuminates for approximately 4 seconds.
The system performs a self check, then the lamp extinguishes if the front
passenger seat is not occupied.
If the front passengers seat is occupied the lamp remains on until the
passenger’s seat belt is fastened.
Note The front passenger seat belt reminder is located on the dashboard
directly in front of the passenger seat.
WARNING/REMINDER INDICATIONS cont.
MY10_CG_Captiva 7(C100)_book.ind11 11 5/4/2010 2:40:53 PM

1A-12 Chapter 1A
DASHBOARD
Note For vehicles tted with the Navigation system3, refer to Trip computer in chapter 1B.
The Driver Information Display (DID) displays information for the climate control
system, outside temperature, trip computer and the compass when the ignition switch
is in the ON position.
OUTSIDE TEMPERATURE
The OUTSIDE TEMP display may not show the current outside temperature until the
vehicle has reached a speed of at least 30 km/h for a minimum of 3 minutes. This
avoids temperature uctuations from radiated engine heat or heat from other sources,
such as exhaust from other vehicles, from being displayed.
TRIP COMPUTER
The trip computer displays driving information such as driving distance for remaining
fuel, average fuel consumption, average speed and driving time.
Each time the MODE button is pressed the display changes in the following
sequence:
• Driving distance for remaining fuel.
• Average speed.
• Driving time.
• Average fuel consumption.
To reset average speed, driving time or average fuel consumption, press the MODE
button for more than 2 seconds.
To change the display from km to miles or from °F to °C proceed as follows:
1. Press the SET button for more than 2 seconds then the temperature display
will blink.
2. Press the SET button again, the distance display will blink.
3. Press the ▲ and ▼ button to change the distance display (km. mile or °F. °C).
DRIVER INFORMATION DISPLAY (DID)3
C100_1A008
1Climate control display.
2Outside temperature.
3Trip computer.
4Compass.
MY10_CG_Captiva 7(C100)_book.ind12 12 5/4/2010 2:40:53 PM

1A-13
Chapter 1A
DASHBOARD
Driving distance for
remaining fuel
This mode indicates the estimated driving
distance to empty from the current fuel in
the fuel tank.
When the distance to empty is less than
50 km, --- will be displayed.
Note The driving distance for remaining
fuel can differ from the actual distance
according to driving conditions, driving
pattern or vehicle speed.
Average speed
This mode indicates the average speed
of the vehicle.
To reset the average speed to zero,
press the MODE button for more than
2 seconds.
Driving time
This mode indicates the total drive time.
To reset the driving time to zero, press the
MODE button for more than 2 seconds.
The driving time will be initialised to 0:00
after being displayed to 99:59.
Average fuel consumption
This mode calculates the average fuel
consumption from the total fuel used and
the distance since the last average fuel
consumption reset.
To reset the average fuel consumption
to zero, press the MODE button for more
than 2 seconds.
Note
• Average fuel consumption is reset to 10:0 if the battery is disconnected.
• The average fuel consumption can differ from the actual average fuel consumption
according to driving conditions, driving pattern or vehicle speed.
DRIVER INFORMATION DISPLAY (DID)3cont.
km
C100_1A009
C100_1A010
km/h
C100_1A011
C100_1A012
/ 100 km
MY10_CG_Captiva 7(C100)_book.ind13 13 5/4/2010 2:40:56 PM

1A-14 Chapter 1A
DASHBOARD
DRIVER INFORMATION DISPLAY (DID)3cont.
COMPASS
Thisdisplaysthevehicle’sdrivingdirection
in 8 directions, (N, NE, E, SE, S, SW,
W, NW).
Note The direction will be displayed when
the ignition is switched to the ON position.
Compass calibration
The compass needs to be calibrated the
rst time it is used or when the battery has
been disconnected.
Follow these steps to calibrate the
compass:
1. Press the MODE and SET buttons
simultaneously for more than
2 seconds, and the compass display
will ash.
2. Drive the vehicle around slowly in one
complete circle within 90 seconds,
then the calibration will be complete.
3. When the calibration is complete the compass display stops ashing.
4. If enough space is not available to turn the vehicle in one complete circle, follow the
diagram opposite for an alternate method.
Note
• The vehicle can be turned in any direction, left or right.
• If the compass display continues to ash, drive the vehicle slowly in a circle
again until it stops ashing.
Cancelling compass calibration
• Press the SET button twice.
• If the vehicle was not turned within 90 seconds after the calibration mode was
started, compass calibration will be cancelled.
Deection calibration
Inthecompasscalibration mode, press theSET button to move to deection calibration
mode. Then press ▲ and ▼ button to adjust the deection calibration value.
C100_1A013
C100_1A014
MY10_CG_Captiva 7(C100)_book.ind14 14 5/4/2010 2:40:57 PM
Table of contents


 Technical manual")


