CHALET A-Frame User manual

1
A

2
TABLE OF CONTENTS
INDEX, WARRANTY STATEMENT PG. 3-4
IDENTIFICATION INFORMATION PG. 5
SAFETY PG. 6-7
WELCOME PG. 8
CONTACT INFORMATION PG. 9
OVERVIEW PG. 10
DEALER RESPONSIBILITIES PG. 11
SAFETY DEFECTS PG. 12
TOW VEHICLE AND TIRES PG. 13-14
ELECTRICAL CONNECTION TO TOW VEHICLE PG. 15
ON THE ROAD PG. 16
SAFETY ON THE ROAD PG. 17-18
FIRE AND SAFETY PG. 19-21
EQUIPMENT PG. 22-23
ELECTRICAL SYSTEMS PG. 24-26
PROPANE SYSTEMS PG. 27-28
APPLIANCES PG. 29-31
FRESH WATER/WASTE SYSTEM PG. 32-35
GENERAL MAINTENANCE PG. 35-41
WINTERIZATION / STORAGE PG. 42-45
OPENING / CLOSING YOUR CHALET PG. 46-47

3
LIMITED WARRANTY
FOR RECREATIONAL VEHICLES MANUFACTURED BY CHALET INC.
MANUFACTURING CORPORATION AND SOLD IN THE
UNITED STATES AND CANADA
Chalet warrants to the original end user purchaser (“Owner”) of this recreational vehicle
(“Camper, A-Frame, Pop Up”) to be free of defects in materials and workmanship and for
structural integrity, under normal use, with reasonable care and maintenance, for one (1)
year from the date of purchase (the “Warranty Period”), subject to the exclusions given
below.
COVERAGE PROVIDED
Within the Warranty Period, Chalet is obligated to repair or replace any part covered by this
warranty proven defective. In the event of such an occurrence, the Owner should contact
the selling dealer for a service appointment. If it is not possible to return to the selling dealer,
call the factory 541-791-4610 and they will provide you with the information required to file
a warranty claim when service is being provided by other than a Chalet dealership. The cost
of transportation to the dealer or service center shall be incurred and paid for by the Owner.
This is the only warranty given by Chalet Inc. other than express or implied warranties given
by the component manufacturers. Any warranties implied by law are limited to the Warranty
Period. Any other warranty, express or implied, not provided for in this Limited Warranty is
waived by the Owner, to the extent allowed by law.
OWNER’S OBLIGATION
The purchaser must notify Chalet Inc. or a Chalet authorized dealer of any defect promptly
upon discovery.
Warranty repairs by a non-authorized Chalet Inc. dealer or service center must be
approved by the Chalet Inc. prior to any work being started.

4
EXCLUSIONS
The scope of this warranty is expressly limited to only items actually constructed by Chalet.
Chalet therefore makes no warranty with respect to component parts constructed or
assembled by other manufacturers, including, but not limited to, all electrical devices (sound
systems, DVD player, antennas, batteries, etc.), the propane appliances, electrical
appliances, heaters, refrigerators, plumbing fixtures, light fixtures, lights and windows. Such
component parts may be warranted by their respective manufacturers, and copies of such
warranties are included in the appliance packet included with the trailer.
This warranty does not cover damage caused by or related to (1) normal wear and tear, (2)
accidents, abuse, misuse or negligence, (3) failure to comply with instructions contained in
the Owner’s Manual, (4) any alteration or modifications, or (5) environmental conditions,
including, but not limited to, road salt, hail, or windstorm. Nor does this warranty apply to
parts made out of cloth, leather, wood, paint, or chrome, which have been affected by
airborne fallout, including, but not limited to, chemicals and tree sap.
No payment or other compensation will be made for incidental expenses, including, but not
limited to, towing, telephone, transportation, lodging, travel, gasoline, loss of pay or indirect
or consequential damage including, but not limited to, loss of use of the recreational vehicle,
inconvenience, damage or injury to person or property, or loss of revenue, which might be
paid, incurred or sustained by reason of manufacturer’s defect covered by this warranty.
Chalet does not warranty equipment or accessories installed at any dealership or other place
of business, or by any other party.
As the manufacturer of the recreational vehicle you purchased, Chalet does not know the
purpose or use you have in mind for your recreational vehicle, nor does Chalet know the
Gross Vehicle Weight Rating (“GVWR”) of your two vehicle. Therefore,
Chalet makes no warranties or representations, express or implied, as to the performance
of your tow vehicle or whether the match up of your tow vehicle and camper/trailer exceeds
the GVWR as specified by your tow vehicles manufacturer. Specifically, there is no express
or implied warranty of merchantability or of fitness for the particular match of your tow
vehicle to any particular camper/trailer model.
This Limited Warranty is intended to comply with the requirements of both State and
Federal laws. Any part of this Limited Warranty in conflict with any law shall be ineffective
to the extent of any such conflict. This warranty gives you specific legal rights, and you may
also have other rights, which may vary from state to state.
5
IDENTIFICATION INFORMATION
For identification purposes it is recommended that you record the following information. Pick a
spot behind a drawer or inside a cabinet. Protect yourself from possible theft and be able to identify
your property. You should keep a copy of this information at home. If the unit is ever stolen, the
police can use the appliance serial number to identify the unit. It is also handy to have when service
is needed.
PLEASE TAKE A FEW MINUTES TO COMPLETE THE INFORMATION. IT
WILL BE A HANDY REFERENCE FOR YOU.
Your Name
Trailer Model
Vehicle ID Number
Dealer
Address
Phone Number
Insurance Company
Phone Number
Policy Number
AC Manufacturer
Model Number
Serial Number
Furnace Manufacturer
Model Number
Serial Number
Key’s Entry door
Baggage Door
Other
Stereo Manufacturer
Model Number
Serial Number
Water Heater Manufacturer
Model Number
Serial Number
Other
Other
Other

6
A FEW IMPORTANT WORDS ON SAFETY
Your safety, and the safety of others, is very important.
Operating your tow vehicle and recreational vehicle is an
important responsibility. As you read this manual, statements
preceded by the following words are of special significance:
WARNING
Indicates a potentially hazardous situation which,
if not avoided, may result in death or serious injury.
CAUTION
Indicates a potentially hazardous situation which,
if not avoided, may result in damage to a
component, the trailer or your tow vehicle.
This information is intended to help you reduce the risk
of personal injury and prevent possible damage to
others, your tow vehicle, trailer and its equipment, or the
environment. To help you make informed decisions about
safety, we have provided operating procedures and other
information on labels in your camper and in this manual.
There are also warnings in the appliance manuals in the
Owner’s Information Package. This information alerts
you to potential hazards that could hurt you or others.
Of course, it is not practical or possible to warn you
about all the hazards associated with operating or
maintaining your camper. You must use your own good
judgment. This manual is filled with important safety
information please read it carefully. If you have any
questions regarding operation, maintenance, or service,
please contact your dealer immediately so he can assist you.
Chalet Inc. is required to furnish the following consumer
information as provided by the National Fire Protection
Association and the American National Standards Institute.
The information and warnings found here might also be
found in other chapters of this Owner’s Manual.
Please see chapters titled “PROPANE SYSTEM” and
“APPLIANCES” for other safety and operating information.
WARNING
Propane containers must not be placed or stored
inside the vehicle. Propane containers are equipped
with safety devices, which relieve excessive
pressure by discharging gas to the atmosphere.
The following label has been located in the cooking
area to remind you to provide an adequate supply of
fresh air for combustion. A warning label has been
located near the propane container. This label reads:
DANGER
ALL PILOT LIGHTS, APPLIANCES AND
THEIR IGNITORS (SEE OPERATING
INSTRUCTIONS) SHALL BE TURNED OFF
BEFORE REFUELING OF MOTOR FUEL
TANKS AND/OR PROPANE CONTAINERS.
FAILURE TO COMPLY COULD RESULT IN
DEATH OR SERIOUS INJURY.
WARNING
Do not bring or store propane containers,
gasoline, or other flammable liquids inside
the camper. Fire or explosion may be the
result.
WARNING
Portable fuel-burning equipment, including
wood and charcoal grills and stoves shall not
be used inside the recreational vehicle. The
use of this equipment inside the recreational
vehicle may cause fires or asphyxiation.
Unlike homes, the amount of oxygen supply is
limited due to the size of the recreational vehicle,
and proper ventilation when using cooking
appliances will avoid dangers of asphyxiation. It
is especially important that cookingappliances not
be used for comfort heating as the danger of
asphyxiation is greater when the appliance is used
for long periods of time.
WARNING
IT IS NOT SAFE TO USE COOKING
APPLIANCES FOR COMFORT HEATING.
Cooking Appliances need fresh air for safe
operation.
BEFORE OPERATION:
Open overhead vent or turn on exhaust fan.
Open window. FAILURE TO COMPLY COULD
RESULT IN DEATH OR SERIOUS INJURY.

7
Overfilling the propane container can result in uncontrolled
gas flow, which can cause fire or explosion.
A properly filled container will contain approximately 80
percent of its volume as liquid propane.
Overfilled Propane tanks must be bled.
This is different than purging the tanks. When the tanks are
new, they must be purged of the oxygen in the tanks used
during the tank manufacturer’s testing procedure prior to
being filled with propane. Overfilled tanks will emit liquid
into the propane system, which can cause problems/plugging
with the regulators used on the tanks, range and generator.
A bathroom scale can be used to weigh the tanks prior to
reinstalling them in the camper. A 5-gallon tank should not
weigh more than 35 lbs. when filled. A 7-gallon tank should
not weigh more than 50 lbs. when filled. Instructions for
bleeding the tanks are located on a label on the tank.
WARNING
DO NOT FILL PROPANE CONTAINERS) TO MORE
THAN 80 PERCENT OF CAPACITY. FAILURE TO
COMPLY COULD RESULT IN A FIRE OR PERSONAL
INJURY.
CAUTION
THIS PROPANE PIPING SYSTEM IS DESIGNED
FOR USE WITH PROPANE ONLY. DO NOT
CONNECT NATURAL GAS TO THIS SYSTEM.
Securely cap inlet when not connected for use. After
turning on gas, except after normal cylinder replacement,
test propane piping and connections to appliance for
leakage with soapy water or bubble solution. Do not use
products that contain ammonia or chlorine.
DANGER
IF YOU SMELL PROPANE:
1. Extinguish any open flames, pilot lights
and all smoking materials.
2. Do not touch electrical switches.
3. Shut off the propane supply at the
container valve(s) or gas supply connection.
4. Open doors and other ventilating
openings.
5. Leave the area until odor clears.
6. Have the gas system checked and
leakage source corrected before using
again.
FAILURE TO COMPLY COULD RESULT IN
EXPLOSION RESULTING IN DEATH OR
SERIOUS INJURY.
Propane regulators must always be
installed with the regulator vent facing
downward. Make sure the regulator vent
faces downward to minimize vent
blockage, which could result in excessive
gas pressure causing fire or explosion.
CARBON MONOXIDE HAZARD
Your truck and your camper’s generator
exhaust contain carbon monoxide gas.
You should have no problem with
carbon monoxide entering into the
camper if you maintain your truck and
generator properly. Have the exhaust
system inspected for leaks whenever:
The truck and camper is serviced.
You notice a change in the sound of
the exhaust.
The truck or camper was in an
accident that may have damaged the
underside.
WARNING
Carbon monoxide is toxic.
Breathing it can cause unconsciousness and even
kill you. Avoid any enclosed areas or activities that
expose you to carbon monoxide.
High levels of carbon monoxide can collect rapidly in
enclosed areas, such as a garage or family room.
The following label has been placed in the vehicle near
the range area:

8
WELCOME
Congratulations and welcome to the recreational vehicle
lifestyle and the ever-growing family of Chalet owners.
We sincerely thank you for choosing Chalet. Your
selection of a Chalet is a wise investment. Chalet Inc. is
confident that it will give you years of camping pleasure.
At Chalet Inc., we work hard to provide our customers
with safe and dependable recreational vehicles.
We constantly strive to produce a quality product to
meet your needs. Customer satisfaction is very
important. If you are satisfied, then we know we have
achieved our number one goal. That is to be the best
folding camper manufacturer in the industry.
Your RV has been designed to conform with, or exceed,
the American National Standards Institute (ANSI) 1192,
National Fire Protection Association (NFPA) 1192,
Canadian Standards Association (CSA) Z-240 (for
Canadian built units), National Electric Code (NEC),
and applicable motor vehicle standards. These standards
establish the requirements for electrical, plumbing, fuel
systems and equipment, fire and life safety provisions
and other requirements for quality and safety. Chalet
Inc. is a member of the Recreational Vehicle Industry
Association (RVIA) and the Canadian Recreational
Vehicle Industry Association (CRVIA) which oversees
that our products are in compliance with the above
agencies and organizations.
One of the best ways to enhance the enjoyment of your
new Chalet is to read this manual along with the
information provided in the Appliance Information
Package. This information will help you learn how to
operate all the features of your new Chalet. Afterwards,
keep this Owner’s Manual along with the appliance
information Package in your trailer so you can refer to
it at any time.
This Owner’s Manual, along with the appliance
Information should be considered a permanent part
of the A-Frame folding trailer, and should remain
with the trailer when it is sold.
The information, specifications and photography
included in this publication were as accurate as possible
at the time of publication. For the most current product
information and changes, please visit our website at
http://chaletinc.com/a-frame/, the appliance
manufacturer’s website. Your dealer is also a source of
information. Chalet Inc. reserves the right, however, to
discontinue or change specifications at any time without
notice and without incurring any obligation whatsoever.
All weights, fuel, liquid capacities, and dimensions are
approximate.
Before calling your Chalet dealer, we suggest that you
look for the answer to your problem in the Owner’s
Manual. Several warranties protect your new Chalet.
and its appliances. Read each of the warranties
thoroughly so you understand the coverages and are
aware of your rights and responsibilities.
Chalet Inc. provides a limited warranty as defined at the
front of this manual. Please read that warranty carefully.
If you have any questions about the warranty or what it
does or does not cover, please contact your Chalet
dealer. At the time of sale, your dealer will fill out and
mail your Chalet Inc. Warranty Registration Card to the
factory.
Your appliances and various other components in your
RV are warranted by their respective manufacturer and
their warranties are included in the Appliance
Information Package. Be sure to fill out the warranty
registration cards for these items and mail them as soon
as possible after taking delivery of your trailer
.

9
CUSTOMER RELATIONS INFORMATION
It is best to return your trailer to the selling
dealer for warranty service. If this is not
possible, you can find the nearest dealer on our
web site, www.chaletrv.com, under the dealer
locator heading, or by contacting Chalet Inc.
Customer Service at 541-791-4610.
Service and maintenance on your RV is easily
accomplished by establishing a mutually
agreeablepartnership between you yourChalet
or local RV repair facility. Take the time to get
to know the people who will play an important
role in helping you keep your trailer in prime
working condition. Visit the dealer’s service
center to meet the service manager,
technicians, service writers, and those charged
with ordering the parts. Ask questions.
Following your appliance recommended
scheduled maintenance will save you money in
the long run. Carefully read all appliance
operating manuals to obtain complete
information on prescribed service intervals.
Don’t forget about your tow vehicle. It too
needs regular service. If you prefer to perform
general maintenance items on your own, your
Chalet dealer service department can be a big
help when it comes to making sure you obtain
the proper replacement parts. You can also
order direct from the factory or from Chalet’s
on line store http://chaletinc.com/parts/
Some of the recommended service and
maintenance items may fall outside the scope
of your capability. In these instances, you may
decide to seek the assistance of a qualified RV
service center to perform these tasks. Contact
your Chalet dealership’s service center in
advance for a scheduled appointment time.
Advise the service manager, in writing, the
specific items needing repair to give the
service center an idea of what parts will be
required, and how long the work can be
expected to take. Keep in mind that seasonal
maintenance needs are a popular time of year
at most service centers. Call early to schedule
annual tune-ups. Always include your vehicle
identification number when contacting your
Chalet dealer. Chalet dealership personnel are
trained professionals. They should be able to
answer all your questions.
If you encounter a problem that your
dealership does not solve to your satisfaction,
please discuss the issues with the dealership’s
management. The Service Manager or General
Manager can help.
If you are dissatisfied with the decision made by the
dealership’s management, contact Chalet Inc.
Customer Service Center at:
Chalet Inc.
124 41st Ave. S.E.
Albany, OR. 97322
541-791-4610
E-mail inquiries to:
customerservice@chaletrv.com
When you call or write, please give us this information:
•Vehicle Identification Number
•Your name, address, and telephone number
•Date of purchase
•Name and address of the dealer where your
camper was purchased.
This information will be on your Owner Registration
Card. The serial number is also located on the
identification tag located next to the entry door.

10
INFORMATION ABOUT THIS MANUAL
This Owner’s Manual is of a general nature only and does not cover every aspect of all models
manufactured by Chalet Inc. Each owner should read this manual thoroughly and heed the warnings
given herein, as well as those warnings given in the component instruction manuals contained in the
Appliance Information Package.
PRODUCT CHANGES
Some equipment and features shown in this
manual may be optional or not available on
some models. Photographs or illustrations in
this manual are representative of function and
may not be specific in their depiction of actual
equipment, fabrics, interior or exterior decor or
design options as installed on or in your RV. For
the most current product information and
changes please visit our website at
www.chaletrv.com or contact your local Chalet
Dealer. Subsequent modification may be
evident in the actual product. Specification are
subject to change without notice. All weights,
fuel, liquid capacities and dimensions are
approximate.
Appliance Information Package
The appliance packet contains valuable
documents explaining in detail how to use and
maintain the major appliances, electrical system
and equipment installed in your trailer. The
appliance manuals also carry warranty
information should you need service. Warranty
registration cards included with the manuals
should be filled out completely and mail in as
instructed.
The appliance manuals should be considered
a permanent part of the RV and should
remain with the trailer when it is sold.
The Appliance Information Package
includes the following items based on
the standard features and applicable
options on your particular trailer:
Owner’s Manual
•Consumer Information
•Refrigerator Manual
•Range/Oven Manual
•Furnace Manual
•Thermostat Manual
•Water Heater Manual
•Air Conditioner Manual
•Water Pump Manual
•Converter Manual
•Smoke, Propane and Carbon
Monoxide Detector Manuals
•Fantastic Vent Manual
•Stereo or DVD Manual

11
DEALER RESPONSIBILITY
Your RV has been thoroughly inspected at the
factory before shipment. However, your dealer
is responsible for performing a complete pre-
delivery inspection of all your trailer’s
components. This should assure you that all
components are in proper working order and
free of defects prior to you taking delivery.
During the delivery process, the dealer should
have taken you through the inside, as well as
around the exterior of the RV, to instruct and
explain the proper usage of all of the following
items:
•Appliances
•Dinette Bed Conversions
•Electrical System
•Fresh Water System
•Propane Gas System
•Loading and Unloading
•Optional Equipment
•RV Park Hookup
•Waste System
•Egress Exits
While the dealer has provided basic
instructions on how to use your RV, it is
ultimately your responsibility to make sure you
fully understand how to use the trailer prior to
doing so. To fulfill this responsibility, in
addition to the instructions received from the
dealer, you must read all instructional material
furnished with the RV. If you do not understand
how to operate any appliance or equipment,
you should return to your dealer for further
instructions.
Your Chalet comes with applicable loose items
based on the standard features and options on
your particular trailer. Please make sure that
you have each of these items:
•Appliance Information Package
•Keys to the entry & baggage doors
•Fire Extinguisher (mounted)
•Remote controls
•Stabilizer jack handle
PLANNING AND PREPARATION
•Proper planning of your trip will ensure
a pleasurable experience. A thorough
knowledge of your RV is important if
you are going to get the most of the
convenience and safety built into your
trailer. You should become as familiar
with your trailer as you are with your
own personal car or truck. If you have
trouble or questions, you should consult
your dealer.
INSPECTION AND MAINTENANCE
•Maintaining your trailer according to
the maintenance schedules given in this
manual helps to keep your camping
experiences trouble-free while
preserving your investment. When your
trailer needs maintenance, keep in mind
that your Chalet dealer’s staff is trained
in servicing the many systems in your
trailer. Your Chalet dealer is dedicated
to your satisfaction and will be pleased
to answer any questions and concerns.
•The Maintenance Chart located at the
rear of this manual defines the
minimum maintenance intervals.
Adherence to this schedule will
minimize the possibility of failure of
important systems of your camper. The
time spent inspecting and maintaining
your trailer will provide you with many
years of trouble free recreational
pleasure.
ALTERING OR MODIFYING YOUR
RV MAY VOID YOUR WARRANTY
Even doing something as simple as hanging
a picture. A drill, screw or nail could
penetrate an unseen gas line or electrical
circuit, which would be hazardous. If you
are not sure, call your Chalet dealer for
help! Also alterations or modifications to
your trailer may void your warranty.

12
REPORTING SAFETY DEFECTS
If you believe that your RV has a defect which could cause a crash or could cause injury or death, you should
immediately inform the National Highway Traffic Safety Administration (NHTSA) in addition to notifying Chalet Inc.
If NHTSA receives similar complaints, it may open an investigation, and if it finds that a safety defect exists,
it may order a recall and remedy campaign. However, NHTSA cannot become involved in individual problems
between you, your dealer, or Chalet Inc.
To contact NHTSA, you may either call the Auto Safety Hotline toll-free at 1-888-327-4236, or write to:
NHTSA,
400 Seventh St., S.W.,
Washington, D.C.20590.
You can also obtain other information about motor vehicle safety from the Hotline. They are on the web at
www.safecar.gov.

13
Tow Vehicle
MATCHING TRAILER AND TOW VEHICLE
Selecting the right combination requires
understanding a few guidelines. Your Chalet dealer
can be a valuable source of information when
matching a recreational vehicle with your tow
vehicle
A Federal Certification Label is required by law on
all tow vehicles. It is usually located on the driver
side door post. It lists the Gross Vehicle Weight
Rating (GVWR), the maximum weight at which
the vehicle may be operated. It also provides a
Gross Axle Weight Rating (GAWR), the
maximum weight allowed for each axle. The
GAWR, divided by two, is the maximum axle
rating for each end of an axle.
Trailers are considered “truck payload.” New
trucks have their payload capacity posted in the
glove box or on a specification sheet located in the
vehicles owner’s manual. Trucks that have many
options and/or a 4-wheel drive option have less
payload. To calculate payload, the vehicle
manufacturers assume all seat positions are filled
with persons weighing 150 pounds.
One way to determine the actual payload available
is to weigh the trailer full of water and propane.
RV’s become overloaded when people put too
many things into them. There is no easy way to
determine the weight you’ve loaded, so there’s a
temptation to keep loading until every available
space if filled. People are loading by volume, but
weight is far more important. Unfortunately, you
may have exceeded the load-carrying capacity of
the tires before everything is on board. The only
way to tell if your truck/trailer is overloaded is to
weigh it fully loaded.
The most critical point about weighing a trailer is
that it must be weighed with everything on board
that will be there while you’re traveling. That
means you must weigh the RV with all the
supplies, food, water, propane and the truck full of
fuel. Keep in mind that water weighs 8.3 lbs per
gallon and propane weighs 4.2 lbs per gallon.
These two items alone can add over 400 lbs alone.
Limiting your on-board water until you arrive at
your destination will lower your total weight. You
must know the actual load on the axles and wheels,
and there’s no other way to do it other than on a
commercial scale.
In addition to knowing the total weight, it is crucial
to know the weight on each end of each axle. That’s
the only way you can find out if the load is both
within the tire capacity, as well as whether or not
the load is properly distributed.
You should be able to find certified scales by
looking in your Yellow Pages for moving and
storage companies, farm suppliers, gravel pits,
recycling companies or commercial truck stops. Be
sure to call in advance to determine whether the
facility offers public weighing services, their hours
of operation and any fees that might be involved.
WARNING Failure to properly match
camper or trailer and the tow vehicle can result in
undesirable handling characteristics and create a
safety hazard.
Do not load your vehicle beyond its gross vehicle
weight rating (GVWR) and/or gross axle weight
ratings (GAWR). Both of these ratings are given on
an identification label normally located at the
driver’s door post area.
In addition to knowing the overall weight that can
be safely loaded in or attached to the tow vehicle,
you should know how to distribute the weight in
the RV so that correct amounts of weight are placed
over each axle. Proper weight distribution is
required for driving stability and will assure that
the trailer is not rear, front or side heavy. Heavy
weights placed at the rear end of the truck/camper
may cause undesirable handling characteristics
When loading the RV, store heavy gear first,
keeping it on or close to the trailer floor. Store only
light objects on high shelves. Distribute weight to
obtain even side-to-side balance of the loaded
vehicle. Secure loose items to prevent weight shifts
that could affect the balance of your vehicle.

14
TIRES
Tires are available in a variety of load ratings and sizes, and if the tires you currently have cannot
handle the load, it may be possible to replace your tires with tires of higher pound capacity. Keep in
mind, that the ultimate capacity of the tow vehicle is determined by the weakest link in the system.
This could be the tires, wheels, suspension or brakes. The maximum ratings are molded into the side
of the tire. The sidewall of the tire shows maximum and minimum inflation pressure for that load.
Be sure you also know the load and inflation pressure ratings for your wheels as well. Often, these
are stamped on the inside of the wheels, but if not, your dealer can help you find out what they are.
Never exceed the maximum load or inflation pressure of your wheels. Driving on under-inflated tires
can cause the tires to overheat, which leads to the breakdown of the tire’s internal structure. Improper
inflation also can reduce your ability to control your vehicle. Tire blowouts occur more during
summer months than any other time of the year. Properly inflated tires last longer, run quieter, grip
better, increase fuel mileage and safely support and control your vehicle. Check your tire pressure
once a month and each time before you take a trip with your truck and camper. Use a quality air
pressure gauge to check the pressure. Do not under-inflate or over-inflate your tires. Inspect your
tires for uneven or excessive wear. Look for bulges, cuts, or blisters on the sidewalls. When you’re
traveling, do as professional commercial drivers do: inspect your tires regularly and check and adjust
cold inflation pressure every day that you travel.
CAUTION Individual wheel position weights must not exceed the maximum tire load capacity.
Maximum tire load capacity can only be achieved utilizing the maximum allowable psi as listed on
the sidewall of the tire.
15
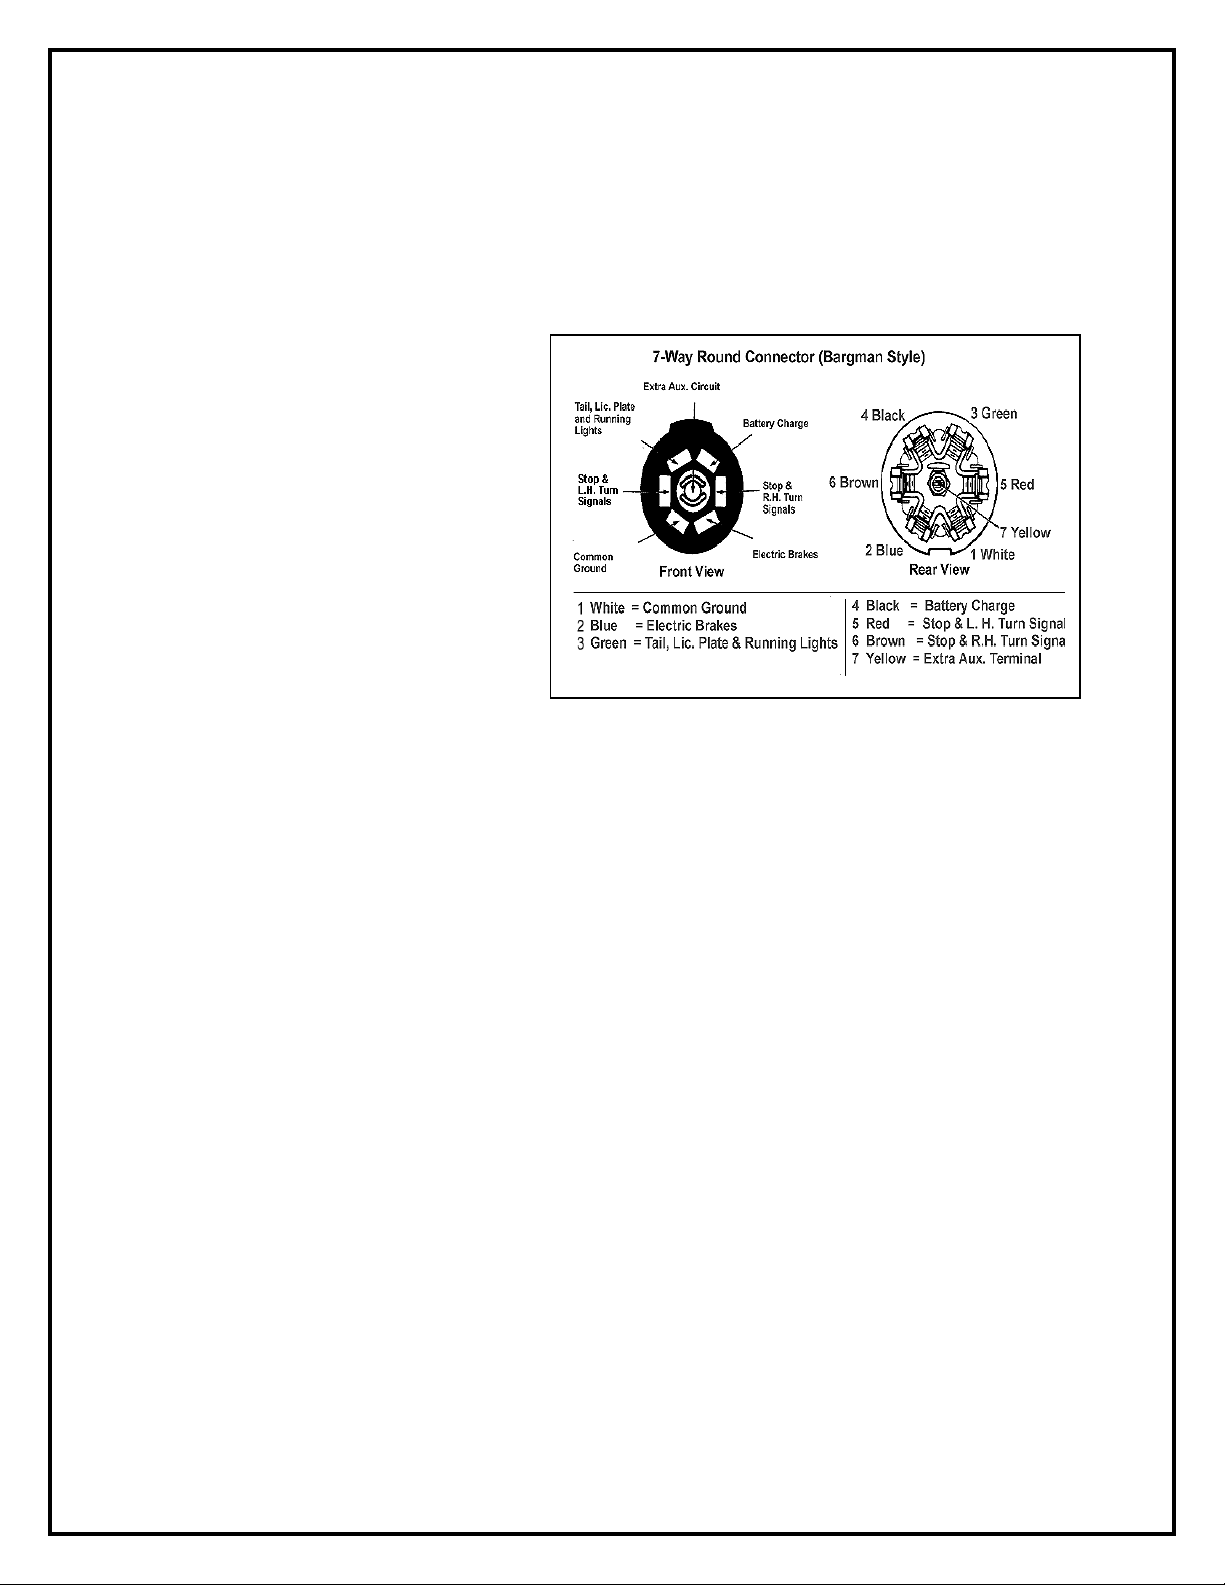
ELECTRICAL CONNECTION TO TRUCK
Your Chalet comes equipped with a 12-volt electrical cord with a molded connector.
The truck electrical connector will be installed by your Chalet Dealer to your truck wiring system.
With the wiring and connectors hooked-up, your truck will supply 12-volt DC power to charge your
trailer’s battery and provide power for the 12-volt power needs while the truck is operating.
Under no circumstances should the plug be
altered or changed to another type.
COLOR GAUGE FUNCTION
•Black 8 12-volt power
•White 8 Ground (-)
•Green 14 Running Lights
•Red 16 Left Turn Signal
•Brown 16 Right Turn Signal
•Yellow 16 Back-up Lights
NOTE:
Do not use less than 8 gauge wire size for charge lines. Also, do not attach them to smaller gauge
wires. Your RV maybe equipped with a 3-way refrigerator which uses 120v, 12v or LP gas to operate.
Selecting the 12v operation requires a large amount of amperage. This selection should only be used
while traveling when your truck alternator can produce this amount of amperage. Using an 8 gauge
wire from your truck battery to the trailer will ensure that adequate amperage will be supplied to the
refrigerator.
To protect your truck’s 12-volt system from overload, a 40-amp circuit breaker should be installed at
the power source under the hood. A Battery Separator may be necessary to install on your vehicle.
Its purpose is to protect your truck’s starting battery from discharge. To handle the trailer’s electrical
requirements and to charge the trailer’s battery, 8 gauge hot and ground wires must be run from the
power source under the truck hood to the 12-volt camper electrical connector location in the truck
bed.

16
ON THE ROAD
LOADING
When loading camping gear, store heavy items first
and place down low. Distribute weight as evenly as
possible from side to side. REMEMBER:
overloading or uneven loading can create a serious
safety hazard. Secure and brace stored items so they
won’t move during travel, thereby shifting the load
in the trailer. Do not load heavy items near the end
of the RV. Carry only as much water as needed for
travel use or to balance the load. Whenever
possible, empty the waste water holding tanks
before traveling.
STORAGE
All cabinets and storage areas should have the
heaviest items on the bottom and lighter items
overhead. After loading you should have the
skillets and can goods on the floor or bottom shelf,
and the cereals and crackers in the overheads. Use
the unbreakable type plates and saucers, and
consider storing your dishtowels around them.
Clothing hung in wardrobes should be kept on
hangers that snap over the clothes rods to keep them
from “jumping” off on rough roads.
PREPARING FOR TRAVEL
Properly preparing for a trip before you leave can
make things more enjoyable. Make a list of items
you will need or wish to take. Keep in mind the
following categories:
•Bathroom & cleaning supplies
•Kitchenware, Bedding, Clothing
•Fire Extinguisher
•First aid items
•Food
•Holding tank chemical
•Personal items
•Road flares & Tools
PRE TRIP CHECKS
Exterior
1. Connect battery(s) and check condition.
2. Check for fluid leaks.
3. Check tires and wheels for damage and proper
inflation. Check tires for cuts or other damage.
4. Check tires for unusual tread wear that may
indicate a balance or suspension problem.
5. Always keep tires in good condition and when
replacing, be certain that the new tires have the
load carrying capacity of your vehicles
GVWR.
6. Check that access doors are securely closed.
7. Check engine and power plant oil levels.
8. Check engine coolant level, windshield washer
reservoir, and batteries.
9. Check all running lights, taillights and
electrical system.
Interior
1. Secure all loose items.
2. Close all drawers and cabinets.
3. Secure range and refrigerator doors.
4. Check that entry door is locked.
Systems
1. Fill fresh water tank.
2. Drain holding tanks and secure drain cap.
3. Check operation of interior lights and
appliances.
4. Check propane gas level. Check for kinked
propane lines and possible leaks.
POST-TRIP CLEAN-UP
1. Clean unit and check for damage.
2. Drain waste-holding tanks.
3. Clean waste drain hose and secure drain cap.
4. Drain fresh water tank and rinse.
5. Close outlet valve on propane tank.
6. Disconnect the battery cables or turn off battery
disconnect switch if equipped.
17
SAFE DRIVING RULES
Your vehicle when towing will have different handling and
stopping characteristics. The following rules will help you
develop needed skills for safe driving.
Travel slowly until you have learned the handling and
stopping characteristics. Practice turning, stopping, and
backing in a secluded place away from traffic.
Do not permit a driver who is inexperienced to tow your
trailer without your direct supervision.
Drive at moderate speeds allowing for adverse highway and
wind conditions. Even under the best of conditions, do not
exceed 55 miles per hour. As speed increase driving stability,
stopping ability and the ability to make emergency maneuvers
are greatly reduced.
Reduce speed before starting down hills –even short ones -
and avoid heavy braking on downgrades. Truck stability is
reduced when traveling downhill.
Slow down before entering turns and avoid heavy braking in
turns. Truck stability is reduced in turns, and the weight of the
trailer on the truck will affect the way the truck handles. Avoid
quick steering movements that can reduce truck stability.
Maintain at least twice the normal stopping distance while
towing your trailer. The increased weight of the trailer on the
truck requires greater stopping distance.
Use lower gears on long grades. Downshift on upgrades to
avoid overheating or undue engine loads. Downshift on
downgrades to allow engine braking to assist in controlling
vehicle speed. Avoid continuous or frequent brake application.
Allow ample time for passing. Your acceleration will be
much slower when you are towing the trailer.
Become familiar with the position of the trailer in traffic, and
be cautious when maneuvering to allow for its length and
width. Always allow extra room to corner and to change lanes.
Learn to use the side mirrors to view the road behind and to
the sides. Check them often.
Allow for extra height of your trailer. Check for low
hanging tree branches or other obstructions whenever you
drive, park, or when pulling in for fuel or service. Always
check overhead clearance of overpasses and bridges,
especially if you drive with the roof vents slightly open or if
the RV is equipped with a roof air conditioner, roof rack,
TV/radio antenna, or a satellite dish. Measure your height from
the ground to the highest point on the roof. Write it down on a
piece of tape and put it in a visible place in your truck. This
will help you when you get to that “low overpass”.
NOTE: Be sure to lower TV antenna before driving.
RIDING IN THE TRAILER WHILE TRAVELING
For the safety of passengers, it is not advisable to ride in the
RV while traveling. In some states it may be illegal.
CARBON MONOXIDE GAS
Safety Precautions
Carbon monoxide gas is colorless, tasteless, and odor-less. It
is a combustion by-product of fuel burning engines. The
engines in your truck and generator system (if installed)
produce it constantly while they are running. Carbon
monoxide gas is deadly. Please read and understand the
following warnings and precautions to protect yourself and
others from the effects of carbon monoxide gas.
WARNING Exhaust gases are deadly. Do not
block the tailpipes or situate the vehicle in a place where the
exhaust gases have any possibility of accumulating either
outside, underneath, or inside your vehicle or any nearby
vehicles.
WARNING Outside air movement can carry
exhaust gases inside the vehicle through windows or other
openings remote from the exhaust outlets.
WARNING Operate the engine(s) only when
safe dispersion of exhaust gases can be assured, and monitor
outside conditions to be sure that exhaust continues to be
dispersed safely.
WARNINGDo not under any circumstances
operate any engine while sleeping. Beware of exhaust gas
(carbon monoxide) poisoning
Symptoms include:
Dizziness
Headache
Weakness and sleepiness
Nausea
Vomiting
Muscular twitching
Throbbing in temples
Inability to think coherently
If symptoms indicate the possibility of monoxide gas
poisoning: Turn off engine(s) immediately. Get out into fresh
air at once. Summon medical assistance Check the exhaust
systems during routine maintenance and repair any leaks,
damage, or obstruction before further operations. Do not
modify any exhaust system in any way.

18
EFFECTS OF PROLONGED OCCUPANCY
Your RV was designed primarily for recreational use and
short-term occupancy. If you expect to occupy the trailer
for an extended period, be prepared to deal with
condensation and the humid conditions that may be
encountered.
The relatively small volume of space and air tight
construction of a modern recreational vehicle means that
the normal living activities of even a few occupants will
lead to rapid moisture saturation of the air contained in
the trailer and the appearance of visible moisture,
especially in cold weather. Just as moisture collects on
the outside of a glass of cold water during humid weather,
moisture can condense on the inside surfaces of your RV
during use in cold weather when the relative humidity of
interior air is high. This condition is increased because
the insulated walls of the trailer are much thinner than
house walls.
Estimates indicate that a family of four can vaporize up
to three gallons of water daily through breathing,
cooking, bathing, and washing. Unless this water vapor
is carried outside by ventilation, or condensed by a
dehumidifier, it will condense on the inside of the
windows and walls as moisture, or in cold weather as
frost or ice. It may also condense out of sight within the
walls or the ceiling where it will manifest itself as warped
or stained panels.
Appearance of these conditions may indicate a serious
condensation problem. When you recognize the signs of
excessive moisture and condensation in your trailer, you
should take action to minimize their effects.
NOTE: Your RV is not designed to be used as permanent
housing. Use of this product for long term or permanent
occupancy may lead to premature deterioration of the
structure, interior finishes, fabrics, carpeting and drapes.
Damage or deterioration due to long-term occupancy
may not be considered normal, and may under the terms
of the warranty constitute misuse, abuse or neglect, and
may therefore reduce your warranty protection.
VENTILATION AND MOISTURE CONTROL
You can reduce interior moisture condensation by taking
the following steps:
Ventilate with outside air. Partially open one or more
roof vents and one or more windows to provide
circulation of outside air into the interior. While this
ventilation may increase furnace-heating load during
cold weather, it will greatly reduce water condensation.
Even when it is raining or snowing, ventilation air from
outside will be far drier than interior air and will
effectively reduce condensation inside the camper.
Minimize moisture release inside the trailer.
Run the range vent fan when cooking and the bath vent
fan (or open the bath vent) when bathing to carry water
vapor out of the RV. Avoid making steam from excessive
boiling or use of hot water. Remove water or snow from
shoes before entering to avoid soaking the carpet. Avoid
drying overcoats or other clothes inside the camper.
DO NOT HEAT THE INTERIOR WITH THE
RANGE OR OVEN!!
In addition to the hazards of toxic fumes and oxygen
depletion, open flames add moisture to the interior air,
increasing condensation. Do not use an air humidifier
inside the trailer. Water put into the air by the humidifier
will greatly increase condensation.
Ventilate closets and cabinets. During prolonged use in
very cold weather, leave cabinets and closet doors
partially open to warm and ventilate the interior of
storage compartments built against exterior walls. The
airflow will warm the exterior wall surface, reducing or
eliminating condensation and minimizing possible ice
formation.
Install a dehumidifier. During prolonged, continuous
use, a dehumidifying appliance maybe more comfortable
and effective in removing excess moisture from the
interior air. While use of a dehumidifier is not a “cure-
all”, ventilation, and moisture reduction continue to be
important, operation of the dehumidifier will reduce the
amount of outside air needed for ventilation. Heating load
on the furnace will be reduced, and the interior will be
less drafty.
INTERIOR ODOR New units may have a strong odor
and even cause eye and lung irritation when closed up in
hot weather. This is due to glues used in production of
forest products (plywood, paneling, etc.). This condition
passes with time, but in an extreme condition, open the
door, windows, and vents to allow the interior to “air out”
for several hours.

19
FIRE AND SAFETY
The hazard and possibility of fire exists in all
areas of life, and the recreational lifestyle is no
exception. Your trailer is a complex device
made up of many materials - some of them
flammable. But like most hazards, the
possibility of fire can be virtually eliminated by
recognizing the danger and practicing common
sense safety and maintenance habits.
Recreational vehicle fires are generally caused
by unattended food cooking on the stove or in
the oven, faulty or damaged wiring and
electrical devices, fuel leaks (both gasoline and
propane), or carelessness.
The most common careless acts include
smoking in bed, leaving children unattended
and cleaning with flammable liquids.
Consider These Fire Safety Suggestions:
Before refueling your truck or any fuel tank in
the vicinity of your RV, be sure to turn off all
pilots and appliances in your trailer. Consider
the cause and severity of the fire and the risk
involved before trying to put it out. If the fire is
major or is fed by gasoline, propane or any type
of oil product, stand clear of the vehicle and
wait for the fire department or other emergency
assistance.
If your RV is damaged by fire, do not use it
until it has been thoroughly examined and
the cause of the fire is found and fixed.
All occupants of the trailer should become
familiar with the audible sound of the smoke,
propane leak and CO detectors. If an alarm
sounds, investigate the cause. Do not remove
the detector in an attempt to silence the alarm.
Teach everyone in the RV how to use the entry
door locking system and emergency exits.
Occasionally open the emergency exit to
prevent the seal from sticking. Always keep the
dead bolt on the entry door in working
condition.
FIRE EXTINGUISHER
The fire extinguisher in your trailer is located
near the main entry door. Your fire extinguisher
should be replaced immediately after use or
discharge. The fire extinguisher furnished with
your camper is rated for Class B (gasoline,
grease, flammable liquids) and Class C
(electrical) fires since these are the most
common types of fires in recreational vehicles.
Read the instructions on the fire extinguisher.
Know how and when to use it. You and your
family should be familiar with its operation. If
you find it necessary to use the fire
extinguisher, stand 45 degrees from the flame
and spray side to side, starting at the top of the
flame. Use caution to avoid standing upwind or
uphill. If flames are climbing, spray vertical and
work the retardant downwards. Dry chemical
flame retardant should be cleaned away as soon
as possible.
SMOKE DETECTOR
Most fire casualties are caused by inhalation of
toxic fumes (smoke) from a fire and not by
flame. The smoke detector responds to smoke
that enters the sensing chamber. It does not
sense gas, heat or flame. A ceiling mounted,
battery powered smoke detector is located in the
living /cooking area of your RV. Please read the
smoke detector Owner’s Manual for details on
testing and caring for this important safety
device. Test the smoke detector after the RV has
been in storage, before each trip, and at least
once a week during use. The smoke detector
should never be disabled due to nuisance or
false alarm from cooking smoke, a dusty
furnace, etc. Ventilate your trailer with fresh air
and the alarm will turn off. Do not disconnect
the battery. Replace the battery once a year or
immediately when the low battery “beep”
signal sounds once a minute. The detector uses
a standard 9-volt battery. Test smoke detector
operation after replacing the battery. If the
smoke detector fails to operate with a new
battery, replace the detector with a new unit.

20
COMBINATION CARBON MONOXIDE AND PROPANE
LEAK DETECTOR
A permanently installed detector is located near
the floor in the forward portion of the main
camper floor area. The unit contains an alarm
that will sound, alerting you to the presence of
propane or carbon monoxide.
WARNING
TO REDUCE THE RISK OF CARBON MONOXIDE
POISONING OR PROPANE GAS EXPLOSION, TEST
THIS ALARM’S OPERATION AFTER THE CAMPER
HAS BEEN IN STORAGE, BEFORE EACH TRIP AND
AT LEAST ONCE PER WEEK DURING USE.
WARNING
DO NOT USE A CIGARETTE LIGHTER TO TEST THE
CO / PROPANE GAS ALARM. Butane gas may
damage the sensors.
DO NOT attempt to test the alarm by any other means than
by using the TEST/RESET button. DO NOT attempt to
produce CO to the alarm. The TEST/RESET button tests
all functions of the alarm and is the ONLY safe way to be
sure the alarm is working properly.
The alarm may be tested at any time. The TEST/Mute
switch is located on the front of the alarm. Press and hold
the test button for 1 second. The alarm is working properly
if the GREEN indicator light changes color to RED and
the alarm beeps 4 times. The Gas LED should also blink
Red.
OPERATION
When the unit is first powered up, the CO sensor requires
a ten (10) minute initial warm-up period to clean the sensor
element and achieve stabilization. The GREEN LED
indicator will flash on and off during the 10 minute warm-
up period. This unit cannot go into a CO alarm during the
warm-up period. After the warm-up period, the GREEN
power ON indicator should glow continuously. If the ON
indicator light does not light see the section, “Trouble-
Shooting Guide” in the User’s Manual for this alarm
provided in the Owner’s Information Package.
This alarm will operate normally down to 7v DC. It will
not work without power.
VISUAL AND AUDIBLE ALARM
SIGNALS
The CO / Propane Gas Alarm is designed to be easy to
operate. The alarm has two indicator lights that display a
specific color for each monitored condition. There also is
a matching sound pattern for alarm conditions.
CO ALARM
The Red CO LED will flash and the alarm will
sound 4 “BEEPS” then silent for 5 seconds.
These signals indicate that the CO level over 70
ppm.
IMMEDIATE ACTION IS REQUIRED. This
cycle will continue until the TEST/Mute button
on the front of the alarm is pressed. Ventilate the
Camper. The RED light will stay ON until the
CO has cleared, or the alarm will reactivate in
approximately 6 minutes if the CO is still
present.
DO NOT RE-ENTER THE TRAILER. This
alarm will return to normal operation after the
RV has been properly ventilated.
PROCEDURES TO TAKE DURING A CO
ALARM
Actuation of this device indicates the presence of
carbon monoxide (CO) or propane gases, which
can kill you. If signal sounds (4beeps and
flashing or solid red light), immediately turn off
all combustion sources and ventilate the
premises. Evacuate the premises immediately.
Check that all persons are accounted for. Do not
re-enter the camper until it has been aired out and
the problem corrected. Have the problem
corrected before restarting appliances.
WARNING Carbon monoxide cannot be seen
or smelled and can kill you.
Table of contents


