Truxta BENDI EB400 User manual

GB OPERATOR MANUAL
FR MODE D’EMPLOI
NL BEDIENINGSHANDLEIDING
DE BEDIENUNGSHANDBUCH
ES MANUAL DEL OPERADOR
IT MANUALE PER L’OPERATORE
CZE UŽIVATELSKÁ PŘÍRUČKA
GB MACHINE MODELS BENDI EB400 /EB500
NL MODELLEN BENDI EB400 /EB500
DE MASCHINENMODELLE BENDI EB400 /EB500
FR MODÈLES DE MACHINE BENDI EB400 /EB500
ES MODELOS DE MAQUINA BENDI EB400 /EB500
IT MODELLI MACCHINA BENDI EB400 /EB500
CS NÁHRADNÍCH SOUČÁSTÍ MODELY STROJE BENDI EB400 /EB500
Pl MODELE URZĄDZENIA BENDI EB400 /EB500
MINI DUMPER
MINI DÚMPER
2
GB - GENERAL SAFETY / WARNING SYMBOLS & DECALS
INDEX Page
GENERAL SAFETY / HEALTH & SAFETY / WARNING, SYMBOLS & DECALS 2
OPERATING INSTRUCTIONS - ELECTRIC / (ELECTRIC / BATTERY CHARGER ) 3
SERVICE & MAINTENANCE - ELECTRIC / (PROBLEM SOLVING / TROUBLE SHOOTING/ WIRING DIAGRAM) 4
ELEC WIRING DIAGRAM / LIFTING / SECURING 5-6
WARRANTY REGISTRATION 7
GENERAL SAFETY / WARNING SYMBOLS & DECALS
For your own personal protecon and for the safety of those around you, please read and ensure you fully understand the following safety informaon.
It is the responsibility of the operator to ensure that he/she fully understands how to operate this equipment safely.
If you are unsure about the safe and correct use of the TRUXTA, consult your supervisor or TRUXTA
• This equipment is heavy and must not be lied single-handedly, GET HELP
and use suitable liing equipment.
• Cordon o the work area and keep members of the public and unauthorized
personnel at a safe distance.
• Personal Protecve Equipment (PPE) must be worn by the operator when
ever this equipment is being used (see Health & Safety).
• Make sure you know how to safely switch this machine OFF before you
switch it ON in case you get into diculty.
• Never remove or tamper with any guards ed, they are there for your
protecon.
• Always check guards for condion and Security, if any is damaged or missing,
DO NOT USE THE TRUXTA unl the guard has been replaced or repaired.
• Do not operate the machine when you are ill, feeling red, or when under
the inuence of alcohol or drugs.
• Do not use the TRUXTA to transport people.
• Do not release the brake suddenly when travelling forward at speed with a
heavy load as the machine may topple forward.
• (Brake o). Close the throle if necessary so that motor braking controls the
speed. Always ensure that when moving downwards on a hill, the machine is
travelling in reverse.
• STEERING THE TRUXTA ON GRADIENTS.
DO NOT steer the TRUXTA le or right when travelling up or down a gradient.
Always travel in a straight line. When travelling across a graduated slope,
always travel in a forward direcon, maximum gradient 6 degrees (10%)
when travelling across with a TRUXTA.
• ENVIRONMENTAL — Safe Disposal.
Instrucons for the protecon of the environment. The machine contains
valuable materials. Take the discarded apparatus and accessories to the
relevant recycling facilies.
• VIBRATION
Some vibraon from the operaon is transmied through the handle to the
operator’s hands. DO NOT exceed the maximum usage mes.
(See Technical Data secon)
• PPE (Personal Protecve Equipment).
Suitable PPE must be worn when using this equipment i.e. Safety Goggles,
Gloves, Ear Defenders, Dust Mask and Steel Toe capped.
Footwear. Wear clothing suitable for the work you are doing. Tie back long
hair and remove any jewellery which may catch in the equipment’s moving
parts.
• Electric
Do not aempt to charge the electric machine if cable or connectors are
damaged
Do not connect or disconnect the machine with wet hands immediately
replace damaged charging parts .
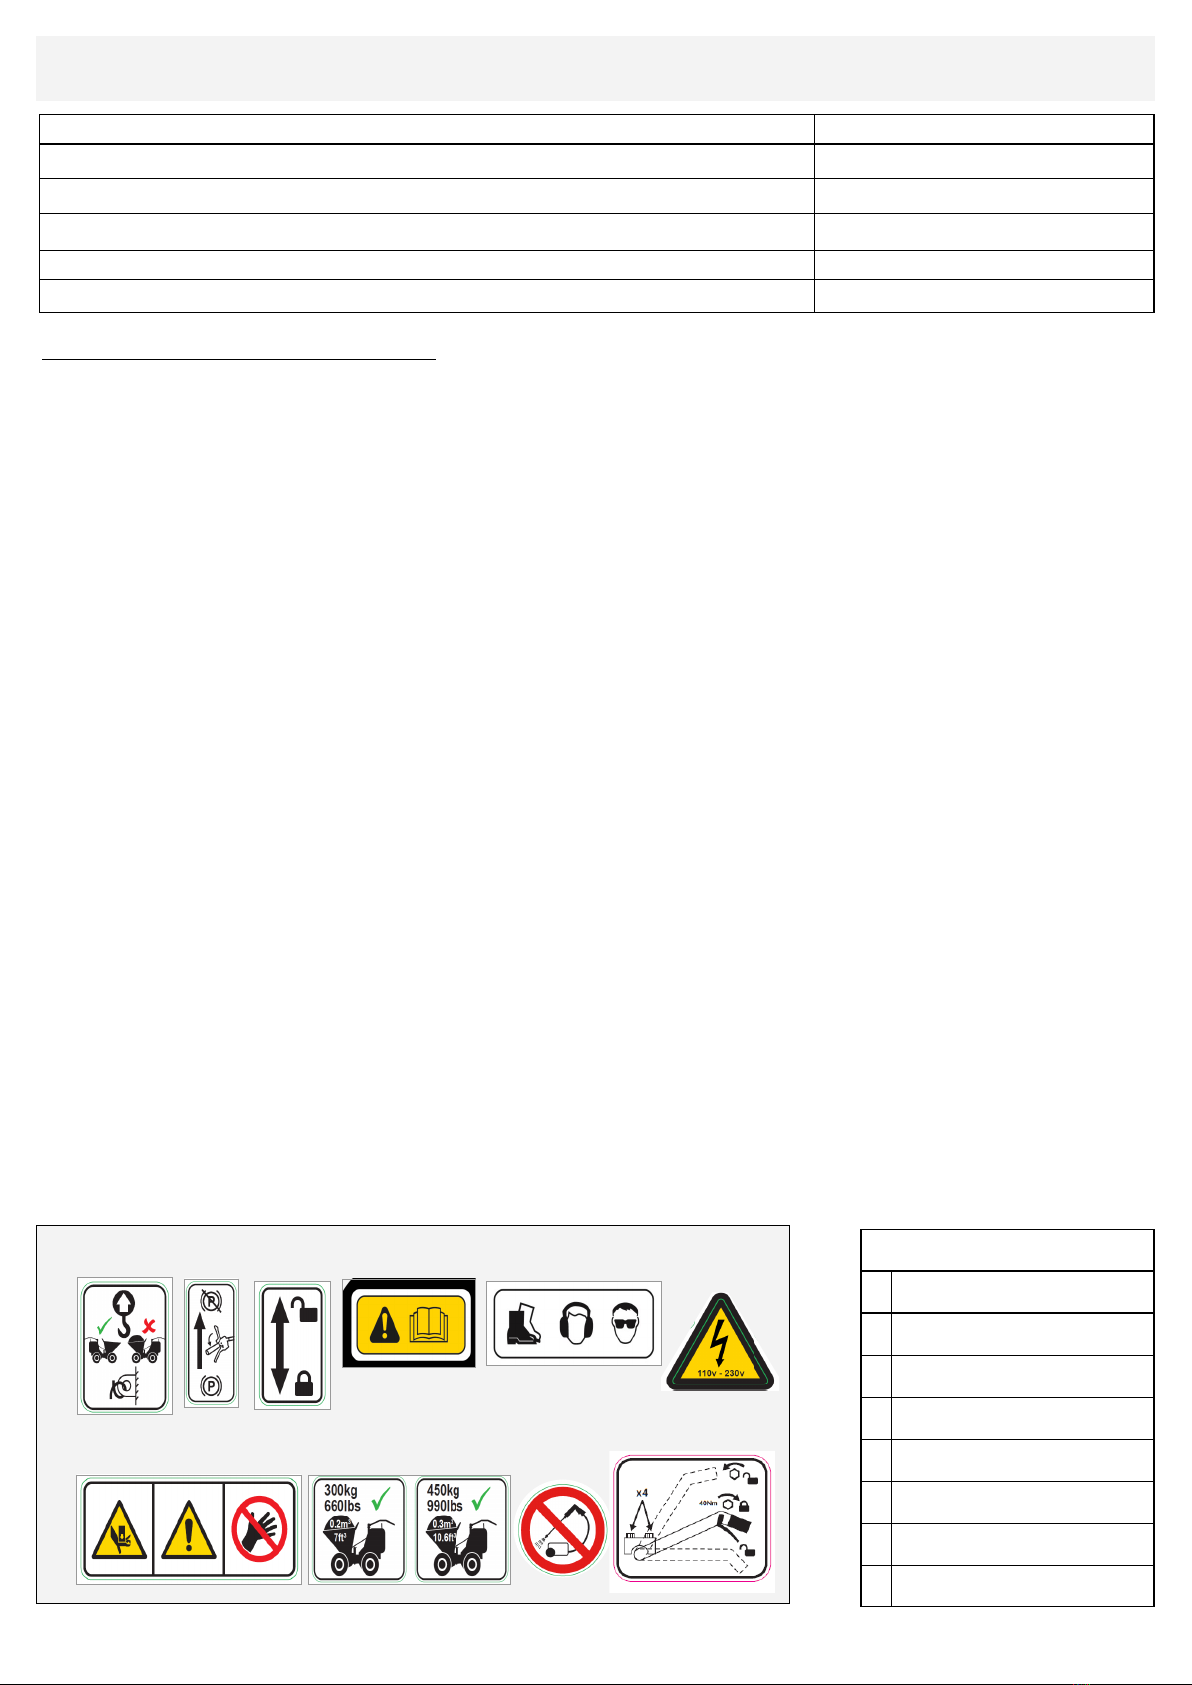
SAFETY DECALS
1LIFTING POINTS UN-LADEN
2BRAKE OVERRIDE, SKIP RETAINER
CATCH
3ALWAYS READ THE MANUAL BEFORE
USE / PPE
4VOLTAGE WARNING
5CRUSH ZONE WARNING
6PAYLOAD
7DO NOT PRESSURE WASHER INTO
AIR VENTS
8HANDLEBAR ADJUSTMENT ANGLE
1 2 3 4
5 67 8

3
OPERATING INSTRUCTIONS & CHARGING - SERVICE & MAINTENANCE - ELECTRIC TRUXTA - GB
OPERATING INSTRUCTIONS
Check Baery Condion - Orange light charging Green light charged
E Stop out ignion on
1&2 Forward & Reverse Controls
3&4. Stopping and Park brake
ON INCLINES Do not use TRUXTA on inclines / ramps above 25°
Do Not travel forwards down inclines.
TO MOVE TRUXTA Press yellow dead-man handle on right handle
down for any movement.
Right handle lower lever for forward moon.
RH & LH lower lever together for reverse moon.
TO STOP / PARK Release dead-man handle to stop.
Release lower forward / reverse levers.
Ideally Park on at surface.
OPERATING INSTRUCTIONS & CHARGING
Check mains lead is stored correctly and is secured to the machine.
Check mains lead is not damaged in any way and replace as necessary.
OPERATING THE TRUXTA
Pull out large red buon. (DEADMAN KILL SWITCH)
Turn ignion key on.
Depress dead man lever (RED) on right hand controls.
To Move Forward — squeeze right hand lever to move forward.
To Reverse — squeeze and hold le hand lever, then squeeze the right hand
lever to move the machine in reverse.
STOPPING THE TRUXTA
Release the right hand lever to stop the machine
Release the dead man red lever to engage the parking brake
In emergencies hit the large red buon (DEADMAN KILL SWITCH)
When machine is not in use, always push in the large red buon.
PARKING BRAKE - The Parking Brake operates automacally when the dead
man lever (RED) is in the upright posion. The brake is on unl the dead-man
(RED) lever is compressed to release it.
MOVING the TRUXTA with NO POWER
For manual brake release when the machine has no power
Push brake release lever forward and hold the dead-man lever down, the
TRUXTA can now be moved manually.
CHARGING THE ELECTRIC TRUXTA
1. TRUXTA has a built-in 24v charger
2. Turn o ignion switch.
3. Push in the large red buon.
4. Connect the cable provided to a mains supply 110-230 v. Charger is dual
voltage.
5. Check baeries are charging by observing small window on right- hand side
of baery box.
6. The CHARGING light is normally ORANGE which changes to GREEN when the
baery is fully charged.
7. The charger is a Smart Charger, it can be le connected to the baeries aer
full charge (green light) without harming baeries. The charger uses minimum
power in this stand-by mode (aer baery is fully charged), maintains the
baeries at full charge and extends baery life.
Machine Cleaning
Clean the machine aer it has been used to prevent the collecon of
hardened debris. Hardened debris is very dicult to remove. To clean it use
an old brush or hand brush with water. Never pressure wash or hose down
the electric motor housing. Clean only with a cloth or compressed air.
Lubricate the single grease nipple on the centre joint once a year.
Tyre Pressure
Truxta tyre pressure should be regularly checked and
maintained at 25PSI (otaon and turf tyres).

GB - ELECTRIC TRUXTA - DIAGNOSTICS & TROUBLESHOOTING
4
ELECTRIC TRUXTA - DIAGNOSTICS & TROUBLESHOOTING
The machine controller detects a wide variety of faults or errors.
Diagnosc informaon can be obtained on the 3100R fuel gauge display where an error code in the format ''Err ##''.
The troubleshoong chart below describes the Error code faults and their possible causes.
Whenever a fault is encountered the rst acon should be to turn o the ignion and push in the E stop buon. Then pull out the E stop buon and turn the ignion back
on to see if the fault clears. This is the RESET procedure:.
If the Error code does not clear aer the machine RESET, turn o the ignion switch and remove the 35-pin connector. Check the connector for correcon or damage,
clean it if necessary, and reinsert it.
If the Error is sll seen then the wiring and connecons on the machine should be checked for breakages or loose connecons.
The table below should be used as a reference once the above checks have been carried out.
Error code Descripon of Error Possible Cause /
Reason for Error Check points Technical Bullen
(see website)
1HW
Fail-safe Motor fault voltage (hardware failure) 1. Motor voltage does not correspond to throle
request.
2. Short in motor or In motor wiring.
10 Main brake driver over
current Short circuit or overloaded controller driver, Early
controllers were re-programmed
15 Main
Current dropped Main contractor failed open. 1. Clean the contactor switch TB10001
17 Main
Contactor Welded Main contractor on fault 1. Main contactor failed closed, replace contactor.
33 Supervisor DIR Check
Fault
If fault is on an external signal, check that
signal rst. If no problem with the external
signal, likely indicates an internal controller
fault.
Early controllers were re-programmed
34 External Supply Fault Under voltage 1. Check control wiring circuit, potenometer wiring in
parcular. TB10010
36 EM-Brake Driver
Open Drain Hold voltage is set at 90% 1. Check bullet connectors to brake, check connuity or
2. The motor brake has failed.
54 Pre-charged Failed Pre-charge fault
1. Low baery voltage - 25V (11/12V) is good
condion, 22V (9/10V) or lower is bad baeries
condion.
2. Short circuit on tracon motor outputs.
TB10008
80 HPD
Sequencing HPD fault present > 10 seconds 1. Misadjusted throle
2. Broken throle potenometer or throle
mechanism. TB10004
92 Motor Open Tracon motor not connected. Controller can not see the motor.
Could be a short circuit in the motor.
1. Check the resistance across the motor leads.
99 Under-voltage Cutback Baery voltage too low Baery voltage < undervoltage threshold.
1. Bad connecon at baery or controller.
2. Check no corrosion on the baery terminals.
Quick checks if no reading on fuel gauge and machine does not operate:
1. Check 10A fuse in the control panel. Fuse holder is located to the right hand side of the main control panel, turn CCW to release the fuse holder.
2. Check main fuse located behind the rear motor housing cover & 100A fuse. Open the rear cover which is xed in posion with 2 x M6 screws, ensure the cover is
supported during this process. Main fuse is located on the le hand side of the baery housing.
When changing the 100 amp fuse, ensure that the posive baery lead is fully dis-connected. Electrical maintenance should be carried out by a qualied person.
To maximize the life of your AGM baery, it is important that it is
properly charged. As with all lead-acid baeries, both over- and under-
charging an AGM baery will result in shortened service life.
The TRUXTA mini dumpers are ed with an on-board SMART charger
which maintains the baery full charge condion without resulng in
over charging.
The AGM baeries are sealed for life units and do not require any uid
top up.
Please read the following instrucons:
Charging system Inspecon
The charger’s AC (mains) cord should be free of breaks or cuts and the
wall plug socket should be clean and free from debris.
The cable connectors from the on-board charger should be clean and
properly mate with the baery terminals to ensure a sound connecon.
Baery Inspecon
• Check baery cables are not damaged.
• Connectors should be free of corrosion.
• DC Cable post or eyelet connectors are ght to avoid arcing.
Charging Guidelines
• Fully charge baeries aer baeries have been dis-charged to ¼ full on baery
gauge. The on-board charger mains cord should be plugged into the mains AC
supply. Leave baeries to complete full charge and do not disconnect unl fully
charged. Once fully charged the on-board SMART baery charger will maintain
the baery fully charged status.
• Do not opportunity charge baeries i.e. if the baeries have only dis-charged
to ¾ full on the baery gauge, there is no need to connect the charger to the
AC supply. It is recommended to use the dumper unl the baeries have dis-
charged to ¼ full on the baery gauge, then place the dumper onto a full
charge cycle.
• Charge in a venlated area as gasses may be released through the pressure
relief valve if the baeries are excessively over-charged.
• Never charge a frozen baery.
• Ideal charging temperatures: (0°C to 40°C) 32°F to 104°F
AGM Baery Charging

5
ELECTRIC TRUXTA - WIRING DIAGRAM – GB
6
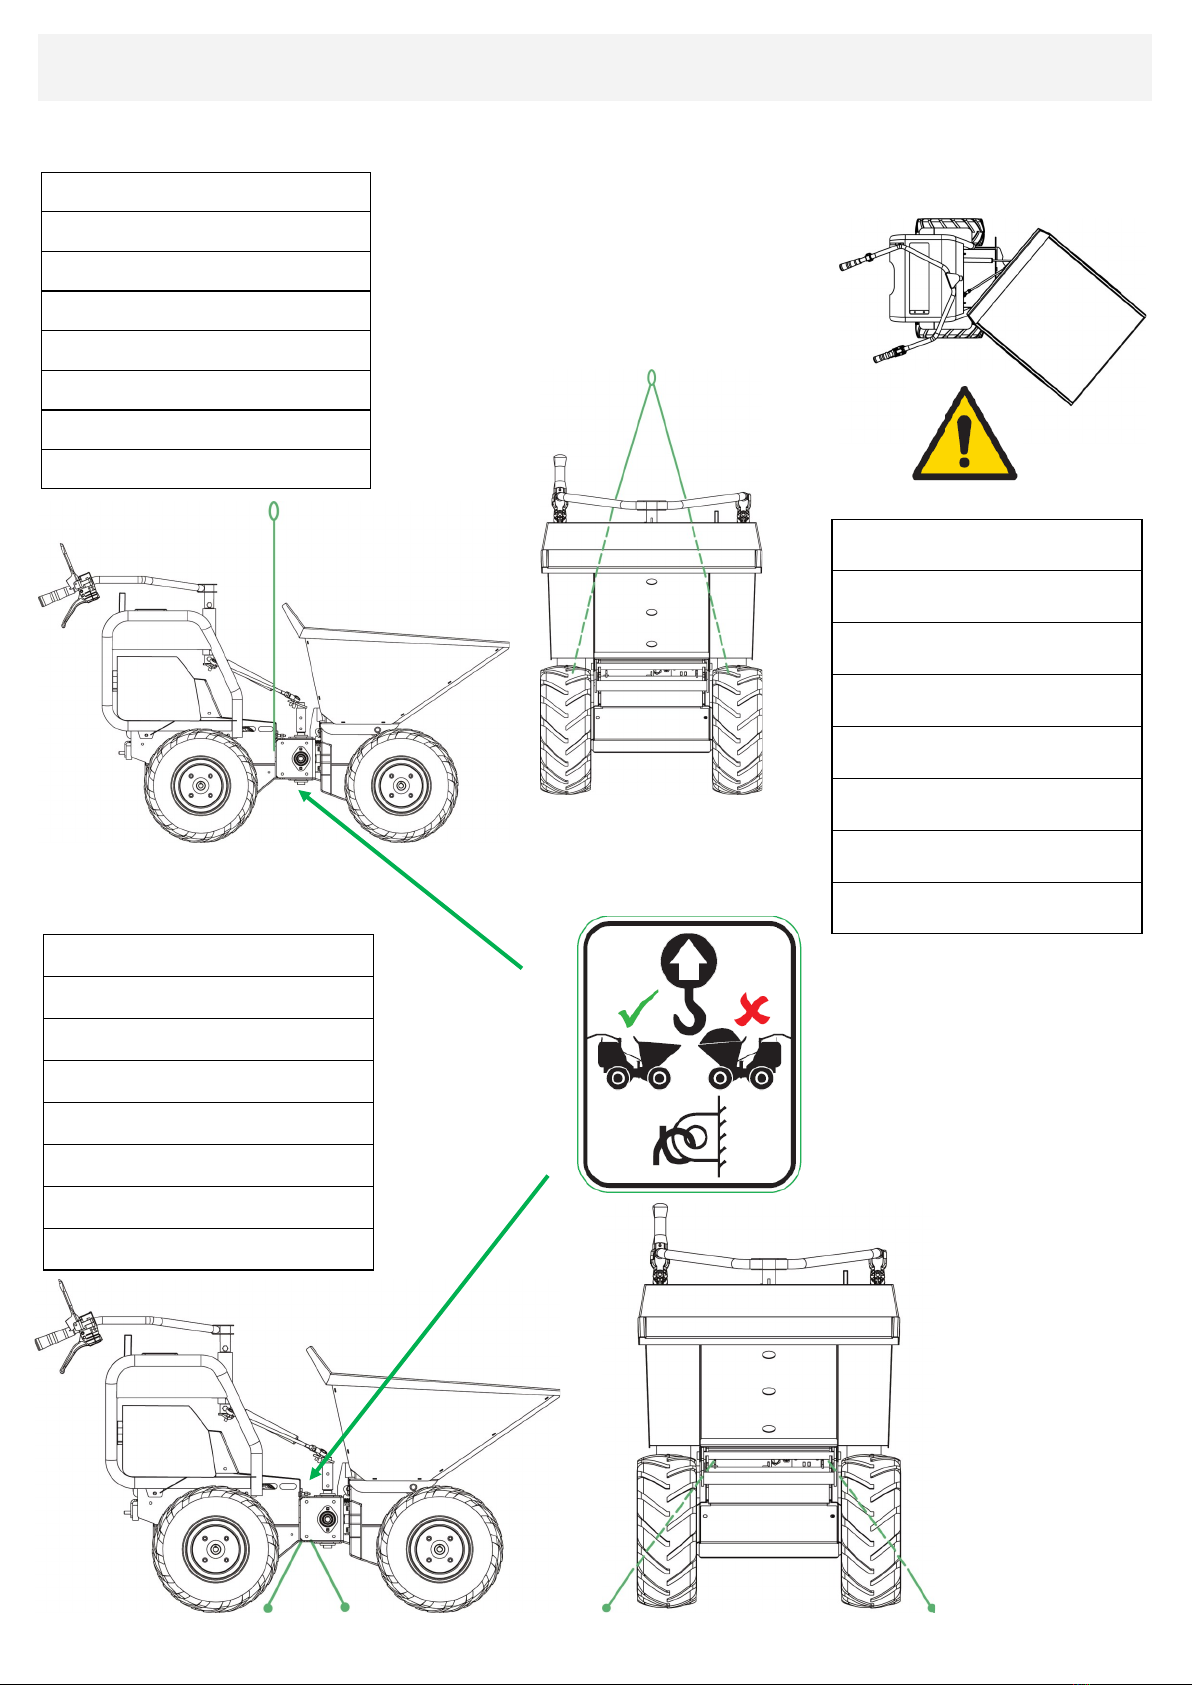
LIFTING PLAN
PLAN DE LEVAGE
HIJSPLAN
HEBEPLAN
PIANO DI SOLLEVAMENTO
PLAN DE ELEVACIÓN
PLAN PODNOSZENIA
PLÁN ZDVIHÁNÍ
BEWARE OF ROTATING WHEN LIFTING
ATTENTION À LA ROTATION PENDANT LE
LEVAGE
PAS OP VOOR RONDDRAAIEN TIJDENS HIJSEN
VORSICHT VOR ROTATION BEIM HEBEN
FARE ATTENZIONE ALLA ROTAZIONE DURANTE
IL SOLLEVAMENTO
CUIDADO CON LA ROTACIÓN AL LEVANTAR
UWAŻAĆ NA OBRACANIE SIĘ PODCZAS
PODNOSZENIA
PŘI ZDVIHÁNÍ DÁVEJTE POZOR NA OTÁČENÍ
SECURING FOR TRANSPORT
FIXATION POUR LE TRANSPORT
VASTZETTEN VOOR TRANSPORT
SICHERUNG FÜR DEN TRANSPORT
PROTEZIONE PER IL TRASPORTO
FIJACIÓN PARA EL TRANSPORTE
ZABEZPIECZENIE DO TRANSPORTU
ZABEZPEČENÍ PRO PŘEPRAVU
GB - LIFTING PLAN SECURING FOR TRANSPORT / FIXATION POUR LE TRANSPORT
GUARANTEE AND WARRANTY CARD - GB
De TRUXTA-garantie geldt voor ontwerp-, materiaal- en constructiefouten.
De TRUXTA-garantie dekt niet:
Wijzigingen, toevoegingen of herstellingen die niet door Tufftruck of diens erkende agenten
werden uitgevoerd.
Garantieclaims
Bewaar het garantieformulier voor uw administratie.
Any warranty issues please do contact your place of purchase.
To Register your Warranty please complete the warranty form and post to Tufftruk Limited, Unit 5,
Prince Street Business Park, Prince Street,
Leek, Staffordshire ST13 6DB
scan photocopyandemailthecompletedwarrantyformto sales@tufftruk.co.uk
Also foryour records, please complete this warranty registration in operator manual.
DATE OF PURCHASE
PLACE OF PURCHASE/ COMPANY
CUSTOMER NAME
ADDRESS
MACHINE MODEL NO
SERIAL NO OF MACHINE
Details van de ONDERDELEN kunt u terugvinden op de Truxta website www.truxta.com
Zodra u het onderdeelnummer en de beschrijving van het onderdeel hebt, kunt u een TRUXTA-verdeler contacteren of u direct aan Turuk richten via
sales@turuk.co.uk.
GB Your new TRUXTA is warranted to the original purchaser for a period of
one-year
(12 months) from the original date of purchase. The TRUXTA warranty is against
defects in design, materials and workmanship.
The following are not covered under the TRUXTA warranty:
1. Damage caused by abuse, misuse, dropping or other similar damage caused
by or as a result of failure to follow assembly, operaon or user maintenance
instrucons.
2. Alteraons, addions or repairs carried out by persons other than Turuk or
their recognised agents.
3. Transportaon or shipment costs to and from TRUXTA or their recognised
agents, for repair or assessment against a warranty claim, on any machine.
4. Materials and /or labour costs to renew repair or replace components due to
fair wear and tear are not covered by warranty.
TRUXTA and/or their recognised agents, directors, employees or insurers will
not be held liable for consequenal or other damages, losses or expenses in
connecon with or by reason of or the inability to use the machine for any
purpose.
Warranty Claims All warranty claims should rstly be directed to the point of
purchase: your TRUXTA reseller / distributor. Keep a record of the warranty
form for your records
Any warranty issues please do contact your place of purchase.
For warranty claims: Tel +44 (0) 1298 84687or Email; sales@turuk.co.uk
For your records, please complete this warranty registraon form
Keep a record of the warranty form for your records
To Register your Warranty please complete the warranty form and post to
Tufftruk Limited, Unit 5, Prince Street Business Park, Prince Street,
Leek, Staffordshire ST13 6DB
Alternatively visit the website
www.truxta.com/service and register warranty online.
WARRA NTY REGISTRATION FORM
DATE OF PURCHASE:
PLACE OF PURCHASE/ COMPANY:
CUSTOMER NAME:
ADDRESS:
MACHINE MODEL NO:
SERIAL NO OF MACHINE:
SPARE PARTS details can be found on Truxta website www.truxta.com
Once you have the part no. and description of required item please contact your TRUXTA retailer of Tufftruk direct to [email protected]
7

Other manuals for BENDI EB400
1
This manual suits for next models
1
Table of contents
Other Truxta Utility Vehicle manuals


Popular Utility Vehicle manuals by other brands


Toro
Toro 7359 Operator's manual

Taylor-Dunn
Taylor-Dunn B0-150-00 Service and Replacement Parts Manual

Great Dane
Great Dane 42101203 Operator's manual

Terex
Terex Evoquip Bison 120 Operation manual

Kubota
Kubota RTV-X900 Operator's manual

Kendon
Kendon Stand-Up TRIKE/SPYDER/SIDECAR Ride-Up SRL owner's manual

Muck-Truck
Muck-Truck Power Barrow PRO MKI Operations & parts manual

Polaris
Polaris RANGER RZR XP 4 900 2013 Owner's manual for maintenance and safety

Toro
Toro Workman GTX Operator's manual

Marlon
Marlon 10' Single Multi Trailer owner's manual

Toro
Toro WORKMAN GTX 07131 Operator's manual

Anderson
Anderson M-115 owner's manual