Chanberlain JM60-433 User manual
114A3269B 1
Instructions – Garage Door Operator Model JM60-433
GB
TÜV Rheinland geprüfte
Sicherheit
JM60-433
CN
Փ⫼䇈ᯢк䔺ᑧ䮼ᓔ䮼ᴎൟো
JM60-433
ⲯᶣᵫ䲚ಶЁⱘࡲџᴎᵘ˖
ⲯᶣᵫ㞾ࡼ࣪㋏㒳˄Ϟ⍋˅᳝䰤݀ৌ
ഄഔ˖Ϟ⍋Ꮦ⌺ϰᮄ催ḹֱބܟ䏃500োAᐶ1ሖ
䚂㓪˖200131
⬉䆱˖021 5869 8833
Ӵⳳ˖021 5869 0432

ᅝ
ᅝ㺙ࠡ䇋ܜ䯙䇏䖭ѯ䞡㽕ᅝܼ䇈ᯢ
ϡ䙉ᅜҹϟ䇈ᯢৃ㛑ᇐ㟈Ϲ䞡ⱘҎ䑿Ӹᆇ䋶ѻᤳ༅DŽ
gҨ㒚䯙䇏ᴀ䇈ᯢкDŽ
gা㽕ϹḐᣝ✻ᴀ䇈ᯢкⱘ䇈ᯢᅝ㺙᪡䔺ᑧ䮼ᓔ䮼ᴎˈߎࠡᏆ㒣䖛⌟䆩ⱘᓔ䮼ᴎ㛑ᅲ⦄݊䆒䅵ࡳ㛑ˈᑊᦤկড়⧚
ⱘᅝܼ᳡ࡵDŽ
䖭ѯᅝܼ䄺ᖫ㸼⼎ᔧᖗҎ䑿ᅝܼ䋶ѻᤳ༅䇈ᯢDŽᑨҨ㒚䯙䇏䖭ѯ䇈ᯢDŽ
䄺˖བᵰᙼⱘ䔺ᑧ≵᳝݊ᅗ㓈ׂܹষˈ߭ᖙ乏ᅝ㺙 ( ൟ䚼⾏ড়㺙㕂DŽ䆹䰘ӊܕ䆌ᮁ⬉ᯊˈҢ䴶ࡼᓔ䔺ᑧ䮼DŽ
ֱᣕ䔺ᑧ䮼ᑇ㸵DŽ
ᅝ㺙ᓔ䮼ᴎПࠡˈᖙ乏㽕ֱ䆕䔺ᑧ䮼
䮼ԧᅝ㺙ℷ⹂ᑊᑇ㸵㡃དDŽ䮼ᴀ䑿᳝ᬙ䱰ᖙ乏䖯㸠ׂ⧚DŽ
䔺ᑧ䮼ǃ䮼ᔍㇻǃ㓚㓇ǃ⒥䕂ǃᬃᶊঞ䮼䜡ӊᵕᑺᓴ
ϟৃ㛑Ӯᇐ㟈Ϲ䞡ⱘҎ䑿ӸᆇDŽ
䴲ϧϮҎϡ㽕ᇱ䆩ᵒ
ࡼǃ⿏ࡼ䇗ᭈᅗӀDŽ
ᑨᠧ⬉䆱㽕∖䔺ᑧ䮼㓈ׂ᳡ࡵDŽ
ᅝ㺙㓈ׂ䔺ᑧ䮼ᓔ䮼ᴎᯊˈ
ϡ㽕᠈៦ᣛǃ㸼こᆑᵒ
ⱘ㸷᳡DŽ
Ўњ䙓ܡ㑴㓴ᇐ㟈Ϲ䞡Ҏ䑿Ӹᆇˈ
ᅝ㺙ᓔ䮼ᴎПࠡᑨᢚ
䰸᠔᳝䖲ࠄ䔺ᑧ䮼Ϟⱘ㓇㋶DŽ
ᅝ㺙㒓ᖙ乏ヺড়ᔧഄⱘᓎㄥ⬉⇨㾘㣗DŽ
⦏⩗㑸㓈ǃ䪱䩶ࠊ䕏ൟ䮼ᖙ乏ܙߚࡴ䙓ܡ㹿ᤳണDŽ
˄খ
㾕 3义˅DŽ᳔དⱘ㾷އᮍḜᰃϢᙼⱘ䔺ᑧ䮼ࠊ䗴ଚଚ
Ўᓔ䮼ᴎᅝ㺙ࡴ㺙㕂DŽ
䘛䰏ডᔍࡳ㛑⌟䆩䴲ᐌ䞡㽕DŽ
ᙼⱘ䔺ᑧ䮼⺄ࠄᬒഄ䴶
Ϟⱘ 40 ↿㉇ⱘ䱰⠽ᯊ
ᖙ乏
㛑㞾ࡼডᔍDŽབᵰϡ㛑
ℷ⹂䇗䆩ᓔ䮼ᴎˈ߭݇䯁䔺ᑧ䮼ᯊৃ㛑Ӯ䗴៤Ϲ䞡ⱘҎ
䑿ӸᆇDŽ
↣᳜䞡䆩偠ϔˈᖙ㽕ᯊ䖯㸠䇗ᭈDŽ
ᴀ㺙㕂ϡᑨᅝ㺙╂∈ߚ䞣催ⱘഎ᠔DŽ
᪡ᳳ䯈ˈ䮼ϡᕫᓊԌࠄ݀݅䗮䘧ϞDŽ
ᔧ݇䯁䔺ᑧ䮼ᯊˈབᵰ䮼ⱘϟ䖍㓬໘⌟䞣ࠄⱘ䍙
䖛њ
400
⠯乓˄
40
݀᭸˅ˈ߭ᖙ乏ᅝ㺙ֱᡸ㺙㕂DŽ
䖛
ⱘ䞣Ӯᕅડ䘛䰏ডᔍࡳ㛑ⱘℷ⹂Ꮉ㗙ᤳണ
䔺ᑧ䮼DŽ
ᡞ
䄺ㅒ
∌Й⠶ഄᅝ㺙䮼ᓔ݇ᮕ䖍⫼᠋
ᦤ⼎ᅝܼ᪡ᑣDŽ
ᠧᓔ᠔᳝ⱘ䔺ᑧ䮼䫕ҹ䙓ܡᤳണ䔺ᑧ䮼DŽ
䮼ᓔ݇˄݊ᅗࡴⱘᓔ݇˅
ᑨᅝ㺙㛑ⳟᕫࠄ
ᭈ䔺ᑧ䮼ǃ⾏ഄ䴶㟇ᇥ
1.5
㉇催ǃܓスϡࠄⱘഄ
ᮍDŽ⽕ℶܓス᪡䮼ᓔ݇䘹఼
DŽ䇃᪡ᓔ䮼ᴎ
݇䯁䔺ᑧ䮼ৃ㛑ᇐ㟈Ϲ䞡ⱘҎ䑿ӸᆇDŽ
া᳝ৃҹⳟࠄᭈ䮼ˈ≵᳝䱰⠽ᑊϨᇍᓔ䮼ᴎ䖯
㸠䖛ℷ⹂䇗䆩ⱘᚙމϟᠡৃҹ⫼ᓔ䮼ᴎDŽ䮼䖤ࡼ
⢊ᗕᯊˈ⽕ℶߎܹ䔺ᑧDŽ⽕ℶܓス䮼䰘䖥⥽㗡DŽ
Փ⫼ࡼ䞞ᬒ
াᰃ
⫼ᴹߚ⾏⾏ড়఼ˈᑊᑨሑৃ㛑䮼
໘
݇䯁⢊ᗕ
ᯊ䖯㸠DŽ
⽕ℶՓ⫼㑶㡆⾏ড়ᶘᢝᓔ
݇䯁䮼DŽ
䖯㸠ׂ⧚ᠧᓔᴎⲪПࠡˈᑨߛᮁ䔺ᑧ䮼ᓔ䮼ᴎ⬉
⑤DŽ
ᴀѻક䜡⡍⅞䆒䅵ⱘ⬉⑤㒓ˈ
བᵰᤳണњˈᖙ
乏⫼Ⳍৠൟোⱘ⬉⑤㒓ᤶ
˗ℸ㉏⬉㒓ৃҢϧϮҎ
໘㦋পᑊ䖯㸠㺙䜡DŽ
Ⳃᔩ
义ⷕ ো
ᅝܼ㾘 1
ᅝ㺙ޚ 1
䮼ⱘ㉏ൟ 1 1
ᖙ㽕ⱘᅝ㺙Ꮉ 1 2
ᦤկⱘ䜡ӊ 1 3
ᅠᭈⱘᅝ㺙 1 4
㺙䜡 2 5 - 11
ᅝ㺙 2 12 - 17
䇗䆩 3 18 - 20
⌟䆩㞾ࡼডᔍࡳ㛑 3 19
ᅝ㺙㑶㒓ֱᡸ㺙㕂
(䗝乍) 3
䘹఼ᇍⷕ 3 20
ᤶ♃⊵ 3 21
᪡ᓔ䮼ᴎ 3
⿏Ѹᓔ䮼ᴎ 3
㓈ᡸᓔ䮼ᴎ 3
䯂乬ঞ㾷ㄨ 3 - 4
ࡳ㛑ᏺ♃ຕ䮼ᓔ݇㒓
䮼ᣝ䪂 (䗝乍) 4 22
䰘ӊ 4 23
䜡ӊ 4 24
ᡔᴃখ᭄ 4
-3
ᅝ㺙ޚ
1. ᶹⳟຕ䔺ᑧ䮼Ϟ䴶ⱘ㢅ᵓDŽ
乊ッᬃᶊᖙ乏⠶ഄᅮᬃᩥ㒧ᵘϞDŽ
2. བᵰᙼⱘ䔺ᑧЁ᳝乊ˈ߭ৃ㛑䳔㽕乱ⱘ㋻ӊ˄ᦤկ˅DŽ
3. བᵰᙼⱘ䔺ᑧ≵᳝݊ᅗⱘܹষˈ߭䳔㽕1702Eൟ䚼⾏ড়㺙㕂DŽ
1
䮼ⱘ㉏ൟ
A. া᳝∈ᑇ䔼䘧ⱘᵓ䮼
B. ᏺᓻᔶ䔼䘧ⱘ㒘ড়ᦤ䮼
⊼˖ᴀᓔ䮼ᴎϡ䗖⫼Ѣ᮶᳝∈ᑇ䔼䘧জ᳝ൖⳈ䔼䘧ⱘᵓ䮼ǃঠᓔ䮼
Canopy䮼DŽ
2
ᖙ㽕ⱘᅝ㺙Ꮉ
3
ᦤկⱘ䜡ӊ
㺙䜡䜡ӊ
1. ᮍ༈㶎ϱ
2. 8↿㉇ᇍᭆ㶎ϱ
3. ⒥䕂
ᅝ㺙䜡ӊ
7. 6↿㉇㶎↡
8. 㝼㚔㶎ϱ
9. 6↿㉇㶎ϱ
(4) 4. 䫔ᄤ (1)
(1) 5. 8↿㉇䫕㋻㶎ϱ (1)
(1) 6. ⒥䕂ᬃᶊ (1)
(8) 10. 6↿㉇㞾ᬏ㶎ϱ (4)
(4) 11. 6↿㉇݁㾦ᇍᭆ㶎ϱ (4)
(4) 12.㒓 (3)
13. ݁㾦ߍ༈㶎ϱ (2)
14. C䔼Uᔶᅮᬃᶊ (1)
1
3
1-CN
䮼ⱘ㉏ൟ
2
ᖙ㽕ⱘᅝ㺙Ꮉ
ᦤկⱘ䜡ӊ

2-CN
ᙼӮথ⦄ᶹ䯙䖭ᓴᭈԧᅝ 㺙䇈ᯢ
Ӯᕜ᳝ᐂࡽDŽ
ᙼ㒻㓁ᣝᴀݠ䖯㸠㺙䜡ǃᅝ㺙䇗䆩ᑣᯊ
(1) ⒥䕂ᬃᶊ (8) ♃㔽
(2) ⾏ড়఼ (9) ࡼ⾏ড়
(3) 䫒ᴵ/䩶ϱ㓇༫ӊ 㓇㋶ᶘ
(4) 䔼䘧 (10) 䮼㞖
(5) ᣖᬃᶊ (11) 䮼䖲ӊ
(6) ⬉⑤㒓 (12) 乊ッᬃᶊ
(7) ᓔ䮼ᴎ
4
㺙䜡䚼ߚ
㺙䜡䔼䘧
ᡞⷁ䔼˄1˅ᬒ㕂ϔϾᑇഺⱘ⠽ԧ㸼䴶Ϟ䖯㸠㺙䜡DŽ
ᇚخњ⡍߿⊼ⱘⷁ䔼Ϟⱘߌ䍋߫˄4˅
ᖙ乏ᇍ唤ҹֱ䆕䔼䘧ৃҹℷ⹂ⱘ㺙䜡DŽ
᠔᳝ⱘϝ㡖ⷁ䔼ᰃৃҹѦᤶⱘDŽ
ᡞ䔼䘧䖲ӊ˄2˅ᦦܹ䔼䘧ջ䴶ⱘῑݙDŽ
䇋⹂䅸䔼䘧䖲ӊϞⱘᇣᇣߌ䍋⠽˄3˅ᳱ䔼䘧Ϟ䴶DŽ
ݡᡞϟϔ㡖ⷁ䔼ᦦܹࠄⷁ䔼䖲ӊϞ䖲䔼䘧DŽ
䇋⹂䅸ⷁ䔼Ϟⱘߌ䍋߫˄4˅ᇍ唤DŽ
ഫ˄6˅Ϟ䕏ᢡ䔼䘧㒘ӊ˄5˅Ⳉࠄⷁ䔼唤ᑇDŽ
ᇍѢ࠽ϟⱘⷁ䔼䞡䖯㸠Ϟ䗄㺙䜡DŽ
䆄䔺ᑧ䮼ⱘЁᖗ㒓˄1˅DŽᑊᇚ䆹㒓ᓊ䭓㟇㢅ᵓ˄2˅DŽ
11
ᇚ䔺ᑧ䮼˄3˅ᓔࠄ݊㸠᳔催⚍˄1˅ˈᑊ䆹⚍Ϟᮍ
20↿㉇໘ⱘッ (2˅ϞϔϾ䆄ˈ䔼䘧ᑩ䖍˄4˅
ᑨϡ䍙䖛䔺ᑧ䮼㸠᳔催⚍ (1˅20↿㉇DŽ
⊼ᛣ˖
䔺ᑧ䮼ᡁㇻᰃ৺ᣵњᇚᓔ䮼ᴎⳈᅝ㺙ᡁㇻϞᮍⱘԡ㕂DŽ
䔺ᑧ䮼㸠᳔催⚍Ϣ䔼䘧П䯈ⱘޔぎ䎱⾏ᑨϡ䍙䖛50↿㉇ˈ
ᑊϨᔧ䮼ࠄ㢅ᵓⱘ䎱⾏া᳝30↿㉇ᯊˈޔぎ䎱⾏ৃҹᰃ0DŽ
13
ᣖᓔ䮼ᴎ
ᔃ᳆ᣖᬃᶊ˄1˅Փ݊Ϣ㢅ᵓᑇ㸠DŽ
⌟䞣乊ッᬃᶊࠄ㢅ᵓᅝ㺙㶎ϱⱘ䎱⾏DŽ
㢅ᵓϞҢッᓔྟᣝϞ䗄䎱⾏⬏ϔḍ㒓ˈ
㒓ⱘሒッЎᅝ㺙ᓔ䮼ᴎⱘԡ㕂DŽᇚ䮼ᦤࠄᅠܼᠧᓔⱘԡ㕂ˈ
ᡞᓔ䮼ᴎᬒ䮼ϞDŽ ᇚᮍ༈㶎ϱ(A)ᦦܹ䔼䘧ῑ(B)Ё䎱⾏䔼䘧ッ㑺
120↿㉇ⱘԡ㕂DŽᇚᣖᬃᶊⱘᄨこ䖛ᮍ༈㶎ϱˈ⫼㶎↡˄5˅ᅮᬃᶊDŽ
ᇍѢ⏋ޱೳ㢅ᵓˈ䪏8↿㉇ⱘᄨˈᦦܹ㝼㚔㶎˄2˅DŽݡ⫼㞾ᬏ㶎ϱ
(3˅ᅮᣖᬃᶊDŽᇍࠊ㢅ˈ䪏4↿㉇ⱘᄨ⫼㞾ᬏ㶎ϱ˄3˅ᅮDŽ
䗝乍˖བᵰ䮼䕗䞡ˈᓎ䆂ᙼݡࡴϔ༫ᣖᬃᶊDŽ
䖭༫ᣖᬃᶊⱘᅝ㺙ԡ㕂ᑨҢ䮼ἷࠄ䔼䘧Ё䚼ⱘϝߚП
ϔ໘ᑨᓔ䮼ᴎ㛑ᇚ䮼ᦤࠄⱘ᳔催ԡ㕂DŽ
14
ᅝ㺙乊ッᬃᶊ
ᇚ䔺ᑧ䮼݇䯁ˈЎᅝ㺙乊ッᬃᶊᦤկᮍ֓DŽ
A. 佪䗝˖
ᡒࠄ䔺ᑧ䮼ⱘൖⳈЁᖗ㒓˄4˅ঞℹ偸13ЁᏆ䆄ⱘѸঝ⚍DŽ
ᇚ乊ッᬃᶊ˄1˅ⱘЁᖗᇍޚ䆹⚍ᬒདDŽϞ⊼ད乊ッᬃᶊᄨ
(5˅ⱘԡ㕂DŽᇍѢ⏋ޱೳˈ䪏8↿㉇ⱘᄨˈᦦܹ㝼㚔㶎˄2˅ˈ
ݡ⫼㞾ᬏ㶎ϱ(3˅ᅮ乊ッᬃᶊDŽᇍࠊˈ䪏4↿㉇ⱘᄨˈ
ݡ⫼㞾ᬏ㶎ϱᅮ乊ッᬃᶊDŽ
B. བᵰ䳔㽕˖
ᓊ䭓ൖⳈЁᖗ㒓˄4˅㟇㢅ᵓDŽ⾏ຕϡ䍙䖛150
↿㉇ԡ㕂ⱘൖⳈ䆄ϞᅮԡЎ乊ッᬃᶊⱘЁᖗDŽ
ݡབAЁ᠔䗄⏋ޱೳࠊ㢅ᵓϞ䆄ᑊ䪏ᄨDŽ
Ϟ㋻᠔⫼㶎ϱ㶎↡DŽ
15
ᅮ䮼䖲ӊ
A. ᇚ䮼䖲ӊ˄2˅ᬒ䮼˄3˅ⱘϞ䚼ˈ
⹂ֱ݊Ёᖗℷད䮼ⱘൖⳈЁᖗ㒓˄1˅ϞDŽ乊䚼أৢⱘ2
ϾᄨϞད䆄ˈᑊ4↿㉇ⱘᄨDŽ
B. 乊䚼أࠡⱘ2ϾᄨϞད䆄ˈᑊ䪏4↿㉇ⱘᄨDŽ⫼㶎ϱ˄4˅
ᇚ䮼䖲ӊ (2˅ᅮ䮼ⱘ乊䚼DŽ
⊼ᛣ˖
བᵰᙼⱘ䔺ᑧ䮼ᰃ䳡᳐˄Hörmann˅䮼݊ᅗϔѯ䮼ˈᓎ䆂ݡ⫼2
乫㶎ϱ (5˅˄ᦤկ˅ࠡ䴶أϟⱘ2ϾᄨЁࡴDŽ
12
ᅠᭈⱘᅝ㺙
5
㺙䜡䔼䘧
䔺ᑧЁᖗᅮԡ
ᓔ䮼ᴎᅮԡ
13
ᣖᓔ䮼ᴎ
14
ᅝ
㺙乊ッᬃᶊ
15
ᅮ䮼䖲ӊ
ᅝ㺙乊ッᬃᶊ
ᇚ䔼䘧ᓔ䮼ᴎড䖛ᴹDŽᇚ⒥䕂ᬃᶊ˄2˅ᦦܹ䔼䘧乊ッ˄3˅DŽ
ᇣᖗϡ㽕䅽䫒ᴵѦⳌ㓴㒩Ңᓔ䮼ᴎⱘ䫒䕂Ϟ㜅㨑DŽ
ᇚᇍᭆ㶎ϱ˄5˅こܹ乊ッᬃᶊ˄1˅DŽᇚ䫕㋻㶎↡˄4˅
ᢻ㋻Ⳉࠄ䫒ᴵϡӮൖ㨑ࠄ䔼䘧ϞDŽ䇋࣓ᇚ㶎↡ᢻᕫ䖛㋻DŽ
ࠄℸЎℶˈᓔ䮼ᴎⱘ㺙䜡ህᅠ៤њDŽ
ᅝ㺙䚼ߚ
催ぎϮᯊᑨԽ᠈ᡸⳂ䬰ҹֱᡸⴐϡফӸᆇDŽ
ᠧᓔ᠔᳝䔺ᑧ䮼䫕ҹ䙓ܡᤳണ䔺ᑧ䮼DŽ
Ўњ䙓ܡ㓴㒩ᓩ䍋ⱘϹ䞡ⱘҎӸᆇˈ
ᅝ㺙ᓔ䮼ᴎПࠡᑨᢚ䰸᠔᳝䖲䔺ᑧ䮼Ϟⱘ㓇㋶DŽ
ᴀѻકⱘᅝ㺙ᑨ䙉✻ϟ߫㾘㣗ZH1/494, VDE 0700
238䚼ߚҹঞVDE 07001䚼ߚDŽা㽕ぎ䯈ܕ䆌ˈ
ᓎ䆂ᇚᓔ䮼ᴎᅝ㺙⾏ഄ䴶2.1㉇˄7㣅ሎ˅催ⱘഄᮍDŽ
10
ᅝ㺙乊ッᬃᶊ
㺙䜡⒥䕂ᬃᶊ
ᇚᇍᭆ㶎ϱ˄1˅こࠄ⒥䕂ᠬᶊ˄4˅ⱘᮍᄨЁDŽ
Ңࣙ㺙Ёᇚ䫒ᴵ/䩶ϱ㓇˄3˅পߎDŽᇚ䩶ϱ㓇༫⒥䕂˄2˅Ϟˈ
ᑊᇚ⒥䕂ᦦܹᬃᶊDŽ˄⊼ᛣ˖⹂ֱᬃᶊᅝ㺙⼎ⱘԡ㕂DŽ
˅ᇚ䫔ᄤ˄5˅こ䖛⒥䕂ᬃᶊ⒥䕂ⱘᄨЁDŽ⊼ᛣ˖ᏺ⺕䪕ⱘ⾏ড়఼˄6˅
ᖙ乏ᅝ㺙⼎ⱘԡ㕂DŽ
ᇚ䫒ᴵ/䩶ϱこܹ䔼䘧
ᇚ⒥䕂ᬃᶊ˄1˅こܹ䔼䘧㒘ӊ˄3˅ˈ⹂ֱ݊ᅝ㺙བ᠔⼎DŽ
ᇚ⒥䕂ᬃᶊ䔼䘧ࠡᮍˈᑊᇚݙ⾏ড়˄2˅こܹ䔼䘧㒘ӊDŽ
⺕䪕˄4˅ᖙ乏ᣝ⼎ᅝ㺙ˈ৺߭ᓔ䮼ᴎᇚ᮴⊩ℷᐌՓ⫼DŽ
ᇚ⾏ড়ᦦܹ䔼䘧
ᇚ䔼䘧㒘ӊ㗏䖛ᴹDŽᇚ⾏ড়˄1˅こܹ䔼䘧㒘ӊ˄2˅ˈ
⹂ֱ݊ሒッⱘ䮼㞖ᄨ˄3˅ᳱ䮼˄4˅ⱘᮍDŽ
ᇚ⾏ড়ࠡⳈࠄᅗϢݙ⾏ড়䖲ϞDŽ
ᇚ䔼䘧ᅝ㺙ࠄᓔ䮼ᴎϞ
ᇚ䔼䘧㒘ӊ㗏䖛ᴹDŽᇚ䫒ᴵ㒩䫒䕂˄1˅ϞDŽᇚ䔼䘧㒘ӊ˄2˅
ᦦܹᓔ䮼ᴎ乊䚼ⱘ䔼䘧ῑЁDŽࠡ⒥䕂ᬃᶊՓ䫒ᴵᓴ㋻DŽ
䫒ᴵᖙ乏Ϣ䫒䕂ড়DŽ
བ᠔⼎ˈᇚC䔼Uᔶᅮᬃᶊ˄
3˅༫䔼䘧Ϟᑊ⫼㶎ϱ ᅮདDŽ
6
㺙䜡⒥䕂ᬃᶊ
7
ᇚ䫒ᴵ/䩶ϱこܹ䔼䘧
8
ᇚ⾏ড়ᦦܹ䔼䘧
9
ᇚ䔼䘧ᅝ㺙ࠄᓔ䮼ᴎϞ
㛊ൿᑨ䌈䔼䘧䴴䖥ᴎ༈ⱘԡ㕂˖2Ͼ㛊ൿ䌈Ѣ䔼䘧ϸջ˗
2Ͼᇣ㛊ൿ䌈Ѣ䔼䘧ᑩ䚼DŽᣁ䔼䘧Ϟ㽕㉬䌈㛊ൿⱘഄᮍDŽ
䇋ᣁᑆޔ !Փ䔼䘧㽕㉬䌈㛊ൿ≵᳝⊍⏡♄ᇬDŽ
ޣ䳛䰡ా䜡ӊ

3-CN
A. 佪䗝ⱘᅝ㺙˖
䗮䖛ᢝ㑶㡆ᶘ䞞ᬒ⾏ড়఼ˈᑊ䮼ⱘᮍ⿏ࡼ⾏ড়఼DŽ
݇䯁䔺ᑧ䮼ˈ⫼㶎ϱ˄3˅䖲Ⳉ䮼㞖˄5˅Ϣ⾏ড়఼˄4˅
ˈᑊ⫼㶎↡˄1˅ᅮDŽ⫼㶎ϱ˄3˅䖲᳆䮼㞖˄2˅Ϣ䮼䖲ӊ
ˈᑊ⫼㶎↡˄1˅ᅮDŽᇍ唤Ⳉ䮼㞖᳆䮼㞖ˈՓᅗӀ㟇ᇥ᳝2
Ͼᄨ䞡ˈ⫼㶎ϱ˄3˅䖲ˈᑊ⫼㶎↡˄1˅ᅮDŽབᵰⳈ䮼㞖
˄5˅䭓ˈ䇋ᇚ䮼㞖ሒッ䬃ᥝϔ↉DŽ
B. ḍ⡍ᅮⱘ㸠ᅝ㺙˖
݇䯁䔺ᑧ䮼ˈ⫼㶎ϱ˄3˅䖲᳆䮼㞖˄2˅Ϣ䮼䖲ӊˈᑊ⫼㶎↡
˄1˅ᅮDŽ䅽᳆䮼㞖˄2˅䴴䖥⾏ড়఼ˈ⫼㶎ϱ˄3˅
䖲᳆䮼㞖Ϣ⾏ড়఼ˈᑊ⫼㶎↡˄1˅ᅮDŽ
䖲⬉⑤
Ўњ䙓ܡϡᖙ㽕ⱘ咏⚺ˈ䇈ᯢкᦤ⼎ৃҹ᪡䔺ᑧ䮼ᓔ䮼ᴎПࠡˈ
䇋ϡ㽕ࡼ䔺ᑧ䮼ᓔ䮼ᴎDŽ
ᇚᓔ䮼ᴎ⬉⑤ᦦ༈ᦦࠄヺড়ᔧഄ⬉⇨㾘㣗ޚⱘᦦᑻϞDŽབᵰ⬉⑤ℷᐌˈ
ᓔ䮼ᴎⱘ✻ᯢ♃ᇚ⚍҂ᑊֱᣕ2.5ߚ䩳DŽ
17
ᅝ㺙䰤ԡᓔ݇
⊼ᛣ˖བ᠔⼎ᅝ㺙䰤ԡᓔ݇DŽབᵰᅝ㺙ϡℷ⹂ˈӮᕅડᓔ䮼ᴎⱘℷᐌࡳ㛑
DŽ
ࡼ݇䯁䔺ᑧ䮼DŽ䗮䖛䇗ᭈ⾏ড়఼Ёᖗ䰤ԡᓔ݇Ёᖗᴹ⹂ᅮད݇
˄/ϟ˅䰤ԡᓔ݇˄1˅˄䜡䭓㒓˅ⱘԡ㕂DŽ
䰤ԡᓔ݇Ӯফᅝ㺙ݙ⾏ড়Ёⱘ⺕䪕ᕅડ㗠ࡼDŽ
ᇚ䰤ԡᓔ݇˄1˅ⱘϟᅮԡ఼˄5˅䔼䘧ᑩ䚼ⱘ㗏䖍
˄7˅ϞDŽᇚ䰤ԡᓔ݇ⱘϞᅮԡ఼˄4˅䔼䘧Ϟ䚼ⱘ㗏䖍
˄6˅ϞDŽᢀ催䰤ԡ㺙㕂乊ԣ䔼䘧Ϟ䚼ⱘ㗏䖍ˈᑊ⫼㶎ϱ
˄8˅ᅮ݇˄/ϟ˅䰤ԡᓔ݇DŽ
ࡼᇚ䔺ᑧ䮼ᅠܼᠧᓔDŽᢝϟ㑶㡆ᶘˈᑊ䅽䮼䗮䖛ݙ⾏ড়ⱘԡ㕂DŽ
䗮䖛䇗ᭈ⾏ড়఼Ёᖗ䰤ԡᓔ݇Ёᖗԡ㕂ᴹ⹂ᅮདᓔ˄/Ϟ˅䰤ԡᓔ݇
˄3˅˄䜡ⷁ㒓˅ⱘԡ㕂DŽ
ᇚ䰤ԡᓔ݇˄1˅ⱘϟᅮԡ఼˄5˅䔼䘧ᑩ䚼ⱘ㗏䖍˄7˅ϞDŽ
ᇚ䰤ԡᓔ݇ⱘϞᅮԡ఼˄4˅䔼䘧Ϟ䚼ⱘ㗏䖍˄6˅ϞDŽ
ᢀ催䰤ԡ㺙㕂乊ԣ䔼䘧Ϟ䚼ⱘ㗏䖍ˈᑊ⫼㶎ϱ˄8˅ᅮ݇
˄/ϟ˅䰤ԡᓔ݇DŽᇚ䰤ԡᓔ݇ⱘ㒓˄9˅ᦦܹ䔼䘧乊䚼ⱘῑ
˄10˅ݙDŽ⫼㒓།ᅮԣ⬉㒓DŽ⬉㒓ᖙ乏㹿ᅮˈ
⹂ֱᅗϡӮফ⾏ড়఼䖤ࡼᕅડDŽ⫼䘹఼᪡ᓔ䮼ᴎˈ
Փ⾏ড়఼㞾ࡼড়ϞDŽ䅽ᓔ䮼ᴎ䖤㸠2ϾᅠᭈⱘᳳDŽ
བᵰ䮼㸠Ёߎ⦄ডᔍˈ䇋䕀ࠄ䆒㕂偅ࡼ䚼ߚ䖯㸠䆒㕂DŽ
ЎՓ䮼ܼᓔܼ݇ⱘԡ㕂ϡӮডᔍˈгৃ㛑䳔㽕䇗ᭈ䰤ԡᓔ݇ⱘԡ㕂DŽ
18
䆒㕂偅ࡼ
ᇍѢ偅ࡼ᭄ⱘ䔺ᑧ䮼ˈᓔ䮼ᴎⱘ偅ࡼᏆ㹿䆒㕂DŽԚᰃˈ
བᵰ≵᳝䆒ᅮ䰤ԡ䔺ᑧ䮼ℷᐌ䖤㸠⢊ᗕϟ㞾ࡼডᔍˈ
䇋খ✻ϟ߫ℹ偸䆒㕂偅ࡼ˖䇋ᓔ䮼ᴎ˄2˅ⱘᎺջᡒࠄ㓪ᣝ䪂
˄1˅DŽ䖲㓁ᣝ㓪ᣝ䪂2ˈՓᓔ䮼ᴎ䖯ܹࠄ㞾ࡼ䆒㕂偅ࡼⱘᓣϟDŽ
㓓㡆ᣛ⼎♃ᇚᓔྟ᜶䮾DŽ⫼䘹఼ࠊ䅽䮼䖤㸠ࠄᓔ˄/Ϟ˅䰤ԡԡ㕂DŽ
ݡ⫼䘹఼ࠊ䅽䮼䖤㸠ࠄ݇˄/ϟ˅䰤ԡԡ㕂DŽ䮼ᖙ乏䖤㸠ϔ
Ͼᅠᭈⱘᓔǃ݇ᳳˈ偅ࡼᠡ㛑㹿ℷ⹂䆒㕂DŽ
བᵰࠄ䖒ᓔ݇䰤ԡПࠡᓔ䮼ᴎህᏆ㒣ذℶᎹˈ䇋䞡ᮄ䆒㕂偅ࡼDŽ
བᵰ偅ࡼᏆ䆒㕂དˈ㓓㡆ᣛ⼎♃ᇚذℶ䮾⚕DŽ
(䗝乍) – (䆺㾕䰘ӊ㸼)
ᅝ㺙ᑊ䇗䆩དᓔ䮼ᴎৢˈᠡ㛑ᅝ㺙㑶㒓ֱᡸ㺙㕂DŽ
䆹䰘ӊᏆࣙ䇈ᯢкDŽ
㑶㒓ֱᡸ㺙㕂ᦤկⱘᅝܼᮑˈ
ৃ䰆ℶܓス㹿།䔺ᑧ䮼ϟDŽ
ᅗՓ⫼ϔ⾡ϡৃ㾕ⱘܝᴳˈᔧᅗ䘛ࠄ䱰⠽ᯊӮՓℷ݇䯁ⱘ䮼
㞾ࡼডᔍᑊ䰆ℶᠧᓔⱘ䮼݇䯁ˈ
ᔎ⚜㤤ᆊЁ᳝ܓスⱘ᠓Џ䗝⫼䆹㺙㕂DŽ
20
䘹఼ᇍⷕ
া᳝㛑ⳟࠄᭈ䮼ǃ᮴ӏԩ䱰⠽䰏ᣵᑊ䖯㸠䖛ℷ⹂䇗䆩ⱘᚙމ
ϟˈᠡৃҹࡼᓔ䮼ᴎDŽ䮼䖤ࡼᯊˈ⽕ℶӏԩҎߎܹ䔺ᑧDŽ
ᙼⱘ䔺ᑧ䮼ᓔ䮼ᴎᬊ఼䘹఼ߎᯊᏆ䖯㸠䖛ᇍⷕDŽ
བᵰᙼ䳔㽕⏏ࡴ䘹఼ˈ߭ᖙ乏Ўᮄⱘ䘹఼ᇍⷕҹ֓ᓔ䮼ᴎ㛑
䆚߿ᮄⱘ䘹఼DŽ
ᮄⱘ䘹఼ᇍⷕ˖
1. ᣝϔϟᓔ䮼ᴎջ䖍ⱘ㓪ᣝ䪂˄1˅.㓓㡆ᣛ⼎♃Ӯᣕ㓁⚍҂
30⾦䩳DŽ
2. 30⾦ݙˈᣝԣ䘹఼Ϟᙼ㽕⫼ᴹ᪡ᓔ䮼ᴎⱘᣝ䪂˄2˅
3. ᔧᓔ䮼ᴎ✻ᯢ♃ᓔྟ䮾⚕ৢᵒᓔ䘹఼ᣝ䪂ˈᇍⷕᏆᅠ៤DŽ
ᓔ䮼ᴎᏆৃҹ䆚߿䖭ϾҷⷕDŽབᵰ䖬≵᳝ᅝ㺙✻ᯢ♃⊵ˈг㛑ࠄ
ϸໄໄDŽ
⏙䰸᠔᳝䘹఼ҷⷕ˄ՓϡݡՓ⫼Ꮖ϶༅ⱘ䘹఼ϡ
ݡ㛑ࠊᴀᓔ䮼ᴎ˅˖
ᣕ㓁ᣝԣᓔ䮼ᴎϞⱘ㓪ᣝ䪂˄1˅Ⳉࠄ㓓㡆ᣛ⼎♃❘♁˄㑺6⾦䩳˅
DŽℸᯊ᠔᳝ܜࠡᇍ䖛ⱘ䘹఼ҷⷕܼ䚼㹿⏙䰸њ
DŽ✊ৢ䞡ᮄЎᙼ䳔㽕Փ⫼ⱘ↣ϔϾ䘹఼᮴㒓ᆚⷕᓔ݇ᇍⷕDŽ
⌟䆩䘛䰏ডᔍࡳ㛑ᰃߚᖙ㽕ⱘDŽ䔺ᑧ䮼㾺ࠄᑇᬒഄ䴶Ϟⱘ40
↿㉇ⱘ䱰⠽ᯊᖙ乏㛑㞾ࡼডᔍDŽϡℷ⹂ഄ䇗䆩ᓔ䮼ᴎৃ㛑
݇䯁䔺ᑧ䮼ᯊᇐ㟈Ϲ䞡ⱘҎ䑿ӸᆇDŽ↣Ͼ᳜䛑ᑨ䆹䖯㸠ϔ⌟䆩ˈ
ᑊḍ䳔㽕䗖ᯊഄ䇗ᭈᓔ䮼ᴎ䆒㕂DŽ
ℹ偸˖䔺ᑧ䮼ϟᮍⱘഄ䴶ϞᑇᬒϔϾ40↿㉇ⱘ䱰⠽˄1˅DŽ
䅽䔺ᑧ䮼ϟ䖤㸠DŽ䮼ᖙ乏䘛ࠄ䱰⠽ᯊ㞾ࡼϞডᔍDŽ
བᵰ䮼䘛ࠄ䱰⠽ৢذℶˈϡডᔍ㗠Ϩгϡݡϟ䖤㸠ˈ߭䳔ᇚ݇
˄/ϟ˅䰤ԡ䮼ⱘᮍ⿏ࡼϔᅮ䎱⾏DŽ✊ৢ䞡ᮄ⌟䆩DŽ
ᔧ䮼䘛ࠄ40↿㉇ⱘ䱰⠽ৢ㛑㞾ࡼডᔍᯊˈ
߭⿏ᓔ䱰⠽ᑊݡ䅽ᓔ䮼ᴎ䖤㸠ϔϾᓔǃ݇䮼ᅠᭈⱘ䖛DŽ
䮼݇䯁ⱘԡ㕂໘ˈ䮼ϡᑨ㞾ࡼডᔍ˗
৺߭ᑨ䇗ᭈ䰤ԡᓔ݇ԡ㕂ᑊ䞡ᮄ⌟䆩䘛䰏ডᔍࡳ㛑DŽ
䮼Ёᖗԡ㕂ᬒ㕂ϔϾ20݀᭸ⱘ⠽ԧˈ
ᑨֱ䆕䮼ϡӮ䖤㸠䍙䖛500↿㉇DŽ
⫼᳔ࡳ⥛ϡ䍙䖛21⪺ⱘ♃⊵˄1˅䖯㸠ᤶDŽབ᠔⼎ˈ
ᇚ♃⊵ᦦܹ♃ᑻ ЁDŽᓔ䮼ᴎ䗮⬉ৢˈ♃⊵Ӯᣕ㓁⚍҂ 2-1/2ߚ䩳ˈ
✊ৢ㞾ࡼ❘♁DŽ
16
19
21
䖲䮼㞖Ϣ⾏ড়఼
17
ᅝ㺙䰤ԡᓔ݇
18
䆒㕂偅ࡼ
⌟䆩䘛䰏ডᔍࡳ㛑
䇋䆄ԣ䖭ѯ䇈ᯢ
ᅝ
㺙㑶㒓ֱᡸ㺙㕂
20
䘹఼ᇍⷕ
ᤶ♃⊵
᪡ᙼⱘᓔ䮼ᴎ
ᓔ䮼ᴎৃҹ䗮䖛ҹϟӏԩϔ⾡㺙㕂ࡼ˖
䘹఼˖ᣝԣᣝ䪂Ⳉࠄ䮼ᓔྟ䖤ࡼDŽ
ᏺ♃ⱘ䮼ᓔ݇˄བᵰᙼᅝ㺙њ䆹䰘ӊ˅˖
ᣝԣᣝ䪂Ⳉࠄ䮼ᓔྟ䖤ࡼDŽ
ᅸ䩹࣭ᓔ݇᮴㒓ᆚⷕᓔ݇˄བᵰᙼᅝ㺙њ
䆹䰘ӊ˅DŽ
ࡼᓔ䮼˖
ᑨሑৃ㛑Փ䮼໘Ѣ݇䯁⢊ᗕDŽ᮴ᮁ㺖ⱘᔍㇻৃ㛑ӮՓᓔ
ⴔⱘ䔺ᑧ䮼ᖿ䗳㨑ϟˈҢ㗠ᇐ㟈䋶ѻᤳ༅Ϲ䞡ⱘҎ䑿ӸᆇDŽ
ৃҹ䗮䖛ϟᢝ⾏ড়ᶘˈ✊ৢࡼᓔ݇䮼DŽՓ⫼ᓔ䮼ᴎᯊˈ
䇋ড়Ϟ⾏ড়఼DŽ
⽕ℶⳈՓ⫼⾏ড়ᶘⳈᠧᓔ䯁ড়䔺ᑧ䮼DŽ
䗮䖛䘹఼䮼ᓔ݇ࡼᓔ䮼ᴎ˖
1. བᵰ䮼ᰃᠧᓔⱘˈ߭䮼Ӯ㹿݇䯁DŽ
2. བᵰ䮼ᰃ䯁ড়ⱘˈ߭䮼Ӯ㹿ᠧᓔDŽ
3. བᵰ䮼ℷ㹿ᠧᓔ݇䯁ˈ߭䮼ӮذℶDŽ
4. བᵰ䮼ذℶ䚼ߚᠧᓔ䯁ড়ԡ㕂ˈᅗӮҹϢذℶࠡ䖤ࡼᮍ
Ⳍডⱘᮍ䖤ࡼDŽ
5. བᵰ䮼ℷ㹿݇䯁ᯊ䘛ࠄ䱰⠽ˈ䮼Ӯ㞾ࡼডᔍDŽ
6. བᵰ䮼ℷ㹿ᠧᓔᯊ䘛ࠄ䱰⠽ˈ䮼Ӯড䖤㸠1⾦䩳DŽ
7. 㑶㒓ֱᡸ㺙㕂˄䗝ӊ˅Փ⫼ϔ⾡ϡৃ㾕ⱘܝᴳˈ䘛ࠄ䱰⠽ᯊˈ
ӮՓℷ݇䯁ⱘ䮼ᠧᓔˈᑊ䰆ℶ໘Ѣᠧᓔ⢊ᗕⱘ䮼݇䯁DŽ
ᔎ⚜㤤ᆊЁ᳝ᑐܓⱘᅸЏ䗝⫼DŽ
ᓔ䮼ᴎ䖲㓁䖤㸠5ৢˈᑨ䅽ᅗދ15ߚ䩳DŽ
ϟ߫ᚙމϟˈᓔ䮼ᴎ✻ᯢ♃Ӯ҂䍋˖1. ᔧᓔ䮼ᴎ߱䗮⬉⑤ᯊ˗
2.ذ⬉ৢজ䞡ᮄᴹ⬉ᯊ˗3. ࡼᓔ䮼ᴎᯊ˗ᓊᯊ2.5
ৢ
♃Ӯ㞾ࡼ❘♁DŽ
♃⊵㾘ḐЎ᳔21⪺
ߚ䩳

4-CN
ℷ⹂ᅝ㺙ৢˈা䳔᳔ᇥⱘ㓈ᡸˈᓔ䮼ᴎৃ催ᗻ㛑ⱘ䖤㸠DŽ
᮴䳔Ўᓔ䮼ᴎ⏏ࡴⱘӏԩ⍺⒥⊍DŽ
䇗ᭈ䰤ԡ偅ࡼ˖
䖭ѯ䆒ᅮᅝ㺙ᓔ䮼ᴎᯊህᖙ乏䖯㸠ᑊ䳔㒣䖛ẔᶹDŽ䇗ᭈ䰤ԡᯊ
া䳔㽕ϔᡞ㶎ϱߔDŽ⇨ᴵӊৃ㛑ᇐ㟈䮼䖤㸠ᯊӮ᳝ϔѯᖂᇣব࣪ˈ
䳔㽕䞡ᮄ䖯㸠䆒㕂ˈᇸ݊ᰃՓ⫼ⱘϔᑈDŽখ䯙2义Ϟ䇈ᯢⱘ
䇗ᭈ䰤ԡ偅ࡼDŽ
䖯㸠䖛䇗ᭈৢˈ䇋䅸ⳳഄখ✻䇈ᯢк㽕∖ˈ
䞡ᮄ⌟䆩䘛䰏ডᔍࡳ㛑DŽ
䘹఼˖ৃҹ䱣ᯊЎՓ⫼䆹䔺ᑧⱘ᠔᳝䔺䕚䅶䌁ᮄⱘ䘹఼DŽ
খ䯙䰘ӊ㸼DŽᮄⱘ䘹఼ᖙ乏Ϣᓔ䮼ᴎ䖯㸠ᇍⷕDŽ
䘹఼⬉∴˖
䫖⬉∴ৃҹ᳔䭓5ᑈݙᦤկ⬉㛑DŽབᵰ䘹䎱⾏বⷁˈ
߭ᑨᤶ⬉∴DŽ
ᤶ⬉∴˖ᡞ⬉∴ℷᵕᳱϞᦦܹDŽড়Ⲫᯊˈ⊓ϸջ⫼
ᠷԣDŽ⽕ℶᡞᮻ⬉∴Ϣᆊᒁൗഒϔ䍋໘⧚DŽ
ᑨᡞ⬉∴䗕ࠄ䗖ᔧⱘᑳ᭭໘⧚ЁᖗDŽ
㓈ᡸᙼⱘᓔ䮼ᴎ
↣᳜ϔ˖
⌟䆩䘛䰏ডᔍࡳ㛑ˈᑊ䖯㸠ᖙ㽕ⱘ䇗ᭈDŽ
ࡼ᪡䮼DŽབᵰᅗϡᑇ㸵㹿ԣˈৃҹᇏ∖ϧϮⱘ䔺ᑧ
䮼㓈ׂ᳡ࡵDŽ
Ẕᶹҹ⹂ᅮ䮼㛑ᅠܼᠧᓔ݇䯁DŽᖙ㽕ᯊৃҹ䆒ᅮ䰤ԡ
/偅ࡼDŽ
↣ᑈѠ˖ߚ⾏⾏ড়఼ˈẔᶹ䫒ᴵⱘᓴˈᖙ㽕ᯊ䖯㸠䇗ᭈ
↣ᑈϔ˖
㒭䮼䕈ǃ䕈ᡓ䫄䫒Ϟ⊍DŽ᮴䳔Ўᓔ䮼ᴎ⏏ࡴⱘ⍺⒥⊍DŽ
ϡ㽕⍺⒥䮼ⱘᇐ䔼DŽ
1. ᓔ䮼ᴎϡ㛑⫼䘹఼᪡˖
ᓔ䮼ᴎ⬉⑤ᰃ৺᳝⬉˛ᇚ♃ᦦܹᦦᑻDŽབᵰ♃ϡ҂ˈ
䇋Ẕᶹֱ䰽ϱⷁ䏃ֱᡸ఼DŽ˄᳝ѯᦦᑻᰃ⬅ᓔ݇ࠊⱘ˅
䮼ᰃ৺㹿䫕ԣњ˛ᶹⳟ1义Ϟⱘᅝ㺙䇈ᯢ䄺DŽ
ᤶᮄ⬉∴䆩䆩DŽ
བᵰᙼ᳝ϸϾҹϞ䘹఼ˈা᳝ϔϾ㛑Ꮉˈ䇋ᶹⳟ䘹఼ᇍⷕ
(ℹ偸21˅DŽ
䮼ϟᰃ৺᳝⿃ބ⿃䲾˛䮼ৃ㛑ޏഄ䴶Ϟњˈ䇋⏙䰸䱰⠽DŽ
䔺ᑧ䮼ᔍㇻৃ㛑ᮁњˈ䇋ϧϮҎᴹᤶDŽ
2. 䘹䎱⾏䖥:
ᅝ㺙⬉∴њ৫? ᤶᮄ⬉∴䆩䆩DŽ
ᤶϔϟ䔺Ϟ䘹఼ⱘԡ㕂䆩䆩DŽ
䞥ሲⱘˈ
᳝䞥ሲ㚠ᵓ䞥ሲ䖍ⱘ䔺ᑧ䮼Ӯᕅડ䘹఼ⱘӴ䕧䎱⾏DŽ
3. 䮼≵᳝ᯢᰒⱘ㞾ࡼডᔍ䖤ࡼᑊϨᓔ䮼ᴎ✻ᯢ♃ϡ䮾҂˖
᳝ҔМ䱰⠽䰏ᣵ䮼њ৫˛ᢝᓔ䞞ᬒᶘDŽࡼ᪡䔺ᑧ䮼DŽ
བᵰᅗϡᑇ㸵㗙㹿ԣњˈৃҹᠧ⬉䆱ᇏ∖ϧϮⱘ
䔺ᑧ䮼㓈ׂ᳡ࡵDŽ
䞡ᮄ䆒㕂偅ࡼDŽ
⏙䰸䔺ᑧ䮼ϟᮍഄ䴶Ϟⱘބǃ䲾ൗഒDŽ
བᵰ䮼݇˄/ϟ˅䰤ԡԡ㕂ডᔍˈ䇋䞡ᮄ䆒ᅮ݇˄/ϟ˅䰤ԡᓔ
݇
ᅠ៤䇗ᭈৢˈ䇋䞡ᮄ⌟䆩䘛䰏ডᔍࡳ㛑DŽ
يᇨ䇗ᭈ䰤ԡᓔ݇ⱘԡ㕂ᰃℷᐌⱘDŽ
⡍⅞ⱘ⇨ᴵӊৃ㛑Ӯᕅડ䮼ⱘ㸠DŽ
4. 䮼≵᳝ᯢᰒⱘ
㞾ࡼ䖤ࡼᑊϨডᔍৢ䮼ᓔ݇♃䮾⚕5⾦䩳˖
Ẕᶹ㑶㒓ֱᡸ㺙㕂DŽ˄བᵰᙼᅝ㺙њ䖭Ͼ䰘ӊ˅DŽ
བᵰ♃䮾⚕ˈ䇋ᇍޚ㑶㒓༈DŽ
5. ᪡ˈ䔺ᑧ䮼㞾Ꮕᠧᓔ݇䯁˖
ᰃ৺䚏ሙՓ⫼ⱘ䘹఼Ϣᙼⱘᓔ䮼ᴎᇍ䖛ⷕ˛
⏙䰸᠔᳝䘹఼ҷⷕˈ䞡ᮄᇍⷕDŽ
䇋⹂䅸䘹ᣝ䪂≵᳝“ᓔ”ⱘԡ㕂DŽ
6. 䮼݇ϡϹ˖
䇗ᭈ݇˄/ϟ˅䰤ԡᓔ݇ԡ㕂DŽ
䇗ᭈ䰤ԡৢ䳔䞡ᮄ⌟䆩䘛䰏ডᔍࡳ㛑DŽ
7. 䮼㛑ᓔԚϡ㛑݇˖
Ẕᶹ㑶㒓ֱᡸ㺙㕂˄བᵰᙼᅝ㺙њ䖭Ͼ䰘ӊ˅DŽ
བᵰ♃䮾⚕ˈ䇋ᇍޚ㑶㒓༈DŽ
䇗ᭈ㒧ᴳৢ䳔䞡ᮄ⌟䆩䘛䰏ডᔍࡳ㛑DŽ
8. ᓔ䮼ᴎ✻ᯢ♃ϡ҂˖
ᤶ✻ᯢ♃⊵˄᳔ࡳ⥛Ў21⪺˅DŽ
9. ᓔ䮼ᴎ✻ᯢ♃ϡ҂˖
ᤶ䘏䕥ᵓDŽ
1
0. ᓔ䮼ᴎ偀䖒᳝வவໄԚϡᎹ:
䔺ᑧ䮼ᔍㇻᮁњDŽᇚ䮼݇ࠄᑩˈ
Փ⫼ࡼ䞞ᬒ㓇㋶ᶘߚ⾏⾏ড়఼DŽࡼᓔǃ
݇䮼DŽϔᑇ㸵㡃དⱘ䮼ৃҹձ䴴ᔍㇻⱘ⫼
ذ㸠Ёⱘӏԩԡ㕂DŽ৺߭ˈ䇋ৃҹᠧ⬉䆱ᇏ∖
ϧϮⱘ䔺ᑧ䮼㓈ׂ᳡ࡵˈҹ㾷އ䮼ᑇ㸵ⱘ䯂乬DŽ
བᵰ䯂乬থ⫳߱᪡ᓔ䮼ᴎᯊˈ߭䮼ৃ㛑ᰃ㹿䫕ԣњDŽ
䇋ᠧᓔ᠔᳝䮼䫕DŽ
1
1. ⬅Ѣᮁ⬉ˈᓔ䮼ᴎ᮴⊩Ꮉ˖
䗮䖛ᢝ䞞ᬒᶘᇚ⾏ড়఼ߚ⾏DŽ䮼ৃҹࡼᠧᓔ݇䯁DŽ
ᔧկ⬉ᘶৢˈ䇋ᇚ⾏ড়఼䞡ᮄড়ϞDŽ
ᮁ⬉ᚙމϟˈৃҹ⫼ᅸ⾏ড়㺙㕂˄བᵰᅝ㺙њ˅
Ң䔺ᑧ䴶ߚ⾏⾏ড়఼DŽ
12. 䞣䇗ᭈᅠ↩ৢˈ䮼ҡডᔍ˖
㾖ᆳ䔼䘧ᰃ৺ᔃ᳆ᨚࡼDŽབᵰᰃˈ䇋ⳟ1314乍DŽ
䮼ᕜ䞡ᑇ㸵䕗Ꮒˈ䇋㟈⬉ϧϮⱘ䔺ᑧ䮼᳡ࡵଚ䖯㸠㓈ׂDŽ
13. 䔼䘧ᔃ᳆ˈᑊϨᰗࡼ䕗ᆇ˖
Ў䔼䘧Փ⫼䰘ࡴᣖᬃᶊDŽ
䮼ᕜ䞡ᑇ㸵䕗Ꮒˈ䇋㟈⬉ϧϮⱘ䔺ᑧ䮼᳡ࡵଚ䖯㸠㓈ׂDŽ
14. ៥ᰃ৺䳔㽕Փ⫼䰘ࡴᣖᬃᶊ˛
䰆ℶ䔼䘧ᔃ᳆ᰗࡼDŽ
15. ᓔ䮼ᴎ♃䮾⚕˖
ᔧ䮼䖛䞡䖤㸠ϡᑇ〇ᯊӮߎ⦄䖭⾡⦄䈵DŽ
16. ᓔ䮼ᴎ䍞䖛њᶤϾ䰤ԡᓔ݇˖
䰤ԡᓔ݇ᅝ㺙ԡ㕂ϡℷ⹂DŽ䇋খ㾕“ᅝ㺙䰤ԡᓔ݇”˗
䔼䘧ⱘࡳ㛑⌟䆩ৃҹ⫼ϔϾㅔⱘᆊ⫼⺕䪕䖯㸠˗
Ẕᶹ䰤ԡᓔ݇㒓ⱘ㒱㓬⢊މ˗
Ẕᶹݙ⾏ড়Ёⱘ⺕䪕ᰃ৺ℷ⹂ⱘԡ㕂DŽ
ֱ
ݏᙼⱘᓔ䮼ᴎ
㓈ᡸᙼⱘᓔ䮼ᴎ
䯂乬ঞ㾷ㄨ

114A3269B Printed in China
5-CN
䮼ᓔ݇ᑨᅝ㺙ϔϾৃҹⳟࠄ䔺ᑧ䮼ˈ䖰⾏䮼䮼⹀ӊ
ˈᑊܓスϡࠄⱘຕϞDŽᅝ㺙ഄ䴶ҹϞ㟇ᇥ1.5 ㉇໘DŽ
䮼ᓔ݇˄2˅ৢ䴶᳝ϸϾ㶎ϱ㒓ッ˄1˅DŽҢ⬉㒓
˄4˅Ϟ࠹এ㑺6↿㉇ⱘ㒱㓬ⲂDŽᡞ㒓ߚᓔˈ
ᇚ㑶/ⱑ㡆㒓䖲ࠄ⊼Ў“RED”ⱘ㒓㶎ϱ1Ϟˈ
ᇚⱑ㡆㒓䖲ࠄ⊼ “WHT”ⱘ㒓㶎ϱ2ϞDŽ
ᏺ♃ܝᣛ⼎ⱘ䮼ᓔ݇˖⫼᠔ᦤկⱘ㶎ϱ˄3˅
ᡞ䮼ᓔ݇ᅮࠄ䔺ᑧݙⱘຕϞDŽ
བᵰᅝ㺙∈⊹⏋ޱೳϞˈ߭䇋䪏ϔϾ4↿㉇
˄5/32㣅ᇌ˅ᄨݡ⫼㝼㚔㶎ϱ˄6˅ᅮDŽ
᳔Շԡ㕂ᑨ䴴䖥Ẕׂ䮼ˈϨܓスϡࠄⱘഄᮍDŽ
ࡳ㛑䮼ᓔ݇˖䮼ᓔ݇˄10˅ⱘ乊䚼ᦦܹ1
ᡞᇣⱘᑇ༈㶎ϱߔˈ䕏䕏ഄᇚⲪᵓᢚϟDŽᣝϟ߫ℹ偸ˈ
⫼㶎ϱ˄8˅ᡞ䮼ᓔ݇ᅮࠄ䔺ᑧݙⱘຕϞ˖
ᅝ㺙ᑩ䚼ᅮ㶎ϱˈ㶎ϱሒ䚼⬭㑺3↿㉇˗
ᇚ䮼ᓔ݇ⱘϟ䚼ⱘ㶎ᄨ༫㶎ϱϞˈ䕏䕏ഄ䇗ᭈ䮼ᓔ݇
ˈՓ݊ൖⳈ˗
ᇣᖗഄᅝ㺙乊䚼㶎ϱˈ䰆ℶล᭭㺖ˈϡ㽕⫼䖛⣯˗
ᇚⲪᵓᑩ䚼ⱘᠷ˄ 9˅ᦦⳌᑨⱘԡ㕂ˈᇚ䴶ᵓᠷϞ˗
ᢚ䰸Ⲫᵓᯊˈৃ⫼ಲ㸠䩜ᇣⱘᑇ༈㶎ϱߔᇚ݊䕏䕏㖬䍋DŽ
ᇚᓔ݇㒓⊓ຕϞᓩˈ῾こ䖛㢅ᵓࠄ䔺ᑧ䮼ᓔ䮼ᴎϞDŽ
Փ⫼㒱㓬ⱘUᔶ䩝˄5˅ᅮ⬉㒓DŽ
ᓔ䮼ᴎⱘᖿ䗳㒓ッᄤ˄7˅
ԡѢᓔ䮼ᴎᎺջᄺдᣝ䪂ᮕ䖍ⱘߍ໘DŽ
ᣝҹϟ㾘߭ᡞᓔ݇㒓ࠄッᄤϞ˖㑶/ⱑ㡆㒓ࠄ㑶㡆ッᄤϞˈ
ⱑ㡆㒓ࠄⱑ㡆ッᄤ˄5˅ϞDŽ
23
䰘ӊ
(1) ൟো 4335EML 3䬂䗋Դ䘹఼
(2) ൟো 770EML 㑶㒓Ӵᛳ఼
(3) ൟো 747EML ᮴㒓ᆚⷕᓔ݇
(4) ൟো 845EML ࡳ㛑䮼ᓔ݇
(5) ൟো 75EML ᏺ♃䮼ᓔ݇
(6) ൟো 760EML ᅸ䩹࣭ᓔ݇
(7) ൟো 1702EML ᅸᖿ䗳⾏ড়㺙㕂
(1) 041A5644 ⾏ড়఼䫒ᴵǃ
䩶ϱ㓇㺙㕂
˄3㡖ᓣ䔼䘧䗖⫼˅
041A0516-1 ⾏ড়఼䫒ᴵǃ
䩶ϱ㓇㺙㕂
˄1㡖ᓣ䔼䘧䗖⫼˅
(2) 041A6342 ᓔ䮼ᴎ˄ҙᴎ༈˅
(3) 041A5643-4 ⹀ӊࣙ
(4) 041B0668 䮼˄䖲˅ᬃᶊ
(5) 041C0669 乊ッᬃᶊ
(6) 001A5644 ݙ⾏ড়
(7) 041C5620 ⾏ড়
(8) 041C0521-1 䰤ԡᓔ݇
˄3㡖ᓣ䔼䘧䗖⫼˅
041A0521-2 䰤ԡᓔ݇
˄1㡖ᓣ䔼䘧䗖⫼˅
(9) 002D0838 1㡖ᓣ䔼䘧
(10) 041A5675 䔼䘧䜡ӊ
(11) 041A5676 ⷁ䔼
041A5626 䘏䕥ᵓ
041A0157-1 ব఼
ᡔᴃখ᭄
䕧ܹ⬉……….Ѹ⌕230ӣ50/60䌿ݍ
᳔偅ࡼ…….600⠯乓
乱ᅮ䕧ܹࡳ⥛….85⪺
乱ᅮᡁⶽ……….3⠯㉇
ᕙᴎࡳ⥛……….9⪺
᳔䮼䞡……….60݀᭸
偀䖒
ޣ䗳↨………….63˖1啓䕂ޣ䗳
⬉…………….Ⳉ⌕24ӣ
偅ࡼ㺙㕂
㸠…………….2.8㉇
䖤㸠䗳ᑺ……….8㉇/⾦
✻ᯢ♃………….24ӣ21⪺
ᅝܼᗻ
⬉⇨…………….㞾ࡼ䆒㕂偅ࡼ
⬉ᄤ…………….ব఼ݙ㕂⛁ֱ䰽ϱ
䆒ᅮ䰤ԡ……….ࡼ
ሎᇌ
ሎᇌ˄ᘏ䭓˅....3.3㉇
ᅝ㺙ޔぎ催ᑺ….30↿㉇
ᣖ䞡䞣……….10݀᭸
䘹ᬊ఼ᄬټ䞣
ܚҷⷕ……… 12Ͼ
ᢼⷕᓔ݇……….1Ͼ
᮴㒓ᆚⷕᓔ݇….1Ͼ
䘹乥⥛……….433.92ܚ䌿ݍ
22 24
ࡳ㛑䮼ᓔ݇ᏺ♃ⱘ䮼ᓔ݇㒓˄䗝乍˅
23
䰘ӊ
ӊ
1-GB
Start by Reading These Important Safety Rules
WARNING: If your garage has no service entrance door, Model 1702EML Outside Quick Release must be installed. This
accessory allows manual operation of the garage door from outside in case of power failure.
Keep garage door balanced. Sticking or binding doors
must be repaired. Garage doors, door springs, cables,
pulleys, brackets and their hardware are under extreme
tension and can cause serious personal injury. Do not
attempt to loosen, move or adjust them. Call for garage
door service.
Do not wear rings, watches or loose clothing while
installing or servicing a garage door opener.
To avoid serious personal injury from entanglement,
remove all ropes connected to the garage door before
installing the door opener.
Installation and wiring must be in compliance with your local
building and electrical codes. This is a class 2 double
insulated product, connesction to earth is not required
or provided.
Lightweight doors of fiberglass, aluminum or steel
must be substantially reinforced to avoid door damage.
The best solution is to check with your garage door
manufacturer for an opener installation reinforcement kit.
The safety reverse system test is very important. Your
garage door MUST reverse on contact with a 40mm
obstacle placed on the floor. Failure to properly adjust the
opener may result in serious personal injury from a closing
garage door. Repeat the test once a month and make
any needed adjustments.
This unit should not be installed in a damp or wet space.
Door must not extend over a public byway during
operation.
Fasten the child warning label adjacent to the lighted door
control button as a reminder of safe operating procedures.
Disengage all existing garage door locks to avoid
damage to garage door.
Any door control buttons (if installed) MUST be located
where the garage door is visible, but out of the reach of
children. Do not allow children to operate push
button(s) or remote control(s). Serious personal injury
from a closing garage door may result from misuse of
the opener.
Activate opener ONLY when the door is in full view, free
of obstructions and opener is properly adjusted. No
one should enter or leave the garage while the door is
in motion. Do not allow children to play near the door.
Use manual release only to disengage the trolley and, if
possible, ONLY when the door is closed. Do not use the
red handle to pull the door open or closed.
Disconnect electric power to the garage door opener
before making repairs or removing covers.
This product is provided with a transformer and power
supply cord of special design which, if damaged, MUST be
replaced by a transformer from your local Chamberlain
distributor and fitted by a specialist.
SAVE THESE INSTRUCTIONS
Table of Contents
Safety Rules 1
Before You Begin 1
Door Types 1 1
Tools Required 1 2
Hardware Provided 1 3
Completed Installation 1 4
Assembly 2 5 - 11
Installation 2 12 - 17
Adjustment 3 18 - 20
Test the Safety Reverse System 3 19
Install The Protector System™
(Optional) 3
Program Remote 3 20
Replace Light Bulb 3 21
Operation Of Your Opener 3
Care Of Your Opener 3
Maintenance Of Your Opener 3
Having a Problem? 3 - 4
Wiring the Multi-Function Door
Control Panel and the Lighted
Door Control Button (Optional) 4 22
Accessories 4 23
Replacement Parts 4 24
Specifications 4
Page Illustration(s)
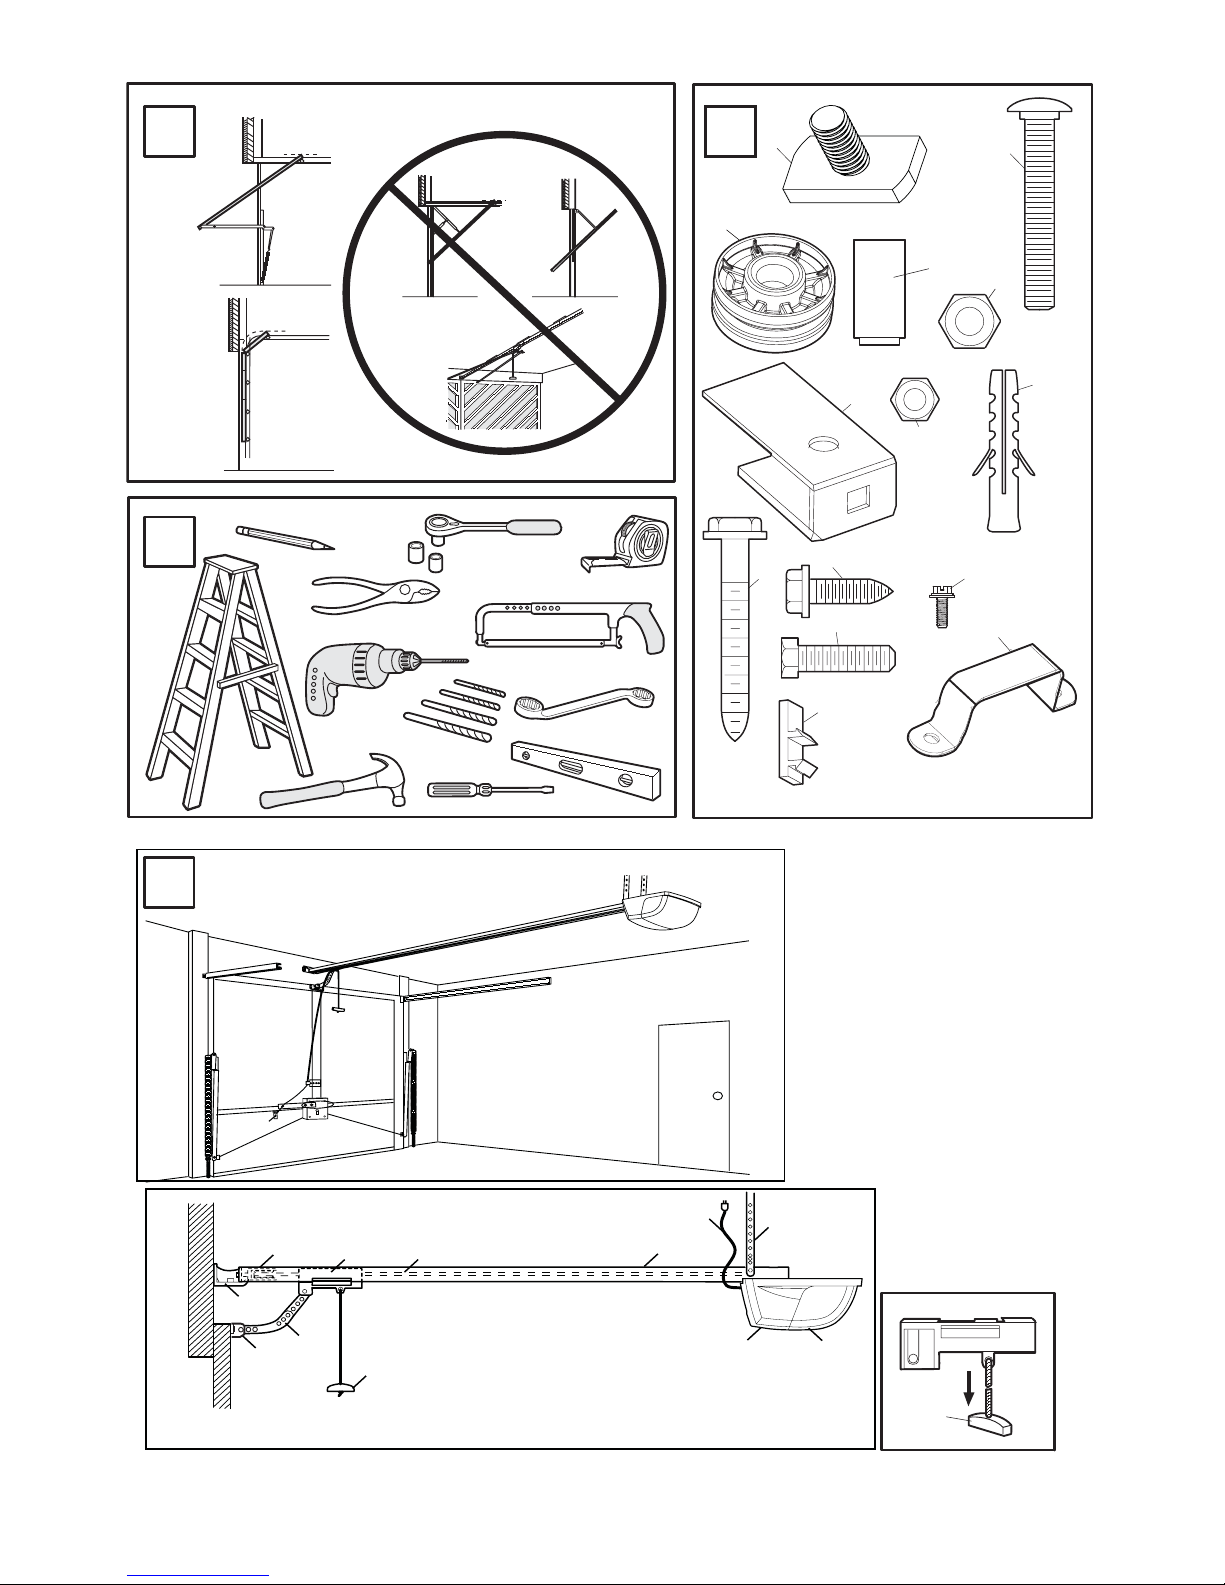
Door Types
A. One-Piece Door with Horizontal Track Only
B. Sectional Door with Curved Track
NOTE: Unit will not work with One-Piece Doors with Horizontal and
Vertical Tracks, Double-Wing Doors, or Canopy Doors.
1
ASSEMBLY HARDWARE
1. Square Head Screws (4)
2. 8mm Carriage Bolt (1)
3. Cable Pulley (1)
4. Pin (1)
5. 8mm Lock Nut (1)
6. Pulley Bracket (1)
These safety alert symbols mean WARNING – a personal safety or property damage instruction.
Read these instructions carefully.
This garage door opener is designed and tested to offer reasonable safe service provided it is installed and
operated in strict accordance with the following safety rules.
Failure to comply with the following instructions may result in serious personal injury or property damage.
INSTALLATION HARDWARE
7. 6mm Nut (8)
8. Concrete Anchor (4)
9. 6mm Lag Bolt (4)
10. 6mm Self-Threading Screw (4)
11. 6mm Hex Bolt (4)
12. Wire Clips (3)
13. Hex Screws (2)
14. C-rail Bracket (1)
Before You Begin
1. Look at the wall or ceiling above the garage door. The header
bracket MUST be securely fastened to structural supports.
2. Do you have a finished ceiling in your garage? If so, a support
bracket and additional fastening hardware (not supplied) may be
required.
3. Do you have an access door in addition to the garage door? If
not, Model 1702EML Outside Quick Release Accessory is
required.
Hardware Provided
3
Tools Required for Installation
2
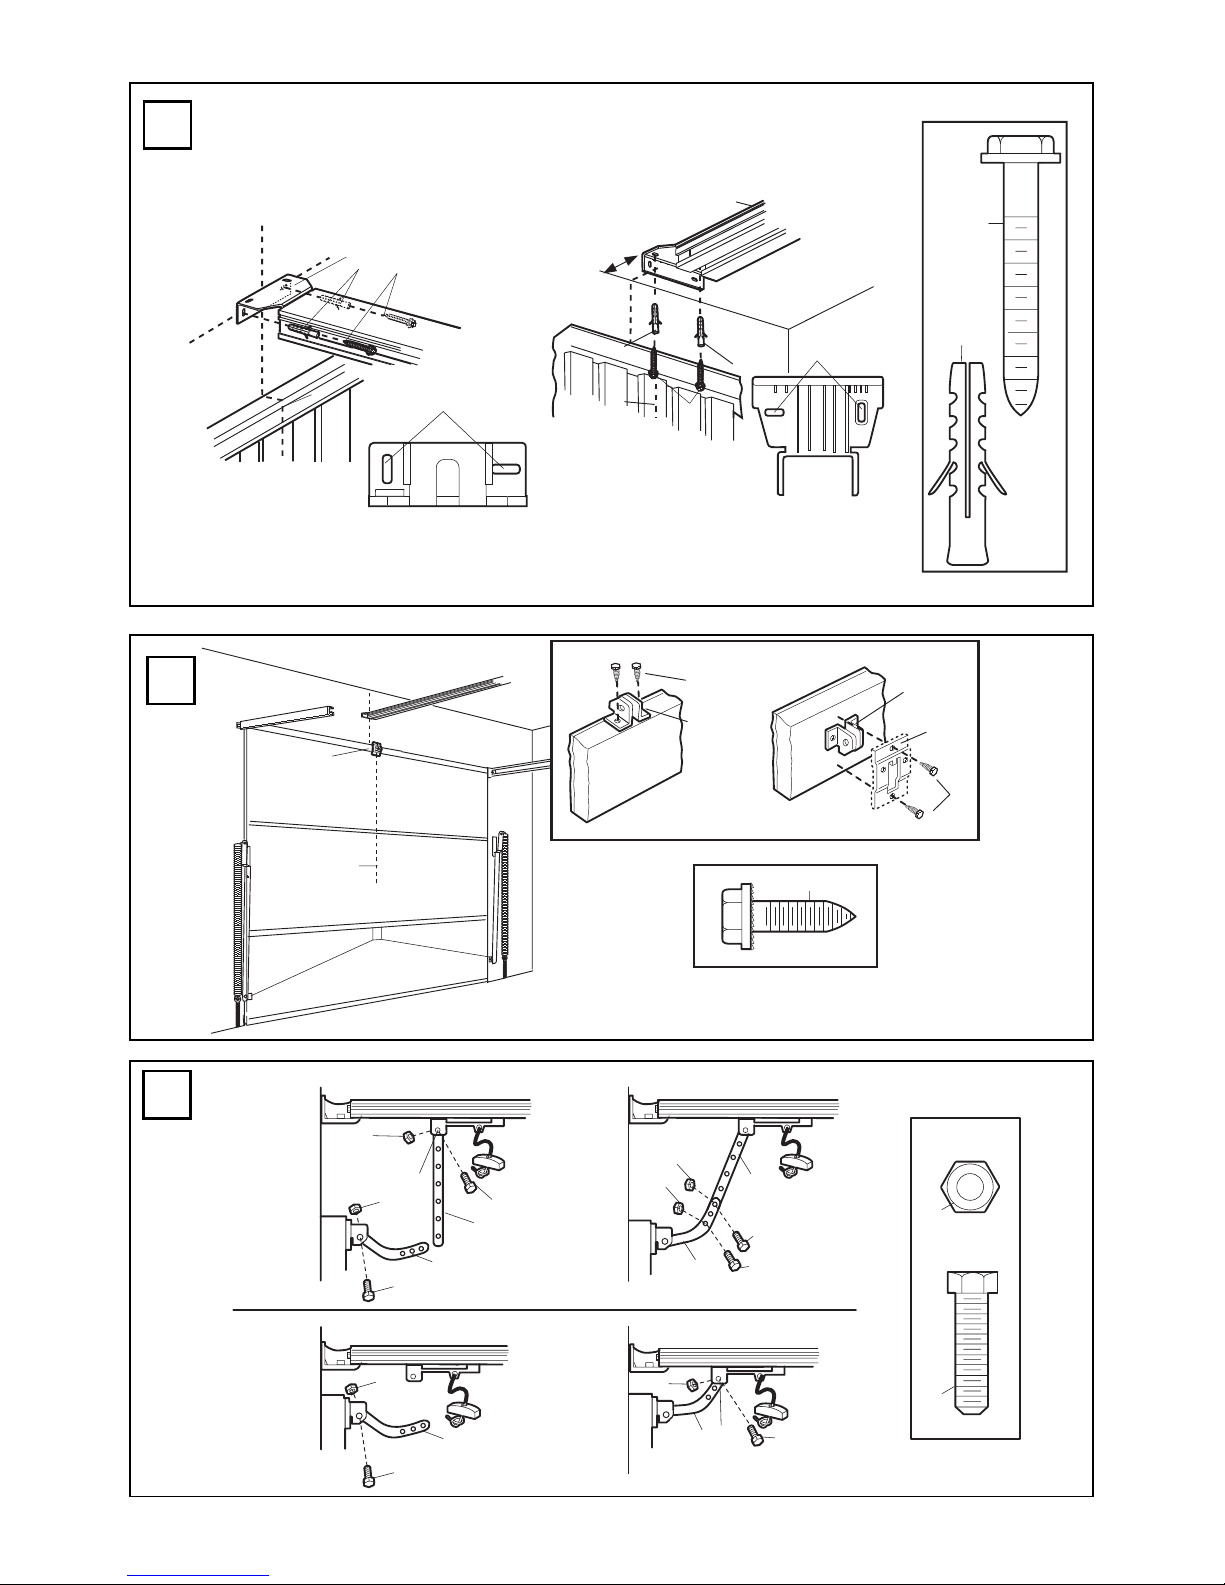
Mount Header Bracket
Close door providing a support for header bracket.
A. Preferred:
Locate the vertical center line (4) and the point that was marked
in step 13. Place bottom of Header bracket (1) over this point.
Mark holes for Header Bracket (5) that meet the wall. For
concrete walls drill 8mm pilot holes. Insert Concrete Anchors (2)
and secure Header Bracket to Header Wall with Lag Screws (3).
For wood walls, drill 4mm pilot holes and secure header bracket
with Lag Screws.
B. If Necessary:
Locate center line on ceiling (4) center Header Bracket over
center line. Mark and drill pilot holes for concrete or wood
ceilings as in A above. Tighten all nuts and bolts securely.
Fasten Door Bracket
A. Place Door Bracket (2) on the top of the door (3) and center
over Vertical Center Line (1). Mark the two rear top holes. Drill
4mm holes.
B. Mark the two top front holes. Drill 4mm holes. Fasten Door
Bracket (2) to the top of the door (3) using Screws (4)
NOTE: If you have a Hörmann Door and for some other doors it is
recommended to place two screws (5) in the front bottom holes
(Not Provided).
Connect Door Arm to Trolley
A. Preferred Installation:
Disconnect Trolley by pulling on the red handle and slide
towards door. With door closed connect Straight Door Arm (5) to
Trolley (4) with Bolt (3), secure with Nut (1). Connect Curved
Door Arm (2) to Door Bracket with Bolt (3) Secure with Nut (1).
Align Straight and Curved Door Arms with a 2 hole overlap
connect with Bolt (3), secure with Nut (1), If Straight Door Arm
(5) is too long, cut the end of the Door Arm.
B. Where extra travel distance is required:
With door closed connect Curved Door Arm (2) to Door Bracket
with Bolt (3), secure with Nut (1). Lift Curved Door Arm (2) to
meet Trolley, connect door arm to Trolley with Bolt (3), secure
with Nut (1).
Connect Electric Power
To avoid installation difficulties, do not run the garage door
opener until instructed to do so.
Plug the opener into electric outlets as specified by local wiring
codes. The opener light will turn on when power is connected and
remain on for 2-1/2 minutes.
16
15
14
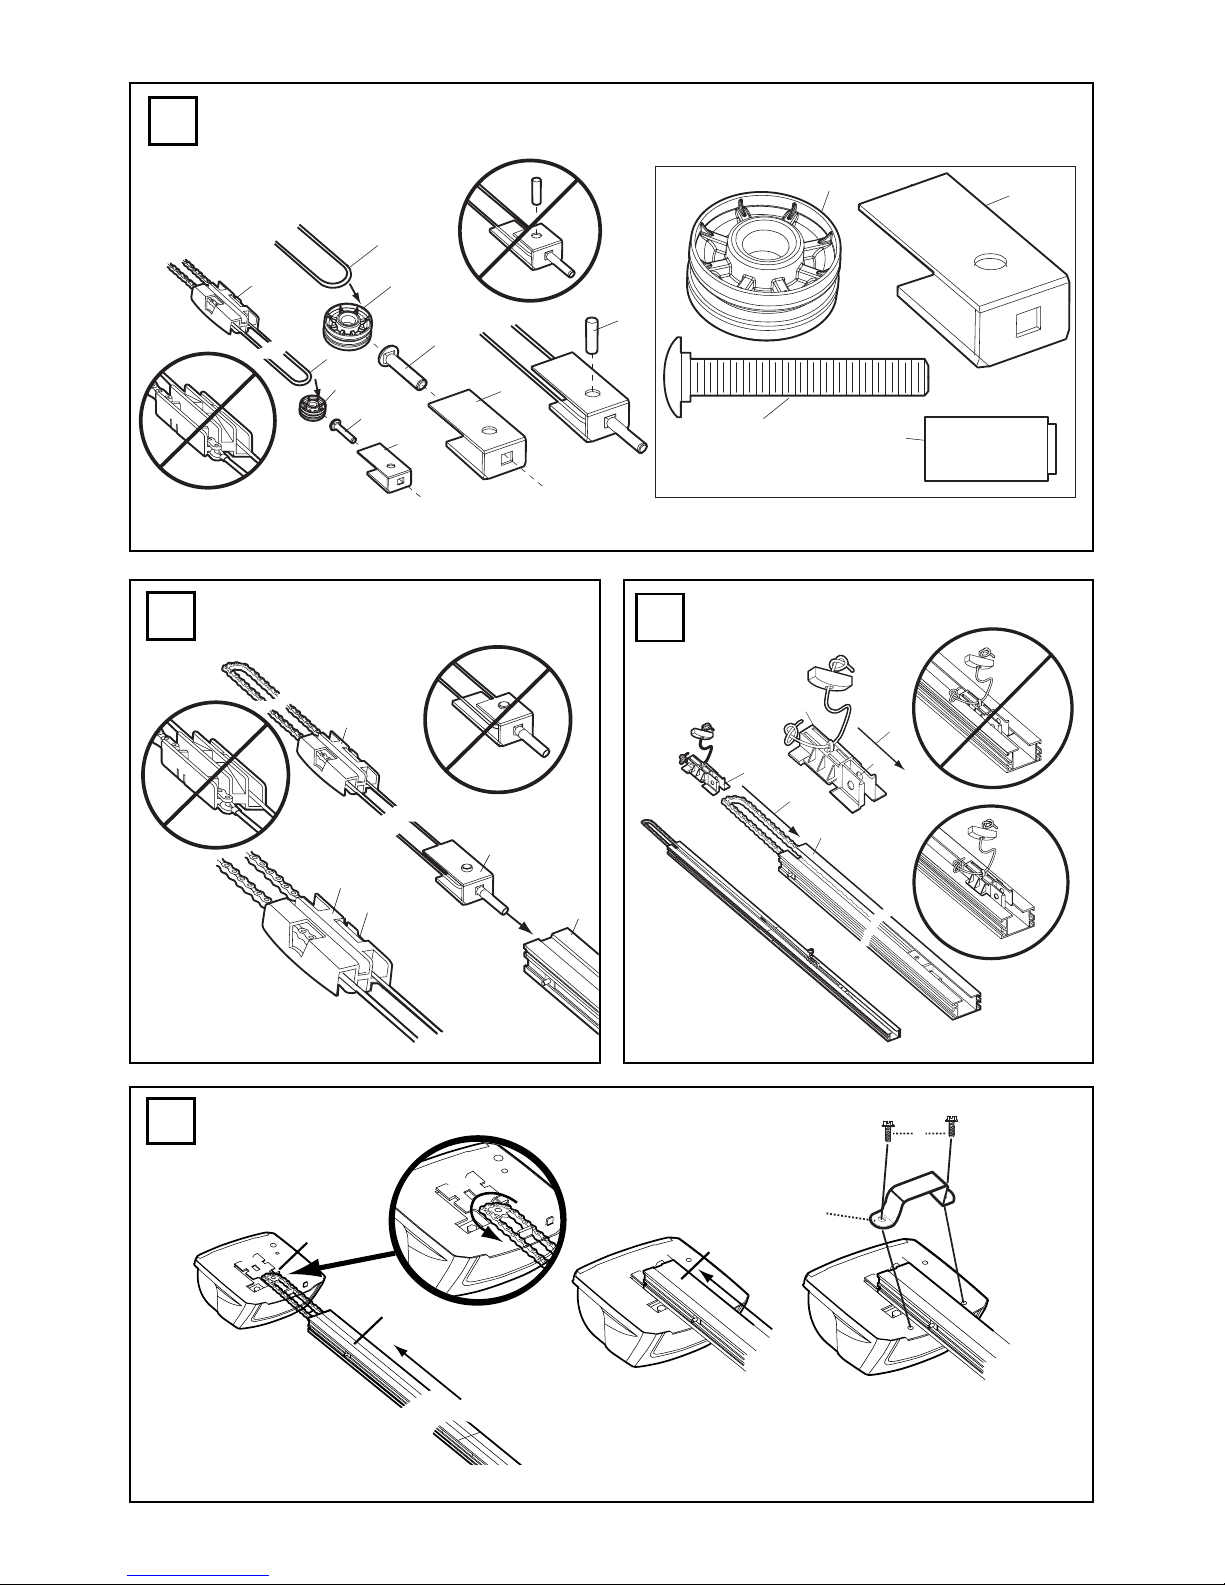
ASSEMBLY SECTION
Assemble Rail
Place Rail pieces (1) on a flat surface for assembly. Take special
note of the raised line on the Rail pieces (4) these lines MUST line
up in order for the Rail to fit together properly. All three Rail
sections are interchangeable. Slide Rail Braces (2) into slots on the
sides of Rail. Make sure small tabs on Rail Braces (3) are up
against top lip of Rail. Connect Rail by sliding other end of braces
into next Rail. Be sure the raised lines that run down Rail sections
(4) line up. Tap Rail assembly (5) on a piece of wood (6) until Rail
sections are flush. Repeat for final Rail section.
Vibration Reduction Kit:
Pads are to be placed inside the rail close to the operator power
head. Two pads on each side. Two half pads at the bottom of the
rail. Clean rail where pads will be placed. WORK CLEAN! Remove
grease or any dirt from rail otherwise pads won’t stick.
Assemble Cable Pulley Bracket
Insert Carriage Bolt (1) though square hole in Cable Pulley Bracket
(4). Remove Chain/Cable assembly (3) from carton. Wrap Cable
around Cable Pulley (2) and insert Pulley into Bracket (NOTE:
Make sure the Bracket is assembled in position shown). Slide pin
(5) through holes in Cable Pulley Bracket and Cable Pulley. NOTE:
Trolley with Magnet (6) MUST be installed in the position shown.
Insert Chain/Cable into Rail
Slide Cable Pulley Bracket (1) into Rail assembly (3), be sure to
insert Cable Pulley Bracket as shown. Push Cable Pulley Bracket
toward front of Rail and slide Inner Trolley (2) into Rail assembly.
Magnet (4) MUST be installed in position shown or unit will not
function properly.
Attach Trolley to Rail
Turn Rail assembly over. Slide Outer Trolley (1) into Rail assembly
(2), be sure the end with Door Arm Hole (3) is heading in direction
of door (4). Slide Outer Trolley down Rail until it engages with Inner
Trolley.
Attach Rail to Unit
Turn Rail assembly over. Wrap Chain around Drive Sprocket (1).
Slide Rail assembly (2) toward unit and into slots on top of unit.
Attach C-Bracket (3) on rail and secure with screws (4) as shown.
Push Cable Pulley Bracket forward making Chain tight on sprocket.
Chain MUST engage teeth on Drive Sprocket.
Attach Header Bracket
Turn Rail and Unit assembly over. Slide Cable Pulley Bracket (2)
toward front end of Rail (3). Be careful Chain does not come off
Drive Sprocket on unit or become twisted. Slide Carriage Bolt (5)
into Header Bracket (1). Secure with Lock Nut (4). Tighten Nut until
Chain does not droop below rail. Do NOT over tighten.
ASSEMBLY OF YOUR OPENER IS NOW COMPLETE.
INSTALLATION SECTION
Wear protective goggles when working overhead to protect your
eyes from injury. Disengage all existing garage door locks to avoid
damage to garage door. To avoid serious personal injury from
entanglement, remove all ropes connected to garage door before
installing opener. Installation of this product shall comply with
ZH1/494, VDE 0700 Part 238, and VDE 0700 Part 1. It is
recommended that the opener be installed 2.1m (7 feet) or more
above the floor where space permits.
10
9
8
7
6
5
2-GB
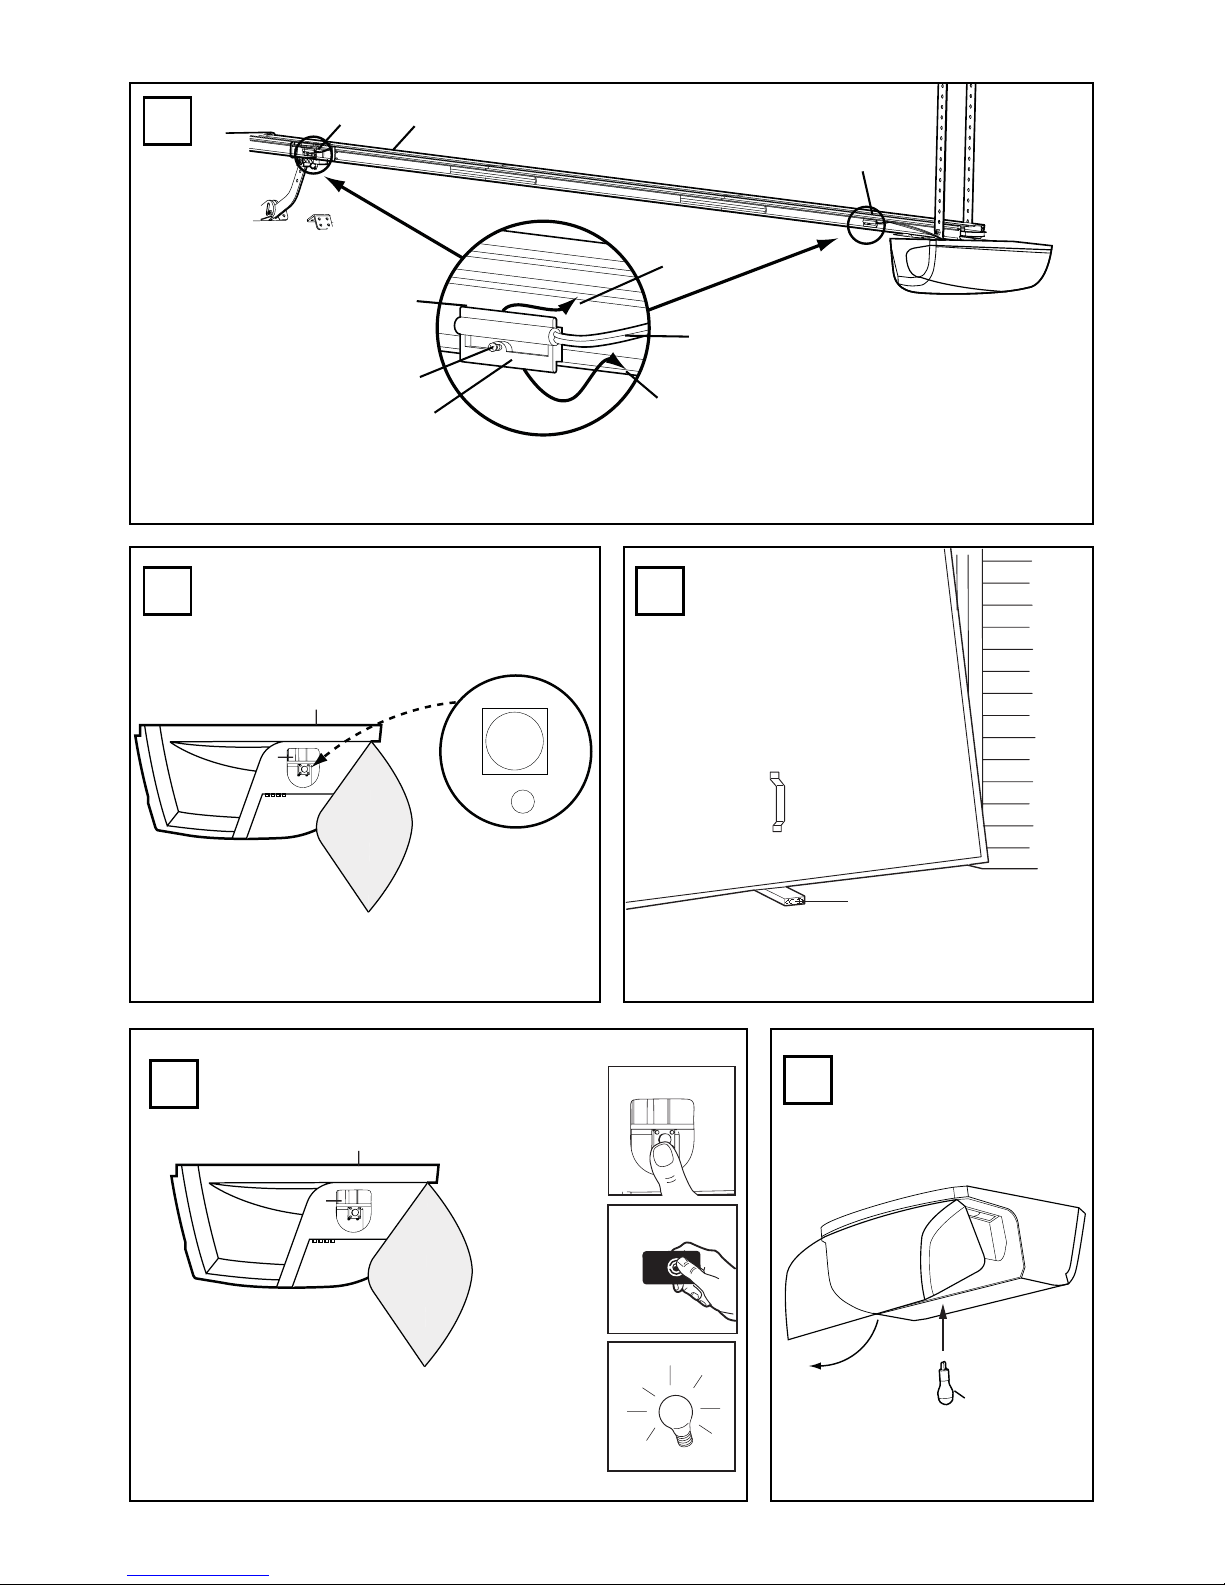
Hang Opener
Bend Hanging Brackets (1) so they are flat against ceiling.
Measure distance from Header Bracket to Ceiling Mounting
Bracket Bolts. Mark length on ceiling starting at the Header Wall,
along this point is where the unit will be mounted. Lift door to full
open position, rest opener on door. Insert Square Head Screws (A)
into Rail assembly (B) approximately 120mm from end of Rail near
motor unit. Slide Hanging Brackets on to Square Head Screws and
secure Brackets with Nuts (5). In this process the Square Head
Screws hook into slots on the sides of rail. (C)
For concrete ceilings, drill 8mm pilot holes into ceiling and insert
Concrete Anchors (2). Secure Hanging Brackets to ceiling with Lag
Screws (3). For wood ceilings, drill 4mm pilot holes and secure
with Lag Screws (3).
Optional: A second set of hanging brackets is recommended when
door is very heavy. The hanging brackets should be located in the
first third to the center of the rail from the front or at the location
the garage door opener lifts the rail upwards the most during the
travel.
13
CCoommpplleetteeddIInnssttaallllaattiioonn
As you proceed with the assembly, installation and
adjustment procedures in this manual, you may find it helpful
to refer back to this illustration of a completed installation.
4
(1) Cable Pulley Bracket
(2) Trolley
(3) Chain/Cable Assembly
(4) Rail
(5) Hanging Bracket
(6) Power Cord
(7) Opener
(8) Light Lens
(9) Manual Release
Rope & Handle
(10) Door Arm
(11) Door Bracket
(12) Header Bracket
Position Opener
Open Door (3) to its highest point of travel (1) measure 20mm
above this point and mark on Header Wall (2) the bottom of the
Rail (4) should be no more than 20mm above highest point of
travel of the door (1). NOTE: If door spring is in the way install unit
directly above spring. Clearance between highest point of travel
and Rail should not exceed 50mm and can be zero when
clearance between door and ceiling is only 30mm.
12
Find Center of Garage
Mark center of door (1). Extend line onto ceiling (2).
11

Replace Light Bulb
Replace light bulb (1) with a 21 watt maximum light bulb. Insert
bulb into socket as shown. The light will turn on and remain lit for 2
1/2 minutes when power is connected. After 2 1/2 minutes it will
turn off.
21
3-GB
Test the Safety Reverse System
The safety reverse system test is important. Garage door
must reverse on contact with a 40mm obstacle laid flat on the
floor. Failure to properly adjust opener may result in serious
personal injury from a closing garage door. Repeat test once
a month and adjust as needed.
Procedure: Place a 40mm obstacle (1) laid flat on the floor under
the garage door. Operate the door in the down direction. The door
must reverse on the obstruction. If the door stops on the
obstruction, it is not traveling far enough in the down direction.
Move Close Limit closer to door.
When the door reverses on the 40mm obstacle, remove the
obstruction and run the opener through a complete travel cycle.
Door must not reverse in closed position. If it does, adjust Limit
and repeat safety reverse test.
Place 20kg at the center of the door and ensure that the door will
not move up more than 500mm.
SAVE THESE INSTRUCTIONS
19
Install Protector System™
(Optional) – (See accessories)
After opener has been installed and adjusted, The Protector
System™ accessory can be installed. Instructions are included
with this optional device.
The Protector System™ provides an additional measure of
safety against a small child being caught under a garage door.
It uses an invisible beam which, when broken by an obstruction,
causes a closing door to open and prevents an open door from
closing and is strongly recommended for homeowners with young
children.
Program Remotes
Activate the opener only when door is in full view, free of
obstruction and properly adjusted. No one should enter or
leave garage while door is in motion.
Your garage door opener receiver and Remote Control Transmitter
are set to a matching code. If you purchase additional Remote
Controls, the garage door opener must be programmed to accept
the new Remote code.
To program receiver to match additional Remote Control
codes:
1. Press and release the program button on the side of the unit (1).
The green LED will glow steadily for 30 seconds.
2. Within 30 seconds press and hold the button on the hand-held
Remote (2).
3. Release the button when the motor unit light blinks. It has
learned the code. If the light bulb is not installed, two clicks will
be hear.
To erase all codes from motor unit memory or to deactivate
any unwanted Remote, first erase all codes:
Press and hold the program button (1) on motor unit until the learn
indicator light goes out (approximately 6 seconds). All previous
codes are now erased. Reprogram each Remote or Keyless Entry
you wish to use.
20
Operation Of Your Opener
Your opener can be activated by any of the following devices:
• The Remote Control Transmitter. Hold the push button down until
the door starts to move.
• The Lighted Door Control Button (if you have installed this
accessory). Hold the button down until door starts to move.
• The Outside Keylock or Keyless Entry System (if you have
installed either of these accessories).
Opening the Door Manually:
Door should be fully closed if possible. Weak or broken springs
could allow an open door to fall rapidly. Property damage or
serious personal injury could result.
The door can be opened manually by pulling the release handle
down. To reconnect the door, activate the unit.
Do not use the manual release handle to pull the door open
or closed.
When the Opener is Activated by Remote Control or Door
Control Button:
1. If fully open, the door will close.
2. If closed, the door will open.
3. If opening or closing, the door will stop.
4. If partially open, the door will move in the opposite direction of
last travel.
5. If an obstruction is encountered while closing, the door will
reverse to the open position.
6. If an obstruction is encountered while opening, the door will
reverse for 1 second.
7. The optional Protector System™ uses an invisible beam which,
when broken by an obstruction, causes a closing door to open
and prevents an open door from closing. It is STRONGLY
RECOMMENDED for homeowners with young children.
Allow a 15 minute cooling period after 5 continuous operations of
the opener.
The opener light will turn on: 1. when opener is initially plugged in;
2. when the power is interrupted; 3. when the opener is activated.
The light turns off automatically after 2-1/2 minutes. Bulb size is
21 Watts maximum.
Setting the Force
The Force is programmed to operate most doors, however, if
Limits are not able to be set, or the door reverses during normal
operation follow this procedure: Locate the Program Button (1) on
the left side panel of unit (2). Push the Program Button twice to
enter unit into Auto-Force Adjustment Mode. The green LED will
flash slowly. Activate unit with remote and run the unit to the Open
Limit. Activate unit again to run the unit to the Closed Limit. The
door must travel through a complete cycle up and down in order
for the Force to be set properly. If the unit stops before it reaches
the Open or Close Limit repeat the process. The green LED will
stop flashing when the Force has been learned.
18
Attach Limit Switches
NOTE: The limits must be installed as shown. If installed
incorrectly the unit will not function properly.
Close garage door by hand. Determine the position of the Close
Limit Switch (1) (Long wire) by aligning the center of trolley and the
center of the Limit Switch. The Limit Switches are actuated by a
magnet in the Inner Trolley. Insert bottom tab (5) of Limit Switch (1)
into bottom lip of Rail (7). Insert top tab (4) under top lip of Rail (6).
Lift limit assembly against top lip of Rail and tighten screw (8) to
secure Close Limit Switch. Open garage door by hand to the full
open position. Pull red handle to open door past Inner Trolley.
Determine the position of the Open Limit Switch (3) (Short Wire) by
aligning the center of the Trolley and the center of the Limit Switch.
Insert bottom tab (5) of Limit Switch (1) into bottom lip of rail (7).
Insert top tab (4) under top lip of rail (6). Lift limit assembly against
top lip of rail and tighten screw (8) to secure Open Limit Switch.
Insert wires for Limit Switch (9) into top channel of Rail (10).
Secure wires with wire clip. the wires must be secured so they do
not interfere with the travel of the Trolley. Activate remote, the
opener will operate and reconnect to the door automatically. Run
opener 2 full travel cycles. If the door reverses in mid travel go to
Setting the Force Section. Adjust Limit Switches as necessary to
fully open and close the door without reversing.
17

4-GB
5. The garage door opens and closes by itself:
• (Keypad or Code Switch transmitters only) Is there a neighbor
with a garage door opener using the same code? Change your
code.
• Make sure remote push button is not stuck in ON position.
6. Door does not close completely:
Adjust the Close Limit.
Repeat safety reverse test after any adjustment of door arm
length, or Close Limit.
7. Door opens but won’t close:
• Check The Protector System™ (if you have installed this
accessory). If the light is blinking, correct alignment.
Repeat the safety reverse test after the adjustment is
complete.
8. Opener light does not turn on:
Replace light bulb (21 Watts maximum).
9. Opener light does not turn off:
Defective logic board.
10. Opener motor hums briefly, then won’t work:
• Garage door springs are broken. Close door and use Manual
Release Rope and handle to disconnect Trolley. Open and
close door manually. A properly balanced door will stay in any
point of travel while being supported entirely by its springs. If it
does not, call for a professional garage door service to correct
the problem.
• If problem occurs on first operation at opener, door may be
locked. Disable door lock.
11. Opener won’t activate due to power failure:
• Pull Manual Release Handle to disconnect Trolley. Door can be
opened and closed manually. The next time opener is
activated, the Trolley will reconnect.
• The Outside Quick Release accessory 1702EML (if fitted)
disconnects the Trolley from outside the garage in case of
power failure.
12. Door reverses after the force adjustment was completed.
• Watch rail if it bends or swings. If so, see point 13+14.
• Door is very heavy and/or in bad condition. Call for
professional garage door service.
13. Rail bends respectively rail swings a lot
• Use additional hanging brackets for the rail.
• Garage door is very heavy or in bad condition. Call for
professional garage door service.
14. Do I need to use the additional hanging brackets?
• Avoids bending or swinging of rail.
15. Opener light flares
• When the garage door is very heavy or isn’t smooth running.
>> Normal
16. Opener overrides one of the limit switches
• Limit switches are not installed at the correct side of the rail
and/or in the location. See “Attach Limit Switch”
• A functional test of the rail contact (cable) can be made with a
simple household magnet.
• Check condition of cables for insulation damages
• Check if the magnet located inside the inner trolley is in place
HAVING A PROBLEM?
1. Opener doesn’t operate from remote:
• Does the opener have electric power? Plug lamp into outlet. If
it doesn’t light, check the fuse box or the circuit breaker. (Some
outlets are controlled by a wall switch.)
• Have you disengaged all door locks? Review installation
instruction warning on page 1.
• Try a new battery.
• If you have two or more remotes and only one operates, review
receiver programming procedures in Step 21.
• Is there a build-up of ice or snow under door? The door may be
frozen to ground. Remove any obstruction.
• The garage door spring may be broken. Have it professionally
replaced.
2. Remote has short range:
• Is battery installed? Try a new one.
• Change the location of the remote control in the car.
• The metal garage door, foil-backed insulation or metal siding
will reduce the transmission range.
3. Door reverses for no apparent reason and opener lights
don’t blink:
• Is something obstruction the door? Pull Manual Release
Handle. Operate door manually. If it is unbalance or binding,
call for professional garage door service.
• Reprogram the Force.
• Clear any ice or snow from garage floor area where garage
door closes.
• If door reverses in fully closed position, adjust the Close Limit.
Repeat safety reverse test after adjustment is complete.
The need for occasional adjustment of the Limit positions is
normal. Weather conditions in particular can affect door travel.
4. Door reverses for no apparent reason and door control
button light blinks for 5 seconds after reversing:
• Check The Protector System™ (if you have installed this
accessory). if the light is blinking, correct alignment.
Care Of Your Opener
When properly installed, opener will provide high performance with
a minimum of maintenance. The opener does not require
additional lubrication.
Limit and Force Adjustments: These adjustments must be
checked and properly set when opener is installed. Only a
screwdriver is required to adjust the limits. Weather conditions may
cause some minor changes in the door operation, requiring some
re-adjustments, particularly during the first year of operation.
Refer to the Limit and Force Adjustments on page 2. Follow the
instructions carefully and repeat the safety reverse test after any
adjustment.
Remote Control Transmitter: Additional Remotes can be
purchased at any time for use in all vehicles using garage. Refer to
Accessories.The receiver must be programmed to operate with
any new Remote.
Remote Control Battery: The lithium batteries should produce
power for up to 5 years. If transmission range lessens, replace
battery.
To Change Battery: Insert batteries positive side up. To replace
cover, snap shut along both sides. Do not dispose of the old
battery with household waste. Take batteries to a proper disposal
center.
Maintenance Of Your Opener
Once a Month:
• Repeat safety reverse test. Make any necessary adjustments.
• Manually operate door. If it is unbalanced or binding, call for
professional garage door service.
• Check to be sure door opens and closes fully. Adjust Limits
and/or Force if necessary.
Twice a Year:
• Check chain tension. Disconnect Trolley first. Adjust if
necessary.
Once a Year:
Oil door roller, bearings and hinges. The opener does not require
additional lubrication. Do not grease the door tracks.

Replacement Parts
(1) 41A5644 Trolley with Chain/Cable Assy.
(3 piece rail)
041A0516-1 Trolley with Chain/Cable Assy
(1 piece rail)
(2) 041A6342 Head Only
(3) 041A5643-4 Hardware Bag
(4) 41B0668 Door Bracket
(5) 41C0669 Header Bracket
(6) 001A5644 Inner Trolley
(7) 41C5620 Outer Trolley
(8) 41C0521-1 Limit Switch (3 piece rail)
041A0521-2 Limit Switch (1 piece rail)
(9) 002D0838 1 piece rail
(10) 41A5675 Rail Hardware
(11) 41A5676 Rail Sections
041A5626 Logic Board
041A0157-1 Transformer
Specifications
Input Voltage . . . . . . . . . .230 VAC 50/60 Hz
Max. Pull force . . . . . . . .600N
Rated Power Input . . . . .85 Watts
Rated Load . . . . . . . . . . .3.0 Nm
Standby Power . . . . . . . .9 Watts
Max. Door Weight . . . . . .60kg
Motor
Type . . . . . . . . . . . . . . . .63:1 Worm Gear Reduction
Volts . . . . . . . . . . . . . . . .24VDC
Drive Mechanism
Length of Travel . . . . . . .2.8M
Travel Rate . . . . . . . . . . .8cm/sec
Lamp . . . . . . . . . . . . . . . .24V 21 Watts
Safety
Electronic . . . . . . . . . . . .Auto-Force Adjustment
Electrical . . . . . . . . . . . . .Thermal Fuse in Transformer
Limit Adjustment . . . . . . .Manual
Dimension
Length (Overall) . . . . . . .3.3m
Headroom Required . . . .30mm
Hanging Weight . . . . . . . .10kg
Receiver Code Registers
Billion Code . . . . . . . . . . .12
Dip Switch . . . . . . . . . . . .1
Keypad . . . . . . . . . . . . . .1
Operating Frequency . . .433.92MHz
24
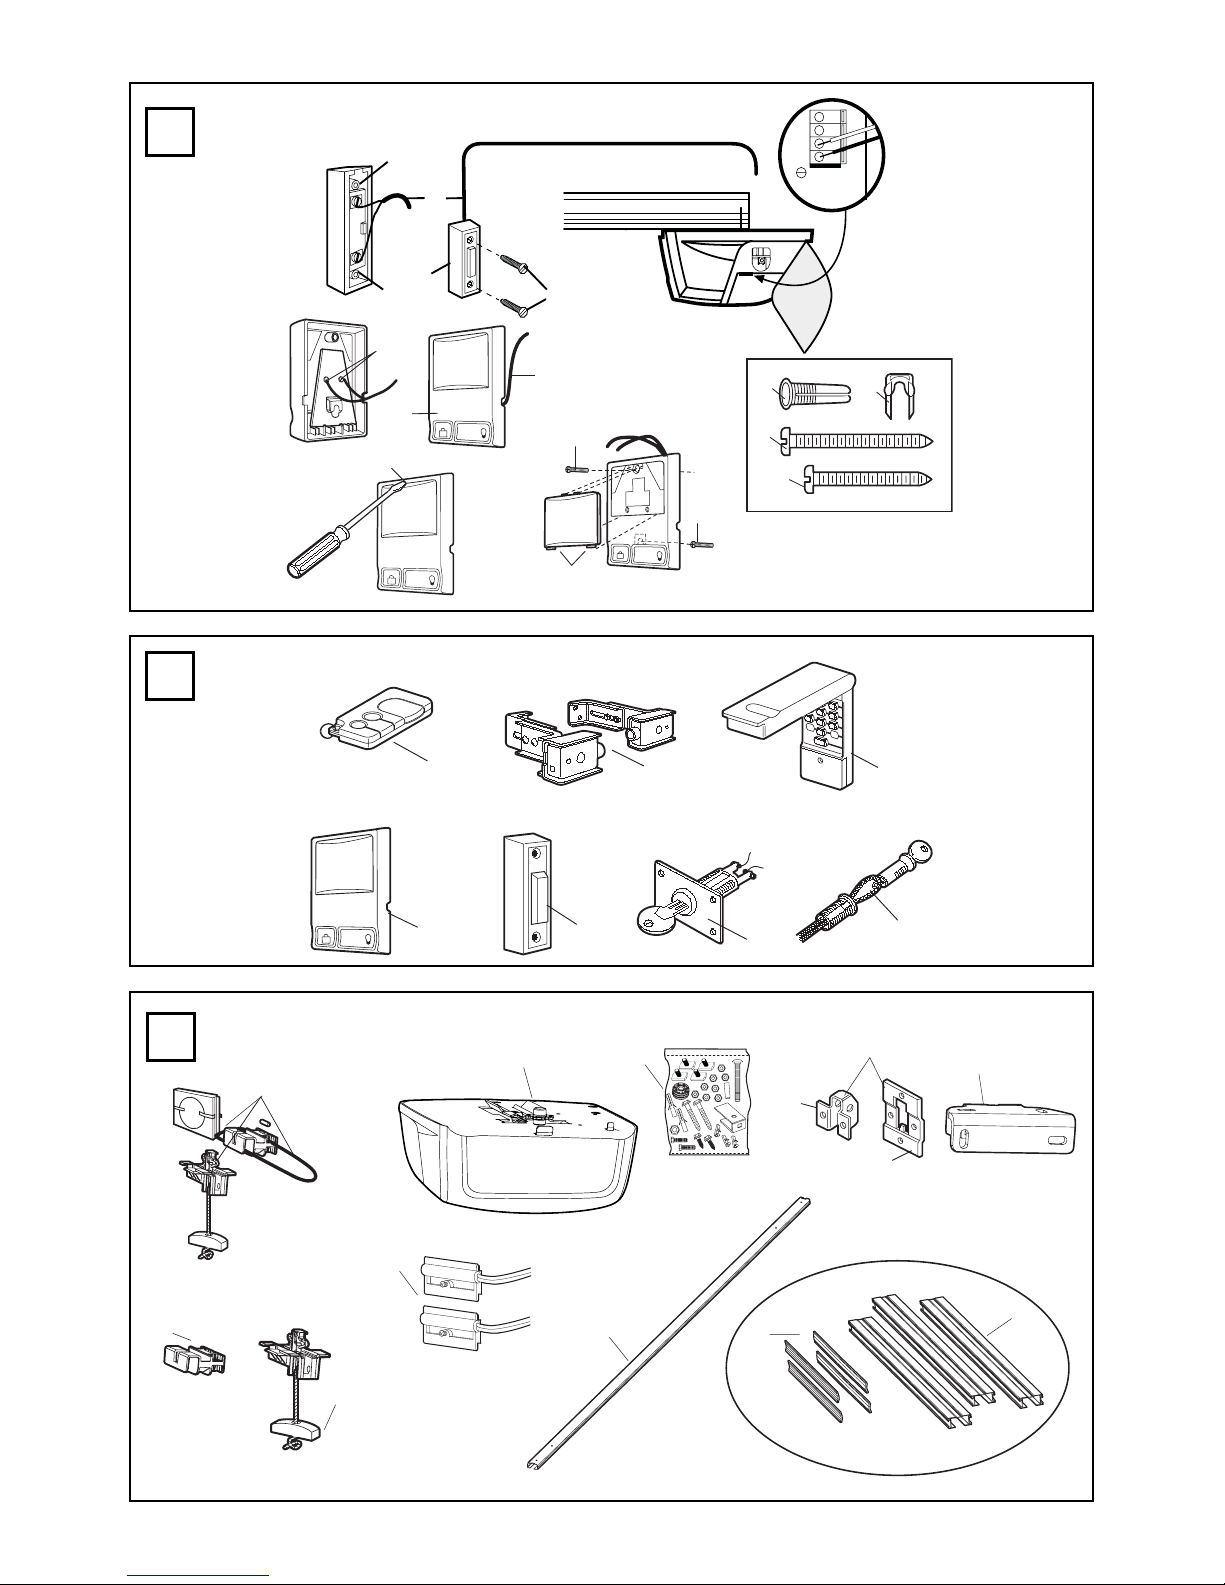
Accessories
(1) Model 4335EML 3-Function Mini Remote Control
(2) Model 770EML The Protector System
(3) Model 747EML Wireless Keyless Entry Keypad
(4) Model 845EML Multi-Function Door Control Panel
(5) Model 75EML Lighted Door Control Button
(6) Model 760EML Outside Keylock
(7) Model 1702EML Outside Quick Release
23
Wiring the Multi-Function Door Control Panel
and the Lighted Door Control Button (Optional)
Locate any Wall Mounted Door Control where the garage door
is visible, away from door and door hardware, at a minimum
height of 1.5m. fasten the child warning label on the wall near
the Door Control.
There are 2 screw terminals (1) on the back of the Door Control
(2). Strip about 6mm of insulation from bell wire (4). Separate wires
enough to connect the white/red wire to terminal screw 1 and the
white wire to terminal screw (1).
Lighted Door Control Button: Fasten to an inside garage wall
with sheet metal screws (3) provided with Lighted Push Button.
Drill 4mm holes and use anchors (6) if installing into drywall or
concrete. A convenient place is beside the service door and out of
reach of children.
Multifunction Door Control: Insert a small flat head screwdriver
into the top of the Wall Control (10), gently pry the cover off.
Fasten to an inside garage wall with sheet metal screws (8) as
follows:
• Install bottom screw, allowing 3mm to protrude from the wall.
• Position bottom of door control over screw head and adjust for
snug fit.
• Install top screw with care to avoid cracking plastic housing. Do
not over tighten.
• Replace cover by inserting bottom tabs (9) and snapping into
place. To remove cover after mounting, gently pry at top with
paper clip or small flat head screwdriver.
Run the bell wire up the wall and across the ceiling to the garage
door opener. Use insulated staples (5) to secure wire.
The opener Quick-Connect Terminals (7) are located in the recess
next to the learn button on the left side panel. Insert bell wire into
holes in the Quick Connect Terminals as follows: Red/White to
Red and White to White.
22
114A3269B Printed in China
5-GB
114A3269B 2
2
1
2
1A3
4
3
5
B
2
6
7
8
910
11
12
1
13
14
12 3 4
6
5
9
10
12
11 8
7
NOTICE
9
4

114A3269B 3
1
1
1
4
4
1
5
5
4
6
2
2
4
5
4
3
3
5
114A3269B 4
1
2
2
3
4
1
2
3
2
4
1
2
5
4
4
3
1
2
5
1
2
4
3
6
7
1
2
1
3
4
4
9
6
8

114A3269B 5
5
2
3
A
B
C
5
3
2
1
4
53
2
1
13
5
41
3
2
4
1
3
2
5
4
1
23
2
1
50mm
4
1
12
10
11
114A3269B 6
A
B
1
3
1
2
3
1
43
2
23
3
1
1
5
1
2
3
1
3
4
5
16
1
2
AB
1
41
2
4
15
A
1
5
4
23
B
15cm
1
4
2
2
3
62
3
14
114A3269B 7
1.
2.
3.
2
1
20
1
21
1
2
18
1
19
3
1
4
8
5
7
9
6
2
17
41A5644 = 3 piece rail
041A0516-1 = 1 piece rail
41C0669
41A5675 41A5676
1
234
5
6
7
41C0521-1 = 3 piece rail
041A0521-2 = 1 piece rail
002D0838
41C5620
001A5644
041A5643-4
041A6342
8
910
11
3倓式剒道
1倓式剒道
3倓式剒道
1倓式剒道
12B374
12B380
24
114A3269B 8
4335EML
747EML
760EML
6
1702EML
7
770EML
5
75EML
123
LOCK
LIGHT
845EML
4
23
LOCK
LIGHT
8
8
2
1
RED WHT
LOC
K
LIGHT
1
23
5
6
8
9
10
4
LOC
K
LIGHT
WHT
2
RED
1
1
1
4
3
7
2
22

114A3269B 9
/ Notes
⊼

114A3269B Chamberlain, 2006 Printed in China
Table of contents
Popular Garage Door Opener manuals by other brands

Nice
Nice RONDO Series Instructions and warnings for installation and use

Genie
Genie Series H quick start guide

CAME
CAME BXV Series installation manual

Wayne-Dalton
Wayne-Dalton 800 installation instructions

FlexiForce
FlexiForce RSC Installation & maintenance

Automatic Technology
Automatic Technology GDO-10v1Toro user guide

Genie
Genie Chain/Belt Drive Models Installation

Chamberlain
Chamberlain LiftMaster Professional RDO800-series Installation and operating instructions

Beninca
Beninca VN.S20 manual

Chamberlain
Chamberlain Security+ 2565 owner's manual

Chamberlain
Chamberlain LiftMaster Elite Security+ 3800PC owner's manual

Chamberlain
Chamberlain 8808CB quick start guide


