Charge COMFORT 2 User manual

Quick sta guide
COMFORT 2

2
Ready to Ride in 10 Minutes
Not only are Charge e-bikes easy to store
and maintain, they’re also easy to put together.
With just a few simple steps, you can have your
bike assembled and on the road in about 10
minutes flat.
Want to make the process even easier? Grab a
friend. This guide will walk you through the steps it
takes to get your bike ready for riding.
If you’d rather follow along with a video as you build
your bike visit: help.chargebikes.com
Still have questions?
Don’t hesitate to call us at 833-482-3822.
This is a Quick Start Guide, not an Owner’s manual.
Bicycling is an active sport with inherent risk. A wide range of injuries are
possible. Due to the nature of bicycle riding, the situations you encounter
while riding, you will be exposed to the risk of serious injury, paralysis or
death. This risk cannot be eliminated. You can minimize the risk in many
ways. Begin by reading the complete Charge Bicycle Owner’s manual
accompanying this bike and available online at .chargebikes.com,
particularly Section “IMPORTANT SAFETY INFORMATION”.
Scan me with your
phone to view online

3
The 4 Major Steps to Geing
Your Bike Ready to Ride:
1. Install Handlebars 2. Install Front Wheel
3. Flip Down Pedals 4. Adjust Seat Height
4
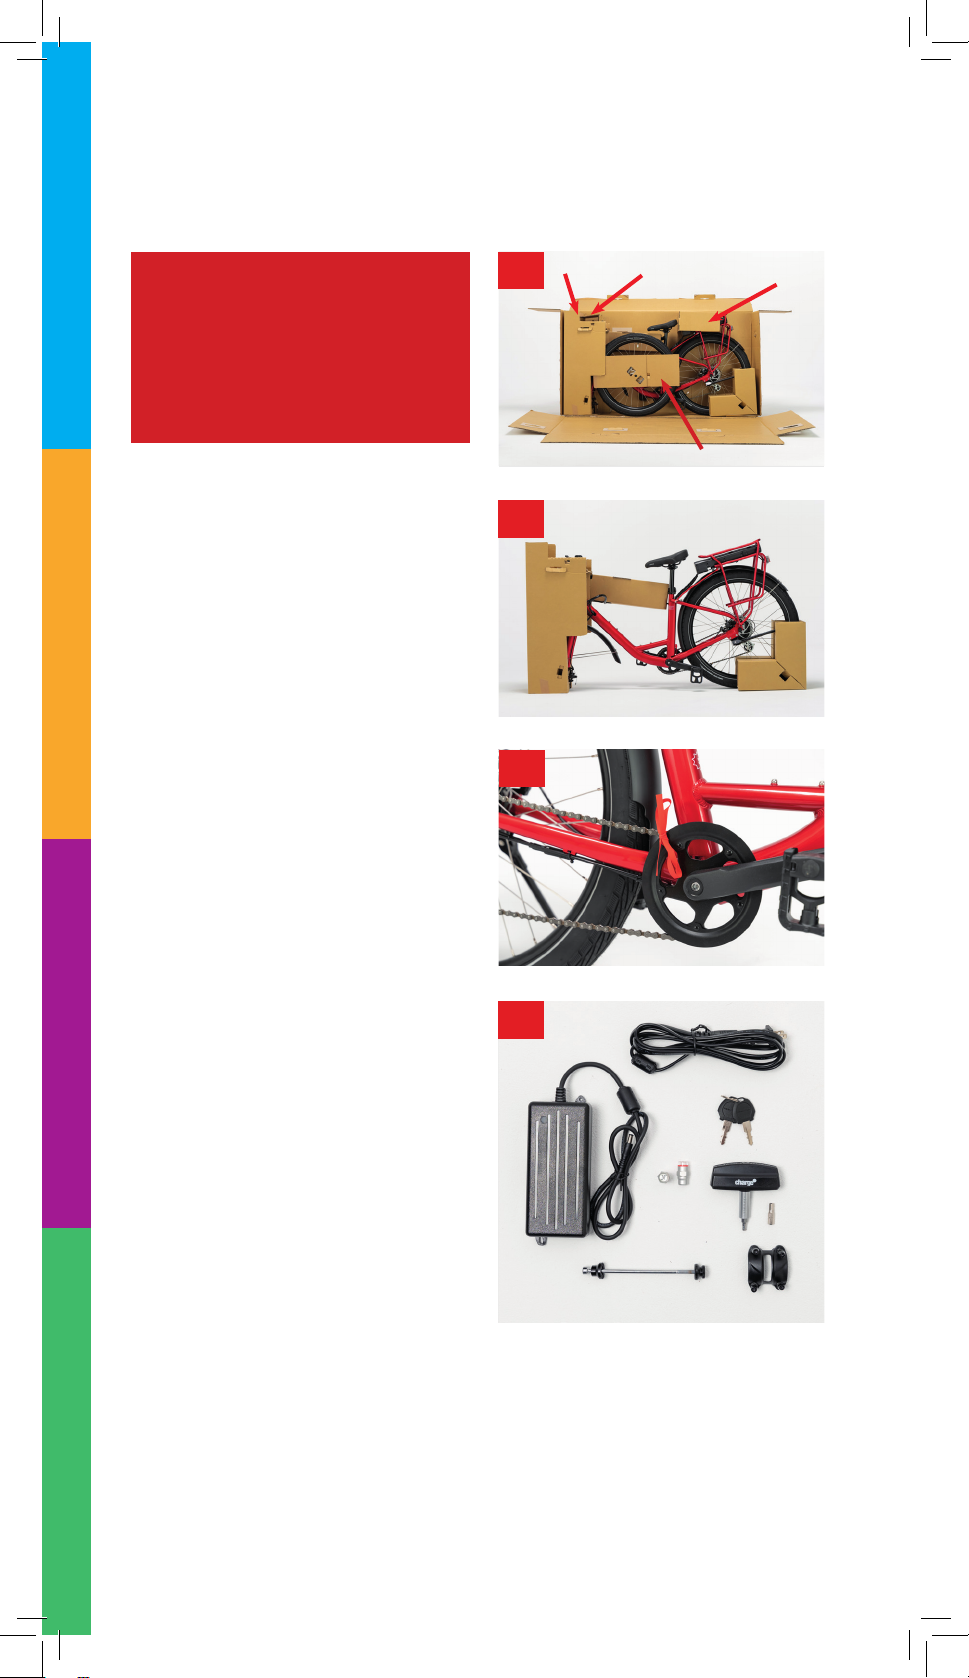
1. Remove and set
aside items:
Parts box ❶
Stem cover ❷
Rack block ❸
Front wheel ❹
2. Lay the back side of the bike
box down to create a clear work
space or slide the bike out of the
box to an open area where you
can complete assembly.
3. Remove the red string around
the chain and chainwheel.
4. Open the parts box.
❹
❺
❻
❼
❽
❶ Batery Charger
❷ Axle Rod and Nut
❸ Tire Pressure Sensors
❹ Charging Cord
❺ Batery Keys
❻ Torque Wrench with
4mm Bit
❼ 5mm Bit
❽ Stem Faceplate with
four, 4mm Bolts
Geing Your Bike Ready for Assembly
2
1
3
4
❶
❷
❸
Important: Some parts of the
bike packaging function as a bike
stand and facilitate the assembly
process. In order to ensure an
easy assembly, only remove
packaging when told to do so in
the following instructions.
❶❷❸
❹
5
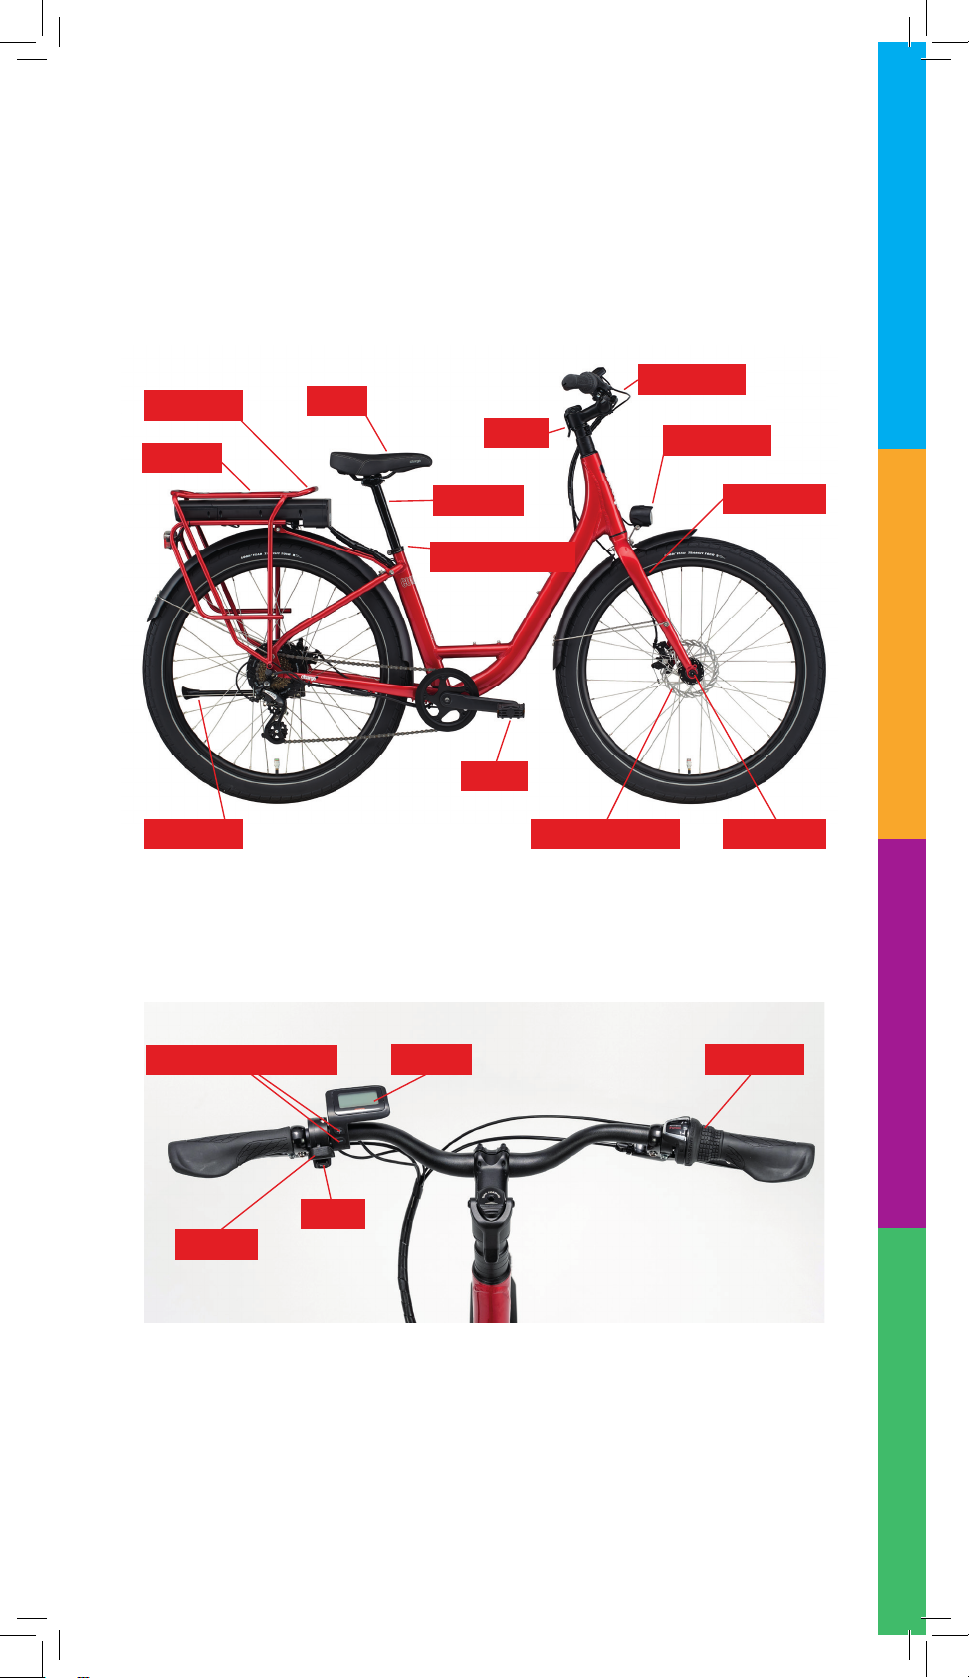
Key Pas of the Bike Referenced
in This Guide
Seat
Stem
Handlebars
Pedal
Batery
Front Light
Front Fork
Front AxleBrake Disc Rotor
Rear Rack
Seatpost
Kickstand
Pedal Assist Selectors Display Gear Shit
Horn
Throtle
Seatpost Binder
6
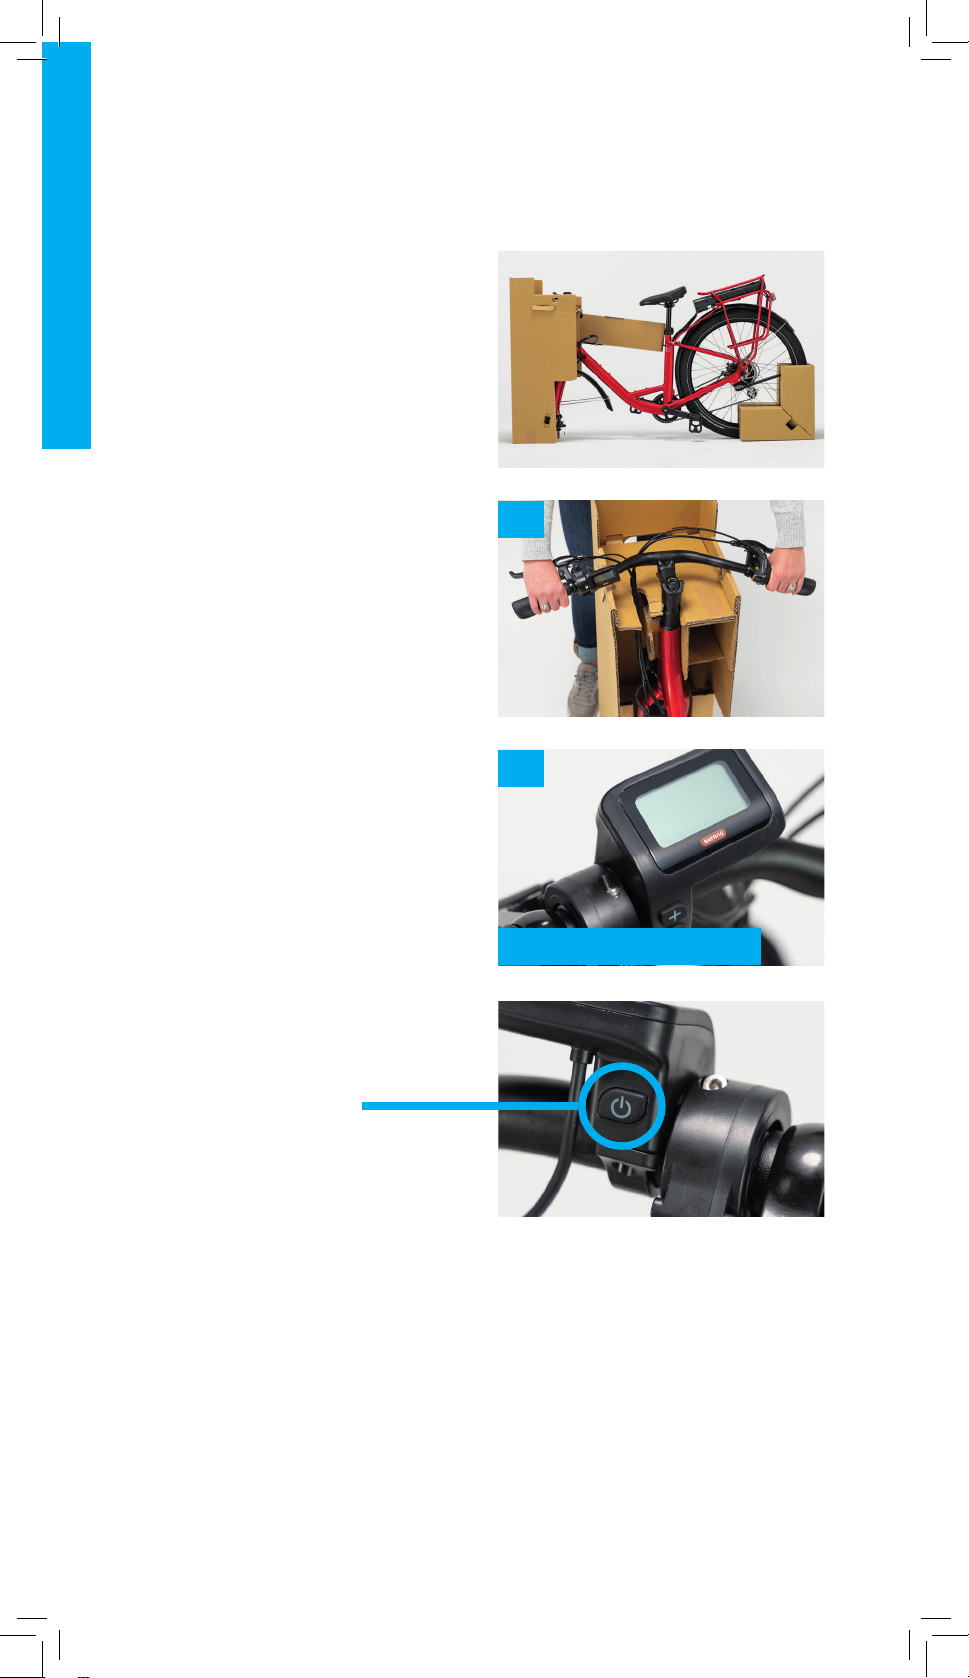
OFF (ready for Assembly)
This step is particularly important
to your safety. Please see the
assembly video at
help.chargebikes.com as well as
ADJUSTMENT INSTRUCTIONS:
Adjustable Stem Instructions,
in your Charge Bicycle Owner’s
Manual.
1. The handlebars are located
in a cardboard sleeve on the
right side of the bike. Slide the
handlebars out of the sleeve and
place them on the tray made by
the top of the cardboard shroud.
Make sure the wires and cables
running from the handlebars to
the bike frame aren’t twisted.
2. Ensure the power is OFF
before continuing assembly by
confirming the handlebar display
is blank. (If power is on, press
and hold the power buton until
the display shuts of.)
3. Find the stem faceplate and the
four, 4mm stem bolts located in
the parts box.
Step 1: Install the Handlebars
1
2
Power buton

7
4
4. Slide the handlebars so they
are tight against the bike stem.
5. While holding the bars against
the stem, place the faceplate
on the opposite side of the
handlebars and loosely thread
the four, 4mm bolts into the four
holes on the stem (two above
the handlebars and two below).
6. Move to the back of the bike and
slide the cardboard wheel block
of the rear wheel, then put the
kickstand down.
7. Move to the front of the bike and
remove the cardboard shroud
from around the front of the bike.
The kickstand will keep the bike
from falling over.
5
6
7
8
8. Grab the torque wrench from the
parts box.
9. Use the positioning guide sticker
to center the handlebars. When
looking at the bike from the front,
the sticker should be just to the
let of the stem and the “Center”
mark should be in-line with the
gap between the stem and
faceplate. No part of the sticker
should be under the stem.
10. If you prefer the handlebars to be
a bit closer or a bit farther away,
you can rotate them forward or
backward to the desired position,
using the face of the stem and
the positioning guide sticker as
reference.
11. Once the handlebars are in the
desired position, turn the two
top faceplate bolts clockwise,
tightening them just until the
rubber O-ring makes contact
with both the stem and stem
faceplate.
Step 1: Continued
8
11
9
10
9
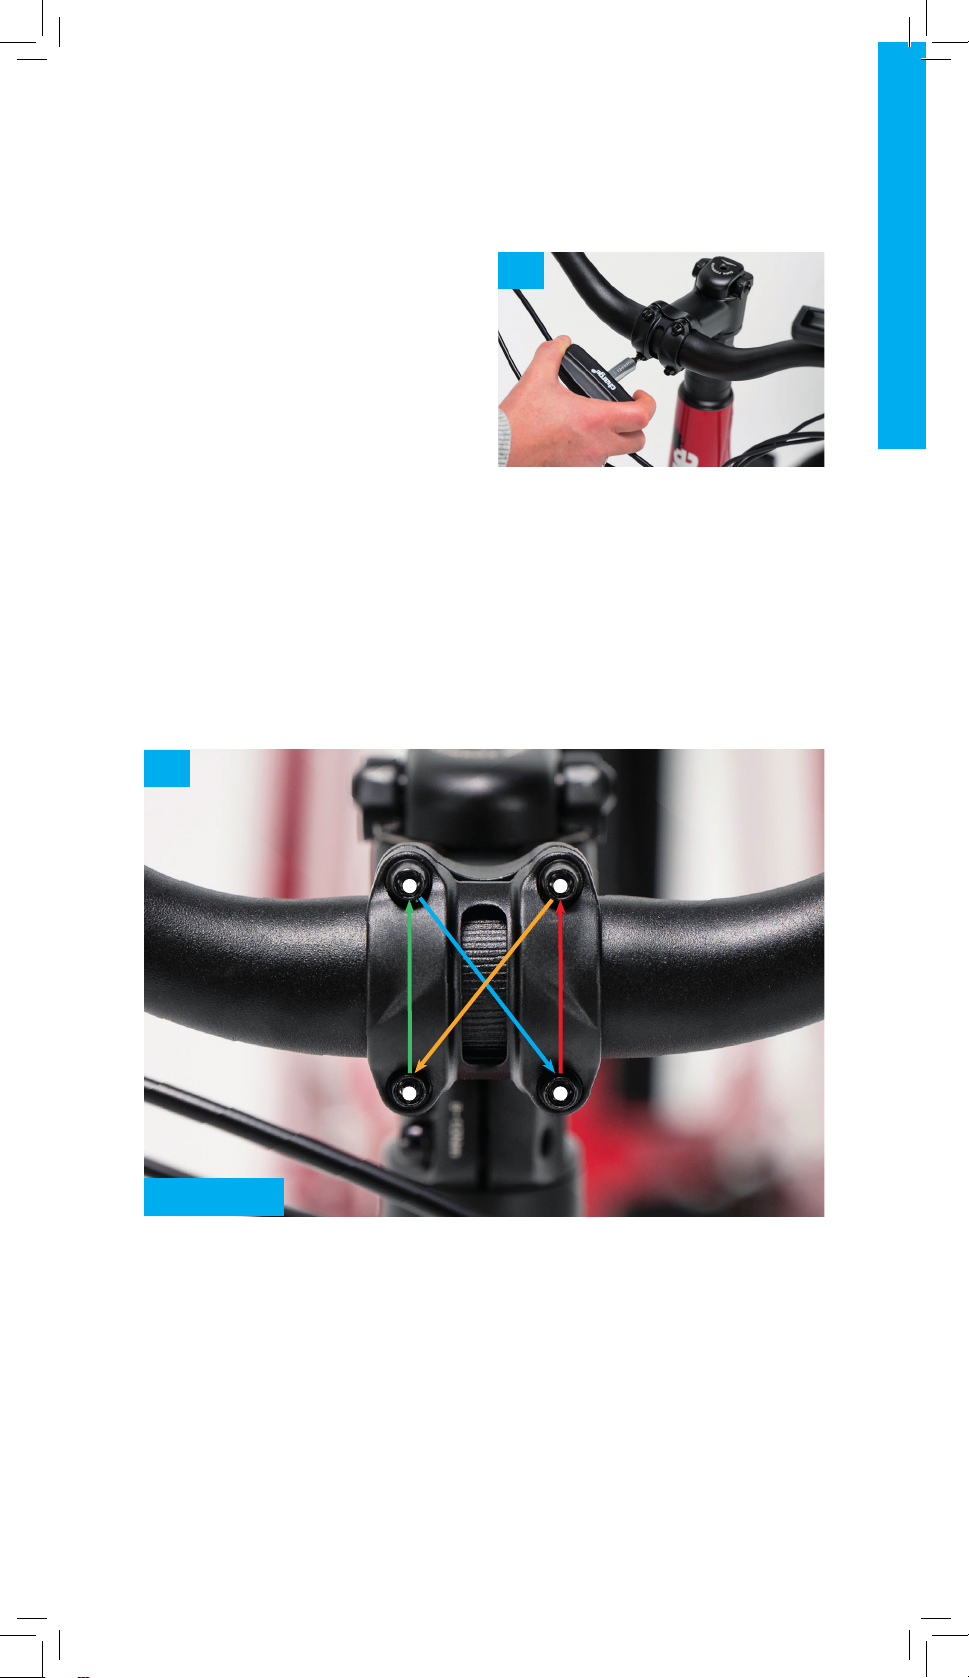
12. Use the torque wrench, turn the
two botom stem faceplate bolts
clockwise, tightening them until
you hear and feel the torque
wrench click indicating the
bolts have reached the required
torque.
13. Ensure all faceplate bolts have
reached required torque by using
the torque wrench to turn the
bolts clockwise, tightening them
until you hear and feel the torque
wrench click, following the
patern in Diagram A.
Step 1: Continued
12
14
❶❸
❷❹
DIAGRAM A
10
Step 2: Install the Front Wheel
2
1
3
NOTE: The front wheel should
now stay upright on its own in the
temporary stand.
4
5
This step is particularly important
to your safety. Please see the
assembly video at
help.chargebikes.com as well as
this Quick Start Guide.
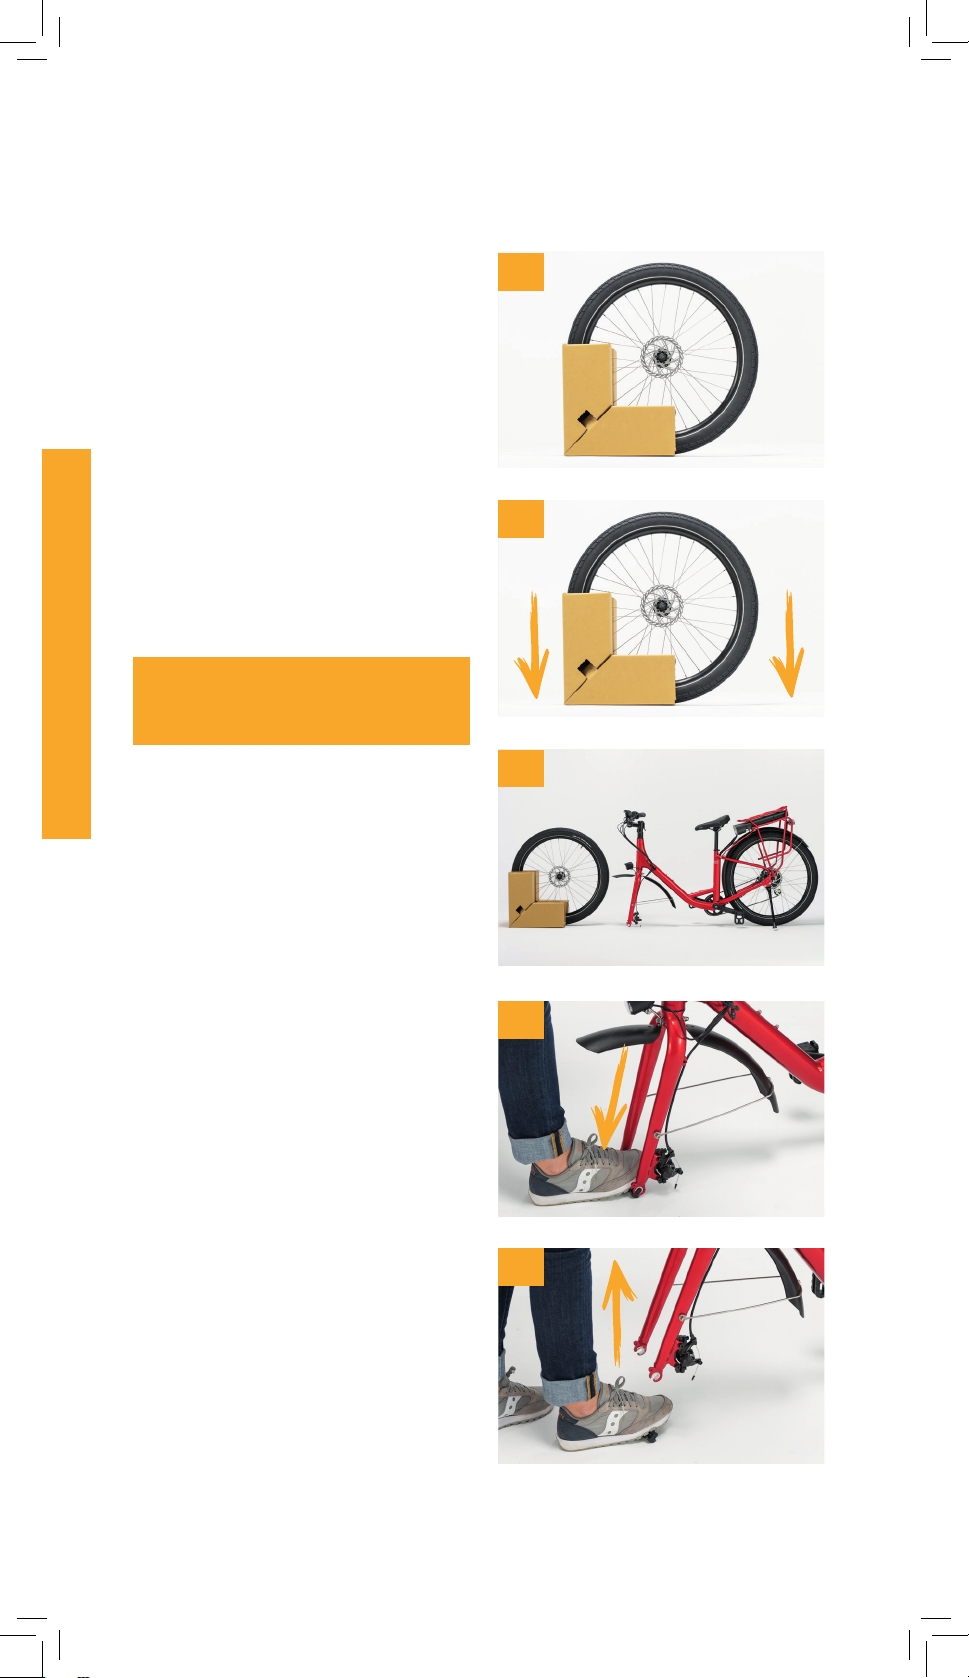
1. Use the cardboard block that
says, “Save this block” and lay it
flat on the ground with the side
that says, “This side down” flat
on the floor.
2. Insert the front wheel into the
block. Verify the disc brake rotor
is on the side marked “Brake Disc
This Side”.
3. Place the front wheel and the
wheel stand in front of the bike.
Verify the front wheel disc brake
rotor is on the same side as the
kickstand.
4. Locate the front fork spacer
and place your foot on top.
5. Holding the handlebars, lit the
bike up to remove the spacer.
11
Step 2: Install the Front Wheel
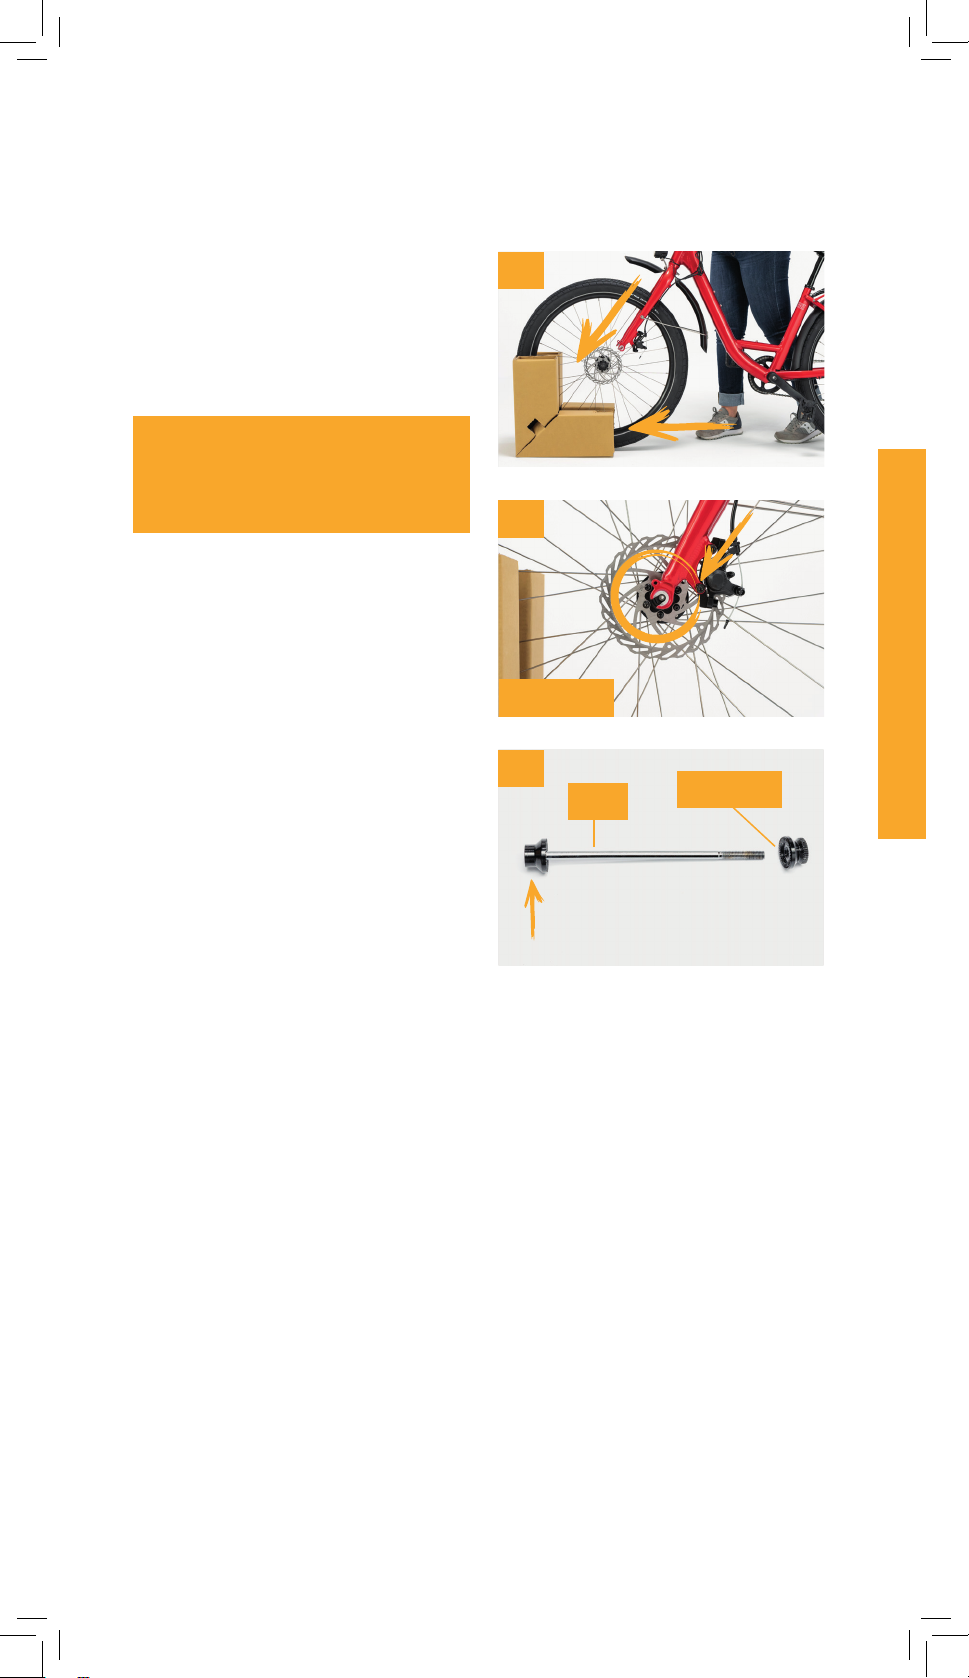
6
6. Lit the bike over to the
front wheel.
7. Lower the fork onto the front
wheel until the axle is
fully-engaged in the fork end.
8. Locate the metal axle rod and
axle nut from the parts box.
9. While facing the front of the
CORRECT
7
Axle Nut
Rod
8
NOTE: While the wheel axle does
not extend past the fork end,
it is enough for the fork to rest
securely, as pictured.

12
NOTE: Always screw the axle nut
onto the rod with the larger end
first.
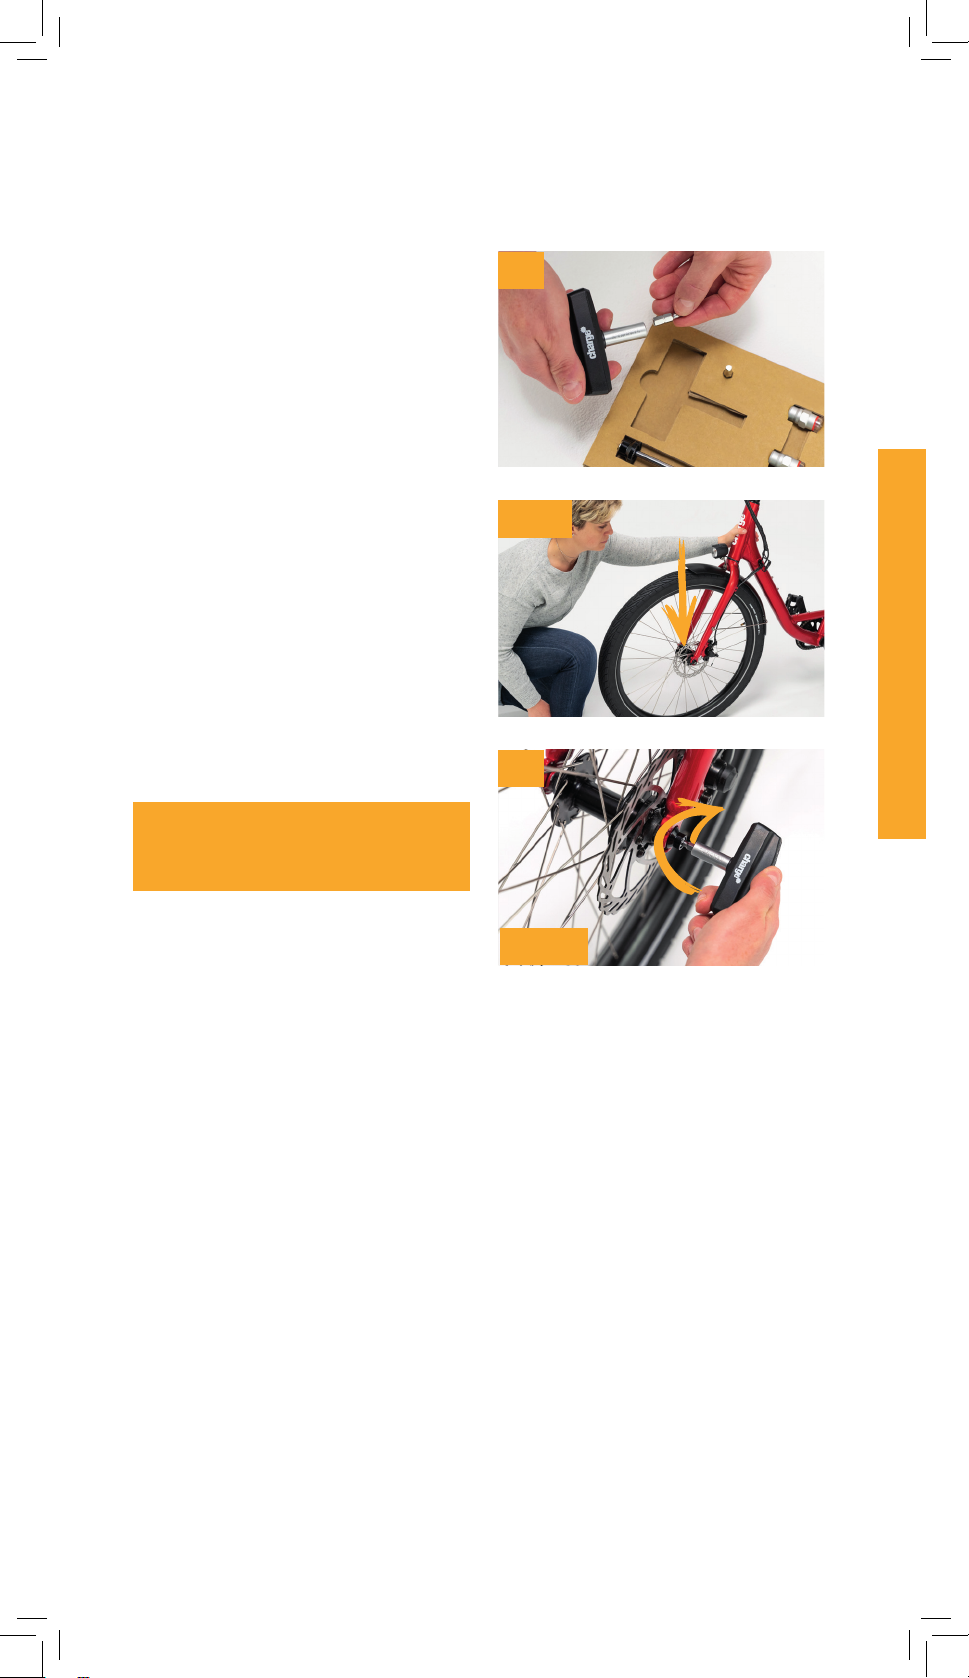
9
Step 2: Continued
11
10
bike (looking at the headlight),
use your right hand to insert the
metal rod through the axle from
brake disc side.
10. With your let hand, screw the
axle nut onto the axle rod, making
sure the large end of the nut
goes onto the rod first.
11. Turn the axle nut clockwise
until finger-tight.
13
CLICK!
Step 2: Continued
12
12. Locate the torque wrench.
Remove the 4mm bit and install
the 5mm bit.
13. With your let hand, hold the
bike upright and centered
(perpendicular to the floor).
14. Push the frame down to ensure
the fork ends are fully seated on
the axle.
15. Continuing to hold the bike
upright with one hand, use your
free hand to insert the torque
wrench into the axle on the brake
disc side.
16. Turn the torque wrench
clockwise until you hear and feel
a click. This indicates the correct
torque has been achieved.
14-15
16
NOTE: You may need to apply a
good deal of pressure to hear and
feel the click.

14
Step 3: Flip Down the Pedals
1. Flip each pedal down (or up)
until it clicks.
2. Pull lever to reverse this process
when folding the pedals flat for
easy storage.
NOTE: You can always flip up the
pedals by pulling on the lever
with your fingers as you move the
pedal to the upright position.
CLICK!
1
2
Pull leaver to flip closed

15
Step 3: Flip Down the Pedals
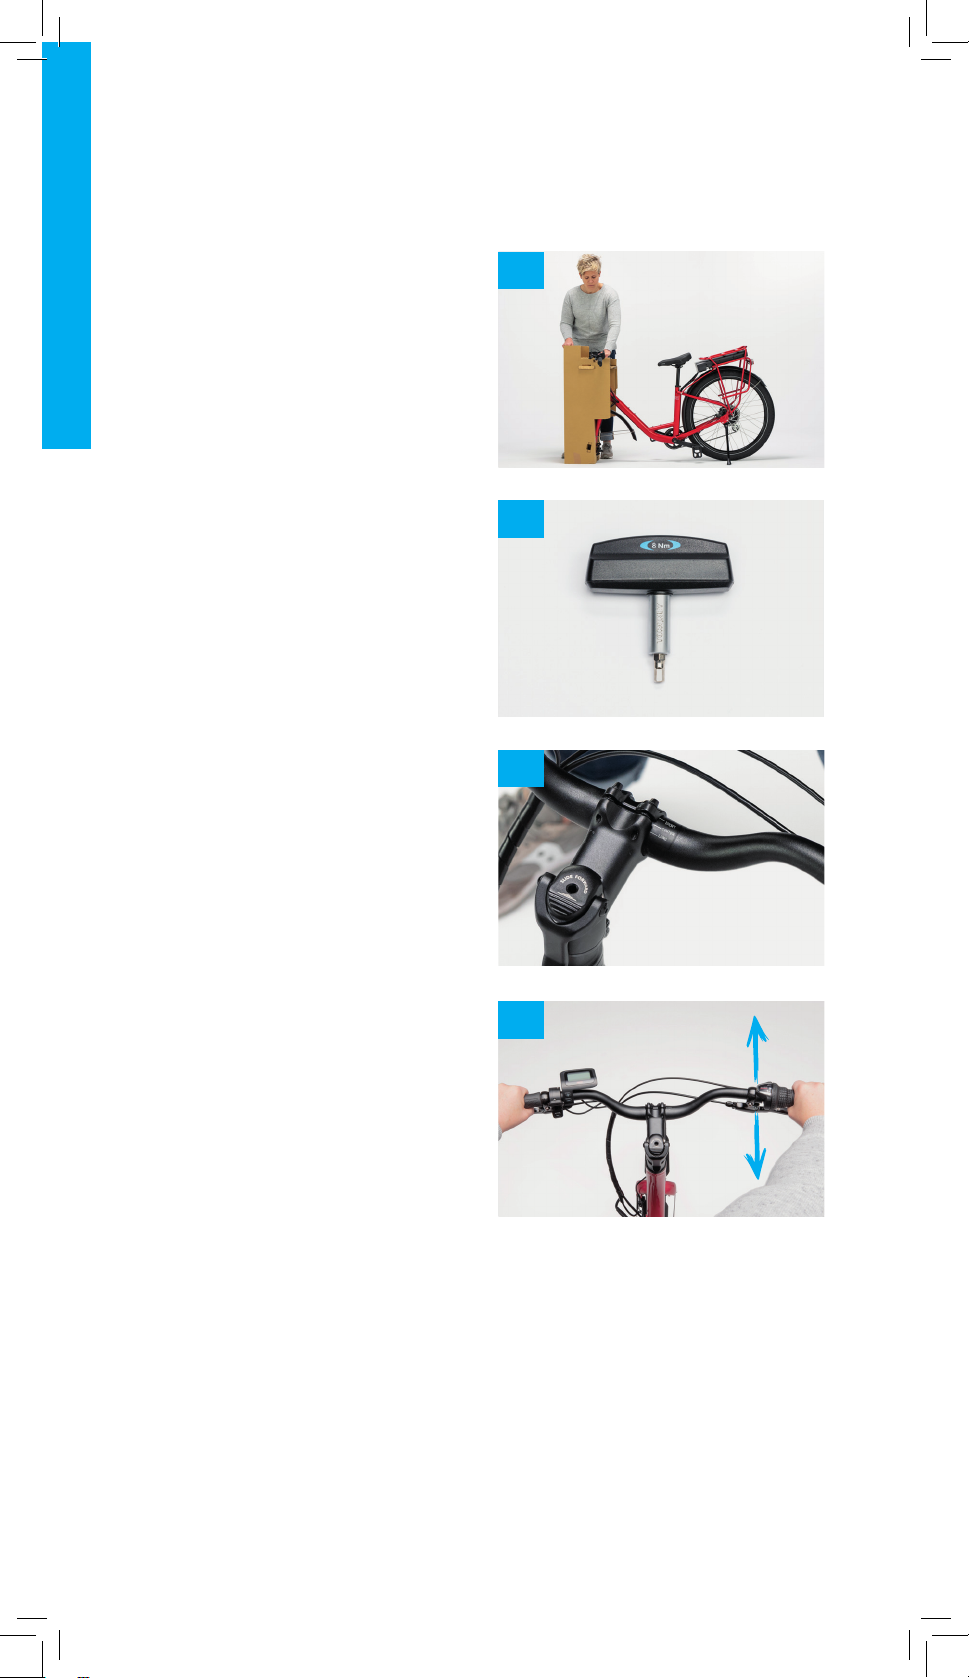
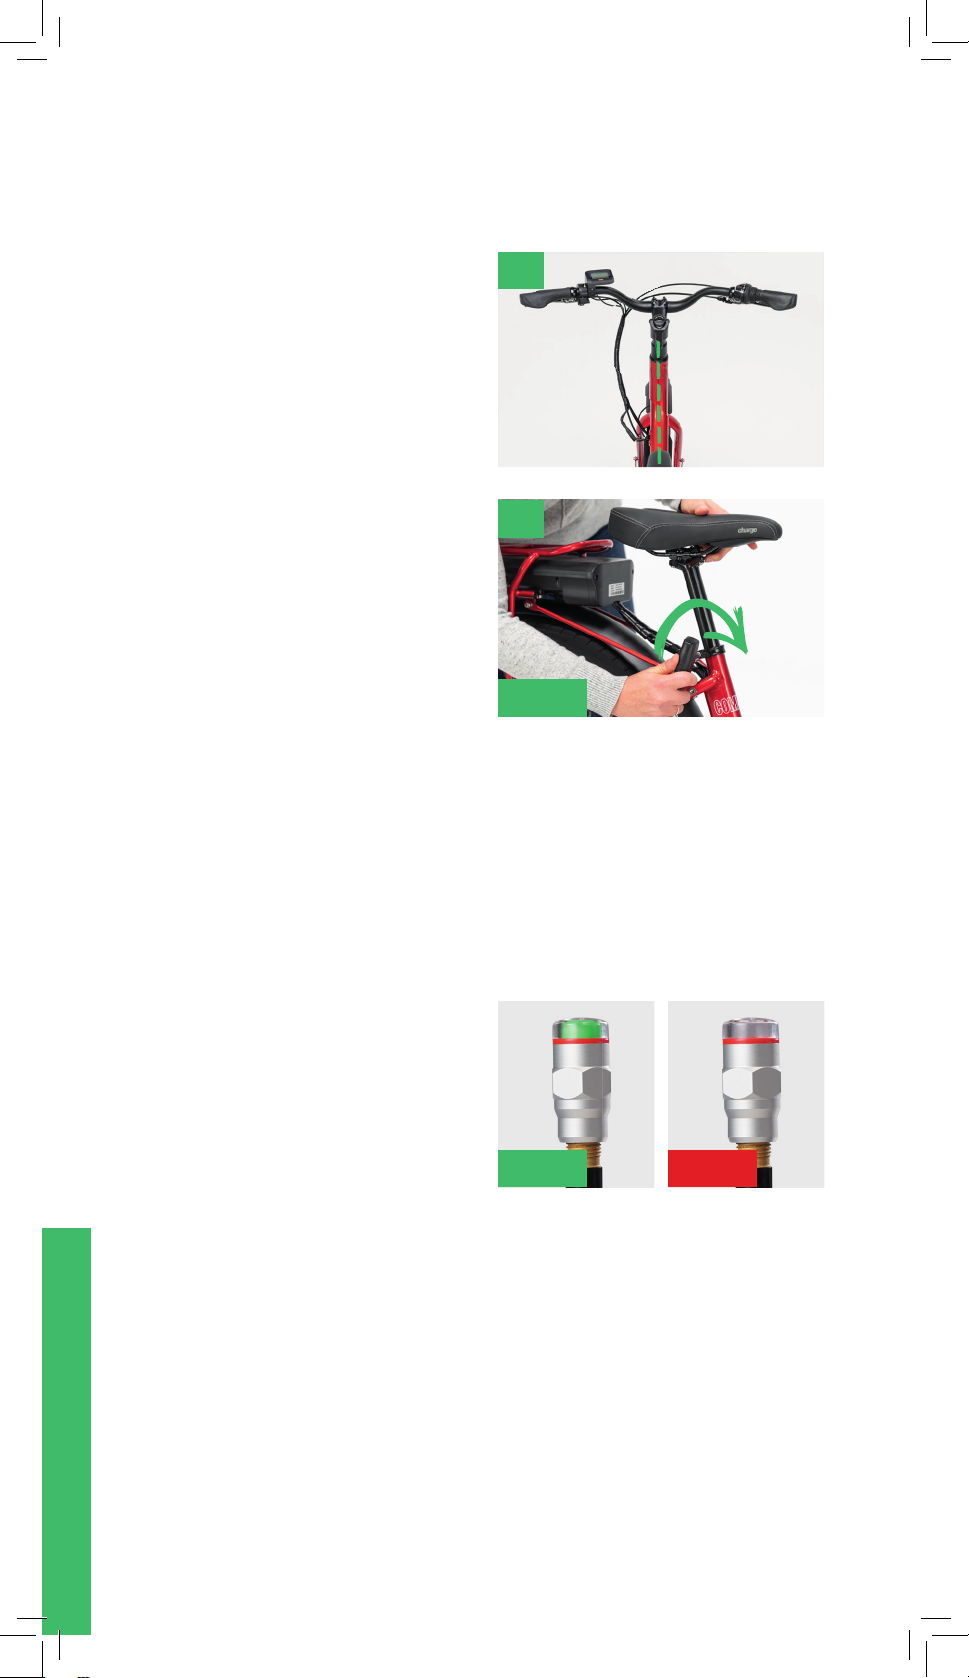
Step 4: Adjust Seat Height
WARNING: Do not raise the seat
above minimum insertion line
marked on the seat post.
1. Using the torque wrench, loosen
the seat post clamp bolt (turning
counterclockwise) until the seat
post can move.
2. Slide the seat to your desired
position. See Diagram B for
guidance on finding the right
seat height.
NOTE: Do not leave kickstand
down when siting on the bike.
The kickstand is not designed to
hold up the weight of a rider.
NOTE: You do not need to remove
the bolt from the clamp.
Diagram B
1
2
Diagram B – Find the right seat height
To find a comfortable seat height: While siting on the bike, move one
of the pedals to the 6 o’clock position, and place your heel on the pedal.
Adjust the seat higher or lower until your knee is just slightly bent
without having to shit around on the seat.
WATCH VIDEO.
help.chargebikes.com
16
CLICK!
GO! STOP!
3
4
The finishing touch
Charge Bikes feature a valve cap
sensor, so you always know when
it’s time to add air. The sensors are
included in your parts box. Simply
screw the sensors onto the valve
stems to quickly verify air pressure.
Green is good to go
Red means add some air
3. Ensure the seat nose is in-line
with the bike frame.
4. Secure the seat by turning the
bolt clockwise until you hear and
feel the torque wrench click.
Step 4: Continued

17
Step 4: Continued
Congratulations!
Your New Charge Bike is Now Assembled
Before going for your first ride, review this assembly
checklist and the pre-ride checklist in your Charge
Bicycle Owner’s Manual
• Remove any remaining packaging material
• Check tire pressure – Tires must be inflated to the recommended
pressure (See Section TECHINICAL INFORMATION: Tires and Tubes in
your Charge Bicycle Owner’s Manual).
• Check brakes are working properly – Check that the lever feels
firm and doesn’t move too close to the handlebar grip. With any disc
brakes, the brake pads must make firm contact with the rotor without
the brake levers hiting the handlebar grip (See Section TECHINICAL
INFORMATION:Brakes in your Charge Bicycle Owner’s Manual).
• Is your stem securely fastened? Twist the handlebars firmly from
side to side while holding the front wheel between your knees. The
stem must not move in the steering tube (See SectionADJUSTMENT
INSTRUCTIONS: Adjustable Stem Instructions in your Charge Bicycle
Owner’s Manual).
• Is your seatpost securely fastened? Using the seat for leverage, twist
the seatpost. The seatpost must not move in the seat tube (See Section
ADJUSTMENT INSTRUCTIONS: Saddle/Seatpost in your Charge Bicycle
Owner’s Manual).
• Are your wheels properly fastened? Be sure to read the section on
proper wheel installation (See Section TECHNICAL INFORMATION:
Wheels in your Charge Bicycle Owner’s Manual).
• Ensure the fender stays are atached and fenders are not rubbing
on tires.
• Make sure your headlight is upright and pointing forward
• Power up the bike – Press and hold the power buton on the display or
the batery pack (marked with the [power symbol]) to power on the bike.
The LCD display will come to life.
• Verify batery charge – The Charge display will not only tell you how
much batery power is let as a percentage, but will also estimate range
in miles/km, so you can always be sure you have enough power to get
you where you’re going… and back again!

18
1. Turn Batery Power on: Press
the switch located on the
batery to the ON (-) position.
NOTE: This switch can be let
in the ON position at all times,
except when removing the
batery from the bike. Leaving
the batery switch ON allows
you to control the bike’s on / of
status from the display on the
handlebars.
2. Turn the Display on: Find the
power buton on the backside
of the handlebar display. Press
and hold the buton until the
display comes on or goes of
(about 2 seconds).
1. Shiting Gears: The Comfort is
also equipped with a 7-speed
manual shiter, so you can shit
gears just as you would on a
regular bike. Simply twist the
gear shiter on the handlebar
to select a gear – the lower the
number, the easier it is to pedal.
Turning the Bike ON/OFF
ON
OFF
1
1
2
Shiing Gears

19
1. The Charge Comfort 2 is
equipped with Electric Assist,
Throtle and Walk Assistance
Mode. Choose your level of
electric assist from the display
by pressing the +/- butons: +
moves you to a higher level of
assist; - reduces the assist level.
The display will register the level
of assist: 1 = the lowest assist
level; 5 = the most assistance.
When the batery reaches 25%
- 30% of life remaining, the
system will enter a power-saver
mode, which will disable the
throtle and limit the level of
assist being provided in order
to maximize eficiency.
Level of assistance provided will
continue to decline as batery
charge is further depleted.
Once recharged, system will
return to full assist and throtle
function.
2. Using the Throtle: When you
don’t want to pedal, you can
use the thumb throtle on the
let-hand grip. Pressing down
with your thumb accelerates
the bike. Release to stop assist.
For safety reasons, the bike
must be moving forward at 1
mph or greater for the throtle
to engage. This is to prevent
accidentally engaging the
throtle and losing control of
the bicycle.
3. Using Walk Assistance Mode:
Walk assist mode propels the
bike forward at 2 mph making it
easier for you to move your bike
when you’re not riding.
Press and hold the “-” buton
on display. The “insert icon” will
display and the bike will begin
rolling forward. To disengage
Walk Assistance, release the “-”
buton.
Controlling Electric Assist
Throtle Horn
Pedal Assist Selectors
1
2
3 Walk Assist Mode
For more guidance on the
display, view the manual
included with your bike or
visit help.chargebikes.com.
20
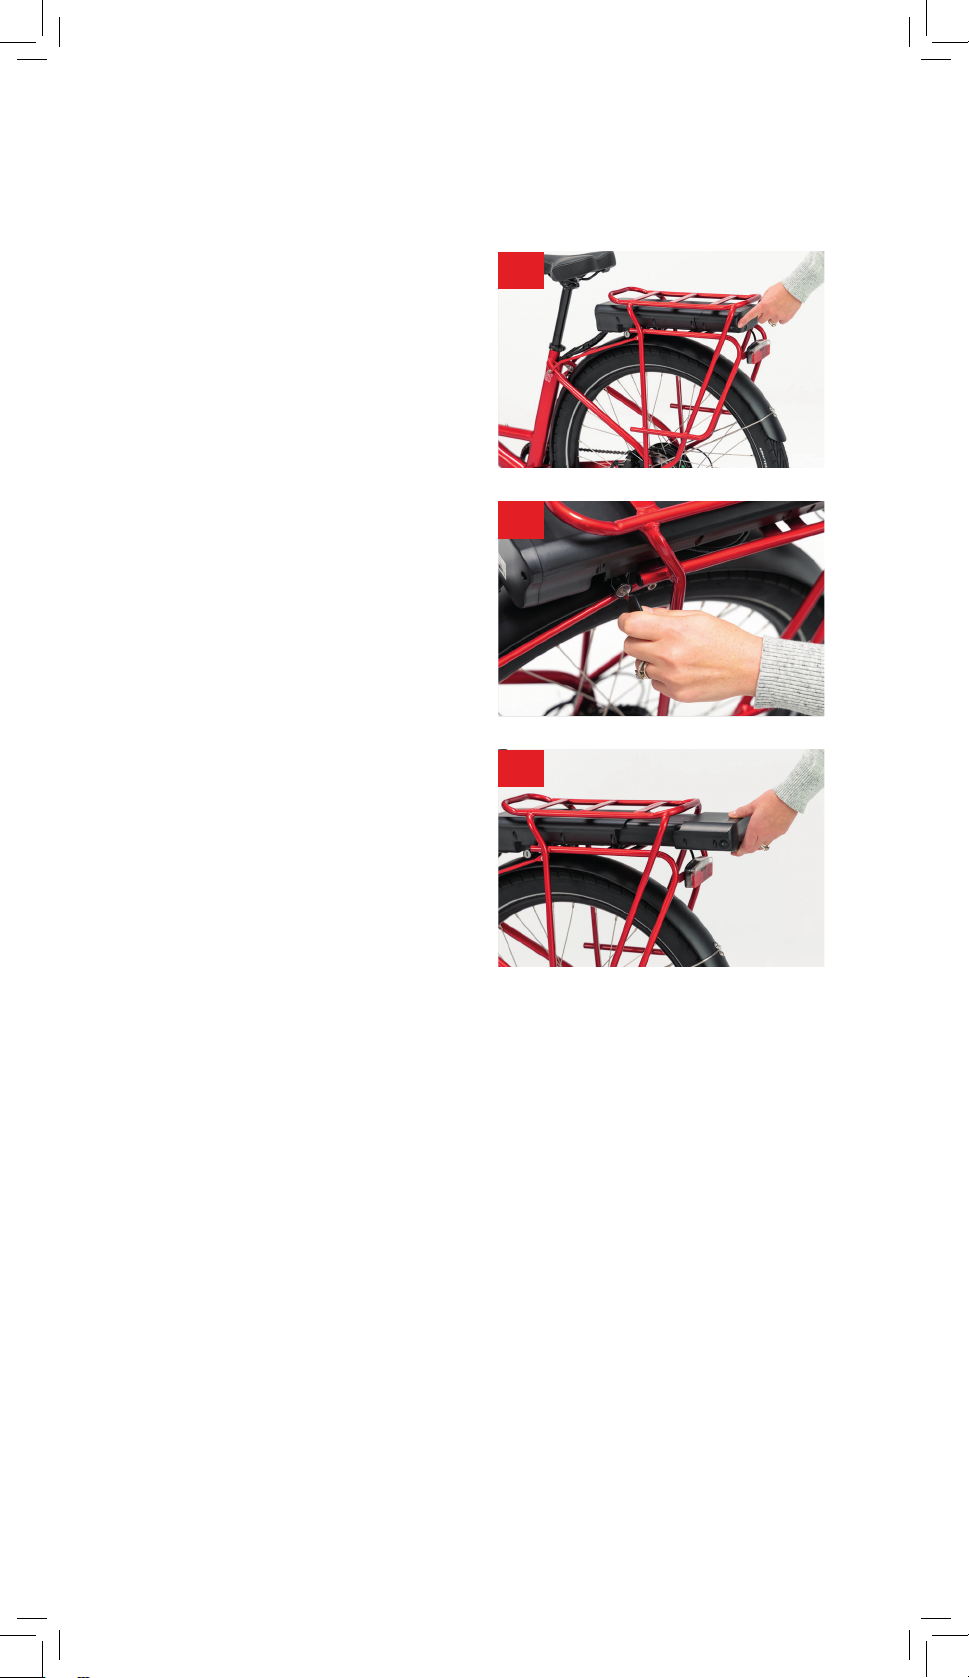
The Charge Comfort comes with an
easy-to-remove external batery,
which ofers the freedom to charge
at home, in the ofice, or wherever
you have power.
To remove the batery:
1. Power of the batery pack by
flipping the switch located at
the back of the batery to the Of
(O) position.
2. Insert and turn the batery key
counterclockwise to unlock the
batery.
3. Slide the batery out of the rack.
To install the batery
1. Slide the batery pack into the
rack until you hear a click.
2. Remove the key and store safely.
Removing the Baery
1
2
3
Table of contents


