Charmate CM160-018 User manual
14405-06/16
Important: The installer or seller must leave these instructions with the consumer.
Gourmet Outdoor Oven
Model No. CM160-018
FOR OUTDOOR USE ONLY
DO NOT OPERATE THIS APPLIANCE BEFORE READING THE INSTRUCTION BOOKLET
DO NOT PLACE ARTICLES ON OR AGAINST THIS APPLIANCE
DO NOT STORE CHEMICALS OR FLAMMABLE MATERIALS OR SPRAY AEROSOLS NEAR THIS APPLIANCE
DO NOT OPERATE THE APPLIANCE INDOORS
DO NOT OPERATE IN AN ENCLOSED AREA
ACCESSIBLE PARTS MAY BE VERY HOT. KEEP YOUNG CHILDREN AWAY.
Minimum clearance from combustible materials: 3 metres
Retain these instructions for future use.

32
GENERAL INFORMATION
ATTENTION
• For Your Safety, Follow All Instructions
Outlined Below.
• Remove all point of sale stickers from the
glass window, air intake controls, and all
packaging materials from inside of the oven,
beneath the ceramic stone and re brick.
• This manual and all documentation attached
to it must be kept in an accessible place.
FOR YOUR SAFETY
• DO NOT attempt to light this appliance until
you have read carefully all warnings and
instructions outlined in this manual.
• DO NOT use the oven for purposes other than
indicated in this manual.
• Follow instructions on page 3 for minimum
clearance to combustible materials, and steps
for safely moving the appliance on page 4.
• This oven must be cleaned and seasoned
before rst use.
• The external surfaces of this appliance will
become very hot when in operation.
• DO NOT touch the appliances surfaces without
protection. ALWAYS wear oven gloves when
using this appliance, to avoid burns.
• Protect your children and pets - DO NOT
allow children and pets in the vicinity of this
appliance when in operation.
• DO NOT use indoors.
• This appliance is very heavy. Care must be
taken to ensure that the appliance is set-up on
a at and stable surface, to avoid tipping.
• DO NOT USE SPIRITS, PETROL OR
COMPARABLE FLUIDS FOR LIGHTING OR
RELIGHTING THE OVEN. SEE PROPER FUELS
AND LIGHTING YOUR OUTDOOR OVEN ON
PAGE 6-8.
BEFORE YOU GET STARTED POSITIONING YOUR GOURMET
OUTDOOR OVEN
Care must be taken to ensure that the appliance
is set-up on a at and stable surface to avoid
tipping.
915mm
915mm
1000mm
915mm
Minimum clearance to combustible materials:
Rear: 915mm
Sides: 915mm
Vertical / Above: 1000mm

32
GENERAL INFORMATION
MOVING YOUR GOURMET OUTDOOR
OVEN
Always ensure that the oven is not in operation
and is cooled completely, before attempting to lift
the moving handles to relocate.
• The oven can be moved easily by pulling out the
two moving handles that are nested in the left
cart legs.
• The moving handles enable you to easily lift and
tilt the oven to engage the wheels and move the
oven to its new position.
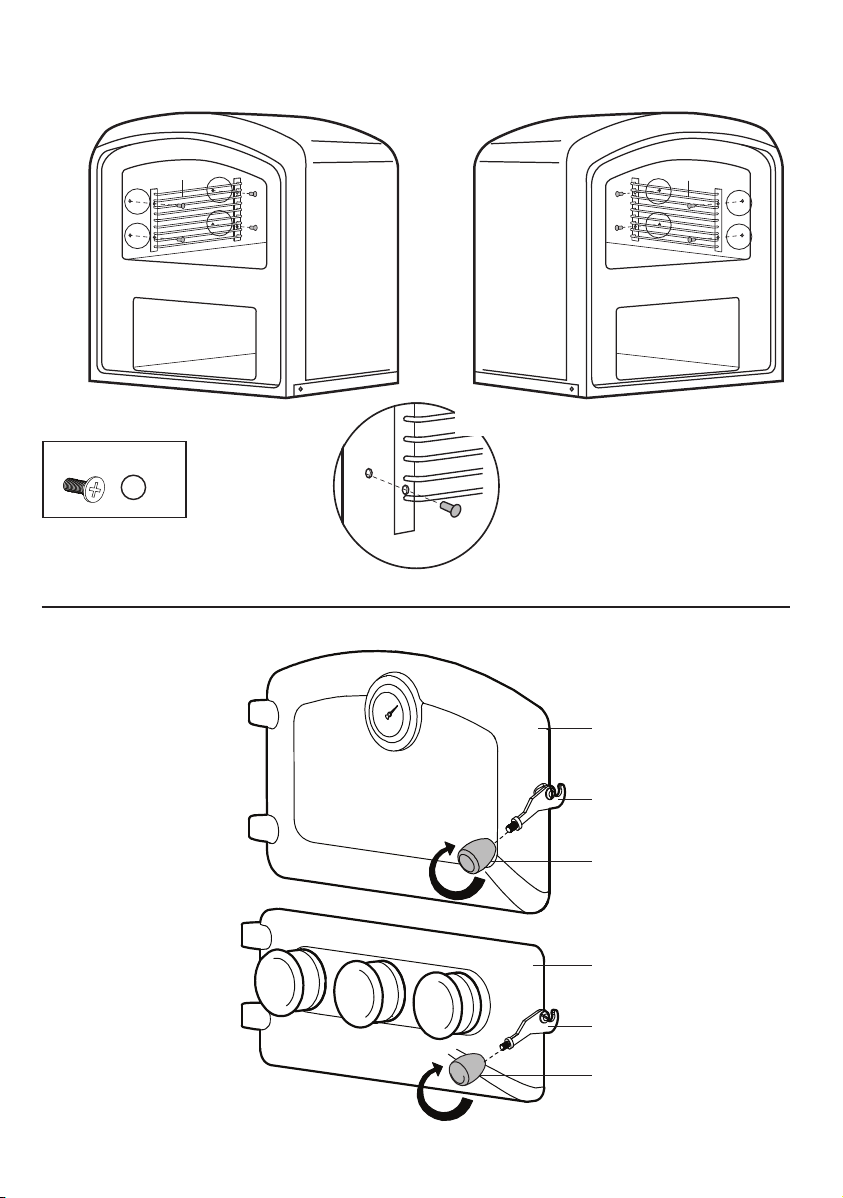
Before moving, the handles must be locked in
position using the locking bolt.
See image below.
CAUTION
• Never relocate a hot oven.
• Avoid tipping. Using the moving handles,
only lift the oven a few inches off the ground
to relocate.
1 2
1 2
Not in use In use

54
GENERAL INFORMATION
GETTING TO KNOW YOUR GOURMET OUTDOOR OVEN
Chimney
Chimney Cap
Moving Handle
Bottom Shelf
Tool Hooks
Air Intake Controls
Chimney Damper
Thermometer
Cooking Chamber Door Latch
Door Latch
Smoker Vent Control
Fire Chamber
Top Shelf
Tool Hooks
Cart Assembly
Smoker Box and Cover
Cooking Grill Support
Cooking Grill
Ash Tray
Baking Stone
Wood Grate
Fire Brick

54
CHOOSING YOUR FUEL AND METHOD OF IGNITION
TOP CHOICES
PROS CONS
LUMP CHARCOAL
Look for 100% all
natural lump charcoal
Lights faster than briquettes. More expensive than charcoal
briquettes.
Burns hotter than briquettes. Less consistent sizing of lump
charcoal pieces.
More responsive to oxygen than
charcoal briquettes making it
easier to control temperature
within the oven.
Burns cleaner than charcoal
briquettes, with minimal smoke
emissions and sparking.
Better avour.
Minimal ash is produced.
HARDWOOD LOGS
OR WOOD CHUNKS
Look for oak, apple,
elm, beech or ash.
100% natural hardwood logs. More expensive than charcoal
briquettes.
Great for offering more smoky
avour to your foods.
Must be DRY. Wet rewood burns
poorly and may prevent the oven
from reaching optimal temperatures
More responsive to oxygen
making it easier to control
temperature within the oven.
Hardwood burns HOTTER and
SLOWER than softwood.
Can be cut to exactly t the
oven’s wood grate
ATTENTION
It is important that the wood being used has been seasoned by allowing it to dry to about
20% humidity content.
GENERAL INFORMATION
BEFORE FIRST USE
1. Read this manual in its entirety.
2. Clean the oven.
3. Get to know key features.
4. Season the oven.
5. Get cooking!!!
CLEANING BEFORE USE
Before attempting to light your Gourmet Outdoor
Oven, it is necessary to clean the inside of the
oven to remove the special coatings applied during
the manufacturing process.
NOTE: These coatings can emit unpleasant odours
when the oven is lit for the rst time.
1. Remove all packaging materials from the inside
of the oven, and beneath the baking stone and
rebricks.
2. Remove the cooking grills and the baking stone
from the inside of the oven.
3. Clean the interior of the oven with a mild soapy
detergent, warm water, and a soft cloth. Wipe
off any excess residue.
4. Wipe out interior using a dry cloth. A microber
cloth is recommended.
5. Place the cooking grills and the baking stone
back into the oven.

76
FINE CHOICES
PROS CONS
CHARCOAL
BRIQUETTES
100% all-natural charcoal
briquettes.
Some charcoal briquettes contain
chemical accelerants and additives,
which may disrupt the avours of
your food.
Briquettes are all sized the same
allowing for a more consistent
burn.
Will not burn quite as hot as lump
charcoal.
Less expensive than hardwood
logs or lump charcoal.
Will not burn as clean as lump
charcoal.
Lower cooking temperatures than
lump charcoal.
Will have longer cooking times.
Any charcoal that is SOFTWOOD
in its origin is not recommended.
Will produce a lot of ash.
SOFTWOOD LOGS Softwood lights easier and burns
faster than hardwood.
Softwood has half of the heat
content of hardwood by volume, so
about twice as much softwood will
be required to achieve the same
heat output as hardwood.
Ideal for kindling and initial
burning because it provides
immediate heat.
Softwood will require more refuelling
than hardwood.
Softwood tends to be more prone to
popping due to pockets of moisture
and/or sap contained within wood.
Risk of this is reduced by properly
seasoning wood to 20% humidity
content.
ATTENTION
• Check the ingredients list of the charcoal you are buying. Avoid charcoals with additives,
chemicals and accelerants, which can disrupt the avours of your food, and have a
negative impact on the appliance and it’s performance.
• RECOVERED WOOD can be used as fuel, but must be cut to length and not treated
or painted. Do not burn chipboard, plywood, or MDF because they contain chemical
binders and adhesives. Recovered wood should be seasoned and stored the same way as
hardwood and softwood.
GENERAL INFORMATION
CAUTION
• NEVER LEAVE YOUR APPLIANCE UNATTENDED.
• Not reading this manual in its entirety, before
lighting, may result in injury, property damage
or permanent damage to the appliance.
• Do not use any liquid lighting uids or
chemical accelerants.

76
RECOMMENDED LIGHTING METHODS
LIGHTING OPTIONS
RECOMMENDED LIGHTING
OPTIONS
NOT RECOMMENDED
What should I use
to light my Lump
Charcoal, Hardwood
Logs, Softwood or
Charcoal Briquettes?
Use ALL NATURAL re starters. NEVER USE any fuel accelerants, liquid
lighting uid to start a re, or inside of
the re chamber.
Use a chimney charcoal starter
and follow the instructions that
accompany this tool.
NEVER USE WOOD that has been
chemically treated such as treated
pine.
Use a propane torch or butane
lighter.
NEVER USE any packaging materials,
including, but not limited to:
polystyrene, plastics or WOOD that has
a high resin content.
Use parafn starter blocks or
cubes that DO NOT contain any
chemicals.
NEVER USE hearth logs meant for a
replace.
Use twigs, paper and corrugate
to get your re going.
GENERAL INFORMATION
WARNING
Overlling your re chamber with wood
can cause overheating and make managing
temperatures difcult.
HOW TO LIGHT YOUR OUTDOOR OVEN
USING HARDWOOD
1. Lay out kindling on your wood grate rst.
2. Cut softwood to length and stack on top of
kindling. Softwood is optional, but because it
lights quickly and burns hot, it will allow for a
prolonged ignition which will help the hardwood
to light.
3. Chop hardwood into thin slices and stack on top
of softwood.
4. Remove ash tray and load the igniters onto
ash tray spaced evenly, light with a lighter, and
replace ash tray.
5. Leave the re chamber door open to allow
enough oxygen to fuel the re. Monitor the re
until the hardwood is fully lit, before closing the
fuel chamber door.
6. Once fully lit, close the door and make sure the
three air intake controls are open.
HOW TO REGULATE THE OVEN’S
TEMPERATURE
Regulating the cooking chamber temperature
can be achieved in three ways:
1. Adjusting the chimney damper position.
2. Adjusting the three air intake controls on the
front of the re chamber.
3. Adding rewood and stoking rewood during
cooking.
4. Keep the cooking chamber and Fire Chamber
doors closed once you have a bright, hot re.
Only open the re chamber door when your re
requires more oxygen.
5. Always preheat the Gourmet Outdoor Oven
for 40 min or more, depending on ambient
temperatures. Always get oven to desired
temperature before adding food.
TIP: When building your re, always leave enough
room in your re chamber for oxygen to circulate,
as your re will need it to burn.

98
GENERAL INFORMATION
HOW TO USE THE CHIMNEY DAMPER
The chimney damper control handle allows
the user to:
1. Control how quickly the
fuel burns in the re
chamber.
2. Control the temperature
output inside of the
cooking chamber
3. Control the smoke inside
of the cooking chamber by
venting smoke out the chimney
There are three positions within the Chimney
Damper
OPEN
To increase temperature turn left
CLOSE
To decrease temperature turn right
TIPS FOR CONTROLLING COOKING
TEMPERATURES
1. DO NOT EXCEED THE TEMPERATURE 360 °C
/ 680 °F IN THE OVEN, at any time as this
will permanently damage your oven, and
void your warranty.
2. Always preheat your Oven to the correct
cooking temperature and maintain this
temperature for at least 10 minutes before
introducing food. This allows the temperature to
stabilize internally
3. Once the desired temperature has been
reached reduce the ames by reducing
airow using the air intake controls on the
front of the re chamber. The hot coals will
continue the cooking process and heat the oven
4. If the temperature decreases during cooking
or when cooking for prolonged periods of time,
more fuel may be required.
5. If the temperature of the oven is too high,
open the door of the cooking chamber and
DO NOT add any more wood.
6. When the cooking chamber door is opened to
check food, temperatures may drop slightly.
Do not immediately add more wood. Close the
cooking chamber door and wait a few minutes
to see if the temperature rises back to the
desired cooking temperature
7. Maintain the Cooking temperatures by adding
a small amount of lump charcoal or wood at
a time. Ensure that the re is maintained and
that the temperatures are not falling, before
proceeding.
8. Do not overload oven.
ATTENTION
You must allow the oven to preheat for
approximately 40 minutes to allow temperatures
to stabilize and to ensure you have established a
bright, hot re.
CLOSE
OPEN
HOW TO USE THE AIR INTAKE
CONTROLS
Opening the three air intake controls and the
chimney damper, allows air to enter the wood
chamber and circulate through the oven,
increasing the ames and temperature within the
cooking chamber.
These controls can be used to both raise and lower
temperatures.
Chimney is closed
Chimney is partially
open for smoking only
Chimney is open
Pointer
Chimney is closed
Chimney is partially
open for smoking only
Chimney is open
Pointer

98
GENERAL INFORMATION
SEASONING BEFORE USE
Cleaning and seasoning your Gourmet Outdoor
Oven are essential to its proper operation.
1. Ensure that the cooking grills and the baking
stone are positioned correctly inside of the
cooking chamber.
2. Open the door of the re chamber to add the
recommended dry hardwood or lump charcoal.
Load small pieces of hardwood, not longer than
30cm. It is ideal to cut hardwood into thinner
pieces to encourage faster ignition onto the wood
grate, closer to the back of the oven.
NOTE: How much hardwood you will require
will depend on the size of the pieces being
used and the t of these pieces on top of the
kindling and the wood grate. Don’t worry. You
can add more wood if required.
3. Ensure that the ash tray is in position below
the wood grate.
4. Using the chimney damper handle open the
chimney damper ( ).
5. Open all air intake controls located on the re
chamber door. Close the cooking chamber door.
6. Light the kindling using the lighting method of
choice. If using something other than paper,
or wood kindling. Follow the instructions that
accompany the product.
7. Once you have established a bright, hot re,
close the re chamber door.
8. Heat the oven, maintaining a temperature of
about 350 °F / 177 °C for at least 2 hours.There
are three positions within the Chimney Damper
CAUTION
• ALWAYS keep children and pets away from the
oven.
• ALWAYS use Insulated oven gloves when
operating the oven for protection from the
oven’s hot surfaces.
For best seasoning results
9. Open the door of the cooking chamber for
a few minutes to allow the release of bad
odours. Then close the cooking chamber door.
Repeat this action several times throughout
the seasoning process. This will allow the
temperature resistant paint to fully cure and
disburse any associated fumes before cooking
is commenced.
10. Open the re chamber to stoke the re,
using your re poker, throughout the 2 hour
seasoning process, to ensure that enough
wood has been added to fuel the re. Add
more wood if required.

1110
GENERAL INFORMATION
HOW TO SMOKE USING THE SMOKER
VENT AND SMOKER BOX FEATURES
1. Allow enough time to build a re and get the
oven up to temperature.
2. Place your food in the cooking chamber
3. Set the chimney damper to the SMOKE position
( ). This will close the chimney damper and
allow smoke to remain within the cooking
chamber walls, offering traditional indirect heat
and smoke, to avour your foods.
4. Open the Smoker Vent to control how much
smoke enters the cooking chamber to avour
your food. Adjust as needed.
5. Follow the steps below to add avour to your
smoked dishes
6. Keep the door closed while cooking to prevent
unnecessary loss of heat and smoke. Add
wood when required, to maintain cooking
temperatures.
ATTENTION
• When not in use, store your smoker box
indoors.
• When not smoking, ensure that the Smoker
Vent Control is in the closed position.
ADDING FLAVOUR TO YOUR SMOKED
DISHES
Your outdoor oven comes equipped with a
detachable cast iron smoker box. Follow the steps
outlined below to achieve subtle smoky avours.
For reference, smoking temperatures range from
approximately 140 °C / 284 °F to 225 °C / 437 °F,
and smoking requires an extended cooking time.
This type of cooking is ideal for poultry, ham,
brisket, ribs and more.
1. Place a small amount of avoured, wood
smoking chips into the detachable smoker
box, and soak as recommended. Follow the
instructions that accompany your smoking
chips.
2. As a general rule, soak the chips in water for
about 15 minutes to get maximum avour.
3. Position the detachable smoker box on the
inside of your outdoor oven’s re chamber door.
4. It is possible to add either more subtle or
pungent avours to your meats, sh or poultry,
by opening and closing the smoker vent
throughout a cooking cycle, more or less often.
Using avoured wood chunks
Another method for adding avour is to add
several pieces of avoured wood chunks to
your lump charcoal or hardwood, within the re
chamber, to achieve the desired avour. Any
hardwood that bears a fruit or nut is suitable for
cooking.
ATTENTION
DO NOT take risks with your safety. ALWAYS
wear protective, fully insulated gloves, which
cover your hands and forearms, when using
your oven.
CLOSED
OPEN
CLOSED
OPEN

1110
COOKING TIPS
• Cooking is fast and economical thanks to the
insulation of the cooking chamber, preventing
loss of heat, and maintaining cooking
temperatures.
• Cooking should take place with the door of
the cooking chamber closed. Open the door as
infrequently as possible.
• When multiple dishes are on the menu, it is
important to plan your meal in advance, cooking
foods that require similar temperatures and
time together.
• When cooking food at high temperatures, such
as pizza, you can then use the oven to introduce
dishes that require a lower temperature,
without having to add more wood.
• It is also possible to cook food directly on the
baking stone, which is tted on the oor of
the cooking chamber as it is perfectly suited
for direct cooking. However, to avoid staining
with fat or grease, or for a lower maintenance
approach to cooking, place food on a tray or
sheet of aluminum, or use an additional ceramic
stone.
• The Gourmet Outdoor Oven has multiple
surfaces to use for cooking a number of
different dishes at a time. It is possible to use
the two cooking grills, and the baking stone at
the bottom of the cooking chamber, at the same
time.
What cooking vessels are recommended?
Cooking vessels that are made of ceramic, clay,
cast iron, aluminum and stainless steel can be
used as long as the vessel and its handles are safe
for use in a conventional oven. However, please
note that for vessels made of stainless steel or
another shiny surface, it is possible for these
materials to darken under high temperatures or
while smoking.
THERMOMETER AND VIEWING
WINDOW
The large cooking window and thermometer
allow you to observe your food while it cooks
without opening the door. Keeping the cooking
chamber door closed will allow you to maintain
temperatures and avour. The thermometer is
calibrated to Celsius and Fahrenheit and lets you
closely monitor the temperature inside the oven
chambers.
Baked Goods
The temperature is normally moderate (usually
250 °F / 121 °C or 300 °F / 149 °C and the oven
must be preheated to the desired temperature for
40 to 50 minutes. Remember that the door should
not be opened during the cooking process. Beaten
mixtures must leave a spoon with difculty,
because an excess of uid will wastefully prolong
cooking time.
Meat and Fish
Meat can be roasted in an oven proof dish or
placed directly onto the wire shelves. If positioning
your roast on one of the wire shelves, a tray
should be placed underneath to collect the cooking
juices. To prevent over cooking, avoid cooking
very small portion sizes. Basting is recommended
throughout longer cooking cycles; however,
turning meats infrequently is recommended.
Cooking Times
Cooking times vary depending on the type of
foods being prepared, its weight and size. When
cooking a particular dish for the rst time in your
Gourmet Outdoor Oven, you should regularly
monitor the foods during the cooking process
using the viewing window.
Always ensure that you are preheating your oven
to temperatures that are specically recommended
for the dishes being prepared.
It is advisable to refrain from opening the door
repeatedly as this will allow the internal heat to
escape and affect the cooking time.
GENERAL INFORMATION

1312
HOW TO USE YOUR OUTDOOR OVEN AS
A FIREPLACE
The Gourmet Outdoor Oven can easily be
transformed into an outdoor replace. Simply
open the re chamber door after cooking is
complete to providewarmth and ambience to your
outdoor space.
NOTE: For best results, do not keep the re
chamber door open while cooking.
GENERAL INFORMATION
CLEANING AND MAINTENANCE
In order to get the most of your Gourmet Outdoor
Oven, regular care and maintenance are critical
to ensuring a safe experience for you and your
family, the longest life for the product, and the
best performance possible.
Before Cleaning
Cleaning the Baking Stone
• To clean the baking stone, we recommend using
a heavy duty brass brush with scraper.
• Use the blade edge of the cleaning brush to
scrape away any food debris or spills on the
surface. Then, turn the brush over and brush
away any debris leftover on the baking stone.
• Wipe the stone down with a damp cloth.
• If stubborn stains from oils and fats are still
visible on the baking stone, don’t worry, most
will be burned off during preheat, when the
oven is in use again.
• To avoid permanent damage, never allow
the oils and grease to build-up.
Cleaning the Cooking Grills
• To remove build up from the cooking grills and
cooking rack, brush away any debris using a
Cleaning Brush, and use a damp cloth with a
mild detergent to wipe away any residue.
• The Cooking grills can also be removed and
cleaned in hot soapy water using a non-abrasive
scouring pad, if necessary.
• To avoid permanent damage, do not
scrape, or use chemical cleaners on the
cooking grills.
WARNING
Failure to adhere to the care and maintenance
schedule outlined below, may lead to early
product failure, degradation, poor performance
and unsafe conditions for you and your family.
ATTENTION
Ensure that the Gourmet Outdoor Oven is cool
before performing any care and maintenance.

1312
Cleaning the Cooking Chamber
1. Before cleaning the cooking chamber, remove
the baking stone and the re bricks.
2. The cooking chamber should be cleaned
periodically with products that are suitable to
stainless steel and glass. DO NOT use abrasive
products or chemical cleaners, as these could
scratch all surfaces and remove the surface
protection.
3. Always clean off residue from cleaners and
follow by drying the walls entirely with a soft,
microber cloth.
4. To eliminate the more persistent stains, it
is advised to run the oven at its maximum
temperature in order to burn off any residue.
5. When the oven has cooled completely it will be
necessary to remove the residual dust with a
damp sponge.
Cleaning the external painted surfaces
Clean regularly the external painted surfaces of
the oven, to avoid surface contamination and rust.
Do not use abrasive or corrosive products, as
these may cause damage to the paint. Clean the
exterior of the oven with a mild detergent suitable
for painted surfaces, using a damp cloth. Always
follow by drying the surfaces with a microber
cloth.
GENERAL INFORMATION
Cleaning the Fire Chamber and Ash Tray
It is necessary to empty the ash from the ash
tray at the end of every cooking cycle. When
the embers are fully extinguished and the oven
has cooled completely, remove the ash tray and
support grid and empty contents into a heavy foil
container or other reproof container.
ALWAYS wait for the oven to completely cool
before attempting to remove the ASH TRAY. Once
cooled, ashes can be disposed of into compost.
Cleaning the Glass
Clean the glass window using a household window
cleaner or an oven cleaner product. Care should
be taken if using a household abrasive cream
cleaner to not scratch or damage the glass or the
painted line markings on the glass.
NOTE: The doors of the oven have been screen
printed with a special heat resistant paint. Heavy
duty scouring pads may damage the paint and are
NOT recommended for use.
PROTECTING YOUR GOURMET OVEN
Always cover your Gourmet Outdoor Oven during
periods of non-usage to keep it clean, dry and
protected from the elements. If not properly
maintained and stored, steel parts will rust. This
will not affect the functionality of the oven, but
should be avoided.
ATTENTION
If the oven gets scratched exposing the steel,
immediately apply high temperature touch-up
paint, available at your local hardware store.
ATTENTION
Do not allow the oven to build up with stains
and grease. It is much harder to clean an oven
that has been neglected for a long period of
time, and much easier to perform maintenance
on a regular basis.

1514
Tools needed for assembly
• #2 Phillips screwdriver
• Adjustable wrench
For correct hardware
assembly, always
position the lock
washer between the
screw and the at
washer.
Note: Do not fully tighten all the nuts during
this initial stage
HARDWARE PACK
CAUTION
• BEFORE ASSEMBLING THE OVEN, READ
THESE INSTRUCTIONS CAREFULLY.
• Assemble the oven on a at, clean surface.
Oven is heavy. Two people are recommended
to complete assembly.
• Sheet metal can cause injury. Wear gloves
when installing this oven.
No. Description Qty
A M4x10 Screw 6
B 4mm Washer 4
C Locking Bolt & Chain 2
D M6x15 Screw 30
E 6mm Washer 30
F 6mm lock Washer 4
G M12x130 Bolt 2
H M12 Nut 2
I 12mm Washer 6
J Spacer 2
K 4mm Lock Washer 4
L M10x75 bolt 2
M M10 Nut 2
N M5x6 Screw 8
Lock Washer
Flat Washer
Screw
AB C
M4x10 Screw
X 6
4mm Washer
X 4
Locking Bolt & Chain
X 2
DE F
M6x15 Screw
X 30
6mm Washer
X 30
6mm Lock Washer
X 4
G H I
M12x130 Bolt
X 2
M12 Nut
X 2
12mm Washer
X 6
J K L
Spacer
X 2
4mm Lock Washer
X 4
M10x75 Bolt
X 2
MN
M10 Nut
X 2
M5x6 Screw
X 8
Lock Washer
Flat Washer
Screw
AB C
M4x10 Screw
X 6
4mm Washer
X 4
Locking Bolt & Chain
X 2
DE F
M6x15 Screw
X 30
6mm Washer
X 30
6mm Lock Washer
X 4
G H I
M12x130 Bolt
X 2
M12 Nut
X 2
12mm Washer
X 6
J K L
Spacer
X 2
4mm Lock Washer
X 4
M10x75 Bolt
X 2
MN
M10 Nut
X 2
M5x6 Screw
X 8

1514
EXPLODED DIAGRAM AND PARTS LIST
No. Description Qty
1 Left Side panel 1
2 Cooking Chamber Door 1
3 Window 1
4 Cooking Chamber Door Gasket 1
5 Door Latch 2
6 Thermometer 1
7 Handle 3
8 Chimney Damper Arm 1
9 Chimney Cover 1
10 Chimney 1
11 Chimney Damper 1
12 Top Panel 1
13 Cooking Grill Support 2
14 Back Panel 1
15 Right Side Panel 1
16 Cooking Grill 2
17 Baking Stone Wire Rack 1
18 Oven Body 1
19 Front Panel 1
20 Fire Chamber Door 1
21 Smoker Box + Lid 1
No. Description Qty
22 Bracket for Smoker Box 1
23 Fire Chamber Door Gasket 1
24 Air Intake Controls 3
25 Tool Hooks 2
26 Moving Handles 2
27 Locking Bolt and Chain 2
28 Left Cart Assembly 1
29 End Caps 2
30 Wood Grate 1
31 Shelf 2
32 Ash Tray 1
33 Baking Stone 1
34 Fire Brick 3
35 Right Cart Assembly 1
36 Wheel 2
37 Front and Back Brace 2
38 Assembly Manual 1
39 Hardware Pack 1
40 Smoker Vent Handle 1
41 Door Adapter 2
13
16
37
35
17
14
15
10
9
4
12
11
8
7
25
29
32
40
41
30
19
23
20
22
3
6
21
24
18
2
1
5
5
7
7
33
34
25
27
26
36
31
28
1716
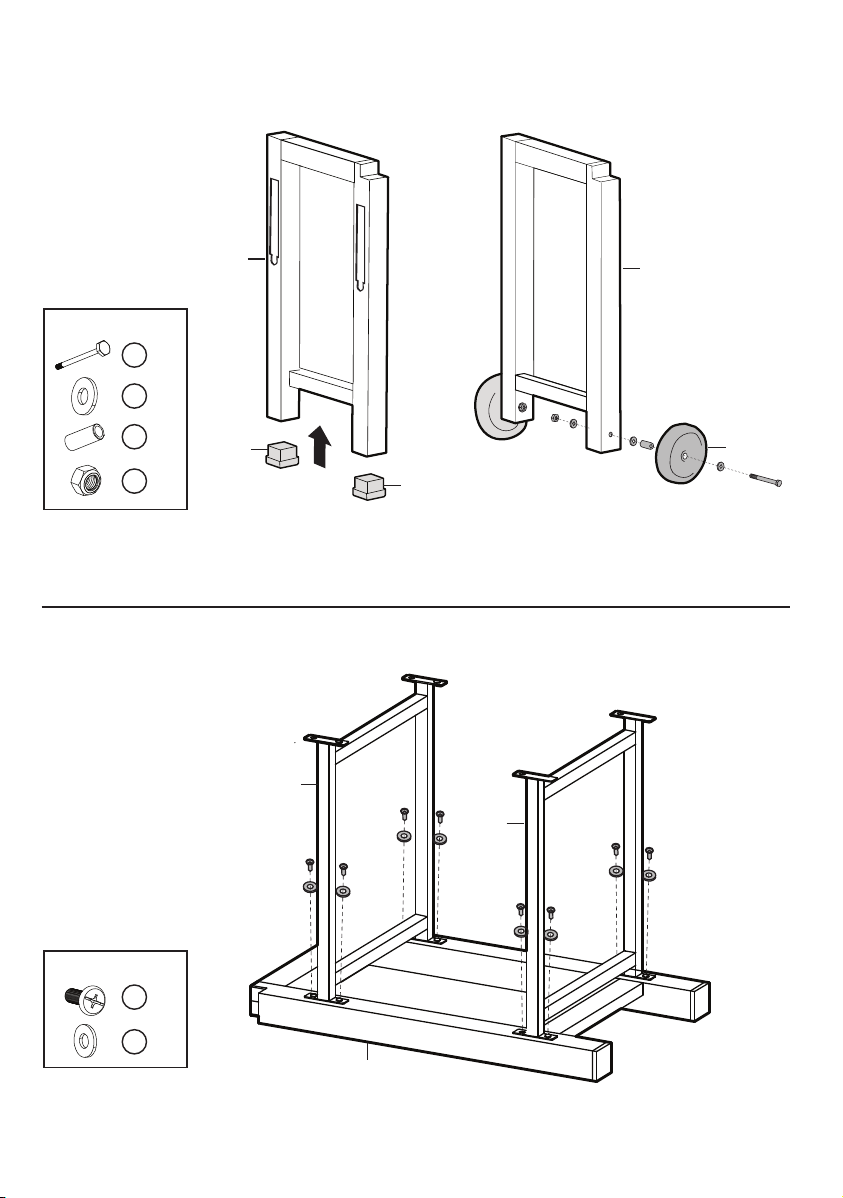
35
31
28
31
28
29 36
29
YOU WILL NEED:
Gx 2
Ix 6
Jx 2
Hx 2
YOU WILL NEED:
Dx 8
Ex 8
ASSEMBLY INSTRUCTIONS
1.
2.
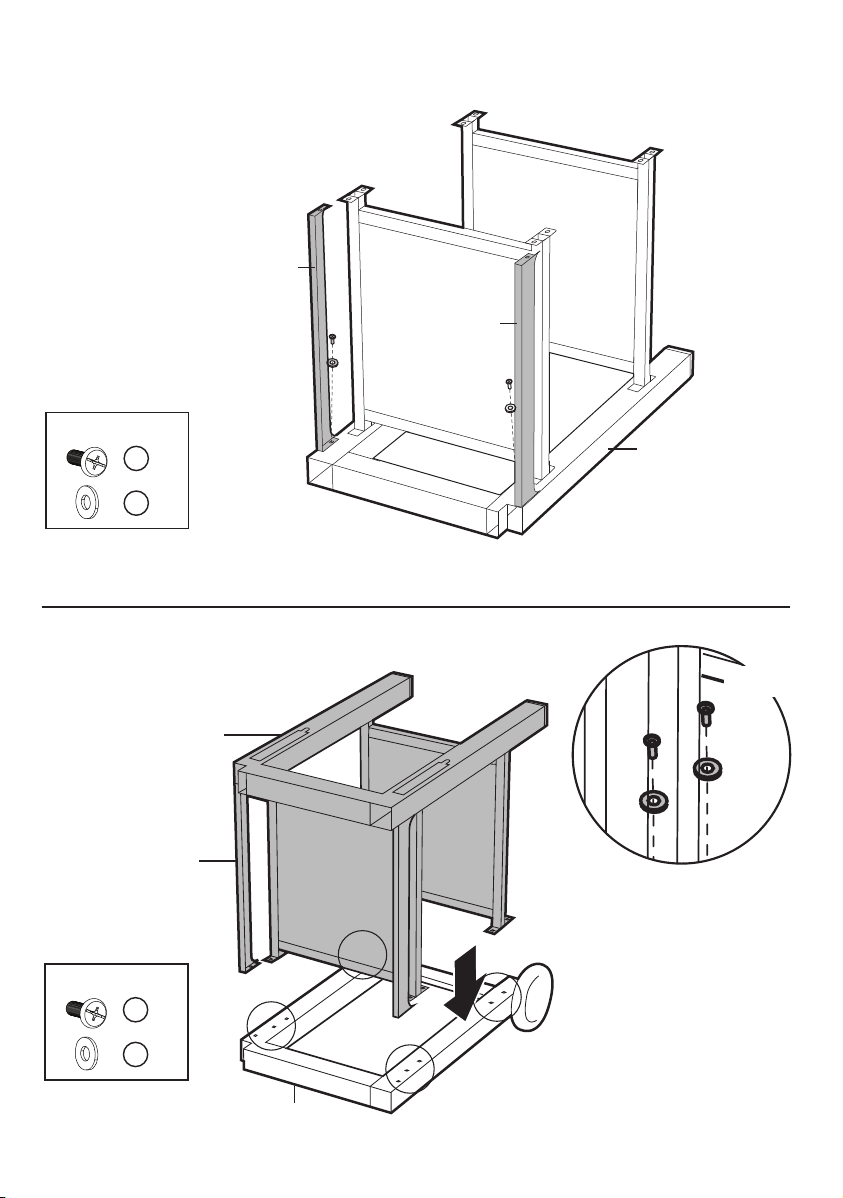
1716
37
28
37
YOU WILL NEED:
Dx 2
Ex 2
YOU WILL NEED:
Dx 10
Ex 10
28
37
35
10X
3.
4.

1918
YOU WILL NEED:
Ax 4
Kx 4
Bx 4
25 28
35
25
YOU WILL NEED:
Lx 2
Mx 2
Cx 2
28
L
M
C
26
5.
6.
1918
YOU WILL NEED:
Dx 6
Ex 6
7.
8.
YOU WILL NEED:
Dx 6
Ex 6
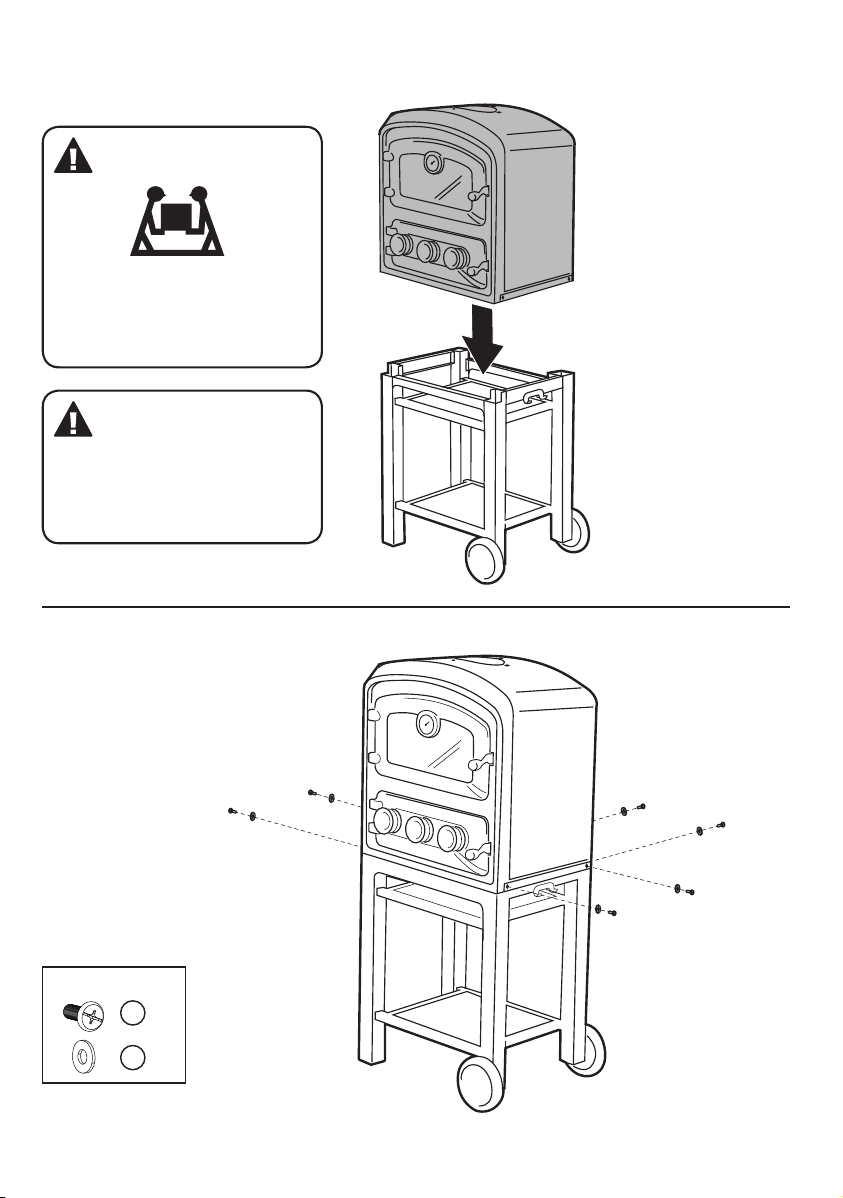
CAUTION
YOU WILL NEED:
Dx 6
Ex 6
THIS STEP REQUIRES 2 OR
MORE PEOPLE. DO NOT ATTEMPT
ALONE. EXTREMELY HEAVY.
WEIGHT: 54 kg / 119 lbs
WARNING
Before completing this step, remove
both the Cooking Chamber and Fire
Chamber doors. Reach hands inside
Oven to lift safely. For your safety, do
not lift the oven from the bottom.
2120
13 13
8X
YOU WILL NEED:
Nx 8
2
5
7
20
5
7
13 13
8X
YOU WILL NEED:
Nx 8
2
5
7
20
5
7
9.
10.
Table of contents


