Chef's FCC-GG-230100-20 User manual

FCC-GG-230100-20
!OUTDOOR USE ONLY
READTHEMANUAL, FOLLOWTHEASSEMBLY
INSTRUCTIONSSTEPBYSTEP. GETTOKNOWYOUR
BARBECUEANDTHESAFETYINSTRUCTIONSBEFORE
USINGTHEAPPLIANCE!
SCAN QR CODE FOR
BARBECUE
ASSEMBLY VIDEO
USER MANUAL
Assembly, maintenance and safety
EX WARRANTY:
SCAN QR CODE AND
REGISTER BARBECUE FOR
EXTENDED WARRANTY

WHO ARE WE?
The Flying Culinary Circus is the world’s first traveling cooking
group. In 2005 Trond, Hans-Kristian, Mathias, and Tor, went to
New York. A journey that ended up being an adventure of
a lifetime. With 65 countries and 300,000 hours of culinary
experience in the Chef whites, we have developed, designed, and
produced a wide range of grills and accessories that add something
new and unique to the grill range in the Nordic region.
Something we have always had is great love for grilling and
barbeque as a cooking method. Whether we have a garden party,
enjoy summer evenings in the park, cater for famous guests on
the French Riviera or simply just go on a cabin trip, barbecue and
grilling is in the center. It´s fantastic flavors, it´s tough, it´s cool and
it’s love for the most amazing cooking method in the world!
2023 will be the sixth year for FCC BBQ, and we´re very proud
and humble for the success and what we as a company have
achieved. For all of FCC BBQ products, the common denominator
is high quality and functionality at a good price. We want to inspire
the world trough cooking. Just as our vision:
Share the fun of cooking!
THESTORYOFFCC
2

Hans-Kristian, Mathias, Trond and Tor
3

CONTENTS
The story of FCC...........................................................................................2
Warnings ...........................................................................................................5
Technical Data ...............................................................................................6
Read before assembly ................................................................................7
Parts List ...........................................................................................................8
Exploded Drawing.........................................................................................9
Assembly Instructions ...............................................................................10
Regulator and Hose - Connecting the gas ........................................13
Check for leaks before using the barbecue .....................................14
Last Check ...................................................................................................16
Lighting Instructions ...................................................................................17
Maintenance ................................................................................................18
Advice, tips and safety .............................................................................20
Troubleshooting ..........................................................................................21
Consumer Contact ....................................................................................22
4

WARNINGS!
●ACCESSIBLE PARTS OF THE BARBECUE BECOME VERY HOT DURING USE.
KEEP CHILDREN AND OTHERS WHO NEED SUPERVISION AT A SAFE DISTANCE.
●THE BARBECUE IS INTENDED FOR OUTDOOR USE ONLY IN
WELL-VENTILATED AREAS.
●LEAK TESTS (SEE PAGE 14) MUST ALWAYS BE CARRIED OUT BEFORE THE
BARBECUE IS USED AND WHEN REPLACING THE GAS CYLINDER. ALSO PERFORM
A LEAK TEST IF THE PRODUCT HAS NOT BEEN IN USE FOR A LONG TIME AND IN
ADVANCE OF A NEW BARBECUE SEASON. ALWAYS CHECK THE GAS HOSE FOR
DAMAGE AND CRACKS BEFORE USING THE BARBECUE.
●NEVER GRILL IN CLOSED ROOMS OR UNDER ROOFS, AS THIS MAY LEAD TO
A LACK OF OXYGEN.
●FAILURE TO FOLLOW THE INSTRUCTIONS PROVIDED CAN IMPLY A RISK OF
SERIOUS INJURY TO PERSONNEL AND FIXED INSTALLATIONS.
●REBUILDING/MODIFYING THE BARBECUE CAN CAUSE DANGER AND WILL
INVALIDATE THE WARRANTY.
●ALWAYS SUPERVISE THE BARBECUE DURING USE AND KEEP SUITABLE
EXTINGUISHING EQUIPMENT WITHIN REACH. THE BARBECUE SHOULD NOT BE
OPERATED BY INTOXICATED PERSONS.
●THE BARBECUE MUST NOT BE USED IN PLACES THAT ARE BELOW NORMAL
GROUND LEVEL. GAS CAN ACCUMULATE AND REPRESENT A DANGER OF
EXPLOSION. GAS ACCUMULATION CAN ALSO CAUSE OXYGEN DEFICIENCY.
●THE BARBECUE MUST BE CLEANED REGULARLY AND THOROUGHLY TO
PREVENT UNCONTROLLED GREASE FIRE.
READ MORE ABOUT GREASE FIRE ON PAGE 18.
●ALSO READ PAGE 20 FOR MORE ADVICE AND TIPS ON GRILLING AND SAFETY.
!
FIRST TIME USE – GRILL BURN-OFF
BEFORE USING THE BARBECUE FOR THE FIRST TIME, IT IS IMPORTANT TO COMPLETE A
BURN-OFF. FIRE UP THE BARBECUE AND OPERATE FOR A MINIMUM OF 15 MINUTES ON
MAX TEMPERATURE TO BURN-OFF THE UNIT. THIS WILL “HEAT CLEAN” THE INTERNAL
COMPONENTS, DISSIPATE ODORS AND RID IT OF ANY FOREIGN MATTER.
5

TECHNICALDATA
Total Heat input: 4.6kW (butane) 4.2kW (propane)
Gas consumption: 335 gram/hour
Gas cylinder (not included): Use standard cylinder approved for use in the Nordic Region.
Even though butane and propane gas can be used, we recommend propane for use in the Nordic
Region. Approved hoses and regulators are available from most outlets selling gas equipment.
NB! Gas hoses used for this product must not exceed 120 cm in length.
Ø 0.75 mm Main Burner G(Butane G Propane)
and their mixtures
IB/P(30)
The product is manufactured in accordance with
European Gas Appliances Regulation (EU) 2016/426
USE ONLY GAS TYPE AND GAS CATEGORY ENTERED IN THIS MANUAL.
!
DESTINATION OF
COUNTRIES TO USE GAS TYPEVALVE SIZE GAS CATEGORY
1336-22
W: 725 mm
D: 502 mm
H: 380 mm
LU, NL, DK, FI, SE, CY, CZ,
EE, LT, LV, MT,
SK, SI, BG, IS, NO, TR, HR,
RO, IT, HU
9
2
6.
Parts Required:
1 x Cooking Grid (#2)
Installation:
• Place the Cooking Grid inside Grill Body, shown in 6A. The unit is now
completely assembled and ready to use. Note 6B.
6

READBEFOREASSEMBLY
A screwdriver (not provided)
is necessary when assembling the barbecue.
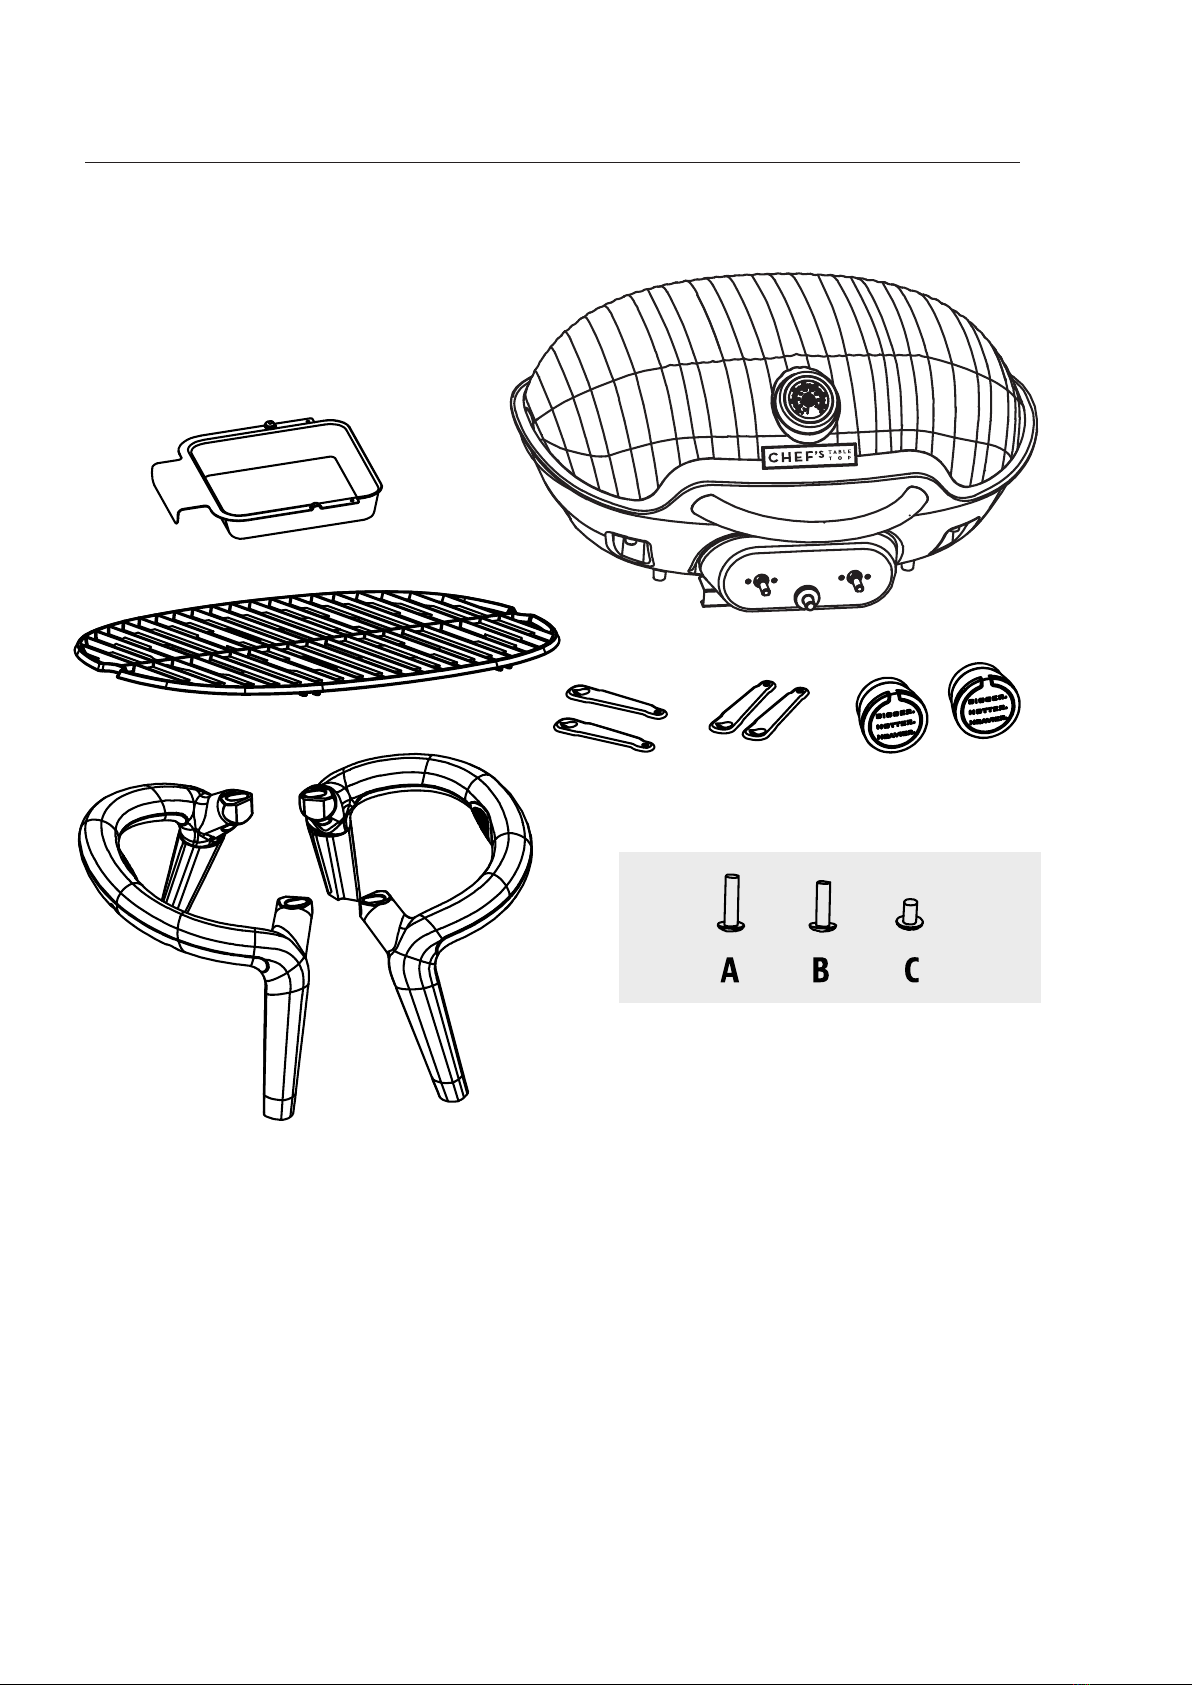
Make sure that all parts and screws are included by comparing the parts list with the contents of the box.
Also check that everything is undamaged before assembling the product.
If the barbecue is damaged during transport, do not assemble the barbecue before contacting your
dealer or support@fccbbq.com.
Transport damage to parts, varnish or enamel must be reported to the dealer or FCC BBQ before
mounting and using the barbecue. If damage is reported after, there is a possibility that damage may have
occurred during assembly. This will not be considered as transport damage.
Please note that some parts may be located in the Styrofoam to protect the part during transport.
If parts are missing, first check the packaging carefully. Remove all remnants of packaging material
and any plastic foil from the barbecue before using the barbecue.
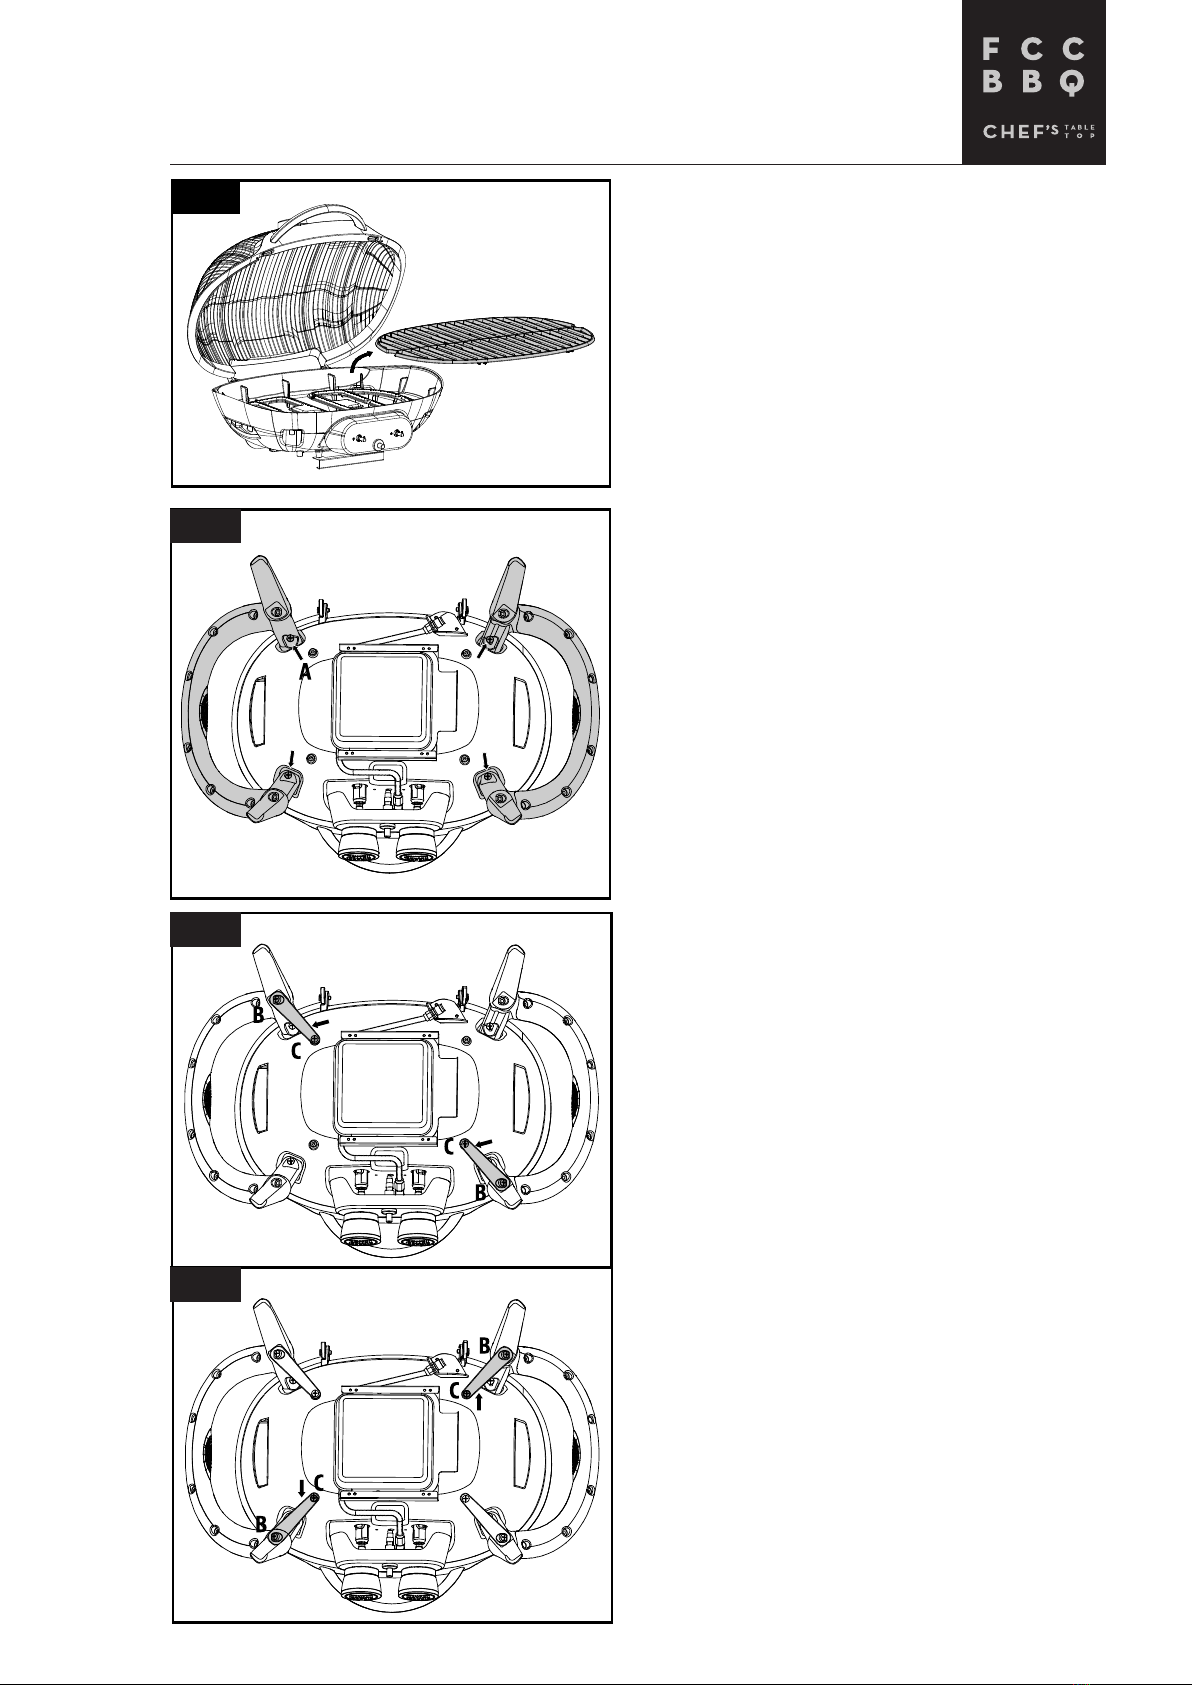
●FOLLOW THE ORDER IN THIS MANUAL TO AVOID INCORRECT ASSEMBLY.
PARTS OF THE ASSEMBLY WILL REQUIRE HEAVY LIFTING WHICH SHOULD
BE PERFORMED BY TWO PEOPLE TOGETHER, TO AVOID PERSONAL INJURY
AND DAMAGE TO THE BARBECUE. SOME METAL PARTS MAY BE SHARP,
WEAR PROTECTIVE GLOVES.
●POWER TOOLS SHOULD NOT BE USED TO ASSEMBLE THE BARBECUE.
TOOLS WITH TOO MUCH FORCE CAN DAMAGE THE SURFACE TREATMENT
ON SCREWS, DAMAGE ENAMELLED/LACQUERED PARTS
OF THE BARBECUE, AS WELL AS LOOSEN PRE-ASSEMBLED NUTS.
●IF THE PRODUCT'S VARNISH OR ENAMEL IS DAMAGED DURING ASSEMBLY,
WE RECOMMEND THAT THE DAMAGE BE TREATED IMMEDIATELY TO
AVOID LATER RUST DAMAGE. SUITABLE HEAT-RESISTANT VARNISH CAN BE
ORDERED FROM SUPPORT@FCCBBQ.COM.
!
FOLLOW THESE INSTRUCTIONS CAREFULLY TO AVOID SERIOUS
PERSON INJURY OR DAMAGE TO YOUR BARBECUE.
7

PARTSLIST
CODE DESCRIPTION QTY
GRILLBODY
COOKINGGRID
LIDGREASETRAY
SUPPORTINGLEGS
LEGBRACE - A
LEGBRACE - B
KNOB
Am6XMMSCREW
Bm6XMMSCREW
Cm6XMMSCREW
8

EXPLODEDDRAWING
1
2
5
3
467
1
9

1
2
3
ENGLISH
7
IMPORTANT: It is advised to read each step entirely before starting assembly on instructions. Do not tighten screws
completely until all screws for that step have been installed.
1.
Parts Required:
1 x Grill Body (#1)
1 x Cooking Grid (#2)
Installation:
• First, remove the cooking grid from the inside of the grill body. This will
prevent it from moving around while completing the assembly.
2.
Parts Required:
2 x Knob (#7)
Installation:
• Place a piece of cardboard on the floor to prevent scratching the unit
and parts during assembly. Turn the grill body over onto its lid to view
the underside of the grill body.
• Insert the knobs onto the pins of the control panel.
3.
Parts Required:
1 x Grease Tray (#3)
Installation:
• Slide the Grease Tray between the drip pan brackets as shown in the
illustration.
NOTE: You will hear a click when the Grease Tray is completely inserted.
2
1
1
2
7
3
3
ASSEMBLY
Remove the Cooking Grid
This will prevent it from moving around while
completing the assembly.
Mounting the Legs to the grill body
Place a piece of cardboard (e.g the grill
carton) on the floor to prevent scratching the
unit and parts during assembly. Turn the grill
body over onto its lid to view the underside
of the grill body.
Align one of the Support Legs to the holes on
the Grill Body. Use two, m6x25mm screws, to
attach the Support Leg. Repeat installation
for the opposite leg.
Installing Leg Braces
Secure Leg Brace - A to opposite corners
with two m6x10mm screws to the body and
two m6x20mm screws attached to the legs,
shownin 3A illustration. Repeat installation
for the opposite corners with Leg Brace - B,
illustration 3B.
8
4.
Parts Required:
2 x Support Legs (#4)
4 x m6x25mm Screws (#A)
Installation:
• Align one of the Support Legs to the holes on the Grill Body. Use two,
m6x25mm Screws, to attach the Support Leg. Repeat installation for
the opposite leg.
5.
Parts Required:
2 x Leg Brace - A (#5)
2 x Leg Brace - B (#6)
4 x m6x20mm Screws (#B)
4 x m6x10mm Screws (#C)
Installation:
• Secure Leg Brace - A to opposite corners with two m6x10mm Screws
to the body and two m6x20mm Screws attached to the legs, shown
in 5A illustration. Repeat installation for the opposite corners with Leg
Brace - B. Note 5B
4
4
5
5
6
6
2
3a
3b
10

7
IMPORTANT: It is advised to read each step entirely before starting assembly on instructions. Do not tighten screws
completely until all screws for that step have been installed.
1.
Parts Required:
1 x Grill Body (#1)
1 x Cooking Grid (#2)
Installation:
• First, remove the cooking grid from the inside of the grill body. This will
prevent it from moving around while completing the assembly.
2.
Parts Required:
2 x Knob (#7)
Installation:
• Place a piece of cardboard on the floor to prevent scratching the unit
and parts during assembly. Turn the grill body over onto its lid to view
the underside of the grill body.
• Insert the knobs onto the pins of the control panel.
3.
Parts Required:
1 x Grease Tray (#3)
Installation:
• Slide the Grease Tray between the drip pan brackets as shown in the
illustration.
NOTE: You will hear a click when the Grease Tray is completely inserted.
2
1
1
2
7
3
3
4
ASSEMBLY
Installing the Knobs
Insert the knobs onto the pins of the control
panel.
5
Insert the Grease Tray
Slide the Grease Tray (3) between the drip pan
brackets as shown in the illustration.
NOTE: You will hear a click when the Grease
Tray is completely inserted.
4
5
11

6
ASSEMBLY
Installing the Cooking Grid
Place the Cooking Grid inside the Grill Body,
shown in image 6A. Make sure to place the
cooking grid with the correct side facing up.
6a
6b
x
The unit is now completely assembled.
6B: Image shows the cooking grid
inserted INCORRECTLY.
9
2
6.
Parts Required:
1 x Cooking Grid (#2)
Installation:
• Place the Cooking Grid inside Grill Body, shown in 6A. The unit is now
completely assembled and ready to use. Note 6B.
6b
12

CONNECTINGGAS
FOLLOW THESE INSTRUCTIONS CAREFULLY TO AVOID SERIOUS DAMAGE TO YOUR
BARBECUE AND CAUSE PERSONAL INJURY.
HOSE
•Connect the gas hose to the gas inlet on the
barbecue. Tighten well.
•Install the regulator and hose. Follow the install
ation instructions that came with the controller
set.
•Do not use sealing tape, glue or liquid on the
connection.
•Gas hoses used for this product must not be
longer than 120 cm.
•Check the gas hose regularly for cracks, damage
and rot. Never use a damaged gas hose.
REGULATOR
•Check that all controls on the control panel
are in the OFF position before connecting the
regulator to the gas cylinder.
•Connect the regulator to the gas cylinder
according to your regulator and the cylinder
dealer’s instructions.
•We recommend propane gas for use in the
Nordic countries, but butane can also be used.
Butane is poorly suited for low temperatures.
•Check that the regulator is not damaged.
•Check that the gas cylinder is on a firm, level
surface and is lower than the gas inlet on the
barbecue.
•Use an approved gas cylinder that fits the
regulator. Cylinders of 10 kg or more are
recommended.
ENGLISH
10
GAS CYLINDER REQUIREMENTS
The grill is set and tested with liquid propane gas only. The regulator supplied is set for 27.94 cm (11 inch) water column (WC) and
is for use with liquid propane (LP) gas only. The factory-supplied regulator and hose must be used with a 9 kg (20 lbs) LP gas
cylinder, to the dimensions of 18-1/4” (46.35 cm) high, 12-1/4”(31 cm) diameter. Contact your gas supplier for a special regulator
for bulk gas that fuels other appliances.
CAUTION: It is important to inspect the full length of the gas line hose. If it is evident there is excessive
abrasion or wear, or the hose is cut, the hose must be replaced prior to the appliance being used. The
replacement hose assembly shall be that specified by the manufacturer.
INSTALLING A GAS CYLINDER
1. Before connecting, visually check the connection between
the burner venturi pipe and orifice for each burner. Make sure
the burner venturi pipe fits over the orifice. Note illustration
A for proper installation. If the burner pipe does not rest flush
to the orifice, contact Customer Care for assistance.
WARNING: Failure to inspect this connection or
follow these instructions could cause a fire or an
explosion which can cause death, serious bodily
injury or damage to property.
2. Next, inspect the regulator and gas components. Check to
ensure there is no debris caught in the head of the LP gas
cylinder, head of the regulator valve, or in the head of the
burner and burner ports.
3. Place gas cylinder onto a flat level surface. Note illustration B.
Make sure the gas cylinder valve is in the CLOSED position. It
is important to ensure the gas cylinder is completely upright,
as it is unsafe to operate the grill if the gas cylinder is not
installed properly.
4. Ensure the regulator valve on the grill is completely closed by
turning the knobs clockwise to the "OFF" position.
5. Remove the protective caps from the regulator valve opening
and the top of the gas cylinder. Save the caps. Check the gas
cylinder to assure it has proper external male threads (type 1
connection per ANS Z21.81).
6. Insert the gas cylinder valve into the threaded opening of the
regulator valve.
7. Gas cylinder is now installed.
WARNING: Shut off the gas cylinder if you smell gas. Attempt to re-install gas cylinder to ensure that tube
is connected properly.
A
B
13

ALWAYS PERFORM A LEAK TEST
BEFORE USING THE BARBECUE!
1. Thread the hose all the way into the gas nipple.
2. Place the hose clamp 0.5 - 1 cm from the end of the hose.
3. Use a socket wrench (size 7), wrench (size 7) or screwdriver to
tighten the hose clamp and tighten well.
4. IMPORTANT! A gas leak test must be performed as
described on next page before using the barbecue.
!
If the hose is too tight to thread onto the gas nipple, use soap at the tip of
the hose. Never use flammable liquids. Alternatively, dip the tip of the hose in
boiling water, and the hose will expand.
GASLEAKTEST
BEFORE USING THE BARBECUE, A LEAK TEST MUST BE CARRIED OUT!
NEVER CHECK FOR LEAKS BY USING AN OPEN FLAME! USE A LEAK SPRAY
OR ALTERNATIVELY A SOAPY WATER MIXTURE
(TWO PARTS DISHWASHING SOAP AND ONE PART WATER).
14

GASLEAKTEST
!
!
GAS LEAK TEST
1. Extinguish all live flames, heat sources and cigarettes in the area where
the leak test is to be performed.
2. Turn all controls on the barbecue to the OFF position.
3. Set the regulator to the OFF position and connect it to the gas cylinder.
4. Spray the leaking spray (or brush the soap mixture) on all joints and connections on the gas
cylinder, regulator, the entire hose and all valves on the barbecue.
5. Open the gas supply on the regulator and carefully check for bubbles
in any of the places where the spray mixture is applied.
6. IF BUBBLES OCCUR, CLOSE THE GAS SUPPLY AND TIGHTEN ALL CONNECTIONS/
JOINTS. THEN DO A NEW TEST.
THE BARBECUE MUST NOT BE USED UNTIL YOU ARE SURE THERE ARE NO LEAKS.
GAS LEAK CAN CAUSE UNCONTROLLED FIRE WHICH MAY INJURY PERSONS,
FIXED INSTALLATIONS AND YOUR BARBECUE.
7. If detected leakage cannot be rectified, do not attempt to cure leakage but consult your
dealer or FCC BBQ Products support at support@fccbbq.com for help in solving the
problem.
●LEAK TEST MUST BE DONE REGULARLY AND EVERY TIME THE GAS
CYLINDER, REGULATOR OR HOSE IS REPLACED.
●ALSO TEST BEFORE NEW GRILL SEASON AND IF THE BARBECUE HAS
NOT BEEN USED FOR A WHILE.
●WE RECOMMEND TO PERFORM A GAS LEAK TEST AT LEAST TWICE A
SEASON, REGARDLESS OF WHETHER YOU HAVE CHANGED THE GAS
BOTTLE OR NOT.
Leak spray
!
15

LASTCHECK
PLACEMENT OF THE TABLE TOP BARBECUE
•Ensure that the barbecue is placed at least 150 cm in all directions from house
walls, trees, plants and other flammable materials or liquids when in use.
•Do not place the barbecue under a roof or overhang.
•The barbecue must be placed on a higher level than the gas cylinder (e.g. on a table).
•Make sure that the barbecue is placed in a well-ventilated place to avoid carbon
monoxide poisoning.
•The barbecue must not be used below normal ground level, as this can
lead to an explosion hazard and a risk of lack of oxygen.
FINAL CHECK
•Check that the control knobs work
normally.
•Check that the gas hose is free
of cracks and damage (it should
always be done before using the
barbecue).
•Check that the gas cylinder and
hose do not come into contact
with hot objects.
GOOD ADVICE
•KEEP THE BARBECUE CLEAN. A clean
barbecue gives better effect, less smoke, less
irregular flames and reduces the risk of fat
burning.
•PREHEAT THE BARBECUE for 10-15 minutes at
maximum temperature. After preheating, adjust
the controls according to the type of grilling and
the desired grilling result. Using too much heat
can result in burnt and overcooked food.
FIRST USE – GRILL BURN-OFF
BEFORE USING YOUR GRILL FOR THE FIRST TIME WITH FOOD, IT IS IMPORTANT TO
COMPLETE A BURN-OFF. START THE GRILL AND OPERATE FOR A MINIMUM OF 15 MINUTES
ON HIGH TO BURN-OFF THE UNIT. THIS WILL “HEAT CLEAN” THE INTERNAL COMPONENTS,
DISSIPATE ODORS AND RID IT OF ANY FOREIGN MATTER.
120 cm
40 cm
16

LIGHTINGINSTRUCTIONS
IF THE BURNER DOES NOT IGNITE, TURN THE SWITCHES TO THE OFF POSITION
(CLOSE THE GAS SUPPLY) AND WAIT 5 MINUTES BEFORE TRYING TO IGNITE AGAIN.
IF THE BARBECUE STILL DOES NOT LIGHT WITH NORMAL OR MANUAL METHOD,
READ THE TROUBLESHOOTING TABLE OR CONTACT YOUR DEALER.
!
DO NOT LEAN OVER THE BARBECUE WHILE LIGHTING!
1. Open lid during lighting.
2. Set all control knobs to the “OFF” position.
3. Open the cylinder/gas valve according to the operating
instructions on tank.
4. Push and turn the control knob counter-clockwise to “HIGH “.
5. Push the igniter button a few times until the burner lights.
6. If ignition does not occur within 5 seconds, turn valve to “OFF”,
wait 5 minutes, and repeat lighting instruction. After lighting, observe the burner flame.
Make sure all burner ports are lit and flame height matches illustration shown.
7. If the above points do not work, follow Manual Lighting Procedure. If the burner goes out during
operation, turn the control knobs to the ”OFF” position. Wait five minutes before attempting to relight
to allow any accumulated gas to dissipate.
MANUAL LIGHTING PROCEDURE
1. Open lid during lighting.
2. Set all control knobs to the ”OFF” position.
3. Open the cylinder/gas valve according to the operating instructions on tank.
4. Quickly and carefully, use a lit match secured with the lighting rod (included with the grill) to light the
burner. Gain access to the burner through the cooking grids. Position lit match near side of burner. Do
not attempt to light another area of the burner. This can cause injury.
NOTE: Do not use spirit, lighter-fluid or kerosene for lighting or refreshing a fire in your grill.
5. If the burner does not light within 5 seconds, turn burner control knob to “OFF”, wait 5 minutes, and
repeat lighting instruction. After lighting, observe the burner flame. Make sure all burner ports are lit
and flame height matches illustration shown previously. Replace the Cooking Grid back into position,
and you are ready to enjoy your grill at your desired temperature!
NOTE: Each burner lights independently – repeat same steps
IGNITER FAILURE PROCEDURE
If for any reason your igniter fails after three of four attempts, check the following steps, or start your grill
using the manual method.
1. Ensure the control knobs are turned to the OFF position. Allow any accumulated gas to dissipate.
2. After five minutes, check the following:
Visually confirm that the igniter is working by pushing the igniter button and looking at the igniter tip for a
spark. If no spark, adjust the distance between the igniter (electrode) tip and burner to 4.5 mm.
Visually confirm that the burner tube and portholes are not obstructed. If blocked, follow Maintenance
instructions.
3. If the above points do not work, follow Troubleshooting instructions.
ENGLISH
14
LIGHTING PROCEDURE
1. Open lid during lighting.
2. Set all control knobs to the “OFF” position.
3. Open the cylinder/gas valve according to the operating instructions on tank.
4. Push and turn the control knob counter-clockwise to “HIGH “.
5. Push the igniter button a few times until the burner lights.
6. If ignition does not occur within 5 seconds, turn valve to “OFF”, wait 5 minutes, and
repeat lighting instruction. After lighting, observe the burner flame. Make sure all
burner ports are lit and flame height matches illustration shown.
7. If the above points do not work, follow
Manual Lighting Procedure.
If the burner goes out during operation, turn the control knobs to the "OFF" position. Wait five minutes
before attempting to relight to allow any accumulated gas to dissipate.
IGNITER FAILURE PROCEDURE
If for any reason your igniter fails after three of four attempts, check the following steps, or start your grill
using the manual method.
1. Ensure the control knobs are turned to the OFF position. Allow any accumulated gas to dissipate.
2. After five minutes, check the following:
• Visually confirm that the igniter is working by pushing the igniter button and looking at the igniter tip for a
spark. If no spark, adjust the distance between the igniter (electrode) tip and burner to 4.5 mm (3/16 in).
• Visually confirm that the burner tube and portholes are not obstructed. If blocked, follow
Care & Maintenance
instructions
.
3. If the above points do not work, follow
Troubleshooting
instructions
.
Slight Yellow
Slight Blue
Dark Blue
Flame
Burner
17

KEEP THE FIREBOX, FLAME TAMERS, COOKING GRATE
AND ACCESSORIES CLEAN TO AVOID GREASE FIRES.
IF A GREASE FIRE OCCUR
In case of grease fire, close the gas supply on the
regulator/barbecue and disconnect the regulator.
In the event of a minor grease fire, wait until the
fire goes out on its own. In the event of a major
grease fire, use a suitable extinguishing agent
(CO2 appliance, fire blanket, etc.) and try to
suffocate the fire.
HOW TO AVOID GREASE FIRE
Check the drip tray and grease cup after each
grilling and clean regularly with a nylon brush and
dishwashing detergent. How often it will be
necessary to clean will depend on how much
and type of food is grilled. To simplify cleaning we
recommend adding cat litter and/or aluminum foil
on the drip tray.
Clean the grill grate after grilling with a grill brush
and, if necessary, with soap and water.
Clean flame tamers after grilling with a grill brush
and, if necessary, with soap and water. In case of
visible accumulation of grease and food residue in
the firebox, remove these with a plastic scraper or
use a nylon brush, water and dish soap.
During preheating, check that there are no signs of
irregular flames. When grilling foods with much fat,
pay extra attention. Feel free to use trays in alu-
minum foil to prevent large amounts from running
down on flame tamers and on the grease tray.
Do not leave the barbecue when it is lit and close
the gas supply as soon as possible if there is a sign
of a grease fire.
MAINTENANCE OF THE BARBECUE
•Check regularly that the burners are burning
correctly.
•Remove the grill grate and flame tamers
•Light the barbecue in the normal way.
•Turn the control from low to high. Check if
there is a difference in strength, and that the
flame is clear and blue. The flame should not
be orange. If the burner behaves abnormally,
read the troubleshooting table.
•Remove grease and old food debris on the
burners with a nylon brush and check that no
holes in the burner are clogged.
MAINTENANCE OF THE BURNERS
1. All controls must be in OFF mode. Check
that the gas supply is switched off and the
regulator is disconnected from the gas
cylinder.
2. Remove the cooking grate, flame tamers and
drip tray.
3. Remove the screws on the burner,
use a screwdriver.
4. Carefully lift the burners out of the valve
outlet.
5. Use a nylon brush to clean the outside of the
burner.
6. Clean blocked passages/channels by using a
metal string or e.g. bending a paper clip.
7. Check that insects, cobwebs etc. do not
block the inside of the burner. In that case,
remove this.
8. Check if the burner is damaged. Small holes
and corrosion can occur with normal use of
the barbecue. Are there cracks or holes, the
burner should be replaced with a new one.
9. After cleaning, place the burner in place and
screw it on.
10.Replace flame tamers, grease trays and grill
grate.
MAINTENANCE
!NB: DO NOT USE WATER TO
EXTINGUISH GREASE FIRE!
CLEAN THE BARBECUE REGULARLY
TO AVOID GREASE FIRES.
18

CLEANING
All cleaning and maintenance must be performed
when the barbecue is cold. Make sure that the
gas upply is switched OFF and the regulator is
disconnected from the gas cylinder.
Use a mixture of dishwashing detergent and water,
or use a separate grill cleaner with a nylon scrubbing
brush / scouring sponge on the inside of the lid and
in the inner grill body itself. Rinse well and allow to
air dry completely. Do not use caustic soda, alcoholic
or abrasive detergents. This can damage the
barbecue and cause a fire. Cast iron cooking grate,
drip tray and grease cup must not be cleaned in a
dishwasher.
PLASTIC PARTS
Use only clean water and any mild detergents.
Wipe with a clean cloth.
BARBECUES IN CAST ALUMINUM
Cast aluminum parts are varnished with a high-
quality lacquer that can be damaged if abrasives
grinding cleaning is used. Clean with a mixture of
dishwashing detergent and water, or use a separate
grill cleaner with a nylon scrubbing brush/scouring
sponge on the inside of the lid and in the inner grill
body itself. Outside of the barbecue use a soft
sponge or microfiber cloth to clean painted surfaces.
Rinse well and allow to air dry completely. Do not
use caustic soda, alcoholic or abrasive detergents.
This can damage the barbecue and cause a fire.
Cast iron cooking grate, drip tray and grease cup
must not be cleaned in a dishwasher.
As a finishing step you can use polish or aluminum
protector to give your bbq a protection from the
elements. This is something we recommend 1-2 times
pr year.
Barbecues in cast aluminum requires less
maintenance than barbecues in other materials,
but surface rust can appear if the step above is not
followed.
COOKING GRATE OG FLAME TAMERS
Grill grate and flame tamers are brushed regularly
with a grill brush for rough cleaning. The grill grate
can be soaked in mild soapy water. For difficult,
burnt stains, use a non-abrasive cleaner. Rinse well
with water and dry well.
NB! The grill grates must be completely dry before
they are placed back in the barbecue. For main
cleaning before storing the barbecue for a longer
period, feel free to insert the grill grates with a
thin layer of cooking oil.
INSECTS AND VERMIN
After long-term storage, insects and other vermin
can be found in the barbecue. If you experience
problems with lighting or irregular flames, it can be
due to unwanted guests blocking the gas supply. In
such instances, dismantle and clean the burners.
Replace the burners when they are dry.
•Disassemble the burners and clean them if
pests are suspected in the barbecue. Refit the
burners when they are completely dry.
•Check that the gas hose is not cracked or
damaged by mice or rats.
To avoid rust damage, we recommend protecting
the barbecue with a fitted barbecue cover, or that
you do not store the barbecue out in the open or
expose it to rain.
MAINTENANCE
FIRES CAUSED BY FAT, CAN DAMAGE THE METAL, PAINT AND ENAMEL. DAMAGE
TO THE BARBECUE CAUSED BY FAT BURNING, IS NOT COVERED BY THE
GUARANTEE AS IT IS DUE TO INCORRECT USE.
!
19

ADVICE TIPSANDSAFETY
SAFETY AND INFORMATION
•The gas cylinder should always be placed next to the barbecue when in use.
•Close the gas supply on the regulator when the barbecue is not in use and when storing the gas
cylinder under the barbecue, disconnect the regulator.
•If the barbecue is stored in a garage or basement below ground level, the gas cylinder should not be
stored in the same place.
•If the barbecue has a side burner, the circumference of the pots and pans used must not be larger
than the opening on the side burner.
If oversized accessories are used, the heat will be trapped inside which will create an overheating
that can damage the barbecue.
•THIS PRODUCT IS INTENDED FOR USE IN PRIVATE HOUSEHOLDS AND IS NOT SUITABLE
FOR PROFESSIONAL USE IN A RESTAURANT OR SIMILAR.
•Coatings should not be applied until the barbecue is completely cold and dry. Moisture on the
inside of the cover will cause large formations of surface rust for those of the grill parts which are in
painted steel and stainless steel.
•AVOID STORAGE OF The barbecue IN DIRECT SUNLIGHT, AS PARTS OF THE BARBECUE THAT
CONTAIN STAINLESS STEEL OR GLASS MAY REFLECT SUNLIGHT AND CAUSE FIRE.
•PARTS IN PLASTIC WILL BE ABLE TO BLEACH UNDER THE INFLUENCE OF SUNLIGHT.
•LACQUERED PARTS WILL BE ABLE TO WHITE WITH THE EFFECT OF SUNLIGHT.
ADVICE AND TIPS
•Always preheat the barbecue for 10-15 minutes before starting to grill. Then the cast iron grates are
taken up and distributed evenly over the barbecue surface.
•Outdoor temperature, wind, snow and rain can give a deviation of up to 30% on the temperature
shown in the thermometer and the temperature that is actually on the barbecue surface.
•Make sure that the barbecue is on a stable and straight surface to prevent grease from leaking out
of the grease collection system.
•To facilitate cleaning of grease trays, cat litter can be used to absorb grease.
•Make sure that the barbecue is stored dry under a roof or under a cover. Water from snow, ice and
rain that enters the barbecue can overfill the grease collection system and cause leakage to the
surface.
•We recommend the use of FCC BBQ original covers for the best possible protection against
rain, pollen and pollution. Remember that the barbecue must be completely dry and cold before
applying the coating. The coating is equally waterproof both ways and moisture on the inside can
cause major rust damage on painted and stainless steel surfaces.
20
Table of contents
Popular Grill manuals by other brands

Maxima
Maxima MCG SINGLE GR user manual

Outback
Outback THG2216AW Assembly and operating instructions

Eva Solo
Eva Solo Gas grill 60 cm Instructions for use

Argos
Argos 84840 Assembly and operating instructions

Rinnai
Rinnai GT3-V Operating and assembly instructions

Master Forge
Master Forge 332738 Instructions for use