Chef Tested 767976 User manual

Instruction Manual
MODEL: 767976
Wards.com 1•888•557•3848
Montgomery Ward Customer Service
3650 Milwaukee Street, Madison, WI 53714
8:00 am to Midnight, Monday through Friday
Healthier
frying!
Wards.com 1•888•557•3848
Digital Air Fryer Oven
Thank you for purchasing your Chef Tested Digital Air Fryer
Oven by Montgomery Ward. Put through the paces by the
experts, we guarantee that it will perform to the highest
standard, time after time, with all the convenience, easy cleanup
and durability you rely on from Wards.
3
Important Safeguards ................... 3
Electrical Safety ...............................4
Specications.................................... 4
Parts & Features.......................... 4–5
How to Use.....................................6–7
Troubleshooting............................... 8
Cleaning & Care................................ 9
Recipes.......................................... ..9–11
Return Information ........................ 12
Warranty...............................................13
Thank you
for your
purchase!
Table of Contents
21•888•557•3848
Wards.com
Important Safeguards
READ CAREFULLY BEFORE USING AND SAVE THESE INSTRUCTIONS!
• FOR HOUSEHOLD USE ONLY. DO NOT use this appliance for other than its
intended use.
• Remove all packaging materials and labels before rst use. Dispose of the
packaging materials via the appropriate recycling system.
• WASH all removable parts and wipe down the interior of the oven before rst
use. See Cleaning & Care.
• A short cord is provided to reduce the hazards resulting from entanglement
or tripping. DO NOT drape the cord over a counter or tabletop, where it can
be pulled on or tripped over. Never wrap the cord tightly around the
appliance, as this could cause the cord to fray or break.
• We DO NOT recommend using an extension cord with this appliance.
However, if an extension cord is used, the marked electrical rating should be
at least as great as the electrical rating of this appliance.
• CLOSE SUPERVISION IS NECESSARY WHEN USING THIS APPLIANCE NEAR
CHILDREN.
• A re may occur if this appliance is used near ammable materials, including
curtains, towels, walls, etc. DO NOT place any paper, plastic, or other
non-food items in the appliance. DO NOT place the appliance or its cord on or
near a heated surface, or in a heated oven.
• This appliance should always be used on a STABLE, DRY, HEAT-RESISTANT
SURFACE. DO NOT use near water or humid areas.
• DO NOT use an accessory or attachment not recommended by Montgomery
Ward, as this may cause injury, or damage the appliance.
• Keep hands, hair and clothing away from all MOVING PARTS.
• Always use oven mitts when handling hot food or appliances. DO NOT
attempt to move an appliance when it is hot or has hot contents.
• Never leave the appliance unattended when in use.
• DO NOT use outdoors.
• DO NOT cover the appliance. Ensure the air vents are not covered or blocked.
• Turn off and unplug this appliance when not in use.
• NO SERVICEABLE PARTS INSIDE THIS APPLIANCE.
• DO NOT USE AN APPLIANCE WITH A DAMAGED CORD OR PLUG, OR AFTER
THE APPLIANCE MALFUNCTIONS OR HAS BEEN DAMAGED IN ANY MANNER.
• Appliances/tools contain valuable materials that can be recycled. Dispose of
your old appliances/tools using appropriate collection systems in accordance
with federal and local regulations.
Parts & Features (cont.)
Specications
Electrical Safety
1•888•557•3848
Wards.com
45
This appliance is equipped with a polarized plug in which one prong is wider than
the other. This is a safety feature to reduce the risk of electrical shock. The plug will
t into a polarized outlet only one way. If you are unable to insert the plug into the
outlet, try reversing the plug. If it still does not t, contact a qualied electrician.
Do not attempt to modify the plug in any way. Montgomery Ward can not accept
any liability for damage or injury resulting from failure to observe these safety
procedures.
POWER RATING 60Hz, 120V, 1700W
CAPACITY 3 qt.
CORD LENGTH 40"
DIMENSIONS 12" W x 15½" H x 12" D
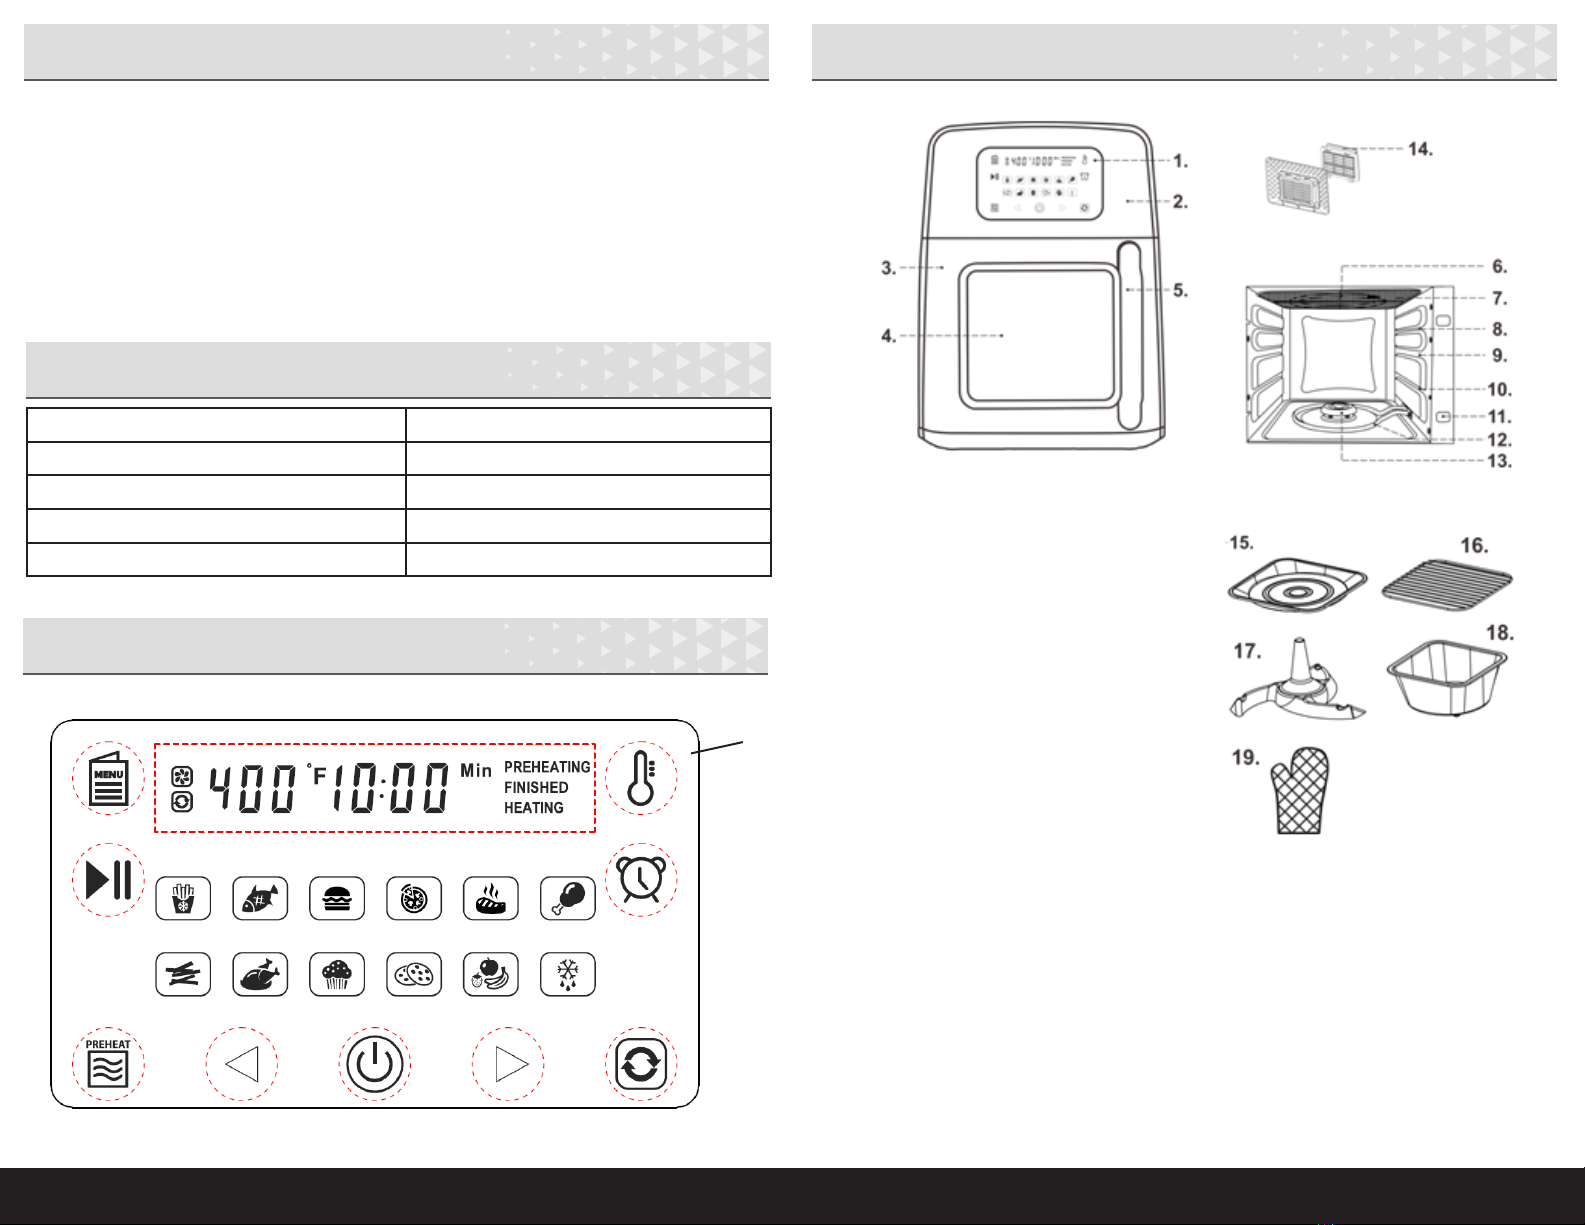
MODEL EAF-04 1. Digital Control Panel
2. Housing
3. Door
4. Glass Window
5. Door Handle
6. Top Heating Element
7. Heating Element Cover
8. Top Level
9. Middle Level
10. Bottom Level
11. Safety Switch
12. Bottom Heating Element
13. Stirring Connector
14. Air Inlet & Outlet with Ceramic Filter
15. Pan
16. Wire Rack
17. Stirring Blade
18. Stirring Pan
19. Oven Mitt
20. Mesh Dehydration Rack (not shown)
21. Wire Stand (not shown)
Parts & Features
1.
interior view
1•888•557•3848
Wards.com 7
6
How to Use How to Use (cont.)
7. When the oven is done, you will hear a beep and the oven will stop heating. The
fan will continue running 1 minute to cool down the interior and then the oven
will switch to standby mode.
8. When nished cooking, turn off and unplug the oven.
Note: The oven light will cycle on and off, as the food cooks, to maintain the
selected cooking temperature.
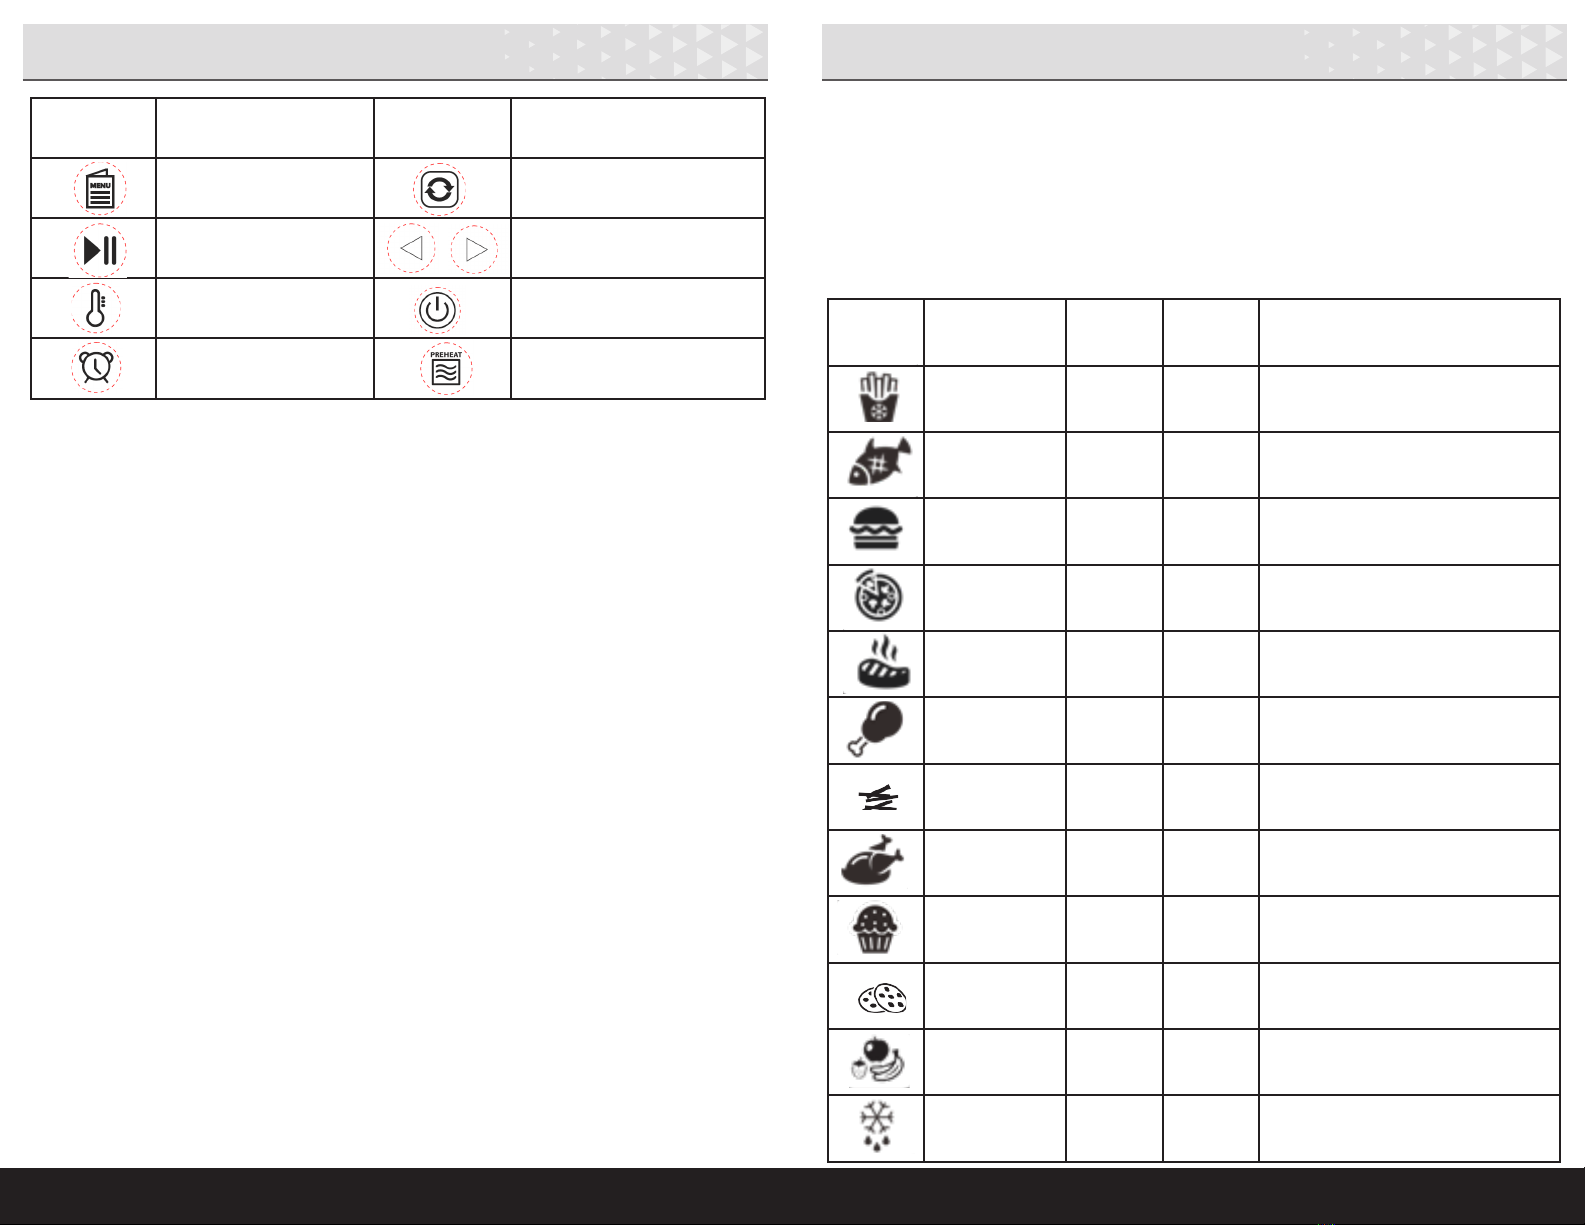
Preset Menu ° F Minutes Size/Weight/Amount
Frozen
French Fries 400 20 2 lbs–2 lbs., 10 oz.
Fish/Seafood 360 13 1–2 lbs.
Hamburger 360 13 7–14 oz.
Frozen Pizza 320 9 10"
Steak 360 11 7–14 oz.
Frozen chick-
en drumsticks 360 13 6 pc.
Fresh French
Fries 400 25 1 lb.
Fried Chicken 360 25 1–3 lbs.
Cake 300 38 1 lb.
Cookies 320 18 20 pc.
Dehydrate 150 210 1 lb. or amount that ts on rack
without crowding
Defrost 140 5 1 lb.
Note: After the oven has started cooking, time and temperature may be
adjusted, except for DEHYDRATE and DEFROST functions, by
pressing the buttons as indicated in 3.B. above.
Icon Description Icon Description
MENU STIRRING ON/OFF
START/PAUSE TIME/TEMP DECREASE/
INCREASE arrows
TEMPERATURE
(140–400° F) POWER ON/OFF
TIMER (1–60 minutes) PREHEAT
(380° F, 5 minutes)
1. Plug the cord into an electrical outlet.
2. Put food in the oven using the pan, stirring pan with blade, or rack and pan.
3. Press POWER and the display appears with the default of 400° F, 10 minutes.
A. Press START to begin cooking with the default setting, or
B. Manually adjust the temperature and time using TEMPERATURE and
TIMER and the arrow buttons, and press START to begin cooking, or
C. Press MENU and choose one of the preset buttons shown on page 7.
Press START to begin cooking.
4. The preset settings may or may not automatically include the stirring function. If
the preset does not stir, you can manually select STIRRING to add it. If the
preset does stir, you cannot turn it off.
5. If you do not press START, the oven will switch to standby mode after 3 minutes.
6. When the oven starts, the time in the display will count down.
WARNINGS:
•NEVERllthestirringpanbeyondtheMAXline.
•ALWAYSuseanovenmittwhenremovinghotpans/racksfromthe
oven.
• NEVER USE THE WIRE OR MESH RACK ONLY. ALWAYS ADD THE
PAN BELOW TO CATCH DRIPS.
•Cleantheovenandrack/pansaftereveryuse!

1•888•557•3848
Wards.com
89
Recipes
Cleaning & CareTroubleshooting
1. Turn off and unplug the appliance.
2. Always allow the appliance to cool completely before cleaning.
3. Disassemble all accessories.
4. Do not use abrasive brushes or pads, or harsh cleaning solutions.
5. Use a soft cloth, sponge or rubber spatula to remove any stuck-on food or
residue.
6. Hand wash the accessories in warm, soapy water. The accessories are also
dishwasher safe on the top rack.
7. Wipe the interior and exterior of the oven with a damp cloth. Use a little mild
dish soap, if needed, and rinse with a damp cloth.
8. Donotimmerseanyelectricalappliance,itscord,oritsplugintowater.
9. Ensure all parts are dried thoroughly before reassembling and using this
appliance.
4-Egg Omelette
4 eggs 1 fresh mushroom, sliced
1–2 slices deli ham, chopped salt & pepper
1 Tbsp. onion, minced ½cup cheddar cheese, shredded
1 Tbsp. bell pepper, minced
1. In a small bowl, beat the eggs. Stir in the ham, onion, pepper and mushroom.
Salt & pepper, to taste.
2. Spray the pan with cooking spray and pour the egg mixture onto it. Place in the
center of the air fryer oven and cook at 350° F for 5 minutes.
3. Add the cheese and cook another 2 minutes.
4. Use a spatula to fold over the omelette and serve.
Serves 2
PROBLEM POSSIBLE CAUSES SOLUTIONS
Oven does
not work
Oven is not plugged in.
Oven is not turned on
or time/temp is not set.
The door is not closed
properly.
Oven has overheated.
The oven has an over-
heating safeguard when
the surface tempera-
ture reaches 175° F. The
oven will shut off auto-
matically.
Double check the plug/outlet.
Press POWER, select a preset or
set TIME and TEMPERATURE and
press START.
Close the door; push until it “clicks”.
Unplug the oven, open the door and
allow oven to cool down (about 5 min-
utes) before starting again.
Food not
cooked or
cooked un-
evenly
The pan is overloaded.
The set temperature is
too low.
Use smaller batches of food.
Raise the temperature and continue
cooking.
Food is not
fried evenly
The stirring blade is not
installed properly.
Stirring blade is stuck.
Remove the stirring blade and install it
properly.
Check from the the window to ensure
the stirring blade is turning.
Snacks are
not crispy
Traditional deep fryer
snacks are being used.
Use oven snacks or lightly brush some
oil onto the snacks before cooking for
a crispy result.
White smoke
coming from
oven
Greasy ingredients.
Pan has grease residue
from previous cooking.
Use less oil.
Make sure you wash pans thoroughly
after each use.
Error Code E1 Broken thermal sensor. Call customer service.
Error Code E2 Short circuited thermal
sensor.
Call customer service.

1•888•557•3848
Wards.com
10 11
RecipesRecipes
AirFriedChicken
1½ cup our ½ ½tsp. cayenne pepper
1 tsp. pepper 1 cup milk
1½ tsp. salt ½ ½chicken, cut into pieces (skin on)
1. In a large bowl, whisk together the dry ingredients.
2. Pour the milk into another bowl.
3. Dredge the chicken pieces in the dry ingredients, then in the milk, then back into
the dry ingredients.
4. Put the coated chicken pieces onto the rack in the air fryer in 1 layer with a little
space between each piece. Put the pan under the rack to catch any drips.
5. Press FRIED CHICKEN. Chicken is done when internal temperature is 165° F.
Serves 2–3
Mexican-StyleCornontheCob
4 ears of corn salt & pepper
1 tsp. olive oil hot sauce
2 cloves garlic, minced fresh cilantro, chopped
2 Tbsp. butter
1. Brush the corn with the olive oil and place on the rack in the air fryer. Put the
pan under the rack to catch any drips.
2. Cook at 400° F for 10 minutes.
3. While the corn is cooking. put the garlic and butter in a microwave-safe dish
and cook in a microwave oven just until the better is melted.
4. When the corn is done, pour the garlic butter over it and garnish with salt &
pepper, hot sauce and cilantro.
Serves 4
GarlicMushrooms
8 oz. fresh mushrooms 1 tsp. soy sauce
2 Tbsp. butter, melted 2 cloves garlic, minced
1 tsp. olive oil
1. Put all the ingredients in a medium bowl. Gently stir to coat the mushrooms.
2. Pour all out onto the pan and cook at 360° F for 10 minutes.
Serves 2–3
AirFryerCheeseBurgers
1 lb. ground beef salt & pepper
¼onion, minced 4 slices cheddar cheese
1. Combine the ground beef with the onion. Salt & pepper, to taste.
2. Divide the ground beef into 4 equal portions and press into patties.
3. Place the patties on the pan and cook in the air fryer oven (in the center
position) using the hamburger button (360° F for 13 minutes).
4. Add a slice of cheese to each patty when about 30 seconds remain on the
timer.
Serves 4
AppleHandPies
2 small apples, peeled and diced 2 tsp. cornstarch
2 Tbsp. honey 2 tsp. water
½tsp. cinnamon 1 pre-made 9" pie crust
½tsp. nutmeg
1. Heat the rst 4 ingredients in a saucepan over medium heat for about 5
minutes.
2. Mix the cornstarch and water in a cup and pour it into the apple mixture. Heat
another minute, stirring.
3. Roll out the pie crust and cut into 4 equal pieces.
4. Divide the apple mixture between the 4 crust pieces and fold each crust over
to make 4 triangular pies.
5. Cook on the pan in the air fryer oven at 375° F for 15 minutes.
Serves 4
1•888•557•3848
Wards.com
12 13
If any item, for any reason, does not meet your expectations, just
return it to us. We’ll gladly either:
• Refund your merchandise amount
• Credit your account
• Send a replacement
You can return any unused item in its original packaging within 60
days of its receipt for a full refund of the purchase price (excluding
shipping and handling charges). Please send returns to:
Montgomery Ward, Inc.
Attn: Customer Returns
2000 Harrison Suite 100
Clinton, IA 52732-6676
Whenreturninganitem:
• Use the original packaging and pack it securely.
• Please adequately insure your item in case you need to
make a claim with the carrier you choose for returning your
item.
• Include your order number and reason for return.
• We recommend keeping the receipt for 4 weeks.
Montgomery Ward, Inc. warrants this Chef Tested product
to be free from defects in material and workmanship
for one year from provable date of purchase.
Within this warranty period, Montgomery Ward will repair
or replace, at its option, defective parts of this Chef Tested
product at no charge, provided the product is returned,
freight prepaid with proof of purchase to
Montgomery Ward.
Allow 2–4 weeks for return shipping.
This warranty does not cover improper installation, misuse,
abuse or neglect on part of the owner. Warranty is also
invalid in any case that the product is taken apart or
serviced by an unauthorized service station.
This warranty gives you specic legal rights and they may
vary from state to state.
THE FOREGOING WARRANTIES ARE IN LIEU OF ALL
OTHER WARRANTIES AND CONDITIONS,
EXPRESS OR IMPLIED, INCLUDING
BUT NOT LIMITED TO THOSE OF MERCHANTIBILITY
OR FITNESS FOR A PARTICULAR PURPOSE.
1 Year Limited Warranty
Montgomery Ward Customer Service
8:00 am to Midnight CST, Monday through Friday
Wards.com 1•888•557•3848
Returns

1514
Table of contents
Other Chef Tested Fryer manuals


