Chefwave CW-SIRG User manual

™
SŌSAKU
SMOKELESS INDOOR
TABLETOP GRILL
MODEL CW-SIRG
120 V, 60 Hz, 1780 W
For household use only.
Please read this manual carefully before using the grill.
Save these instructions.

Dear ChefWave Customer,
Congratulations on your purchase of the ChefWave SŌSAKU
SmokelessIndoorTabletopGrill. Youwill nowbeabletoquickly
and easily sear your favorite meats and vegetables from the
comfort of your kitchen.
Toensureyoursafetyandmanyyearsoftrouble-freeoperation,
please read this manual carefully before using this appliance
and keep it in a safe place for future reference.
We hope you enjoy your new ChefWave SŌSAKU Grill.
Sincerely,
The ChefWave Team
WELCOME!
@ MYCHEFWAVE
@ CHEFWAVEKITCHEN

1
TABLE OF CONTENTS
Safety Instructions
Parts & Accessories
Control Panel
Using the Accessories
Using the Grill/Griddle Function
Using the Rotisserie Function
Cooking Tips
Cooking Chart
Technical Specifications
ChefWave Warranty
2
4
6
7
10
11
12
13
14
15

2
SAFETY INSTRUCTIONS
When using electrical appliances, basic safety precautions should be observed.
Please read and follow these warnings and instructions:
• Read all instructions.
• Do not expose the appliance to high temperatures or place it on or near a
working or still hot gas or electric burner, stove, cooker, or heated oven.
• Before turning on the grill, remove any objects that are on top of it and any
flammable objects that are near it.
• This appliance operates at high temperatures that may cause burns.
• Always use heat-resistant gloves or oven pads/mitts when removing the
rack, drip tray, round cage, steak/fish cage, kebab skewers or plates.
• Do not touch any hot surfaces, parts, or the inside of the appliance while it is
operating. Allow the appliance to cool down completely before you remove
the grill rack or drip tray and before moving, handling, cleaning, or storing
the appliance.
• Extreme caution must be used when removing or disposing of hot grease or
when moving an appliance containing hot oil or grease.
• Do not place paper, cardboard, plastic, and similar materials on the
appliance.
• Close supervision is necessary when any appliance is used by or near
children or the disabled. Children should not play with the appliance. Keep
the appliance and its cord out of the reach of children.
• Always turn the appliance off after use and before unplugging it
• Unplug the appliance from the outlet when it is not in use and before
moving or cleaning it. Allow it to cool completely before putting on or taking
off parts and before cleaning.

3
• To protect yourself from electric shock, do not immerse the cord, plug,
heating elements, or unit in water or other liquid.
• Make sure that the grill rack, drip tray, and the outside of the unit are clean
and dry before inserting the plug in a power outlet.
• Always clean the appliance after each use. Make sure the machine has
cooled down, and then wipe down the surfaces with a damp cloth. Do not
clean the appliance with metal scouring pads because pieces can break off
the pad and touch the electrical parts, creating a risk of electric shock.
• Use this appliance only with a properly grounded outlet.
• Do not let the cord hang over the edge of the table or counter. Do not let
the cord touch hot surfaces.
• A short power cord or detachable power cord should be used in order to
reduce the risk of becoming entangled or tripping over a longer cord.
• Extension cords may be used if care is exercised in their use. If an extension
cord is used, the marked electrical rating of the cord must be as great as the
rating of the appliance. The extension cord should be arranged so that it will
not drape over the edge of the counter or table where it could be pulled by
children or tripped over unintentionally. A grounded extension cord with a
three-prong plug should be used.
• Do not operate the appliance if the power cord, plug, grill rack, or drip tray
has been damaged. Do not operate the appliance if it has malfunctioned, is
not operating properly, or has been damaged in any way.
• Use the appliance on a flat, stable, heat-resistant surface with sufficient
open space around it. Do not use the appliance near water or any heat
source.
• If you need to dispose of this product, please note that electrical products
should not be disposed of with household waste. Please recycle this
appliance at an appropriate facility. Check with your local authority or
retailer for recycling advice.

4
PARTS & ACCESSORIES
MAIN UNIT 1 x ROTISSERIE SPIT WITH 2 x FORKS
(FORKS ARE SEPARATE PARTS)
NONSTICK GRILL RACK DRIP TRAY
5
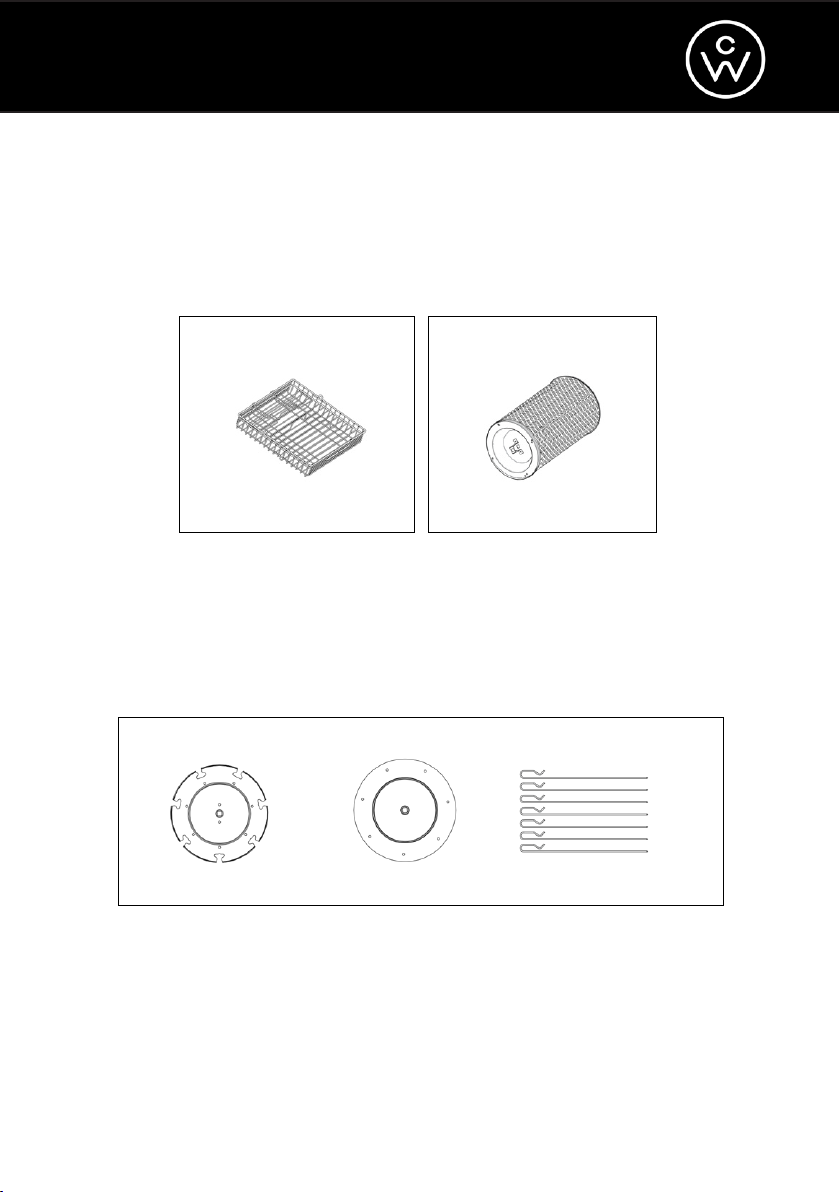
STEAK/FISH CAGE ROUND CAGE
KEBAB SET (7 x SKEWERS & 2 x ROUND PLATES)
6
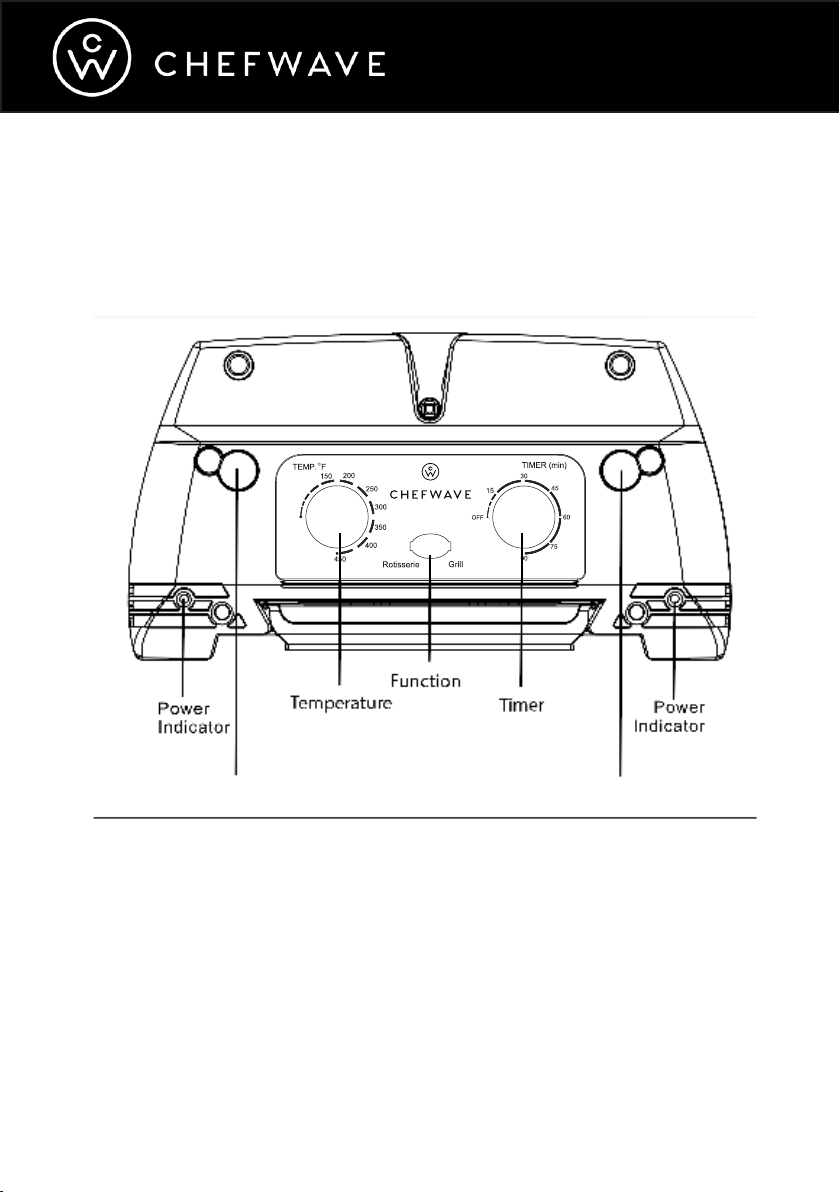
CONTROL PANEL
F
MIN.
In-use Indicator In-use Indicator
7
USING THE ACCESSORIES
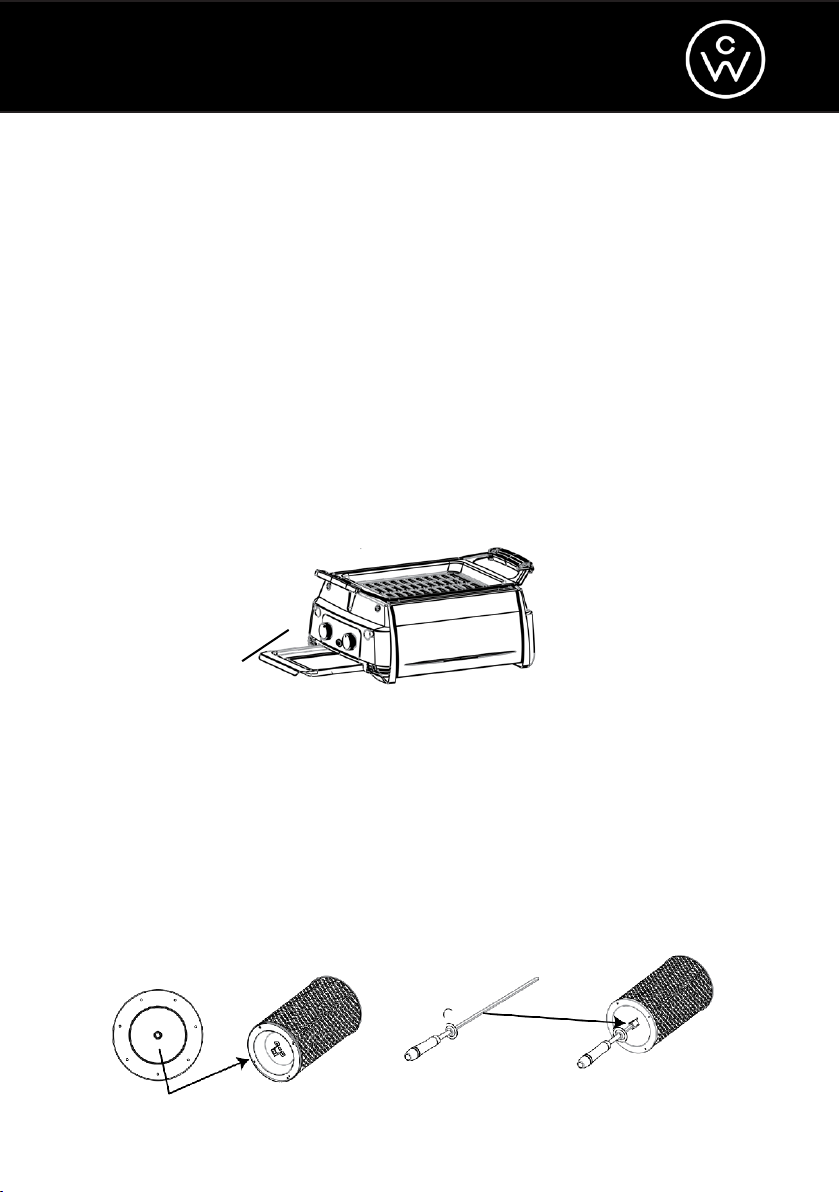
DRIP TRAY
The Drip Tray should always be placed inside the main unit to
catch grease, oil, and crumbs. Slide the tray into the bottom of
the unit, as shown in the illustration below. Allow the SŌSAKU to
cool down completely before you remove the tray.
DRIP TRAY
ROUND CAGE
Assemble the Round Cage as shown in the illustrations below.
Use the included rotisserie set screws to secure the cage and
prevent shifting. Place food inside the basket. Be careful not to
overfill, as food may expand during cooking.
Follow these instructions for using the included accessories with
the grill. All accessories are dishwasher safe.
8
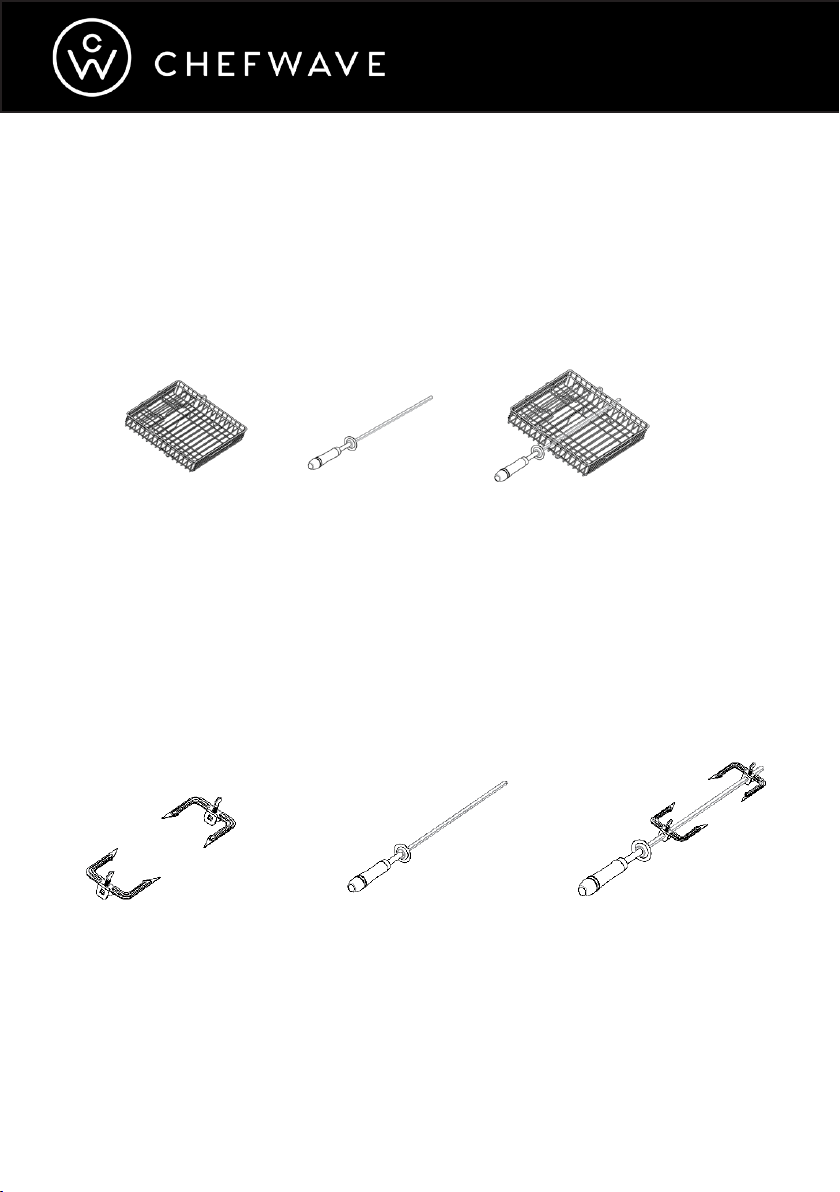
STEAK/FISH CAGE
Assemble the Steak/Fish Cage as shown in the illustrations below.
Place food inside the cage. Be careful not to overfill, as food may
expand during cooking.
ROTISSERIE
Assemble the rotisserie tools as shown in the illustrations below.
Make sure your food is securely attached to the spit rod.

9
SPIT
Assemble the spit tools as shown in the illustrations below. Use
the included rotisserie set screws to secure the plates and prevent
shifting. Make sure your food is securely attached to the spit rod.
KEBAB
Assemble the kebab tools as shown in the illustrations below. Use
the included rotisserie set screws to secure the plates and prevent
shifting. Make sure your food is securely attached to the spit rod.

10
USING THE GRILL/GRIDDLE FUNCTION
Grill:
1. Insert the Drip Tray into the SŌSAKU. Put the Nonstick Grill
Rack on top of the main unit.
2. Plug the SŌSAKU into the outlet. The power indicators on
both sides of the lower control panel will light up.
3. Use the Function switch to select the Grill function.
4. Place the foods you wish to cook on top of the grill rack.
5. Select the desired temperature by turning the Temperature
knob.
6. Select the desired cooking time by turning the Timer knob.
Doing this will also start the cooking, so make sure the unit is
plugged in before turning the knob.
7. The in-use indicators on both sides of the upper control panel
will light up, indicating that the heating elements are running.
8. When grilling is finished, the in-use indicators and the heating
elements will automatically power off.
Griddle:
To use the Griddle function, place a metal plate, tinfoil, or other
flat surface on top of the grill rack. Then, follow the same steps as
above.
NOTE: When griddling, do not block the holes at the edges of the
surface. Those vents allow heat to escape.

11
USING THE ROTISSERIE FUNCTION
1. Insert the Drip Tray into the SŌSAKU main unit.
2. Properly attach the foods using the appropriate accessories.
3. Insert the solid end of the Rotisserie Spit into the socket on
the inner back wall of the unit. Place the other side with the
handle onto the V-shaped notch on the top of the unit.
4. Use the Function switch to select the Rotisserie function.
5. Select the desired temperature by turning the Temperature
knob.
6. Select the desired cooking time by turning the Timer knob.
Doing this will also start the cooking, so make sure the unit is
plugged in before turning the knob.
7. The in-use indicators on both sides of the upper control panel
will light up, indicating that the rotisserie is running.
8. When the rotisserie is finished, the in-use indicators and the
heating elements will automatically power off.

12
COOKING TIPS
1. The temperature selection range for the unit is 150-450° F.
The timer selection range is 0-90 minutes.
2. If you’d like to stop cooking before the selected length of time,
you can manually turn the Timer knob to the “OFF” position.
3. When cooking has finished, the in-use indicators will turn off,
but the power indicators will remain on. Unplug the unit to
turn off the power indicators when you have finished cooking
with the SŌSAKU.
4. Clean the appliance after each use. Be sure to wait until the
appliance completely cools down. Metal scouring pads or
steel wool are safe to use on the grill but should not be used to
clean other parts and accessories. Use a non-metal scouring
pad instead.
NOTE: Grease will get on the glass cover on top of the infrared
heating element with regular use. It is normal for residue to
develop over time even after thorough cleaning.
5. The suggested cooking times for various types of food are
specified in the chart on the next page. Depending on the
thickness and serving quantity of the food, you may wish to
adjust the cooking time.
6. When using the rotisserie set, make sure the chicken isn’t too
big/too wide on the rotisserie as it will burn and cause smoke if
it touches the inner walls of the grill.

13
TYPE OF FOOD COOKING TIME
Steak 7-14 minutes
Frozen French Fries 25-30 minutes
Fresh French Fries 20-25 minutes
Chicken (5.5 pounds) 30-35 minutes
Pork 10-14 minutes
Sausage 10-15 minutes
Kebabs (meat) 14-15 minutes
Kebabs (vegetable) 5-13 minutes
Fish 12-14 minutes
Shrimp 10-12 minutes
Vegetables 7-13 minutes
COOKING CHART

14
TECHNICAL SPECIFICATIONS
These are the technical details of the ChefWave SŌSAKU
Smokeless Indoor Tabletop Grill:
• Voltage: 120 V
• Wattage: 1780 W
• Temperature Control: 150° F-450° F
• Timer: 0-90 minutes
• Grilling Area: 9” W x 13” D
• Material
• Grate: Teflon nonstick
• Metal Body: Stainless steel
• Other Parts: Plastic
• Dimensions: 14.2” W x 18.9” D x 7.9” H
• Weight: 13.2 lb.

15
CHEFWAVE WARRANTY
This appliance is guaranteed against defects in materials and
workmanship for a period of 1 year from the date of purchase.
Under this warranty, ChefWave will replace any parts found to be
defective. This warranty is only valid if the appliance has been used
in accordance with the instructions and if it has not been modified,
repaired, or interfered with by any unauthorized person or damaged
through misuse.
This warranty does not cover wear and tear nor breakables such as
glass and ceramic items, bulbs, etc. This warranty does not affect
yourstatutory rightsnorany legalrights youmayhaveasaconsumer
under applicable national legislation governing the purchase of
goods.
If the product fails to operate and needs to be returned, pack it
carefully, enclosing your name, address, and order number and the
reason for return.
Pleaseemailusatcs@mychefwave.com forquestionsand warranty
service.

™
Table of contents
Other Chefwave Kitchen Appliance manuals


