CHESHIRE TOP100 Installation instructions

CHESHIRE
Electric Trimmer TOP100
User’s Guide and Safety Notes
Featuring
Standard Accessories
● Electric Trimmer ● Li-Ion Battery
● Electric Charger ● Power Cable
● Power Cord of Charger ● Back pack of battery
● Work Bag ●Hand Carried Tool Box
For safety and proper usage, please read the user’s guide carefully before using Electric Trimmer
and put the user’s guide at handy place for references.
Cutting Capability
Net Weight
Charging Time
Long Lasting Operations
0~30mm
CE-100
Battery
4.5~5hr
8 hours operation
0.9KG
1.6KG

CONTENTS
Electric Trimmer Specifications ……………… 1
Important Safety Notes ……………… 3
User’s Guide for the Electric Trimmer ……………… 5
Battery Charging Operation Instructions ……………… 8
Maintenance procedures for Electric Trimmer ………… 10
Warranty & Maintenance ………………………… 16
Trouble - shooting ………………………………18
1
Electric Trimmer Top 100 Specifications
Characteristics
Electric Trimmer
Capability
Dry, hard wood of 0~30mm diameters
Rated Operating Voltage
DC36V
Rated Current
10A
Max. Current Protection
40A
Weight
0.9KG
Li-Ion Battery
Rated Voltage
DC36V
Rated Capacity
4AH
Long Lasting Operation
8 hours operation
Weight
1.6KG
Charger
Input Voltage
AC100-240V/50-60Hz
Output Voltage
DC41.5V
Charging Current
1A
Charging Time
4.5~5hrs
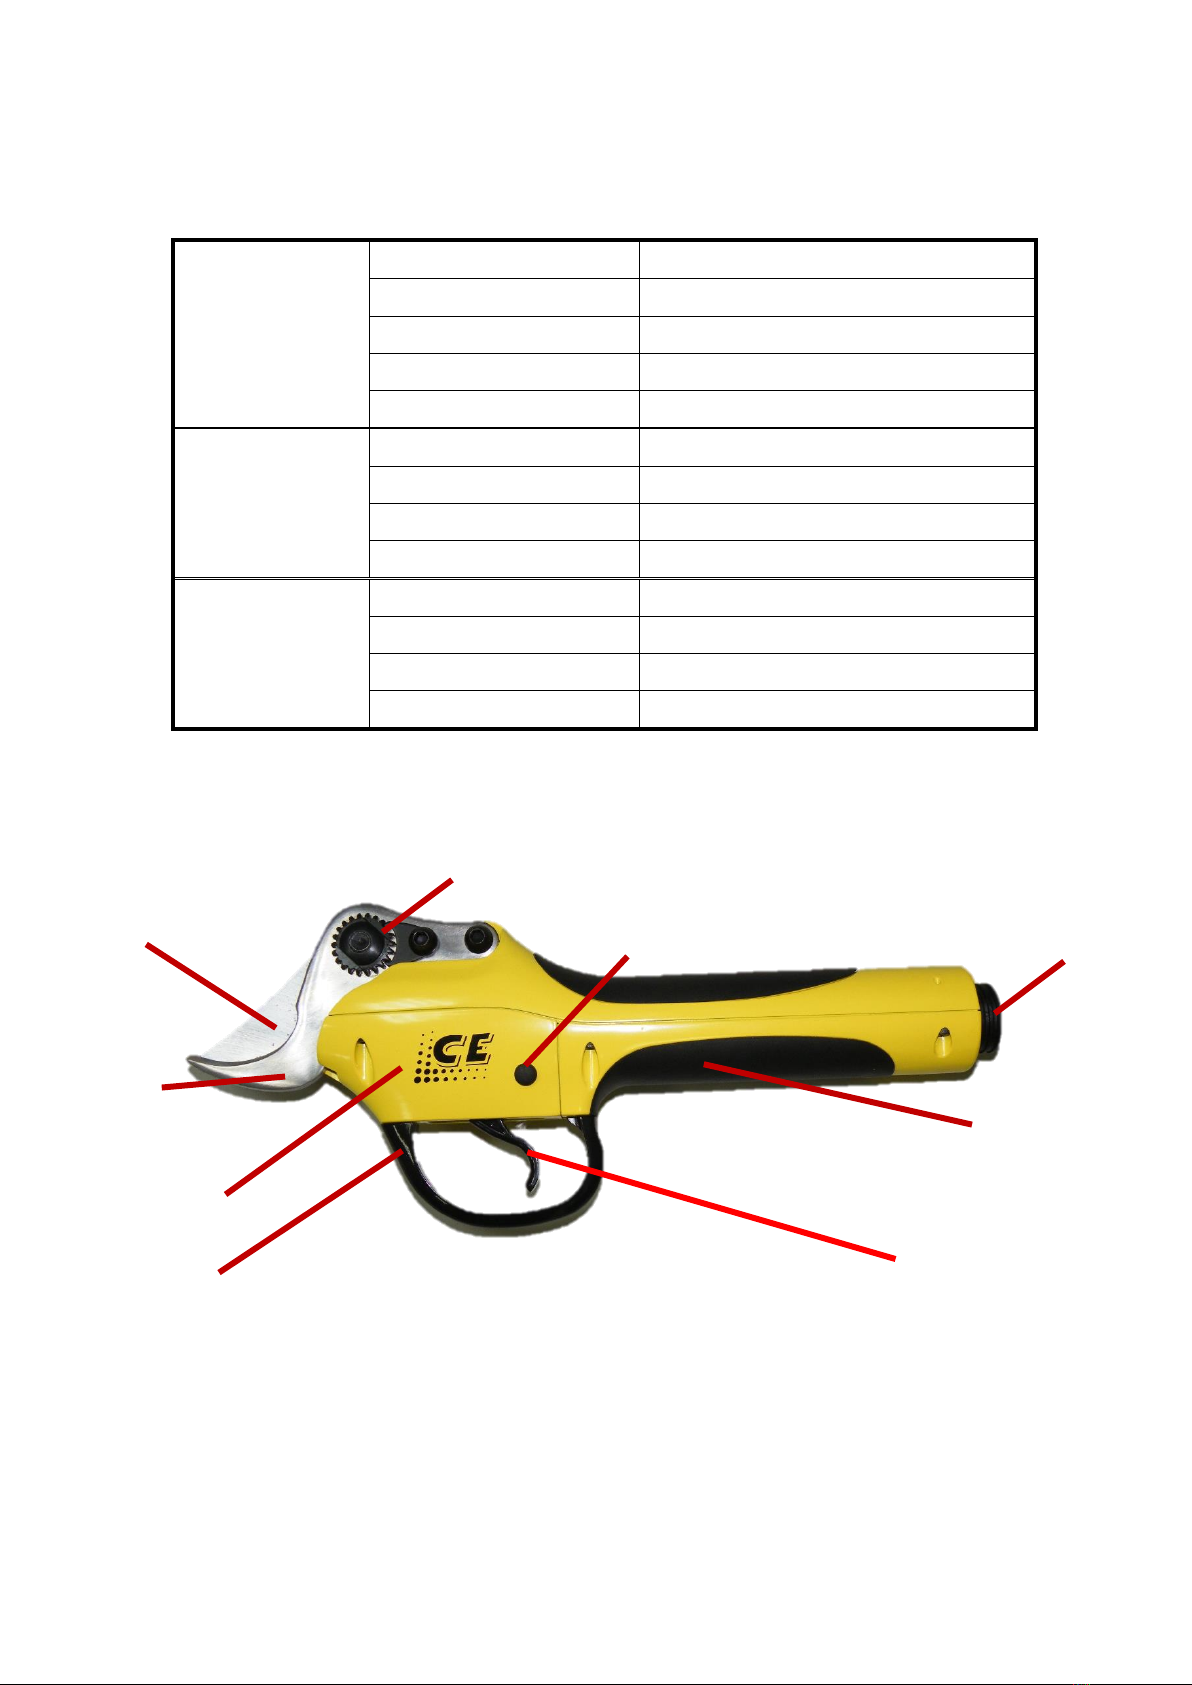
Names of Parts and Components
1. Moving blade 2. Fixed blade 3. Adjust set screw
4. Protection housing 5. Finger guard 6. Trigger
7. Cable plug 8. Handle 9. Blades opening adjustment button
1
2
4
3
5
6
7
8
9

2
LED Indication of Charge
Item
Indication
Status
Li-Battery
3 Green Lights
80% - 100%
2 Green Lights
50% - 80%
1 Green Light
30% - 50%
1 Red Light
Below 30%
Charger
Red
Charging
Green
Charging finish
Back pack of battery
Li-Ion Battery
Power Cable
Electric charger
Power Cord of Charger
Tool box

3
Main Safety Notes
※※ Please keep the Electric Trimmer away from reachable area of children. ※※
Caution: To prevent accidents like fire, electric shock or injury, please follow the basic
safety guidelines when operate the Electric Trimmer as mentioned below. Do read
carefully about the operation instructions before usage.
I. Safety For Operator
(1) Never put finger or any part of the body in between the Electric Trimmer blades. During
maintenance, make sure the power cable is unplugged and the Battery switch is off, or the Electric
Trimmer connector is disconnected.
(2) Be alert when using the Electric Trimmer. Do not operate the Electric Trimmer when feeling tired or
under the influences of medications, alcohol, sleeping pills or drugs which can prevent from getting
hurt seriously in operating the Electric Trimmer.
(3) Depends on the surrounding of the workplace, equip with appropriate protective devices such as
helmet, goggles, dust mask, mask, earplugs, gloves, safety shoes and so on, whichever adequate, to
reduce the possible injury of operator.
(4) To prevent accidents, please be sure to turn the power off when not using and keep the power off at all
time while in storage.
(5) Before turning on the Electric Trimmer, please check any tool or object in the vicinity of the blades or
attached onto it. The handle must be kept clean, dry, and free from oil or grease.
(6) When operating the Electric Trimmer, the operator must be alert to step and stand on firm and steady
ground. Do not reach out across the tool to get other objects while Electric Trimmer is in operation.
(7) The operator must wear comfortable working clothes. Do not wear unfit clothes, or with unnecessary
accessories and hanging strips, or anything that might hinder normal movements of the body. The
operator needs to contain their hair/beard, tie, necklets, bracelets, belts, etc., that might accidentally be
caught in high-speed motion.
(8) Do not operate the Electric Trimmer if you are not the well-informed, designated operator.
II. Important Cautions
(1) Do not use the Electric Trimmer in any other purpose than cutting tree branches. (Strictly forbidden
to use the Electric Trimmer to cut metal or other hard or tough material.).
(2) If the switch is off while the Electric Trimmer is still working, please do not operate it and contact
original manufacturer to repair.
(3) Do not modify the Electric Trimmer with other none compatible components than provided.
(4) In the process of adjusting, maintaining or changing components of the Electric Trimmer, please make
sure to unplug the power cable from the Electric Trimmer. Please confirm it is power off before any
disassembling procedures。

4
(5) When the Electric Trimmer and accessories are not in use, it must be kept in dry area, away from
reachable places of children. It is recommended to keep it locked in safety place.
(6) The blades must be kept sharp that will result in the best cutting ability. Keep the good habit of
cleaning and lubricating it right after use, or, once a month when it is in storage. Replace the
accessories when it is necessary. Checking the power cable regularly, if there is any damage, please
contact the factory or dealer to purchase the replacements immediately before using it again。
(7) Before plugging in the Electric Trimmer, it must be verified that the switch is at off position. The
toggle switch or the trigger switch must not be turned on and off frequently for no purpose at all.
They must be turned on and off when the Electric Trimmer is used in operation.
(8) Please follow the safety notes herein. Any improper usage, maintenance, or modifications will not
be cover by the warranty, and any injuries and/or damages caused are the full responsibility of the
user. Damages to the Electric Trimmer due to improper usage, maintenance, modifications, or not
following the direction of this User’s Guide and Safety Notes will be the sole responsibility of the
user. Parts, components or the entire system will be repaired and/or replaced at operator’s own
expense.
(9) Do not allow untrained person to operate the Electric Trimmer.
III. Safety ForAppliance
(1) The Electric Trimmer plug must be compatible with socket and cannot be modified/replaced.
(2) Do not step on power cable and/or pull power cable when moving the Electric Trimmer. Never pull
the power cable itself to unplug or disconnect connector. Holding the plug/connector on hand to
unplug or disconnect. Avoid to get close to fire, petrochemicals, sharp/pointing objects, moving
objects (running lathe, turn tables, etc.) and wet places to store or to operate the Electric Trimmer.
(3) To avoid causing fire, electric shock or injury, the charger provided by the original manufacturer must
be used; any another brand of charger employed with this Electric Trimmer battery, it may explode
and lead to injure and damage.
IV. Safety At Workplace
(1) Keep clean and bright at workplace, it can enhance your safety and keep good eyesight when working.
(2) Do not operate the Electric Trimmer in flammable and explosive environment such as flammable liquid,
gas, and dust, it may cause fire.
(3) Do not use the Electric Trimmer in water, on rainy days and/or wet environment that can avoid electric
shock
(4) Do not allow children to get close at workplace and keep none work-related personnel away from the
workplace.

5
Operation Instructions
1. Take out the Electric Trimmer, battery,
power cable and battery bag from tool box.
2. According to the habit of the operator
(right-handed or left-handed), orient the
battery’s power cable connector (exit from
right or left) and put battery into the back pack
of battery.
3. Plug in power cable and lock screw tightly
(Plug has key way to guide it in, please do not
force the plug in.).
4. The operator wear battery sling.

6
5. Power cable connect to Electric Trimmer
socket and tighten the screw.
6. Turn on the power switch, the Green LED
light will be on, also, there will be an audible
beep to indicate the power supplier is normal,
red light represents that the battery must be
charged.
If the connection is abnormal between the battery and the electric trimmer,
there will be continuous short pulses of beeps alarm, please turn off the power
switch, and re-connect all plugs to battery and electric trimmer.
7. Pull the trigger 3 times, the Electric
Trimmer blade will open automatically. The
blade movement can be controlled by the
motion of the trigger. Now the electric
Trimmer is ready to cut when the trigger is
pulled and release the trigger to return to
opening position.
8. When pull the trigger, the blade starts to
close; at any point of time, when the finger
releases from the trigger, the blade will return
to opening position.
7
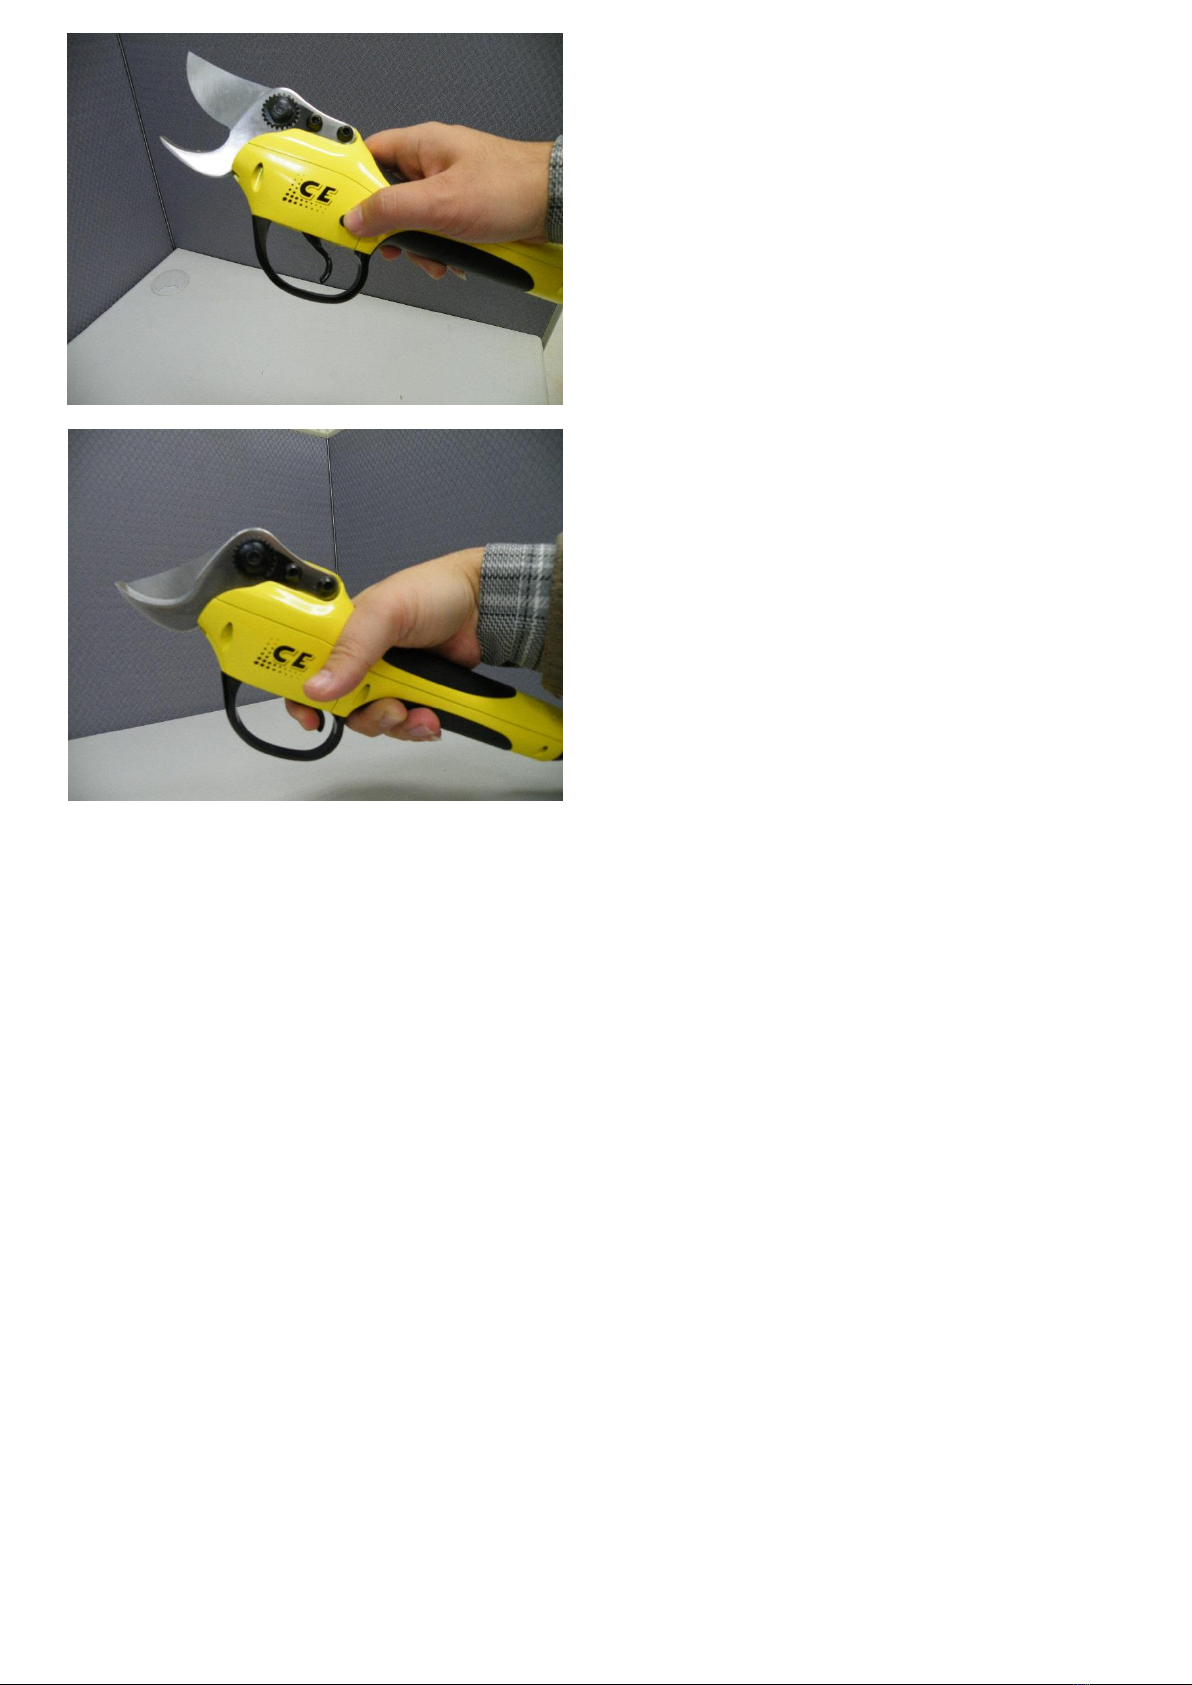
9. To adjust the blade opening width: when the
Electric Trimmer is connected to the battery,
and power switch is ON, give a long press to
the red button on the left hand side of the
protection housing as shown in the picture,
there will be an alert audible beep, then, pull the
trigger one time, the blade opening can be
changed from wide to narrow. Follow the
same procedure again to change it back to wide
opening.
10. To turn off the Electric Trimmer: pull the
trigger all the way and hold for at least three (3)
seconds with an audible beep, then, the blade
will be closed, release the trigger and turn the
power switch OFF.
Notes to Operation of Electric Trimmer
1. This product can only be used for trimming fruit trees and garden vegetation branches.
Any other usage is forbidden and not under the warrantee coverage.
2. This product is designed to trim wooden branch of no bigger than 30 mm in diameter.
3. In the process of cutting, the Electric Trimmer will automatically open when it meets harder material than
its ability to cut. When the blade is completely open, it can be used as normal trimming again. Caution
must be taken: In the process of retrieving the blade from the jamming point, NEVER shake/twist/wiggle
around the blades out of the jamming point to avoid any damage to the body of the blade. Trying to
remove out of jamming with gentle pulling and push, following the contour of the blade, back and forth,
until the blade is loosen.
4. Never operate the Electric Trimmer when the outer protecting enclosure is taken apart or not in their
proper positions.
5. While the Electric Trimmer power is switched on, NEVER touch the blades with fingers or human body
or living animals. This is to prevent the Electric Trimmer to hurt/damage anything unintentionally.
6. This product is only for grown-ups to use it on vegetation. Any other usage or improper operations not
covered in this menu, is user’s responsibility for any accident or damage to lives and properties caused.
8
7. This product will generate electromagnetic disturbances, which could have had some influences or
possibly even irreversible damages on implanted mechanisms in human bodies. Consult physicians and
the implanted mechanism producers before usage.
8. Every usage of the Electric Trimmer must be followed by proper cleaning and maintenances:
Thoroughly clean the blades, then grease with oil to lubricate the blades and prevent rusting. Refer to
the Maintenances and Adjustments Section.
9. When the cutting is not smooth, please switch off the power and disconnect the power cable, then,
examine the blades to see if they are getting dull. Slightly polishing of the blades may help to sharpen
the blades. Caution must be taken to thoroughly clean the blades and remove all particles away from the
blades after polishing. Then, re-connect the power cable and turn the switch on to continue the operations.
Refer to the Maintenances and Adjustments Section.
10. When finished the utilization and maintenances of the Electric Trimmer, please put the Electric Trimmer
and all components back to their proper positions in the container.
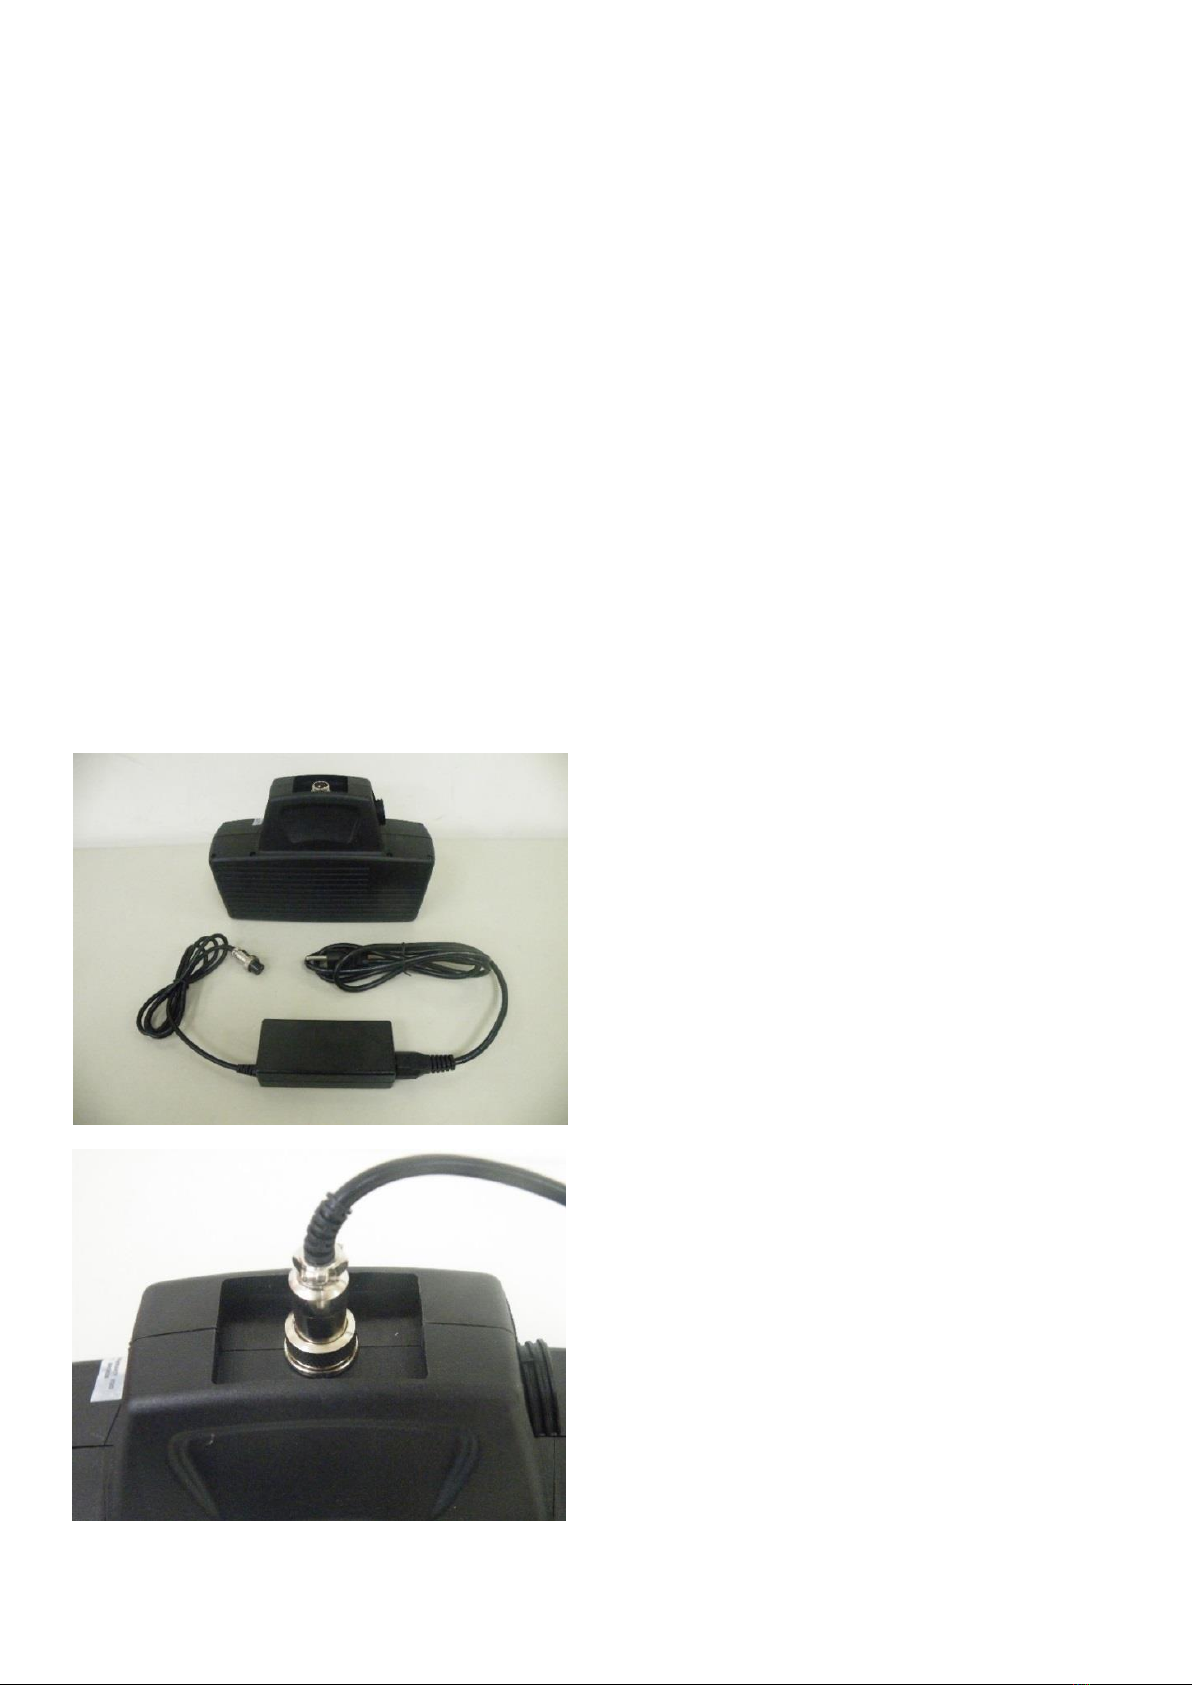
Battery Charging Operation Instructions
1. When the LED on the battery is 1 Green
Light, indicating that the battery need recharge.
Please take the charger and the battery out of
the box.
2. First connect the charging cord from the
charger to the battery, then, make sure the
battery switch is at OFF position, and power
cable is disconnected. Plug the charger to the
wall electric outlet (AC 100V~240V). (There
is a fool-proof device in the plug to prevent
plug-in the wrong direction. Please follow the
key direction to plug it in.).
9
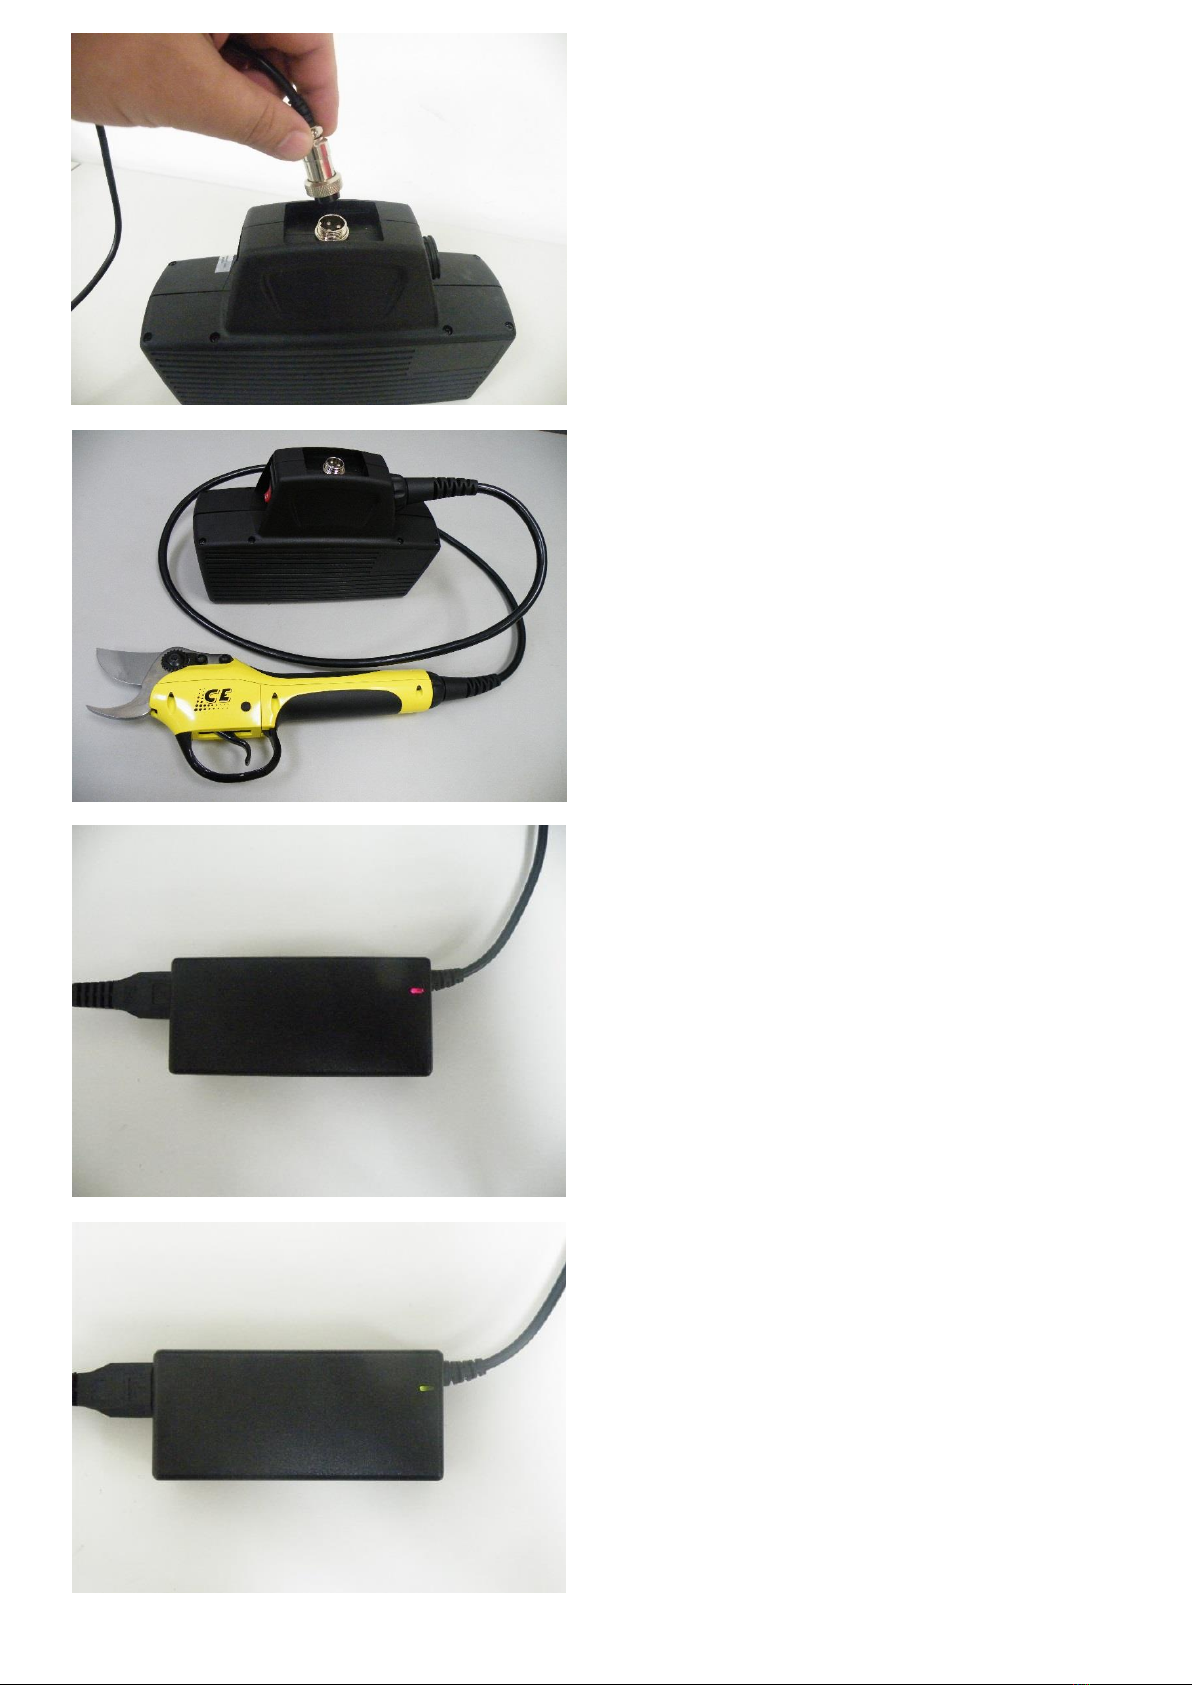
3. The LED on the charger is RED indicating
that the charger is charging the battery.
Complete charging may require four and half
(4.5) to five (5) hours.
4. When the LED on the charger is GREEN
indicating the battery is completely charged.
5. After charging, please remove the charger
plug from the wall electric outlet first, then,
take the plug off the battery. Put the charger
back to its container.
6. After charging the battery, follow the
Electric Trimmer “Operational Instructions” to
connect the battery and the Electric Trimmer
and get into cutting and trimming operations.

10
Notes on the Usage of Battery
1. Please use the electric charger comes with this Electric Trimmer to charge the battery. Any other
electric battery charger WILL cause damages or destructions (explosions) of the battery and possibly
fire.
2. Battery switch MUST be at off position before the starting and the entire duration of charging of the
battery.
3. Unplug the Electric Trimmer from the battery pack before the charging process.
4. Never use other brand’s battery to operate the Electric Trimmer. The incompatibility of the battery and
the Electric Trimmer will cause damages or destructions to both, and possibly fire as well.
5. Under abnormal conditions, if the battery fluid spilt, please avoid direct contact with human skin or eyes.
If it does happen, please flush thoroughly with huge amount of water and consult with physicians
immediately. The fluid from the battery is very corrosive, can cause severe burning and injury.
6. It is recommended to seal the battery plug with a tape before charging. To avoid small metallic
particles, metal chips or objects, e.g., coins, screws, paper clips, paper staples, metallic pins, needles and
nails to get near the battery plug. These small particles may cause short circuit of the battery to create
electric shock, explosion, and fire.
7. If the battery is stored away for long period of time, please remember to recharge the battery at least
once a month.
8. When the battery is stored away, please make sure the switch of the battery is at OFF position.
9. Please avoid shock, strong impact or drop on the floor of the battery. If the out appearances of the
battery is deformed or damaged, please contact your local dealer or the factory immediately.
10.Battery must be stored in cool and dry place, avoid the exposure of the battery to flammable material,
humid environments, or direct sun shine.
11.When the battery reaches its life expectancy, please DONOT disassemble the battery. Use local
recommended method to recycle the battery (put plastic tape over the battery plug to prevent short circuit
explosion), or give it to recycle personnel to handle. Never treat it as normal garbage to be thrown
away in normal garbage can.
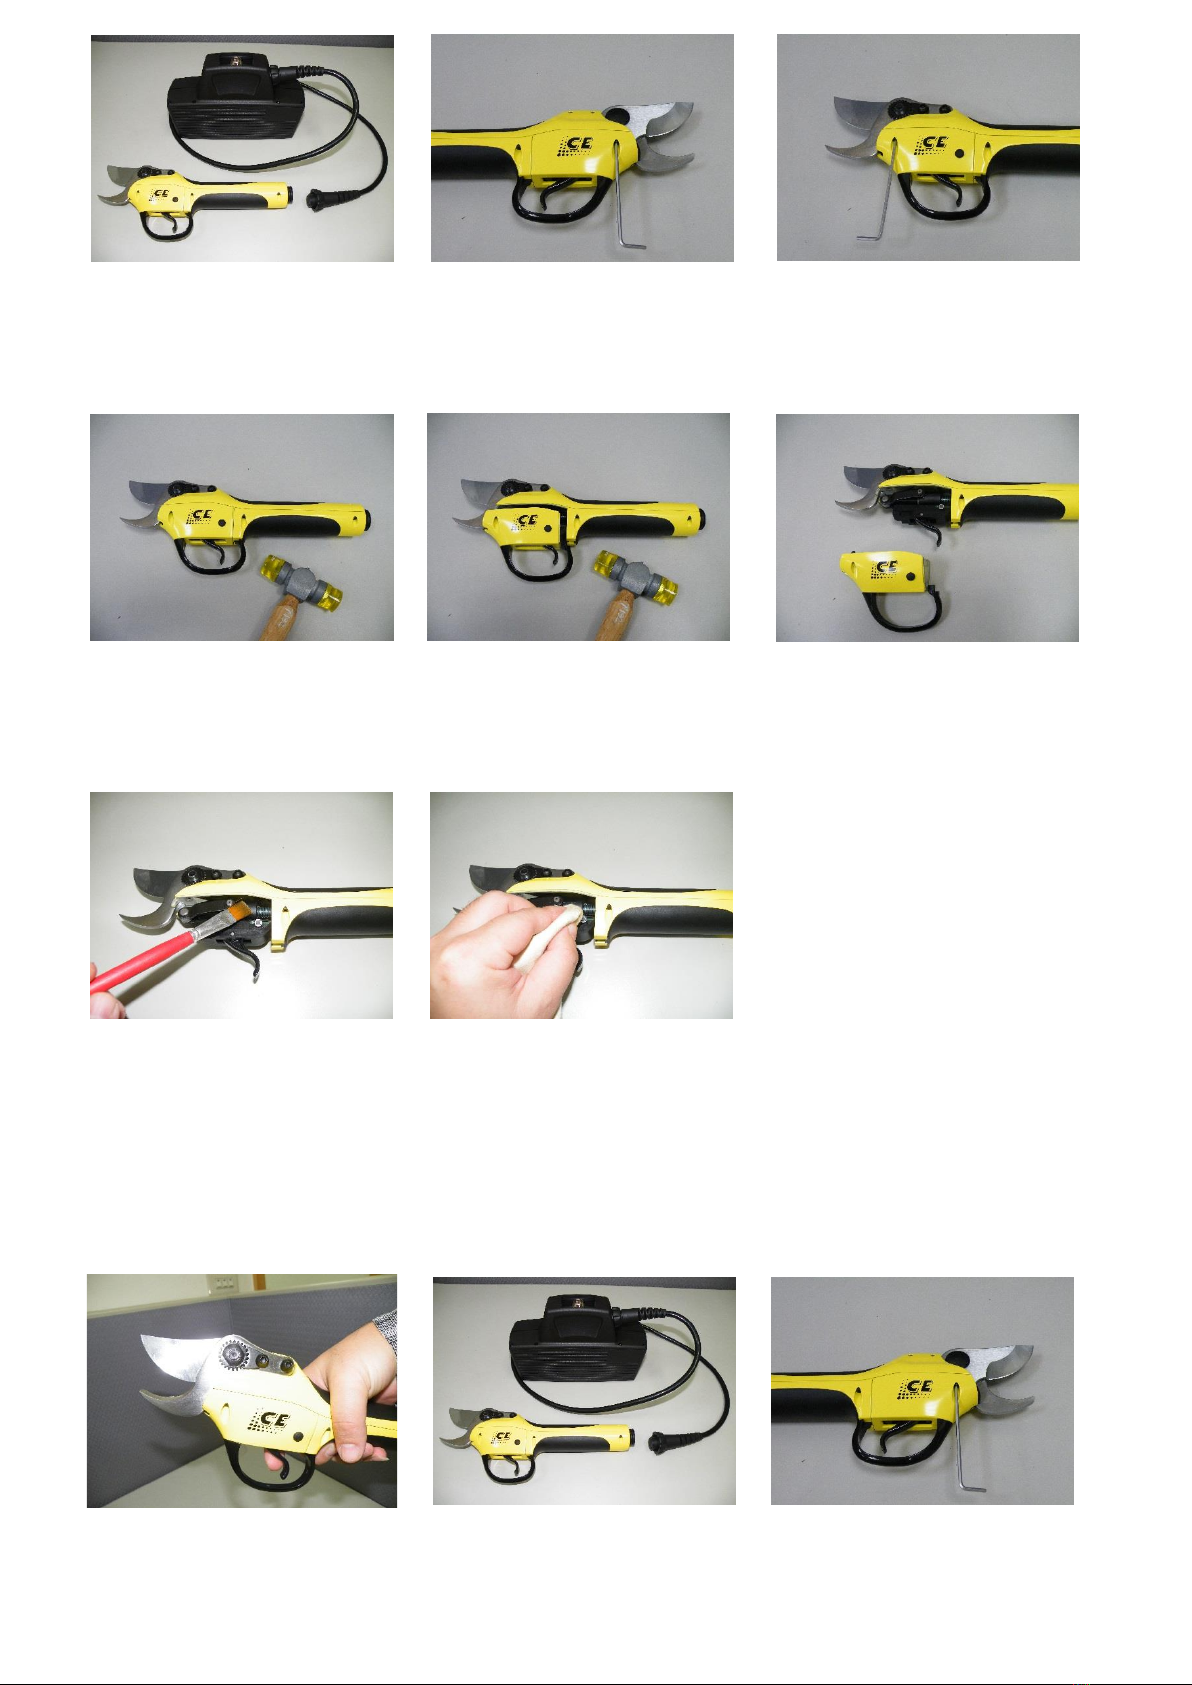
Maintenances and Adjustments procedures for Electric Trimmer
1. Inner cleaning Procedure 1-1 至1-10
1-1
Connect to the power cable
1-2
Turn the power on and open the
Electric Trimmer blades.
Required tool
11
1-11 Following steps 6-1 ~ 6-6(P.16) to put the Electric Trimmer together
2. Grease the Lead screw Procedure 2-1~2-22
Before taking the steps, please follow the procedures 1-1~1-2(P.10) as mentioned above.
1-3
Turn the power off and separate
the power cable
1-4
Disassemble the right side screw
with the hex key provided
1-5
Disassemble the left side screw
with the hex key provided
1-6
Knock on the trigger guard
slightly, gently
1-7
Knock protection housing loose,
gently
1-8
Take out the protection housing
1-9
Cleaning with brush
1-10
Wipe with dry towel
2-1
Position the blade opening to small
opening
2-2
Turn the power off and separate
the power cable
2-3
Disassemble the right side screw
with the hex key provided

12
2-4
Disassemble the left side screw
with the hex key provided
2-10
Pull the acting arms out.
2-13
Remove the right side acting arm.
2-15
Remove the lead screw cover
2-5
Knock on the trigger guard
slightly, gently
2-6
Knock protection housing loose,
gently.
2-7
Take out the protection housing
2-8
Take off the front c-clip from the
acting arm.
2-9
Take off the locking pin from the
acting arm.
2-11
Take off the left side c-clip from
the acting arm.
2-12
Take off the right side c-clip from
the acting arm.
2-14
Remove the left side acting arm.

13
2-22 following steps 6-1 ~ 6-4(P.16) to put the Electric Trimmer together
3. Polish the blades Procedure 3-1~3-3
Before taking the steps, please follow the procedures 1-1 ~ 1-3(P.10 &P.11) as mentioned
above.
3-1
Polish the front side
3-2
Polish the back side
3-3
Wipe the blade clean
2-16
Properly grease the lead screw
2-17
Insert the lead screw cover
2-18
Insert the acting arms
2-19
Insert c-clips to the two acting
arms
2-20
Insert the front locking pin to the
acting arms
2-21
Insert the front c-clip to the acting
arms
14
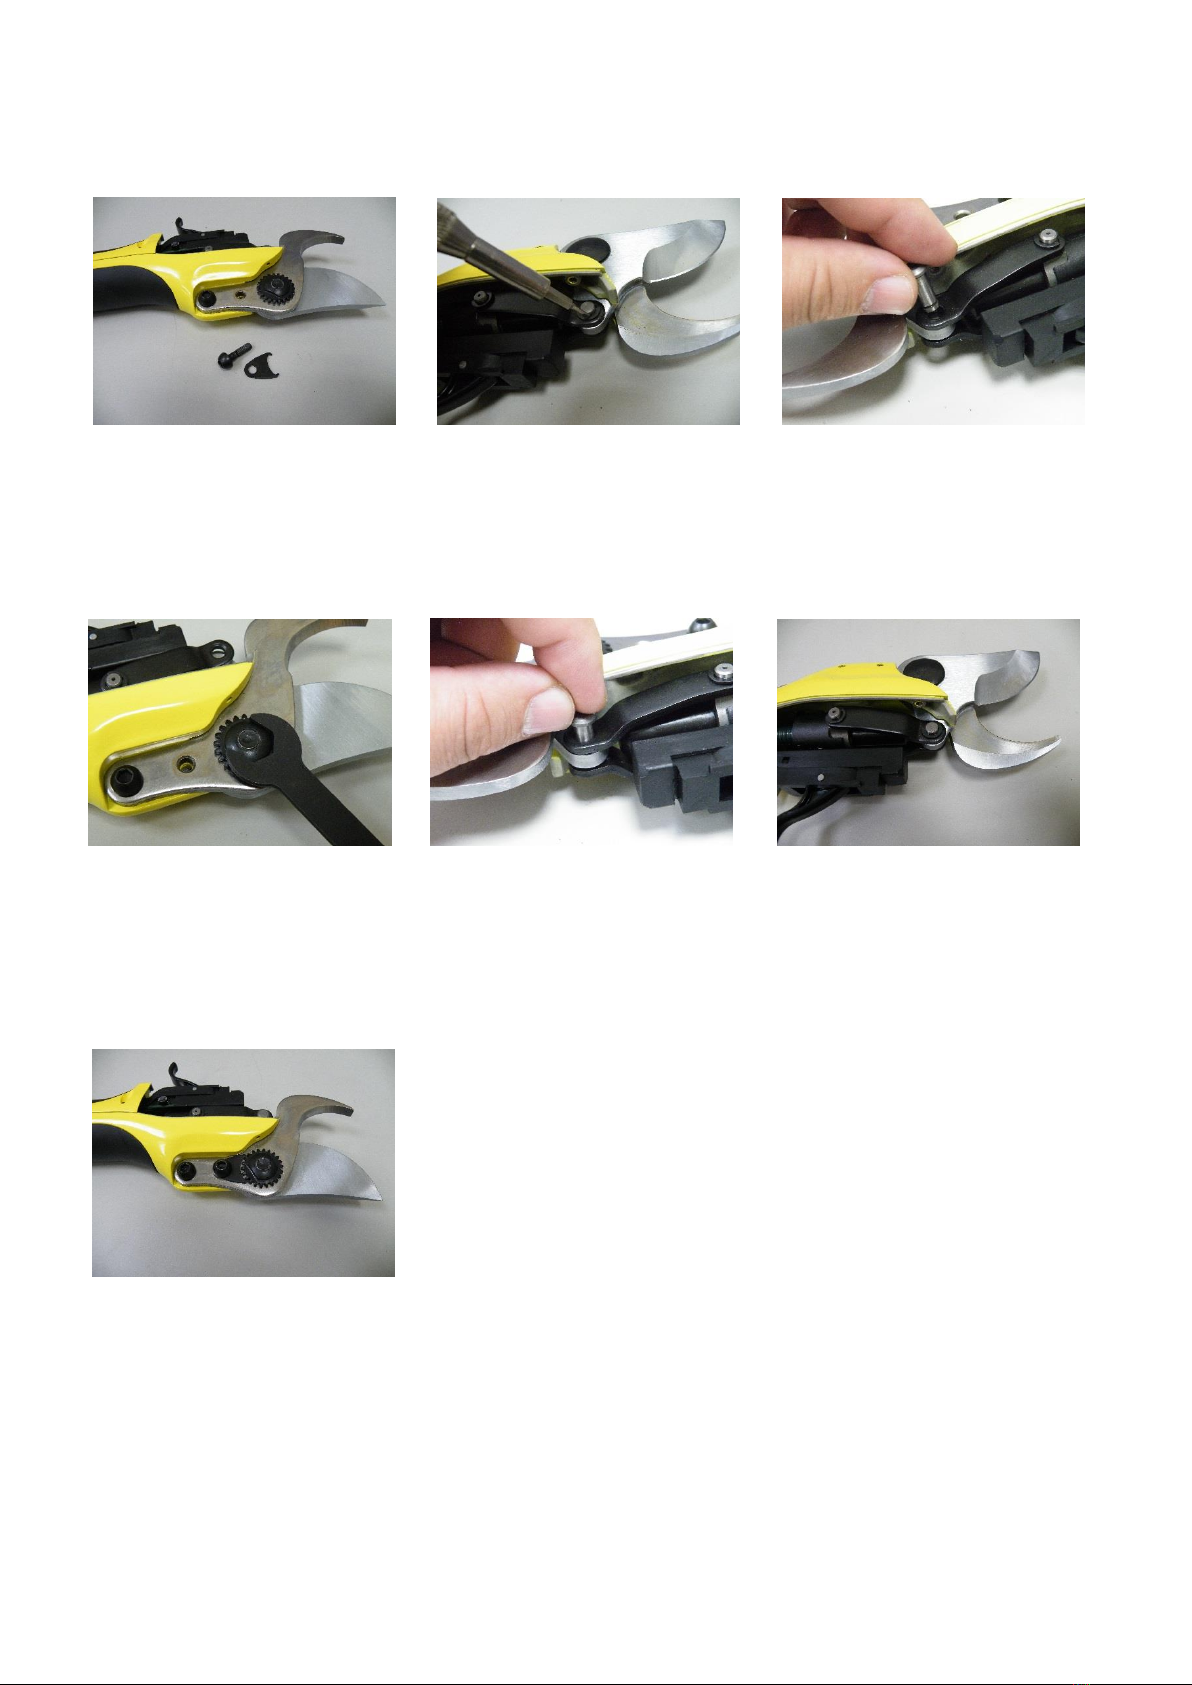
4. Adjust the gap of blades. Procedure 4-1~4-8
Before taking the steps, please follow the procedures 1-1 ~ 1-8(P.10 &P.11) as mentioned
above.
above.。
4-8 Following steps 6-1 ~ 6-6(P.16) to put the Electric Trimmer together
4-1
Loose the fixed screw and spur
gear locker
4-2
Flat screw drive to remove the
c-clip
4-3
Remove locking pin
4-4
Adjust the tightness of the set
screw with the wrench provided
and check the gap of blade
4-5
Insert the locking pin
4-6
Put c-clip back in place
4-7
Reset the spur gear locker and
tighten the screw
15
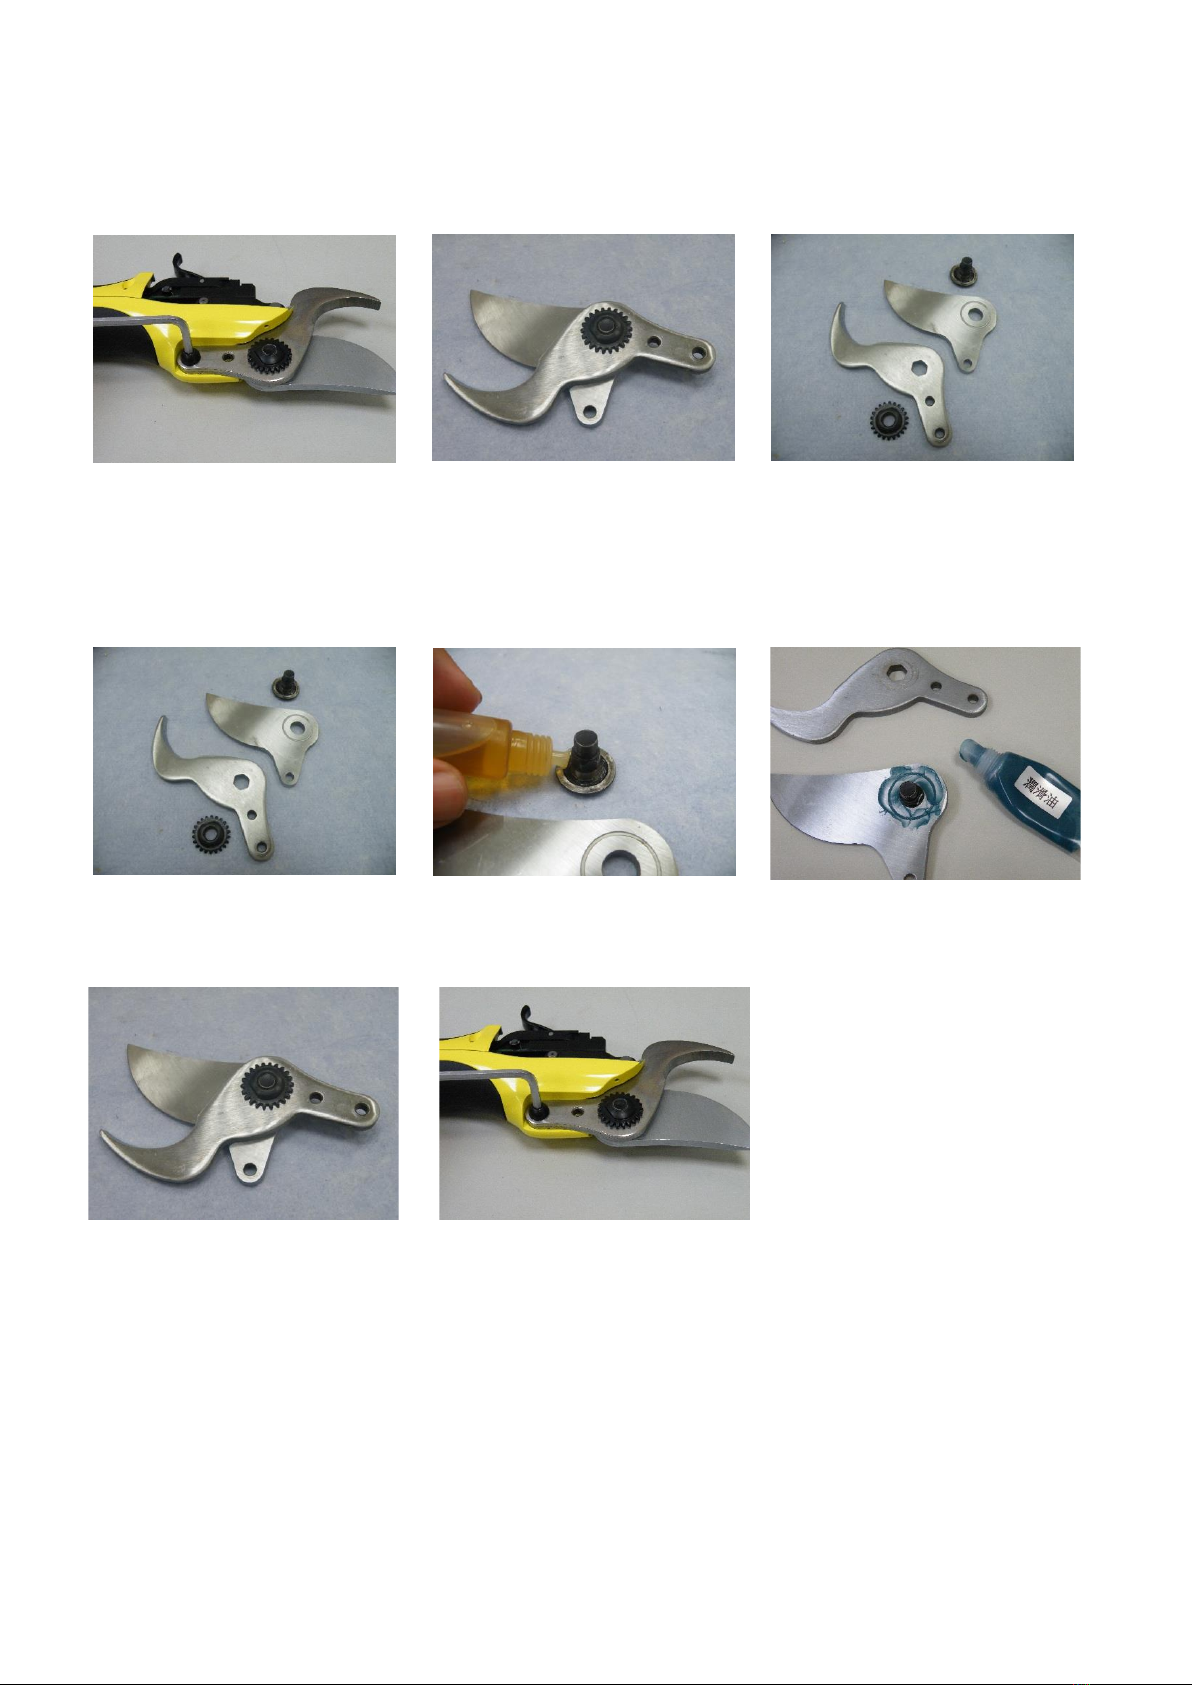
5. Replace the blades. Procedure 5-1~5-9,
Before taking the steps, please follow the procedures 1-1 ~ 1-8(P.10 &P.11), followed by
procedure 4-1 ~ 4-3(P.14) as mentioned above.
5-9 Following steps 4-4 ~ 4-7(P.14) and steps 6-1~6-4(P.16) to put the Electric Trimmer together.
5-1
Disassemble the fixed screw with
the hex key provided
5-2
Take out the blade assembly
5-3
Disassemble the adjustment screw
and spur gear nut with the wrench
provided
5-5
Lubricate the adjustment screw
5-6
Lubricate the grove of the blade
5-7
Assemble the blades with the
wrench provided
5-8
Tighten the blade assembly to
housing with set screw. Using hex
key provided
5-4
Replace the new blade
16
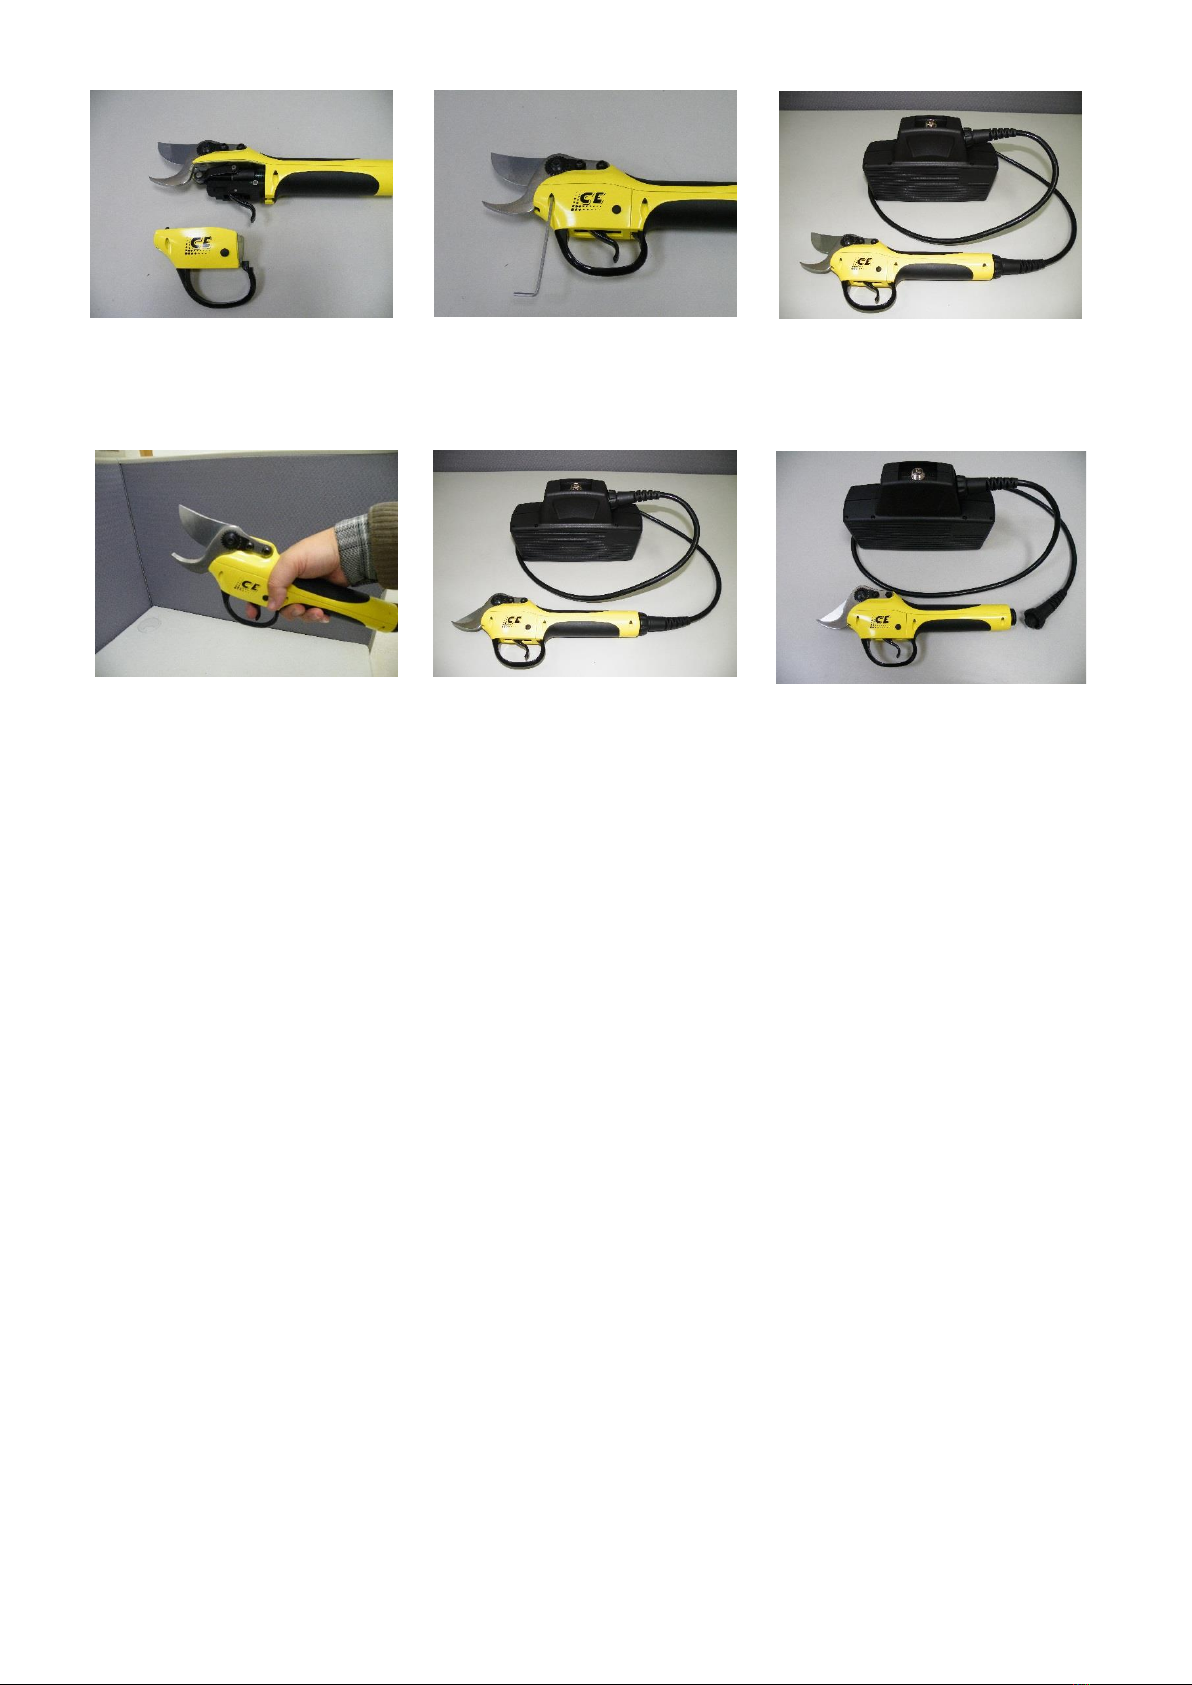
6-6
Separate the power cable
6. Assemble and test Procedure 6-1~6-6
Warranty
1. The warranty of the Electric Trimmer is one year from the date of purchase, under normal operation
conditions except the follows:
(1) Improper usage (e.g. to use Electric Trimmer to cut metallic material.)
(2) Improper transportation method induced damages. All components must be inside the container
provided, at their each individual locations for transportations.
(3) Any alterations or modifications induced damages. Damages by disassembled unit other than normal
maintenances and adjustments covered in this menu
(4) Natural and unnatural disasters (fire, lightening, electric shocks, flood or water damages, etc.) of
irresistible causes induced damages.
(5) Utilizing non-original factory components, battery, and/or accessories with the Electric Trimmer
induced damages..
(6) Do not operate the Electric Trimmer out doors in rainy days.
(7) Except wearable components (e.g. blades), any defects components or unit from the factory, other than
those mentioned above, will be replaced without charge. Factory reserve the right to determine and
judge the origin of the defects.
2. To avoid unnecessary confusions, please note that:
When the product exceeds its warranty period, any maintenance or change of parts/components, the
factory will charge the expenses of the work done on the maintenance and the parts/components
changed.
6-1
Assemble the protection housing
6-2
Tighten the screws on both sides.
Use the hex key provided
6-3
Connect to the power cable to
battery
6-4
Turn the power on to test that it is
operating normally
6-5
Turn off the power

17
Maintenances AndAdjustments
1. Protective housing cleaning (following the disassemble procedures on Page 9)
DONOT immerse the Electric Trimmer into water. DONOT use any cleaning agent. Just wipe with
wrung-dry wet towel on the housing surface.After every usage, the blades must be clean thoroughly.
Use clean dry towel to put on a thin layer of rust-preventing oil to cover the blade, to isolate vapor and
air from corroding the blades. After severe usages of the Electric Trimmer, please open the protecting
housing, and use a brush to clean remaining wood chips, dirt, leaves, etc.
2. Polishing the blades (following the polishing procedures on Page 11)
The procedures determines the trimming quality and life expectancy of blade. If the Electric Trimmer
becomes sluggish in cutting or hard to cut, please check the blades if they have been corroded or with
dull edges, polish the blades with grindstone properly with oil lubricant.The grinding frequency is
depended on the hardness of the wood trimmed. Therefore, the blades must be inspected constantly, in
the basis of every 15 minutes a time, then decide the grinding frequency by yourself.
3. Adjust the blade opening(following the adjustment of the blade gap procedures on page 12)
Using the tool in the box to open the spur gear locker, then use a wrench to relax or tighten the spur gear
to adjust the gap between blades.
4. Change the blade (following the replacement of the blade procedures on page 13)
After polishing many times of the blade, the Electric Trimmer cannot cut the branch effectively any
more. The blades must be changed. After the replacement of the blades, it has to be tested to confirm
the opening and closing are normal, and the cutting operation is okay.
5. Storage
After operating or maintaining the Electric Trimmer blades, please remove the power cable from the
Electric Trimmer and battery, turn the power off and put all accessories back in the container in their
proper locations. The device has to avoid exposure to extreme environmental conditions, such as high
temperature, cold, wet, dirt, high voltages, and direct sunshine.
Suggestion for storage in dry environment as below:
Short-term storage of temperature for 1 month
-20℃~+60℃
Storage of temperature for 1~6 months
-10℃~+40℃
Storage of temperature for more than 6 months
0℃~+30℃
※To prevent battery from degrading forlong term storage, please recharge the batterybefore storing,
inspect and recharge once a month regularly.

18
Trouble-shooting
Condition
Possible causes
Suggesting procedures
Cannot operate
Not turn on the switch
Turn on the switch
Not pull the trigger 3 times
consecutively.
Pull the trigger 3 times
consecutively.
Run out of the battery
Recharge the battery
Power cable improper connection
Reconnect the power cable and
tighten it
The switch does not work
Return ET to the original factory
to repair
Blade opening cannot be
adjusted
Protective housing jammed with the
button
Take the protective housing apart
and re-assemble the protective
housing again to avoid jamming.
The adjustment button does not work
Return ET to the original factory
to repair
Odd sound when trimming
Long term storage without lubrication
of blades
Return ET to the original factory
to repair
Component loosen
The blade becomes hot
easily
Blade gap adjustment screw too tight
Loosen the adjustment set screw
Not lubricated blades
grease with oil to lubricate the
blades
Dull blades
Polish or replace the blades
Notched blade edge
Polish or replace the blades
Cutting effect is not good
Blade gap adjustment screw too loose
Tighten the adjustment set screw
The blades become dull
Polish or replace the blades
Not cutting through
Battery voltage is low
Recharge the battery
Table of contents


