China Great-Wall Computer Shenzhen Co. M976 User manual

2
Table of Contents
1. Before Using the Tablet........................................................................................................................................................... 3
1.1 Acknowledgement....................................................................................................................................................... 3
1.2 Precautions.................................................................................................................................................................. 3
2. Introduction............................................................................................................................................................................. 3
2.1 Charging the Battery..................................................................................................................................................... 3
2.2 Status and Reminders.................................................................................................................................................... 4
2.3 Button and Touchpad Functions................................................................................................................................... 5
2.4 Power Up and Shut Down............................................................................................................................................. 7
3. Main Interface UI...................................................................................................................................................................... 8
3.1 Icon and Application Management…............................................................................................................................ 9
3.2 Change the Desktop Wallpaper...................................................................................................................................... 9
4. USB Connection & Word Input.............................................................................................................................................. 10
4.1 USB Connection............................................................................................................................................................. 10
4.2 Word Input ......................................................................................................................................................................10
5. Basic Settings........................................................................................................................................................................... 11
5.1 Voice and Display............................................................................................................................................................ 11
5.2 Adjust Screen Standby Time.......................................................................................................................................... 12
5.3 Setting a Screen Lock.................................................................................................................................................... 13
5.4 SD Card and Internal Memory........................................................................................................................................ 14
5.5 Date and Time................................................................................................................................................................. 14
5.6 Setting the Display Language........................................................................................................................................ 15
6. About the Tablet........................................................................................................................................................................15
6.1 System Update................................................................................................................................................................. 15
7. Multi-Media.................................................................................................................................................................................16
7.1 Media Formats Supported……………………………........................................................................................................16
7.2 Music................................................................................................................................................................................. 16
7.3 Video................................................................................................................................................................................ 17
7.4 Images ...............................................................................................................................................................................17
7.5 Camera ..............................................................................................................................................................................18
8. Connecting to Wi-Fi..................................................................................................................................................................19
9. Email..........................................................................................................................................................................................20
10. Internet.................................................................................................................................................................................... 21
10.1 Browser............................................................................................................................................................................ 21
11. Other Applications................................................................................................................................................................. 23
11.1 Set an Alarm..................................................................................................................................................................... 23
11.2 File Management.............................................................................................................................................................. 23
12. Installation of Applications................................................................................................................................................... 23
12.1 Installation........................................................................................................................................................................ 23
12.2 Uninstall an App.............................................................................................................................................................. 24
13. Troubleshooting.................................................................................................................................................................... 24
14. Android 4.2 Tablet One-Year Limited Warranty...................................................................................................................26

3
1. Before Using the Tablet
Before the using the tablet, please read this manual carefully and be sure to charge the tablet battery fully per
the instructions before using the tablet. If children will also be using this tablet, be sure to teach them the
information contained in this manual. For further details, please refer to the safety instructions and announcements.
1.1. Acknowledgement
The tablet is a MID (Mobile Internet Device) with a touch screen native resolution of 1204 x 768 pixels. It uses a
Boxchip A20 high speed processor with 1GB RAM DDR III and 16GB flash storage memory. The operating system
is Android 4.2 .
The product has built in Wi-Fi, a front-facing camera, displays HD video and images, and is designed to provide a
fast and easy internet experience.
1.2. Precautions
zPlease always keep the tablet dry. To avoid damaging the tablet, please keep the tablet, battery and charger
away from water and moisture, and don’t operate the tablet or use the charger when your hands are wet.
zDo not drop or strike the tablet against a hard surface.
zNever disassemble the tablet or its accessories as this will immediately VOID any and all warranties you have for
the tablet.
zNever use the tablet while operating a vehicle.
zIn hospitals and areas vulnerable to EMI (electromagnetic interference) such as an airplane, please follow the
area’s posted rules and regulations regarding use of electronic devices.
zTo avoid electrical damage, please power off the tablet before entering an area with unshielded high voltage.
zSubjecting the tablet to an area with a powerful magnetic field may erase all data on the tablet.
zThis tablet can connect to the internet and has access to chat rooms, messenger programs, etc. Please always
supervise children using the tablet.
zPlease comply with your area’s rules and regulations regarding the use of electronic devices and respect others’
privacy and legal rights while using the tablet.
2. Introduction
2.1 Charging the Battery
When you first receive the tablet, please fully charge the battery before use. It takes approximately four (4) hours to
completely charge a drained battery. Recommendation: use the A/C wall adapter supplied with the product.
4
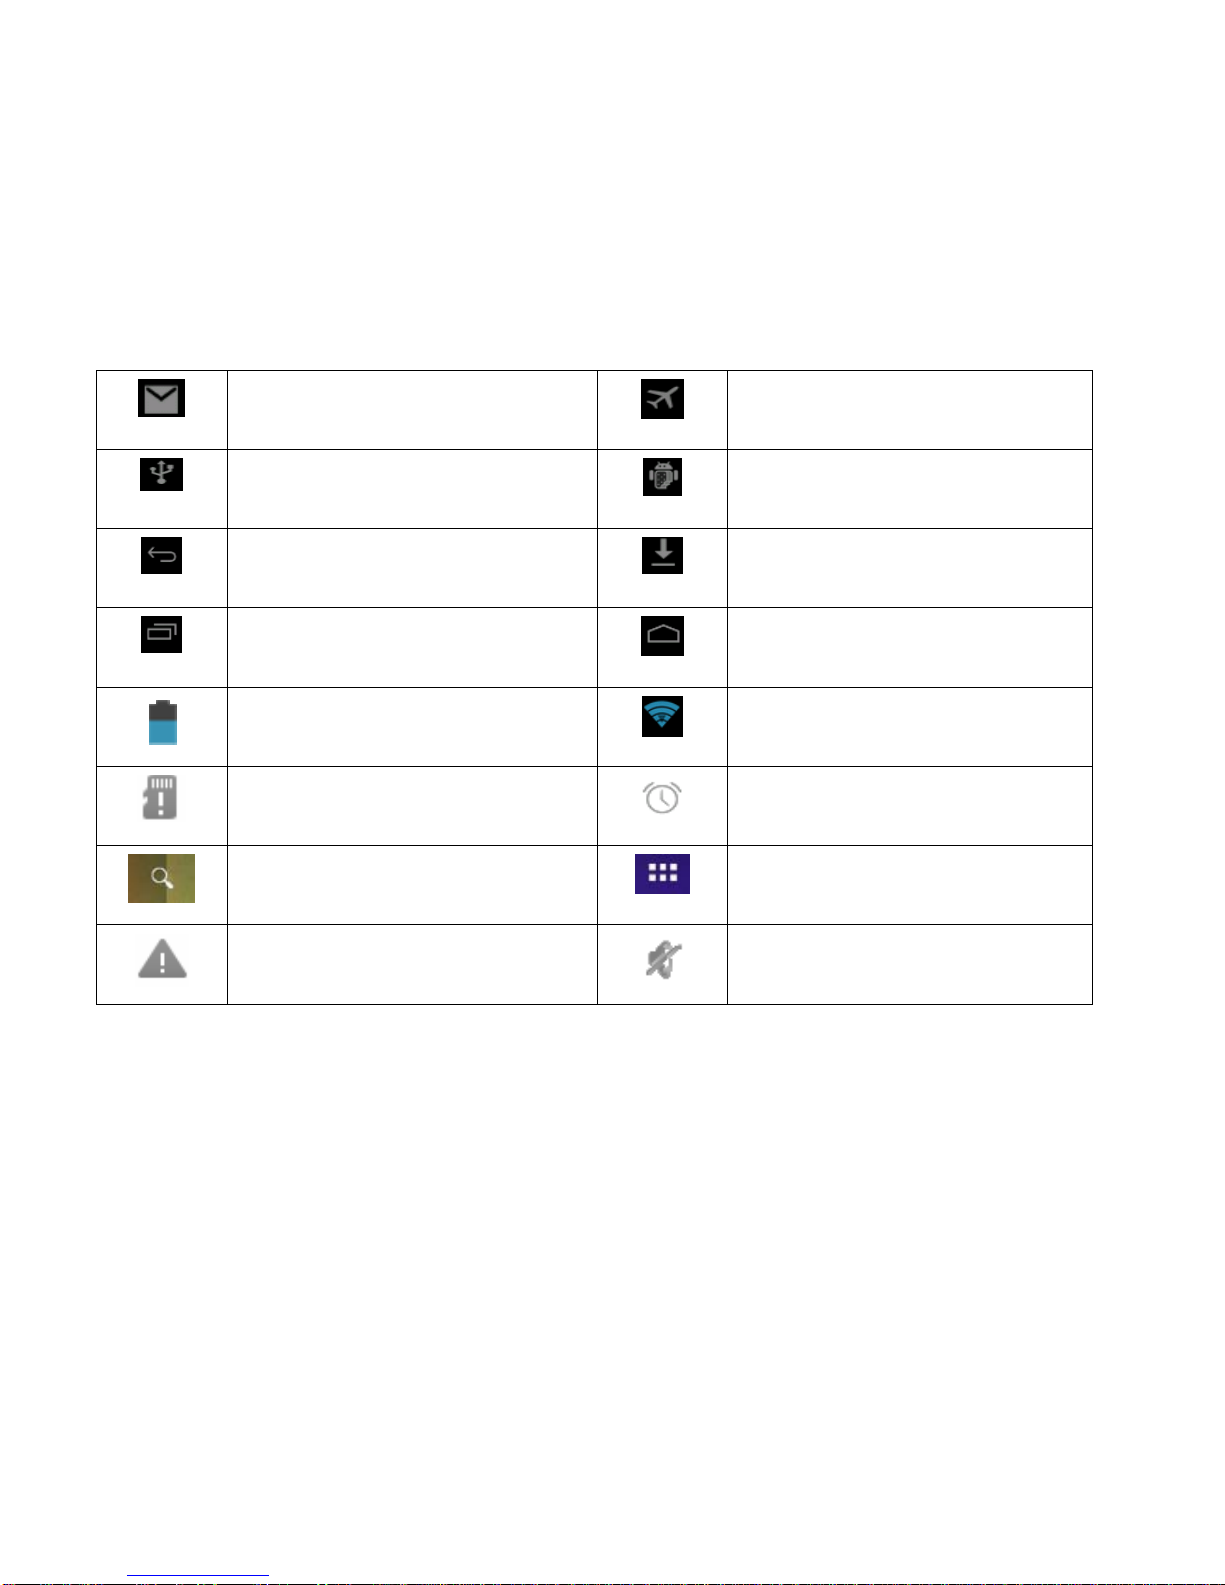
2.2 Status and Reminders
Reminder icons:
When an icon appears in your reminder window (lower left and right hand corners of your screen) you can tap the
icon to open your reminder. Below are the most common reminder icons.
New email Airplane mode
USB is connected USB adjustment is connected
Return/Back icon
Downloading
Recent application icon
Home icon
Battery charge level mark Wi-Fi signal icon
No SD card Alarm on
Google search Applications icon
General Notice Mute
5
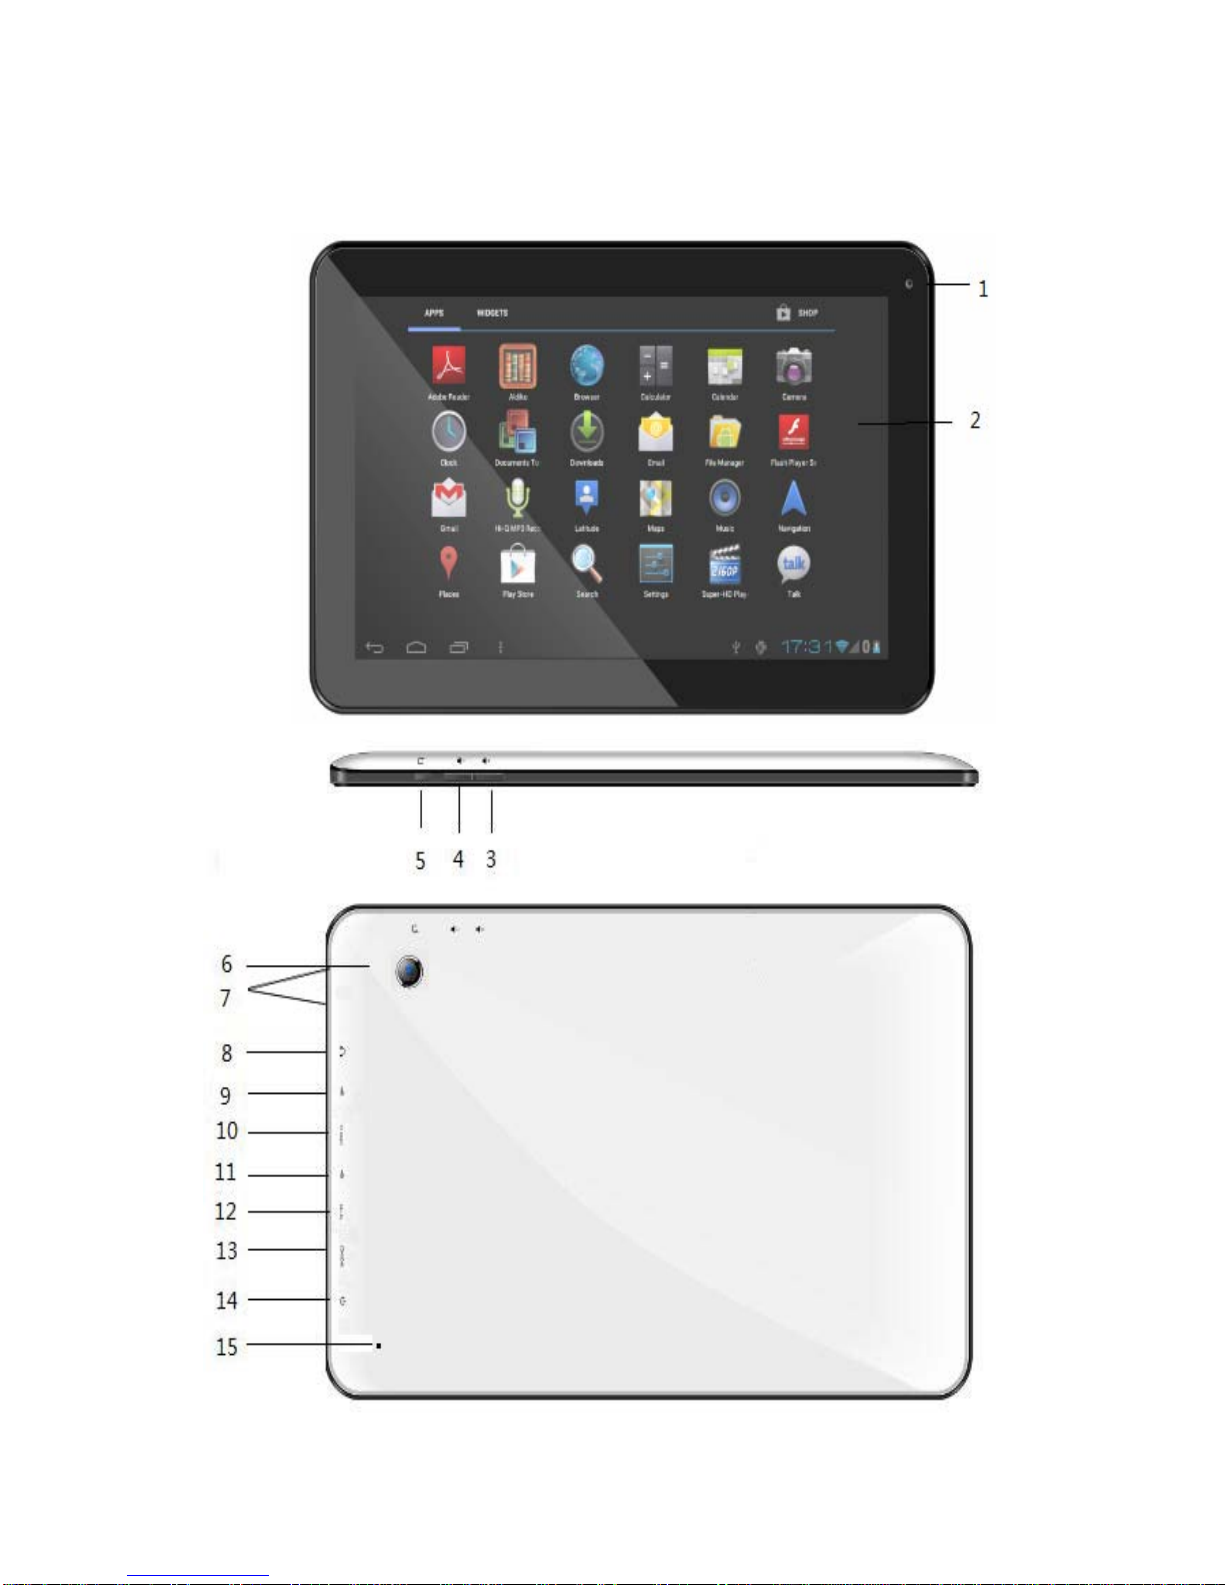
2.3 Keys and Functions

6
1. Front Camera
2. 9.7” Capacitive Touch Panel
3. Volume+ / Menu
4. Volume- / Home
5. Return
6. Back Camera
7. Speaker
8. Earphone jack: 3.5 mm standard earphone jack
9. Micro USB
10. TF card: TF-CARD slot: external T-FLASH card
11. Host
12. HDMI output interface
13. DC in Port
14. Power Button:
To power up, press and hold the power button approximately three (3) seconds and release to enter the
main interface.
To shut down, while in the main menu interface, press and hold the power button approximately three (3)
seconds. The system will display a pop-up “Power off” option. Click “OK” to safely shut down the tablet.
To lock the screen, short press the power button. Repeat the action to unlock the screen.
15. Reset: Should the tablet crash and become unresponsive, you may insert a small object into the reset slot and
short press the reset button to reset the tablet.
Remarks:
1. When battery runs out of power the system will shut down automatically.
2. In the event the tablet is shut down in an irregular manner, restarting the tablet will begin the scan & restore
disk function. Please be aware that during this scan it may take longer to start up the system and enter the
main user interface.
Functions:
Power(power)Press and hold this button to turn the device on and off. Tap this button
briefly to put the player in standby or wake the player up
Vol +(up)Press to increase volume
Vol-(down)Press to decrease volume
Menu icon(menu)Tap it to open the current mode’s menu.
HOME icon(home)Tap this icon to return to your home screen. Please note that this does
NOT close any applications you have open, but just suspends them
Back icon(back)Tap this on any screen to return to the previous screen.
7
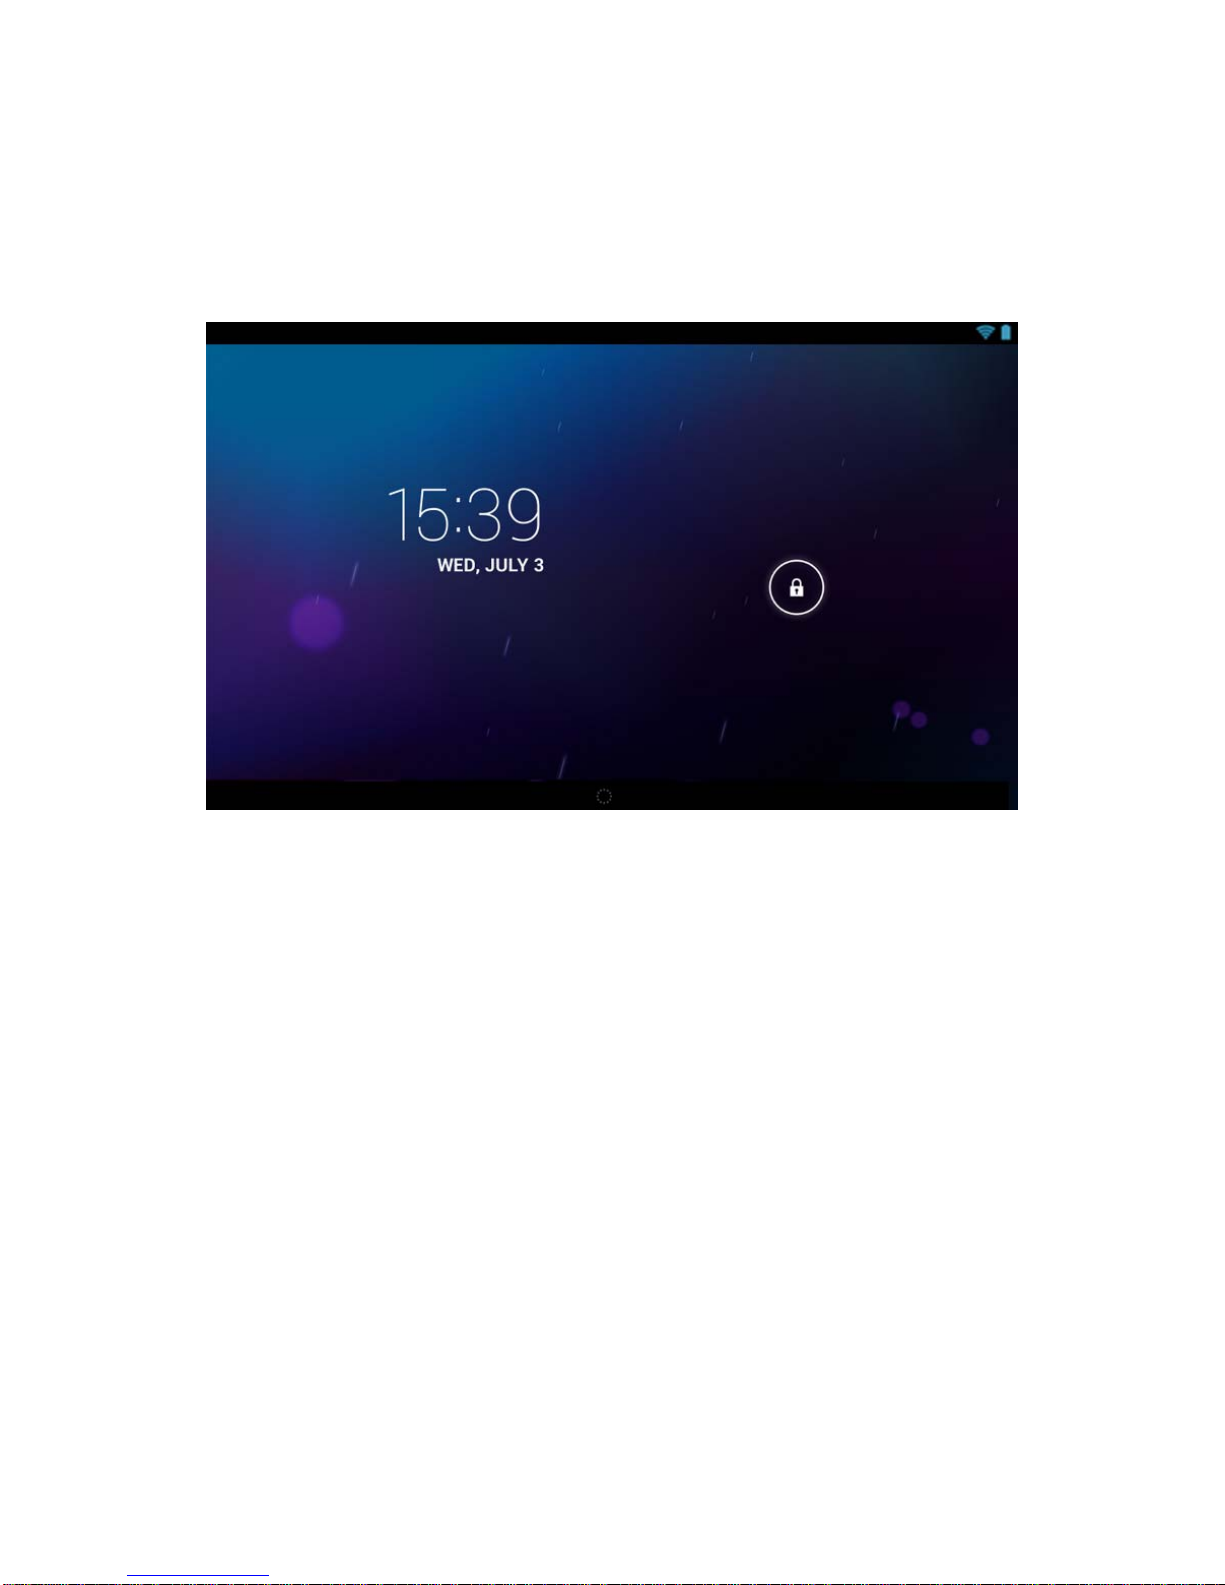
2.4 Power Up and Shut Down
Power Up
Press and hold the Power button for three seconds to power on. Tap and hold the lock icon, then drag it outside
of the circle to unlock the tablet.
Shut Down
Press and hold the Power button for three (3) seconds. The system will display a pop-up “Power off” option.
Tap “OK” to confirm the power off, or tap “Cancel” to continue using the tablet.

8
Standby Mode
Tapping the power button will place the tablet in standby mode; tapping it again will wake-up the tablet.
Please note that if the tablet sits idle, the device will enter standby mode automatically to conserve battery life.
3. Main Interface UI
Note: to scroll the screen left, slide your finger to the right; to scroll right, slide your finger to the left. To
scroll up, slide your finger downwards; to scroll down, slide your finger upwards.
The main portion of your UI is referred to the “Desktop”

9
The second most used portion of your UI is the apps menu, accessed by tapping the apps icon on the main
menu.
3.1 Icon and Applications Management
1) To move the icons on the desktop:
Press and hold an icon in your apps menu to drag it to your desktop. Once you have reached the location you want,
remove your finger from the screen to drop the icon into place.

10
2) To delete the icons from the desktop
Touch and hold desktop icons, then drag it to the “Remove” icon. Please note: this will only delete the icon
from your desktop; the app itself will still be located in your apps menu.
3.2 Change the Desktop Wallpaper
1) Touch and hold an empty spot on the main screen - a window will open with several selections
2) Select the Live Wallpapers gallery or Wallpapers gallery to select an image.
4. USB Connection & Word Input
4.1 USB Connection
1) When connected to a computer via USB, the below window will open. Select “Turn on USB storage” and the
tablet will act as a removable disk drive, allowing you to add or delete files to both an inserted SD card and the
internal memory.
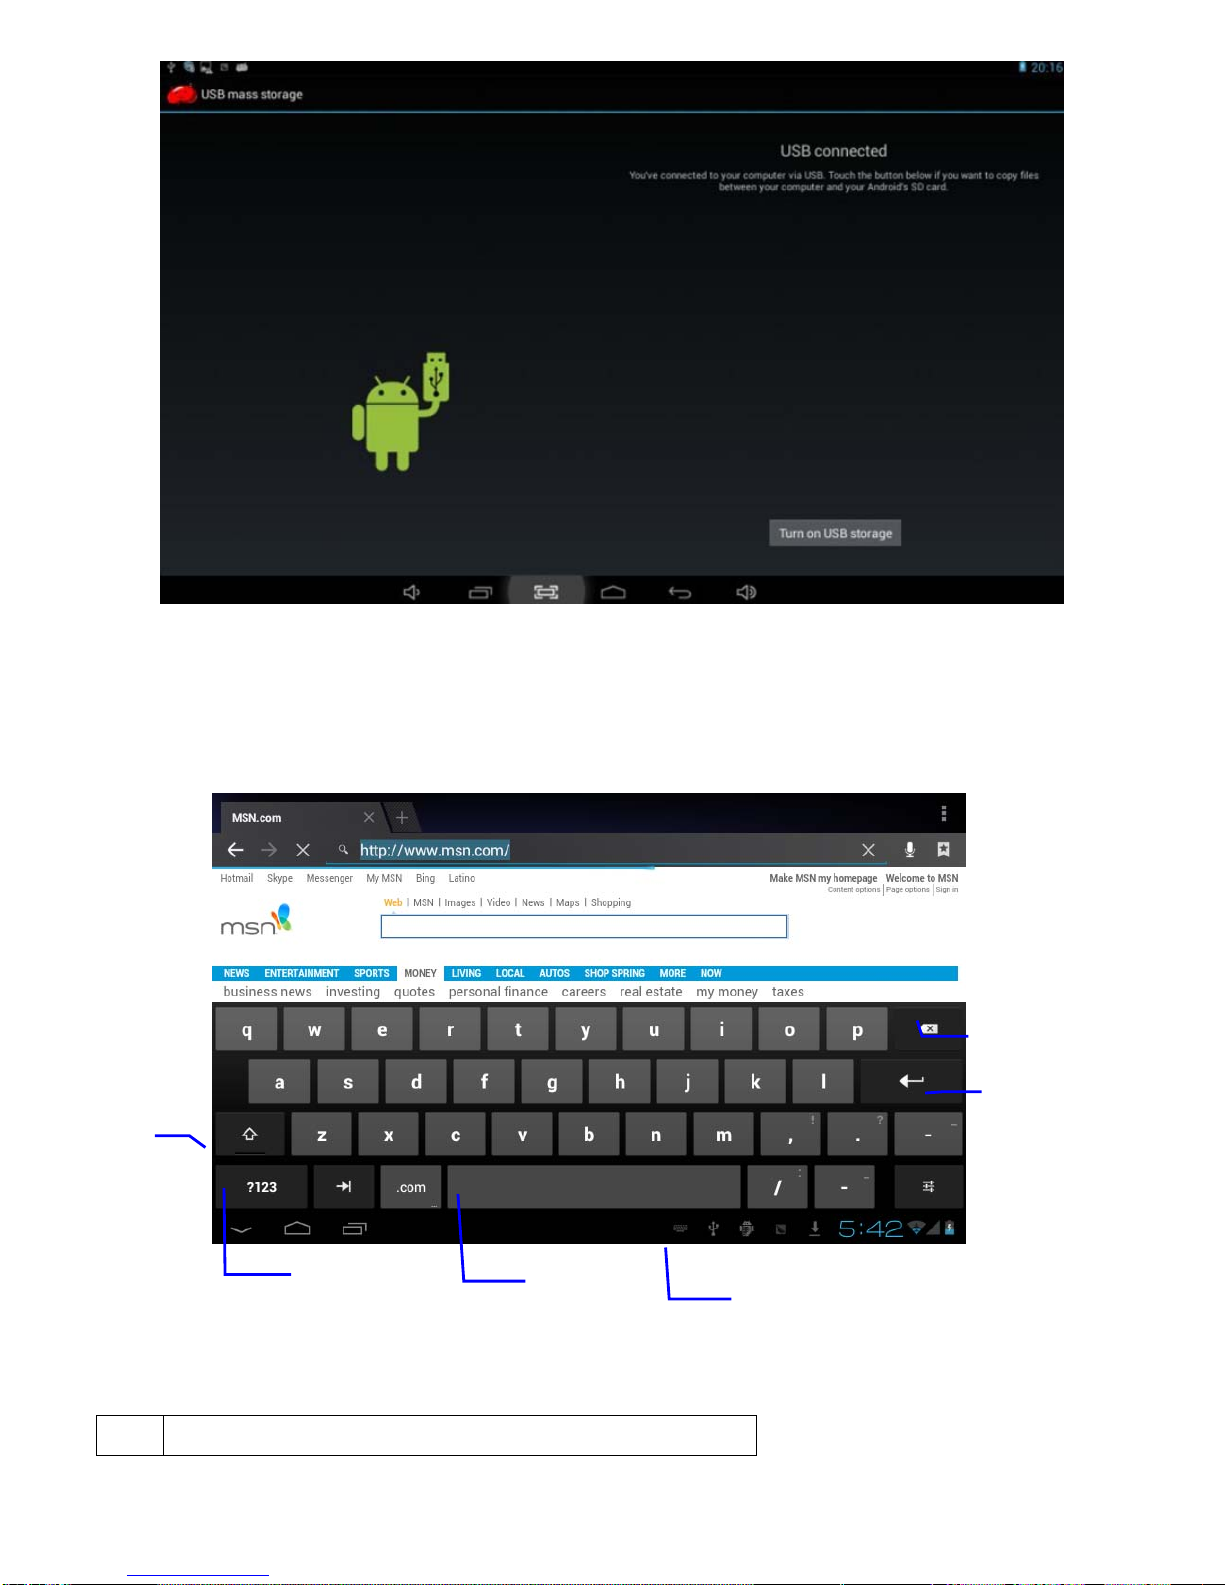
11
4.2 Word Input
Using the Android keyboard
To access the keyboard, simply touch the screen where the cursor appears. The keyboard will pop up
for use.
1 Switch between caps and lowercase letters
1
23
5
4
6
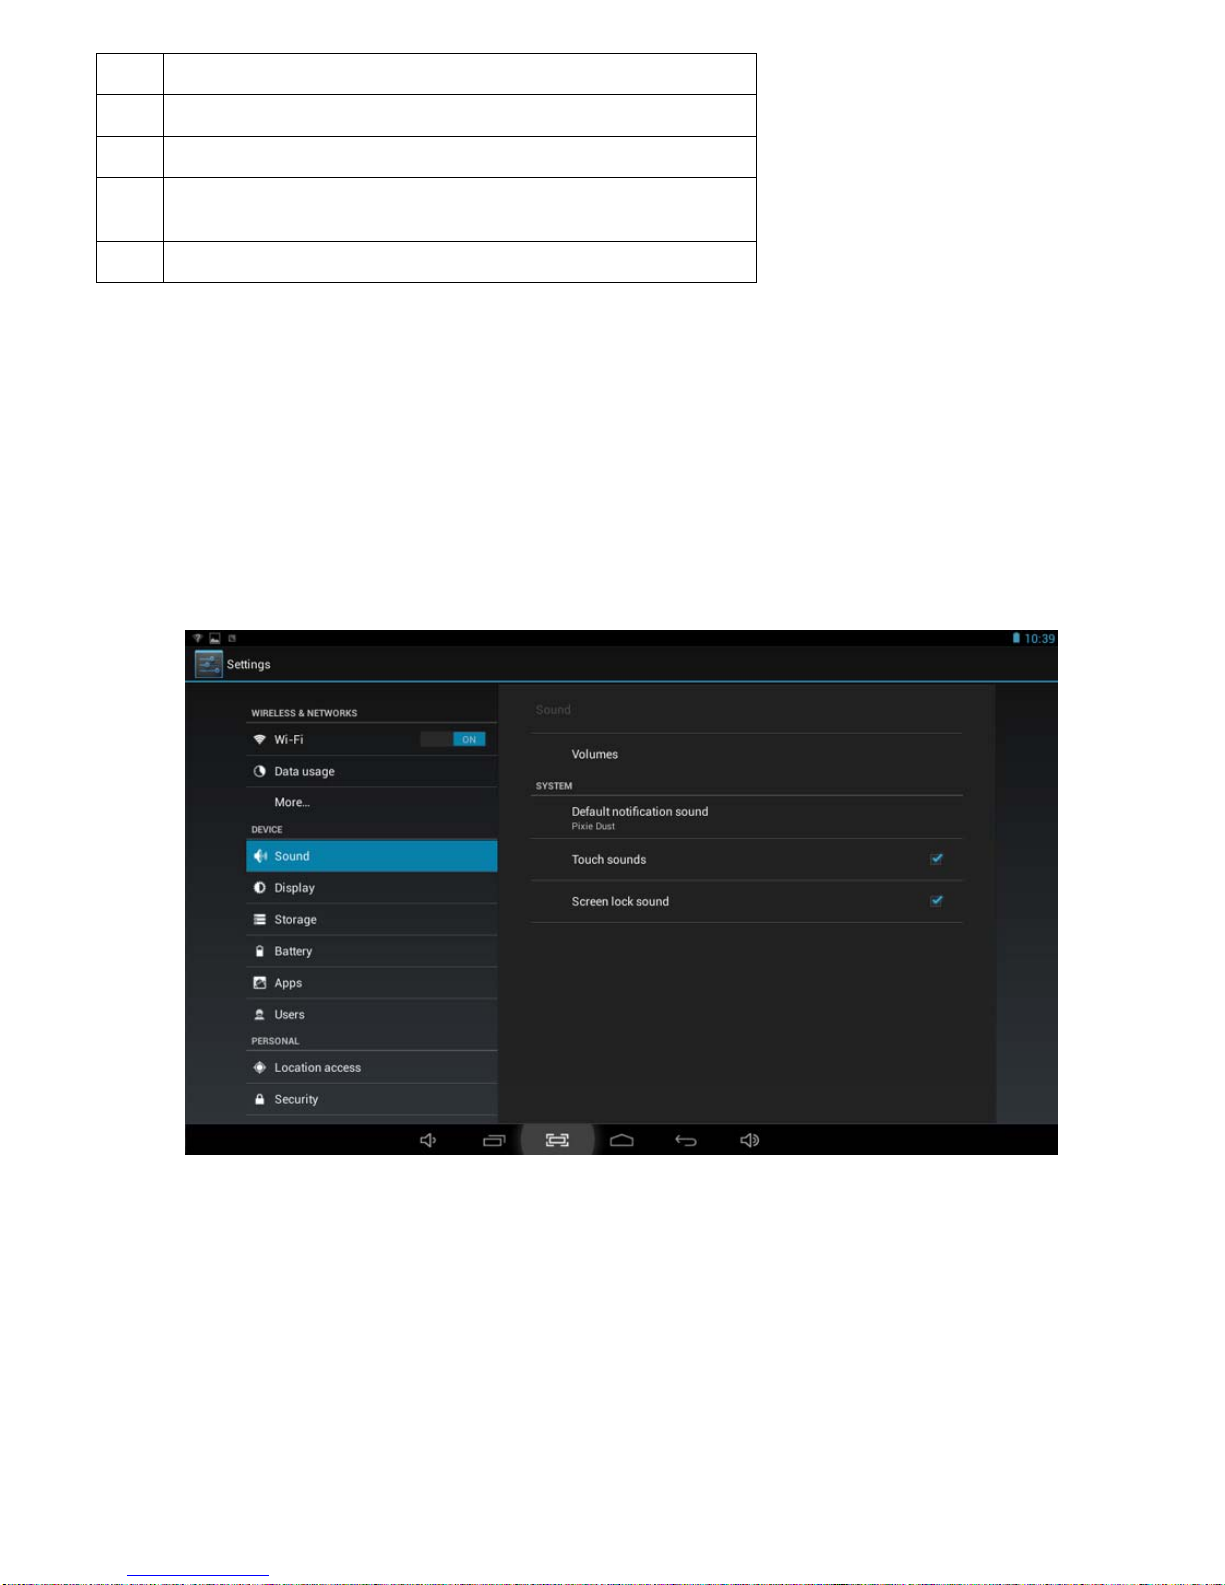
12
2 Switch between letter and symbol/number mode
3 Space bar
4 Enter button
5 Delete: tapping once will delete the last input character, press and
hold to delete all entered characters
6 Select a different keyboard (if installed)
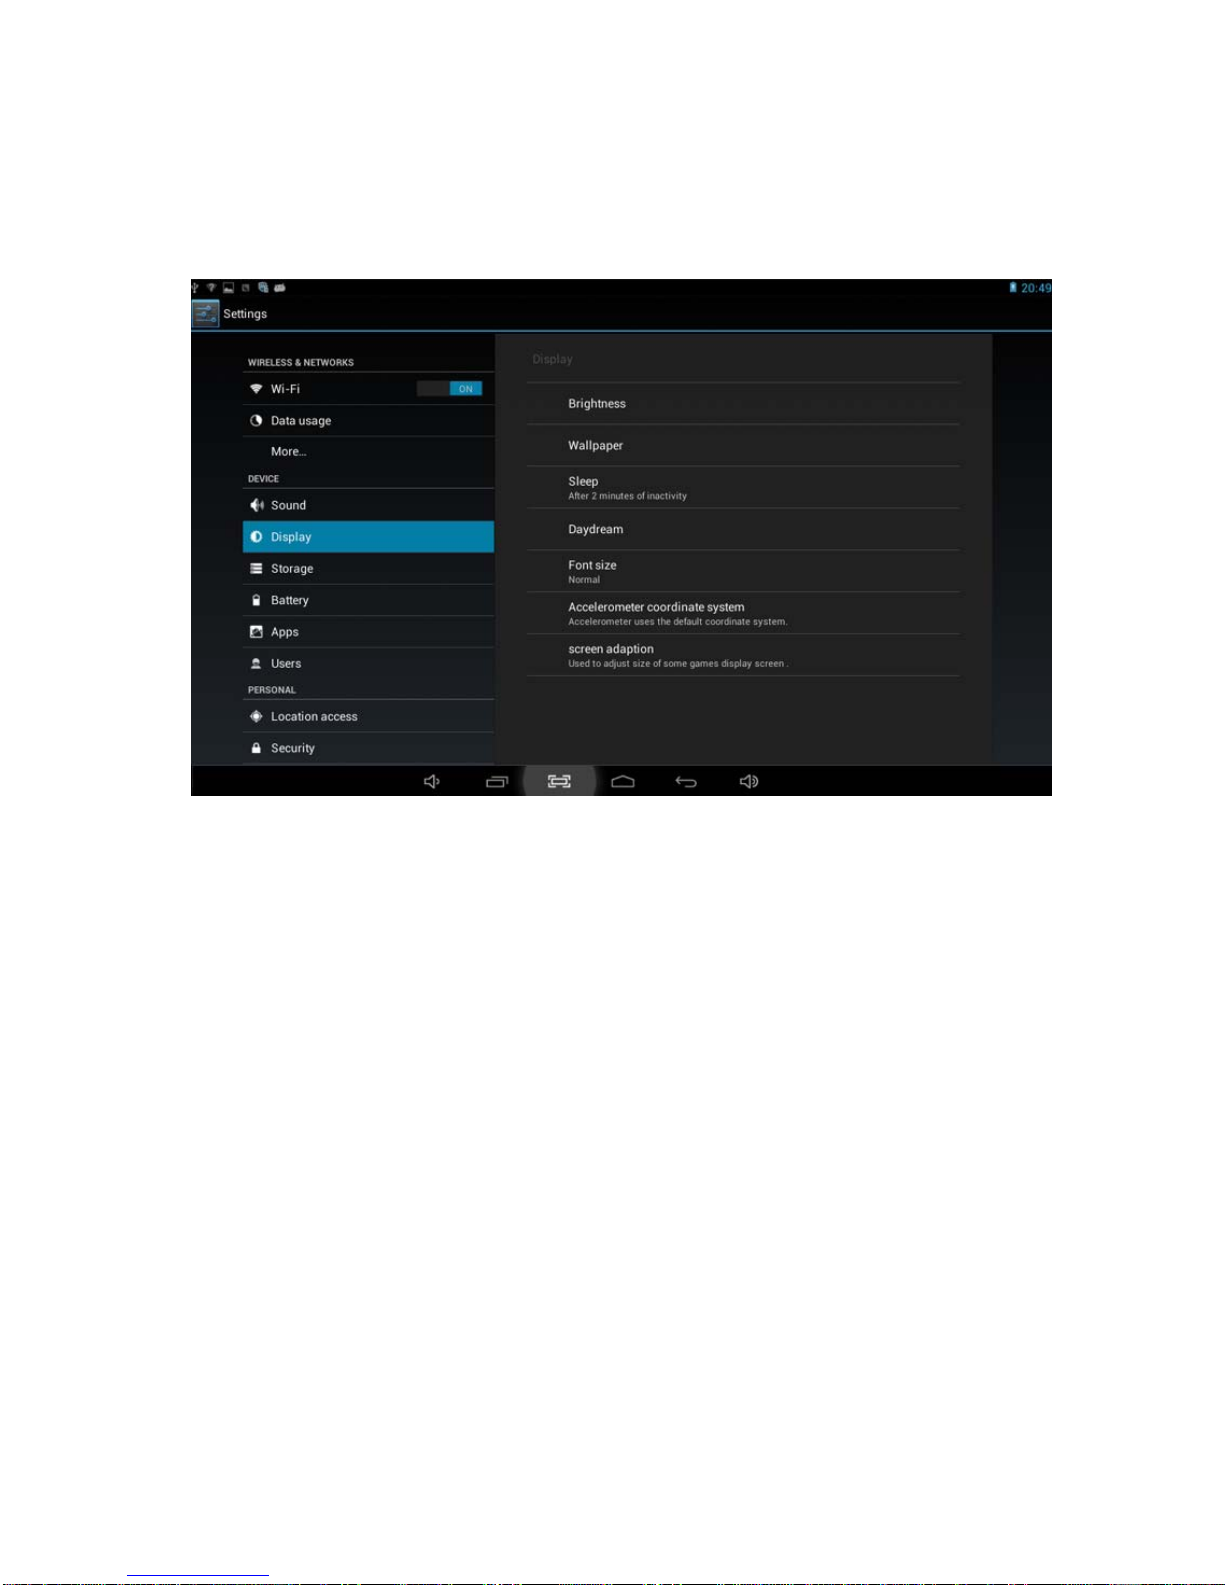
5. Basic Settings
5.1 Voice and Display
1) Sound and volume setting
1. Tap the Settings icon
2. Tap Sound
3. Tap volume to adjust the volume for music and video
4. Or press “VOL +” or “VOL – Button” to adjust the volume
13
2) Display setting
Adjust the brightness of your screen
1) Tap the Settings icon
2) Tap Display Ætap Brightness, a slide bar will open. Slide this bar to the right to increase brightness or to the
left to decrease brightness
3) Tap OK
5.2 Adjust Screen Standby Time
1) Tap the Settings icon
2) Tap display -> tap Sleep, select the amount of idle time you want to pass before the device enters standby
mode to conserve power
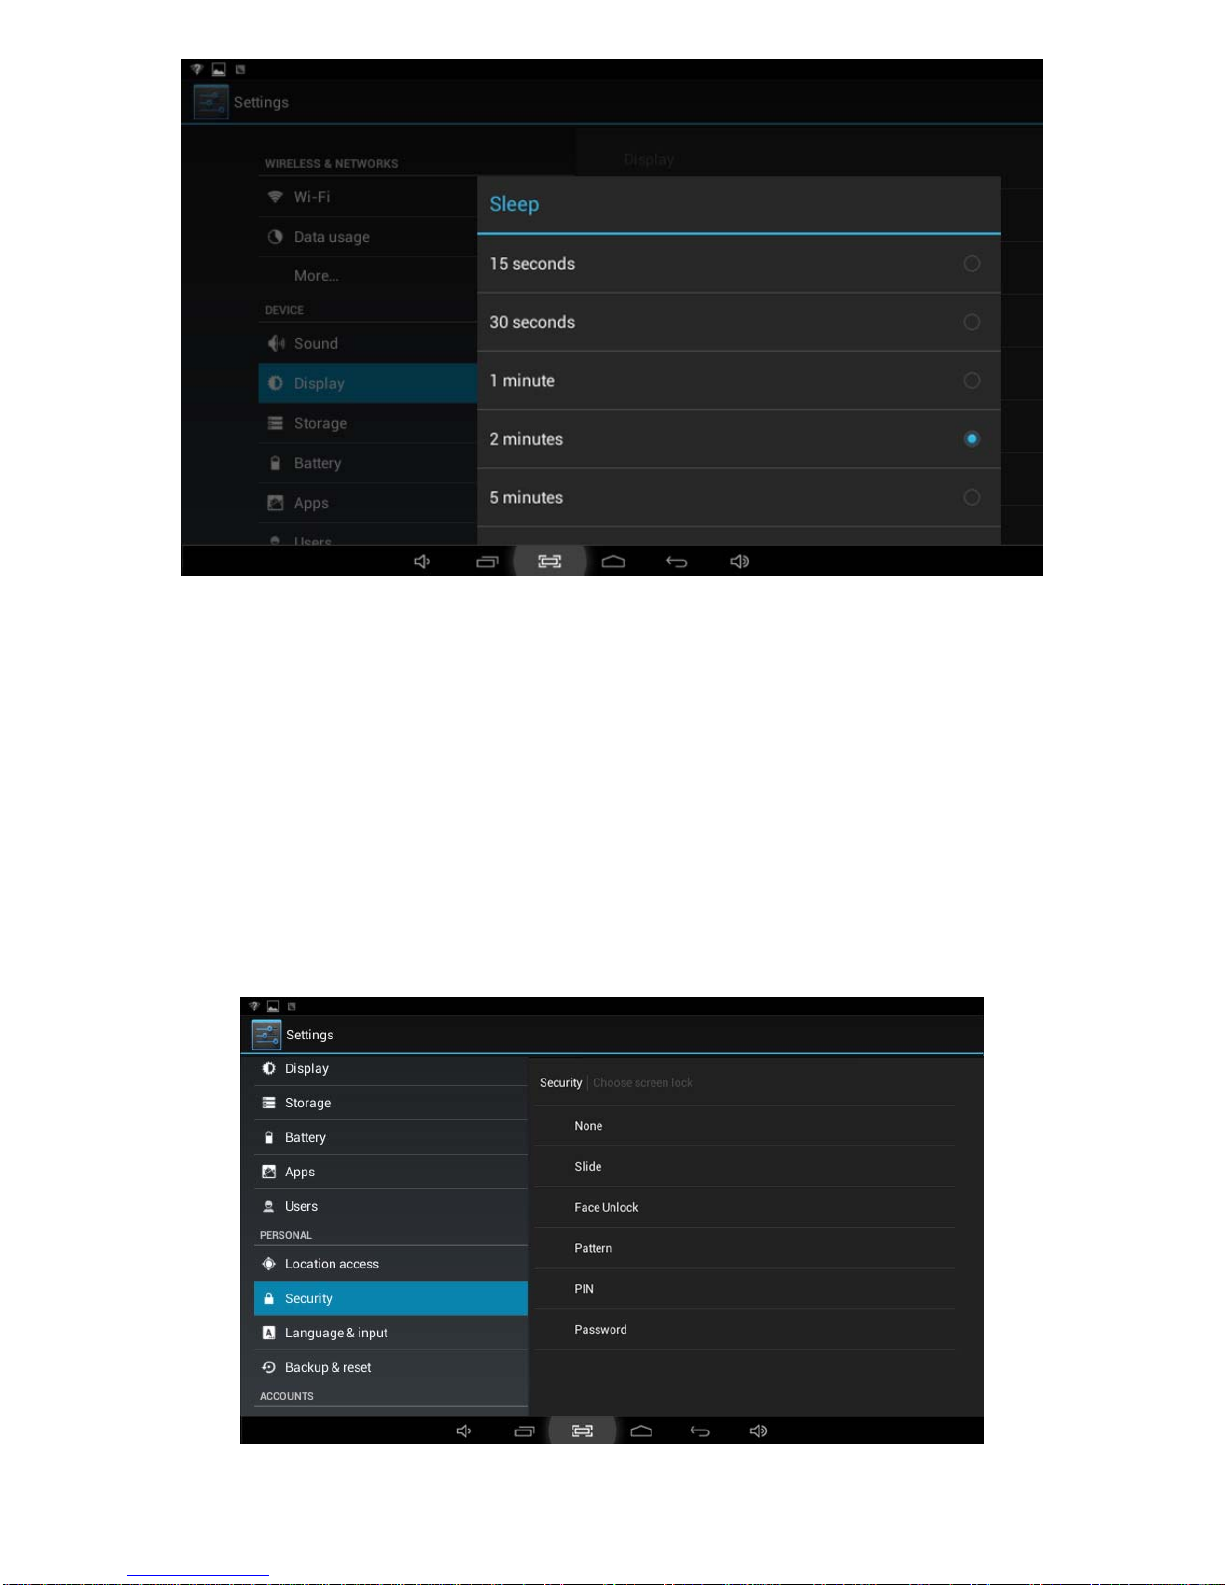
14
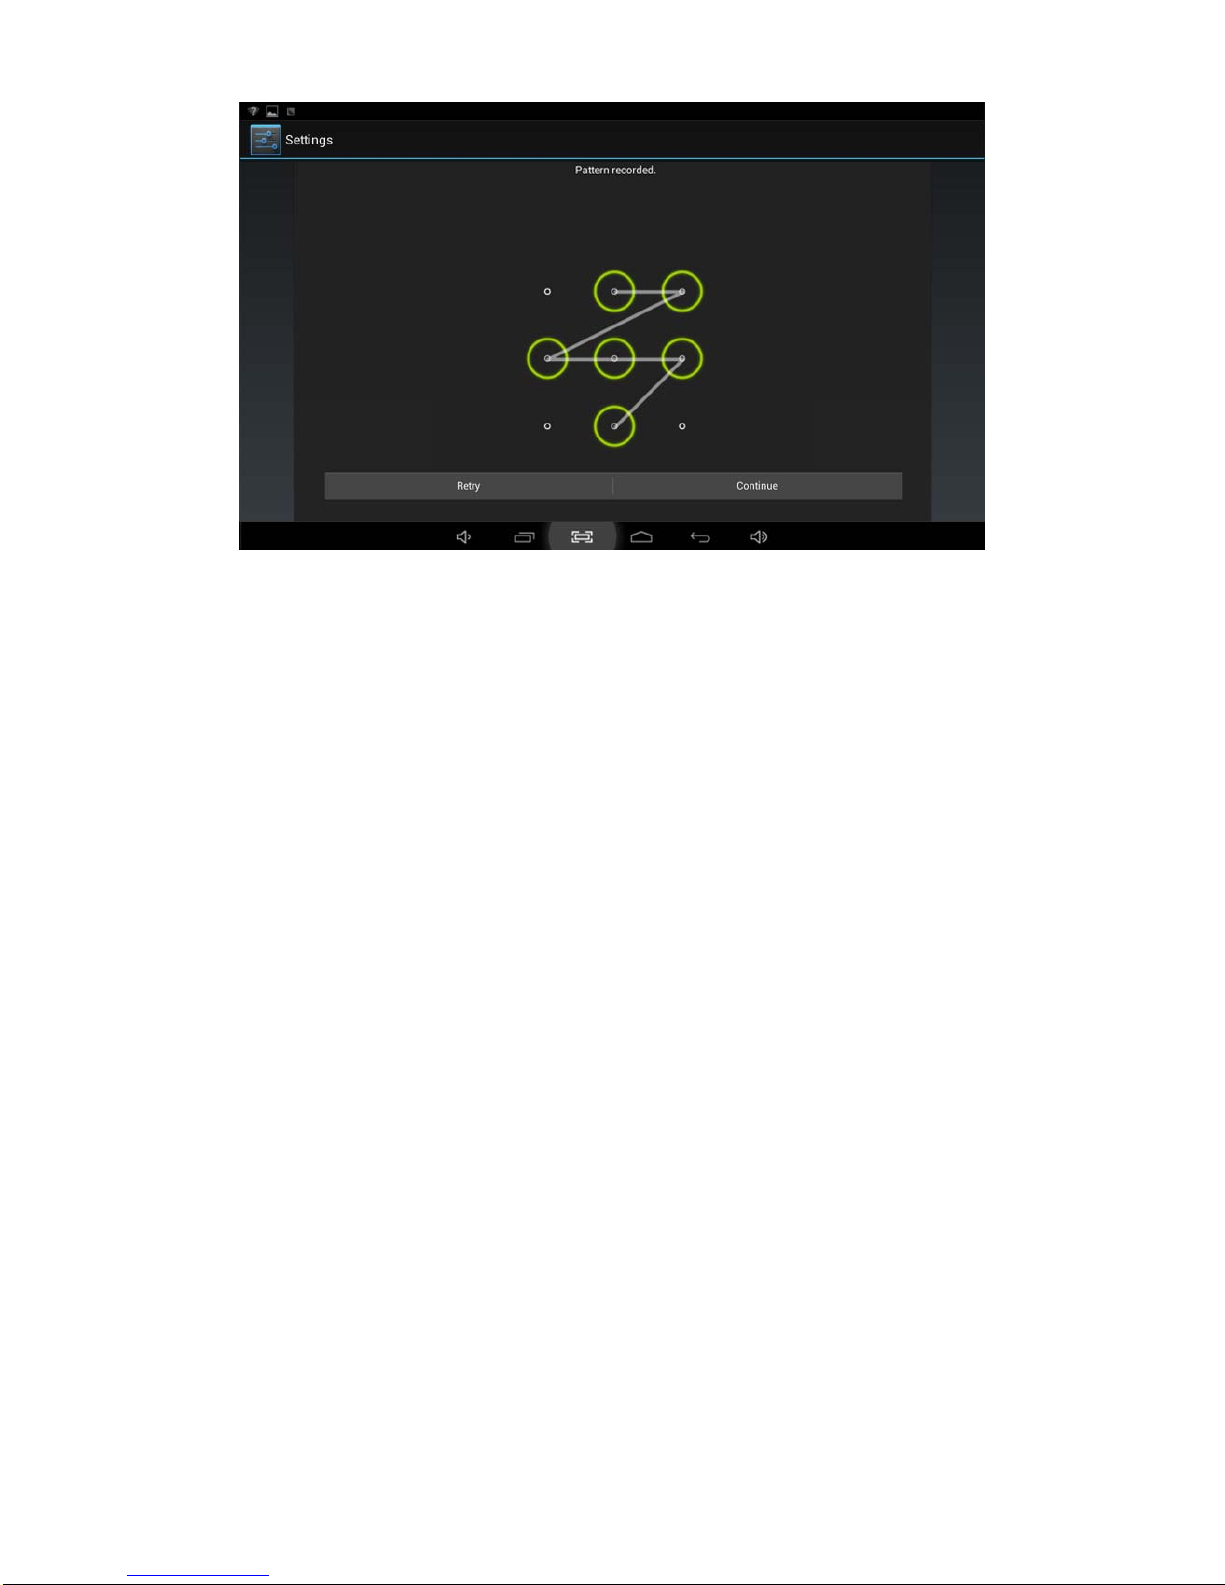
5.3 Setting a Screen Lock.
NOTE - If you set a Password, PIN, or Pattern, and later forget this item, you will be LOCKED
OUT of your tablet. For security purposes, we CANNOT recover a lost Password, PIN, or
Pattern for you.
You can set a password, PIN, or pattern to secure your device from unauthorized access and protect your privacy.
Note: anytime the device enters standby mode (pressing the power button briefly or due to idle time) you must enter
your password, PIN, or pattern to unlock it, if you have one set.
1) Tap the Settings icon
2) Tap Security ÆScreen lock Æthen chose the screen lock type you want
15
5.4 SD Card and Internal Memory
1) View SD card and MID memory available space
1. Tap the Settings icon
2. Tap Memory
3. View the available space on the SD card
4. View internal memory space
2) Safely remove the SD card
Please follow this procedure when removing the SD card to prevent damage to your SD card and files.
1. Tap the Settings icon
2. Tap Memory
3. Tap Remove SD card
4. Pull out the SD card
5.5 Date and Time
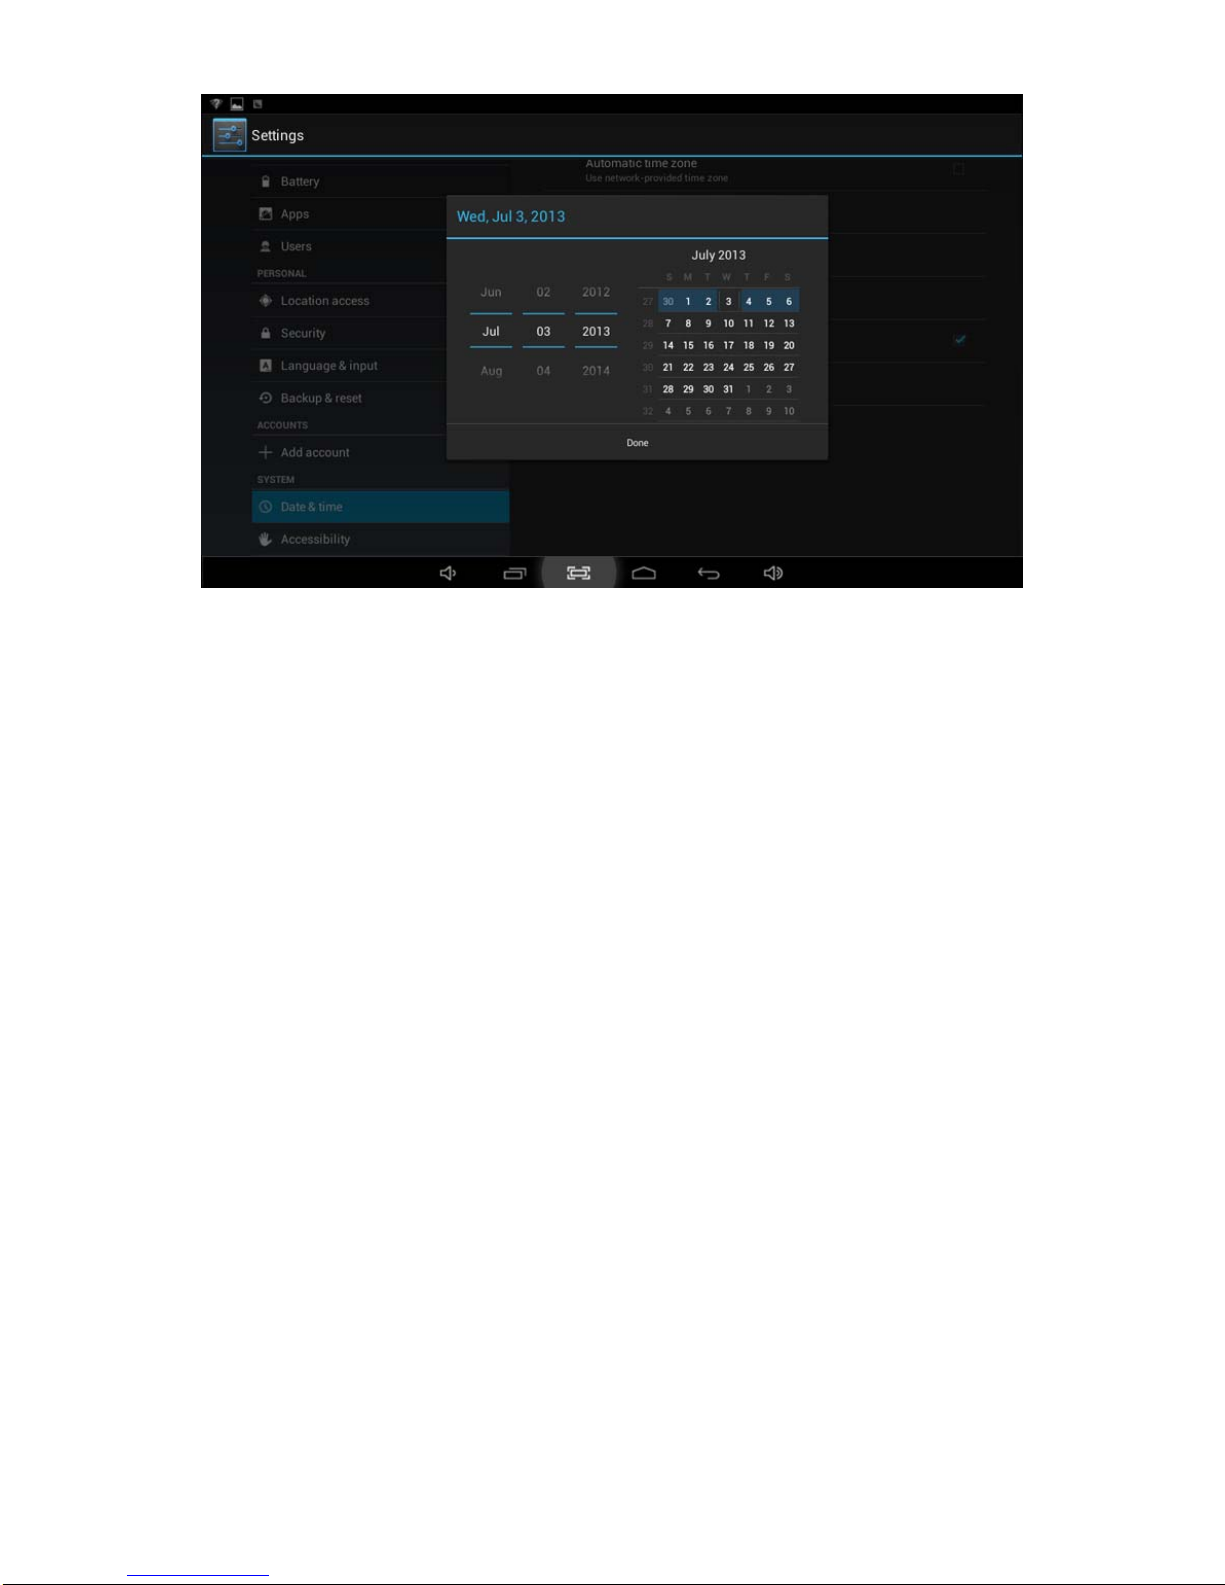
16
Manually adjust the date, time and time zone
1) Tap the Settings icon
2) Scroll the screen down, and tap Date & time
3) Tap Time zone, and choose your zone in the list. Scroll down to view more zone information.
4) Tap choose Date formats, and tap the date formats in MID
5.6 Setting the Display Language

17
1) Tap the setting Settings icon
2) Tap Language & input
3) Tap Language and select the language you want - there are 60 languages from which to choose
6. About the Tablet
6.1 System Update
Note: this setting is for advanced users only. If done improperly, your tablet may be damaged,
as well as your data erased. Please exercise caution when updating.
1) Tap the Settings icon
2) Tap About tablet
3) Tap System update, follow the onscreen instructions
4) Tap Install system update only if there is new version available and you have the update file saved to your SD
card
7. Multi-Media
7.1 Media Formats Supported
18
Audio file formats supported:
MP3, WMA (non encrypted), MP2, OGG, M4A, MA4, FLAC, 3GP, WAV
Supported video formats:
AVI (H.264, DIVX, DIVX, XVID), RM, RMVB, MKV (H.264, DIVX, DIVX, XVID), WMV (non encrypted), MP4(H.264,
MPEG, DIVX, XVID), DAT(VCD), VOB (DVD), PMP,MPEG, MPG, FLV (H.263, H.264), ASF,TS, TP, 3GP, MPG
Supported image formats: JPEG (RGB), GIF, PNG, BMP
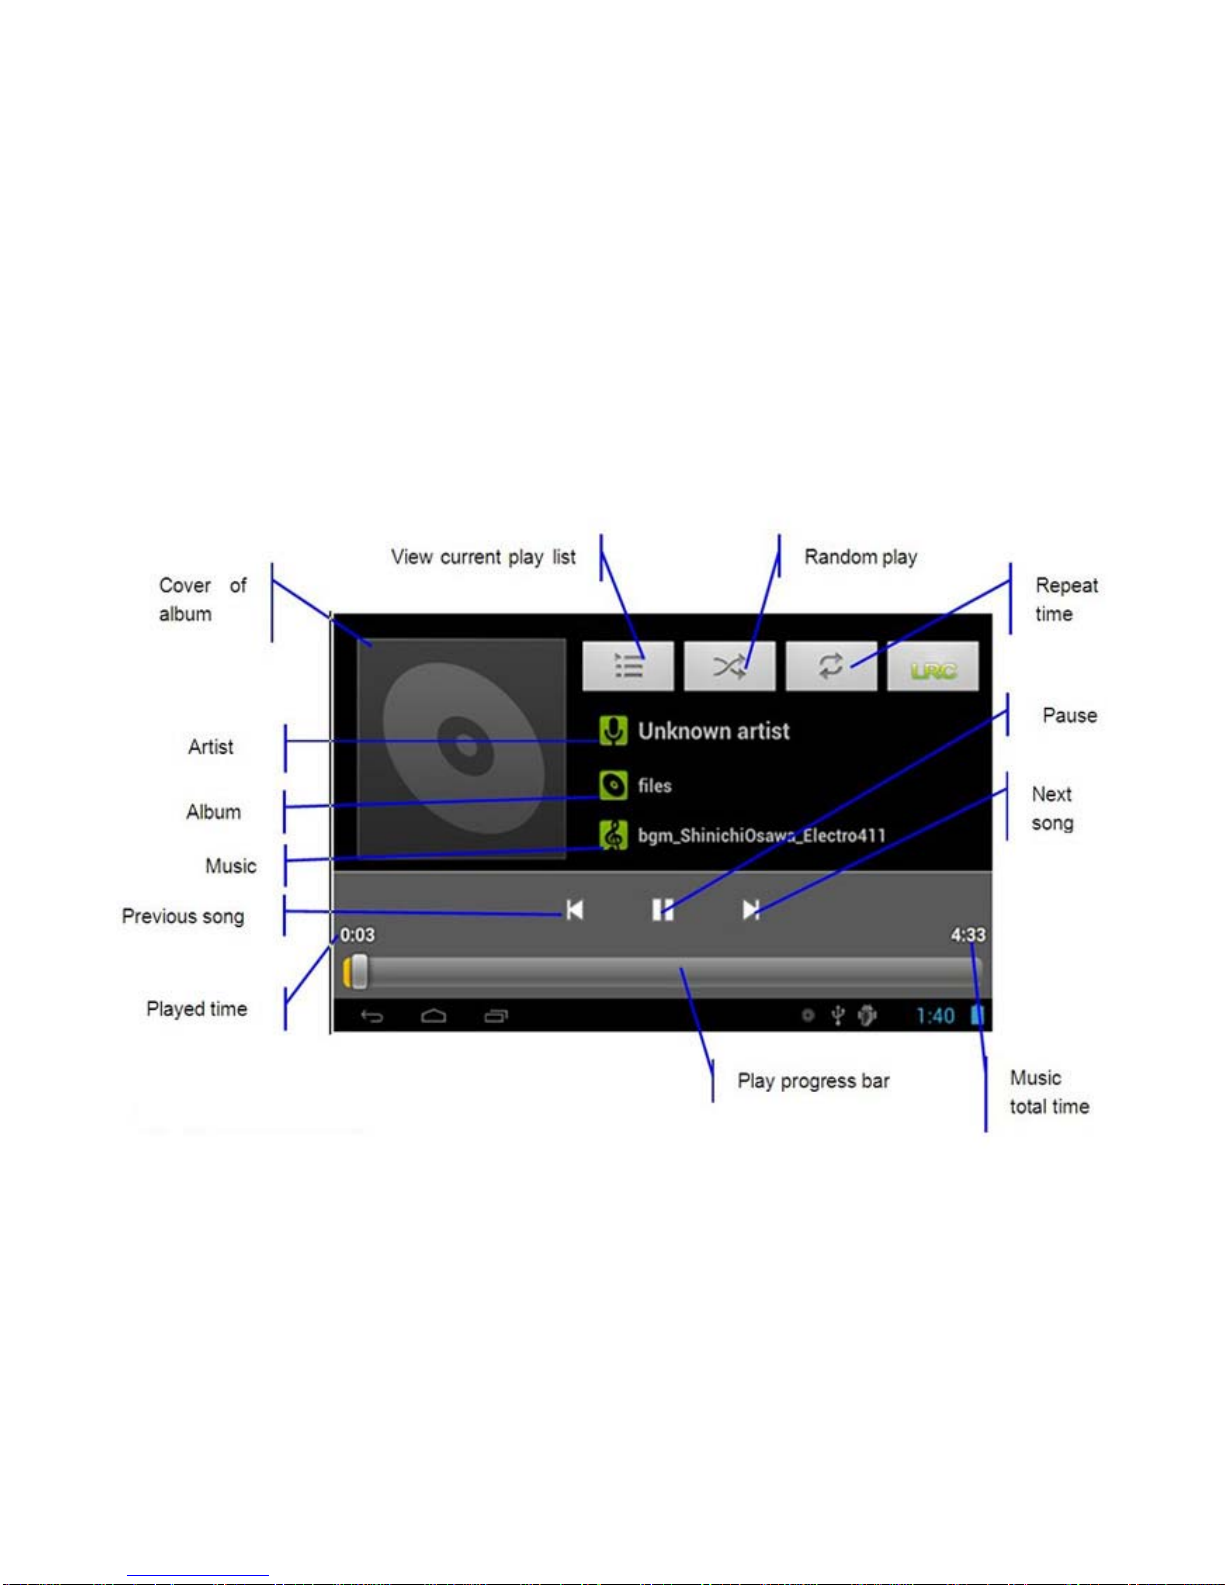
7.2 Music
Your music can be divided into four types: artists, album, all music, and play list. Choose a type to view the list. If
you enter one type, continue to narrow your selection until the music you want to play appears. For example, if you
choose artist type, you can see the artist name from A to Z; if you choose one artist, a list will display the artists’
albums and album list.
1) Find and play music
1. Tap the Music application
2. Tap artist, album or play list
3. Select any music to play
2) Add music to a play list
1. Tap the Music application
2. Enter to select music.

19
3. Tap and hold the music you want add
4. Tap “Add to playlist,“ and select the play list to which you wish to add your files
OR
1. Tap New
2. Input a name for your new play list
3. Tap Save
3) Delete the music in a play list
1. Tap music
2. Tap and hold the music you want delete from the play list
3. In the popup music setting menu, tap delete to finish
7.3 Video
1) Enter video mode
Tap the video application
1. Tap gallery or list selections
2. The device will display all compatible video files
3. Tap the file you want play
7.4 Images
1) View images
1. Tap the image gallery application
2. This bring up the image gallery, tap the file or folder you want to view
3. Tap the image you want to view; system will view the image in full screen
4. When you view images, you can zoom in and out by pinching or sliding two fingers apart
2) Edit and setting images as a contact or desktop
After opening an image, tap the image again to bring up your menu and delete icons. Tapping the delete
icon will allow you to delete the image. Tapping the menu icon will bring up your image submenu.
Slideshow: Tap to enable slideshow mode
Edit: Tap to edit the image
Rotate left/Rotate right: Tap to rotate the image
Crop: Tap allows you to crop the image
Set picture as: Tap to set the picture as a “Contact image” or “Wallpaper”
Details: Tap to display image details, such as filename, creation date, dimensions, orientation, file size, path, etc.
7.5 Camera
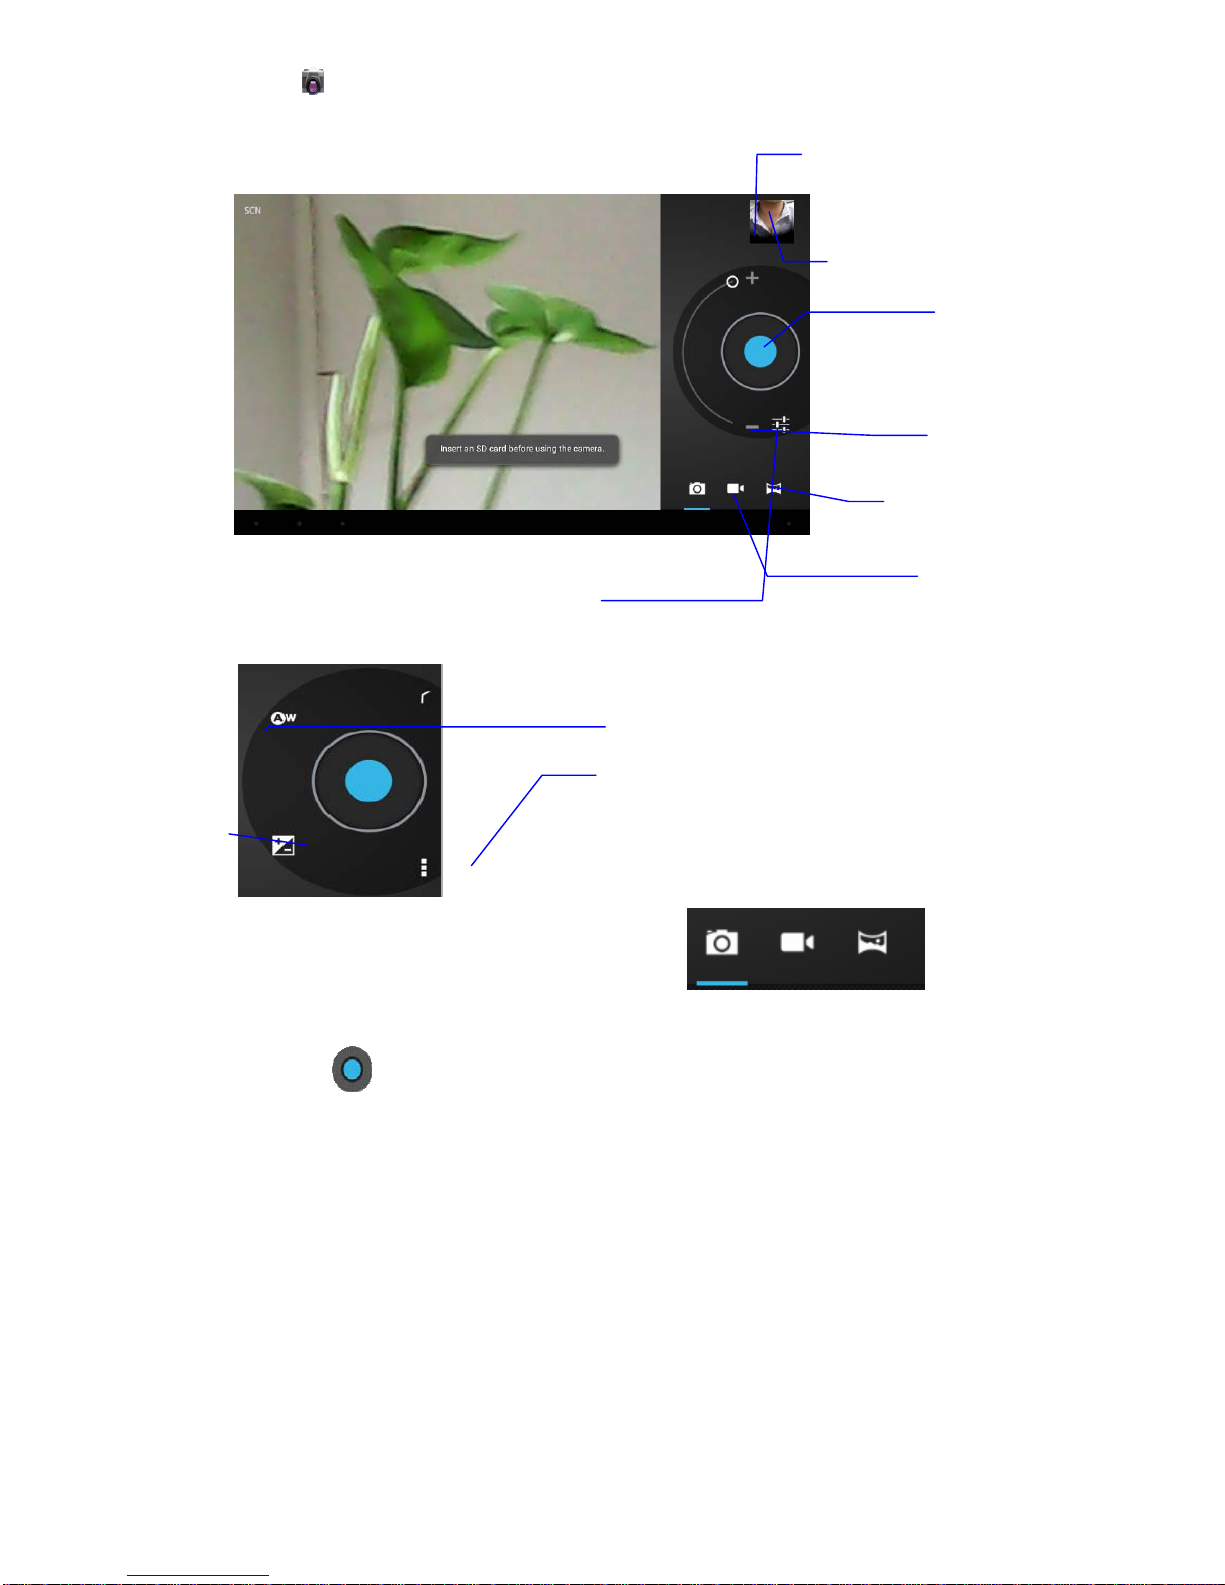
20
Tap the camera icon on the main screen or the app menu.
The controls for camera and digital recording modes are interchangeable.
1) To take pictures, ensure that your tablet is in camera mode:
2) Aim at the target you want take pictures of.
3) Tap the blue button to take images.
Note:To avoid blurring your images, make sure that you hold the device steady and tap the blue button
lightly.
Recording video
Panorama mode
Swap between
video and
camera modes
Zoom out
Tap to capture
image or video
View image or videos
Zoom in
Show additional camera setting
options shown below
White balance
Exposure
Camera settings
(Store location / Picture size
/ Restore defaults)
Table of contents


