Chubu Hatsuyuki HB320A User manual
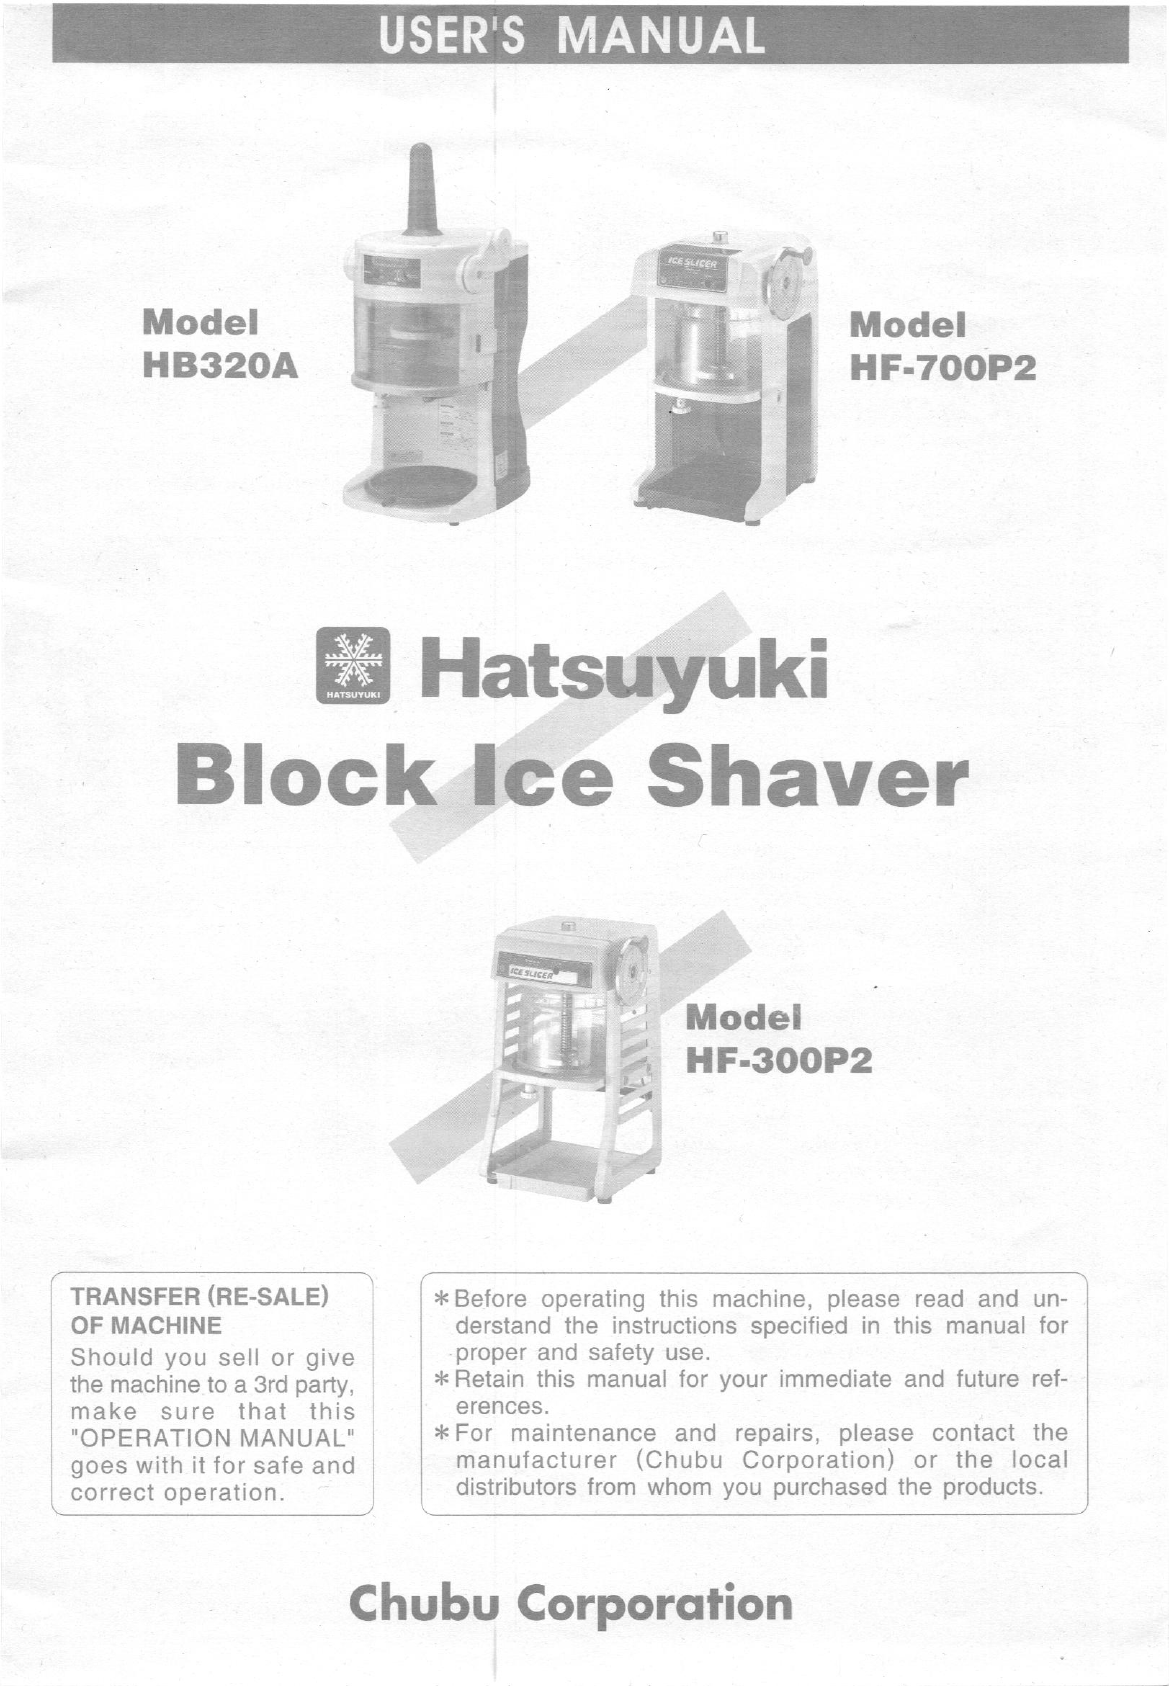
USER'S MANUAL
I
Model
HB32OA
TRANSFER (RE-SALE)
OF MACHINE
Should you sell or give
the machine to a 3rd party,
make sure that this
,OPERATION MANUAL'
goes with it for safe and
correct ope ration.
ffi Hatsuyuki
Block lce Shaver
Model
HF-70/o/P2
* Before operating this machine, please read and un-
derstand the instructions specified in this manual for
proper and safety use.
* Retain this manual for your immediate and future ref-
erences.
* For maintenance and repairs, please contact the
manufacturer (Chubu Corporation) or the local
distributors from whom you purchased the products.
P2
v
Chubu Corporotion
7
L
,Model
I!

FOR SAFETY
a Before operating the machine, please read the following "lnstructions for Safety" in the
manual very carefully, and operate the machine correctly.
o Each instruction specified in the manual is very imporlant for safety, so be sure to fol-
low each instruction as specified.
oAttention marks and their meanings are as follows:
Note: "Material damages "means damages to buildings, furniture and effects, pets, etc
Examples of Mark / Pictograph:
WABNING lncorrect operation of machine is dangerous and can cause
serious injury or death.
CAUTION lncorrect operation of machine is dangerous and can cause injury
of person or material damages.
Electric Shock
AA represents 'CAUTION' (including danger and warning).
The speci{ic contents of caution are shown near the A mark by pictograph
or letters.The mark illustrated left represents 'ELECTRIC SHOCK'.
@
Do Not Disassemble
$ represents'PROHIBITED OPERATION'.
The specific contents of "Prohibited" are shown within or near this
mark by pictograph or letters.
The mark illustrated at left represents "DO NOT DISASSEMBLE'.
)
F+-
\tP
Unplug
(D represents 'ENFORCEMENT" (Things to do).
The specific contents of "Enforcement" are shown within or near O the
mark by pictograph or letters.
The mark illustrated at left represents "Unplug from outlet".
A WARNING
OBe sure to ground (earth) the machine.
Never connect a ground wire (earthing) to gas pipes, water
pipes, Iightening rods or telephone cord/grounding wires.
An incomplete grounding (earthing) is dangerous and
can cause severe electric Shock.
ODedicated (Exclusive-use) outlet.
Always use an outlet dedicated to each machine. Never
use extension cords or connect the unit to other power
supply cords. Never connect several or many plugs into the
same outlet. lt may cause power supply cord to overheat
and melUburn or electric shock or fire.
(DDo not operate the machine outside.
Operating the machine outside or in the rain will cause
electric bleeding or electric shock.
r@
Plug - l--= I
I
I
a

!
A waRrurruc
ODo not install the machine in a damp or wet place.
It can cause electric bleeding or electric shock.
ODo not install/place the machine close to any heating
appliance.
Never install/place the machine close to any heating
appliance such as a gas burner. lt can cause melting
and/or burning of plastic cover.
OThis machine is for'COMMERCIAL USE".
This appliance can be used by children aged from 8
years and above and persons with reduced physical,
sensory or mental capabilities or lack of experience and
knowledge. lf they have been given supervision or in-
struction concerning use of the appliance in a safe way
and understand the hazards involved.
Children shall not play with the appliance.
Cleaning and user maintenance shall not be made by
children without supervision.
v
I 1-
ODo not pour water over the machine or immerse
machine in water.
It can caude a short circuit or electric shock, as well as
rust and other water related problems.
\/
ODo not damage power supply cord.
Never work on power cord and never pull, twist or bundle
it. Do not place a heavy things on it. lt can damage the
power cord and can cause electric shock or f ire.
I=
OKeep plug clean and plug into outlet correctly.
Always keep plug clean and plug into outlet correctly.
Dirty plugs or imperfectly connected plugs can cause
electric shock or f ire.
Attention
to Dust.
ODo not touch any electrical parts (such as plug or
switch) with wet hands.
It can cause electric shock.
S-r
\-7
rtd\
<:_
affi
t)
l,
tl
I
a
2

SAFETY
A WARNING
Oln the event of circuit breaker moving to "OFF" posi-
tion, please contact the machine vendor.
Switching breaker to "ON" position incorrectly or by force
can cause electric shock or fire.
Oo
ashould accidents or irregular operation occur, TURN
OFF the main switch and unplug from outlet.
lmmediately contact your machine vendor for a correct
repairs. Continued operation of a faulty machine can/will
cause electric shock or fire.
OFor cleaning inside the ice hopper or changing blades,
be sure to TURN OFF the main switch and always put
on gloves while cleaning/changing blade works.
Never touch blades directly. They are very sharp and
can cause injury.
ONever try to disassemble or repair the machine by
yourself.
Always call a qualified technician. lncorrect repair will
likely cause irregular operation or electric shock, fire or
injury.
ODo not attempt to alter the machine in any way.
It can cause electric shock or f ire.
ODo not open the sliding door or put your hand into
the chamber during operation.
Lower the blade tip below the shaving table when cleaning the
inside of the chamber. Wipe the shaving table counterclock-
wise to the blade direction. Otherwise, injuries could occur. o
,m
\zz'q3
lrE--'r-r--l
twJ
%m
M'
-ffi
ffi(>
I \_.-
aa
l
3
I
a
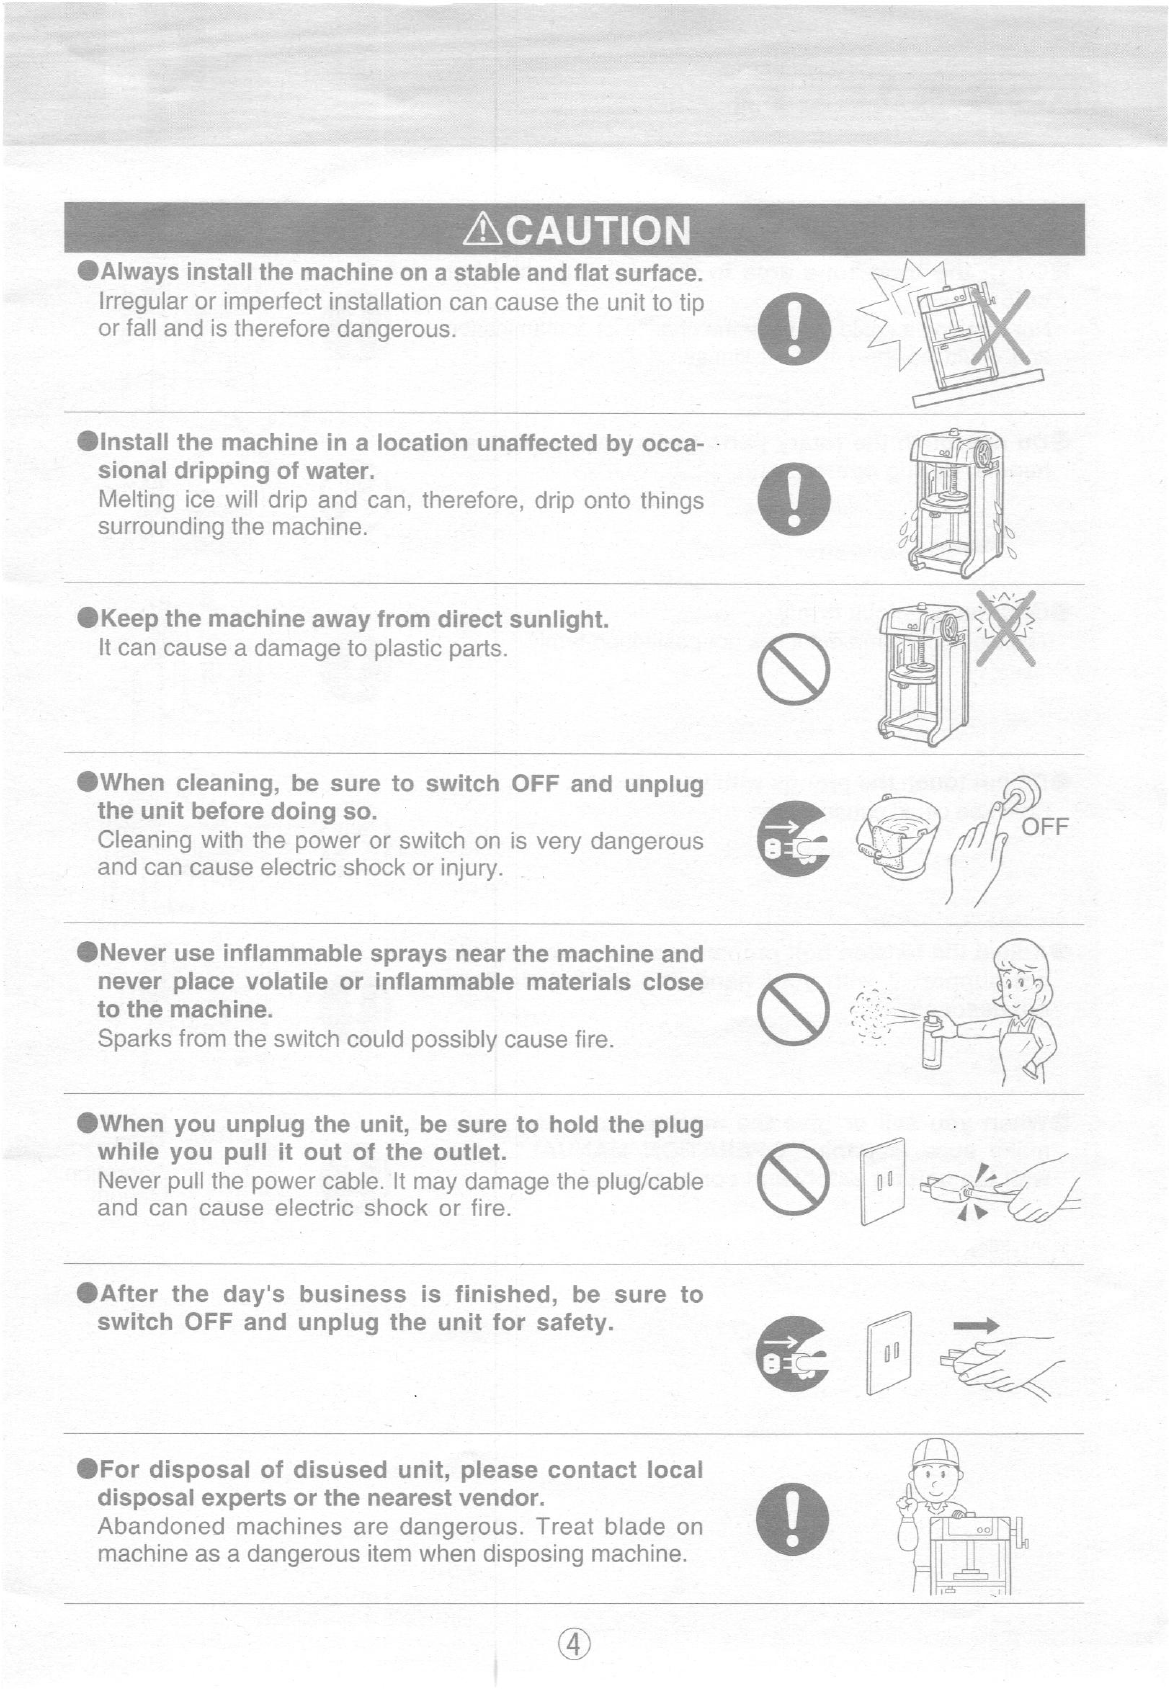
ACAUTION
OAlways install the machine on a stable and flat surface.
lrregular or impedect installation can cause the unit to tip
or fall and is therefore dangerous-
Olnstall the machine in a location unaffected by occa-
sional dripping ol water.
IMelting ice will drip and can, therefore, drip onto things
surrounding the machine. I\
L4ffi
I11
OKeep the machine away from direct sunlight.
It can cause a damage to plastic parts. X
OWhen cleaning, be sure to switch OFF and unplug
the unit before doing so.
Cleaning with the power or switch on is very dangerous
and can cause electric shock or injury. @@ OFF
ONever use inflammable sprays near the machine and
never place volatile or inflammable materials close
to the machine.
Sparks from the switch could possibly cause ,ire.
OWhen you unplug the unit, be sure to hold the plug
while you pull it out of the outlet.
Never pull the power cable. lt may damage the plug/cable
and can cause electric shock or fire. /,
/>
OAfter the day's business is finished, be sure to
switch OFF and unplug the unit for safety. +
OFor disposal of disUsed unit, please contact local
disposal experts or the nearest vendor.
Abandoned machines are dangerous. Treat blade on
machine as a dangerous item when disposing machine.
w
6
V<zz
+l
(:f
Fir
=s\-+h*
u*] *
6
ffii
e\6_
\-/ ll i-T--il] u
a
T
a
I
a
I
a
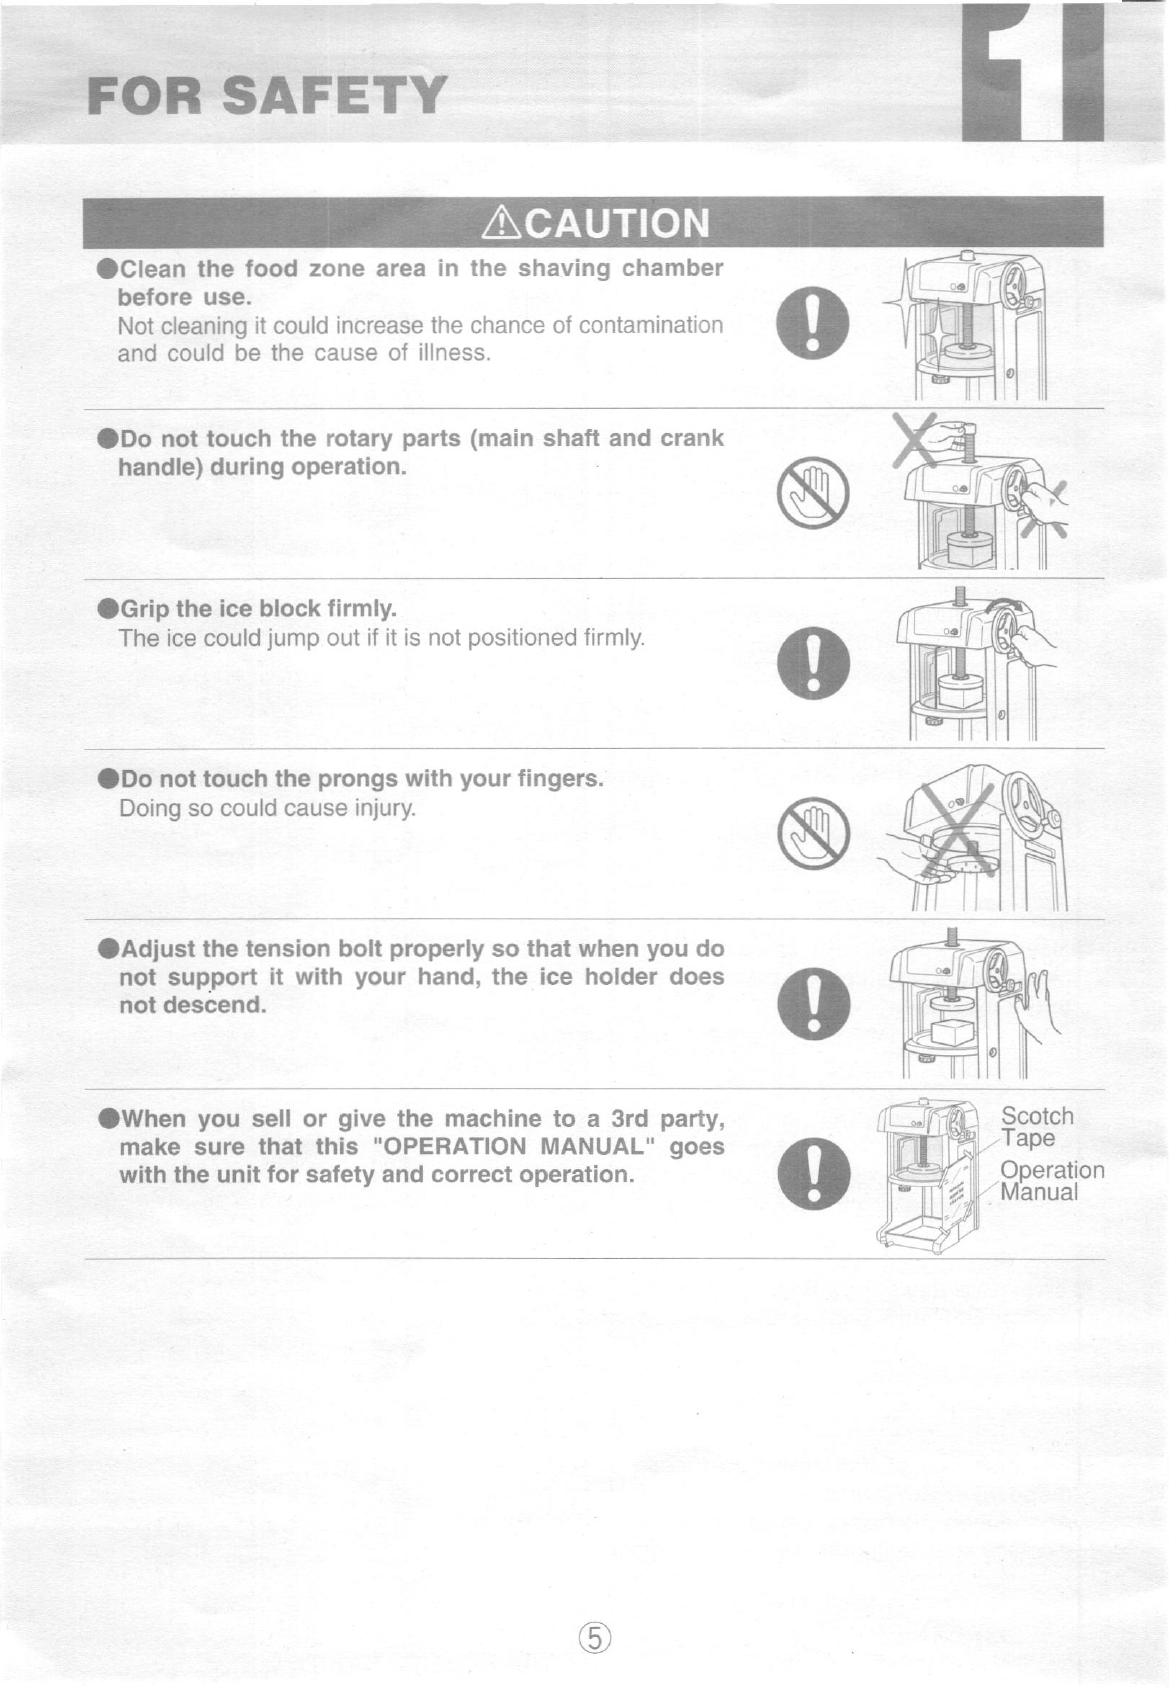
FOR SAFETY
ACAUTION
OClean the tood zone area in the shaving chamber
before use.
Not cleaning it could increase the chance of contamination
and could be the cause of illness.
ODo not touch the rotary parts (main shaft and crank
handle) during operation.
OGrip the ice block firmly.
The ice could jump out if it is not positioned firmly
ODo not touch the prongs with your fingers.
Doing so could cause injury.
OAdjust the tension bolt properly so that when you do
not support it with your hand, the ice holder does
not descend.
Owhen you sell or give the machine to a 3rd party,
make sure that this 'OPERATION MANUAL" goes
with the unit for safety and correct operation.
Scotch
Tape
Operation
Manual
JHLI ,,M
/6t8,
f-4,\
@
#
qIl
,_+=
N
N
1ffitl
llllliA-l frxIl
(ru
Pe
FS#IO
5
I
a
I
a
I
a
I
a
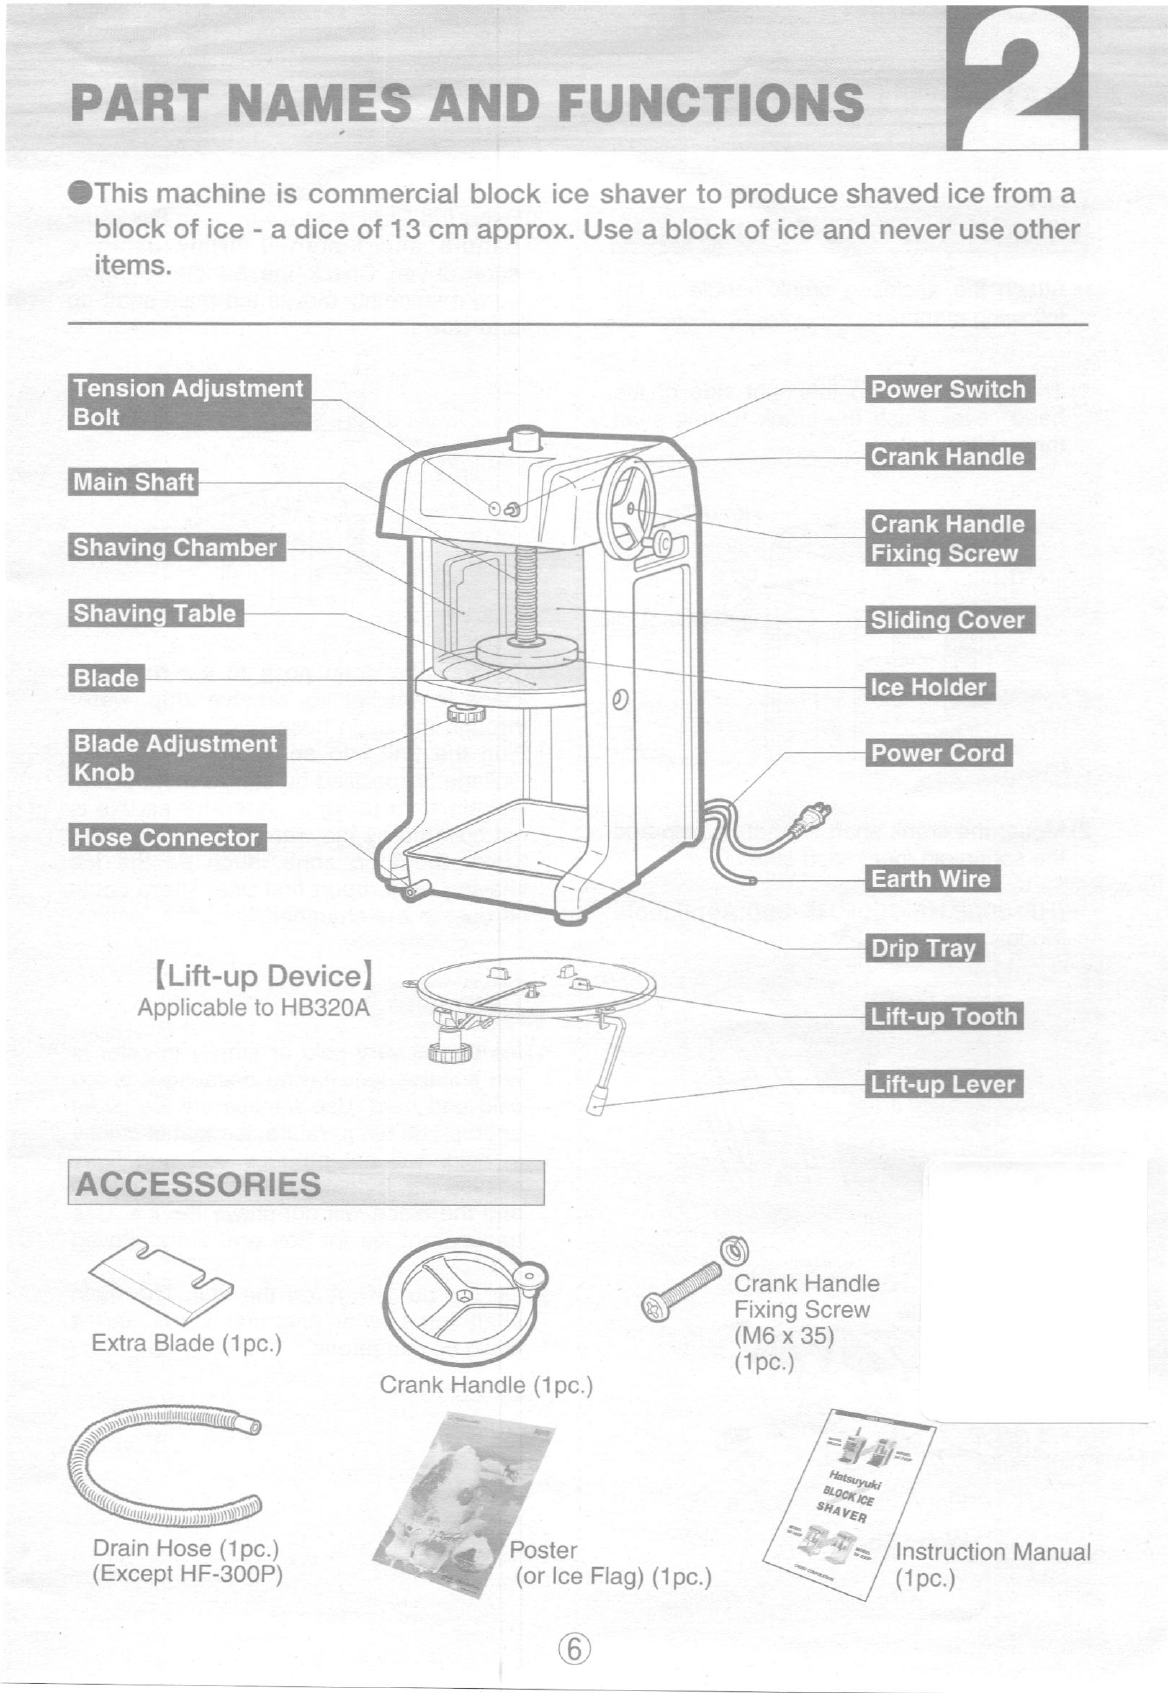
PART NAMES AND FUNGTIONS
Otnis machine is commercial block ice shaver to produce shaved ice from a
block of ice - a dice of 13 cm approx. Use a block of ice and never use other
items.
Ititt-up Device)
Applicable to HB320A
ACCESSORIES
^35@Ocrant Hanote
A)- Fixing Screw
(Mo x 35)
(1pc.)
Extra Blade (1pc.)
Drain Hose (lpc.)
(Except HF-300P)
Crank Handle (1pc.)
Poster
(or lce Flag) (1pc.) lnstruction Manual
(1pc.)
Earth Wire
Hose Connector
Power Cord
lce Holder
Blade
Slidin Cover
Shavin Table
Fixin Screw
Crank Handle
Shavin Chamber
Main Shaft Crank Handle
Power Switch
Blade Adiustment
Knob
Tension Adiustment
Bolt
Drip Tray
Lift-u Tooth
*ilEr*
"rw
-:.],.
_- ./, ".t
{r--\afl
q
tu
\---,*1
,.*"-'=-----a-
I
't5kn
v.,z-
foN
BVE'
a
------lEiuil@
/
G
!

HOW TO USE
CHECK BEFORE OPERATION
. Attach the enclosed crank handle in the
following manner:
1 ) There is a hole on the right side of the
head cover. Push the crank handle shaft
through this hole.
Head Cover
0
2) Mount the crank shaft so that its chip and
the spring pin meet each other.
(H F-300e H F-700e H F-3s0;Applicable
Models)
Worm Shaft
f''o
Spring Pin 0
(Model HB320A)
Crank Handle
Flat Areas "
C
Worm Shaft
@
3)lnsert the Phillips screw through the crank
handle and fasten it firmly using a
screwdriver. Check the handle to make
sure it smoothly moves the main shaft up
and down.
. Connect the drain hose to the drip tray.
Place a bucket to receive drip water
through the drain hose.
. Plug the unit into an appropriate socket
(voltage is specified on the machine plate).
Refrain from using a generator as this is
not covered by the warranty.
. Clean the food zone, such as the ice
shaving area, upon first use. There could
be dust in the chamber.
1)lce that is very cold or smoky in color is
not suitable for shaving because it is too
cold and hard. Use transparent ice of an
appropriate temperature. lce that is smoky
in color will not produce soft and flutfy
shaved ice. lt could damage the blade tip
and the blade will not shave the ice. Use
transparent ice for soft and fluffy shaved
ice.
2) Do not put things on the unit. The main
shaft turns when the unit starts and it
could be dangerous.
o6
Remarks
t
ffi€
,:=g==-
o
*-4
4i \uk
/
l€
,
!

1) Plug the machine in. Make sure the power
switch is turned to the off position before
plugging in the unit.
+
2) Place a block of ice on the shaving table.
. Move the sliding cover to the left to open.
(HF-300P IHF-700P / HF-350P)
Sliding
Cover 0
. Open the shaving shield. Push it slightly to
release the catch and draw it open.
(HB320A)
Shaving
Shield
CO
f
. Turn the crank handle counterclockwise
to raise the ice holder.
' Ensure the crank handle is free and that
it does not fall down. lf it falls down, it
is dangerous. Tighten the tension bolt
clockwise (read "About the Tension Ad-
justment Bolt" on page 11).
Crank Handle
Ice Holder
Holes for Lift-up Teeth
. Draw the lift-up lever upwards to hide the
lift-up teeth under the table. Then place a
block of ice on the center of the shaving
table (Model HB320A).
o
\
. Place a block of ice on the center of the
shaving table. The ice should not exceed
the area of the shaver blade. Otherwise,
the ice will not be shaved well or it will be
shaved improperly and might jump out.
Keep your hands away.
@
4H-
e
OPERATION INSTRUCTIONS
z4l
w
'tat")
_I
/Jj:l
E,:
\Bk\
zu^
t0^
oa
ffi
\:,2=--7
,N
/ :l
,,1
__ /t

USE
. Turn the crank handle clockwise to lower
the ice holder and let its prongs grip the ice
firmly. lf the ice is not firmly gripped, it
could jump out.
. Move the sliding cover (shaving shield)
clockwise to close it securely. lf it is not
closed properly, the unit will not work even
though it has been turned on.
3) Place a cup under the shaving table to
receive the falling shaved ice.
0
0
0
4) Switch ON. The machine will begin to
shave the ice.
ON
o@
JL-
OFF
S)Adjust the texture of the shaved ice. Turn
the blade adiustment knob for the de-
sired ice texture. Standard shaved ice
texture is 1 millimeter (mm), as this is
the pitch between the blade tip and the
shaving table.
. Turn the knob clockwise for a coarser
texture or counterclockwise for a fin6r
texture.
. Turn the knob one full rotation to raise
the blade 1 mm above the shaving ta-
ble. The knob can be turned two or three
times.
6) Turn the unit off.
ON
OFF
7) Unplug the unit when you are finished.
rr+
6
)
E_- rru^
::-=L4
,@-)
(fts
z4)
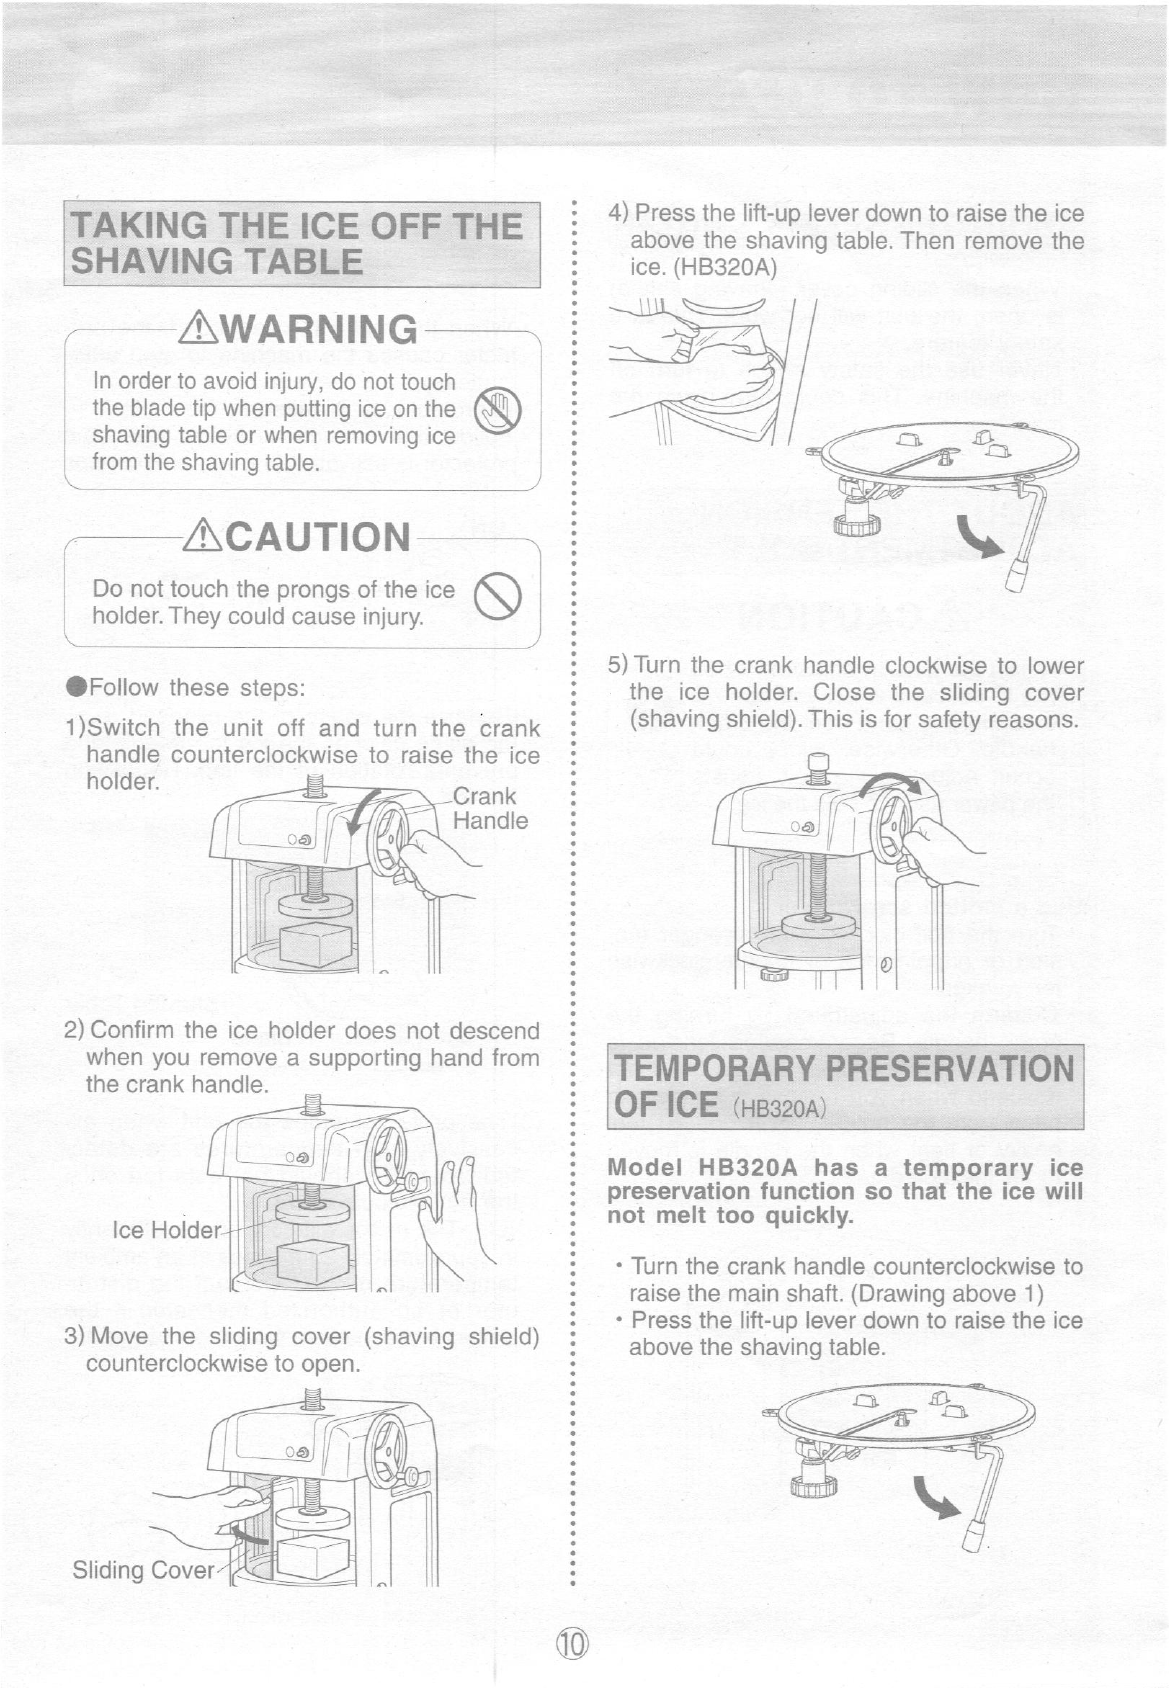
TAKING THE ICE OFF THE
SHAVING TABLE
AwaRrurruc
ln order to avoid injury, do not touch
the blade tip when putting ice on the
shaving table or when removing ice
f rom the shaving table. @
CAUTION
Do not touch the prongs of the ice
holder. They could cause injury.
OFollow these steps:
'| )Switch the unit off and turn the crank
handle counterclockwise to raise the ice
holder Crank
Handle
2) Confirm the ice holder does not descend
when you remove a supporting hand from
the crank handle.
lce Holde
3) Move the sliding cover (shaving shield)
counterclockwise to open.
c6
Sliding Cover
@
\
4) Press the lift-up lever down to raise the ice
above the shaving table. Then remove the
ice. (HB320A)
\
5) Turn the crank handle clockwise to lower
the ice holder. Close the sliding cover
(shaving shield). This is for safety reasons.
TEMPORARY PRESERVATION
OF ICE (HB32oA)
Model HB320A has a temporary ice
preservation function so that the ice will
not melt too quickly.
. Turn the crank handle counterclockwise to
raise the main shaft. (Drawing above 1)
. Press the lift-up lever down to raise the ice
above the shaving table.
0
tffi
)a
--1lE
a"€\
ta{==zl
o6
ffi'
Wqn
-n*++
I 1;/--6-: Iu?.^,
__t-__..._
wq
ffi
\_7
\
.Ki af)-
t_tr
ffi fr
ffi'.-
r6
J)_t_
r-]l
HOW TO USE
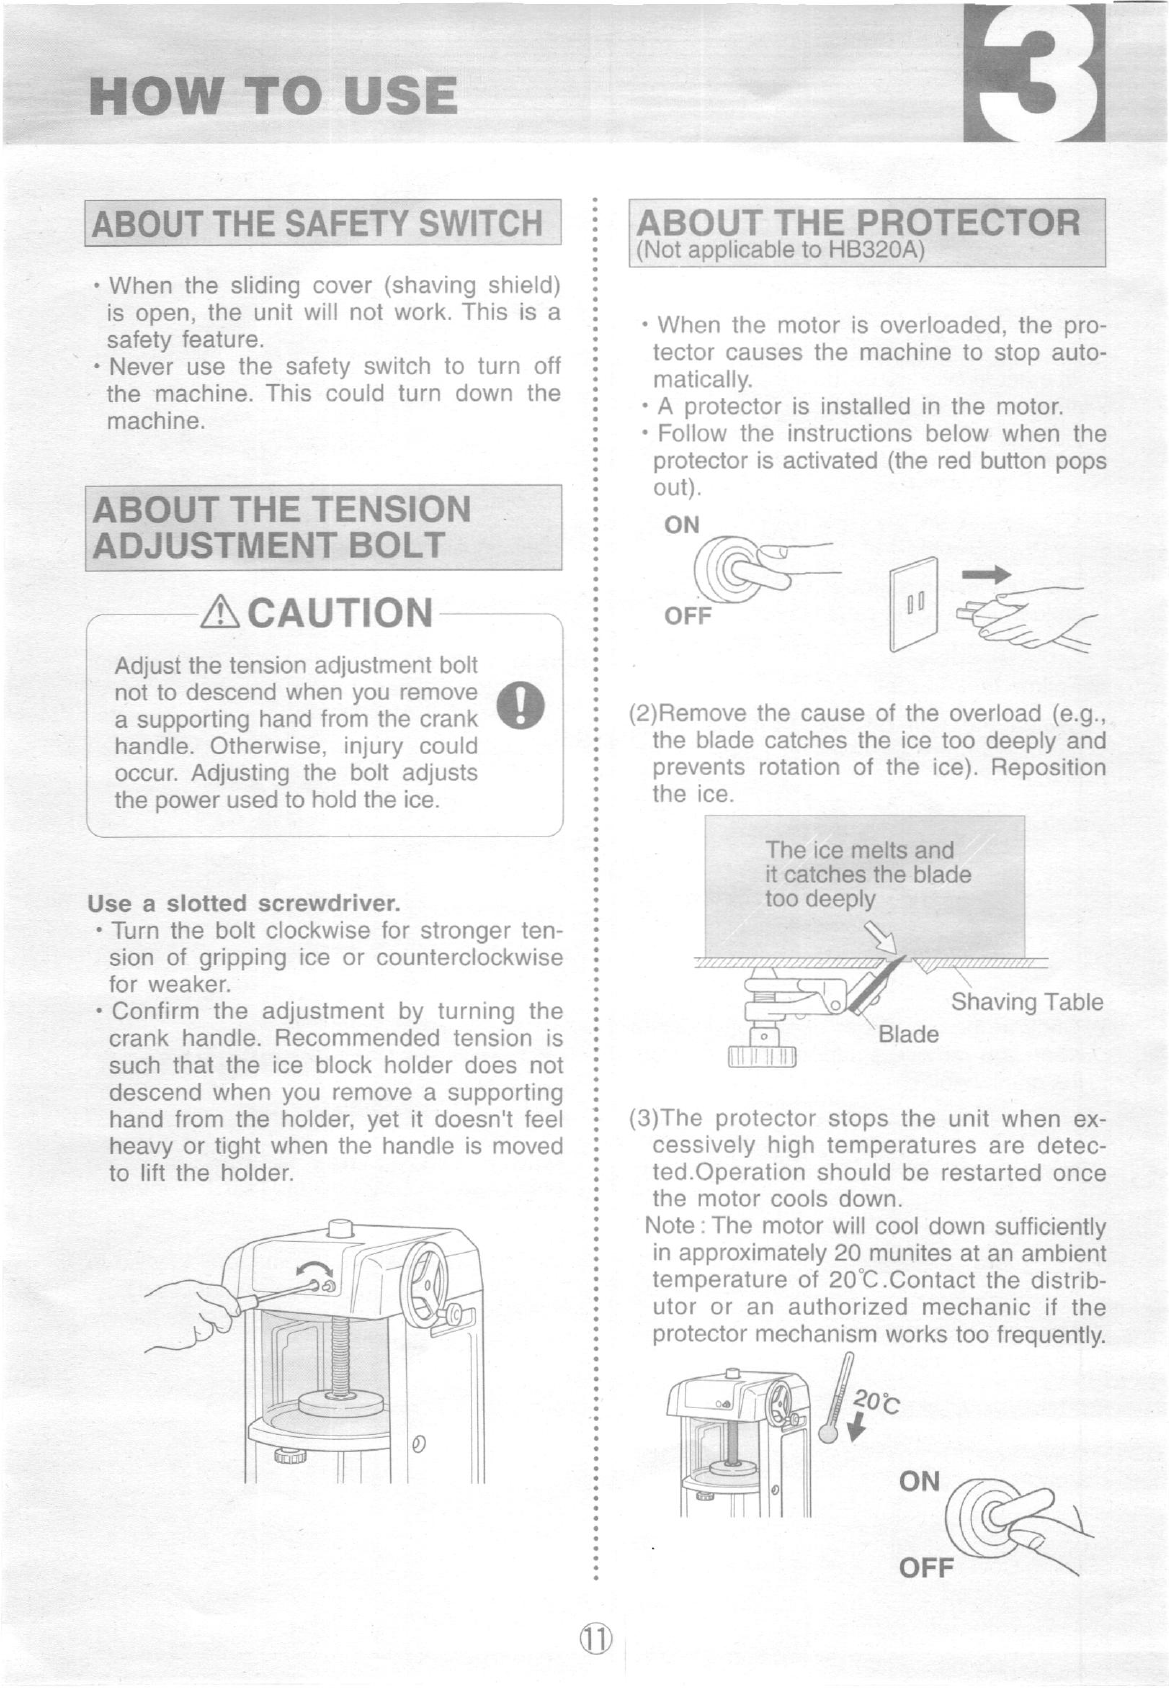
ABOUT THE SAFETY SWITCH
. When the sliding cover (shaving shield)
is open, the unit will not work. This is a
safety feature.
. Never use the safety switch to turn off
the machine. This could turn down the
machine.
ABOUT THE TENSION
ADJUSTMENT BOLT
_ aCAUTION-
Adjust the tension adjustment bolt
not to descend when you remove
a supporting hand from the crank
handle. Otherwise, injury could
occur. Adjusting the bolt adjusts
the power used to hold the ice.
Use a slotted screwdriver.
. Turn the bolt clockwise for stronger ten-
sion of gripping ice or counterclockwise
for weaker.
. Confirm the adjustment by turning the
crank handle. Recommended tension is
such that the ice block holder does not
descend when you remove a supporting
hand lrom the holder, yet it doesn't feel
heavy or tight when the handle is moved
to lift the holder.
o
o
l
ABOUT THE PROTECTOR
(Not applicable to HB320A)
. When the motor is overloaded, the pro-
tector causes the machine to stop auto-
matically.
. A protector is installed in the motor.
. Follow the instructions below when the
protector is activated (the red button pops
ou0.
ON +
OFF
(2)Remove the cause ol the overload (e.9.,
the blade catches the ice too deeply and
prevents rotation of the ice). Reposition
the ice.
The ice melts and
it catches the blade
too deeply
Shaving Table
Blade
(3)The protector stops the unit when ex-
cessively high temperatures are detec-
ted.Operation should be restarted once
the motor cools down.
Note : The motor will cool down sufficiently
in approximately 20 munites at an ambient
temperature ol 20"C.Contact the distrib-
utor or an aulhorized mechanic if the
protector mechanism works too frequently.
20?-
t-ON
,a]tfr
OFF
\
C
/-7a\-
es-- z,<
ur
==+ I
v
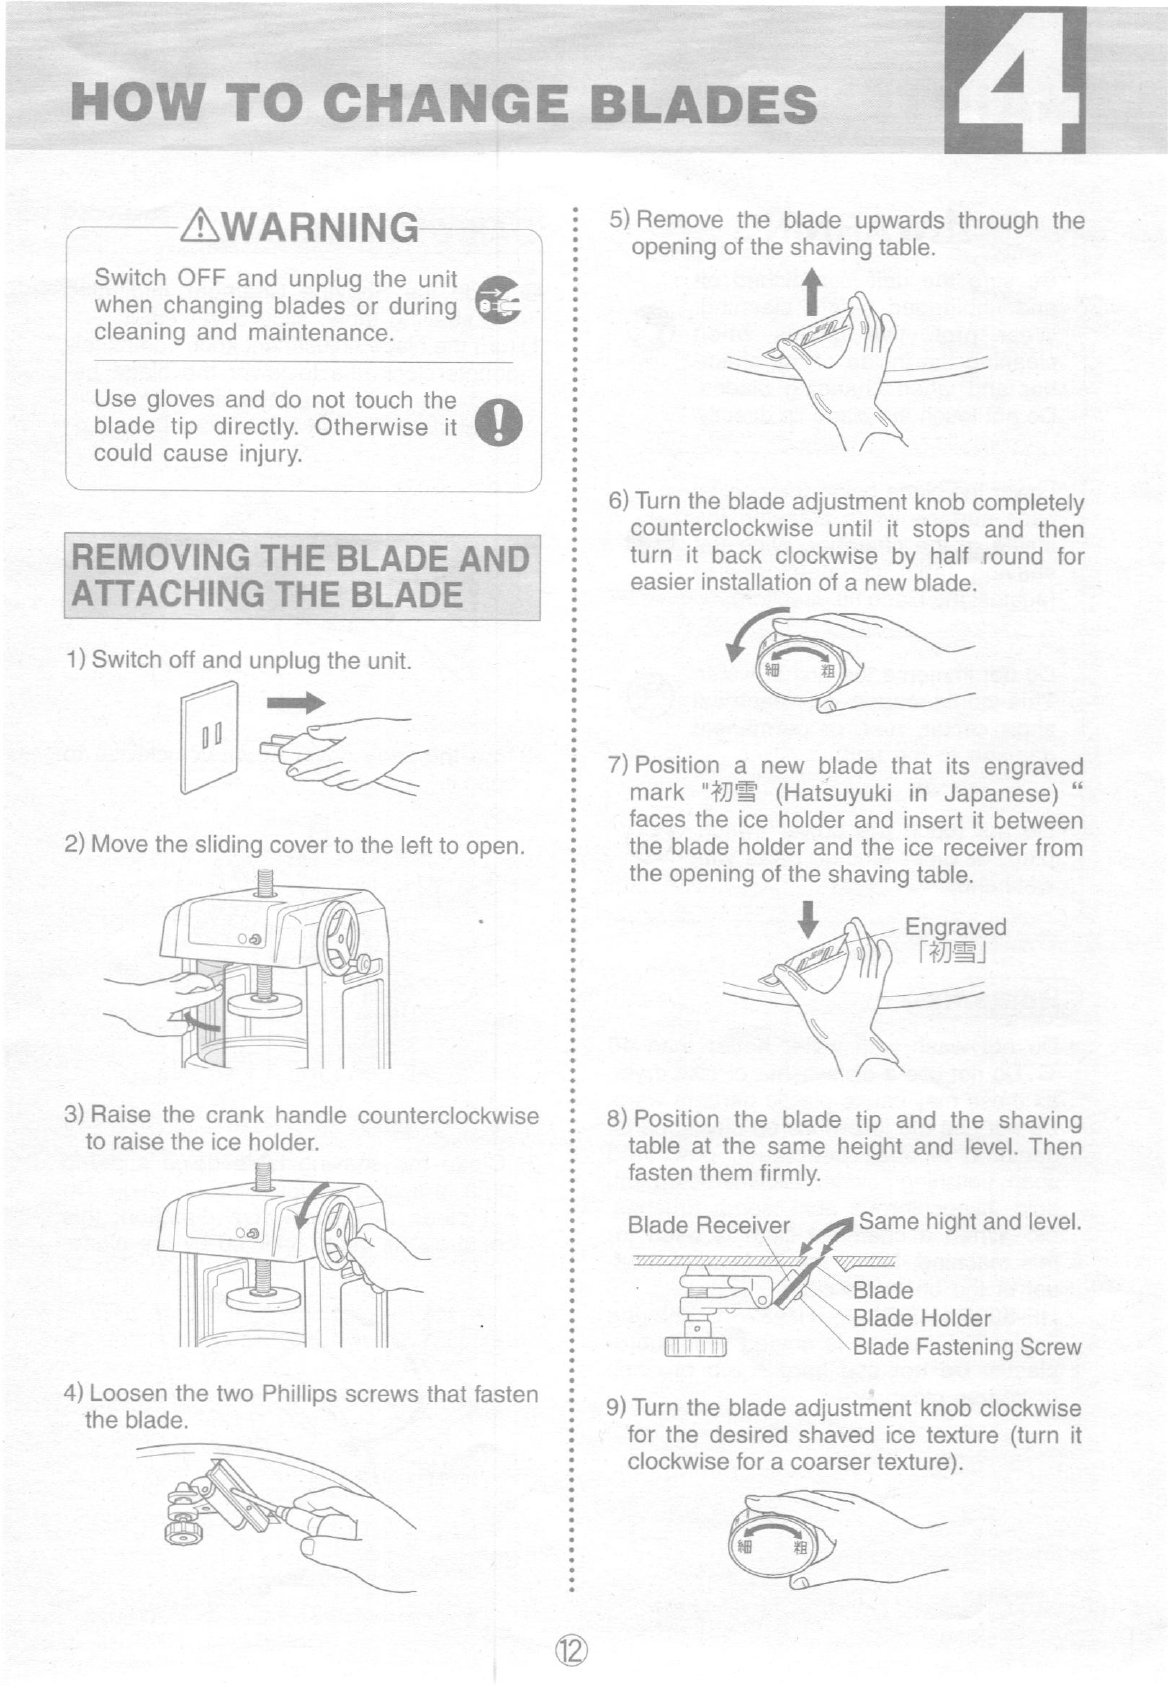
Awanrurru
Switch OFF and unplug the unit
when changing blades or during
cleaning and maintenance.
Use gloves and do not touch the
blade tip directly. Otherwise it
could cause inlury.
d.
\47
o
1) Switch off and unplug the unit.
+
2) Move the sliding cover to the left to open.
3) Raise the crank handle counterclockwise
to raise the ice holder.
4) Loosen the two Phillips screws that fasten
the blade.
oo
I
6
T
-5) Remove the blade upwards through the
opening of the shaving table.
t
6) Turn the blade adjustment knob completely
counterclockwise until it stops and then
turn it back clockwise by half round for
easier installation of a new blade.
7) Position a new blade that its engraved
mark "illE (Hatsuyuki in Japanese) "
faces the ice holder and insert it between
the blade holder and the ice receiver from
the opening of the shaving table.
Engraved
I fL=)
8) Position the blade tip and the shaving
table at the same height and level. Then
fasten them f irmly.
Blade Receiver Same hight and level.
wz
Blade
Blade Holder
Blade Fastening Screw
9) Turn the blade adjustment knob clockwise
for the desired shaved ice texture (turn it
clockwise for a coarser texture).
@
HOW 'O CHANGE BLADES
I
REMOVING THE BLADE AND
ATTACHING THE BLADE
%.<
fl,
-----B
-.-# w
ffi
x
AiN
6
---===\\\-
t_
@
Str

MAINTENANCE
AwRnrurN
Be sure the unit is switched off
and unplugged before cleaning.
Wear protective gloves when
cleaning the inside of the cham-
ber and when changing blades.
Do not touch the blade tip directly.
Lower the blade below the conical
case surface when cleaning the
inside of the chamber. Wipe the
shaving table cou nte rclockwise
(against the blade tip direction).
)
w-
\tl/
o
Do not immerse the unit in water.
This could cause an electrical
short circuit, rust, or permanent
damage to the unit.
Do not touch the power switch,
plug, or other electric parts with
wet hands.
. Do not wash with water hotter than 40
'C. Do not use a dishwasher or dish dryer,
as these may cause plastic parts to warp.
. Do not use the followings on plastic parts:
benzine, alcohol, petroleum, powdered
soap, polishing powder, alkaline detergent,
acid, hypochlorous acid, scrub brushes,
etc. When a chemical cloth is used for
this machine, follow the instruction man-
ual of the chemical cloth.
. HF-300P, HF-700P, HF-320A Shaving
Table: The surface is coated with fluoro-
plastic. Do not use hard scrub brushes
or coarse cleansers.
@
Olnside lce Shaving Chamber (including
the shaving table, slide cover etc.):
1)Turn the blade adjustment knob completely
counterclockwise to lower the blade be-
hind the surface of the shaving table.
Otherwise, it could injure your fingers.o
2)Turn the slide cover counterclockwise to
open it.
3) Clean the shaving table using a damp
cloth in a counterclockwise direction. Do
not clean in a clockwise direction; this
could cause injury inflicted by the blade.
o
oo
Remarks
DAILY MAINTENANCE
\
IY-,/ \\\
flt^\
----5 @
,9>
t

4)Clean the inside of the slide cover us-
ing a damp cloth (HF-300P, HF-3508 HF-
700P).
(HB320A - Clean after the shaving shield
is removed.)
/ L--odI 0
REMOVAL OF THE SHAVING
TABLE (HBs2oA)
. Lower the blade behind the surface of
the shaving table (see daily maintenance
instructions).
. Remove the two shoulder screws (M4).
. Push the lift-up lever toward the inside.
. Raise the shaving table and take it out.
. To mount the shaving table, reverse the
order of the above.
-.'-l
@
Shoulder
Screw M4
CLEANING(COVERS)
. Wipe covers using a soft, dry cloth.
. Clean hardened dirt using a damp cloth
and warm water. A gentle dish detergent
can be used. Be sure to completely re-
move any traces of detergent with a damp
cloth.
<-
MONTHLY MAINTENANCE
. Lubrication - Use the gear oil included
as a standard accessory.
1)Turn the ice holder completely clockwise
to the bottom. Remove the Philips screw
that fastens the crank handle (HF-300P,
HF-350P, HF-700P).
(HB320A - Removal of the crank han-
dle is not necessary.)
lce Holder
2)Remove the Philips screws fastening the
head cover. o
Head Cover
3)Temporarily insert the crank handle into
the worm gear shaft. Lubricate the fol-
lowing parts, turning the crank handle:
. the two holes of the upper part of the
worm gear shaft holder
. the contact point between the Y-brake
and the worm gear
Worm Gear
0
oo
e4)
Worm Gear Shaft Holder
Y-Brake
i<f_ /ELLL-]T ,,r---q;a-
@@
-!&>l-,
]-]€l\
"ft
tL
w
ffi\\\
'*--:-ry
4
e- ,1-
@r ,\(ly
LiY

MAINTENANCE
4) Attach the head cover using the screws
s)Attach the crank handle to the crank
handle shaft. Turning the main shaft will
lubricate the shaft holder and the main
shafl.
YEARLY MAINTENANCE
AWARNING
Periodically confirm there is no
dust on the plug prongs or blade
attachments. Periodically plug in
the unit to check it works. An
improper connection could cause
a fire or electric shock.
Do not damage the power cord.
Keep it clean. lf it is stretched,
folded, placed under a heavy ob-
ject, pinched, stained, or otheruvise
mistreated, it could be damaged.
This could cause a fire or elec-
tric shock.
o
a
o
0
o6
--1-a.
@
MAINTENANCE OF GROUNDING
THE MACHINE
. Check that the earth wire is not cut or
disconnected from the terminal. - Should
there be any defects, contact the dis-
tributor or an authorized mechanic.
CHECK THE PLUG
. Use an exclusive socket.
. Confirm there is no dust on the plug
prongs or the socket.
. Do not use a power cord that is dam-
aged in any way. Should there be any-
thing irregular, contact the distributor or
an authorized mechanic.
PRESERVATION
. To warehouse or store the machine for
more than one week, dry it completely and
keep the machine in a place f ree from
moisture.
&
€
e
q\l
W
'r-- --
S
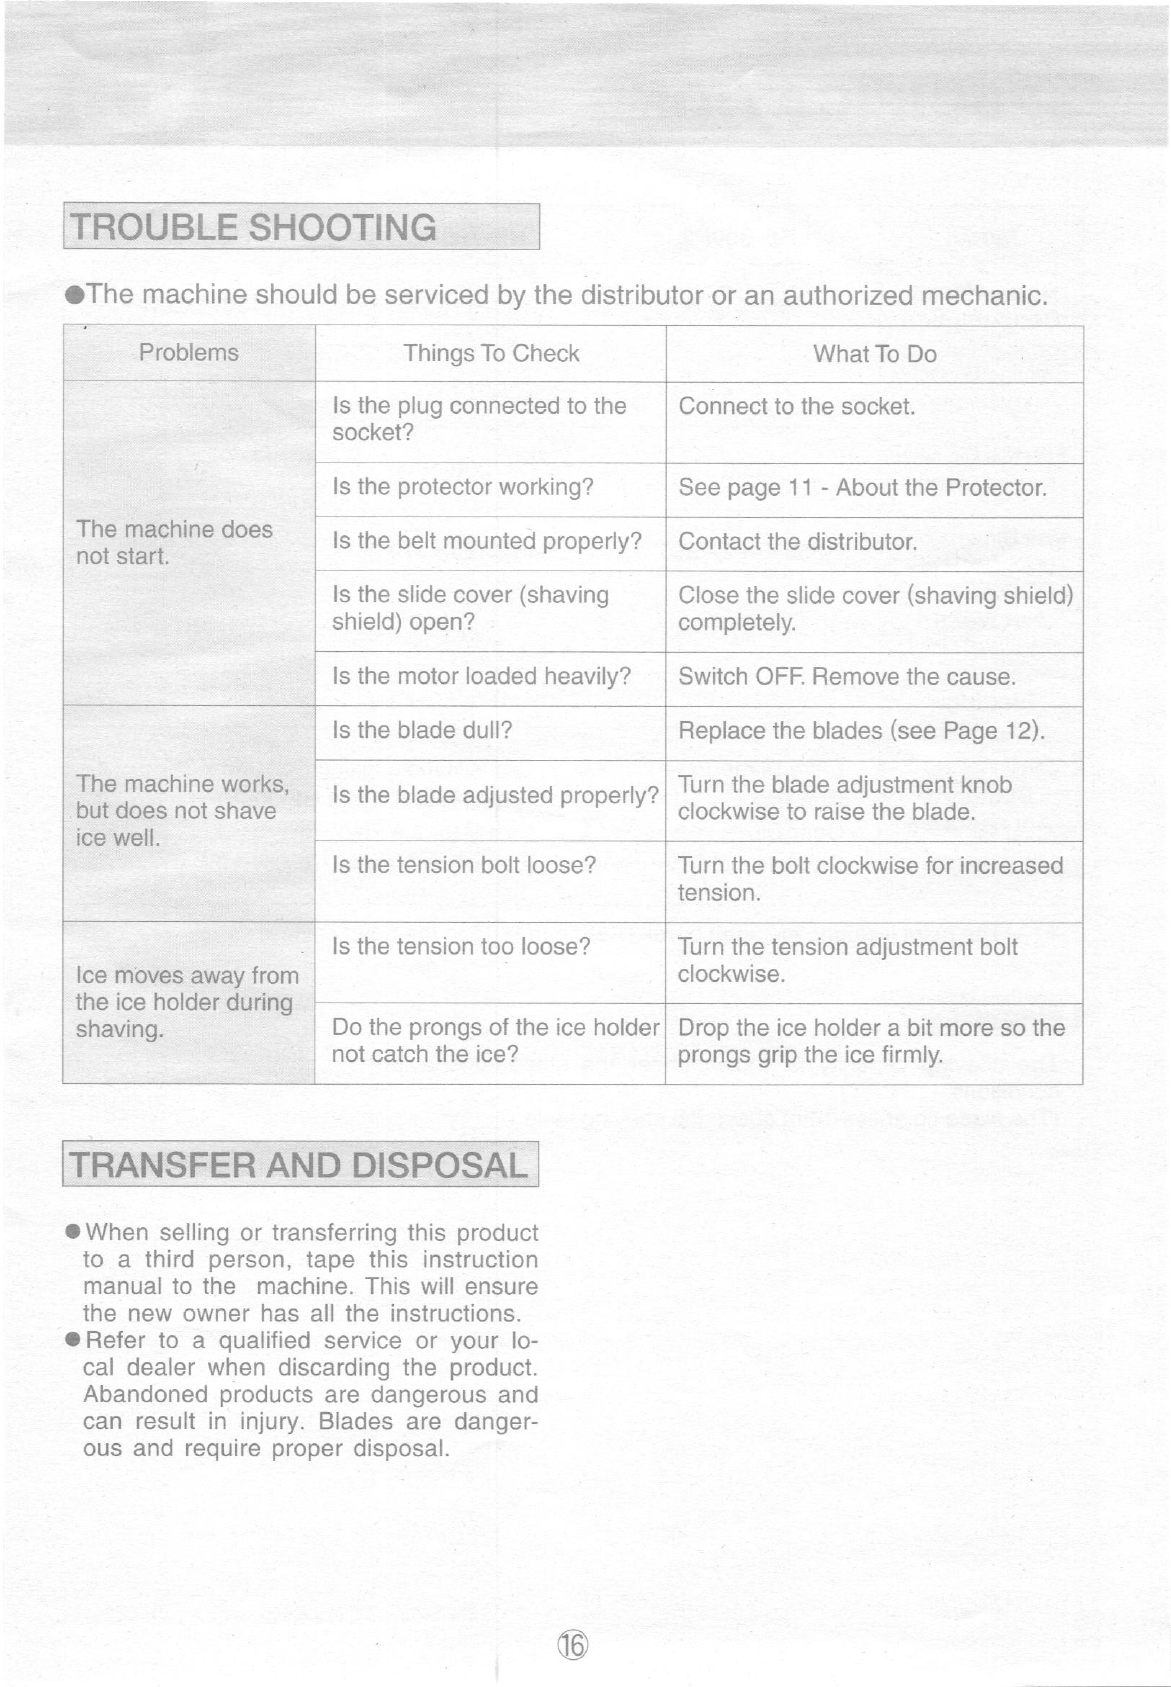
TROUBLE SHOOTING
OThe machine should be serviced by the distributor or an authorized mechanic.
WhatTo Do
TRANSFER AND DISPOSAL
oWhen selling or transferring this product
to a third person, tape this instruction
manual to the machine. This will ensure
the new owner has all the instructions.
a Refer to a qualified service or your lo-
cal dealer when discarding the product.
Abandoned products are dangerous and
can result in injury. Blades are danger-
ous and require proper disposal-
@
Problems Things To Check
The machine does
not starl.
ls the plug connected to the
socket? Connect to the socket.
ls the protector working? See page 11 - About the Protector
ls the belt mounted properly? Contact the distributor.
ls the slide cover (shaving
shield) open? Close the slide cover (shaving shield)
completely.
ls the motor loaded heavily? Switch OFF. Remove the cause.
The machine works,
but does not shave
ice well.
ls the blade dull? Replace the blades (see Page 12).
ls the blade adjusted properly? Turn the blade adjustment knob
clockwise to raise the blade.
ls the tension bolt loose?
ls the tension too loose?
Turn the bolt clockwise for increased
tension.
Turn the tension adiustment bolt
clockwise.
lce moves away from
the ice holder during
shaving. Do the prongs of the ice holder
not catch the ice? Drop the lce holder a bit more so the
prongs grip the ice firmly.

HF-300P2 HF-700P2 HB32OA
'130/115W 130/115 W130/115W
1.8 t2.2 1.812.2 1.7 12.1
200 200 200
350X402X580 345X425X574 355X402X756
(*1)
27 21 20
230V, 1Ph, 50/60H2
1
1
1
1
Crank Handle Fixing Bolt (M6 x 35)'..... 1
1
Extra Blade....
Drip Tray Drain Hose (Except HF-300P)
Poster (or lce Flag)
lnstruction Manual 1
1
Gear Oil
Crank Handle'
*1. (The heigt includes the shaft cover.) (561mm H up to the head cover)
The shaving capacity is shown under thd standard shaving
conditions.
(The blade tip arises 1mm above the shaving table.)
@
SPECIFICATIONS
Model
Rated Power
Consumption
Shaving Capacity
rl
ig
Net t
Etfective Diameter
tor S
urE
'having(mn
Uit Dimensions
lVe
ks)
Electrical
Standard
Accessories
Remarks
This manual suits for next models
2
Table of contents


