Cincoze CO-119C-R10 User manual

Open Frame Panel
TFT-LCD Open Frame Display Module
Version: V1.03
Convertible Display Module
CO-100 Series
User Manual

CO-100 Series | User Manual 2
Contents
Preface ...................................................................................................................................................3
Chapter 1 Product Introductions ...........................................................................................................9
1.1 Overview ................................................................................................................................10
1.2 Highlights................................................................................................................................10
1.3 Key Features...........................................................................................................................11
1.4 Hardware Specification ..........................................................................................................12
1.4.1 CO-119C-R10.............................................................................................................................. 12
1.4.2 CO-W121C-R10.......................................................................................................................... 14
Chapter 2 System Setup.......................................................................................................................16
2.1 Connecting to PC or Monitor Module....................................................................................17
2.2 Standard Mount.....................................................................................................................19
2.2.1 Fixing from front side................................................................................................................. 20
2.2.2 Fixing from rear side.................................................................................................................. 21
2.3 Flat Mount..............................................................................................................................22
2.3.1 Fixing from front side................................................................................................................. 27
2.3.2 Fixing from rear side.................................................................................................................. 28

CO-100 Series | User Manual 3
Preface
Revision
Revision
Description
Date
1.00
First Released
2022/09/05
1.01
Correction Made
2022/10/28
1.02
Correction Made
2023/04/14
1.03
Correction Made
2024/01/30
Copyright Notice
© 2022 by Cincoze Co., Ltd. All rights are reserved. No parts of this manual may be copied, modified,
or reproduced in any form or by any means for commercial use without the prior written permission
of Cincoze Co., Ltd. All information and specification provided in this manual are for reference only
and remain subject to change without prior notice.
Acknowledgement
Cincoze is a registered trademark of Cincoze Co., Ltd. All registered trademarks and product names
mentioned herein are used for identification purposes only and may be trademarks and/or registered
trademarks of their respective owners.
Disclaimer
This manual is intended to be used as a practical and informative guide only and is subject to change
without notice. It does not represent a commitment on the part of Cincoze. This product might
include unintentional technical or typographical errors. Changes are periodically made to the
information herein to correct such errors, and these changes are incorporated into new editions of
the publication.
Declaration of Conformity
FCC
This equipment has been tested and found to comply with the limits for a Class A digital
device, pursuant to Part 15 of the FCC Rules. These limits are designed to provide
CO-100 Series | User Manual 4
reasonable protection against harmful interference when the equipment is operated
in a commercial environment. This equipment generates, uses, and can radiate radio
frequency energy and, if not installed and used in accordance with the instruction
manual, may cause harmful interference to radio communications. Operation of this
equipment in a residential area is likely to cause harmful interference in which case
the user will be required to correct the interference at his own expense.
CE
The product(s) described in this manual complies with all application European Union
(CE) directives if it has a CE marking. For computer systems to remain CE compliant,
only CE-compliant parts may be used. Maintaining CE compliance also requires proper
cable and cabling techniques.
RU (For CO-W121C only)
UL Recognized Components have been evaluated by UL for factory installation within
equipment where the component’s limitations of use are known and investigated by
UL. UL Recognized Components have conditions of acceptability that describe how
components can be used within end products.
Product Warranty Statement
Warranty
Cincoze products are warranted by Cincoze Co., Ltd. to be free from defect in materials and
workmanship for 2 years (2 Years for PC Module, 1 Year for Display Module) from the date of purchase
by the original purchaser. During the warranty period, we shall, at our option, either repair or replace
any product that proves to be defective under normal operation. Defects, malfunctions, or failures of
the warranted product caused by damage resulting from natural disasters (such as by lightening, flood,
earthquake, etc.), environmental and atmospheric disturbances, other external forces such as power
line disturbances, plugging the board in under power, or incorrect cabling, and damage caused by
misuse, abuse, and unauthorized alteration or repair, and the product in question is either software,
or an expendable item (such as a fuse, battery, etc.), are not warranted.
RMA
Before sending your product in, you will need to fill in Cincoze RMA Request Form and obtain an RMA
number from us. Our staff is available at any time to provide you with the most friendly and
immediate service.
◼RMA Instruction
⚫Customers must fill in Cincoze Return Merchandise Authorization (RMA) Request Form
and obtain an RMA number prior to returning a defective product to Cincoze for
service.
⚫Customers must collect all the information about the problems encountered and note

CO-100 Series | User Manual 5
anything abnormal and describe the problems on the “Cincoze Service Form” for the
RMA number apply process.
⚫Charges may be incurred for certain repairs. Cincoze will charge for repairs to products
whose warranty period has expired. Cincoze will also charge for repairs to products if
the damage resulted from acts of God, environmental or atmospheric disturbances, or
other external forces through misuse, abuse, or unauthorized alteration or repair. If
charges will be incurred for a repair, Cincoze lists all charges, and will wait for
customer’s approval before performing the repair.
⚫Customers agree to ensure the product or assume the risk of loss or damage during
transit, to prepay shipping charges, and to use the original shipping container or
equivalent.
⚫Customers can be sent back the faulty products with or without accessories (manuals,
cable, etc.) and any components from the system. If the components were suspected
as part of the problems, please note clearly which components are included.
Otherwise, Cincoze is not responsible for the devices/parts.
⚫Repaired items will be shipped along with a "Repair Report" detailing the findings and
actions taken.
Limitation of Liability
Cincoze’ liability arising out of the manufacture, sale, or supplying of the product and its use, whether
based on warranty, contract, negligence, product liability, or otherwise, shall not exceed the original
selling price of the product. The remedies provided herein are the customer’s sole and exclusive
remedies. In no event shall Cincoze be liable for direct, indirect, special or consequential damages
whether based on contract of any other legal theory.
Technical Support and Assistance
1. Visit the Cincoze website at www.cincoze.com where you can find the latest information about
the product.
2. Contact your distributor or our technical support team or sales representative for technical
support if you need additional assistance. Please have following information ready before you call:
⚫Product name and serial number
⚫Description of your peripheral attachments
⚫Description of your software (operating system, version, application software, etc.)
⚫A complete description of the problem
⚫The exact wording of any error messages
CO-100 Series | User Manual 6
Conventions Used in this Manual
Safety Precautions
Before installing and using this device, please note the following precautions.
1. Read these safety instructions carefully.
2. Keep this User’s Manual for future reference.
3. Disconnected this equipment from any AC outlet before cleaning.
4. For plug-in equipment, the power outlet socket must be located near the equipment and must
be easily accessible.
5. Keep this equipment away from humidity.
6. Put this equipment on a reliable surface during installation. Dropping it or letting it fall may cause
damage.
7. Make sure the voltage of the power source is correct before connecting the equipment to the
power outlet.
8. Use a power cord that has been approved for using with the product and that it matches the
voltage and current marked on the product’s electrical range label. The voltage and current
rating of the cord must be greater than the voltage and current rating marked on the product.
9. Position the power cord so that people cannot step on it. Do not place anything over the power
cord.
10. All cautions and warnings on the equipment should be noted.
11. If the equipment is not used for a long time, disconnect it from the power source to avoid
damage by transient overvoltage.
12. Never pour any liquid into an opening. This may cause fire or electrical shock.
This indication alerts operators to an operation that, if not strictly observed, may result
in severe injury.
(Cette indication avertit les opérateurs d'une opération qui, si elle n'est pas strictement
observée, peut entraîner des blessures graves.)
WARNING
(AVERTIR)
This indication alerts operators to an operation that, if not strictly observed, may result
in safety hazards to personnel or damage to equipment.
(Cette indication avertit les opérateurs d'une opération qui, si elle n'est pas strictement
observée, peut entraîner des risques pour la sécurité du personnel ou des dommages à
l'équipement.)
CAUTION
(ATTENTION)
This indication provides additional information to complete a task easily.
(Cette indication fournit des informations supplémentaires pour effectuer facilement
une tâche.)
NOTE
(NOTE)

CO-100 Series | User Manual 7
13. Never open the equipment. For safety reasons, the equipment should be opened only by
qualified service personnel.
If one of the following situations arises, get the equipment checked by service personnel:
⚫The power cord or plug is damaged.
⚫Liquid has penetrated into the equipment.
⚫The equipment has been exposed to moisture.
⚫The equipment does not work well, or you cannot get it work according to the user's manual.
⚫The equipment has been dropped and damaged.
⚫The equipment has obvious signs of breakage.
14. CAUTION: Risk of Explosion if Battery is replaced by an Incorrect Type. Dispose of
Used Batteries According to the Instructions.
ATTENTION: Risque d'explosion si la batterie est remplacée par un type incorrect. Mettre au
rebus les batteries usagées selon les instructions.
15. Equipment intended only for use in a RESTRICTED ACCESS AREA.
16. Ensure to connect the power cord of power adapter to a socket-outlet with earthing connection.
17. Dispose of used battery promptly. Keep away from children. Do not disassemble and do not
dispose of in fire.
Package Contents
Before installation, please ensure all the items listed in the following table are included in the package.
CO-119C-R10
Item
Description
Q’ty
1
CO-119C Display Module
1
Note: Notify your sales representative if any of the above items are missing or damaged.
CO-W121C-R10
Item
Description
Q’ty
1
CO-W121C Display Module
1
Note: Notify your sales representative if any of the above items are missing or damaged.

CO-100 Series | User Manual 8
Ordering Information
Display Module with Projected Capacitive Touch
Model No.
Product Description
CO-119C-R10
19“TFT-LCD SXGA 5:4 Open Frame Display Module with
Projected Capacitive Touch
CO-W121C-R10
21.5" TFT-LCD Full HD 16:9 Open Frame Display Module with
Projected Capacitive Touch

CO-100 Series | User Manual 9
Chapter 1
Product Introductions
CO-100 Series | User Manual 10
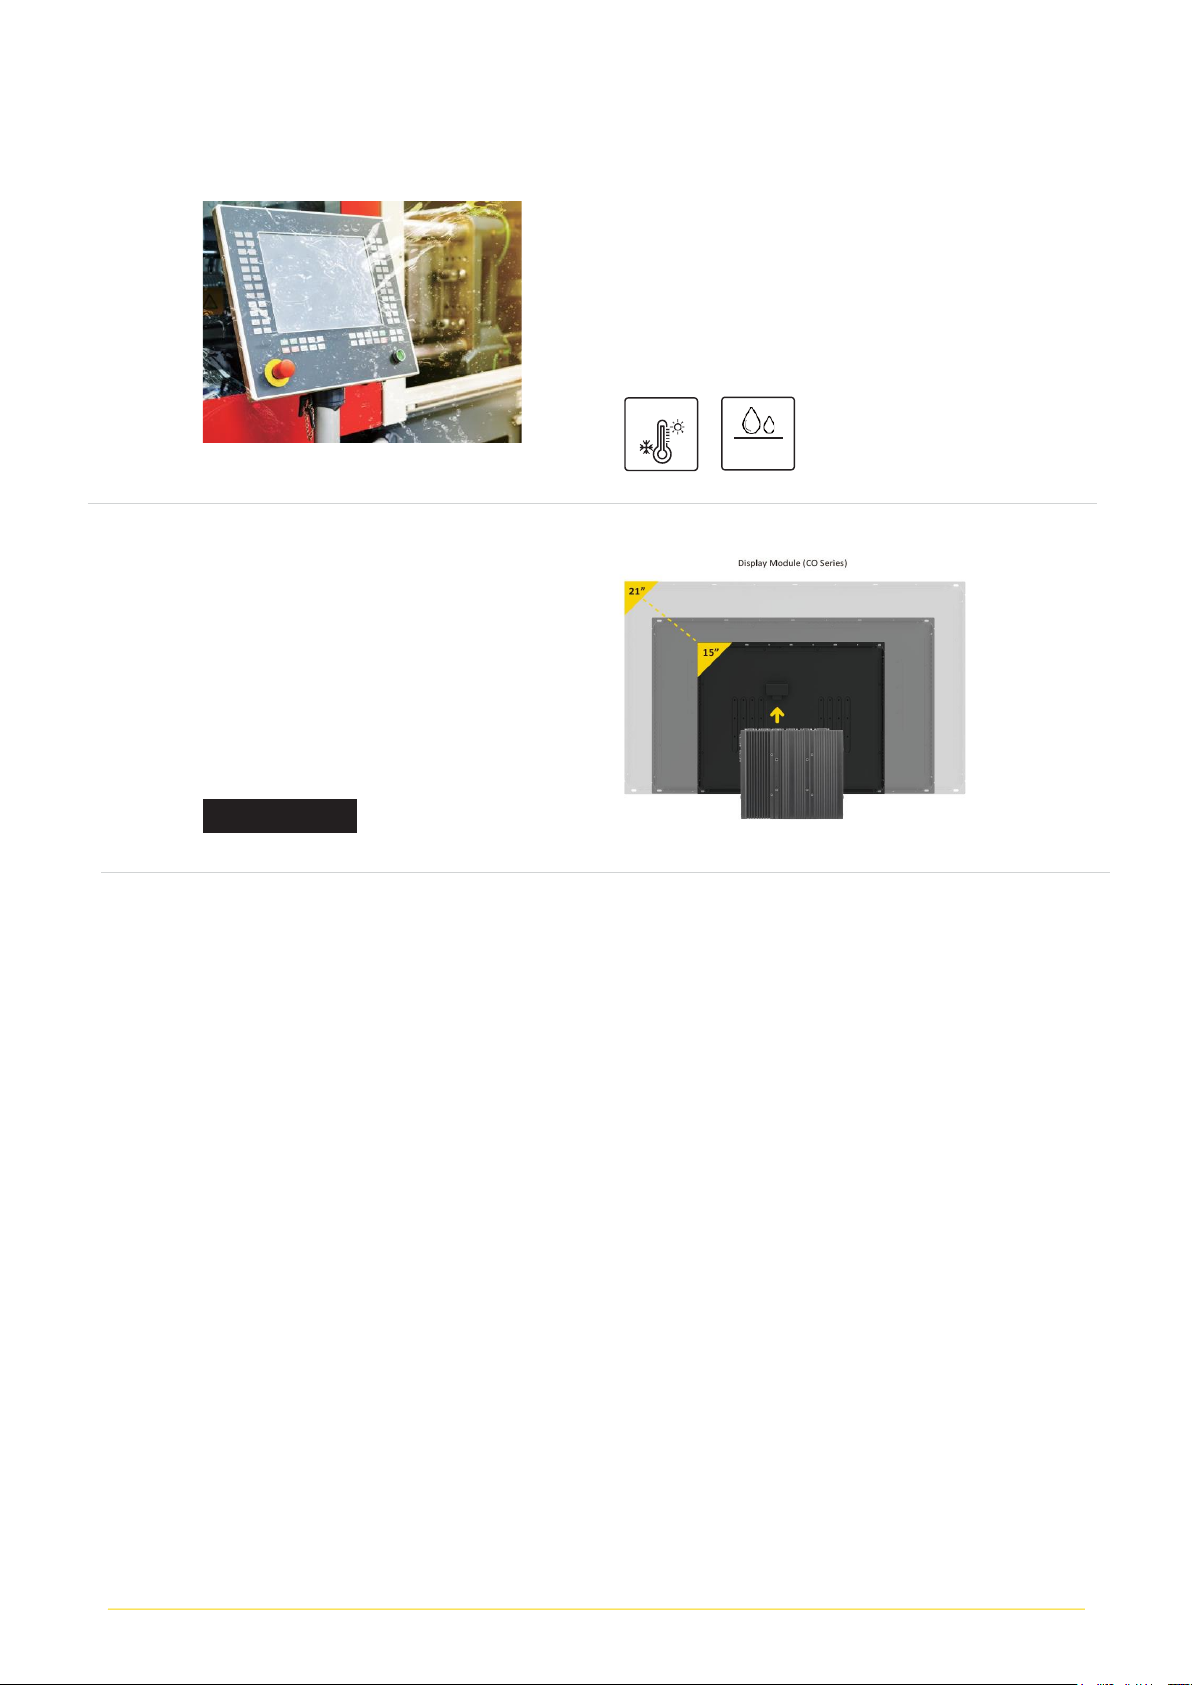
1.1 Overview
Cincoze open frame display modules (CO-100) use our patented CDS (Convertible Display System)
technology to connect with a computer module (P2000 or P1000 series) to form an industrial panel
PC or connect with a monitor module (M1100 series) to form an industrial touch monitor. Designed
for equipment manufacturers, easy installation is the main advantage of the CO-100. The integrated
structure, exclusive adjustable mounting bracket, and support for various mounting methods enable
a perfect fit in cabinets of different materials and thicknesses. The robust design also meets the
application needs of harsh industrial environments.
1.2 Highlights
Flexible Design and Easy Installation
The CO-100 series includes the exclusive adjustable
mounting bracket with thickness adjustment setting,
as well as panel and boss type locking. Flat and
standard mount options make integration in industrial
machinery easy and convenient.
Integrated Structure
The CO-100 series is flexible and reliable. As standard,
the open frame display module can be deployed in
equipment machines, but remove the mounting bracket
and it becomes a standalone display module for use with
a VESA mount or in a 19” rack.
Patent No. I802427, D224544, D224545
CO-100 Series | User Manual 11
Strong, Reliable and Durable
The CO-100 series integrated structure design enables
wide temperature support (0–70°C) in addition to
front IP65 dustproof and waterproof protection,
meeting HMI application requirements.
Highly Adaptable CDS Design
Through the patented CDS technology, theCO-100 can
be combined with a computer module to become an
industrial panel PC, or with a monitor module to become
an industrial touch monitor. Easy maintenance and
upgrade flexibility are its main advantages.
1.3 Key Features
⚫TFT-LCD with Projected Capacitive Touch
⚫Cincoze Patent CDS Technology Support
⚫Designed with Adjustable Mounting Bracket
⚫Support Flat / Standard / VESA / Rack Mount
⚫Front Panel IP65 Compliant
⚫Wide Operating Temperature
Patent No. M482908
0 – 70°C
IP65
CO-100 Series | User Manual 12
1.4 Hardware Specification
1.4.1 CO-119C-R10
Model Name
CO-119C
Display
LCD Size
•19” (5:4)
Resolution
•1280 x 1024
Brightness
•350 cd/m2
Contract Ratio
•1000:1
LCD Color
•16.7M
Pixel Pitch
•0.294(H) x 0.294(V)
Viewing Angle
•170 (H) / 160 (V)
Backlight MTBF
•50,000 hrs (LED Backlight)
Touchscreen
Touchscreen Type
•Projected Capacitive Touch
Physical
Dimension (WxDxH)
•472.8 x 397.5 x 63 mm
Weight
•6.91KG
Construction
•One-piece and Slim Bezel Design
Mounting Type
•Flat / Standard / VESA / Rack Mount
Mounting Bracket
•Pre-installed Mounting Bracket with Adjustable Design
( Support 11 different stages of adjustment)
Protection
Ingress Protection
•Front Panel IP65 Compliant
* According to IEC60529
Environment
Operating Temperature
•0°C to 50°C (with Industrial Grade peripherals; Ambient with air flow)
Storage Temperature
•-20°C to 60°C
Humidity
•80% RH @ 50°C (non-condensing)
* Product Specifications and features are for reference only and are subject to change without prior
notice. For more information, please refer to the latest product datasheet from Cincoze's website.
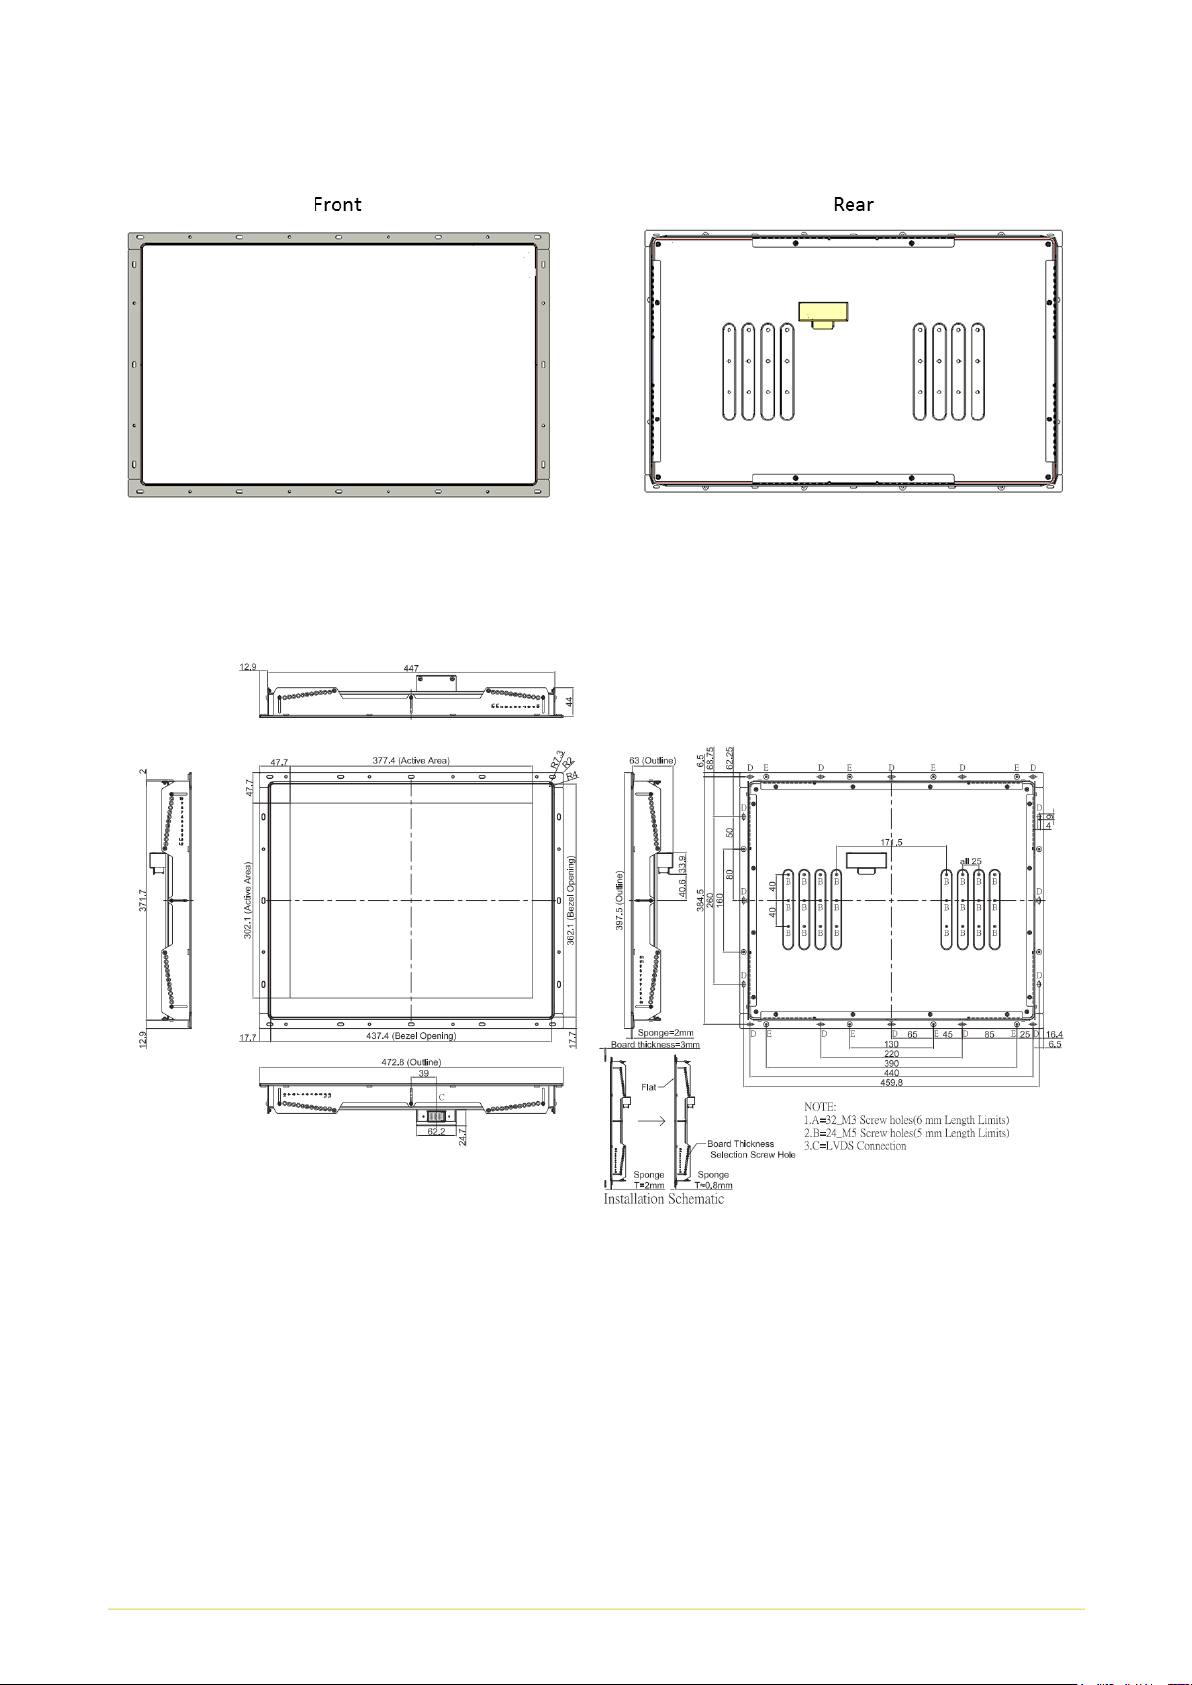
CO-100 Series | User Manual 13
External Layout
Dimension
Unit: mm
CO-100 Series | User Manual 14
1.4.2 CO-W121C-R10
Model Name
CO-W121C
Display
LCD Size
•21.5” (16:9)
Resolution
•1920 x 1080
Brightness
•300 cd/m2
Contract Ratio
•5000:1
LCD Color
•16.7M
Pixel Pitch
•0.24825(H) x 0.24825(V) mm
Viewing Angle
•178 (H) / 178 (V)
Backlight MTBF
•50,000 hrs
Touchscreen
Touchscreen Type
•Projected Capacitive Touch
Physical
Dimension (WxDxH)
•550 x 343.7 x 63.3
Weight
•7.16KG
Construction
•One-piece and Slim Bezel Design
Mounting Type
•Flat / Standard / VESA / Rack Mount
Mounting Bracket
•Pre-installed Mounting Bracket with Adjustable Design
( Support 11 different stages of adjustment)
Protection
Ingress Protection
•Front Panel IP65 Compliant
* According to IEC60529
Environment
Operating Temperature
•0°C to 60°C (with Industrial Grade peripherals; Ambient with air flow)
Storage Temperature
•-20°C to 60°C
Humidity
•80% RH @ 50°C (non-condensing)
Safety
•UL, cUL, CB, IEC, EN 62368-1
* Product Specifications and features are for reference only and are subject to change without prior
notice. For more information, please refer to the latest product datasheet from Cincoze's website.

CO-100 Series | User Manual 15
External Layout
Dimension
Unit: mm

CO-100 Series | User Manual 16
Chapter 2
System Setup

CO-100 Series | User Manual 17
2.1 Connecting to PC or Monitor Module
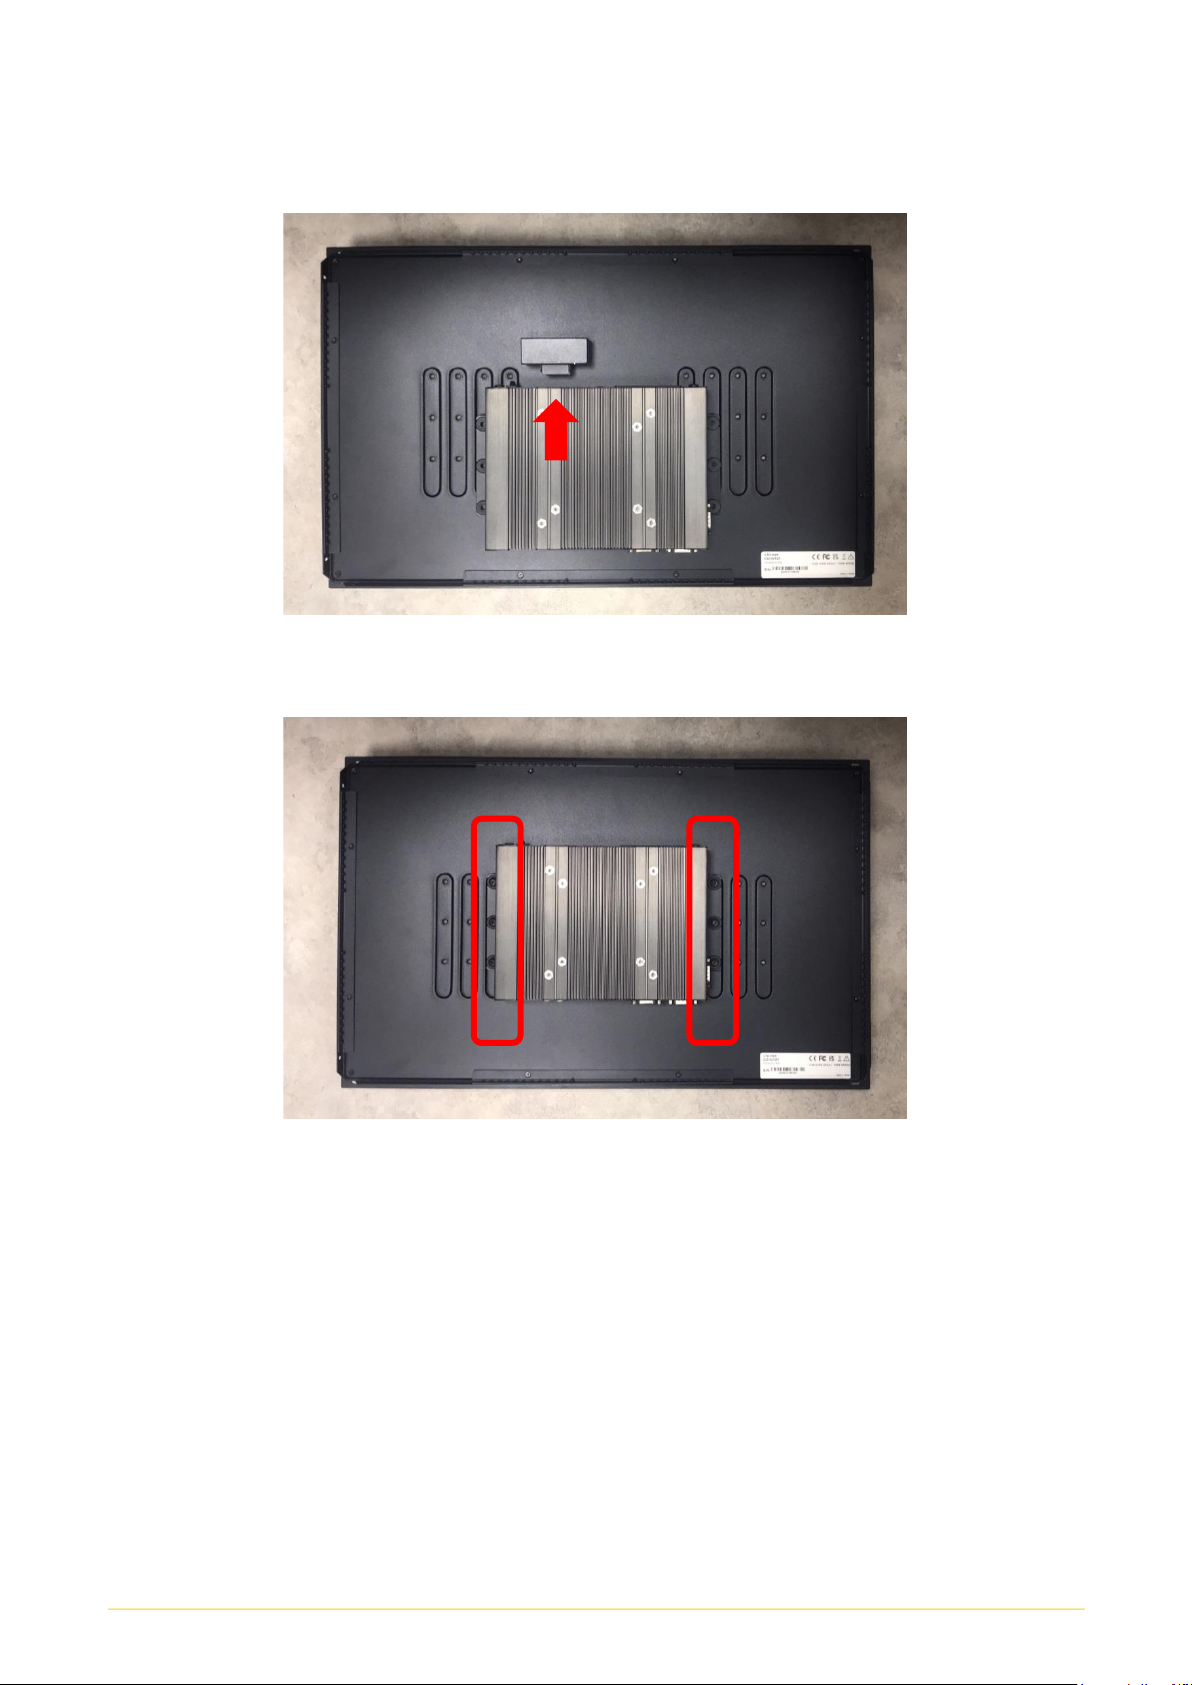
Step 1. Locate the male connector on the display module and the female connector on the PC or
monitor module. (Please assemble the wall mount brackets and remove the CDS cover plate on the
PC or monitor module first according to its user manual.)
In order to prevent electric shock or system damage, must turn off power and disconnect
the unit from power source before removing the chassis cover.
(Afin d'éviter tout risque d'électrocution ou d'endommagement du système, vous devez
couper l'alimentation et débrancher l'appareil de la source d'alimentation avant de
retirer le couvercle du châssis.)
WARNING
(AVERTIR)
PC module
Monitor module
CO-100 Series | User Manual 18
Step 2. Connect the modules.
Step 3. Fasten the 6 screws to fix the PC module or monitor module on the display module.
CO-100 Series | User Manual 19
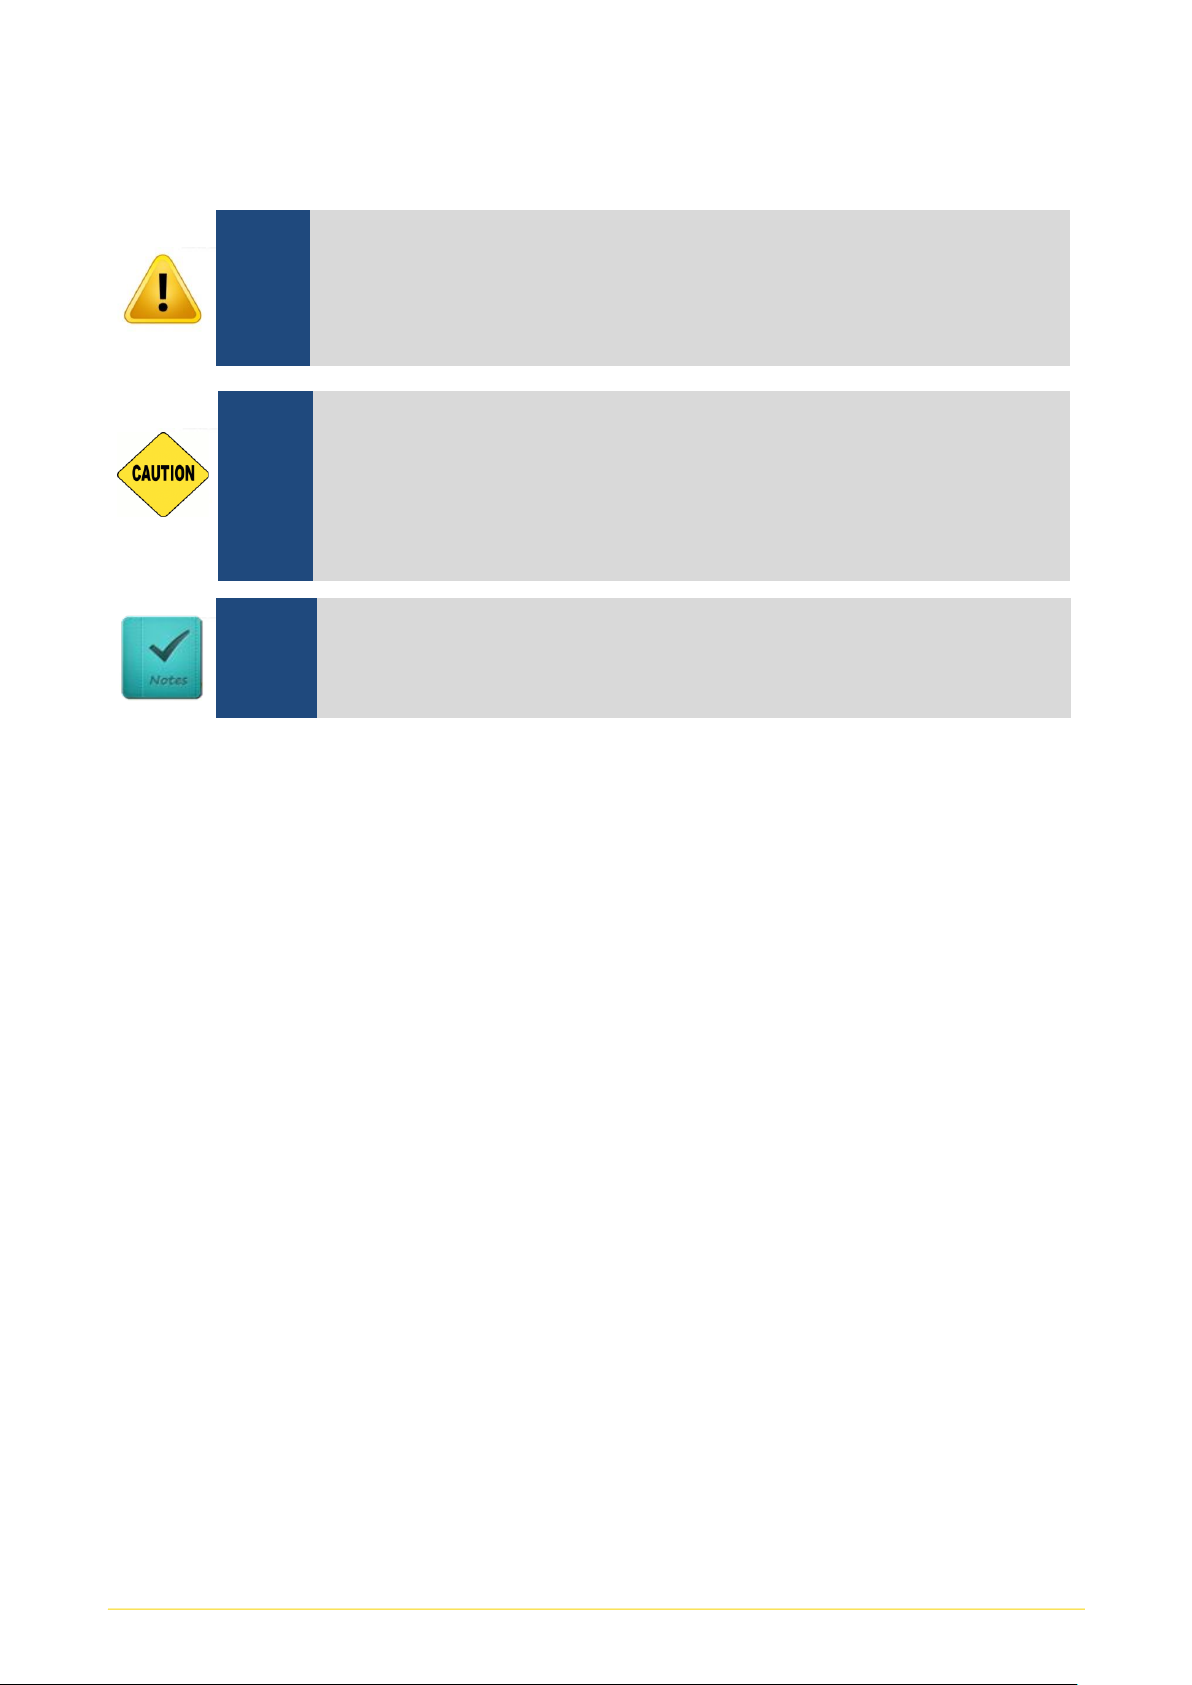
2.2 Standard Mount
The CO-100 series currently features two types of Mounting Bracket designs. For example, the
Mounting Bracket designs of CO-W121C and CO-119C as illustrated below.
CO-W121C
CO-119C
CO-119C is essentially identical to CO-W121C in terms of installation, with the only difference being
the design of the Mounting Bracket. The following steps will demonstrate the installation using CO-
W121C as an example.
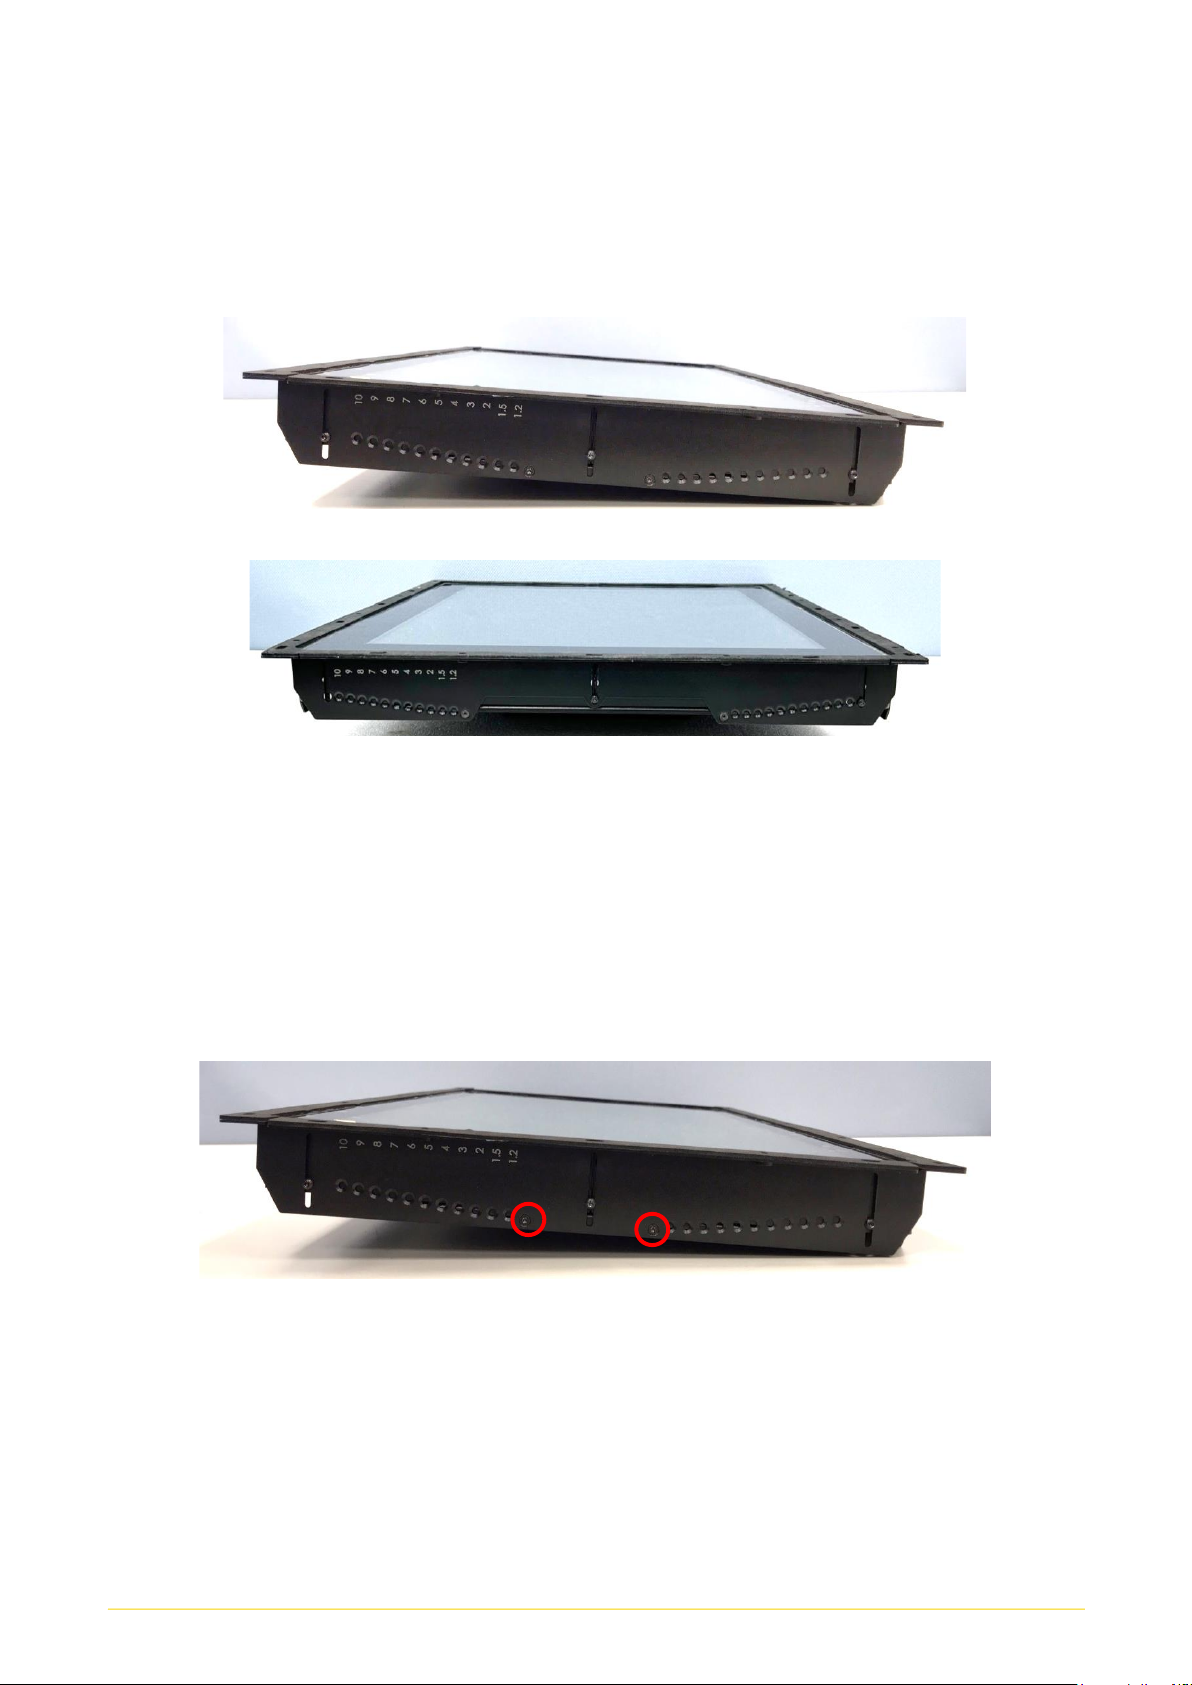
Before doing the following steps, please make sure the screw positions are fastened at the default
positions as indicated in the following picture. The default positions are the correct positions for
Standard Mount, so it does not need to change the screw positions additionally for Standard Mount.

CO-100 Series | User Manual 20
Step 1. Put the CO-100 module onto the cabinet’s back side.
There are two methods for fastening the CO-100 module onto the cabinet to complete the standard
mount. One is to fix the CO-100 module from the front side of the cabinet, which is illustrated in
chapter 2.2.1. The other one is to fix the CO-100 module from the rear side of the cabinet, which is
illustrated in chapter 2.2.2.
2.2.1 Fixing from front side
Step 2. Fasten the screws from the cabinet’s front side. Please prepare 12 pcs of M4 screws for
fixing the module through the circle holes (with screw thread).
This manual suits for next models
4
Table of contents
Other Cincoze Monitor manuals


Popular Monitor manuals by other brands


Orion Technology
Orion Technology LS2600 instruction manual

Philips
Philips 150S6FB/00 Service manual

SWIT Electronics
SWIT Electronics S-1073F user manual

ViewSonic
ViewSonic VA2436-H quick start guide

Philips
Philips Brilliance 225B2CB Specifications

NEC
NEC LCD2090UXI - MultiSync - 20.1" LCD Monitor user manual


