cineVision RV4000 User manual
Note: For advanced connections, please see pages 15-19 of the User’s Guide
...OR...
2Connect
3Setup
TRACKING
123
456
78
0
9
TV VIEW
100+
CLEAR
INPUT
CH+
CH-
SETUP
MENU
TIMER
EDIT
ENTER
SLOW- SLOW+ NEXT
PREV
PLAY/PAUSE FF
REW
STOP REC SPEED
DISPLAY
SEARCH
SUBTITLE
AUDIO
TITLE CLEAR
ANGLE
REPEAT
A-B
ZOOM
P.SCAN
REC
POWER
EJECT
VCR DVD
Quick Start
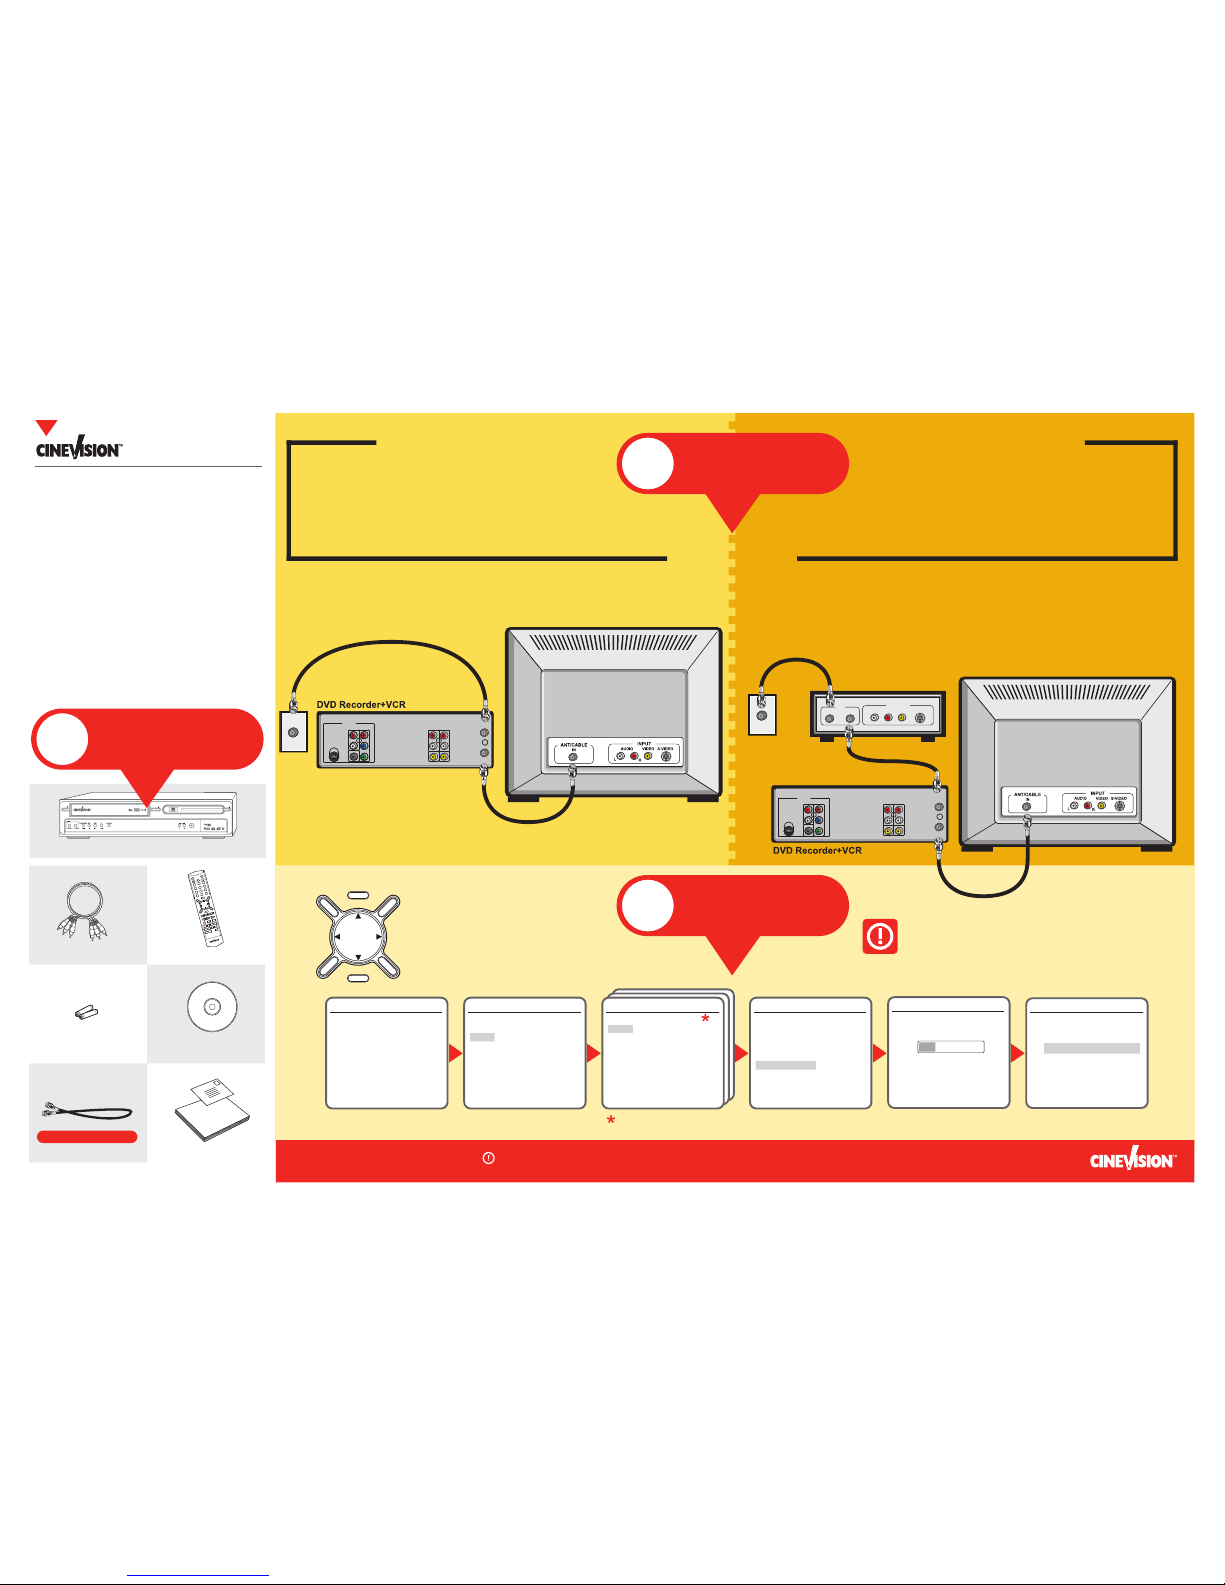
1 Connect the unit to your TV and antenna/cable as shown.
2 Turn on the DVD Recorder+VCR.
3 Turn on your TV and set it to channel 3.
• Use the , , , and ENTER
keys on the remote control to
complete Initial Setup as shown
below.
DVD Recorder + VCR
Remote ControlAudio/Video Cable
RF (Coaxial) Cable
Registration Card & User’s Guide
Blank Disc2 AAA Batteries
Welcome to the RV4000 Quick Start Guide—the
fastest way to get started using your DVD
Recorder+VCR. Just follow these easy steps,
from unpacking and setting up to making your
first recording.
If for some reason you need additional help,
please make sure you have followed every step
in this Quick Start and have referred to the
User’s Guide before calling customer service.
1 Connect the unit to your TV and cable box/satellite receiver as shown.
2 Turn on your TV and set it to channel 3.
3 Turn on your Cable Box/Satellite Receiver.
4 Turn on the DVD Recorder+VCR and follow Initial Setup below.
RV4000
DVD Recorder + VCR
POWER
REC
CH
VCR
EJECT
DVD
ONE-TOUCH COPY
DUAL
RV4000 DVD RECORDER +VCR
DVD
EJECT
Unpack
1
Do you have an
Antenna or
Basic Cable?
Do you have a
Cable Box or
Satellite Receiver?
Follow the instructions
on this panel.
Follow the instructions
on this panel.
Use this cable in step 2
S-VIDEO
OUT
OUT
DIGITAL
AUDIO OUT
AUDIO OUT OUT
COMPONENT
R
LINE IN 2
L
AUDIO
VIDEO
L
R
COAXIAL
Y
Pb
Pr
RF OUT
ANT. IN
DVD & VCR OUT
Antenna/
Cable
Wall
Outlet
S-VIDEO
OUT
OUT
DIGITAL
AUDIO OUT
AUDIO OUT OUT
COMPONENT
R
LINE IN 2
L
AUDIO
VIDEO
L
R
COAXIAL
Y
Pb
Pr
RF OUT
ANT. IN
DVD & VCR OUT
Cable Box/
Satellite Receiver
Antenna/Cable
Wall Outlet
IN OUT AUDIO S-VIDEOVIDEO
LR
OUTPUT
RF
If you are using a Cable/Satellite Receiver...
Auto Search will detect the output channel of your
receiver. Select channel 2, 3, or 4 on the DVD
Recorder+VCR to view the receiver, and then use your
receiver’s remote to select the desired channels.
Installation
Please select your language to begin auto
install procedure:
English
Spanish
French
Instructions
Enter-Confirm Setup-Exit Move
Installation
Welcome.
Press [Enter] to begin auto channel search.
Ensure antenna is connected.
Instructions
Setup-Exit
Also set Audio & Subtitle Languages.
Installation
What type of signal are you using?
Cable TV
Antenna
Detect Automatically
Instructions
Enter-Confirm Setup-Exit Move
Installation
Searching for available TV stations:
2 channels found
Please wait...
Instructions
Setup-Exit
Set Clock
Please set the clock:
Time : 12 : 00 AM
Date : Jan / 01 / 2005 (SAT)
Instructions
Enter-Confirm Setup-Exit Move
Installation
Please select disc menu language:
Default
English
Spanish
French
Italian
Japanese
Chinese
Instructions
Enter-Confirm Setup-Exit Move
INPUT
CH+
CH-
SETUP
MENU
EDIT
ENTER
DISPLAY
4
Record TV
Finalize Your Disc So it Plays
on Other DVD Players
Make Your First
DVD Recording
If you want your recorded discs to be compatible with other
DVD players, you will need to “finalize” them:
1 Press MENU to display the disc menu.
2 Press to go to the top menu.
3 Press to display the “Information” menu.
4 Press repeatedly and select “Finalize” for a DVD+R, or “Make
Compatible” for a DVD+RW.
5 Press ENTER.
6 Select “Yes” and press ENTER to finalize the disc (or make the disc
compatible if it is a DVD+RW).
7 Press ENTER again.
8 Press SETUP to go to the top disc menu.
• Once you finalize a DVD-R you cannot record anything else on the
disc.
• Disc finalization may take a few minutes to complete.
• The disc will now play on most DVD players.
Finalize
Press [Enter] to make any
previous title editing
compatible with your DVD
player.
Instructions
Enter-Confirm
Finalize
Make disc compatible with
your DVD player.
Yes
No
Instructions
Enter-Confirm Move …†
Finalize
Finished.
This Disc should already
be compatible.
ok
Instructions
Enter-Confirm Move …†
DVD+R disc
Make Compatible
Press [Enter] to make any
previous title editing
compatible with your DVD
player.
Instructions
Enter-Confirm
Make Compatible
Make disc compatible with
your DVD player.
Yes
No
Instructions
Enter-Confirm Move …†
Make Compatible
Finished.
This Disc should already
be compatible.
ok
Instructions
Enter-Confirm Move …†
DVD+RW disc
5
Finalize Disc
©2004 CineVision. All rights reserved. Printed in Korea. “Dolby”, “Pro Logic”, and the double D symbol are trademarks of Dolby Laboratories. The product
complies with the KODAK Picture CD format and will display KODAK Picture CDs. The “KODAK Picture CD Compatible” logo is a trademark of Eastman Kodak
Company and is used with permission. All other brand and product names are trademarks or registered trademarks of their respective companies.
POWER
PLAY/PAUSE STOP REW FF DVD • VCR
RV4000 DVD RECORDER + VCR
REC
DVD
EJECT
CH
VCR
EJECT
VCR DVD DVD VCR
ONE-TOUCH COPY
DUAL OPEN
Follow these steps to make your first DVD recording using the supplied disc:
1 Insert the supplied blank DVD disc into the disc tray.
• The disc is initialized automatically when the tray is closed. This may
take a few minutes to complete.
2 Press CH+/- to select the channel to record.
• If using a cable box or satellite receiver, set the DVD recorder to
Channel 3 and select the desired channel on your box/receiver.
3 Press REC to start recording.
4 Press STOP to complete the recording.
• The disc is updated with the new recording and the new title is added
to the Disc Menu. This may take a few minutes to complete.
5 To watch your recorded show, press MENU, select the thumbnail of the
desired title, and press ENTER.
Copy a VHS Tape to DVD
1 Load your source tape in the VCR deck.
2 Load a blank disc in the disc tray.
3 Press VCR on the remote control to select VCR mode.
4 Cue your tape to the start of the scene you wish to copy.
5 Press VCRDVD on the front panel. The “Copy to Disc” menu
appears.
To archive a VHS tape to DVD:
If the VHS videotape you are attempting to copy is
copy-protected, you will not be able to copy the tape.
It is not permitted to copy Macrovision encoded tapes.
DVD COPY
00:00:32 02:03:27
TAPE COPY
Copy to Disc
Choose quality then
press COPY:
HQ
SP
EP
SLP
DVD Status
Stop 0 : 00 : 10
6 Press REC SPEED to select the
desired Record Mode:
• HQ (1 hr/disc)
• SP (2 hrs/disc)
• EP (4 hrs/disc)
• SLP (6 hrs/disc)
7 Press VCRDVD again to start copying.
8 Press STOP at any time to stop copying.
• Copying will stop automatically when
the VHS tape ends.
www.cinevision1.com
customerservice@
cinevision1.com
800.736.7679
Record from Camcorder
1 Connect your camcorder to the front panel A/V jacks as
shown.
2 Press CH+/- to select “LINE 1”.
3 Cue the camcorder to the start of the scene you wish to
record.
4 Load a blank recordable disc.
5 Press REC to start recording.
• Recording continues until you press STOP or the disc is
full.
6 Press STOP to stop recording.
To record your home movies direct to DVD:
REC
CH
DVD RECORDER +VCR
DVD
EJECT
L – AUDIO – R
LINE IN 1
VIDEO
Camcorder
Jack Panel
DVD Recorder+VCR
Other Cool Features
If you would like personal
assistance making your first
recording, call us and we'll walk
you through it. Free.
Other manuals for RV4000
3
Table of contents
Other cineVision DVD Player manuals


