Citiwell OR3200DCA User manual

Instructions
5 Inch Black and White TV/Monitor
with AM/FM Radio
Please read before using this television.

2
Features :
Your 5 inch black and white television incorporates many functions that allow you to watch the television or listen to
the radio with ease and comfort. You can also use your radio/television to monitor an audio/video source such as a
VCR or camcorder.
Your radio/television includes these functions :
Earphone Jack – allows you to plug in earphones or stereo headphones so that you can listen without bothering
others.
External Audio and Video Jacks – allow you to use your radio/television to to receive external audio and video
signals.
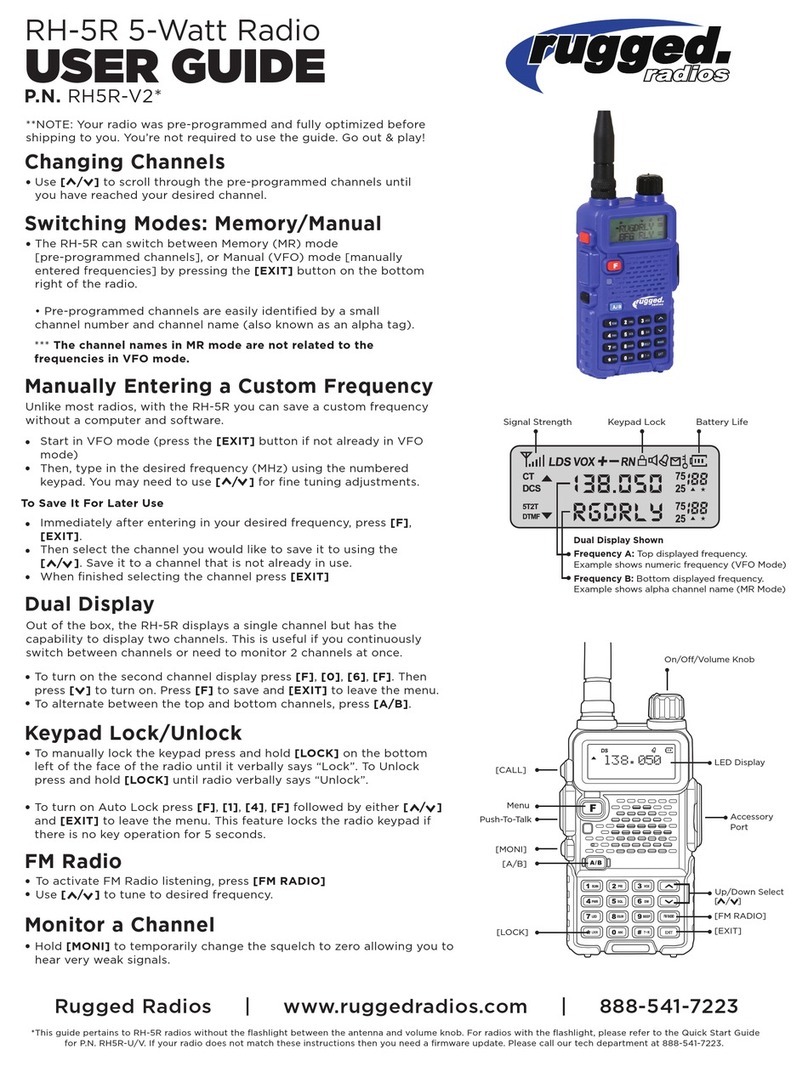
Three Power Sources – allows you to power your radio/television with internal batteries (not included), 120V AC
(with the included AC adapter, or from a 12V DC automobile cigarette lighter (with the included adapter cord).
Radio/Television Switch – lets you choose between the radio and the television.
Brightness Control – to adjust the picture so that it isn’t too dark or too bright.
Contrast Control – allows you to correct the contrast so that it isn’t too weak or too strong.
Vertical Hold Control – to adjust the picture so that it doesn’t roll vertically.
UHF/VHF Range Selector – allows you to easily choose between the UHF, VHF Low (VL) and VHF Hi (VH)
television ranges.
AM/FM Selector – to quickly change between the AM and FM bands.
Telescoping Antenna – you can adjust the length, direction and the angle to receive the clearest, sharpest
pictures and the best sound.
Warning : To reduce the risk of fire or electrocution, do not expose this receiver to rain or dampness.
Warning : Risk of shock. Do not open.
Warning : To reduce the risk of shock do not remove the rear cover. There are no user-servicable parts
inside. Consult a qualified service agent if there is a problem.
This symbol is to alert you to the presence of dangerous high voltage inside the case of this
product. There is sufficient voltage to constitute a shock risk. Do not open the housing of this
product.
This symbol is designed to inform you that the information that accompanies this product contains
important instructions on the care and use of this product.

3
Getting Ready :
Power Sources
You can power this radio/television with any of these three power sources :
• Internal battery power using 10 C cells (not included)
• Standard AC power (using the supplied AC adapter)
• From a 12V DC car battery (using the supplied DC power cord)
Using Internal Batteries
You can power this radio/television with 10 C cells. We recommend alkaline batteries for the longest life. You can
also use rechargeable nickel-cadmium batteries.
Warning :
• Use only fresh batteries of the proper type.
• Do not mix old and new batteries, batteries of different types (standard, alkaline or rechargeable), or
rechargeable batteries with different ratings.
Note : If you use nickel-cadmium rechargeable batteries you will need the proper matching battery charger.
Follow these steps to install batteries :
1. Carefully turn the television upside down and press gently on the two arrows located on the battery
compartment cover. Push the cover in the direction indicated by the arrows to open it.
2. Place the 10 C cells in the positions indicated by the polarity symbols (+ and -) moulded inside the
battery compartment.
Warning :
You can damage your radio/television if you install the batteries with the incorrect polarity.
3. Replace the cover. Ensure that the tabs are properly engaged in the slots in the housing.
Notes :
• Replace the batteries when the television image starts to darken.
• Battery life varies greatly according to how you use your radio/television.
Warnings :
• Replace old or weak batteries promptly. Batteries can release chemicals which can damage electronic
components.
• Dispose of batteries properly.
• If you do not intend to use your radio/television for a month or more, or if you plan on only using AC or DC
power, remove the batteries.
Using AC Power
To use AC power, inset the round plug of the AC adapter into the DC 12V IN jack located at the back of the
radio/television. Then plug the AC adapter into a standard AC outlet. When you use the AC adapter the batteries
are automatically disconnected.
Warning :
The supplied AC adapter supplies 13.5 volts DC at 850 milliamps and has a plug with a positive centre pole
designed to fit the DC 12V IN jack of the radio/television. Using any other adapter may damage the radio/television
or the adapter.
Note :
Always unplug the AC adapter from the AC outlet before unplugging the radio/television.

4
Using the Vehicle Adapter Cable
Follow these steps to power the radio/television from the cigarette lighter in your vehicle using the supplied Vehicle
Adapter Cable.
1. Ensure that the large end of the cable fits securely in the cigarette lighter socket.
2. Place the small end plug of the cable into the DC 12V IN jack at the rear of the radio/television.
Warning :
The Vehicle Adapter Cable supplies 12 Volts DC at 850 milliamps and has a plug with a positive centre
pole designed to fit the DC 12V IN jack of the radio/television. Using any other Adapter Cable may
damage the radio/television or the cable.
3. When you use the Vehicle Adapter Cable the batteries are automatically disconnected.
Notes :
Always unplug the Vehicle Adapter Cable from the cigarette lighter socket before unplugging it from the
radio/television.
If the radio/television stops working, check the fuse located in the Vehicle Adapter Cable. (See Page 6)
How to Adjust the Telescoping Antenna
The built-in telescoping antenna provides good reception of FM, UHF and VHF broadcast signals.
For the UHF channels 14 to 83 position the antenna straight up and down and extend it to its full length.
How to Attach an Audio/Video Source
You can use your radio/television as a monitor to see images from an A/V source such as a VCR, a camcorder or a
DVD player. Insert the output plugs from the A/V source into the AUDIO and VIDEO jacks located on the back of
the radio/television. The TV signal from the antenna and the TV TUNING are automatically disconnected.
How to Attach Earphones or Headphones
To listen in privacy, plug a pair of earphones or headphones with a 1/8 inch (3.5mm) mini plug (not supplied) into
the jack on the back panel of the radio/television.
How to Listen Safely
To protect your hearing while using earphones or headphones, follow the following directions :
• Set the volume to a low level before actually listening. After you have begun listening adjust the volume to
a comfortable level.
• Do not listen at very high volume levels. Prolonged exposure to high volume levels can cause a permanent
hearing loss.
• Once the volume level is adjusted, do not increase it. After a while the ears adapt to a sound level, even a
sound level that can damage hearing.
Accident Prevention
Do not wear earphones or headphones while you are driving a car or riding a bicycle. This can create a dangerous
risk and may be illegal in some areas.

5
Some earphones allow you to hear some exterior sounds while you are listening at normal volume levels. However
they still create a dangerous risk.
Operation :
Using the Television
1. To turn the television on set the RADIO/OFF/TV switch to TV.
2. Set the VL/VH/UHF switch to the desired frequency range.
VL – to select VHF channels 2 to 6
VH – to select VHF channels 7 to 13
UHF – to select UHF channels 14 to 83
3. Turn the TV TUNING knob to the desired station.
4. Adjust the telescoping antenna to obtain the best picture and sound.
5. Turn the BRIGHTNESS, CONTRAST and V-HOLD knobs, located on the back of the radio/television to
adjust the picture as required.
BRIGHTNESS – Adjust until the picture is neither too dark nor too bright.
CONTRAST – Adjust until the picture is neither too soft nor too harsh.
V-HOLD – Adjust so that the picture does not roll vertically.
6. Turn the VOLUME knob to adjust the volume to a comfortable level.
7. To turn the radio/television off set the RADIO/OFF/TV switch to OFF.
Hints Regarding TV Signal Reception
If the picture is fuzzy, unstable, or if there is ‘snow’, the signal reception may be poor. Your location or the position
or length of the antenna may be the cause. Some buildings with a steel frame can also cause reception problems.
Try to change the direction or length of the antenna. If that does not work, use an exterior antenna.
If the picture disappears from the screen while the unit is being powered with batteries th ebatteries may be weak.
Replace or recharge the batteries.
Using the Radio
1. To turn the radio on set the RADIO/OFF/TV switch to RADIO.
2. Set the AM/FM switch to AM or FM, whichever you wish.
3. Turn the RADIO TUNING knob to the desired station.
4. Turn the VOLUME control to the desired level.
5. To turn the radio/television off set the RADIO/OFF/TV switch to OFF.

6
Hints on Radio Reception
Your location, the position or length of the telescoping antenna and the presence of steel framed buildings can
cause poor FM reception. Try to change the position and length of the antenna. If this does not help, use an
exterior antenna.
Poor AM reception can be caused by the distance from the broadcasting station or by using the radio/television in a
steel framed building. This radio/television has a built-in AM antenna. Rotate the unit to obtain the best reception.
Care and Maintenance
Your portable radio/television is an example of superior design and workmanship. The suggestions that follow will
help maintain your unit so that you can enjoy it for many years.
Keep your radio/television dry. If it gets wet, dry it immediately. Liquids can contain minerals that can
corrode the electronic circuits.
Handle your radio/television carefully. A fall can damage the printed circuits and the housing and can cause
the unit to malfunction.
Use and store the radio/television only in normal environments. Temperature extremes can shorten the life
of the electronic components and can weaken the plastic parts.
Keep the radio/television away from dust and dirt that can cause premature wear of the components.
From time to time, wipe the radio/television with a damp cloth to keep it looking new. Do not use strong
chemicals, cleaning solvents or strong detergents to clean the unit.
How to Change the Fuse
If the unit fails to work while you are using the Vehicle Adapter Cable, check the fuse by following these steps :
1. Unscrew the knurled ring on the Vehicle Adapter Cable and remove the spring to check the fuse.
2. If the fuse is bad, replace it with a 2 amp fuse. Do not use a fuse with a different rating.
3. Replace the spring and the knurled ring. Screw the knurled ring back into place.
Interference
Your radio/television can cause interference on another television. This electromagnetic interference can occur een
though your unit is working correctly. To eliminate this interference you can try one or more of the following
corrective measures :
• Change the orientation or position of the receiving antenna.
• Increase the distance between your unit and the affected radio or television.
• Plug your radio television and the affected radio or television into wall plugs from different circuits.

7
Specifications
System NTSC
Horizontal Resolution 260 lines
Received Channels VHF : 2 – 13 / UHF : 14 – 83
Intermediate Frequency Picture Carrying Frequency : 39.5 MHz
Sound Carrying Frequency : 33.5 MHz
Radio Frequencies AM : 540 to 1600 MHz
FM : 87.5 to 108 MHz
Maximum Sensitivity UHF/Cable : 48 dB µ V max.
Antenna UHF 75 ohm
Power Sources AC 110 V, 60 Hz
DC 12 V – 15 V, 850 mA
10 ‘C’ cells
Power Consumption 15 W maximum
Power Output 1 W
Speaker Impedance 8 ohm
Frequency Response 80 Hz – 7 kHz (3 dB bandpass)
Harmonic Distortion 2 %
Input Level Video :1 PV-P
Audio : 400 Mv
Weight (without batteries) 1.4 kg (3 lb, 2 oz)
The specifications are typical. Individual elements can vary. Specifications are subject to change and improvement
without notice.
Made In China
Manual Part # 260289
Table of contents
