citizen quartz U010 Manual

TECHNICAL INFORMATION
INFORMACION TECNICA
CITIZEN QUARTZ
Cal. No. U010

ENGLISH
Contents
§1. FEATURES ..................................................................................................1
§2. SPECIFICATIONS ........................................................................................1
§3. HANDLING OF WATCH ..............................................................................2
1. NAMES OF COMPONENTS ..................................................................2
2. SWITCHING DIGITAL FUNCTIONS (MODES) .....................................2
3. ACCESSING TIMES AND DATES OF MAJOR CITIES ........................3
4. EL ILLUMINATION .................................................................................4
5. SETTING ANALOG TIME.......................................................................4
6. SETTING DIGITAL TIME ........................................................................5
7. SETTING THE DATE ..............................................................................6
8. USING THE ALARM...............................................................................7
9. USING THE CHRONOGRAPH...............................................................8
10.USING THE TIMER.................................................................................9
11.USING THE ZONE SETTING MODE....................................................10
12.ALL-RESET PROCEDUR.....................................................................11
§4. DISASSEMBLY AND ASSEMBLY OF MOVEMENT..................................12
§5. TROUBLESHOOTING AND ADJUSTMENT .............................................16
§1. FEATURES
This watch is a combination quartz watch equipped with a shutter function that allows the digital
display to b e recalled and used only when necessary, and a function that makes it possible to
easily call up the time and date of 30 cities around the world as well as UTC (Universal Time
Coordinated) time and date simply by pressing the watch buttons.
It is also equipped with an EL illumination function that enables the display to be viewed in the
dark.
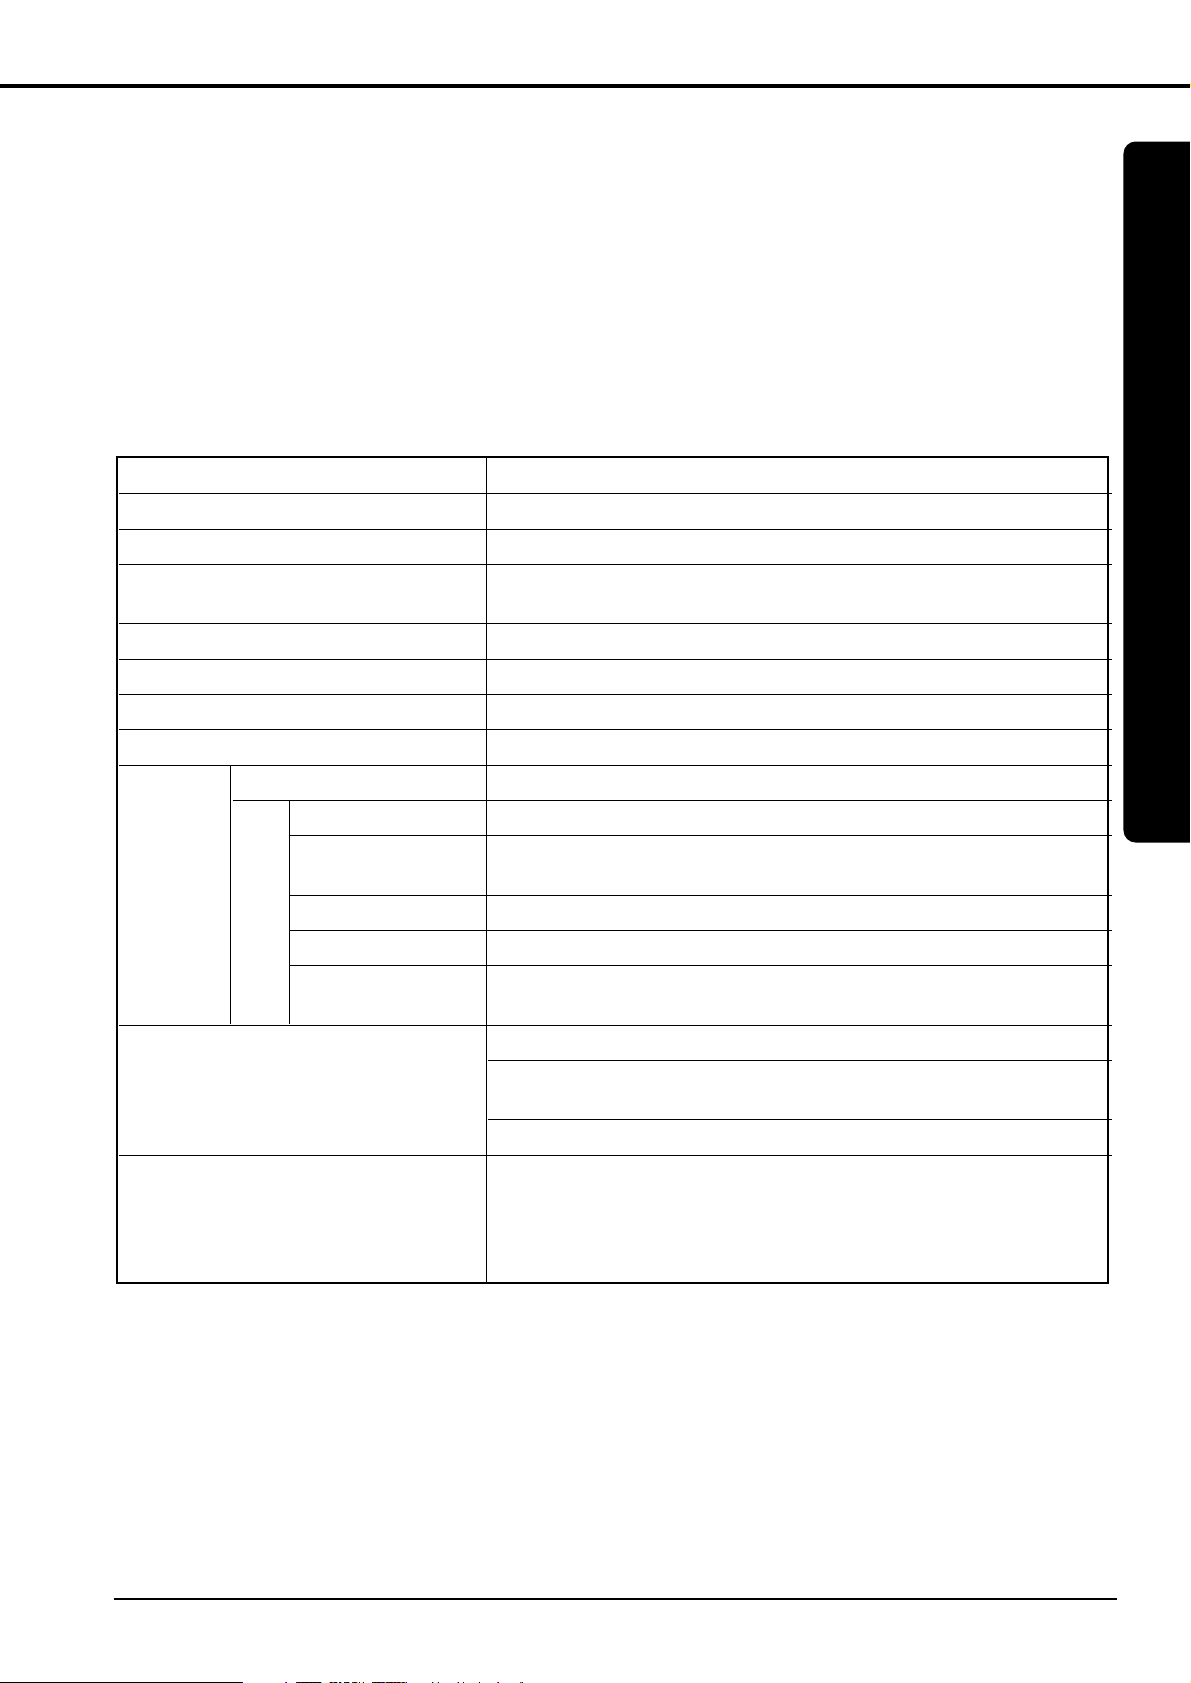
§2. SPECIFICATIONS
1
English
Caliber NO. U010
Type Combination quartz watch
Movement size (mm) ø30.8 x 6.17t
Accuracy Within ±20 seconds/month (when worn at normal
temperatures range of 5°C to 35°C/41°F to 95°F)
Operating temperature range 0°C to +55°C (32°F to 131°F)
Converter Boipolar step motor
Time adjustment No adjustment terminal for use in market
Measurement gate 10 sec.
Analog time Hours, minutes, seconds (3 hands)
Time Hours, minutes, seconds, city name
Display Calendar Month, date, day, city name, year (displayed only during correc-
tion)
function Alarm Hours, minutes, On or OF (off), city name
Chronograph 24 hour timing (1/100 second units), split time
Zone setting Setting of city display or non-display, setting of daylight savings
time
Shutter function
Additional functions Time and date display function for UTC and 30 cities around the
world
EL illumination function
Battery No.: 280-44 (SR927W)
Battery Battery Life: About 3 years.
(When the alarm tone sounds for 15 seconds/day, timer confirma-
tion tone sounds for 5 seconds/day, EL illumination is used for 3
seconds/day and the chronograph is used for 24 hours/week)
* These specifications are subject to change, for product improvement, without prior notice.
Digital
2
§3. HANDLING OF WATCH
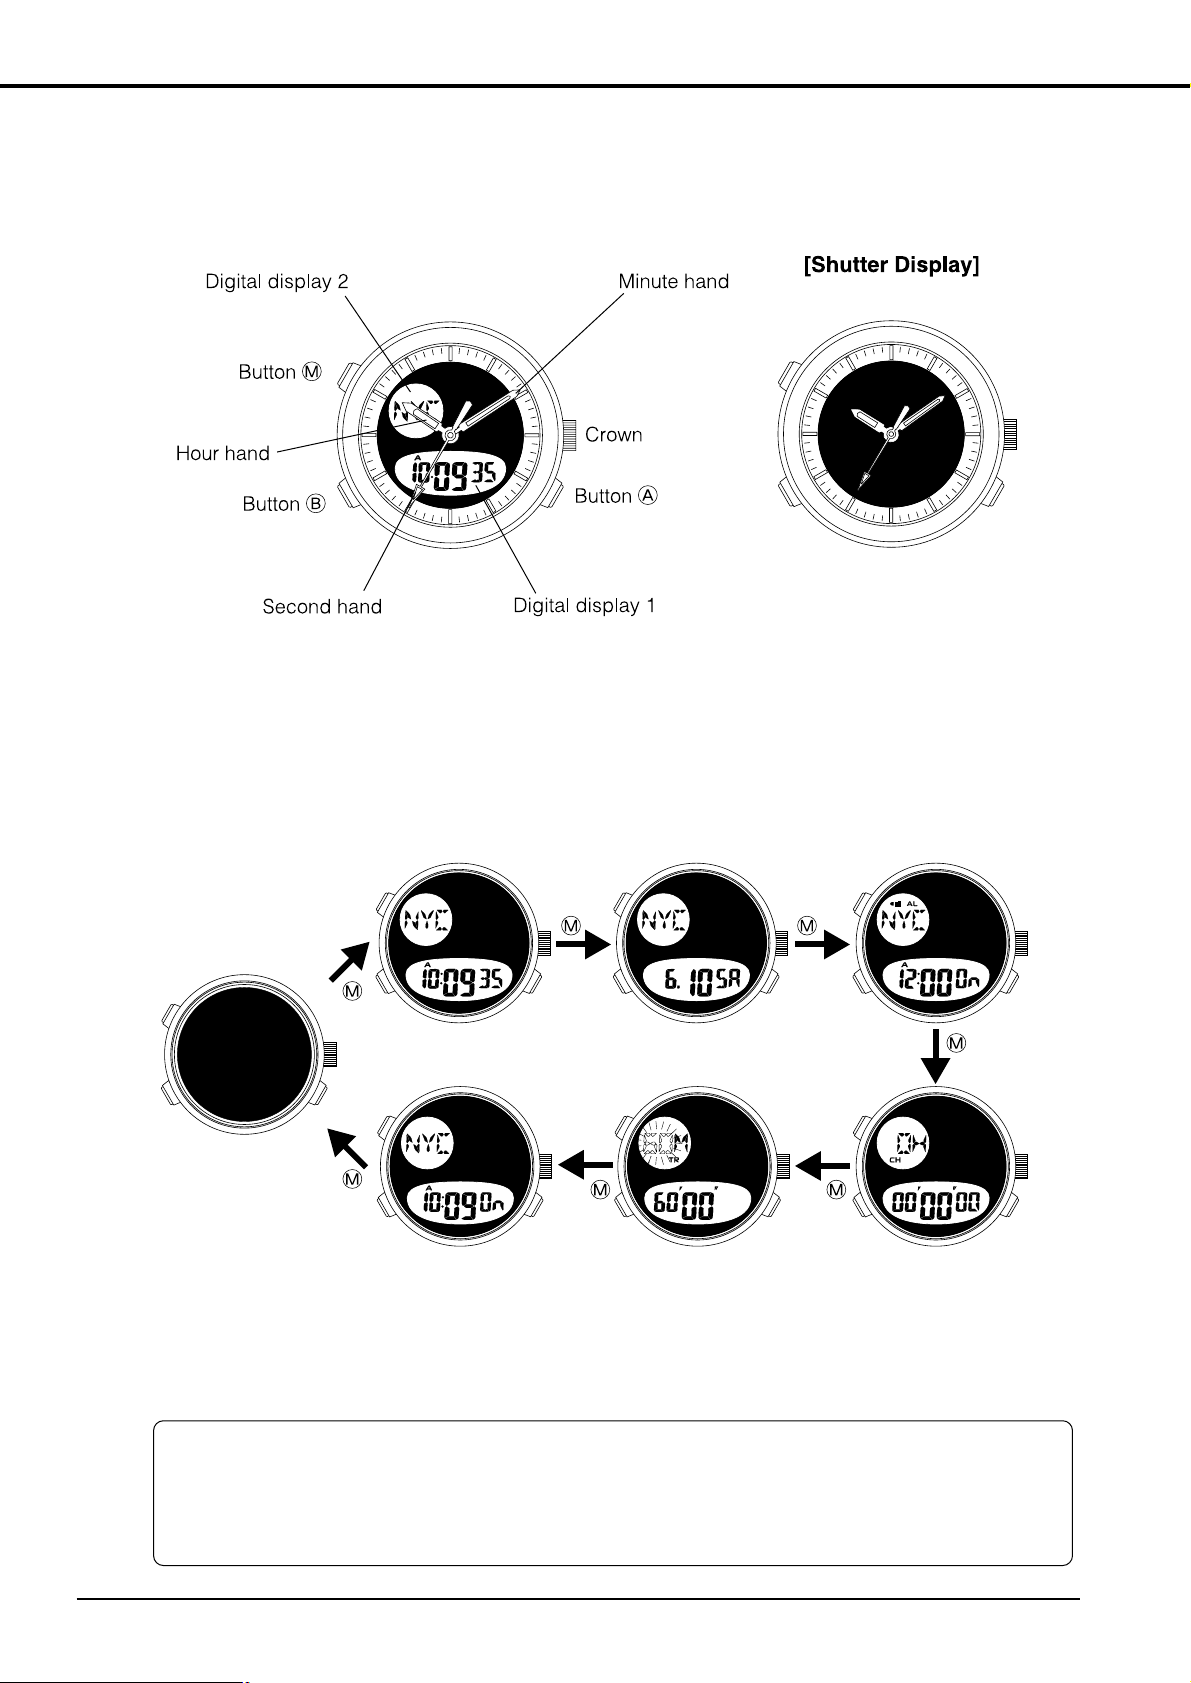
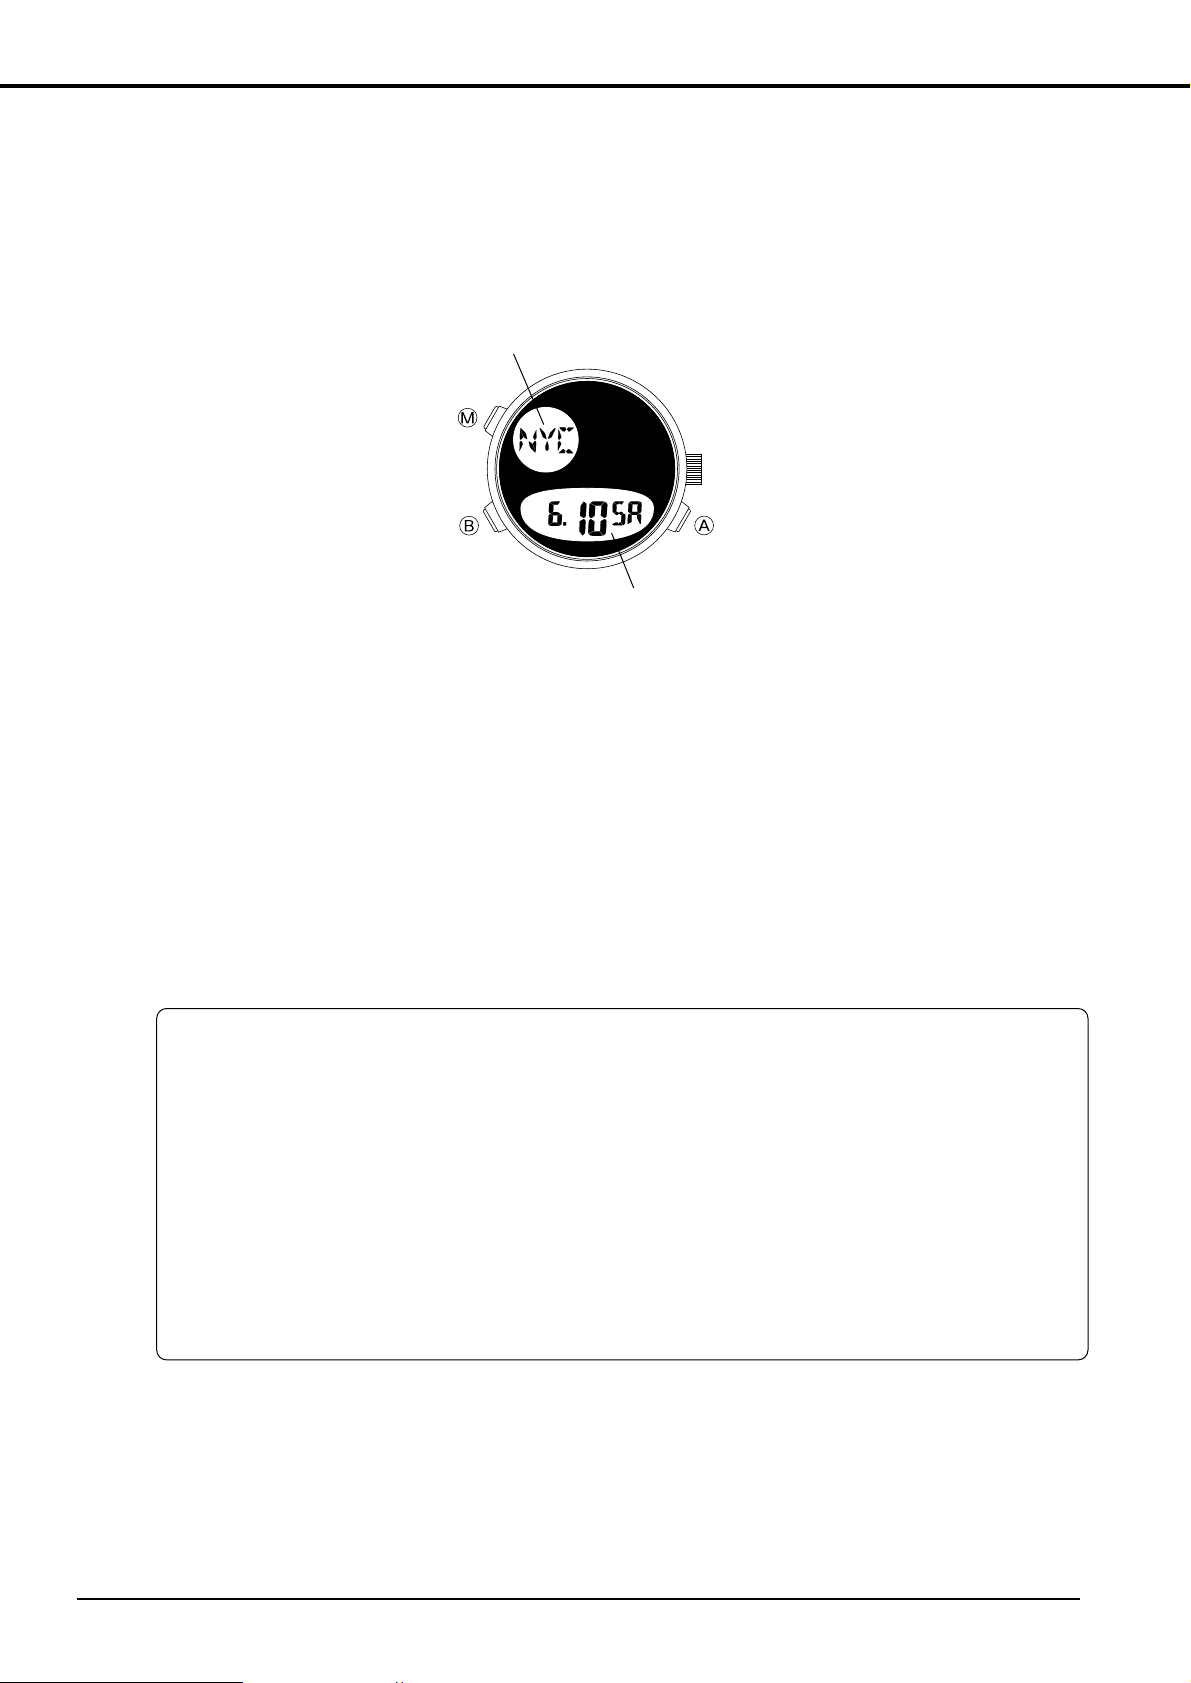
1. NAMES OF COMPONENTS
The design may vary depending on the model.
2. SWITCHING DIGITAL FUNCTIONS (MODES)
This watch is equipped with the functions (modes) shown below. Each time button Mis pressed,
the mode changes in the order shown below.
*1: The digital display is completely concealed in the shutter mode.
*2: In the zone setting mode, the watch can be used to set the display and non-display sta-
tus as well as the use of daylight savings time for each of the 30 cities and UTC
(Universal Time Coordinated) displayed by the watch.
* When none of the buttons are operated for about 2 minutes in the time, calendar,
alarm or zone setting mode, the watch returns to the shutter mode.
* When none of the buttons are operated for about 10 minutes in the chronograph or
timer mode (excluding when timing is in progress), the watch returns to the shutter
mode.
[Time] [Calendar] [Alarm]
[Zone Setting]*2 [Timer] [Chronograph]
[Shutter Mode]*1
M
3
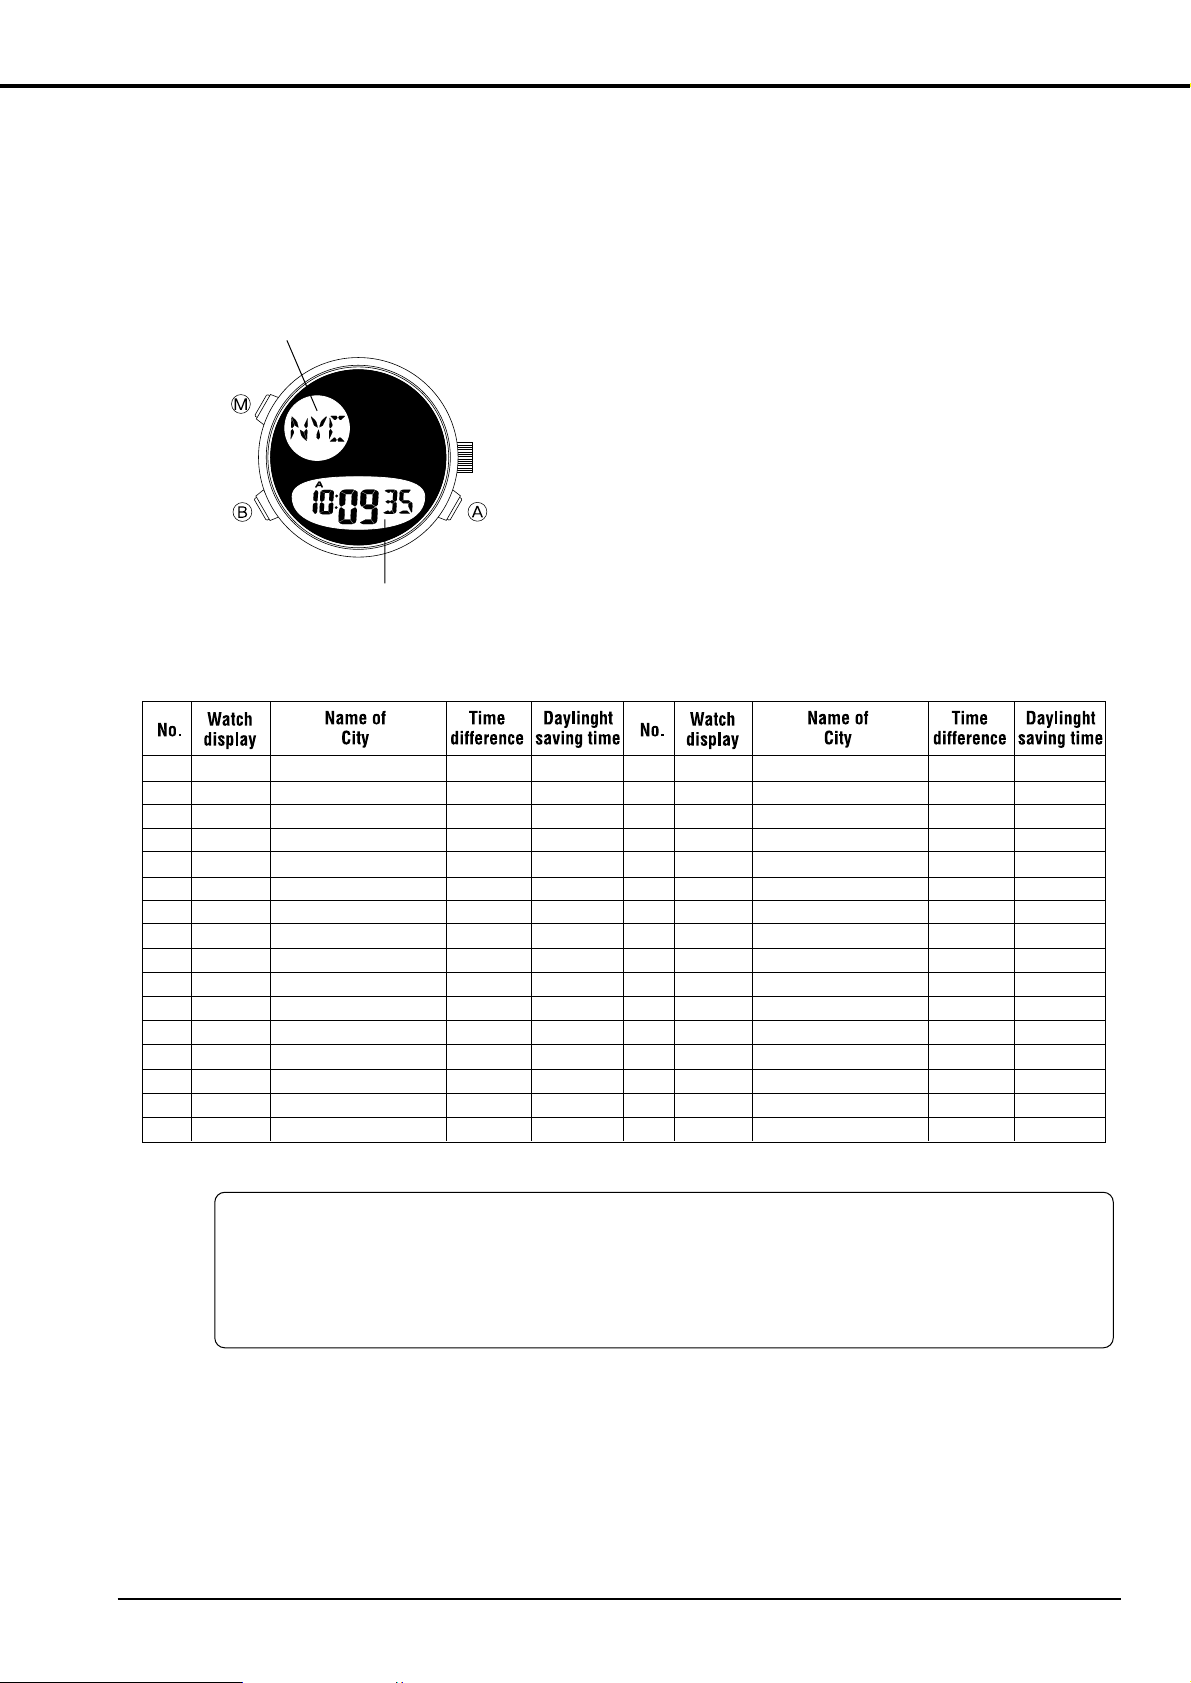
3. ACCESSING TIMES AND DATES OF MAJOR CITIES
The time or date of major cities pre-registered in this watch as well as UTC time or date can be
easily called up by pressing the buttons.
<Access Procedure>
(1) Press button Mto switch to the time or calendar mode.
(2) Each time button Bis pressed, the timer or date of the
next city is displayed in the order shown in the table
below (direction in which the time difference increases
or decreases).
When button Ais pressed simultaneous to pressing
button B, the order in which the cities are recalled
(direction in which the time difference increases or
decreases) changes.
<Cities Previously Registered in This Watch and Time Difference from UTC>
* Cities for which non-display (OF) has been selected in the zone setting mode are not displayed.
* Cities (regions) in which daylight saving time is used are indicated with a O, while those in which it is
not are indicated with an X.
* The time difference and use of daylight savings time of each city are subject to change by the particu-
lar country (the information in the table is valid as of 1999).
City name
Time corresponding to
the city name
1 UTC
Universal time coordinated
±0 —17 TYO Tokyo +9 X
2 LON London ±0 O 18 SYD Sydney +10 O
3 PAR Paris +1 O 19 NOU Nouméa +11 X
4 ROM Rome +1 O 20 AKL Auckland +12 O
5 CAI Cairo +2 O 21 HNL Honolulu –10 X
6 IST Istanbul +2 O 22 ANC Anchorage –9 O
7 MOW Moscow +3 O 23 LAX Los Angeles –8 O
8 KWI Kuwait +3 X 24 DEN Denver –7 O
9 DXB Dubai +4 X 25 CHI Chicago –6 O
10 KHI Karachi +5 X 26 MEX Mexico City –6 X
11 DEL New Delhi +5.5 X 27 NYC New York –5 O
12 DAC Dacca +6 X 28 YUL Montreal –5 O
13 BKK Bangkok +7 X 29 CCS Caracas –4 X
14 SIN Singapore +8 X 30 RIO Río de Janeiro –3 O
15 HKG Hong Kong +8 X 31 BUE Buenos Aires –3 X
16 PEK Beijing +8 X

4
4. EL ILLUMINATION
* The EL light is illuminated when button (A) is pressed (for as long as it is pressed) in the time,
calendar or zone setting mode.
* When button (A) is pressed in the shutter mode (for as long as it is pressed), the EL light is illu-
minated and the watch displays the time mode.
* The EL light is illuminated automatically when the split time or stop operation is performed dur-
ing chronograph measurement.
5. SETTING ANALOG TIME
(1) The second hand stops when the crown is pulled out.
(2) Turn the crown to set the watch to the correct time.
(3) After setting the time, securely push the crown in to the normal position. The second hand
starts to move when the crown is pushed in.
Second hand
Normal position
Time correction
position
5
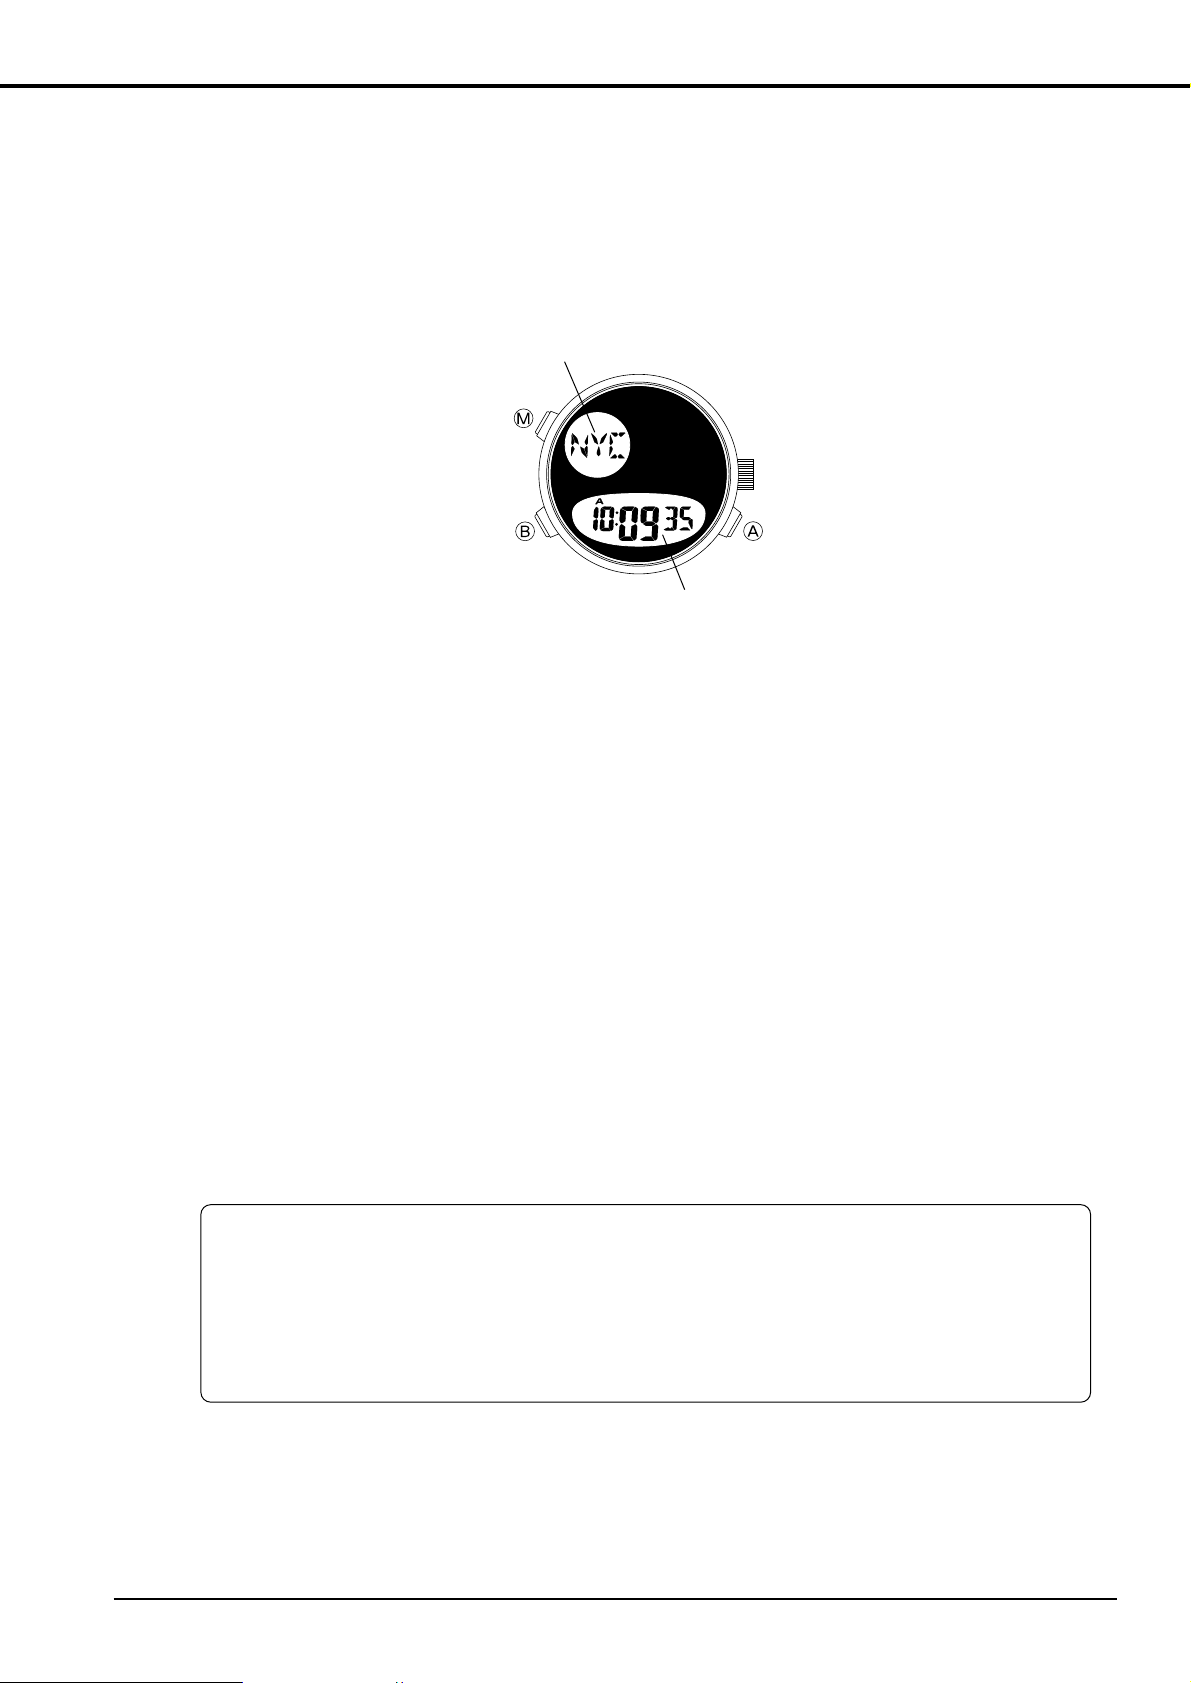
6. SETTING DIGITAL TIME
When the time is set for any of the 30 cities or UTC, the times of other cities are automatically cor-
rected by converting the time difference.
[Normal Time Display]
(1) Press button Mto switch the watch to the time mode.
(2) Press button Bto display the city for which the time is to be corrected.
(3) Pressing button Bcontinuously for about 2 seconds causes "SUM (abbreviation for daylight
savings time)" and "On or OF" to flash.
(4) Press button (A) to switch the selection for daylight savings time to "On" or "OF (OFF)" for that
city.
(5) Each time button Bis pressed, the location that flashes changes in the order of seconds to
minutes to hours and finally to 12/24 hour display. Press button Buntil the location desired
to be corrected flashes.
(6) Press button Ato correct the location that is flashing.
* When button Ais pressed in the seconds correction state, the seconds is corrected to 00.
(The minutes advance by one minute when the seconds are between 30 and 59 seconds.)
* When switching between 12 and 24-hour display, the display switches between 12 and 24
hours each time button Ais pressed.
* Each time button Ais pressed in the hours or minutes correction state, the display
advances by 1. Pressing button Acontinuously causes the display to advance rapidly.
(7) Press button Mto return to the normal display.
* When using the 12-hour display, pay attention to AM(A) and PM(P) when setting the
time.
* When none of the buttons are operated for about 2 minutes in the time correction
state (flashing display), the watch automatically returns to the normal time display.
* Pressing button Min the time correction state immediately returns the watch to the
normal time display.
Time
City name
6
7. SETTING THE DATE
When the date is set for any of the 30 cities or UTC, the dates of other cities are automatically cor-
rected by converting the time difference.
[Normal Date Display]
(1) Press button Mto switch the watch to the calendar mode.
(2) Press button Bto display the city for which the date is to be corrected.
(3) Pressing button Bcontinuously for about 2 seconds causes the "month" to flash so that it
can be corrected. The location on the display that is flashing can be corrected.
(4) Each time button Bis pressed in the correction state, the location that flashes changes in
the order of month to date and finally to the year. Press button Buntil the location desired to
be corrected flashes.
(5) Press button Ato correct the location that is flashing. (Pressing button Acontinuously
causes the display to advance rapidly.)
(6) Press button Mto return to the normal display.
* When none of the buttons are operated for about 2 minutes in the date correction state
(flashing display), the watch automatically returns to the normal date display.
* When button Mis pressed in the date correction state, the watch immediately returns
to the normal date display.
* The year can be corrected from 2000 to 2099 (displayed only when correcting).
* The day is corrected automatically by correcting the year, month and date.
* The calendar function of this watch is a full auto calendar. Once the date is set, the
end of the month is corrected automatically, including leap years.
* When the date is set to a date that does not exist, the date will automatically be cor-
rected to the first day of the next month when the watch is returned to the normal dis-
play (example: February 30 is automatically corrected to March 1).
City name
Month, date
and day

7
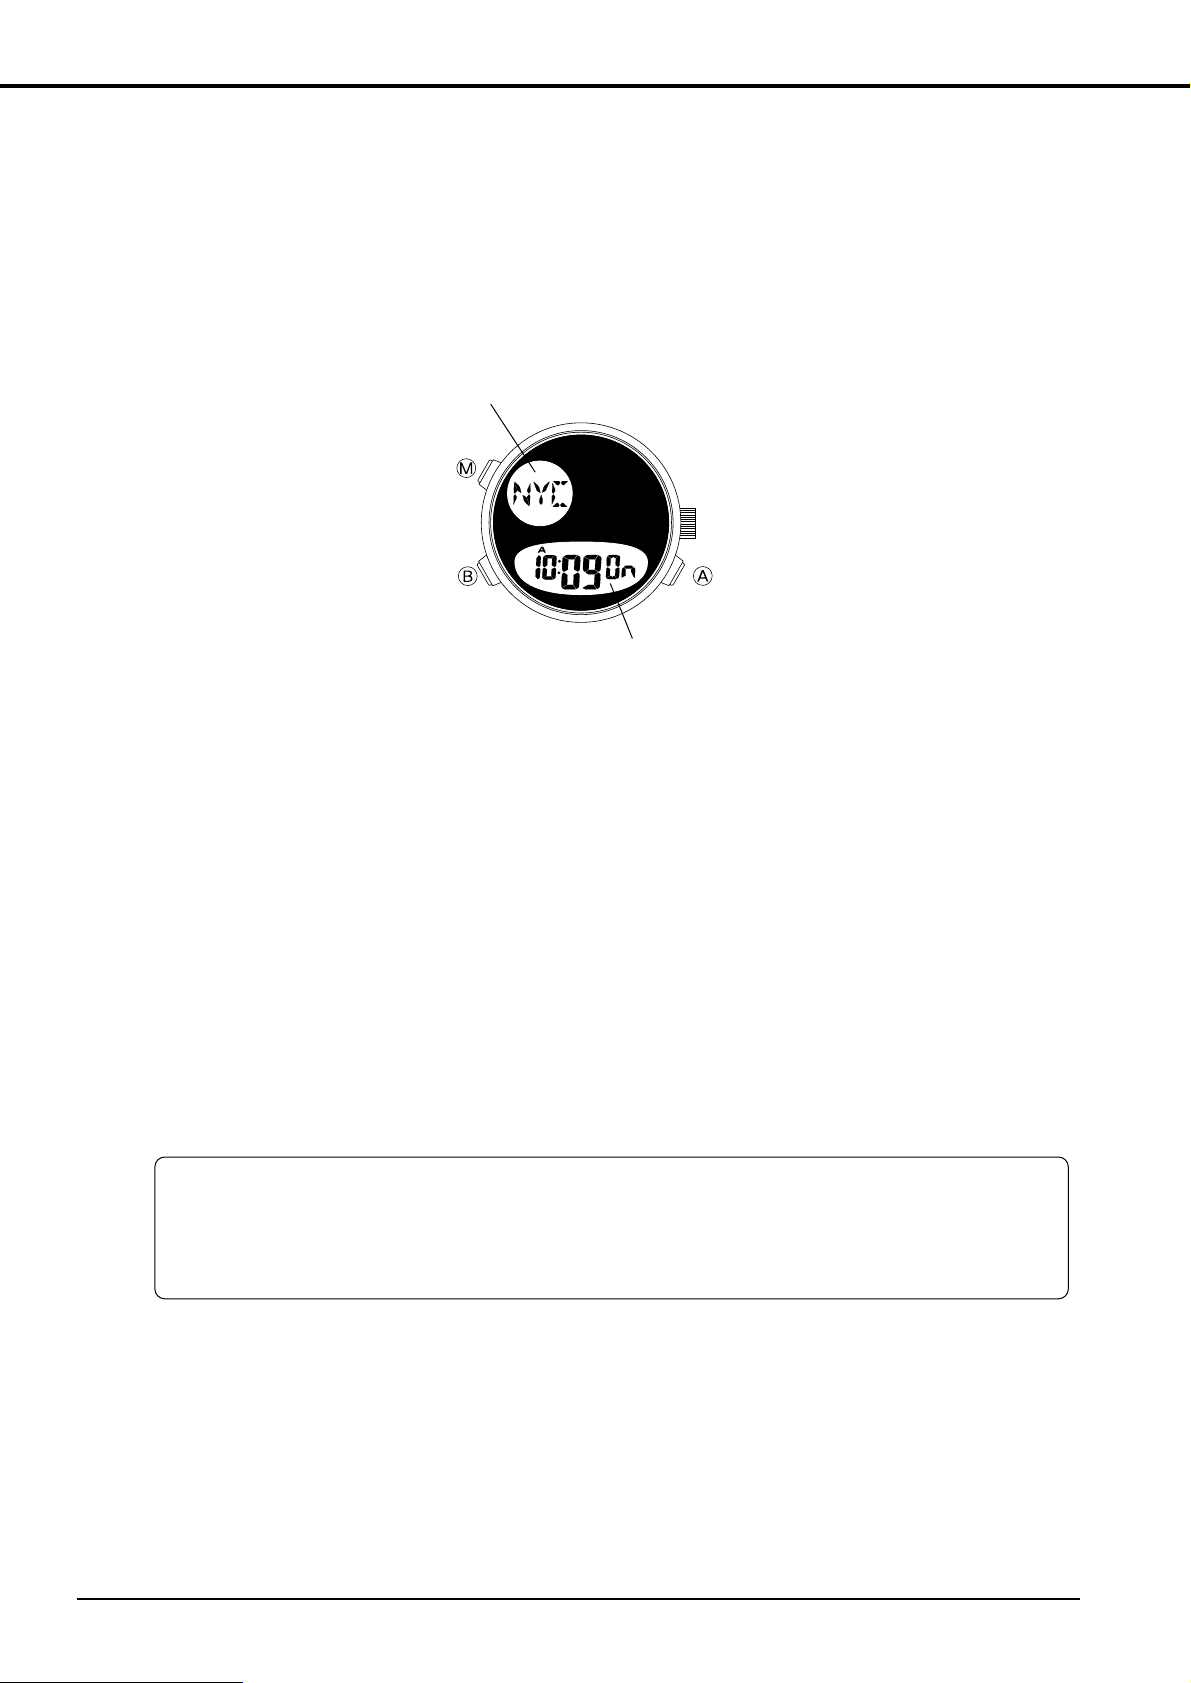
8. USING THE ALARM
The alarm tone sounds for about 15 seconds at the same time every day once it has been set
(ON). The alarm can be switched off when it is sounding by pressing any button.
[Alarm (ON) Display]
<Setting Procedure>
(1) Press button Mto switch the watch to the alarm mode.
(2) Press button Bto display the city for which the alarm is to be set.
(3) Pressing button Bcontinuously for about 2 seconds causes the alarm to be switched ON
and the hours to flash.
(4) Press button Ato correct the "hours". (Pressing button Acontinuously causes the display
to advance rapidly.)
(5) Press button Bto cause the "minutes" to flash.
(6) Press button Ato correct the "minutes".
(7) Press button Mto return to the normal display.
* Since the alarm time is also based on a 12-hour display when the time mode is set
to a 12-hour display, pay attention to AM(A) and PM(P) when setting the alarm time.
* After the alarm has been set, the alarm time does not change even if the time mode
is set to daylight savings time.
* When none of the buttons are operated for about 2 minutes in the alarm correction
state, the watch automatically returns to the normal alarm display.
* When button Mis pressed in the alarm correction state, the watch immediately
returns to the normal alarm display.
<Switching the Alarm ON and OFF>
The alarm is switched On and OF (Off) each time button Ais pressed during the normal alarm
display. When the alarm is set to ON, the " " mark lights on the digital display in each mode.
<Sound Monitor>
The alarm monitor tone sounds for as long as button Ais pressed in the alarm mode.
City name
Alarm On mark
Alarm time On or OF
8
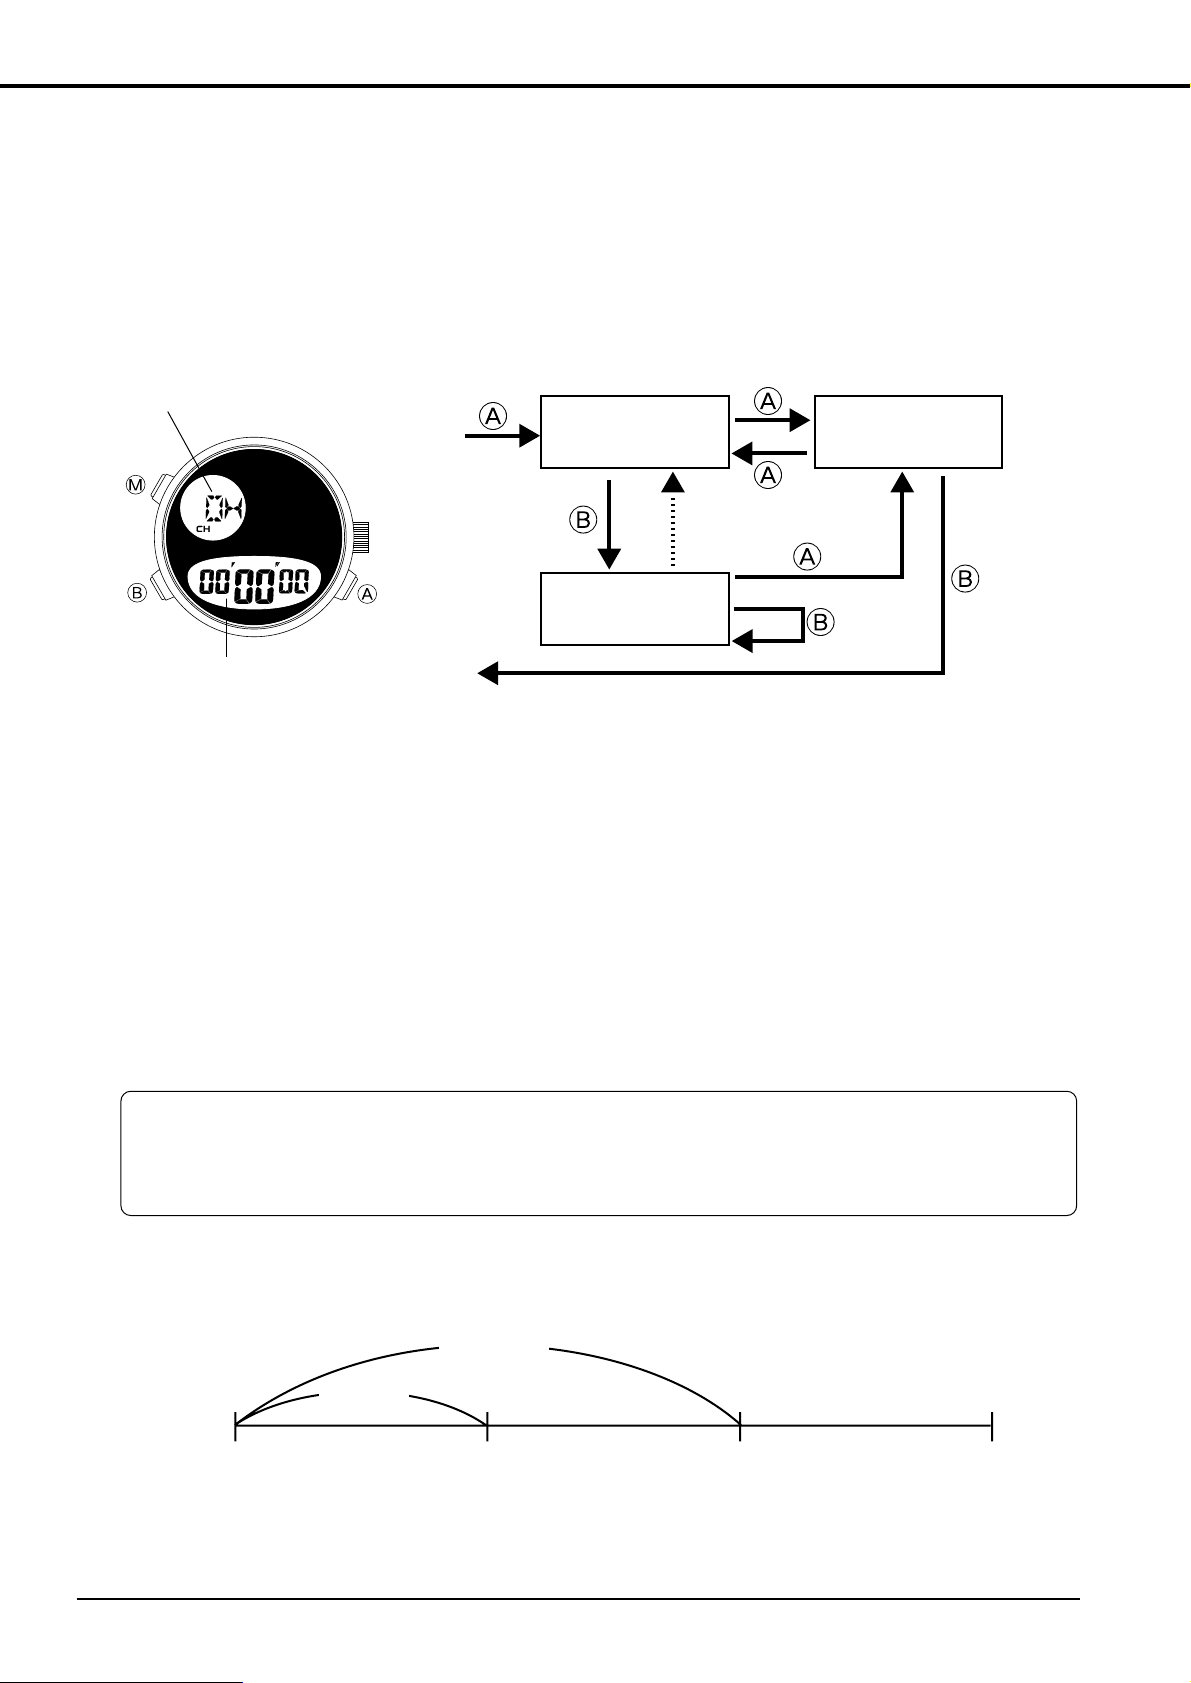
9. USING THE CHRONOGRAPH
The chronograph is able to measure and display time up to a maximum of 23 hours, 59 minutes
and 59.99 seconds in 1/100 second units. Following completion of measurement for 24 hours, the
chronograph returns to the reset display and stops. In addition, the chronograph is also able to
measure split time (intermediate elapsed time).
[Chronograph Reset Display]
<Measurement Procedure>
(1) Press button Mto switch the watch to the chronograph mode.
(2) The chronograph starts when button Ais pressed and stops when button Ais pressed dur-
ing measurement. Starting and stopping is repeated each time button Ais pressed.
(3) Pressing button
Bwhile the chronograph is stopped returns it to the reset display.
<Split Time Measurement Procedure>
The most recent split time is displayed for about 10 seconds whenever button Bis pressed dur-
ing chronograph measurement. (The SPL mark flashes while split time is displayed.)
* Pressing button Mduring chronograph measurement allows the mode to be changed.
Chronograph measurement can be displayed in continuation from the time the mode was
switched by again returning to the chronograph mode. However, the chronograph returns
to the reset display when measurement exceeds 24 hours.
✩Split time: The amount of time that has elapsed at some intermediate point from the starting
line.
Hours
Minutes, seconds
and 1/100 seconds
Measuremant Stops
Split time
*1: Automatically returns to the
measurement state after 10 seconds.
*1
Starting line Finish line
Split time
Split time

9
10. USING THE TIMER
The timer can be set from 60 minutes to 1 minute in 1 minute units. When timer measurement is
completed, a confirmation tone indicating that the time is up sounds for about 5 seconds.
[Timer Set Time Display]
<Setting Procedure>
(1) Press button Mto switch the watch to the timer mode.
(2) The set time can be corrected in the negative direction in 1 minute increments each time
button Bis pressed. (Pressing button Bcontinuously causes the display to advance rapid-
ly.)
<Timer Measurement Procedure>
(1) Press button Mto switch the watch to the timer mode.
(2) When button Ais pressed, the timer starts counting down from the set time.
(3) Pressing button Aduring timing stops the timer, and pressing button Aagain causes it to
resume timing.
(4) Pressing button Bwhile the timer is stopped returns the timer to the set time.
* Pressing button Mduring timer measurement allows, the mode to be changed.
Timer measurement can be displayed in continuation from the time the mode was
switched by again returning to the timer mode. However, the timer returns to the set
time display when the set time has elapsed.
Set time (minutes)
Remaining time (minutes, seconds)
*1
Automatically returns to the set time
Set time Time upTiming
Stopped
*1: Timer Restart Function
10
11. USING THE ZONE SETTING MODE
The zone setting function enables the 30 cities and UTC (Universal Time Coordinated) displayed
by this watch to either be set to displayed or not displayed, and to set daylight savings time for
each city except for UTC. Only those cities for which the city display has been set (On) are dis-
played in the time, calendar and alarm modes.
[Normal Zone Setting Display]
<Setting Procedure>
(1) Press button Mto switch the watch to the zone setting mode.
(2) Press button Bto display the city to be set.
(3) Pressing button Bcontinuously for at least 2 seconds causes the "city name" and "On or OF"
to flash.
(4) Press button Ato select display (On) or non-display (OF) for that city.
(5) Pressing button Bagain causes "SUM (abbreviation for daylight savings time)" and "On or
OF" to flash.
(6) Press button Ato select whether daylight savings time is to be set (On) or canceled (OF).
* When desiring to set another city, pressing button Bagain witches to the watch to the cor-
rection state of the next city. Set display or non-display and the use of daylight savings
time for each city by repeating the same procedure in the order described above.
(7) When settings have been completed for each city, press button Mto return to the normal
display.
* When none of the buttons are operated for about 2 minutes in the zone setting correc-
tion state, the watch automatically returns to the normal display.
* Pressing button Min the zone setting correction state immediately returns the watch
to the normal zone setting display.
City name
Time
11
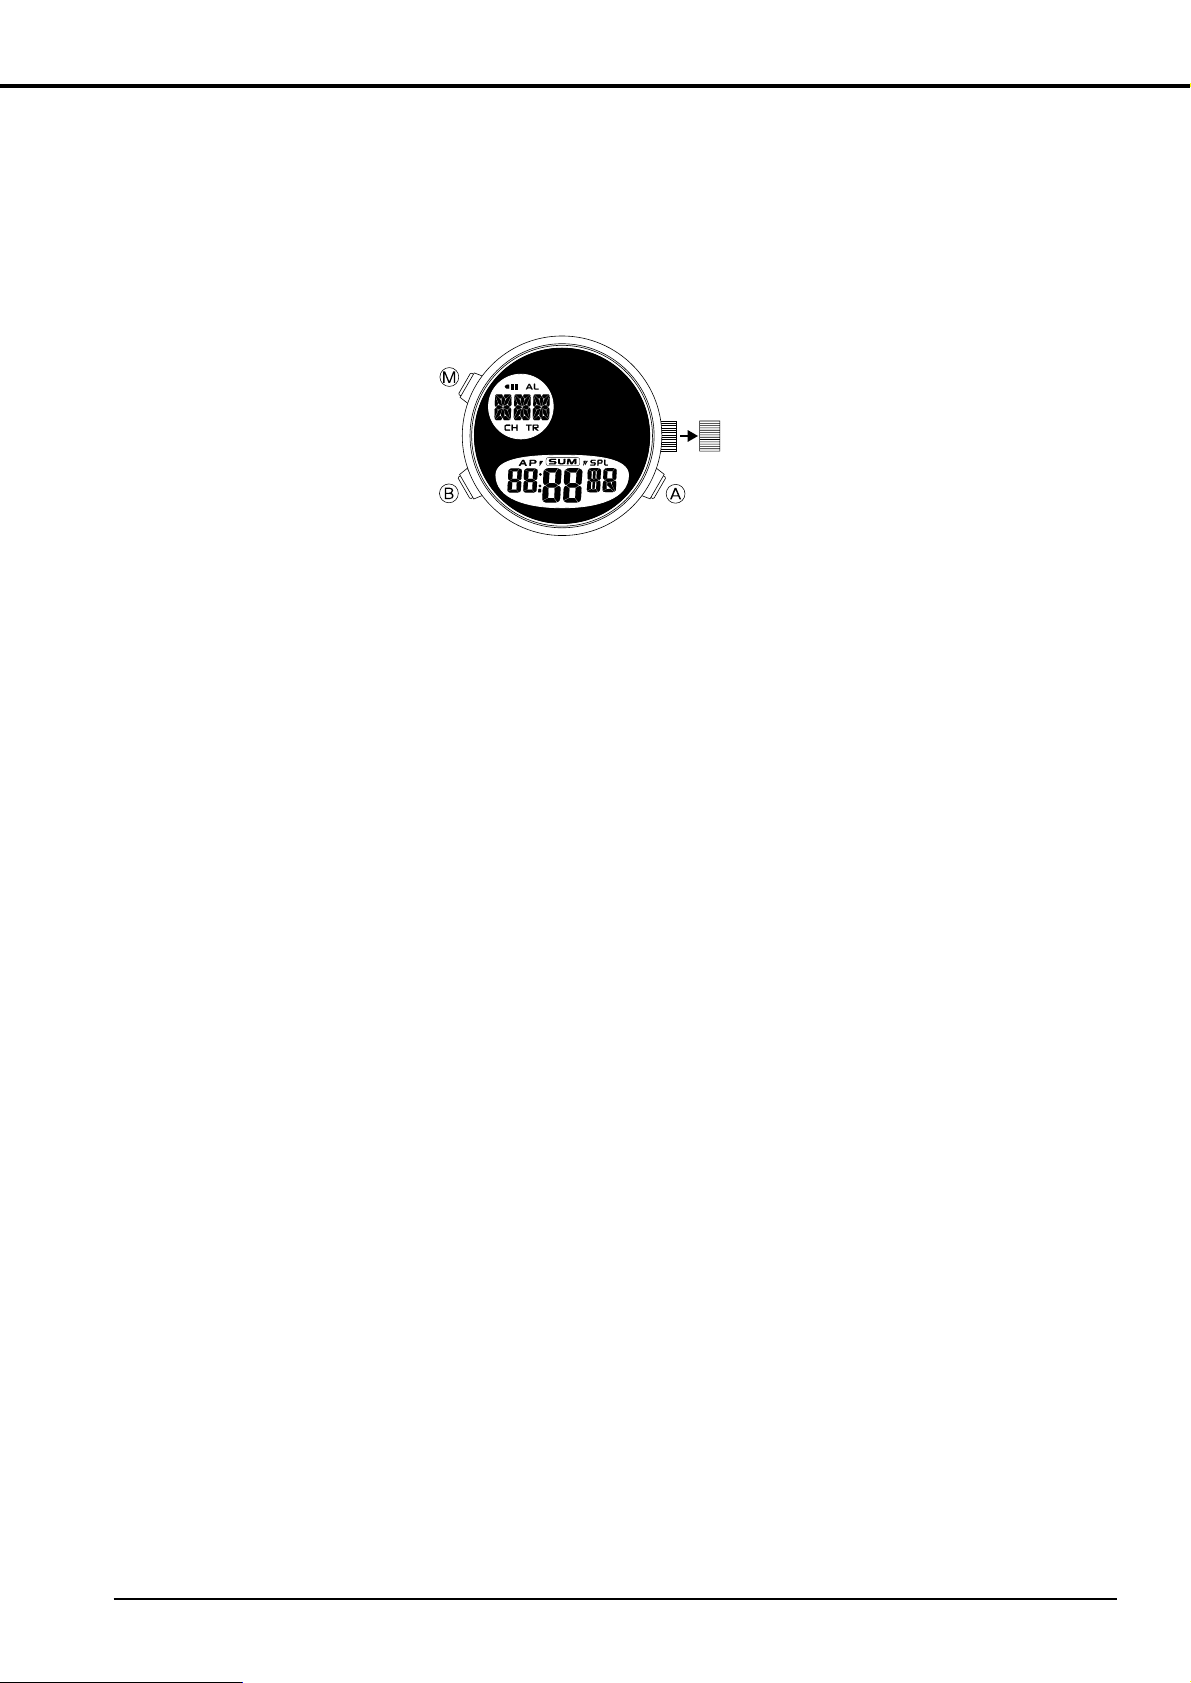
12. ALL-RESET PROCEDURE
Always make sure to perform the all-reset procedure described below after replacing the battery.
The display or operation of the watch may rarely become abnormal (such as the display not being
shown or the alarm continuing to sound) when the watch is subjected to a strong impact or static
electricity. Perform the following all-reset procedure in these cases as well.
<All-Reset Procedure>
(1) Pull out the crown.
(2) Press buttons A, Band Msimultaneously. (The entire display of the watch lights.)
(3) Push the crown in to the normal position. A confirmation tone sounds and the watch
changes to the shutter display (no display).
This completes the all-reset procedure.
After performing the all-reset procedure, correctly reset the time and other modes before
using the watch.
crown

12
§4. DISASSEMBLY AND
ASSEMBLY OF MOVEMENT
: A-Lube oil
: V-Lube oil
: F-Lube oil
: CH-1 oil
Lubrication mark
A
F
V
Battery
PUSH
280-44
A1
NO(0)JEWELS
JAPAN
PULL THE CROWN AND
PRESS 3-PB ALL TOGETHER
WHEN REPLACING BATTERY.
CITIZENWATCHCO.
U010
(+)
(−)
Analog Block
Unit of electronic circuit
( x 1)
E.L. panel connection
spring x 2
Battery connector
spring
Hour wheel
Hour wheel guard
( x 2)
LC display panel
connection rubber (1) x 2
LC display panel
connection rubber (2) x 2
•Use the movement holder Cal. C21.
•The shapes of the some parts may be different from
the above illustration.
Circuit unit
supporter
( x 1)
Buzzer contact spring
Plate complete
supporter
Dial washer
E.L. panel
LC display panel (2)
LC display panel (1)
LC display panel
supporter

13
Coil unit
( x 1)
Analog Block
Train wheel bridge
( x 1)
Third wheel and
pinion
Setting stem
guard
Setting stem
Resetting lever
Clutch wheel
Center wheel
cock
Center wheel
Minute wheel and
pinion
Plate complete
Fourth wheel and
pinion
Fifth wheel and
pinion
Rotor
Stator
F
A
A
F
A
VV
A
F
A
A
A
F

14
Precautions for disassembly and assembly
<How to remove and install circuit unit supporter>
When removing and installing the circuit unit supporter, take care not to deform its hooks, push
buttons, etc.
1. Removal of circuit unit supporter
(1) Remove the 1 screw for the circuit unit
supporter.
(2) Release the 4 hooks on the periphery of
the circuit unit supporter.
2. Installation of circuit unit
supporter
(1) After setting the electronic circuit unit,
place the circuit unit supporter on the
correct position.
(2) Push the top of the circuit unit supporter
hooks (4 places) to fix the hooks to the
plate complete supporter securely.
(3) Fix the push button springs (3 places) of the circuit unit supporter to the grooves of the plate
complete supporter and tighten the 1 screw for the circuit unit supporter.
<Precautions for setting LC display panel connection rubber (1)>
Check the setting directions (vertical and horizontal) of the LC display panel connection rubber
(1).
Set the LC display panel connection rubber (1) on the plate complete supporter so that the lines
printed on it will be vertical.
The LC display panel connection rubber (1) does not have a right side or a wrong side. Since the
LC display panel connection rubber (2) does not have a right direction, it may be set in any direc-
tion.
Hooks
PUSH
280-44
NO(0)JEWELS
JAPAN
PULL THE CROWN AND
PRESS 3-PB ALL TOGETHER
WHEN REPLACING BATTERY.
CITIZEN WATCH CO.
U010
(+)
(−) (−)
A1
Hooks
Screw
LC display panel
connection rubber (2)
LC display panel
connection rubber (1)

15
<How to set LC display panels, LC display panel supporter, and E.L. panel>
Check the setting directions of the LC dis-
play panel supporter and the 2 LC display
panels.
(1) Taking care of the setting directions of
each part, set the LC display panels
(1) and (2) to the LC display panel sup-
porter.
Insert the LC display panels under the
peaks (2 places) on the 9-o'clock side
of the LC display panel supporter and
open the hook on the 3-o'clock side to
set the LC display panels.
(2) Insert the 3-o'clock side (electrode
side) of the E. L. panel under the peak
on the 3-o'clock side of the LC display
panel supporter. Bend the E. L. panel
and set it to the peak on the 9-o'clock
side.
(3) Set the LC display panel supporter on
which the 2 LC display panels and the
E. L. panel are installed to the move-
ment.
<How to set each part in correct direction>
•LC display panel supporter:
Set the mark of "12H" to the 12-o'clock
side.
•LC display panel (1):
Set the electrode having 1 black point at
each end to the 12-o'clock side and the
electrode having 1 black point at only 1
end to the 6-o'clock side.
•LC display panel (2):
Set the electrode having 3 black points (1
at 1 end and 2 at the other end) to the 12-
o'clock side and the electrode having 2
black points (1 at each corner) to the 6-
o'clock side.
Hook on
3-o'clock side
(Take care not
to open this
hook too wide.)
Peaks on
9-o'clock
side
Peak on
9-o'clock
side
Peak on
3-o'clock
side
LC display panel supporter
Electroluminescence panel
Black points
Black points
LC display
panel (2)
LC display
panel (2)
6-o'clock side
12-o'clock side
6-o'clock side
"12H" mark
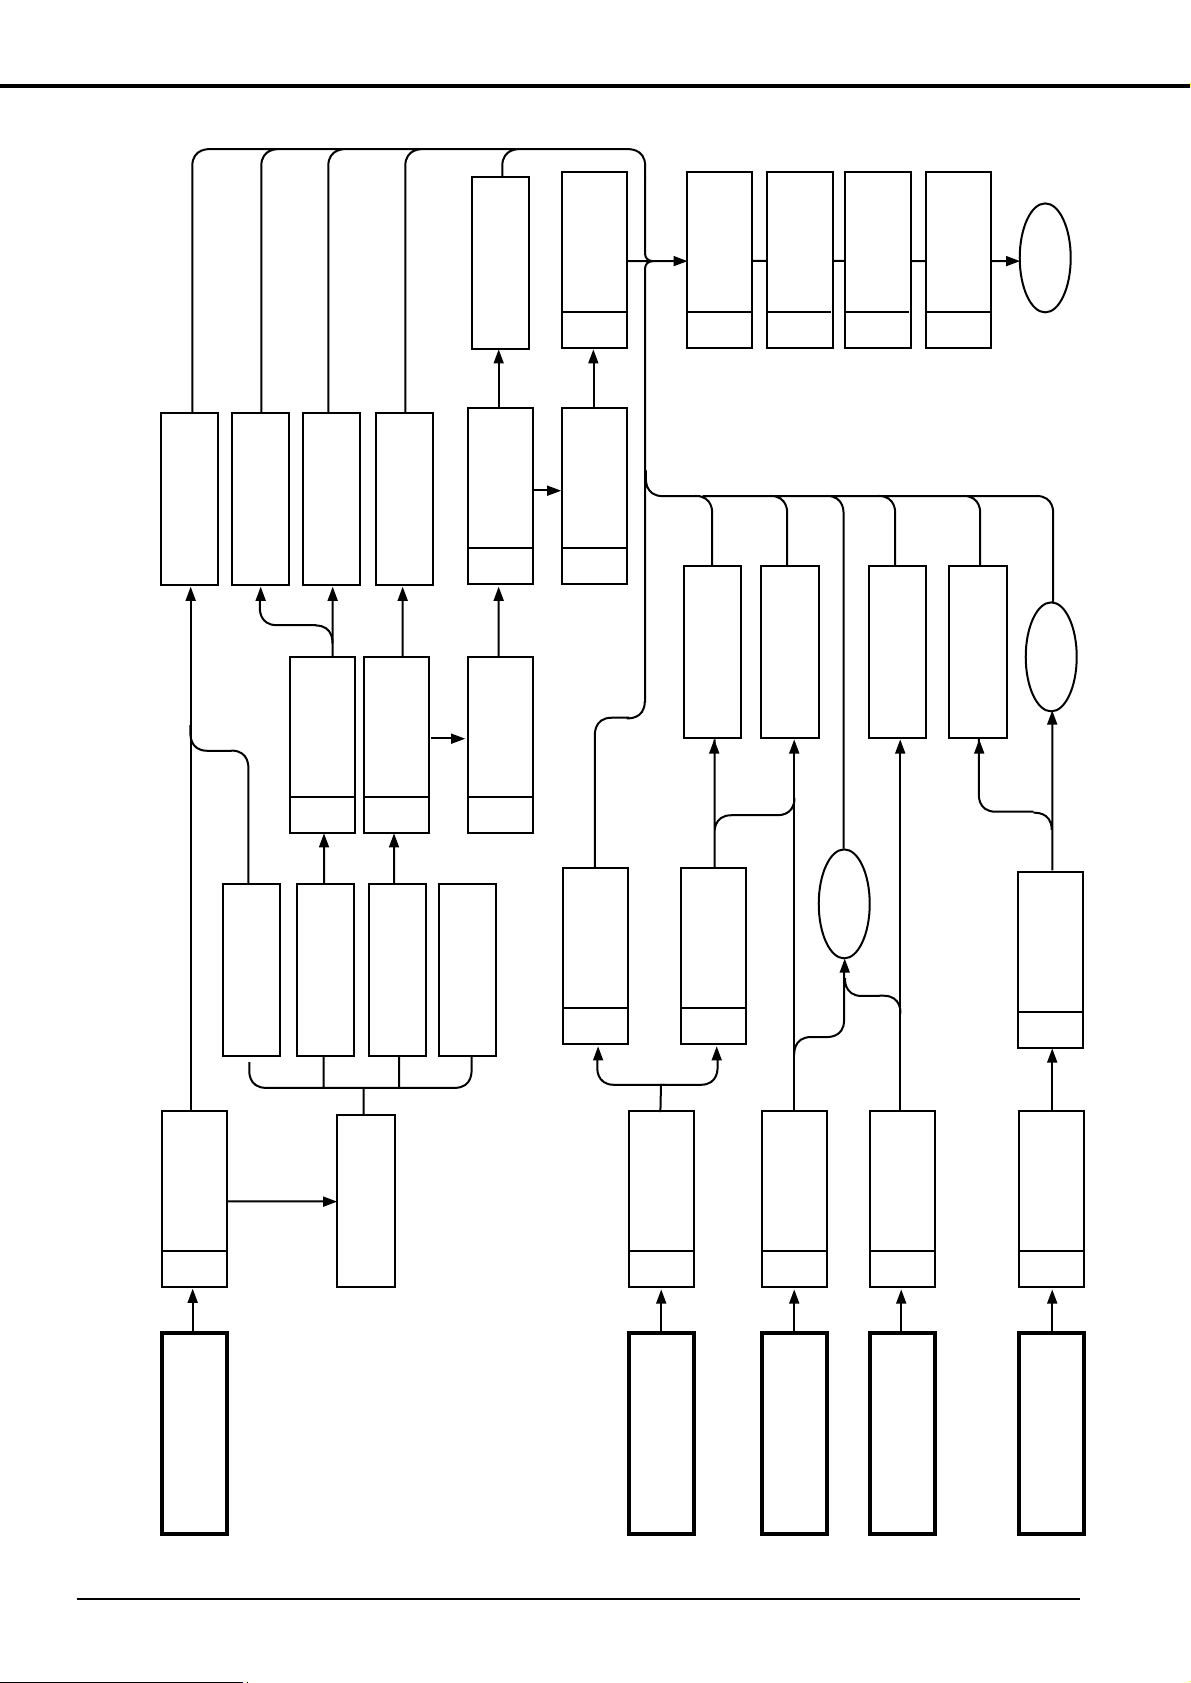
No display/watch stop
1
Measurement
of battery
voltage
Wrong time rate
8
Measurement
of time rate
Defects in operation
10
Check of switch
mechanism
Defective alarm
11
Check of alarm
mecanism
Defective EL
1
Measurement
of battery
voltage
No digital display
Analog stop
Defective digital
display
Analog stop
Normal display/
Working
Replacement
of battery
3
Check of LC
display panel/
connection parts
2
Check of
output signals
4
Check of
connection parts
5
Measurement of
coil resistance
6
Check of train
wheel
7
Check of dial
side mecanism
1
Measurement
of battery
voltage
13
Measurement
of current
consumption
8
Measurement
of time rate
14
Check of
appearance
and functions
Replacement of unit
of electronic circuit
Replacement of unit
of electronic circuit
or LC display panel
Correction of
replacement
Replacement of unit
of electronic circuit
Replacement of coil
Replacement of
battery
Replacement of unit
of electronic circuit
Replacement of unit
of electronic circuit
Replacement of
EL panel
1
Measurement
of battery
voltage
9
Confirmation of
using condition
12
Check of
EL panel
connection
Correction
Correction Completion
O.K.
Low voltage
O.K.
O.K.
No
good
No
good
O.K.
No good
Low voltage
O.K.
O.K.
No
good
O.K.
O.K.
No good
No
good
O.K.
16
§5. TROUBLESHOOTING AND ADJUSTMENT

17
Check Points How to Check Results and Treatments
Measurement of
battery voltage
1
[Refer to Technical Manual, Basic Course II-1-a]
<Tester range: DC 3V>
<Measuring point>
•Over 1.5 V
→Normal
•Under 1.5 V
→Replace the baterry.
Check of output
signals
[Refer to Technical Manual, Basic Course II-1-b]
<Tester range: DC 0.3V>
•The tester pointer swings
every second to the right
and left from 0V.
→Normal
•The tester pointer does not
swing.
→Check of connections
parts.
d
•The connections are normal.
→Replace the unit of
electronic circuit.
(The tester lead pins have no polarity.)
Check of LC dis-
play panel and
connection parts
[Refer to the Digital Section of Technical Manual, Basic
Course II-2-a]
•Inspection of all segments
Pull out the crown and push the A, Band Mat the
same time to turn on all the segments, and check for
defective ones.
•Continuity test on LC display panel, LC display panel
connection rubber and unit of electronic circuit.
Check the parts for stain, breakage, etc.
•LC display panel, connec-
tion rubber or unit of elec-
tronic circuit is not installed
correctly.
→Install correctly.
•Parts are stained or dirty.
→Remove stain and dirt.
•Parts are cut broken or
scratched.
→Replace parts.
Check of con-
nection parts
[Refer to Analog Section of Technical Manual, Basic
Course II-2-a]
•Check the connection parts for stain and dirt.
•Check the screws for looseness.
PUSH
280-44
NO(0)JEWELS
JAPAN
PULL THE CROWN AND
PRESS 3-PB ALL TOGETHER
WHEN REPLACING BATTERY.
CITIZEN WATCH CO.
U010
(+)
(−) (−)
A1
PUSH
280-44
NO(0)JEWELS
JAPAN
PULL THE CROWN AND
PRESS 3-PB ALL TOGETHER
WHEN REPLACING BATTERY.
CITIZEN WATCH CO.
U010
(+)
(−) (−)
A1
2
3
4
•Parts are stained or dirty.
→Remove stain and dirt.
•Screws are loose.
→Fasten screws.

18
Check Points How to Check Results and Treatments
[Refer to Technical Manual, Basic Course II-1-c]
•Remove the unit of electronic circuit, then measure the
resistance of coil.
(The tester lead pins have no polarity.)
<Tester range: R x 10Ω>
•1.9 kΩto 2.3 kΩ
→Nomal
•Outside range of 1.9 kΩto
2.3 kΩ
→Replace coil unit.
Measurement of
coil resistance
Check of train
wheel
[Refer to Technical Manual, Basic Course II-2-b]
•Check clearance of each wheel. Check rotor for dust
and oil.
•Check the plastic parts for deformation and flaw.
[Refer to Technical Manual, Basic Course II-2-c]
•Confirm all parts are not deformed and are lubricated
properly.
Check of dial-
side mechanism
[Refer to Technical Manual, Basic Course II-2-d]
•Since this watch uses the D.F.C. (digital frequency con-
trol) method and has no control terminal, there is no way
of adjusting its time rate in the field.
(Measurement is made in a 10-second range.)
The watch loses or gains a
substantial amount of time.
→Replace the unit of
electronic circuit.
Measurement of
time rate
Confirmation of
using condition
[Refer to Technical Manual, Basic Course II-2-e]
•If the analog section is affected by magnetism, in partic-
ular, the watch may stop or become inaccurate.
Accordingly, the using condition must be confirmed.
Check of switch
mechanism
1. Inspection of movement.
•Press the switch spring of circuit unit supporter with
tweezers, etc. to contact it to unit of electronic circuit,
and confirm the switching function.
•Check for removal of pattern of electronic circuit unit,
deformation of switch return spring, etc.
2. Inspection of push button
•Check push button for deformation, stain, etc.
(Note)
Be sure to apply silicone oil to the packing of push
button for waterproofness and smooth operation.
•Switching function is normal.
→Inspect push button.
•Pattern is removed or
deformed.
→Replace defective
parts.
•Push button is stained or
deformed.
→Remove stain, or
replace push button.
5
6
7
8
9
10
Table of contents
Other citizen quartz Watch manuals


