manuals.online logo
Brands
  1. Home
  2. •
  3. Brands
  4. •
  5. Citizen
  6. •
  7. Watch
  8. •
  9. Citizen H149 User manual

Citizen H149 User manual

Other manuals for H149

1

Other Citizen Watch manuals

Citizen Eco-Drive BT0000-15A User manual

Citizen

Citizen Eco-Drive BT0000-15A User manual

Citizen 6S50 User manual

Citizen

Citizen 6S50 User manual

Citizen E650 User manual

Citizen

Citizen E650 User manual

Citizen PROMASTER NAVISURF CTZ-B6804 User manual

Citizen

Citizen PROMASTER NAVISURF CTZ-B6804 User manual

Citizen H990 Eco-Drive Satellite Wave User manual

Citizen

Citizen H990 Eco-Drive Satellite Wave User manual

Citizen 6P25 User manual

Citizen

Citizen 6P25 User manual

Citizen 6P09 User manual

Citizen

Citizen 6P09 User manual

Citizen Watch User manual

Citizen

Citizen Watch User manual

Citizen B023 User manual

Citizen

Citizen B023 User manual

Citizen E210 User manual

Citizen

Citizen E210 User manual

Citizen 6P25 User manual

Citizen

Citizen 6P25 User manual

Citizen 6P00 User manual

Citizen

Citizen 6P00 User manual

Citizen B11 User manual

Citizen

Citizen B11 User manual

Citizen 0S21 User manual

Citizen

Citizen 0S21 User manual

Citizen C710 User manual

Citizen

Citizen C710 User manual

Citizen 82S7 User manual

Citizen

Citizen 82S7 User manual

Citizen 0S62 User manual

Citizen

Citizen 0S62 User manual

Citizen E76 Series User manual

Citizen

Citizen E76 Series User manual

Citizen BL5XXX User manual

Citizen

Citizen BL5XXX User manual

Citizen Eco-Drive AR5044-03E User manual

Citizen

Citizen Eco-Drive AR5044-03E User manual

Citizen C04 Manual

Citizen

Citizen C04 Manual

Citizen Quartz 7810 Manual

Citizen

Citizen Quartz 7810 Manual

Citizen B690 User manual

Citizen

Citizen B690 User manual

Citizen Eco-Drive User manual

Citizen

Citizen Eco-Drive User manual

Popular Watch manuals by other brands

Casio QW 5513 Operation guide

Casio

Casio QW 5513 Operation guide

Piaget 560P Instructions for use

Piaget

Piaget 560P Instructions for use

Armitron pro sport MD0346 instruction manual

Armitron

Armitron pro sport MD0346 instruction manual

West Marine BlackTip 13411293 Instruction Booklet and Care Guide

West Marine

West Marine BlackTip 13411293 Instruction Booklet and Care Guide

Jaeger-leCoultre HYBRIS MECHANICA CALIBRE 184 manual

Jaeger-leCoultre

Jaeger-leCoultre HYBRIS MECHANICA CALIBRE 184 manual

FOREVER iGO PRO JW-200 user manual

FOREVER

FOREVER iGO PRO JW-200 user manual

Relic OS10 quick start guide

Relic

Relic OS10 quick start guide

MyKronoz ZeClock manual

MyKronoz

MyKronoz ZeClock manual

Casio QW-782 General guide

Casio

Casio QW-782 General guide

Strikes and Spares SASM80 E-manual

Strikes and Spares

Strikes and Spares SASM80 E-manual

Christopher Ward C1000 Owner's handbook

Christopher Ward

Christopher Ward C1000 Owner's handbook

Lotus ILMFS01 instruction manual

Lotus

Lotus ILMFS01 instruction manual

Chronos Manufactures Chrono Diamond Thyrso 10400 instruction manual

Chronos Manufactures

Chronos Manufactures Chrono Diamond Thyrso 10400 instruction manual

Pandora WATCH2 quick guide

Pandora

Pandora WATCH2 quick guide

Suunto X6 user guide

Suunto

Suunto X6 user guide

Seiko N830 instruction manual

Seiko

Seiko N830 instruction manual

MotionX 365 user guide

MotionX

MotionX 365 user guide

Aplus GV18 user guide

Aplus

Aplus GV18 user guide

manuals.online logo
manuals.online logoBrands
  • About & Mission
  • Contact us
  • Privacy Policy
  • Terms and Conditions

Copyright 2025 Manuals.Online. All Rights Reserved.

1/3
H149 Abbreviated instruction
• This watch is solar-powered. Expose the dial to light and use it sufficiently charged.
• To see details of charging time, specifications, and operations, refer to the instruction manual: H149 instruction manual
English
Component identification
• Actual appearance may differ from the illustration.
• The crown has two positions when pulling it out.
Checking the power reserve
1.
Push the crown in to position 0.
2.
Press and release the lower right button A.
The second hand moves to indicate the power reserve.
Second hand movement Power reserve status
Pointing “O (OK)” or “N (NO)” after moving
clockwise Power reserve is sufficient.
Pointing
“O (OK)” or “N (NO)” after moving
counterclockwise Charge immediately
• “O (OK)” and “N (NO)” indicate the time signal reception result. They
have no relation to the charge level.
3.
Press and release the lower right button Ato finish the
procedure.
The indication returns to current time.
• It returns to current time indication automatically in about 10 seconds
without pressing the button.
Checking the signal reception result
1.
Push the crown in to position 0.
2.
Press and release the lower right button A.
The second hand moves to indicate the result of the last reception.
Indication Reception result
O (OK) The reception was successful.
N (NO) The reception failed.
• Try signal reception following the steps in Receiving the signal manually
(on-demand reception) if the last reception failed.
3.
Press and release the lower right button Ato finish the
procedure.
The indication returns to current time.
• It returns to current time indication automatically in about 10 seconds
without pressing the button.
Setting the world time
• The world time setting controls the target station from which the watch tries to
receive signals.
1.
Pull the crown out to position 1.
The second hand moves to point the area currently set.
2.
Rotate the crown to select an area.
• Select an area from Table of time zones and representative areas
• Each time you change the area, the time and date of the selected area is
shown.
3.
Push the crown in to position 0to finish the procedure.
The indication returns to current time.
Crown's position
0 1 2
Summer time setting:
SMT ON/OFF
Button
A
Button
B
Reception result
indication:
O (OK)/N (NO)
Reception-in-progress
indication:
(R/RX)
Hour hand
Area name / time zone
Second hand
Minute hand
Date indication
Crown
2/3
H149 Abbreviated instruction
Receiving the signal manually (on-demand reception)
• It takes 2-15 minutes to finish reception.
1.
Push the crown in to position 0.
2.
Press and hold the lower right button Afor 2 seconds or more.
The second hand points “R (RX)” and signal reception starts. The second
hand returns to normal movement after finishing reception.
Reception was successful The time will be updated.
Reception failed The time is not corrected and the previously set time
resumes.
• Press and hold button
A
for 2 seconds or more to cancel reception.
Switching the summer time and standard time
1.
Pull the crown out to position 2.
2.
Rotate the crown to change the summer time setting.
Summer
time setting Description
SMT ON
Summer time is indicated.
The watch automatically switches between standard time and
summer time depending whether the summer time check signal is
contained or not in the signal received.
SMT OFF
The standard time is indicated.
The standard time is kept indicated even when the summer time
check signal is received.
3.
Push the crown in to position 0to finish the procedure.
Table of time zones and representative areas
• When using the watch in an area not listed in the table, select an area name in
the same time zone.
• It may be difficult to receive signals in certain environment where it is hard for
signals to reach.
Time zone Second
hand Area name Representative area Signal station
0
0
LON
*
London
Germany
+1
2
PAR
*
Paris
+2
4
ATH
*
Athens
◆Germany
+3
7
MOW/RUH
*
Moscow/Riyadh
+4
9
DXB Dubai
+5
11
KHI Karachi
◆China
+5.5
14
DEL Delhi
+6
16
DAC Dhaka
+7
18
BKK Bangkok
+8
21
BJS Beijing
China
+9
23
TYO Tokyo
Japan
+9.5
25
ADL Adelaide
◆Japan
+10
28
SYD Sydney
+11
30
NOU Noumea
+12
32
AKL Auckland
-11
35
MDY Midway
◆USA
-10
37
HNL Honolulu
-9
39
ANC
**
Anchorage
-8
42
LAX
**
Los Angeles
USA
-7
44
DEN
**
Denver
-6
46
CHI
**
Chicago
-5
49
NYC
**
New York
◆USA
-4
51
SCL Santiago
-3
53
RIO Rio de Janeiro
-2
56
FEN Fernando de Noronha
◆Germany
-1
58
PDL
*
Azores
• The time zone in the table is based on UTC (Coordinated Universal Time).
• Countries or regions may change time zones for various reasons.
• For an area with * or **, indication of summer time and that of standard time
are linked together.
• Areas with ◆ mark are out of receivable range and signals cannot be received.
(The watch tries to receive signals from the target signal station though.)
3/3
Checking the reference position
1.
Pull the crown out to position 1.
2.
Press and hold the upper right button Bfor 5 seconds or more.
The hands and indication start to move to the current reference positions
stored in memory.
• Release the button as the hands start to
move.
3.
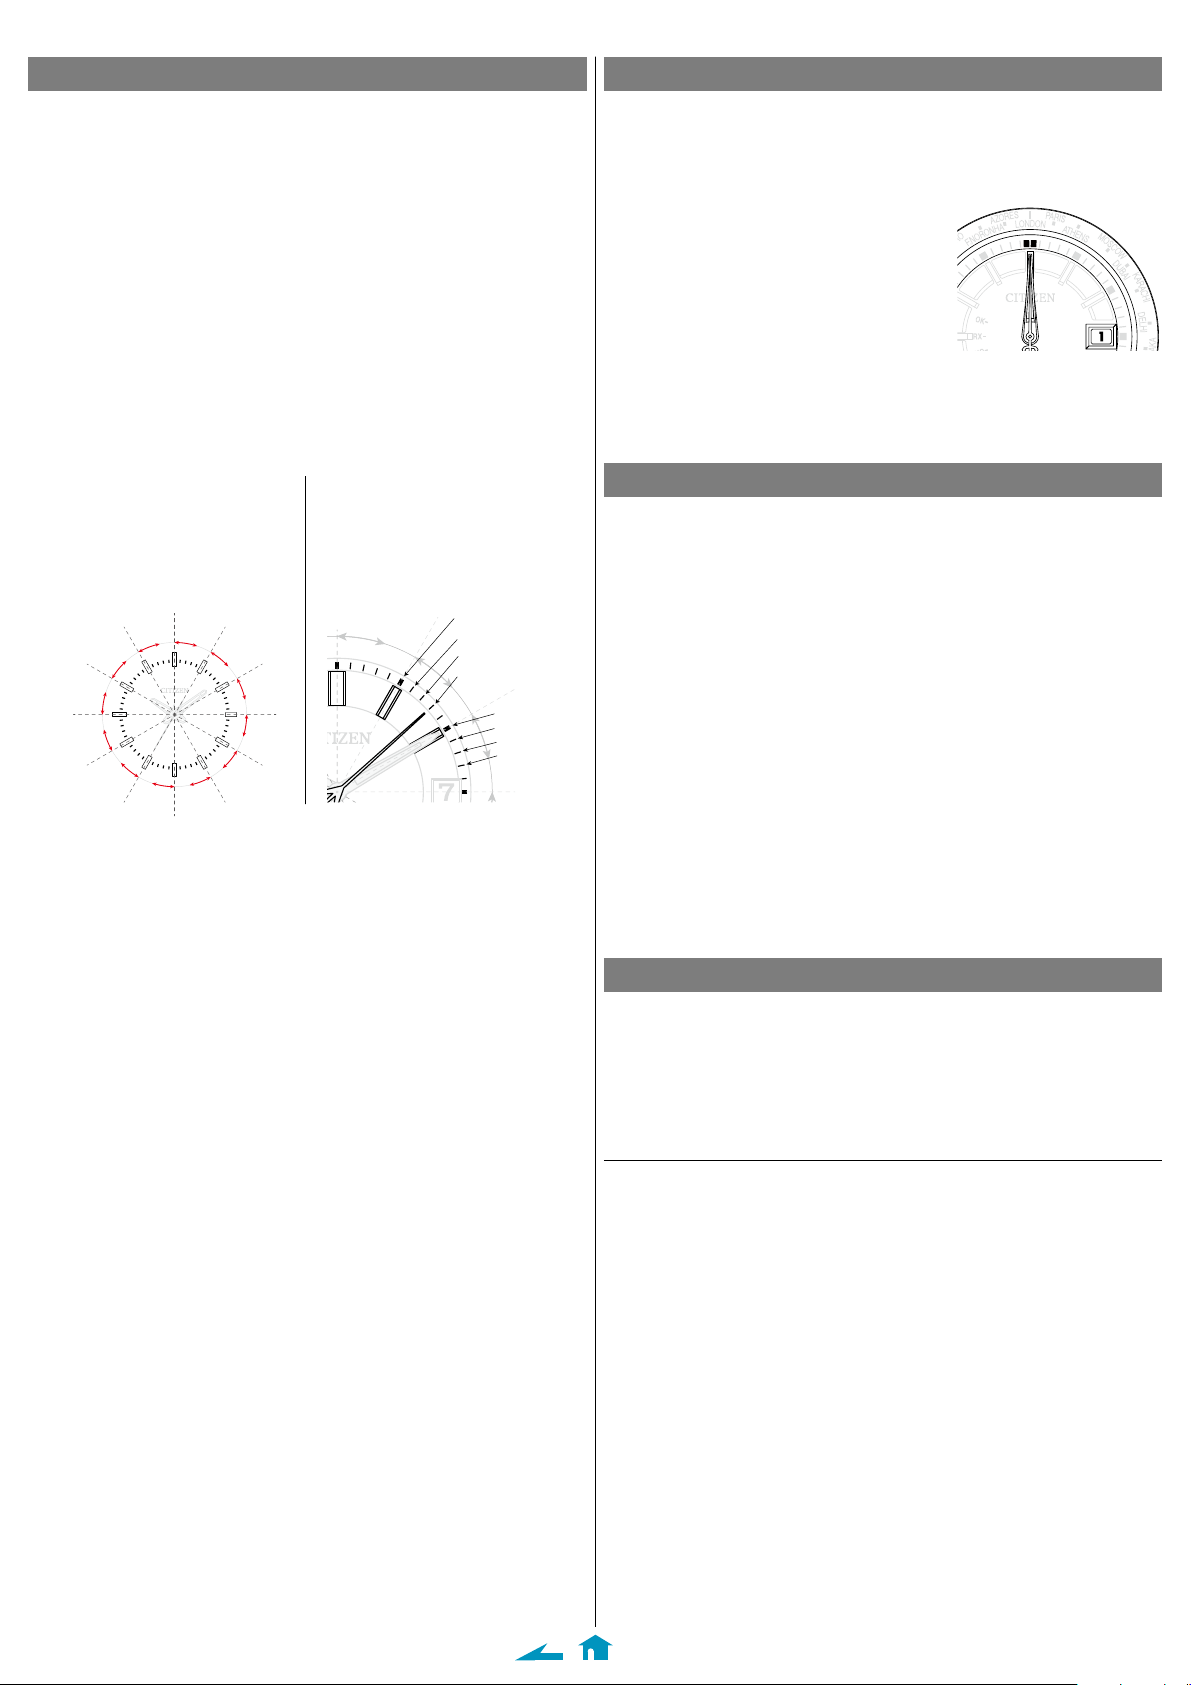
Check the reference positions.
Correct reference positions:
• Hour, minute and second hands: 0 hour 00
minute 0 second
• Date indication: "1"
When the current reference position is different from the correct one, adjust
the position following the steps of “Correcting the reference position”.
4.
Push the crown in to position 0to finish the procedure.
Correcting the reference position
1.
Pull the crown out to position 1.
2.
Press and hold the upper right button Bfor 5 seconds or more.
The hands and indication start to move to the current reference positions
stored in memory.
• Release the button as the hands start to move.
3.
When all the hands stop moving, pull the crown out to position
2.
4.
Press and release the lower right button Arepeatedly to
change the hand/indication to be corrected.
• Each time you press the button, the target changes as follows:
Hour hand → second/minute hands → date indication → (back to the top)
5.
Rotate the crown to adjust the hand/indication.
• When you rotate the crown quickly a few times, the hand/indication will
move continuously. To stop the rapid movement, rotate the crown in either
direction.
• The second and minute hands move synchronously.
6.
Repeat steps 4 and 5.
7.
Push the crown in to position 0to finish the procedure.
Resetting the watch - All Reset
1.
Pull the crown out to position 2.
2.
Press and release both the lower right button Aand upper
right button Bat the same time.
The second hand moves to the 0 second position and other hands and date
indication move slightly, and All Reset is executed.
After All Reset
After All Reset, adjust the reference position. Set the world time setting and
receive signals manually (on-demand reception) to adjust the time and calendar
after that.
H149 Abbreviated instruction
Adjusting the time and calendar manually
• Check world time setting in Setting the world time beforehand.
1.
Pull the crown out to position 2.
2.
Press and release the lower right button A.
The second hand points to 0 second.
3.
Press and release the lower right button Arepeatedly to
change the hand/indication to be corrected.
• Each time you press button
A
, the target changes as follows:
Minute → hour → date → year/month →(back to the top)
• The hands and indications slightly move when selected to show they
become adjustable.
4.
Rotate the crown to adjust the hand/indication.
• When you rotate the crown quickly a few times, the hand/indication will
move continuously. To stop the rapid movement, rotate the crown in either
direction.
• Change of date indication shows it just became AM. Take care the time set
is AM or PM.
• Year and month are indicated with the second hand.
12
1
2
3
4
5
6
7
8
9
10
11
“Month” corresponds to one of
the 12 zones shown in the figure
below.
Each number means month.
“Year” corresponds to the years
since leap year and is indicated
with markers in the zone of each
month. Years since leap year:
0
(Leap year)
Years since leap year:
1
Years since leap year:
2
Years since leap year:
3
0
1
2
3
5.
Repeat steps 3 and 4.
6.
Push the crown in to position 0in accordance with a reliable
time source to finish the procedure.