Clarke CUH100 User manual

USER GUIDE
Model CUH100
PART NO:3220823
05/08
Under Bonnet Inspection Lamp

2
INTRODUCTION
Thank you for purchasing this CLARKE Inspection Lamp.
Please read this manual thoroughly and follow the instructions carefully. Before attempting to use
the lamp, thoroughly familiarise yourself with the lamp & its operation. In doing so you will ensure
the safety of yourself and that of others around you, and you can look forward to the lamp giving
you long and satisfactory service.
GUARANTEE
This product is guaranteed against faulty manufacture for a period of 12 months from the date of
purchase. Please keep your receipt which will be required as proof of purchase.
This guarantee is invalid if the product is found to have been abused or tampered with in any
way, or not used for the purpose for which it was intended.
Faulty goods should be returned to their place of purchase, no product can be returned to us
without prior permission.
This guarantee does not effect your statutory rights.
SPECIFICATIONS
Model: .................................................................................................. CUH100
Part No: ............................................................................................... 3220823
Weight: .................................................................................................... 2.5 kg
Dimensions:(l x w x h) ............................................................ 1245 x 200 x 110
Nominal Light Output .......................................................................... 968 Lum
Lamp type ................................................. T8 G13 Fluorescent lamp (900mm)
Supply Voltage ............................................................................... 230v / 50Hz
Lamp rating ............................................................................................... 30 W
Fuse rating ............................................................................................. 3 amp
Cable length ............................................................................................ 5 m
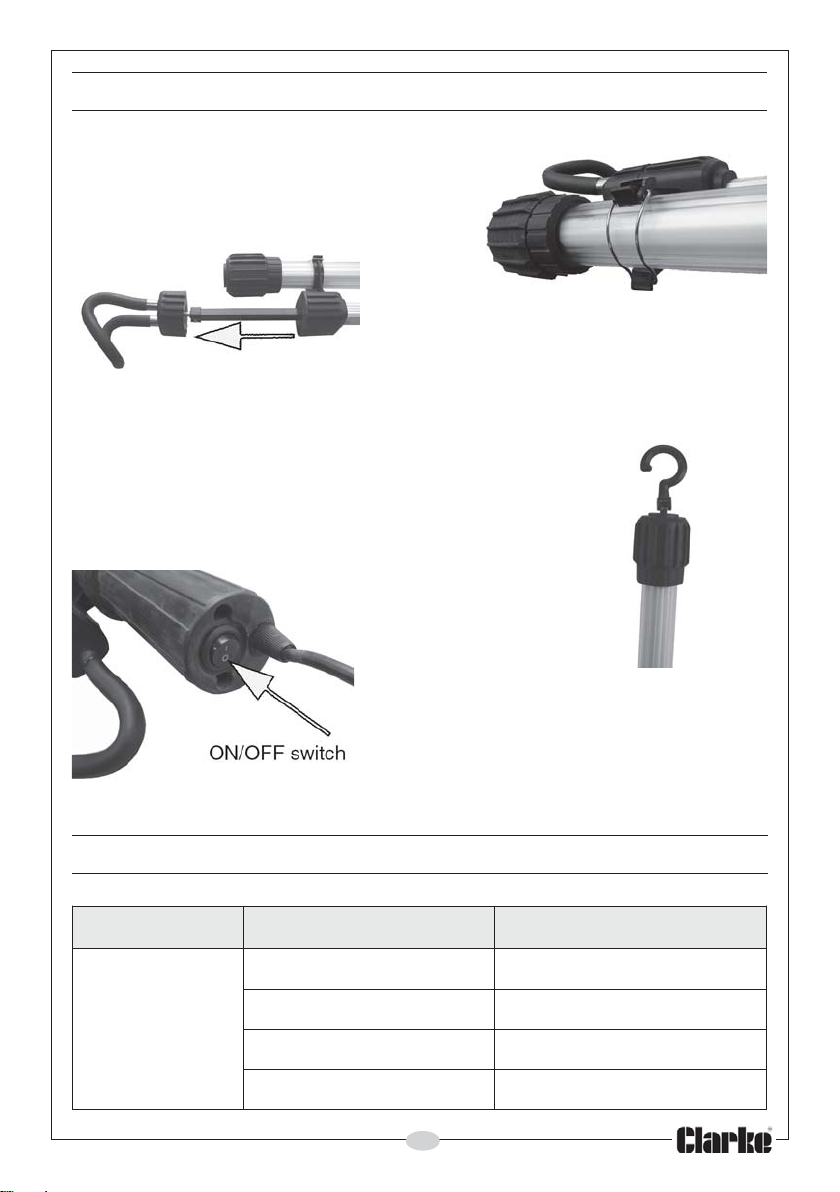
This Under Bonnet Inspection Lamp incorporates a spring loaded telescopic bracket which mounts
underan open bonnetusing foam rubbercovers to preventdamage. A30W900mm long fluorescent
tube with a tough composite clear guard gives complete engine bay illumination. The lamp can be
unclipped from the mounting bracket and used separately or hung via the 360deg swivel hook. The
lamp is supplied with 5 metres cable and a ASTA/BS approved 3-pin moulded plug.

3
GENERAL SAFETY RULES
1. ALWAYS check for damage before using the lamp. Inspect the power cable and plug for
damage and that no connections are loose. Any damage should be properly repaired or the
part replaced. Consult your local dealer.
2. ALWAYS ensure that the voltage marked on the appliance matches the power supply to be
used and that the plug is fitted with the correct 13 amp fuse.
3. ALWAYS disconnect from the mains supply before moving or attempting to change the
fluorescent tube. Do not move your lamp or replace fluorescent tube or broken parts with
wet hands, or when standing on a wet or damp surface or in water. Always ensure the
power supply is disconnected at the mains.
4. ALWAYS keep mains cable away from sources of heat.
5. NEVER use this lamp in a bathroom or in the vicinity of a swimming pool.
6. NEVER cover the lamp.
7. NEVER pull the cable to remove the plug from the power supply or carry the appliance by
the cable.
8. We recommend that a Residual Current Device (RCD) is used in conjunction with your
CLARKE Inspection lamp.
9. When not in use, unplug from the mains pwer supply and store in a safe dry area.
PARTS AND SERVICE
For spare parts and service, please contact your nearest dealer, or CLARKE International, on one
of the following numbers.
PARTS & SERVICE TEL: 020 8988 7400 / FAX: 020 8558 3622
or e-mail as follows:
PARTS: [email protected]
SERVICE: [email protected]
Do not dispose of this product with general household waste. It must be disposed
of according to the laws governing Waste Electrical and Electronic Equipment, at a
recognised disposal facility. The fluorescent tube should only be disposed of in
accordance with local authority guidelines.
ENVIRONMENTAL PROTECTION

4
ELECTRICAL CONNECTIONS
This product is provided with a standard 13 amp, 230 volt (50Hz), BS 1363 plug, for
connection to a standard, domestic electrical supply. Should the plug need changing at
any time, ensure that a plug of identical specification is used.
WARNING
This appliance is double insulated and the two wires in the mains lead should be
connected in accordance with the following coulour code:
BLUE - NEUTRAL
BROWN - LIVE
•Connect the BLUE couloured wire to the plug terminal marked with a letter “N”
•Connect the BROWN couloured wire to the terminal marked with a letter “L””
If this appliance is fitted with a plug which is moulded on to the electric cable (i.e. non-rewireable)
please note:
1. The plug must be thrown away if it is cut from the electric cable. There is a danger of
electric shock if it is subsequently inserted into a socket outlet.
2. Never use the plug without the fuse cover fitted.
3. Should you wish to replace a detachable fuse carrier, ensure that the correct replacement is
used (as indicated by marking or colour code).
4. Replacement fuse covers can be obtained from your local Clarke dealer or most electrical
stockists.
Fuse Rating
The fuse in the plug must be replaced with one of the same rating (3 amps) and this
replacement must be ASTA approved to BS1362. If in doubt, consult a qualified electrician.
Do not attempt any electrical repairs yourself.
Cable Extension
Always use an approved cable extension suitable for the power rating of this product (see
specifications), the conductor size should also be at least the same size as that on the
appliance, or larger. When using a cable reel, always unwind the cable completely. If using the
product outdoors, only use extension cables intended for outdoor use.

5
To turn the lamp on, plug into the mains
supply and use the switch on the bottom of
the lamp Fig 4. To turn off, switch off the
lamp and remove the plug from the socket.
Fig 2.
Fig 4.
TROUBLESHOOTING
MOTPMYS ESUACELBISSOP NOITCALAIDEMER
etarepotonlliwpmaL
.deliafebuttnecseroulF.1.ebutecalpeR
ebutneewtebtcatnocrooP.2 .tekcosdna yltcerrocsiebuttahteesotkcehC .tekcosnidetaes
.gniriwdegamaD.3 deifilauqaybdekcehctinuevaH .naicirtcele
.e
gatlovgnitarepotcerrocnI.4 deifilauqaybdekcehcylppusevaH .naicirtcele
OPERATION
Insert the lamp into the brackets on the support bar
& secure with the spring clips as in Fig 1.
The spring loaded bracket may also be unclipped to
allow the lamp to be hung in the vertical position
using the hook mounting as in Fig 3.
Fig 1.
Attach to the underside of the car bonnet
by pulling the spring-loaded bracket arms
apart as in Fig 2 and allowing them to
close around the bonnet sides.
Fig 3.

6
MAINTENANCE
Keep the lamp clean by wiping with a clean dry cloth. DO NOT use abrasive cleaners.
Check the cable for wear or damage. If the plug is broken, remove the lamp from service and
have it repaired by a qualified electrician.
Allow the lamp to cool down for a few minutes after switching off, before performing any
maintenance tasks. Handle using either a glove or a piece of cloth wrapped around the lamp.
Before attempting to fit/replace the fluorescent lamp, ensure the appliance is switched off and
isolated from the main electrical supply by removing the plug from the socket.
To replace the fluorescent tube;
Unplug from the mains supply. Twist the lower section
of the end cap in the direction shown in Fig 5 and pull
down. This will reveal two small screws, one on each
side.
Remove these crosshead screws and take off the end
cap.
Grip the loop at the top of the tube assembly and pull
it out of the lamp guard. Fig 6.
Replace the fluorescent tube and slot the tube
assembly back into the gaurd, making sure to align
the grooves in the guard with the lamp assembly.
To re-assemble, reverse the dismantling procedure,
taking care not to force or twist the tube or starter
assembly.
Fig 5.
Fig 6.

7
DECLARATION OF CONFORMITY
This is an important document and should be retained.
CUH100 -DOC- RV1.doc Page 1 of 1
We declare that this product complies with the following directives:
89/336/EEC Electromagnetic Compatibility directive, (amended 2004/108/EC).
73/23/EEC Low Voltage Equipment directive (amended by 93/68/EEC).
The Following Standards have been applied to the product:
BS EN 55015:2000+A1:2001+A2:2002, EN 55022, EN 6100-3-2/-3
EN 61547:1995+A1:2000, (EN 61000-4-2 /-3 /-4 /-5 /-6-11)
EN 61347-1:2001, EN 60598-2-8:1997+A1:00, EN 61347-2-3:2001+A1:04+A2:06,
EN 60598-1:2004+A1:06
The technical documentation required to demonstrate that the products meet the
requirements of the Low Voltage Equipment directive has been compiled and is available
for inspection by the relevant enforcement authorities.
The CE mark was first applied in: 2006
Product Description: Under hood Inspection Lamp
Model number(s): CUH100
Serial / batch Number: Current Manufacture.
Date of Issue: 10/06/2008
Signed
A.C.AIKEN
Senior Manager Clarke International.
DECLARATION OF CONFORMITY

This manual suits for next models
1
Table of contents
Other Clarke Outdoor Light manuals
Popular Outdoor Light manuals by other brands

Vaxcel
Vaxcel T0085 Assembly and installation instructions

BEGA
BEGA 99 558 Installation and technical information

Trio
Trio BALOUBET 4282102 Series quick start guide

Quoizel
Quoizel MHE8406K Assembly instruction sheet

Lucci Fresco
Lucci Fresco 239344 installation instructions

Panlux
Panlux POS-60/B instructions