Claro FH302 User manual

User Manual
NEXUS TELECOM SERVICES (HK) LIMITED
Free com
GSM Fixed Wireless Phone
Model No.: FH302

1 General Introduction
Thank you for choosing GSM Fixed Wireless Phone of Claro. To use your phone well,
please read this user manual carefully before you use.
The phone has been designed to operate with the latest digital communication technology -GSM. The
phone provides the following advanced features:
LCD Display with backlight, easy to read
Two-way SMS, voice mail and caller ID
Emergency call
Menu driven interface for easy operation and configuration
Store 300 contacts
Save 100 SMS
Last call redials
Choice of 7 ring tones
Adjustable ring and voice volume
AC power supply
Outdoor antenna
Speaker phone for hand-free operation
User friendly keypad
Long battery stand-by and talk time
Easy to service and repair
Important Information
The product can only be installed indoors.
Do not place the phone near high temperature objects, under direct sunlight, near source of water,
near fire or near inflammable and explosive materials. Avoid using the phone in high temperature or
humidity.
The phone may interfere with heart pacemaker, hearing aid and other electronic medical devices.
Therefore please follow the instructions given by your equipment suppliers or consult your doctor.
Turn your phone OFF in health care centers if any regulations posted in the area instruct you to do so.
Hospitals or health care centers may be using equipment that may be sensitive to external RF energy.
Place the phone away from other electronic devices like TV and Radio to avoid interference.
Keep the product away from magnetic field and static electricity.
Place the phone out of the reach of small children.
Do not attempt to reassemble the phone by yourself. Only authorized personnel could service the
phone and its accessories. Faulty installation or service can be dangerous and may invalidate the
warranty.
Do not clean the phone while in operation. Before attempting to clean the phone, turn the phone off,
disconnect the external power adapter and take out the battery. Use a dry, soft cloth for cleaning. Do

not use liquid or aerosol cleaners.
Do not drop, knock or shake the phone. Rough handling may break the phone body and internal
circuit boards.
Do not use the phone if the antenna is damaged. Replace the damaged antenna immediately by a
qualified technician. Use only a manufacturer approved antenna. Non-approved antennas,
modifications or attachments may impair call quality and damage the phone.
Do not hold the antenna during operation. This may affect call quality and cause the phone to
operate at unintended power levels.
Keep the antenna free from obstructions and position the antenna straight up. This will ensure best
call quality.
Only use the battery and the power adapter approved by the manufacturer. If not, it may cause an
explosion or result in a short circuit.
It is highly recommended to fully charge the battery before initial use. The battery might have been
discharged during storage and delivery.
Do not throw battery. Batteries are not to be disposed off by putting them in fire. It may explode or
catch fire.
The power adapter must be used within the specified AC voltage range.
Take out the battery if you won’t use your phone for a long time and keep the battery well.
During lightning, do not touch the power plug. It may result in an electric shock or death.
Do not touch the plug with wet hands. Always grasp and pull the plug, not the cord. Do not put
heavy things on the power cord or bend it too much.
During daily use, do not pull out the power adapter. The battery is used for backup power, which
will not cause the increasing consumption of electricity.
Don’t use the power adapter if the power cable is damaged. Contact the maintenance center
immediately and replace the adapter.
3 Product Overview
3.1 Packing List
Once you open the product package, please check the packing list to make sure there is no part missing.
If any part is missing or broken, please contact the customer service. The packing list is as follow:
1 Phone Body 1
2 Handset 1
3.Coiled cord 1
4 Antenna 1
5 Ni-MH Rechargeable Battery 1
6 AC Adaptor
7 User Manua 1
3.2 Product Introduction
3.2.1 Appearance
3.2.2 Key Definition
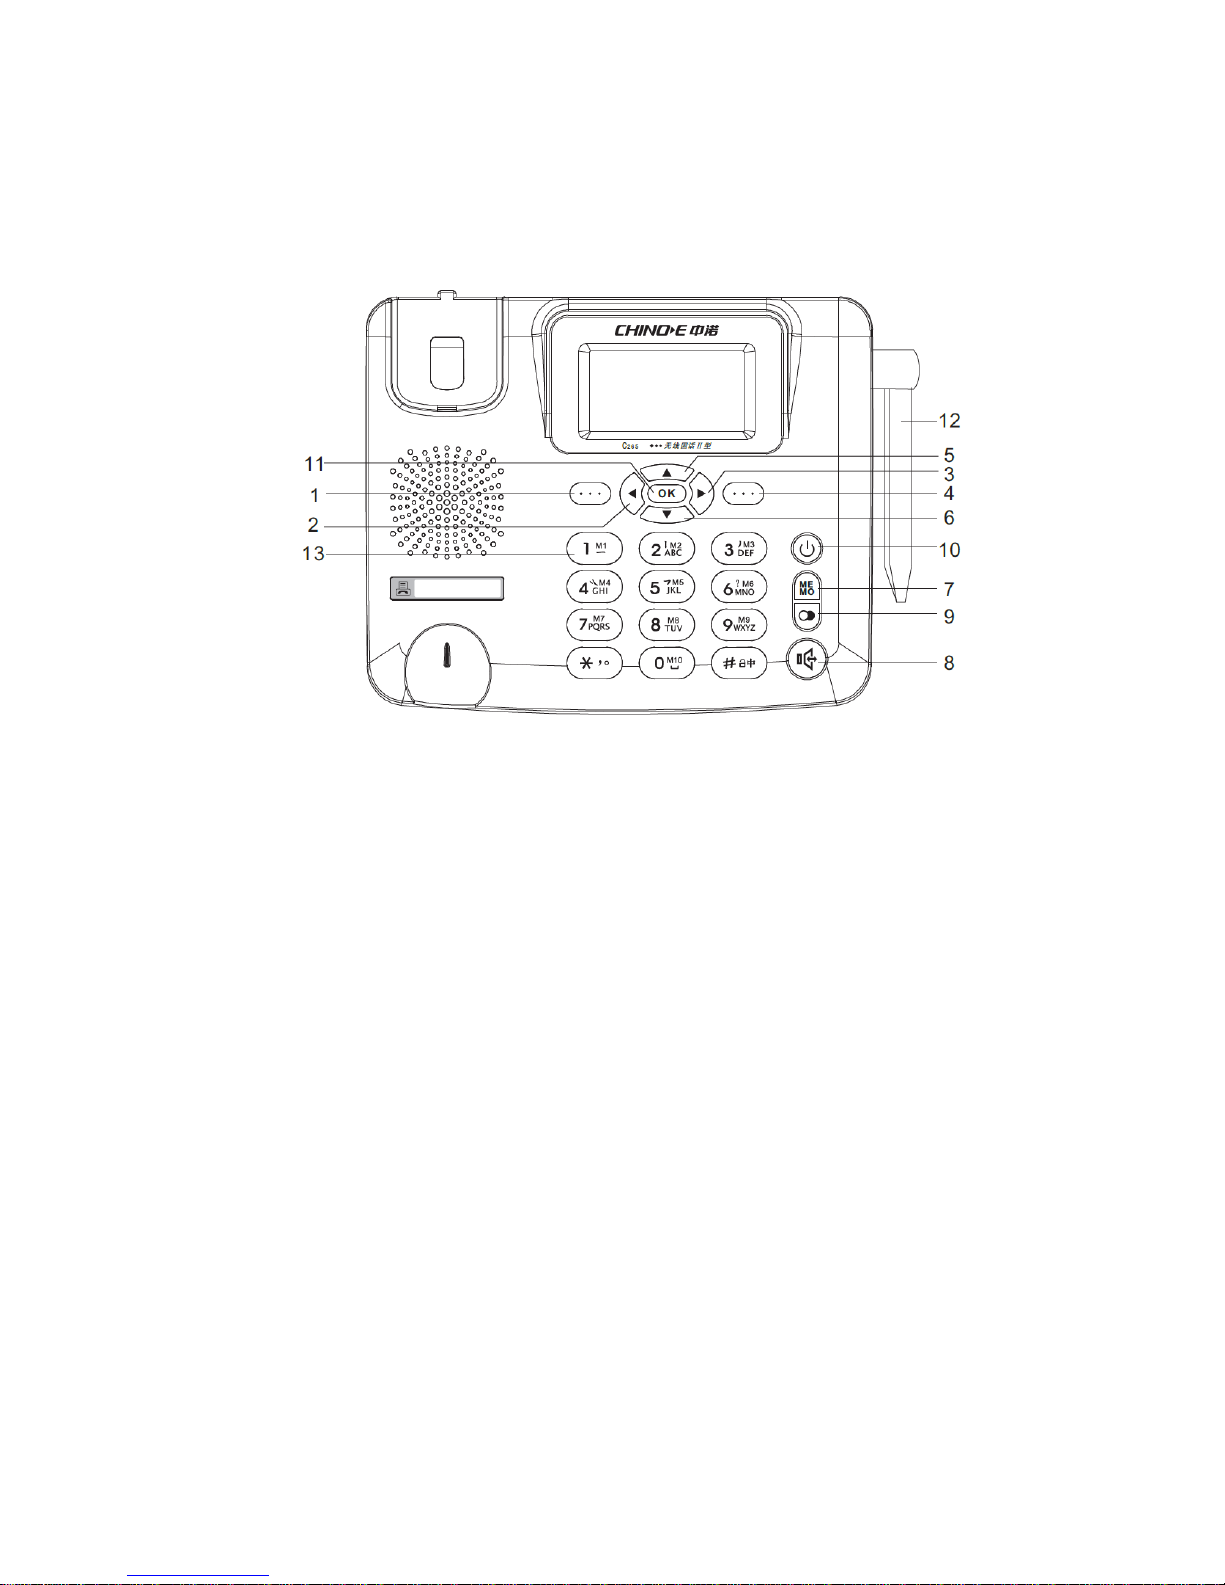
Figure 2 Key Layout
1 Menu/Confirm key: under the hook on status, press this key to enter the menu; when enter the menu, press this
key to operate the left bottom function;
2. ◄: under the hook on status, press this key to enter SMS menu; when enter the SMS, press this key to move
the cursor to the left;
3. ►: under the hook on status, press this key to enter Template menu; when enter the SMS, press this key to
move the cursor to the right;
4. PHONEBOOK/RETURN/DELETE key: when enter the menu, press this key to operate the right bottom
function; when input the words, press this key to delete the word before the cursor; when there have the incoming
call, press this key to reject the call;
5. ▲: when enter the menu, press this key to search upwardly; under the hook on status, press this key to enter the
Alarm clock setup; when talking, press this key to turn the volume lower;
6. ▼: when enter the menu, press this key to search downwardly; under the hook on status, press this key to enter
the call recorder setup; when talking, press this key to turn the volume higher;
7. Speed Dial Memory: can store M1-M10 speed dial memories; when dial, long press the M1-M10 to dial out the
stored number;
8. Handsfree key: turn on or turn off the handsfree function;
9. Redial key: under hook off status, press this key to redial the last number;
10 POWER ON/OFF Key: Long press this key to power on/off the phone; when enter the menu, press this key to
exit and return to the hook on status; under the hook on status and there is a call coming, press this key to reject the
call; when talk, press this key to end the conversation and return to the hook on status.
11 OK key: when enter the menu, press this key to enter the next setup.
12 Outdoor antenna
13 0~9 Alpha Numeric Keys and * # Key

To input numbers and characters, In text input mode, press 0 Key to input
space
3.2.3 Display Icon
The following icon may appear on the display of the phone:
No. Icon Description
1 Current signal strength. The more bars there are, the stronger the signal is.
2 No signal.
3 Battery capacity indicator. The more bars there are, the more capacity the battery has.
4 Supplied by charger
5 Alarm on
6 Call forwarding
7 Phone lock
8 Missed call
9 Unread message
10 Speakerphone actives
4 Basic Operations
4.1 Insert SIM card and connect the battery
Open the battery cover, insert the SIM card as indication; then connect the battery; close the battery
cover; please be sure that this step working is under the telephone power off status to avoid the SIM
card damage.
4.2 Power On/Off
Connect the handset to your phone by the coiled cord and put the handset to hang up position, then
connect DC power supply or insert the battery to the battery chamber., then press the Power On/Off
Key on the panel for 3 seconds to power on the phone, your phone should go to idle screen and is ready
to use.
If the phone will not be used for long time, press the Power On/Off Key for 3 seconds to power off the
Phone.
4.3 Make a Call
While your phone is power on and at idle screen, enter a destination number you wish to call, then
press “Handsfreee” Key or pick up the handset. (Note: To modify digits you enter, you can press
“DELETE” Key to delete wrong digits first and then enter new digits). Once the call is connected, the

phone’s screen will display the number you have dialed, and the time duration the call has lasted.
4.4 Answer a Call
When there is an incoming call, the phone will ring and display the Phone number of the incoming call
(if the number is available). You can pick up the handset or press Handsfree Key to answer the
incoming call. The ring tone and ring-tone volume can be changed in the setting menu.
4.5 End a Call
You can end a call by pressing “POWER ON/OFF” Key. If you are using the handset for a phone call,
hanging up the handset will end the call automatically.
5 Main Menu
Press Menu Key to enter the main menu from the idle screen. The main menu includes:
5.1 Names
5.1.1 All Contacts
5.1.2 Find Contacts
5.2 Message
5.2.1 Write message
5.2.2 Inbox
5.2.3 Outbox
5.2.4 Drafts
5.2.5 Sentbox
5.2.6 Security inbox
5.2.7 Templates
5.3 Call logs
5.3.1 Missed calls
5.3.2 Dialed calls
5.3.3 Received calls
5.34 Delete all
5.3.5 Call timers
5.4 Call settings
5.4.1 Memery key
5.4.2 Call divert
5.4.3 Call waiting
5.4.4 Call barring
5.4.5 Delay to Dial
5.4.6 Others
5.5 Calendar
5.5.1 Go to date
5.6 Settings
5.6.1 Phone setting
5.6.1.1 Date & time
5.6.1.2 Language
5.6.1.3 Shortcut settings
5.6.1.4 Restore factory settings
5.6.2 Display

5.6.3 Security
5.6.4 Profiles
5.6.4.1 Ring setting
5.6.4.2 Adjust volume
5.6.4.3 Ring type
5.6.4.4 Other alert rings
5.6.5 Speech setting
5.6.5.1 Key ring
5.6.5.2 Incoming Call Ring
5.6.6 Calculator
5.6.7 Alarm
5.6.8 STK
5.6.9 Lock 0
5.1 Names
Contacts
Contacts can be used to store contact’s name and contact’s phone numbers. You can store up to 300
entries to phone memory.
5.1.1 All Contacts
5.1.1.1 View a Contact
Press OK Key when the LCD display All Contacts to view the contact list in idle mode, scroll to the
desired contact, press ▲or ▼Key, to view, and then press OK Key to view the contact information;
Press MENU key to enter the Options when choice one contact,
1) When show NEW, press MENU or OK key to edit the contact information, press MENU to confirm
or Back to return;
2) When show Write message, press MENU or OK key to enter the SMS and edit the message;
3) When show Call, press MENU or OK key to enter the voice call or IP call status;
4) When show DELETE, press MENU or OK key to delete this contact; press OK again to delete or
press Cancel to exit;
5) When show Delete multiple, press MENU or OK to enter the delete the multiple contacts, press OK
to choice the contacts you want to delelete, press OK again to delete your choice contacts;
6) When show Copy, press MENU or OK to choice the Copy from Phone or Copy to Phone. To copy
the contacts from SIM card to the phone or from the phone to the SIM card;
7) When show Others, press MENU or OK to check the Memory status. Press OK will show the
memory capacity (Others are supported by the SIM card or telecom)
5.1.1.2 Add a New Contact
Add a New Contact from the Menu
Press the telephone number, or when the LCD displays the telephone number, press OK key, and the
LCD displays New Contact, press OK key again and input the name, press MENU or OK key to store
this contact information;
5.1.2 Find Contacts

When the LCD displays Find Contacts, press MENU or OK key, then please enter the contact name
you want to find, press OK key to find the contact.
5.2 Message Settings
5.2.1 Write message
When LCD display Write message, press MENU key to enter;
when enter SMS setting;
1) you can check the SMS center number: the SMS center number is supplied by your local telecom;
2) choice the message validity period Maximum: you can choice 1,6,24,72 hours, 1 week and
Maximum;
3) Status report: to confirm that the receiver receives the sent message;
4) Save sent message: for the sent message, you can choice: save, Don’t save, Prompt user;
5) Preferred storage Phone: for the preferred storage place, you can choice SIM or Phone.
5.2.2 Inbox
For the inbox messages, you can choice delete, translate, copy, move.
5.2.3 Outbox
5.2.4 Draft
5.2.5 Sentbox
5.2.6 Security inbox
5.2.7 Templates
5.3 Call logs
5.3.1 Missed calls
5.3.2 Dialed calls
5.3.3 Received calls
5.34 Delete all
5.3.5 Call timers
You can find Missed Calls, Dialed Calls, Received Calls, Erase Lists, and Call Duration in
Recent Calls menu.
In idle mode, press ◄key and then select Recent Calls.
5.3.1 Missed Calls
1) Select Missed Calls in Recent Calls menu,
2) The Missed Calls List will be displayed; you could scroll to the desired number,
3) Press ◄key to: View the call information; Delete the call log, Save the Number to Phone
Book,
Dial, Edit this number, and Send SMS to this number.
5.3.2 Dialed Calls
1) Select Dialed Calls in Recent Calls menu, or press SELECT key in idle mode,
2) The Dialed Calls List will be displayed; you could scroll to the desired number,
3) Press ◄key to: View the call information; Delete the call log, Save the Number to Phone
Book,
Dial, Edit this number, and Send SMS to this number.
5.3.3 Received Calls
1) Select Received Calls in Recent Calls menu,
2) The Received Calls List will be displayed; you could scroll to the desired number,

3) Press ◄key to: View the call information; Delete the call log, Save the Number to Phone
Book,
Dial, Edit this number, and Send SMS to this number.
5.3.4 Erase Lists
Select Erase Lists in Recent Calls menu, you could scroll the cursor to erase Missed Calls,
Dialed Calls,
Received Calls list.
5.3.5 Call Duration
Select Call Duration in Recent Calls menu, you could scroll the cursor to view duration of Last
call Time,
Total Dialed, Total Received, scroll to Erase All to erase all duration.
5.4 Call Settings
5.4.1 Memery key
This menu is operating as pressing MEMO key: you can store 10 groups memory number in M1-M10;
When the Memory is empty, press MENU and the LCD displays Edit, press MENU to input number
then press MENU to store. For the stored memory, press MENU to View, Edit, Modify contacts, Call,
Delete.
5.4.2 Call divert
5.4.3 Call waiting
5.4.4 Call barring
5.4.5 Delay to Dial
When pre-dial, you can choice the delay time to dial out the number: off, 3s,5s, 7s, 9s,
5.4.6 Others
5.4.6.1 IP prefix
You can choice the IP number 17951, 17911, 17909,17931,193 as the IP number.
5.4.6.2 Call time minute remember: off, 50s, 55s, 60s, Customize for the user choice;
5.4.6.3 Auto redial: choice this function turn on or off;
5.4.6.4 Reply SMS after reject: choice this function turn on or off;
5.4.6.5 Any-key answer: choice this function turn on or off, if turn on, press any key will answer when
there is a call in;
5.5 Calendar
5.5.1 Go to date
Press the digits to set the year, month, day; then the calendar will show the week.
5.6Settings
5.6.1 Phone setting
5.6.1.1 Date & time
1) Set time: press the digits to set the time;
2) Set date: press the digits to set the year, month, date;
3) Time format: to choice 12 hours or 24 hours for the time format;

4) Date format: to choice Year-Mon-Day/Mon-Day-Year/Day/Mon-Year for the date format;
5) Auto update time: to choice the auto update time off or Activeate
5.6.1.2 Language
To choice the Display/Writing language to be English or Spanish;
5.6.1.3 Shortcut settings
As the user want, to set ◄►▲▼ 4 shortcut key menu;
5.6.1.4 Restore factory settings
Input password to restore factory setting, all the setup will return to the default;
5.6.2 Display
5.6.2.1 Contrast
Press ◄►to choice the display contrast level;
5.6.2.2 Backlight
To choice the backlight time to be 5/10/15/20/30 sec or Always on;
5.6.2.3 Keypad backlight
To choice the keypad backlight time to be 5/10/20 sec, or off, or Night mode
5.6.3 Security
5.6.3.1 PIN
5.6.3.2 Modify PIN2
5.6.3.3 Phone locked
Input the password
5.6.3.4 Modify the cell phone password
Input the setup password, then input the new password, press MENU to confirm and input the new
password again to confirm.
5.6.3.5 Privacy
Input the password
5.6.3.6 Auto keypad lock
Choice the keypad lock off, or auto lock in 5/15/30 sec, or 1/5 minutes, when setup the auto keypad
lock, long press # key, the keypad will be locked; except the emergency call can be dialed out, other
digits can not be dialed; press MENU key and # key to unlock.
5.6.3.7 Fixed dialing
5.6.4 Profiles
5.6.4.1 Ring setting
When enter the ring settings, you can choice the caller ring tone and the message ringtone.
5.6.4.2 Adjust volume
1) Adjust Caller ring tone volume: press MENU to select and press ◄►to choice the volume from 0-9
levels; when choice 0, it is mute and no ring sound;
2) Adjust Message ring volume: press MENU to select and press ◄►to choice the volume from 0-9 levels; when
choice 0, it is mute and no message sound;
3) Adjust Alarm&calend volume: press MENU to select and press ◄►to choice the volume from 0-9
levels; when choice 0, it is mute and no sound;
4) Adjust Call volume: press MENU to select and press ◄►to choice the call volume from 1-9 levels;;
5) Adjust Power ring tone volume: press MENU to select and press ◄►to choice the power on/off
volume from 0-9 levels; when choice 0, it is mute and no sound;
5.6.4.3 Ring type: choice the call alert ring tone/Message alert ring tone/Alarm&calend ring tone or

silent;
5.6.4.4 Other alert rings
1) Key tone ring tone or silent;
2) Battery low alarm Activate or off;
3) Power ring tone Activate or off;
4) Dial tone Activate or off.
FCC Statement
1. This device complies with Part 15 of the FCC Rules. Operation is subject to the following two
conditions:
(1) This device may not cause harmful interference.
(2) This device must accept any interference received, including interference that may cause
undesired operation.
2. Changes or modifications not expressly approved by the party responsible for compliance could
void the user's authority to operate the equipment.
NOTE:
This equipment has been tested and found to comply with the limits for a Class B digital device,
pursuant to Part 15 of the FCC Rules. These limits are designed to provide reasonable protection
against harmful interference in a residential installation.
This equipment generates uses and can radiate radio frequency energy and, if not installed and
used in accordance with the instructions, may cause harmful interference to radio communications.
However, there is no guarantee that interference will not occur in a particular installation. If this
equipment does cause harmful interference to radio or television reception, which can be
determined by turning the equipment off and on, the user is encouraged to try to correct the
interference by one or more of the following measures:
Reorient or relocate the receiving antenna.
Increase the separation between the equipment and receiver.
Connect the equipment into an outlet on a circuit different from that to which the receiver is
connected.
Consult the dealer or an experienced radio/TV technician for help.
FCC Radiation Exposure Statement
This modular complies with FCC RF radiation exposure limits set forth for an uncontrolled enviro
nment.
This transmitter must not be co-located or operating in conjunction with any other antenna or trans
mitter.
This product must be installed and operated with a minimum distance of 20 cm between the radiat
or and user body.
Table of contents


