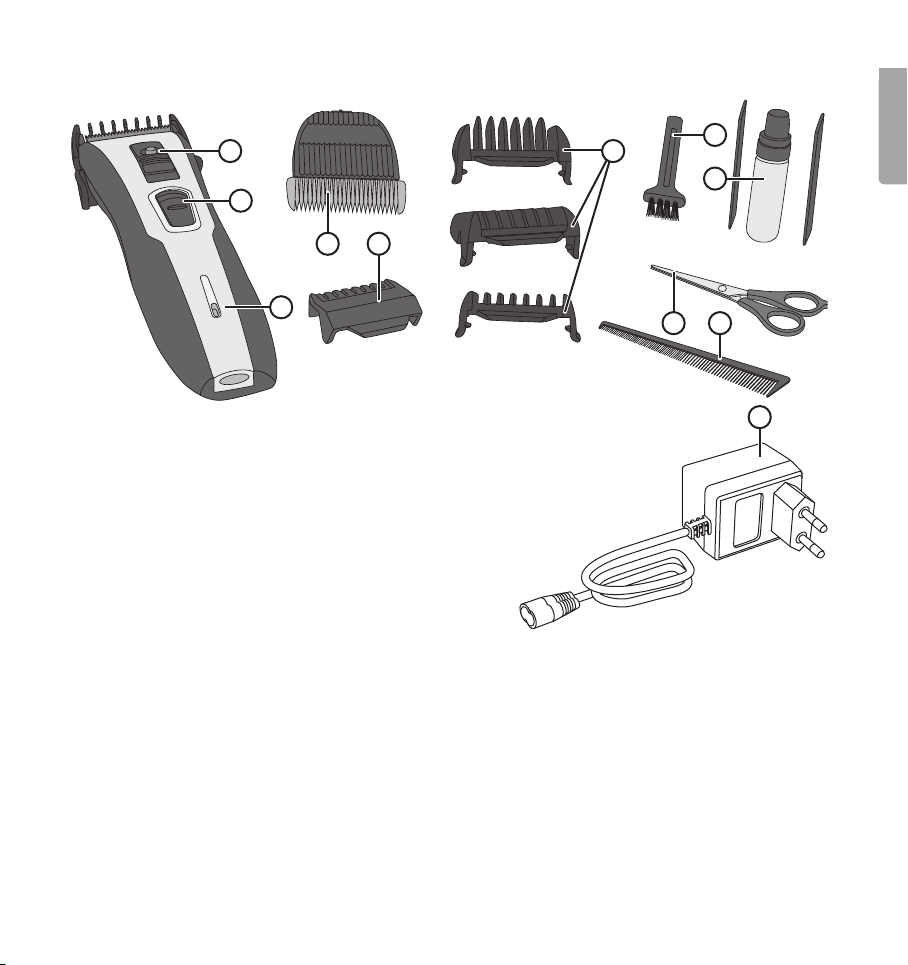
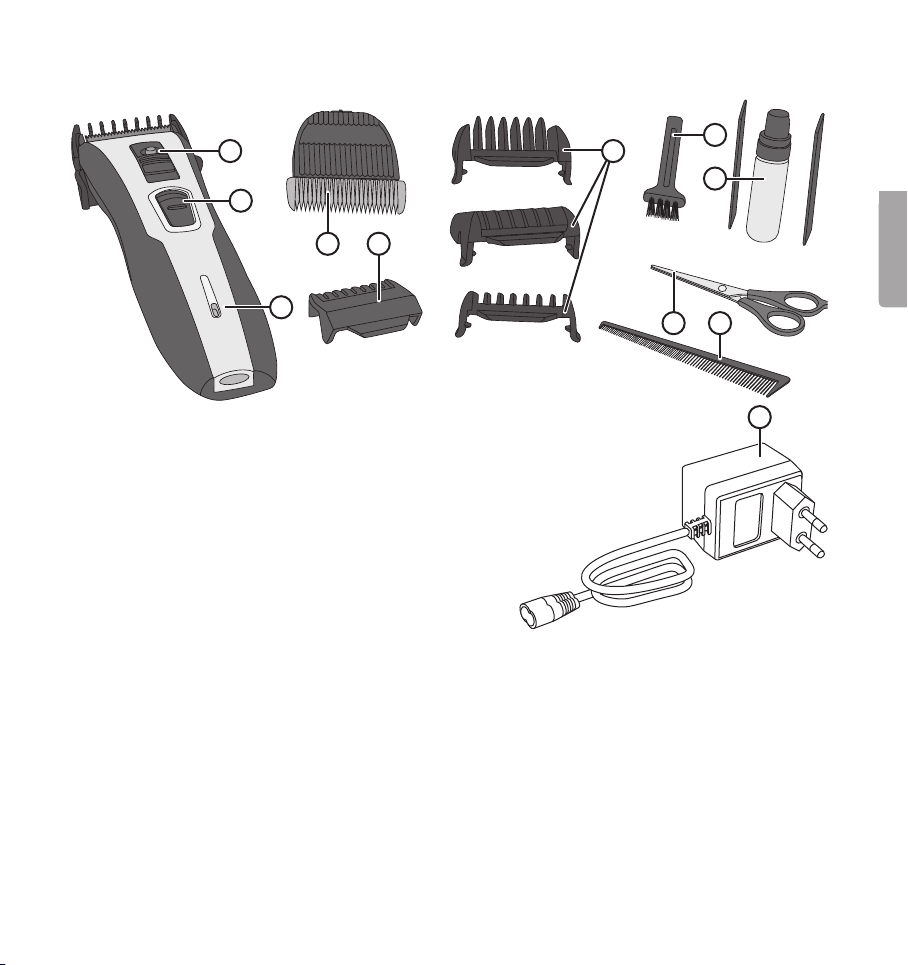
Clas Ohlson 18-4667 User manual

EnglishSvenskaNorskSuomiDeutsch
Hair Clipper
Hårklippare
Hårklipper
Kotiparturi
Haarschneider
Art.no
18-4667, 44-1576 Ver. 20150526

2
English
Hair Clipper
Art.no 18-4667, 44-1576
Please read theentire instruction manual before using theproduct and then save it for future reference.
We reserve theright for any errors in text or images and any necessary changes made to technicaldata.
In theevent of technical problems or other queries, please contact our Customer Services (see address details
on theback).
Safety
• Never use theclipper if it has been damaged in anyway.
• Never use theclipper if themains lead or other accessory is damaged in anyway.
• Never place theclipper where it might fall into thewater.
• Never place theclipper or themains lead close to sources of high temperature such as cookers or naked flames.
• Theclipper must only be used with a100–240 V AC domestic electric supply.
• Always disconnect themains lead from thewall socket during thunderstorms or when it is not inuse.
• If you operate theclipper from themains, remember to always unplug it from thewall socket afteruse.
Neverrun theclipper off themains during thunderstorms.
• Theproduct may be used by children of 8 years and above and by persons with reduced physical, sensory
or mental capability or lack of experience and knowledge provided they have been given supervision or
instruction concerning use of theproduct in asafe way and understand thehazards involved.
• Never let children play with theclipper.
• Store theproduct in adry, frost-free location.
• Cleaning and user maintenance shall not be made by children unless they are older than 8 and supervised.
• Keep theproduct and its mains lead out of reach of children under theage of 8.
• This product is designed exclusively for domesticuse.
• Theclipper must not be disassembled or used in any other manner than as described in theincluded
instruction manual.
• Theproduct should only be repaired by qualified service technicians using originalparts.
• Only use thesupplied accessories.

2
English
3
1
2
3
4 5
6
7
8
910
11
Buttons and functions
1. Cutting length settings (0.5/1.2/1.9/2.5 mm)
2. [I/0] On/off
3. Charging indicator
4. Cutterhead
Accessories
5. Thinningcomb
6. Guidecombs
7. Cleaningbrush
8. Clipperoil
9. Scissors
10. Comb
11. Mains adaptor

4
English
I
0
Charging
Charge thebattery fully before using theclipper for
thefirsttime. Fullcharge is achieved after about 16hours.
• Plug themains adaptor plug into awall socket and then
into theclipper’s charge socket.
• Thecharge indicator will show red while charging.
• Afully charged battery will give about 50 min ofusage.
• TheLED indicator will show green when theclipper is
fullycharged.
• Full charge is achieved after about 9hours.
You can also use theclipper without going through theentire
charging process:
1. Connect themains adaptor to awall socket.
2. Connect themains lead to theclipper.
3. Remember to recharge thebattery afteruse.
4. Do not use theclipper for more than one hour with
themains lead connected.
Note:
Battery life will be shortened if theclipper is used directly from themains toooften. Makeahabit of charging
thebattery and using theclipper without themains lead connected.
Clipping
Note: Thecutter blade is verysharp. Becareful when using theclipper without
theguidecombs.
• Start theclipper by sliding the [I/0] switch to the Iposition.
• Turn off theclipper by sliding the [I/0] switch to the 0position.
Only use theclipper on dryhair.
It is recommended that you start with alonger guide comb and then switch to
ashorter one for thebest results.
Theclipper can be set to various cutting lengths from 0.5 mm up to 30mm.

4
English
5
For a0.5–2.5 mm hair length
Usetheclipper without aguide comb and set thecutting length using theslide
control.
Use guide combs for 4–30 mm hair lengths
Fiveguide combs are included: 4–6, 10–12, 16–18, 22–24 and 28–30 mm plus
athinningcomb. Usetheslide control to finely adjust thecutting length when
using theguidecombs.
Fitting guide combs
1. Thecombs have locking pins that snap into notches on theside of
theclipper. Fitone of thepins into its notch on one side and push theother
one intoplace.
2. Detach theguide comb by working it loose from its notches.
Care and maintenance
• Clean theclipper’s exterior using alightly moistenedcloth. Useonly mild cleaning agents, never solvents
or corrosive chemicals.
• Never attempt to open thebattery casing.
• Be careful not to short-circuit thebattery terminals. Neverput theclipper battery in your pocket with any
metal objects such as coins orkeys.
• Keep thebattery away from any naked flames.
• Note: Inorder for theclipper to function optimally, thecutting head must be cleaned and lubricated regularly.
Cleaning thecuttinghead
1. Remove thecutting head by applying pressure to it while holding
against it slightly to prevent thespring loaded cutting head from
flyingoff.
This manual suits for next models
1
Table of contents
Languages: