Clavia Nord Lead 3 Manual

NORD LEAD 3 V1.2x ADDENDUM 1. OS V1.2x: Sound Categories (V1.2x)
Page 1
1. OS V1.2
1. OS V1.21. OS V1.2
1. OS V1.2X
XX
X
There are a number of new features and improvements made in OS V1.2x. This addendum includes de-
scriptions about new features and improvement made since OS V1.04. It begins with descriptions about
the new features and continues with the improvements.
S
SS
SO
OO
OU
UU
UN
NN
ND
DD
DC
CC
CA
AA
AT
TT
TE
EE
EG
GG
GO
OO
OR
RR
RI
II
IE
EE
ES
SS
S(V1.2
(V1.2(V1.2
(V1.2X
XX
X)
))
)
To make it easier to find different types of sounds in the synth’s memory it’s now possible to save Pro-
grams in separate Sound Categories. When you’re looking for a specific sound you can search either by
category, in alphabetical order or numerically. There are 12+2 different categories to choose between:
C
CC
CA
AA
AT
TT
TE
EE
EG
GG
GO
OO
OR
RR
RY
YY
YD
DD
DE
EE
ES
SS
SC
CC
CR
RR
RI
II
IP
PP
PT
TT
TI
II
IO
OO
ON
NN
N
Acoustic Sounds with an acoustic character like flutes, violins, guitars, ethnic sounds, bells,
mallets etc. Doesn’t necessarily have to be emulations of existing instruments
Arpeggio All sorts of arpeggio and “groove” sounds
Bass All sorts of bass sounds
Classic Traditional “clean” analog types of polyphonic synth sounds based on the classic
waveforms
Drum Drum and percussion sounds
Fantasy Melodic effects sounds and textures, often with rhythmic modulations
FX Atonal effects sounds like water, laser guns, explosions etc. Sometimes with heavy
modulations. Quite often built up using Noise “waveforms”
Lead Sounds meant for lead lines. Usually monophonic sounds. Also lead “chord mem-
ory” sounds
Organ Different types of organ sounds
Pad Melodic polyphonic “chord” sounds with fairy slow attacks like strings, choirs etc.
Piano Piano type sounds like Rhodes and Wurlitzer emulations and FM based piano
sounds
Synth All sorts of melodic polyphonic synth sounds
User1 Reserved for your own sounds
User2 Reserved for your own sounds

1. OS V1.2x: Sound Categories (V1.2x) NORD LEAD 3 V1.2x ADDENDUM
Page 2
S
SS
ST
TT
TO
OO
OR
RR
RE
EE
E
A
AA
AP
PP
PR
RR
RO
OO
OG
GG
GR
RR
RA
AA
AM
MM
M
I
II
IN
NN
N
A
AA
AC
CC
CA
AA
AT
TT
TE
EE
EG
GG
GO
OO
OR
RR
RY
YY
Y
1. Hold down SHIFT and press STORE (Store as...). The STORE LED starts flashing and the DISPLAY
shows the current Sound Category or, if no Sound Category was selected, ’Name: No Cat’.
2. Select Category with the ROTARY DIAL. Let’s say we select ‘Synth’ in this example.
3. Press the RIGHT NAVIGATOR button once and select letters for the Program name by turning the
ROTARY DIAL. Change the cursor position with the LEFT and RIGHT NAVIGATOR buttons.
Alternatively, press and hold the DOWN NAVIGATOR button and select letters with the ROTARY DI-
AL. Each time you release the DOWN NAVIGATOR button the cursor in the DISPLAY advances one
step. Repeat the procedure for the entire Program name. If you want to delete a letter/position and
thus move all the letters to the right of the cursor one step back, hold down SHIFT and press the LEFT
NAVIGATOR button. (This function is the same as using the Delete key on a computer keyboard.) If
you want to move all letters to the right of the cursor one step forward and thus make room for more
Name: No Cat
Init sound
Name: Synth
Init sound

NORD LEAD 3 V1.2x ADDENDUM 1. OS V1.2x: Sound Categories (V1.2x)
Page 3
letters, hold down SHIFT and press the RIGHT NAVIGATOR button.(Press a SLOT button to cancel
the Storing operation).
4. Press STORE again. The STORE LED continues flashing. Select memory location by turning the
ROTARY DIAL. Switch between Banks 1-8 by pressing the UP/DOWN NAVIGATOR buttons. As you
scroll through the memory locations, you can play and hear the Program currently shown in the DIS-
PLAY. This prevents you from overwriting a sound that you want to keep.
5. Press STORE again to store your Program. (To cancel the operation, press a SLOT button.)
S
SS
SE
EE
EA
AA
AR
RR
RC
CC
CH
HH
H
F
FF
FO
OO
OR
RR
R
A
AA
AP
PP
PR
RR
RO
OO
OG
GG
GR
RR
RA
AA
AM
MM
M
I
II
IN
NN
N
A
AA
A
S
SS
SP
PP
PE
EE
EC
CC
CI
II
IF
FF
FI
II
IC
CC
CC
CC
CA
AA
AT
TT
TE
EE
EG
GG
GO
OO
OR
RR
RY
YY
Y
By default, when you load a Program into a Slot by turning the ROTARY DIAL, the Programs are dis-
played (and loaded) in numerical order. By holding down SHIFT and pressing the DOWN NAVIGATOR
button twice you will be able to load Programs by Categories rather than by memory location number.
The Programs within a Category will be displayed and loaded in alphabetical order. Select Category by
pressing the UP/DOWN NAVIGATOR buttons and select Program with the ROTARY DIAL or with the
LEFT/RIGHT NAVIGATOR buttons.
Name: Synth
My synth sound
Synth 4:36
My synth sound

1. OS V1.2x: Sound Categories (V1.2x) NORD LEAD 3 V1.2x ADDENDUM
Page 4
S
SS
SE
EE
EA
AA
AR
RR
RC
CC
CH
HH
H
F
FF
FO
OO
OR
RR
R
A
AA
AP
PP
PR
RR
RO
OO
OG
GG
GR
RR
RA
AA
AM
MM
M
I
II
IN
NN
N
A
AA
AL
LL
LP
PP
PH
HH
HA
AA
AB
BB
BE
EE
ET
TT
TI
II
IC
CC
CA
AA
AL
LL
L
O
OO
OR
RR
RD
DD
DE
EE
ER
RR
R
By default, when you load a Program into a Slot by turning the ROTARY DIAL, the Programs are dis-
played (and loaded) in numerical order. By pressing the SHIFT + DOWN NAVIGATOR buttons you will
be able to load Programs in alphabetical order rather than by memory location number. Select letter by
pressing the UP/DOWN NAVIGATOR buttons and select Program with the ROTARY DIAL or with the
LEFT/RIGHT NAVIGATOR buttons.
Note: The selected ‘Program Sort mode’ (numerically, by category or alphabetically) can be saved us-
ing the ‘Store System Settings’ command in the Synth menu. (This way the selected search mode will
be active every time you power on your Nord Lead 3.)
M 4:36
My synth sound

NORD LEAD 3 V1.2x ADDENDUM 1. OS V1.2x: Arpeggiator (V1.2x)
Page 5
A
AA
AR
RR
RP
PP
PE
EE
EG
GG
GG
GG
GI
II
IA
AA
AT
TT
TO
OO
OR
RR
R(V1.2
(V1.2(V1.2
(V1.2X
XX
X)
))
)
As from OS V1.2x, the Arpeggiator has got some interesting additional features. The Arpeggiator can be
used just like in earlier OS versions, i.e. with the standard Up, Down, Up/Down and Random patterns
with different ranges but now you can also use the new Sub Arpeggiator and the Mask function to create
very interesting pattern variations. The Arpeggiator also uses MIDI Song Position Pointer, which means
that if you record an arpeggio in an external sequencer, it will always play back the pattern exactly the
same way it was recorded - even if you start the sequencer in the middle of the sequence.
S
SS
SU
UU
UB
BB
BA
AA
AR
RR
RP
PP
PE
EE
EG
GG
GG
GG
GI
II
IA
AA
AT
TT
TO
OO
OR
RR
R
An arpeggiator is used to repeatedly play single notes in a held chord. Since the basic arpeggiator patterns
(up, down, up&down and random) are quite limited we decided to expand the functionality. In most
other synths there are a number of special preset patterns to choose between, but this solution is also quite
limiting. To make the patterns more dynamic and interesting we added a second arpeggiator, the Sub
Arpeggiator. The Sub Arpeggiator in Nord Lead 3 is an additional arpeggiator that works in conjunction
with the Arpeggiator. For each step in the Arpeggiator, the Sub Arpeggiator executes its own series of
steps. Directions and ranges can be set separately for both arpeggiators. Let’s have a look at the following
basic example:
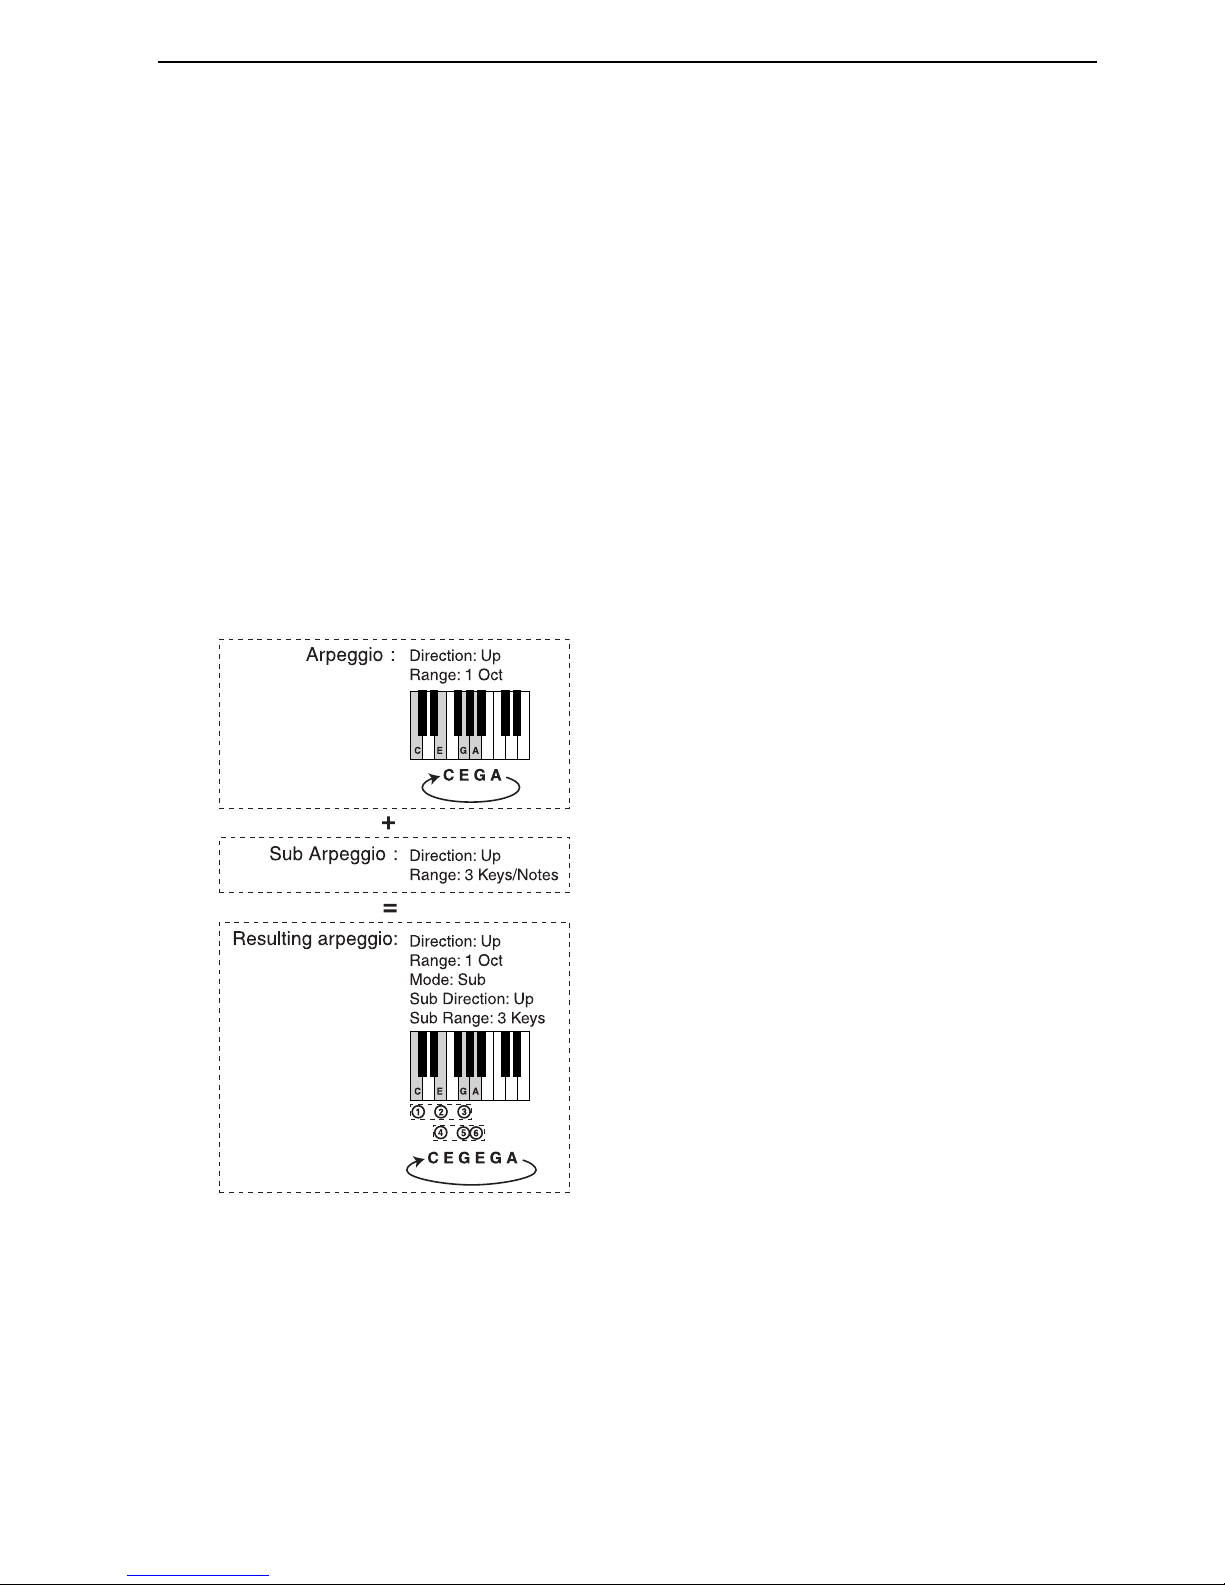
This is the behavior when you play a C-E-G-A
chord and only use the (main) Arpeggio with
the direction set to ‘Up’ and the Range set to ‘1
Octave’.
Activate the Sub Arpeggio and set the direction
to ‘Up’ and the Range to 3 Keys/Notes.
The resulting arpeggio when combining the Ar-
peggio and the Sub Arpeggio and playing the
C-E-G-A chord:
1. The Sub Arpeggio begins its own pattern on
the lowest note of the played chord and finishes
its 3-key cycle.
2. The Sub Arpeggio restarts its pattern on the
second note of the played chord.
3. When the Sub Arpeggio has completed the
pattern that includes the last note in the chord
the whole arpeggio restarts.

1. OS V1.2x: Arpeggiator (V1.2x) NORD LEAD 3 V1.2x ADDENDUM
Page 6
Now, let’s create a similar arpeggio but with the Arpeggiator Range increased to 3 octaves and see what
happens:
1. Create a sound and activate the Arpeggiator by pressing the Arpeggio RUN button.
2. Hold down SHIFT and press the RUN button (alternatively, press the SOUND button to the right
above the DISPLAY) to enter the edit mode for the Arpeggiator. The SOUND LED lights up
3. Select direction by turning the ROTARY DIAL. You can select between Up, Down, Up&Down and
Random. Press the RIGHT NAVIGATOR button to select Range (the cursor will move to the right in
the DISPLAY). Select Range (1-4 Octaves) by turning the ROTARY DIAL. Press the RIGHT NAVIGA-
TOR button again to select Mode (Normal, Sub, Mask Sub+Mask). Turn the ROTARY DIAL to select
Sub. This enables the Sub Arpeggiator which we will use in this example.
4. Press the DOWN NAVIGATOR button to enter the Sub Arpeggiator menu. Here you can select
between Up, Down, Up&Down, Random and Still. Press the RIGHT NAVIGATOR button to select
ARP Range Mode
Up 3 Oct Norm
ARP Range Mode
Up 3 Oct Sub

NORD LEAD 3 V1.2x ADDENDUM 1. OS V1.2x: Arpeggiator (V1.2x)
Page 7
Range (the cursor will move to the right in the DISPLAY). Select Range (1-8 keys/notes) by turning
the ROTARY DIAL.
Now, let’s see how the Arpeggiator behaves according to the settings we made above. Let’s play a 4 finger
chord with the notes C, E, G and A (the black dots on the keyboard below). The Arpeggio Range is set
to ‘3 Octaves’ which means the notes will be duplicated also in the following two octaves (indicated by
the gray dots below) and the direction is set to ‘Up’. The Sub Arpeggiator has a Range of 3 keys/notes
(indicated by the dashed line boxes below) and the direction is set to ‘Up’.
Once the arpeggio has completed the sub arpeggio pattern that includes the last note in the total range it
starts all over again from the beginning. The principle for the arpeggio behavior is the same regardless of
selected directions etc. If you select ‘Still’ in the ARP SubMode menu it means you will get repetitions of
each note in the Arpeggio. The Range setting in the ARP SubMode menu determines the number of rep-
etitions in this case.
ARP SubMode
Up Range:3

1. OS V1.2x: Arpeggiator (V1.2x) NORD LEAD 3 V1.2x ADDENDUM
Page 8
A
AA
AR
RR
RP
PP
PE
EE
EG
GG
GG
GG
GI
II
IA
AA
AT
TT
TO
OO
OR
RR
RM
MM
MA
AA
AS
SS
SK
KK
K
To create even more variations to arpeggio patterns there is the Arpeggio Mask function. With the Ar-
peggio Mask function you are able to mute (skip) certain steps of the arpeggio, creating very interesting
rhythmic effects. Here’s an example:
1. Create a sound and activate the Arpeggiator by pressing the Arpeggio RUN button.
2. Hold down SHIFT and press the RUN button (alternatively, press the SOUND button to the right
above the DISPLAY) to enter the edit mode for the Arpeggiator. The SOUND LED lights up
3. Select ‘Up’ by turning the ROTARY DIAL. Press the RIGHT NAVIGATOR button to select Range (the
cursor will move to the right in the DISPLAY). Select 3 Octaves by turning the ROTARY DIAL. Press
the RIGHT NAVIGATOR button again to select Mode. Turn the ROTARY DIAL to select ‘Mask’.
ARP Range Mode
Up 3 Oct Norm
ARP Range Mode
Up 3 Oct Mask

NORD LEAD 3 V1.2x ADDENDUM 1. OS V1.2x: Arpeggiator (V1.2x)
Page 9
4. Press the DOWN NAVIGATOR button twice to get to the ARP Mask menu. Here you can set the
length of the Mask and enable/disable (mute/skip) steps.
5. Press the LEFT/RIGHT NAVIGATOR buttons until the cursor is below the L. Turn the ROTARY DIAL
counter clockwise to reduce the length to 14 steps. Press the RIGHT NAVIGATOR button to begin
editing the steps. Move between the steps with the RIGHT/LEFT NAVIGATOR buttons and disable/
enable each step by turning the ROTARY DIAL. A filled dot means that the step is enabled and a circle
means that the step should be skipped (muted).
Now, let’s see how the Arpeggiator behaves according to the settings we made above. Let’s play a 4 finger
chord with the notes C, E, G and A (the black dots on the keyboard below). The Arpeggio Range is set
to ‘3 Octaves’ which means the notes will be duplicated also in the following two octaves (indicated by
the gray dots below) and the direction is set to ‘Up’. In this example we don’t use the Sub Arpeggiator,
but the principle is the same also when this is used. The filled dots in the figure indicates the notes that
are played and the circles indicates notes that will be muted according to the ARP Mask settings:

1. OS V1.2x: Stack Detune (V1.06) NORD LEAD 3 V1.2x ADDENDUM
Page 10
S
SS
ST
TT
TA
AA
AC
CC
CK
KK
KD
DD
DE
EE
ET
TT
TU
UU
UN
NN
NE
EE
E(V1.06)
(V1.06)(V1.06)
(V1.06)
The Stack function is a variation of the Chord Memory function. Stack makes it possible to store a chord,
and/or the same note several times (stack), and then play it back by only playing single keys. The stack/
chord will be transposed, equally tempered, with the first note you stacked as the reference key of the
chord.
Press and hold Shift and the CHORD MEM button. Play one note at a time to build up your stack/chord.
Note that if you play the same note several times, they will be stacked “on top” of each other with the
number of times shown within parenthesis in the DISPLAY. This makes it possible to create really fat
sounds, for example. The played keys in the stack/chord are shown in the DISPLAY (the first key of the
stack/chord is displayed as ‘0’). The new thing in OS V1.06 is that you can now detune stacked notes
(if it’s the same note) without using the Unison effect. You do this by turning the Unison Detune knob
without activating the Unison effect. This means that you could stack the same note several times and
then detune the cluster. Note that the detune effect doesn’t take effect until you play new notes.
Release the SHIFT and CHORD MEM buttons. The CHORD MEM LED stays on and the stack/chord has
been stored. Now, when playing single keys, the stored stack/chord will be played back (and transposed).
Of course, you can also play several keys at once with the Chord Mem/Stack function activated.
The Stack function can be saved with each Program. In Performance mode you can select different Stack
settings for each of the Slots and save the whole combination with the Performance.
Note: Since you use several notes in the Stack function, the polyphony will be reduced.
Note: It’s only the actual key(s) you play that will output MIDI Note information to the MIDI OUT
- not all notes that are included in the Stack!
Chord Mem (5)
0(5)

NORD LEAD 3 V1.2x ADDENDUM 1. OS V1.2x: Oscillator Bypass in the Filter (V1.06)
Page 11
O
OO
OS
SS
SC
CC
CI
II
IL
LL
LL
LL
LA
AA
AT
TT
TO
OO
OR
RR
RB
BB
BY
YY
YP
PP
PA
AA
AS
SS
SS
SS
S
I
II
IN
NN
N
T
TT
TH
HH
HE
EE
EF
FF
FI
II
IL
LL
LT
TT
TE
EE
ER
RR
R(V1.06)
(V1.06)(V1.06)
(V1.06)
Oscillator Bypass in the Filter section has been redefined to be Oscillator 2 only bypass. This makes it
possible to have a non-filtered FM sound in Oscillator 2 and a filtered subtractive sound in Oscillator 1
at the same time. However, if Noise is selected in the OscMix section then this noise is routed alone
through the filter and both Oscillators are bypassed (i.e. as it was in previous OS versions). Hold down
SHIFT and press the KB TRACK button to bypass the signal from the Filter section.The LED below the
KB TRACK button is lit when the Bypass function is activated.
Note: If you’re using Oscillator Mix Noise, described on page 72 in the manual, this will be routed
alone through the Filter if you use the Osc Bypass function. This makes it possible to filter only the
Oscillator Mix Noise but bypass both Oscillator waveforms. This feature opens up for FM sounds with
very realistic “breath” attacks, for example.
M
MM
MU
UU
UT
TT
TE
EE
E(V1.06)
(V1.06)(V1.06)
(V1.06)
By holding the MONITOR/COPY button and pressing any of the following SELECTOR buttons, the se-
lected function is temporarily muted (disabled): LFO1 or 2 Destination, MOD ENV Destination, OSC1
or 2 Waveform, OscMod Mode and Filter Type.
Mute state is indicated by the corresponding SELECTOR LED flashing.
To revert to normal state, and thus activate the parameter section/function again, press the corresponding
SELECTOR button or the MONITOR/COPY+SELECTOR buttons.

1. OS V1.2x: New Performance Mode features NORD LEAD 3 V1.2x ADDENDUM
Page 12
N
NN
NE
EE
EW
WW
WP
PP
PE
EE
ER
RR
RF
FF
FO
OO
OR
RR
RM
MM
MA
AA
AN
NN
NC
CC
CE
EE
EM
MM
MO
OO
OD
DD
DE
EE
E
F
FF
FE
EE
EA
AA
AT
TT
TU
UU
UR
RR
RE
EE
ES
SS
S
S
SS
SO
OO
OL
LL
LO
OO
OI
II
IN
NN
NG
GG
G
S
SS
SI
II
IN
NN
NG
GG
GL
LL
LE
EE
E
S
SS
SO
OO
OU
UU
UN
NN
ND
DD
DS
SS
S
I
II
IN
NN
N
A
AA
AP
PP
PE
EE
ER
RR
RF
FF
FO
OO
OR
RR
RM
MM
MA
AA
AN
NN
NC
CC
CE
EE
E(1.06)
(1.06)(1.06)
(1.06)
In V1.06 it’s possible to temporarily “isolate” and solo single sounds in a Performance to make it easier
to hear what you’re editing. Do like this to solo a sound in a Performance:
1. Enter Performance mode by pressing the PERFORMANCE MODE button. Scroll with the ROTARY
DIAL to select a Performance.
2. Double-click a SLOT button used in the Performance (Slot A in this example). All other selected
SLOT LEDSgo blank. The DISPLAY shows which memory location the original Program for Slot A
was fetched from and its name.
3. When you play the keyboard you’ll only hear the sound of Slot A alone. If you want to solo another
sound (Slot) in the Performance, just double-click the corresponding SLOT button.
4. To revert to normal playback, press any of the SLOT buttons that are active in the Performance.
Perf 1:1
Orchestra
Program 6:62
BellArpeggio

NORD LEAD 3 V1.2x ADDENDUM 1. OS V1.2x: New Performance Mode features
Page 13
N
NN
NA
AA
AM
MM
MI
II
IN
NN
NG
GG
G
S
SS
SI
II
IN
NN
NG
GG
GL
LL
LE
EE
E
S
SS
SO
OO
OU
UU
UN
NN
ND
DD
DS
SS
S
I
II
IN
NN
NP
PP
PE
EE
ER
RR
RF
FF
FO
OO
OR
RR
RM
MM
MA
AA
AN
NN
NC
CC
CE
EE
ES
SS
S(1.06)
(1.06)(1.06)
(1.06)
As from V1.06 it’s possible to name each of the sounds in a Performance individually. Do like this:
1. Enter Performance mode by pressing the PERFORMANCE MODE button. Scroll with the ROTARY
DIAL to a Performance of your choice.
2. Press the SLOT button for the sound you want to name (Slot A in this example). The corresponding
SLOT LED flashes.
3. Press the SOUND button and then press the DOWN NAVIGATOR button repeatedly until the DIS-
PLAY reads:
4. Select letters with the ROTARY DIAL and change the cursor position with the RIGHT and LEFT NAV-
IGATOR buttons. If you want to change the names of the other sounds in the Performance, simply
press another SLOT button and repeat the naming procedure.
5. When you’re finished with naming the sound(s), press STORE twice to store your Performance.
Perf 1:1
Orchestra
Perf 1:1*
Orchestra
Program Name:
BellArpeggio

1. OS V1.2x: MIDI Panning (V1.06) NORD LEAD 3 V1.2x ADDENDUM
Page 14
MIDI P
MIDI PMIDI P
MIDI PA
AA
AN
NN
NN
NN
NI
II
IN
NN
NG
GG
G(V1.06)
(V1.06)(V1.06)
(V1.06)
Nord Lead 3 now responds to Panning via MIDI. Panning is recognized as MIDI Controller 10. The
Nord Lead 3 has no knob on its front panel for panning, it only responds to panning via MIDI.
I
II
IM
MM
MP
PP
PR
RR
RO
OO
OV
VV
VE
EE
ED
DD
D/
//
/C
CC
CH
HH
HA
AA
AN
NN
NG
GG
GE
EE
ED
DD
D
F
FF
FU
UU
UN
NN
NC
CC
CT
TT
TI
II
IO
OO
ON
NN
NS
SS
S
S
SS
SY
YY
YN
NN
NC
CC
CI
II
IN
NN
NG
GG
G
T
TT
TO
OO
O
E
EE
EX
XX
XT
TT
TE
EE
ER
RR
RN
NN
NA
AA
AL
LL
LMIDI C
MIDI CMIDI C
MIDI CL
LL
LO
OO
OC
CC
CK
KK
K(V1.2
(V1.2(V1.2
(V1.2X
XX
X)
))
)
The External MIDI Clock Sync function has been improved so now you should be able to sync up the
Arpeggiator and/or LFOs more easily to an external MIDI Clock signal.
E
EE
ER
RR
RA
AA
AS
SS
SI
II
IN
NN
NG
GG
GB
BB
BA
AA
AN
NN
NK
KK
KS
SS
S
B
BB
BE
EE
EF
FF
FO
OO
OR
RR
RE
EE
E
D
DD
DO
OO
OW
WW
WN
NN
NL
LL
LO
OO
OA
AA
AD
DD
DI
II
IN
NN
NG
GG
G
N
NN
NE
EE
EW
WW
W
S
SS
SO
OO
OU
UU
UN
NN
ND
DD
DS
SS
S(V1.06)
(V1.06)(V1.06)
(V1.06)
When you want to download a Bank of Programs or Performances via MIDI to the internal memory of
the Nord Lead 3 you must first erase a Bank to make room for the new sounds. This is done by pressing
the SYNTH button and then the DOWN NAVIGATOR button repeatedly until the DISPLAY reads:
Select the Bank to erase with the ROTARY DIAL and then press the RIGHT NAVIGATOR button. The DIS-
PLAY now reads:
Program Receive
Bank:1 > Erase
Erase Bank:1
Are you sure? >

NORD LEAD 3 V1.2x ADDENDUM 1. OS V1.2x: Improved/changed functions
Page 15
Now is your last chance to change your mind about erasing the Bank. To abort press the LEFT NAVIGA-
TOR button and to begin erasing the Bank, press the RIGHT NAVIGATOR button.
When you’ve erased the Bank the Nord Lead 3 is ready to receive a Program (or Performance) Bank via
MIDI. See the Manual on pages 116-118 for more info.
O
OO
OU
UU
UT
TT
TP
PP
PU
UU
UT
TT
TL
LL
LE
EE
EV
VV
VE
EE
EL
LL
L(MIDI) (V1.06)
(MIDI) (V1.06)(MIDI) (V1.06)
(MIDI) (V1.06)
The Output LEVEL parameter has now a new MIDI Controller number - MIDI CC#71. The synth also
responds to the regular MIDI Volume Controller - MIDI CC#7 “in the background”. This makes it pos-
sible to use MIDI Volume with sequencers to do mixing without destroying any Morphs set up for the
Output LEVEL parameter. However, the synth only sends MIDI CC#71 from the Output LEVEL knob.
T
TT
TR
RR
RY
YY
YI
II
IN
NN
NG
GG
G
T
TT
TO
OO
O
S
SS
ST
TT
TO
OO
OR
RR
RE
EE
E
W
WW
WI
II
IT
TT
TH
HH
HM
MM
ME
EE
EM
MM
MO
OO
OR
RR
RY
YY
YP
PP
PR
RR
RO
OO
OT
TT
TE
EE
EC
CC
CT
TT
T
O
OO
ON
NN
N(V1.06)
(V1.06)(V1.06)
(V1.06)
To be able to store Programs and Performances the Memory Protect function in the Synth menu must
be set to ‘Off’ (see page 119 in the manual). However, if you tried to store a Program or Performance
with Memory Protect set to ‘On’ in earlier OS versions, the name of the Program/Performance was lost.
In V1.06 the Program/Performance name is preserved.
D
DD
DU
UU
UM
MM
MP
PP
PI
II
IN
NN
NG
GG
GP
PP
PE
EE
ER
RR
RF
FF
FO
OO
OR
RR
RM
MM
MA
AA
AN
NN
NC
CC
CE
EE
EB
BB
BA
AA
AN
NN
NK
KK
KS
SS
S
A
AA
AS
SS
SMIDI S
MIDI SMIDI S
MIDI SY
YY
YS
SS
SE
EE
EX
XX
X(V1.06)
(V1.06)(V1.06)
(V1.06)
The MIDI Sysex transmission rate for Performance Bank dumps has been reduced by 50% since most
sequencers seem to have problems receiving and recording the amount of data (128 x 1kb) sent by the
Nord Lead 3.

1. OS V1.2x: Improved/changed functions NORD LEAD 3 V1.2x ADDENDUM
Page 16
Other manuals for Nord Lead 3
2
Other Clavia Electronic Keyboard manuals

Clavia
Clavia Nord Modular V3 User manual

Clavia
Clavia Nord Electro 4D User manual

Clavia
Clavia Nord Modular G2 User manual

Clavia
Clavia nord STAGE User manual

Clavia
Clavia Nord Electro 2 User manual

Clavia
Clavia Nord Electro 3 HP User manual

Clavia
Clavia Nord Electro 3 User manual

Clavia
Clavia Nord Electro 3 User manual