Clean Air Optima CA-606 User manual

Brukermanual
Användarmanual
Ohjekirja
Brugermanual
Manuale d’uso
Manual do usuário
Uputstvo za upotrebu
Korisnički priručnik
Használati utasítás
Kullanım kılavuzu
Instrukcja obsługi
Mануал
Руководство пользователя
Прирачник за користење
Посібник користувача
Ръководство за потребителя
User manual
Gebrauchsanweisung
Gebruiksaanwijzing
Mode d’emploi
Manual del usuario
Manual de utilizare
Uživatelská příručka
Naudotojo vadovas
Kasutusjuhend
Lietotāja rokasgrāmata
Read these instructions carefully before you start using the Ultrasonic Humidifier and keep the manual for later usage.
Ultrasonic Humidifier Clean Air Optima® CA-606
© Copyright: Clean Air Optima
®
Manual
Find more languages on:
www.cleanairoptima.com/
info/manuals
2
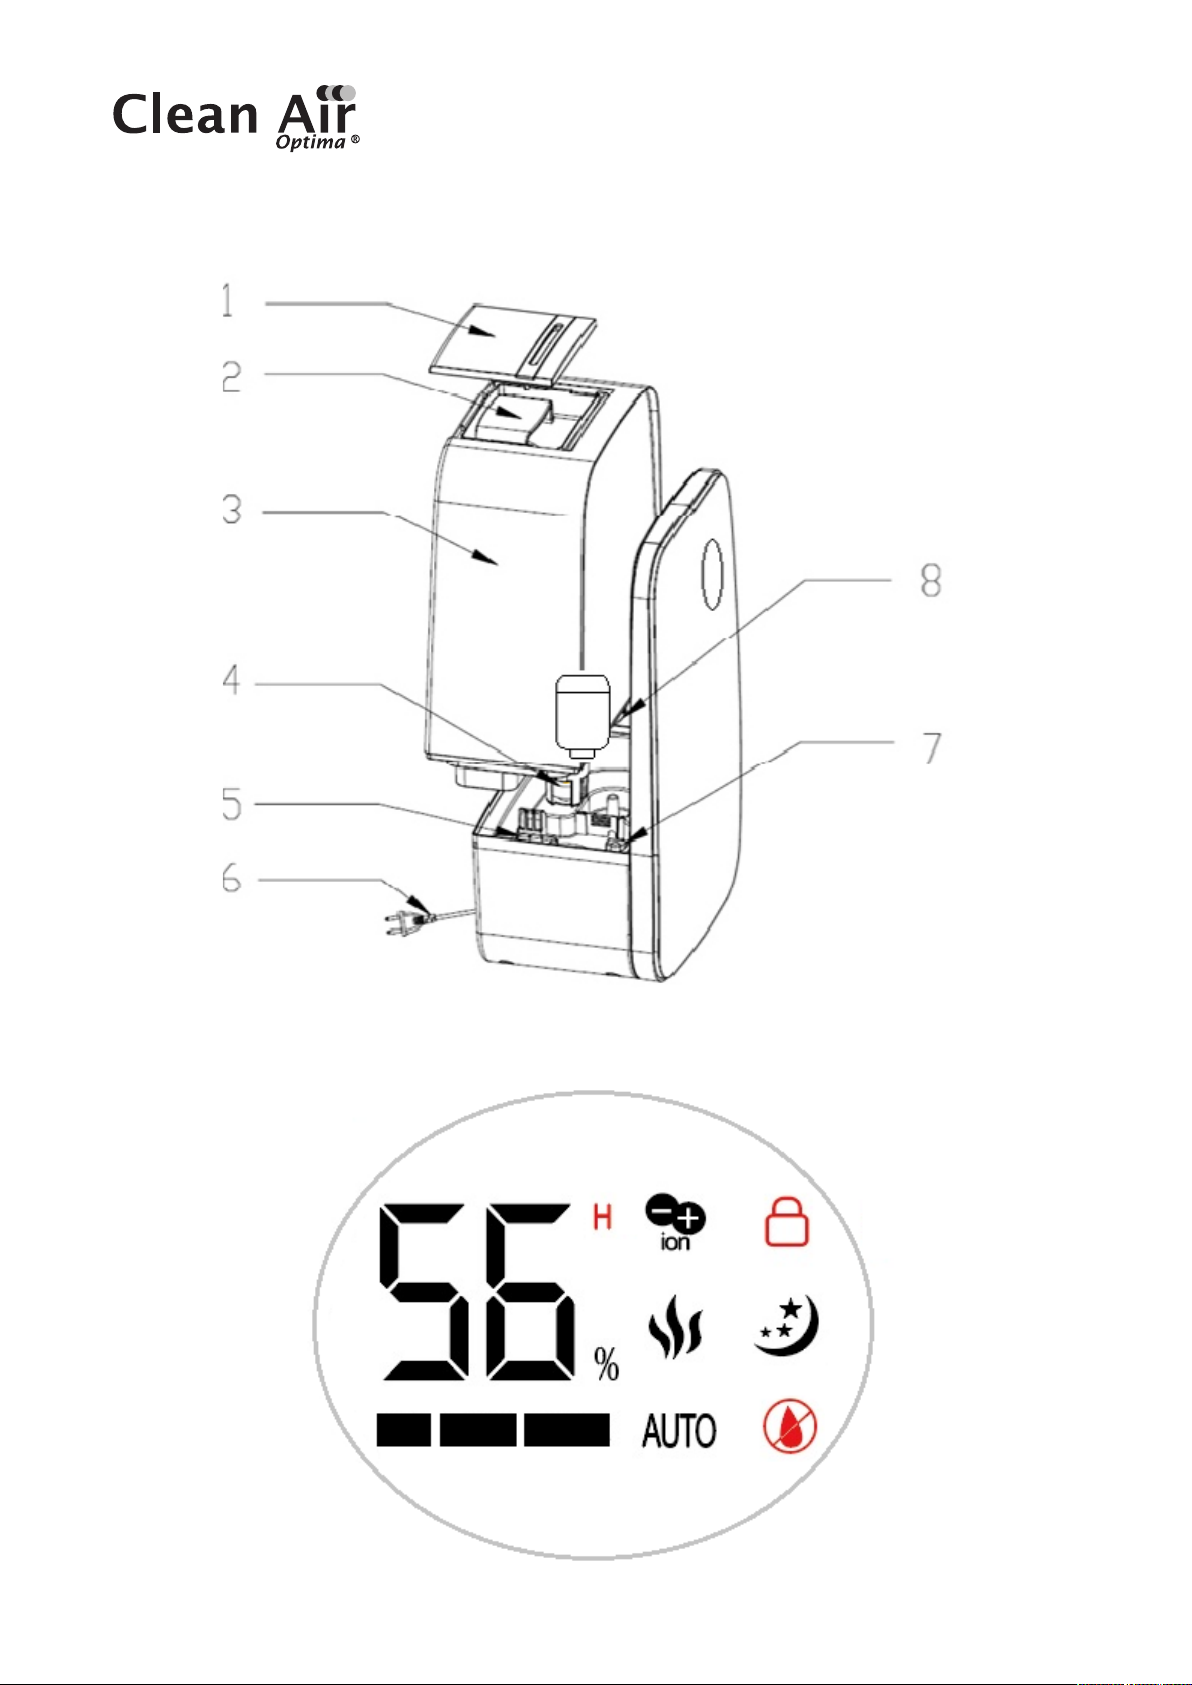
CA-606 / Main unit
CA-606 / Display

3
English
Thank you for purchasing the Clean Air Optima®Ultrasonic Humidifier CA-606.
We wish you many years of healthy indoor air with this ecient and eective product.
These instructions describe the safety precautions to be observed during operation. They are
meant to prevent injuries and to avoid damaging the device.
Description of the device
The device consists of the following main components:
1. Mist nozzle
2. Handle
3. Water tank
4. Float
5. Aroma box
6. Power cord
7. PTC heating element
8. Water tank lid and filter

4
Safety warnings
This device may only be used in accordance with these safety instructions. Take the following
steps to minimize the risk of personal injury caused by for example electric shocks or fire.
1. Only for indoor use. Do not use or store outdoors.
2. Use proper voltage: AC 220V - 240V, 50/60Hz
3. The inner ultrasonic transducer is highly sensitive. Do not touch it with bare fingers or
scrape it with metal tools, or it will reduce mist output. When cleaning this area please use
a small cleaning brush, cotton swab or tooth brush. Do not use hot water as it may damage
the misting parts.
4. The device is not intended to be used by children or persons with reduced physical-,
sensory- or mental capabilities, unless they are supervised by a person responsible for
their safety.
5. Children should be kept away unless continuously supervised.
6. To safely use the device, put it in a steady, horizontal position. Do not move while using.
7. To prevent interference and damage to other electronic devices, this machine should
be placed at least 1 meter away from a computer, television, radio or other electronic
equipment.
8. Do not use the device when there is visible damage on the electrical cord or on the device
itself. Do not repair the device yourself in case of damage. Never pull the device by its cord.
If the power cord is damaged, then it must be replaced by an authorized service person to
prevent electric shock or fire.
9. Repairs may only be performed by authorized service personal. Do not try to repair the
device yourself to prevent electric shock or fire.
10. Always remove the plug from the socket when the device is not being used or when you
clean internal or external parts of it.
11. Remove the water tank before moving the device.
12. Only use power cords provided.
13. Do not use the device in rooms where inflammable liquids or gases are stored, close to
heat sources or in particularly humid rooms like the bathroom, shower or swimming pool.
14. To prevent malfunctions, never insert strange objects into the device.
15. Never dissemble or replace the device’s inner parts.
16. Do not place the device in direct sunlight, to avoid that the device discolours.
17. Never immerse the unit in water or other liquids.
18. Do not touch the power cord with wet hands.
19. Do not touch the warm mist closely.
20.Clean and dry the device before storage (including the removal of all water from the inside
of the device). Store the machine in a cool and dry place outside the reach of children.
21. Do not clean the water sink when the water is still hot.
22.Use, maintain and clean the device as described in this manual.
5
Operating instructions
Before getting started, remove the Clean Air Optima®CA-606 from its box and allow it to
become accustomed to the room temperature for at least 30 minutes especially if the
machine is cold from the outside air. Place the device on a solid, level and front water-
insensitive surface, approx. 60 cm from the floor and at least 20 cm from the wall.
The CA-606 is designed to operate at temperatures between 5 -40 ºC and relative humidity of
less than 80%.
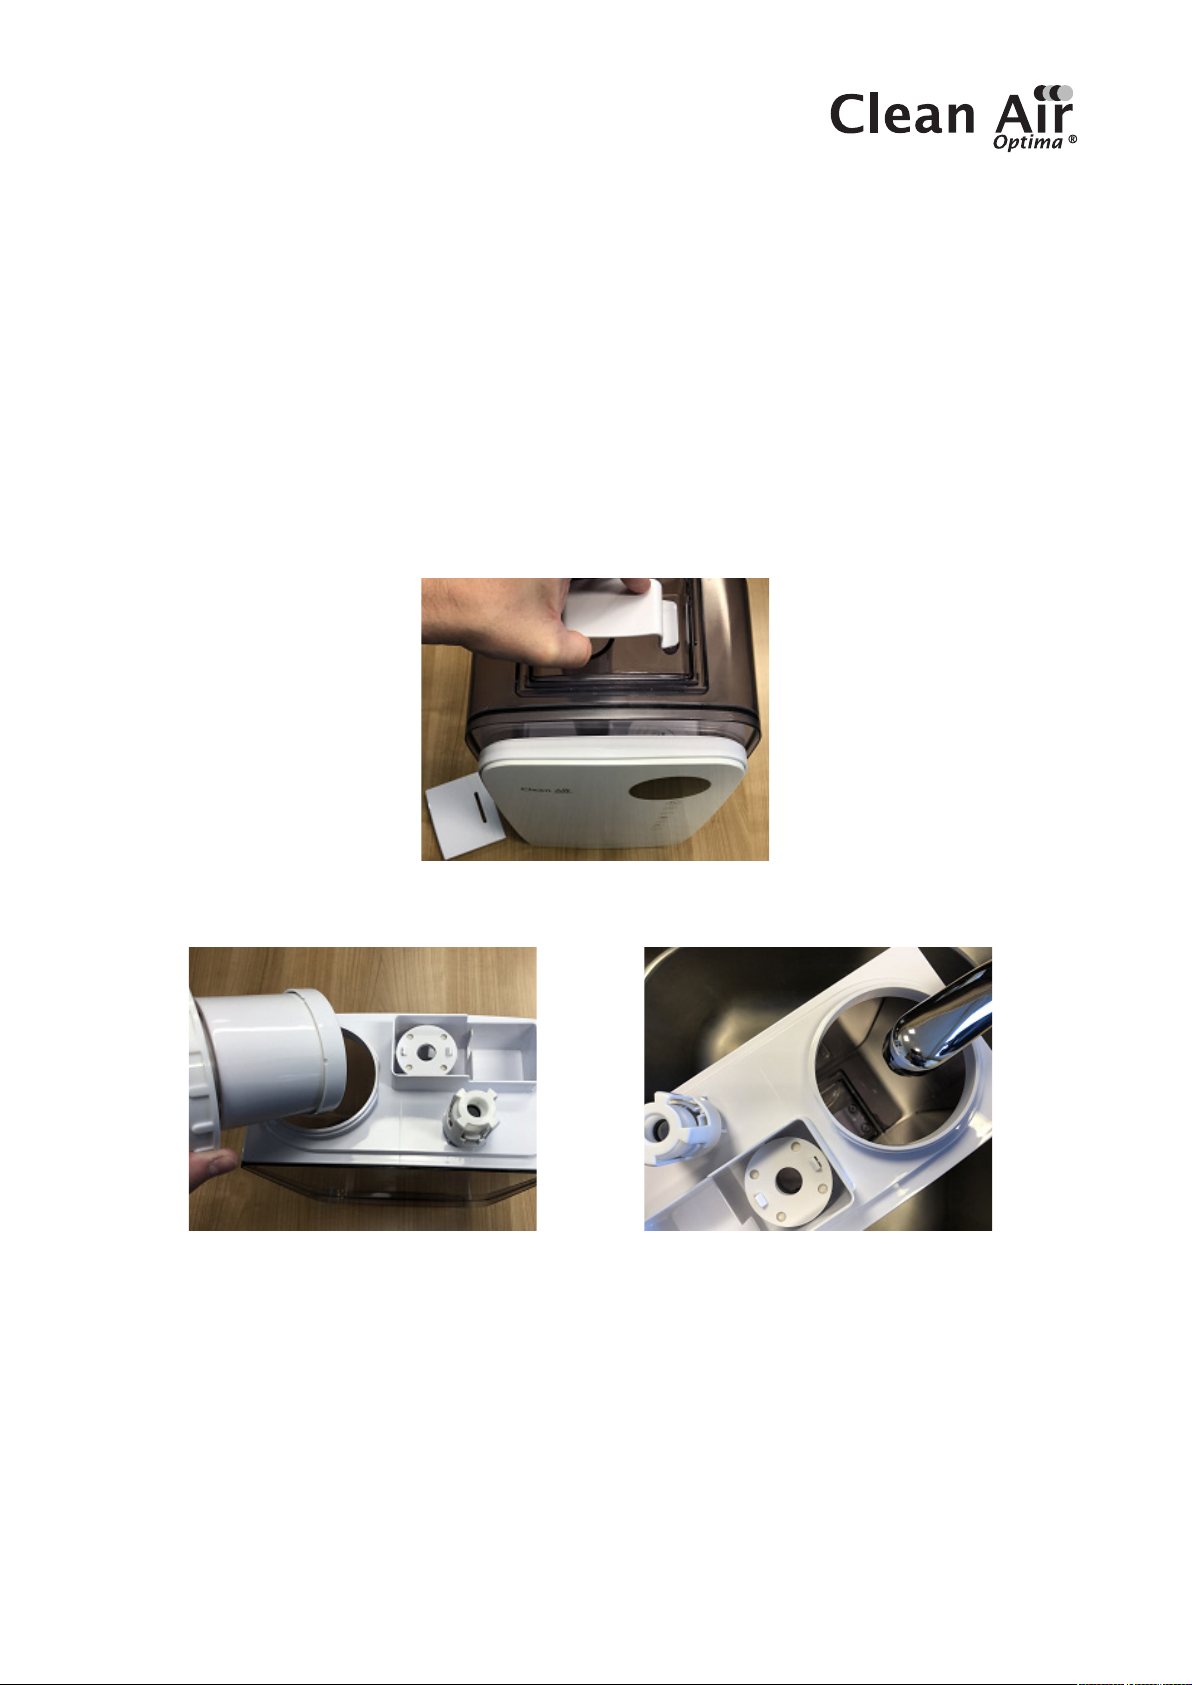
To get started, grasp the water tank by the handle at the top and lift from the base. Next, flip
the tank over and unscrew and remove the water tank lid and filter.
Handle
Water tank lid and filter Faucet for filling
Then place the water tank under the faucet for filling, grasping it from the handle under the
water tank. Fill the tank with tap water (or other clean water source with water temperature
under 40ºC), re-insert the lid and filter. Flip the water tank once again until it is on the right side
up. Ensure that the basin is clean and then carefully place the water tank back on the lower
body.
Wait a few seconds until the water tank lid starts to release water into the basin. You will hear
a bubbling sound as the air enters the water tank. Plug the power plug into a suitable power
outlet, a signal sounds to indicate that your device is in standby mode. If the humidifier is
switched on/o, the value for humidity will now be displayed.

6
Power Button:
Press the Power Button to activate the humidifier. The machine is now operating in manual
mode. It will release cool mist on a constant basis with the mist intensity level automatically
set to medium.
Manual Button:
The Manual Button changes the mist level (low, medium, high). There are 3 levels of mist
output available.
Child Lock:
Child lock protects from unwanted use of the device.
The Child Lock is switched on / o by pressing the Manual Button for 3 seconds.
If the child lock is switched on, a red lock con appears in the display.
Humidity Button:
Pressing the Humidity Button, you can select the desired humidity level by pressing
this button repeatedly until the required humidity level is displayed (from 40% to 80% in
increments of 5%). Once you select your desired humidity level, simply stop pressing the
button and your humidity level will be set.
When the humidity level in the room reaches the set humidity level, the machine will go into
automatic sleep state and stop producing mist. When the room’s actual humidity level drops
below your set humidity level, then the machine will start producing mist again.
Auto Mode:
When automatic mode is activated, the unit will automatically select the level of relative
humidity and keep it between 55% and 68%.
The Auto Mode is switched on / o by pressing the Humidity Button for 3 seconds.
7
Negative Ion Button:
Pressing the Negative Ion Button will activate the negative ion generator with a total capacity
of > 3.000.000 negative ions / cm³that are spread through out the entire room and thereby
neutralize pollutants and smells. Negative ions attach onto dust particles, microorganisms
and other unwanted particles in the air and connect them to each other. This way, the particles
become heavier than air and fall onto the ground so that you can no longer breathe them in.
Negative ions are most found in the forest, mountains and by the sea. Negative ions ensures
fresh and healthy air.
Timer Button:
Pressing the Timer Button sets the timer. The timer function determines how many hours the
humidifier will operate. You can set the timer simply by pressing it once for each hour that you
would like to run the device. The timer can be set from 1 hour to 12 hours. As time passes, the
time value decreases until it goes to 00:00 and the device shuts o.
Sleep Mode:
When the sleep mode is activated, the display will turn o in 10 seconds. Only the sleep mode
light is on.
The Sleep Mode is switched on / o by pressing the Timer Button for 3 seconds.
Heating Button:
Pressing the Heating Button activates the warm mist function and is shown on the LED display
with three wavy vertical lines. The water is heated in the basin by a PTC heating element and
will be heated up by over 65 degrees for killing eective bacteria (Legionella). Heating the
water makes the mist output finer for faster and more ecient humidification.
Automatic shutdown when water tank is empty
Should the water tank be empty, a threefold acoustic signal sounds. The corresponding
symbol lights up in the display while the remaining indicators go out. The device will
automatically stop humidifying. In this case, turn o the device with the ON / OFF button. Let
the device cool down before pouring any more water in the tank.
Caution: The device and the water in the nebulisation chamber (basin) might be very hot.
When lifting the device or removing the water tank right after operation you risk scalding
yourself with the hot water!
Ensure that the water tank is always completely refilled.
8
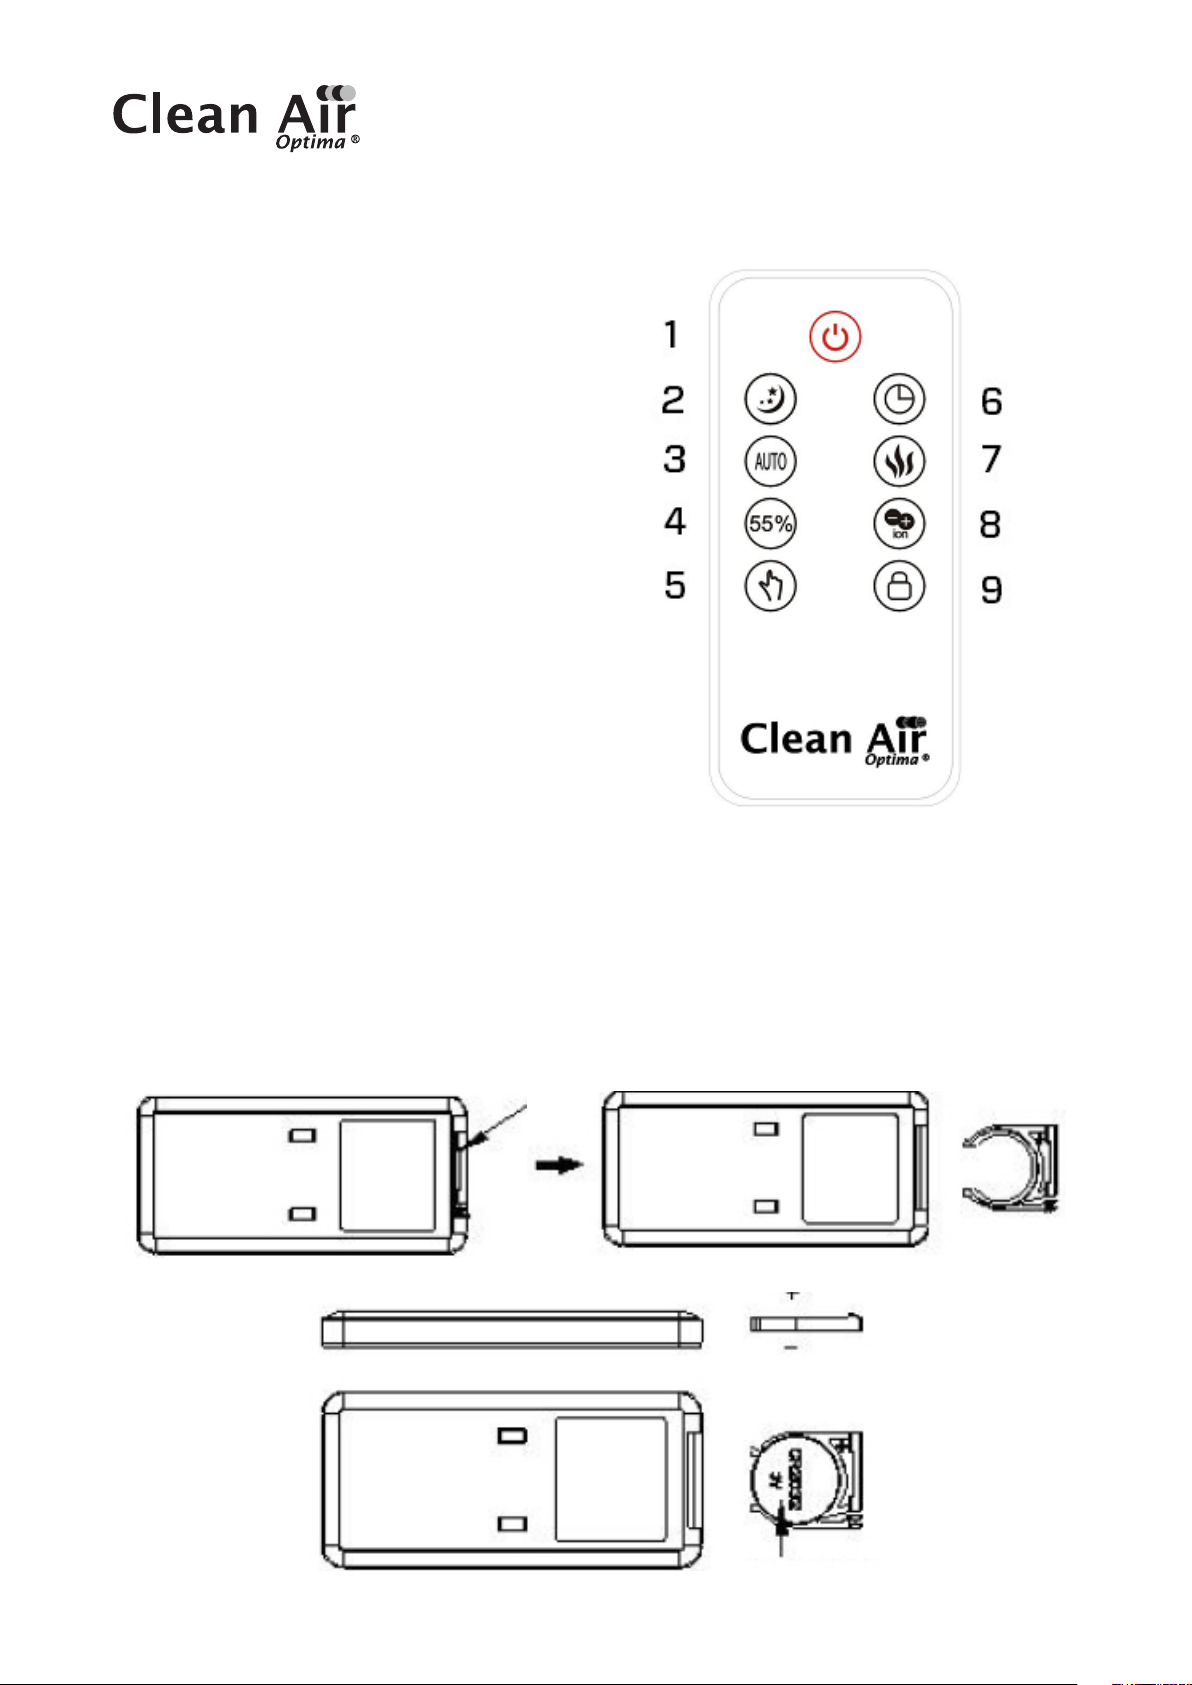
Remote control
The buttons on your remote control:
1. ON / OFF
2. Sleep mode
3. Auto mode
4. Desired humidity
5. Min. / Max.
6. Timer
7. Heating
8. Negative ions
9. Child lock
Replacing batteries in the remote control
1. Open the battery cover at the back side of remote control to place the battery. (see Picture
1).
2. To place the battery: there is a “security tab” at the bottom of the remote control that you
first have to slide to the right and then pull out the battery holder. (see Picture 2). Insert the
battery with the correct polarity. (see Picture 3).
3. Push the battery cover back into the remote control.
Remote control Battery cover
(Picture 1) (Picture 2)
(Picture 3) Battery (CR2025)

9
Preparation Clean Air Optima®Water Filter W-01W
The Water Filter W-01W reduces the limescale in the water and the undesirable emission of
limescale particles into the room surroundings. Eective for one to three months, depending
on the water hardness. Hard tap water accelerates saturation of the granulate faster so that
the Water Filter W-01W must be replaced earlier.
1. Rinse the Water Filter W-01W for 2 minutes
under cold running tap water.
2. Screw the Water Filter W-01W to the water tank lid.
Determining water hardness:
1. Dip the enclosed test strip into a glass of
cold tap water for 1 second.
2. Read the water hardness teststrip after one minute.
3. Refer to the table to determine the expected duration of the Water Filter W-01W.
Dispose of the saturated Water Filter W-01W with your regular household waste.
The Water Filter W-01W should not be used longer than specified.
You can order the Water Filter W-01W in our online store at www.cleanairoptima.com
= 3 months
= 3 months
= 2 months
= 2 months
= 1 months

10
Replacing the Clean Air Optima®Water Filter W-01W
The Clean Air Optima CA-606 is equipped with a filter lifespan surveillance mechanism that
signals that the water filter have to be replaced after 400 working hours. To show that the
Water Filter W-01W need to be replaced, the humidifier emits a double zero indicator
light. Reset the timer for the water filter by pressing and holding the power button for about
3 seconds. If the indicator light goes out, the timer has been successfully reset.
Placing/Replacing the Clean Air Optima®Silver Ion SI-01
The Silver Ion SI-01 uses the anti-microbial eect of silver, it prevents the growth of bacteria
and smells in the water. The Silver Ion SI-01 even works when your humidifier is switched o,
so the water stays fresh.
Replace the Silver Ion SI-01 at the start of the humidifier season or repace the Silver Ion SI-01
after one year of usage.
Replacing the Silver Ion SI-01:
1. Grasp the water tank by the handle at the top and lift from the base.
2. Take out the used Silver Ion SI-01.
3. Insert the new Silver Ion SI-01.
Dispose of the Silver Ion SI-01 with your regular household waste.
The Silver Ion SI-01 should not be used longer than specified.
You can order the Silver Ion SI-01 in our online store at www.cleanairoptima.com
11
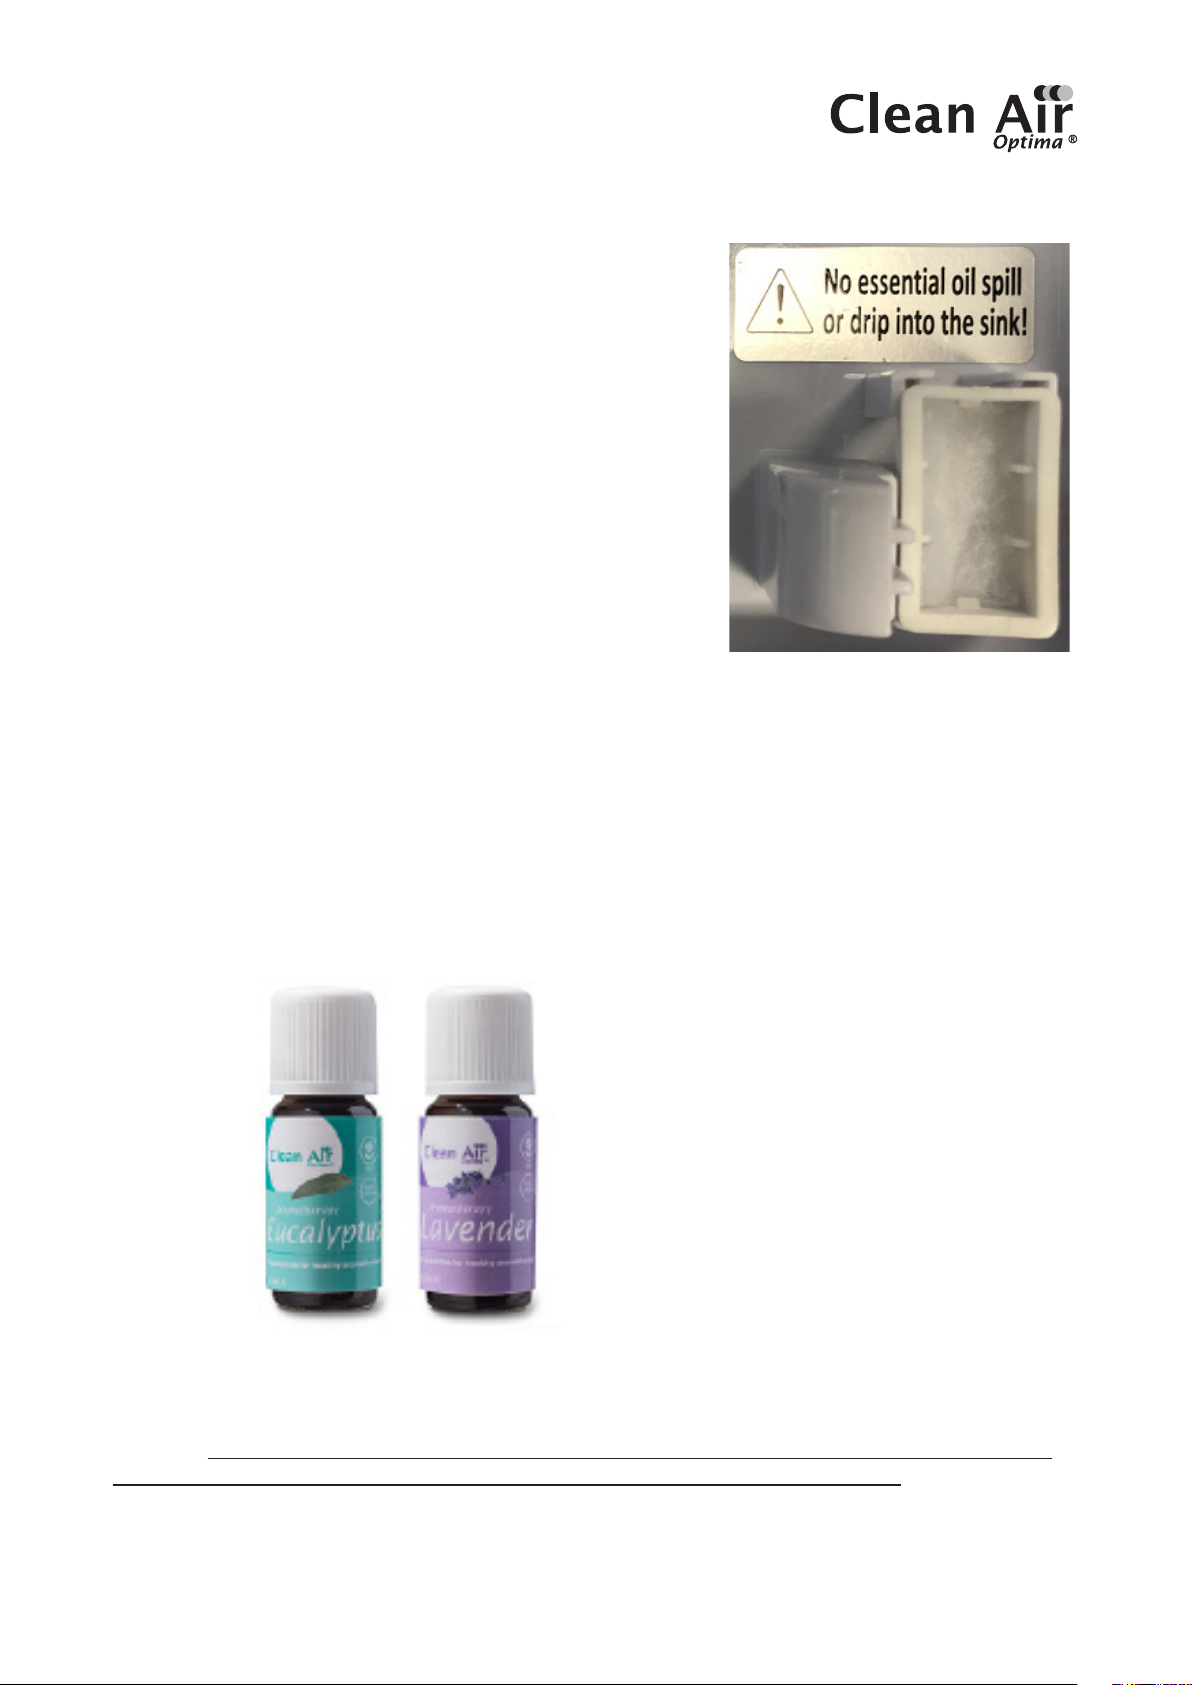
Aromatherapy
Activating the aroma function:
– Remove the aroma tray from the bracket.
– Pour 5 - 10 drops of Clean Air Optima® essential oil
onto the sponge.
– Put the aroma tray back into the bracket.
– When you turn on your air humidifier, the aroma
function will be activated.
– If you want to deactivate the aroma function,
or should the device not be in use for extended
periods of time, remove the aroma sponge from the
compartment and wash it with a little of mild soap
water. Let it dry completely before placingit back in
the aroma compartment. Basically, the aroma sponge
is reusable.
Important
In order to reach the best results and to enjoy your ultrasonic air humidifier as much as
possible, we advise to read carefully the following instructions regarding the use of essential
oils in the ultrasonic air humidifier CA-606.
Use of essential oils in the CA-606
Use our high quality essential oils and enjoy your personal aromatherapy! A scent sensation at
its highest level!
You can find high quality essential oils with many dierent scents in our assortment. They
perfectly fit to the ultrasonic air humidifier CA-606 and have been specially developed for the
use with this ultrasonic humidifier:
You can order the Essential Oils in our online
store at www.cleanairoptima.com
Warning!
The use of other essential oils not made for this air humidifier or other additives (for example:
fragrances and water purification products) can damage the air humidifier and must NOT
be used!
Never
put other pure essential oils or other additives into the water tank resp. the
waterbasin! Even a small quantity can damage the plastic and cause cracks.
The material is not made for the use of additives. One drop is enough to damage the water
tank/ waterbasin and disable the device. Devices that are damaged through additives are
excluded from the guarantee.
12
Cleaning and Maintenance
You can ensure many years of trouble free operation of your Clean Air Optima®CA-606
humidifier by following a few simple maintenance procedures. If your water is hard, containing
high concentrations of calcium and other minerals, then over a period of time white dust will
start to deposit on the various surfaces in the room. A white, film-like substance will also start
to develop in the water basin, on the transducer and on the inner surface of the water tank.
This white film will impede the proper function of the transducer and the operation of the
machine.
We recommend the following
1. If you are using the device on a daily basis, clean the transducer, water tank and basin once
a week.
2. When the water tank needs a refill, empty the remaining water from the tank and fill it with
fresh water.
3. Clean the whole device and make sure to keep all the parts completely dry when the device
is not in use.
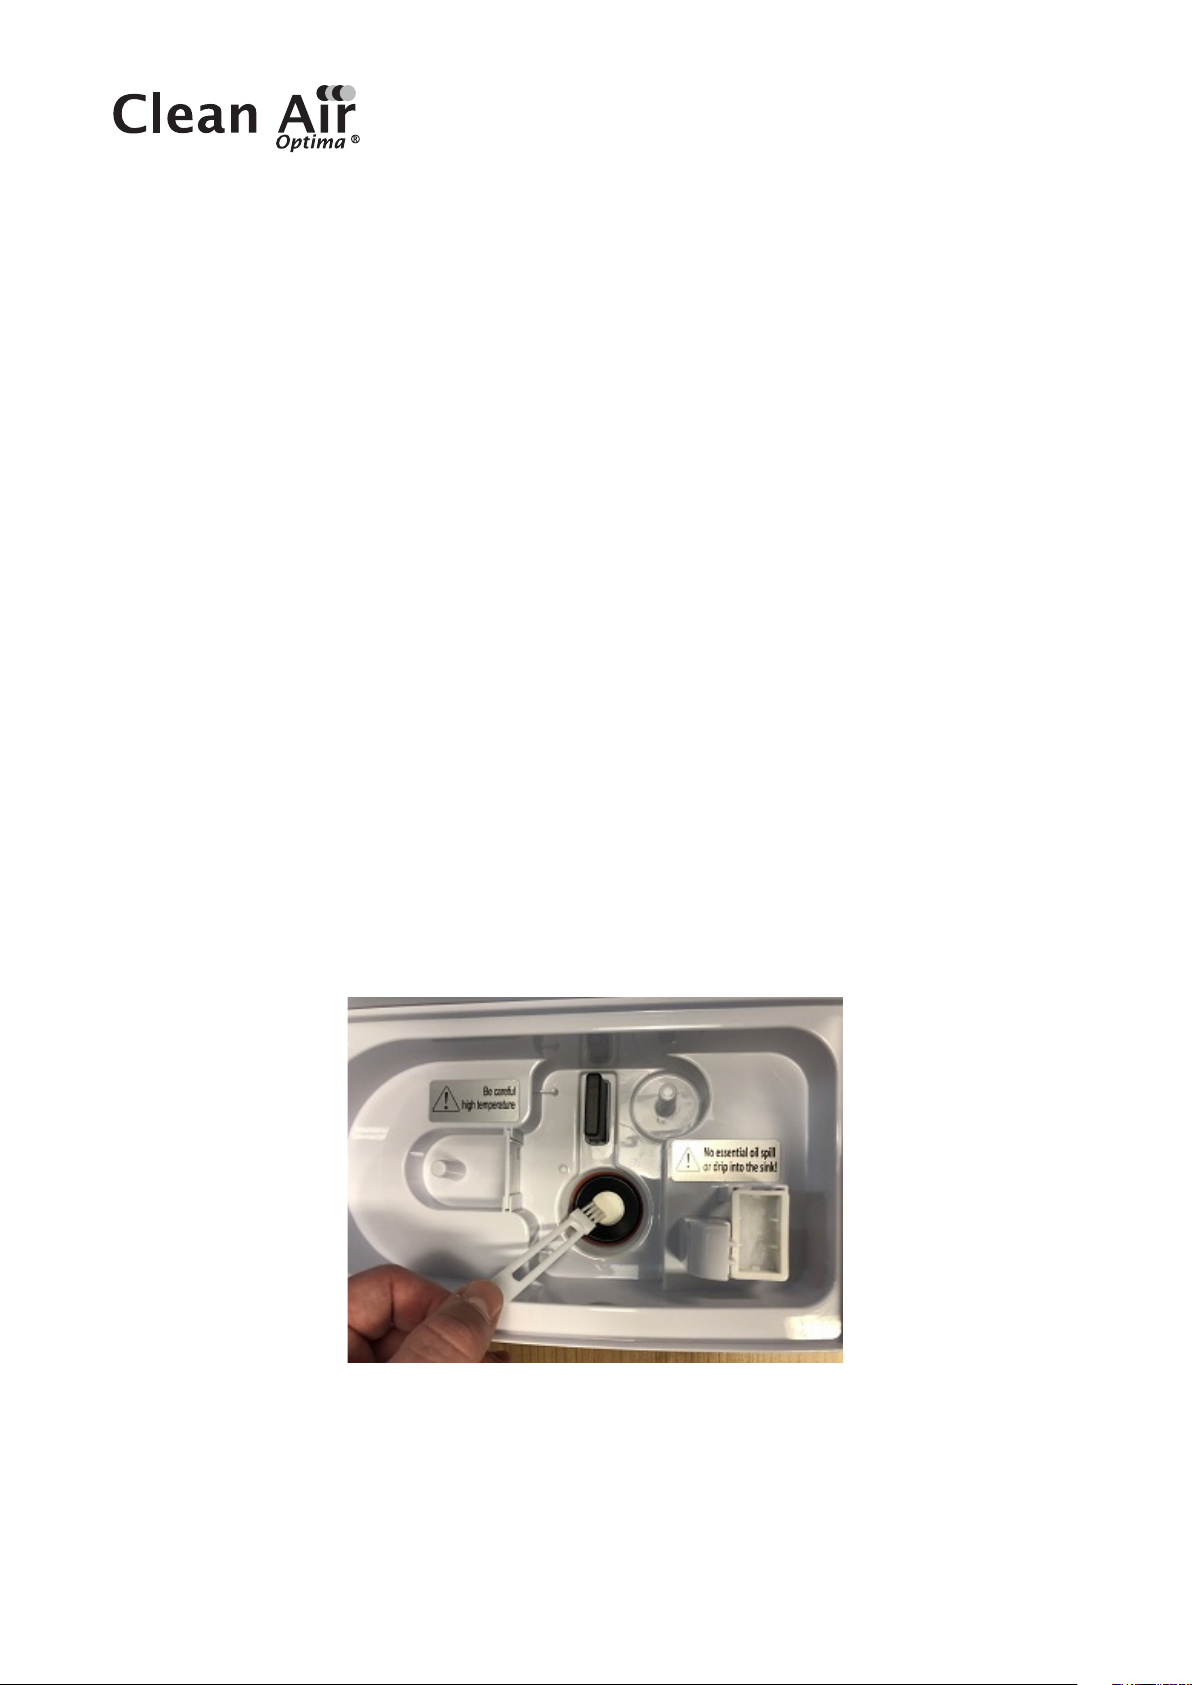
How to clean the transducer
1. Place 5-10 drops of vinegar on the surface of the transducer and wait for 2-5 minutes.
2. Using a small brush, cotton swab or tooth brush, gently clean the mineral film from the
surface of the transducer.
3. Rinse the transducer with clean water.
4. Never use sharp or solid objects for cleaning the transducer
How to clean the water basin
1. Clean the water basin with a soft damp cloth. If there is excess film on the surfaces, then
soak the cloth with vinegar and repeat the process.
2. If there is a film in any of the depressions along the basin, drop a bit of vinegar into
depression and clean it out with a brush.
3. Rinse the basin with clean water.
13
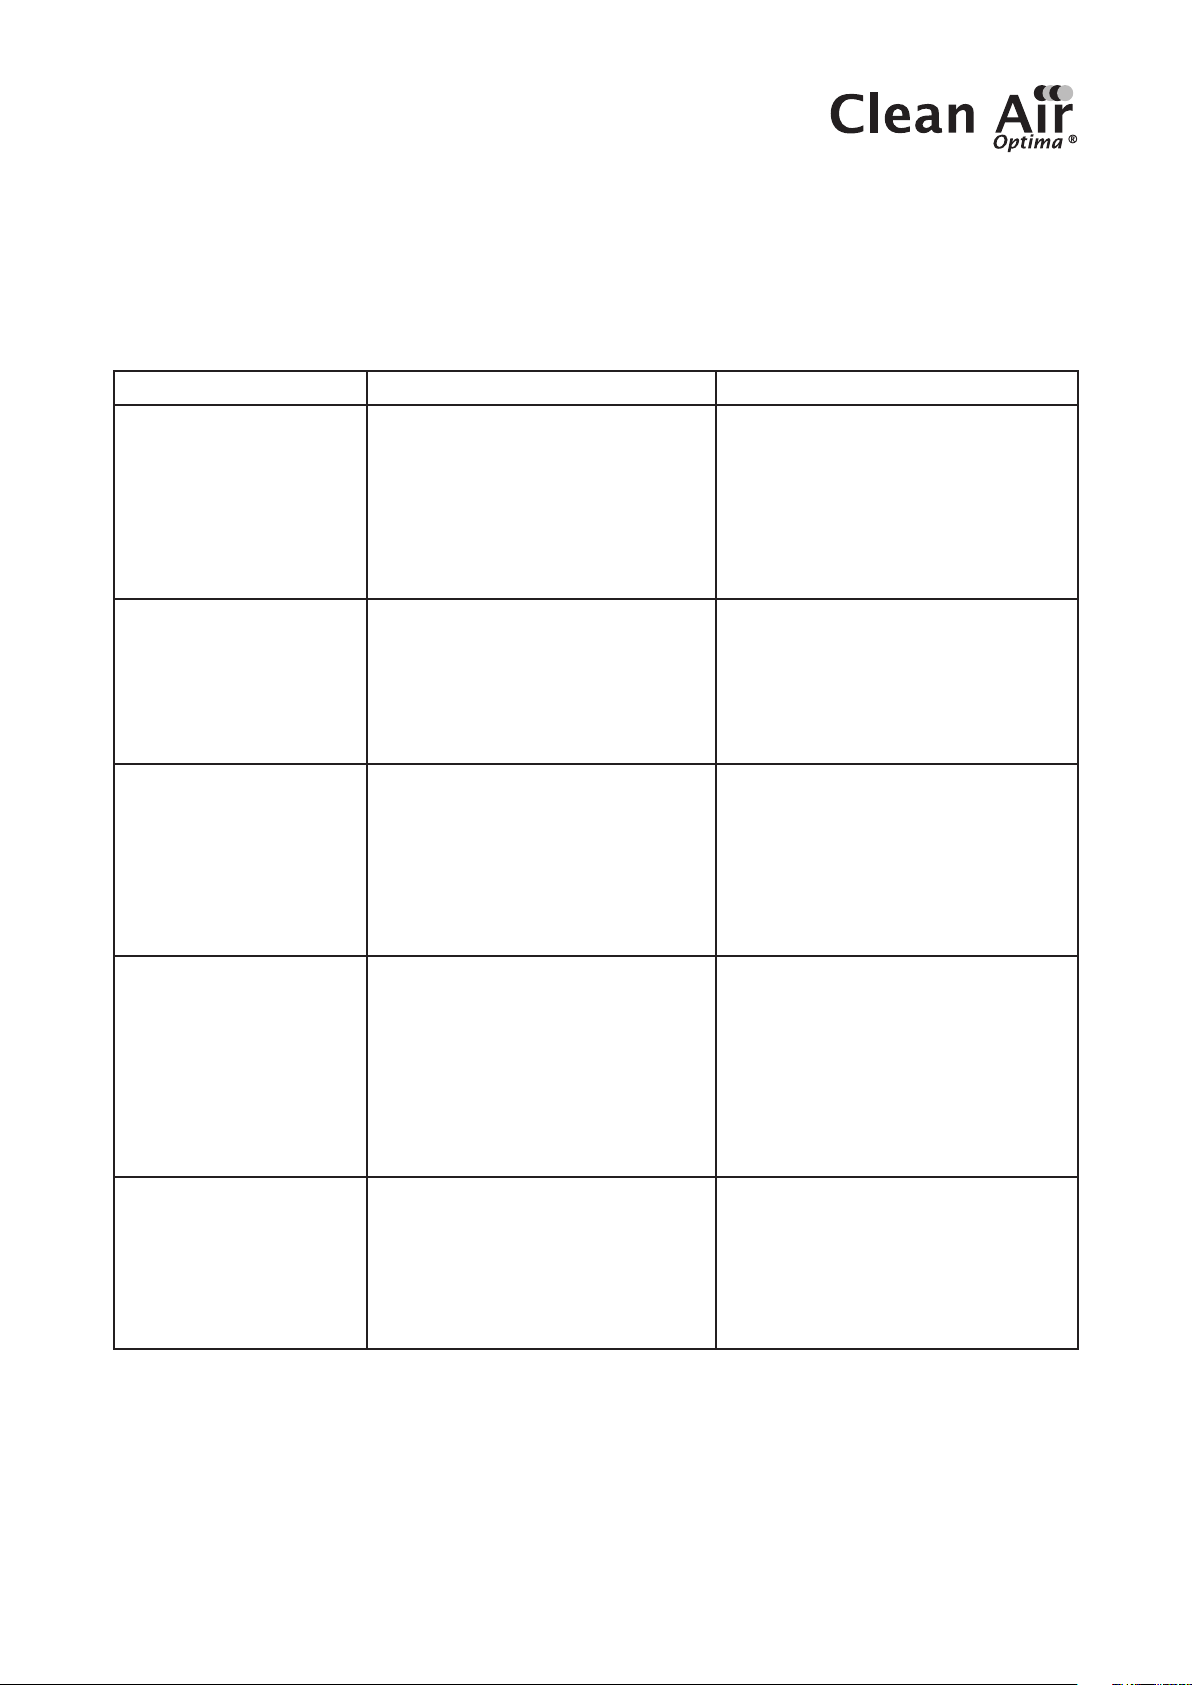
Troubleshooting
The following is a troubling shooting guide to help you solve any issues that you may have
using the Clean Air Optima®Ultrasonic Humidifier CA-606.
Problem Possible Cause Solution
No mist diused.
Power plug not plugged in.
ON / OFF button not activated.
Empty water tank.
Not enough water in tank.
Plug in device.
Press ON / OFF button.
Fill tank with water.
Refill tank with water.
The mist has a strange
odour.
A new device.
It either has dirty water or the
water has been stagnant too
long.
Remove the water tank, unscrew
the lid and let it air out in a cool
area for 12 hours.
Clean the water tank and refill
with clean water.
The volume of spray
mist is too low.
Too much mineral scale in
the water basin and on the
transducer.
Water is too dirty or water was
kept too long in the tank.
Clean transducer.
Clean the water tank and refill
with clean water.
Device is noisy.
Water tank not positioned
correctly.
Not enough water in the water
tank.
Device is on an unstable
surface.
Correctly position water tank on
the base.
Refill water in the water tank.
Place device on solid and even
ground.
Spray mist is coming
out of the area around
the mist nozzle.
There are gaps between the
housing around the nozzle and
the top of the water tank.
Remove the nozzle from the top
of the water tank and clean with a
damp cloth. Reattach to the water
tank.

14
If your water is very hard (containing abnormally high levels of minerals) the humidifier may
produce white dust. This is not a malfunction. The solution would be to replace the Water
Filter W-01W more often or use softer water, like distilled water. Or we can recommend Clean
Air Optima Air Washers, more info in our online store www.cleanairoptima.com
WARNING!
If the above recommended solutions do not work, please contact Clean Air Optima technical
support at the telephone number for your region. Do not attempt to disassemble, reassemble,
or repair the device as this may void the warranty.
Specifications
Model CA-606
For rooms up to 65m²/ 160m³/ 699ft²
Rated voltage 220V - 240V, 50/60Hz
Rated power 25W - Max. 105W
Capacity airhumidification Min. 120 ml/h - Max. 480 ml/h
Active oxygen <0.05 ppm
Sound level Silent fan < 25dB(A)
Dimensions 230 x 150 x 370 mm
Weight 3,4 kg
Water tank 5,5 L
Colour Pearl white with smoked glass water tank
Complies with EU regulations CE / WEEE / RoHS
Ask your retailer or your municipality for updated information regarding the
disposal of the packaging and of the device.

15
Service
Warranty Certificate for the Clean Air Optima®Ultrasonic Humidifier CA-606.
Date of purchase: …………………………………………………………………………………………
Customers name: …………………………………………………………………………………………
Address: …………………………………………………………………………………………………….
Telephone: ………………………………………………………………………………………………….
Email: ………………………………………………………………………………………………………..
Seller’s name: ……………………………………………………………………………………………...
Address: …………………………………………………………………………………………………….
1. Please fill in completely this Warranty Certificate. Send it with the invoice and the unit,
postage pre-paid and using the original packing box, to your distributor. Make sure to include
the appropriate return postage for the package.
2. Please enclose a short description of the damage, fault or malfunction, and the
circumstances under which these problems arose.
The Clean Air Optima®Ultrasonic Humidifier CA-606 is subjected to strict testing procedures
before leaving the factory. If within 2 years from the date of purchase the product does not
perform according to the specifications, because of factory defects, the purchaser is entitled
to free repairs or replacement of parts upon presentation of this warranty (provided that
the malfunction or damage to the device and/or parts occurred under normal operating
conditions). What is covered: All parts defective in material and workmanship. For how long:
two years from purchase date. What we will do: Repair or replace any defective parts.
Other Conditions
The provisions of this warranty are in lieu of any other written warranty whether express or
implied, written or oral, including any warranty of merchantability or fitness for a particular
purpose. The manufacturer’s maximum liability shall not exceed the actual purchase price
paid by you for the product. In no event shall the manufacturer be liable for special, incidental,
consequential, or indirect damages. This warranty does not cover a defect that has resulted
from improper or unreasonable use or maintenance, faulty assembly, accident, natural
catastrophes, improper packing, or unauthorized tampering, alteration, or modification as
determined solely by us. This warranty is void if the label bearing the serial number has been
removed or defaced.
Never put other pure essential oils or other additives into the water tank resp. the
waterbasin! Even a small quantity can damage the plastic and cause cracks.
16
Thank you for reading!
Share your feedback about the Clean Air Optima®
Ultrasonic Humidifier CA-606 on:
www.cleanairoptima.com
For frequently asked questions about the CA-606 go to:
www.cleanairoptima.com and search for the CA-606.
Download PDF instruction manual on:
www.cleanairoptima.com/info/manuals
Watch all Clean Air Optima®Product
animation video’s on:
www.youtube.com
Clean Air Optima International B.V. | David Ricardostraat 9-7 / 9-9 | 7559 SH Hengelo (ov)
The Netherlands | Phone: +31 (0) 74 - 2670145
Clean Air Optima Germany GmbH | Enschedestraße 14 | 48529 Nordhorn | Germany
Phone: +49 (0) 5921 879-121

17
Deutsch
Vielen Dank, dass Sie sich für den Luftbefeuchter Clean Air Optima CA-606®
entschieden haben.
Wir wünschen Ihnen viele Jahre gesunde Raumluft mit diesem ezienten und eektiven Produkt.
Diese Anleitung beschreibt die Sicherheitsvorkehrungen, die im Betrieb zu beachten sind.
Sie sind dafür vorgesehen, Verletzungen vorzubeugen und Beschädigungen am Gerät zu vermeiden.
Beschreibung des Geräts
Das Gerät besteht aus folgenden Hauptkomponenten:
1. Nebeldüse
2. Gri
3. Wassertank
4. Schwimmer
5. Aromakasten
6. Netzkabel
7. PTC-Heizelement
8. Wassertankdeckel und Filter

18
Sicherheitshinweise
Dieses Gerät darf nur in Übereinstimmung mit diesen Sicherheitshinweisen verwendet
werden. Führen Sie die folgenden Schritte aus, um das Verletzungsrisiko für Personen
(z.B. durch Stromschläge oder Feuer) zu minimieren.
1. Nur für Innenräume geeignet. Nicht im Freien verwenden oder lagern.
2. Die richtige Spannung verwenden: AC 220V - 240V, 50/60Hz
3. Der interne Ultraschall-Messwandler ist hochempfindlich. Berühren Sie ihn nicht
mit bloßen Fingern und kratzen Sie nicht mit Metallwerkzeugen daran, da sonst die
Nebelabgabe verringert wird. Für die Reinigung dieses Bereichs verwenden Sie bitte eine
kleine Reinigungsbürste, einen Wattebausch oder eine Zahnbürste. Verwenden Sie kein
heißes Wasser, da dies die Vernebelungsteile beschädigen kann.
4. Das Gerät ist nicht für die Verwendung durch Kinder oder Personen mit eingeschränkten
körperlichen, sensorischen oder geistigen Fähigkeiten bestimmt, es sei denn, diese
Personen werden von einer für ihre Sicherheit verantwortlichen Person beaufsichtigt.
5. Kinder müssen vom Gerät ferngehalten werden, außer die Kinder sind unter ständiger
Aufsicht.
6. Stellen Sie das Gerät zum sicheren Gebrauch in eine stabile, horizontale Position.
Beim Gebrauch nicht bewegen.
7. Um Störungen und Schäden an anderen elektronischen Geräten zu vermeiden, sollte
dieses Gerät mindestens 1 Meter von einem Computer, Fernseher, Radio oder anderen
elektronischen Geräten entfernt aufgestellt werden.
8. Verwenden Sie das Gerät nicht, wenn sichtbare Schäden am Netzkabel oder am Gerät
selbst vorhanden sind. Reparieren Sie das Gerät nicht selbst, wenn es beschädigt ist.
Ziehen Sie das Gerät niemals an seinem Kabel. Wenn das Netzkabel beschädigt ist,
muss es von einem befugten Servicemitarbeiter ausgetauscht werden, um Stromschlag
oder Feuer zu vorzubeugen.
9. Reparaturen dürfen nur von befugtem Servicepersonal durchgeführt werden. Nicht
versuchen, das Gerät selbst zu reparieren, um Stromschlägen oder Feuer vorzubeugen.
10. Immer den Stecker aus der Steckdose ziehen, wenn das Gerät nicht benutzt wird,
oder wenn Sie innere oder äußere Teile des Geräts reinigen.
11. Den Wassertank herausnehmen, bevor Sie das Gerät bewegen.
12. Verwenden Sie nur die mitgelieferten Netzkabel.
13. Verwenden Sie das Gerät nicht in Räumen, in denen brennbare Flüssigkeiten oder Gase
aufbewahrt werden, in der Nähe von Wärmequellen oder in besonders feuchten Räumen
wie dem Badezimmer.
14. Um Fehlfunktionen vorzubeugen: Keine Fremdkörper in das Gerät einführen.
15. Nie die inneren Teile des Geräts zerlegen oder ersetzen.
16. Das Gerät nicht in direktem Sonnenlicht aufbewahren, damit sich das Gerät nicht verfärbt.
17. Nie das Gerät in Wasser oder andere Flüssigkeiten eintauchen.
18. Berühren Sie das Netzkabel nicht mit nassen Händen.
19. Den warmen Nebel nicht in der Nähe berühren.
20.Vor der Aufbewahrung das Gerät reinigen und trocknen (auch das gesamte Wasser
aus dem Inneren des Geräts entfernen). Bewahren Sie das Gerät an einem kühlen
und trockenen Ort außerhalb der Reichweite von Kindern.
21. Die Wasserwanne nicht reinigen, wenn das Wasser noch heiß ist.
22.Verwenden, warten und reinigen Sie das Gerät wie in dieser Anleitung beschrieben.

19
Bedienungsanleitung
Bevor Sie beginnen: Nehmen Sie den Clean Air Optima CA-606 aus dem Karton und
lassen Sie ihn mindestens 30 Minuten an die Raumtemperatur akklimatisieren, besonders
wenn das Gerät von der Außenluft kalt ist. Stellen Sie das Gerät auf eine feste, ebene und
wasserunempfindliche Fläche, ca. 60 cm über dem Fußboden und mindestens 20 cm von
der Wand entfernt.
Der CA-606 ist für den Betrieb bei Temperaturen von 5 bis 40 ºC und einer relativen
Luftfeuchtigkeit unter 80% ausgelegt.
Als erstes fassen Sie den Wassertank am Gri oben und heben ihn vom Unterteil. Als nächstes
den Tank umdrehen, abschrauben und Wassertankdeckel sowie Filter abnehmen.
Gri
Wassertankdeckel und Filter Wasserhahn zum Befüllen
Stellen Sie dann den Wassertank zum Befüllen unter den Wasserhahn, fassen Sie ihn dazu am
Gri unter dem Wassertank. Füllen Sie den Tank mit Leitungswasser (oder einer anderen sauberen
Wasserquelle mit einer Wassertemperatur unter 40ºC), setzen Sie den Deckel und den Filter wieder
ein. Den Wassertank noch einmal umdrehen, sodass die richtige Seite oben ist. Sicherstellen, dass
das Becken sauber ist, und den Wassertank vorsichtig wieder auf das untere Gehäuse setzen.
Warten Sie einige Sekunden, bis der Wassertankdeckel beginnt, Wasser in das Becken abzugeben.
Sie hören ein blubberndes Geräusch, wenn die Luft in den Wassertank eintritt. Stecken Sie den
Netzstecker in eine geeignete Steckdose. Ein Signalton gibt an, dass sich das Gerät im Standby-Modus
befindet. Wenn der Befeuchter ein- und ausgeschaltet wird, werd die Werte für die Luftfeuchtigkeit
angezeigt.

20
Ein/Aus-Taste:
Die Power-Taste drücken, um den Befeuchter zu aktivieren. Das Gerät arbeitet nun im
manuellen Modus. Es gibt konstant kühlenden Nebel ab, wobei die Intensität des Nebels
automatisch auf mittel eingestellt ist.
Taste „Manuell“:
Die Manuell-Taste ändert die Nebelstufe (niedrig, mittel, hoch). Für die Nebelabgabe stehen
3 Stufen zur Auswahl.
Kindersicherung
Die Kindersicherung schützt vor unbefugter Benutzung des Gerätes.
Die Kindersicherung wird durch Drücken der Manual-Taste für ca. 3 Sekunden
ein- und ausgeschaltet.
Wenn die Kindersicherung eingeschaltet ist, zeigt das Display ein rotes Schloss-Symbol .
Feuchtigkeit-Taste:
Durch Drücken der Humidity-Tastekönnen Sie den gewünschten Feuchtigkeitsgrad durch
wiederholtes Drücken dieser Taste auswählen, bis der gewünschte Feuchtigkeitsgrad angezeigt
wird (von 40% bis 80% in Schritten von 5%). Sobald Sie Ihre gewünschte Luftfeuchtigkeit
ausgewählt haben, lassen Sie die Taste einfach los, und Ihre Luftfeuchtigkeit ist eingestellt.
Wenn die Luftfeuchtigkeit im Raum den eingestellten Wert erreicht, schaltet das Gerät
in den automatischen Ruhezustand und erzeugt keinen Nebel mehr. Wenn die tatsächliche
Luftfeuchtigkeit im Raum unter die eingestellte Luftfeuchtigkeit fällt, beginnt das Gerät, wieder
Nebel zu erzeugen.
Auto-Modus:
Wenn der automatische Modus aktiviert ist, hält das Gerät die relative Luftfeuchtigkeit
zwischen 55 % und 68 %, das Gerät wählt den Nebelgrad selbständig.
Die Automatische Modus wird durch Drücken der Feuchtigkeit-Taste für ca. 3 Sekunden
ein- und ausgeschaltet.
Table of contents
Languages:
Other Clean Air Optima Humidifier manuals

Clean Air Optima
Clean Air Optima CA-605 User manual

Clean Air Optima
Clean Air Optima CA-807 User manual

Clean Air Optima
Clean Air Optima CA-605B Smart User manual

Clean Air Optima
Clean Air Optima CA-106 Smart User manual

Clean Air Optima
Clean Air Optima CA-604B Smart User manual

Clean Air Optima
Clean Air Optima CA-606B User manual

Clean Air Optima
Clean Air Optima CA-604W Smart User manual

Clean Air Optima
Clean Air Optima CA-606W User manual

Clean Air Optima
Clean Air Optima CA-104 User manual

Clean Air Optima
Clean Air Optima Smart CA-605T User manual


