Cleantec Innovation ENVIRODRI GEN4 User manual

CLEANTEC INNOVATION LIMITED
E00-4-2050 READ INSTRUCTIONS CAREFULLY BEFORE OPERATING THE MACHINE
E
CARPET CLEANING MACHINE
INSTRUCTION MANUAL
Model: GEN4

TABLE OF CONTENTS
INTRODUCTION
SAFETY
OPERATIONS
MAINTENANCE
WARRANTY
SPARE PARTS LIST............................................................... 1-7
How to use this Manual .............................................. 2.0
Machine Data Log/Overview....................................... 2-1
Important Safety Instructions.......................................3-0
Hazard Intensity Level ................................................3-1
Earthing and Grounding Instructions ........................... 3-2
Product Technical Specifications .................................4-0
How the Machine Works.............................................. 4-1
Machine Operation .....................................................4-2
Pre-run Inspection...............................................4-2
Starting Machine.................................................4-2
Machine Shut-down and Storage.......................... 4-2
Brush Cleaning and Maintenance................................. 5-0
Machine Maintenance .................................................5-0
Daily Maintenance .............................................. 5-0
Periodic Maintenance.......................................... 5-0
Annual Maintenance ............................................5-0
Machine Troubleshooting.............................................5-1
Electrical Diagram.......................................................5-2
Cleantec Innovation Ltd Warranty Policy ...................... 6-0
Warranty Card............................................................ 6-1
Machine Warranty Request Form................................. 6-2
-1.1-

INTRODUCTION
This manual contains the following sections:
- HOW TO USE THIS MANUAL
- SAFETY
- OPERATIONS
- MAINTENANCE
the HOW TO USE THIS MANUAL section
will tell you how to find important information
for ordering correct spare parts.
Parts may be ordered from authorized
envirodri dealers. When placing an order for
parts, the machine model, and machine serial
number are important, Refer to the MACHINE
DATA box which is filled out during the
installation of your machine. The MACHINE
DATA box is located on the inside of the front
cover of this manual.
The model and serial number of your
machine is on the operator’s left hand side
panel of base.
The SAFETY section is to familiarize
the operator with the operation and function
of the machine.
The MAINTENANCE section contains
preventive maintenance to keep the machine
and its components in good working condition.
MODEL
DATE OF PURCHASE
SERIAL NUMBER
SALES REPRESENTATIVE #
DEALER NAME
OPERATIONS GUIDE NUMBER
-2-

MODEL
DATE OF PURCHASE
SERIAL NUMBER
SALES REPRESENTATIVE #
DEALER NAME
OPERATIONS GUIDE NUMBER
Name:
Address:
Phone Number:
MACHINE DATA LOG/OVERIEW
The GEN4 Carpet Cleaning Machine is designed to maintain your carpet using the envirodri
MicroSponges, dry carpet cleaning system. The machine has two counter rotating brushes that enable
the envirodri Microsponges to be brushed into the carpet. The envirodri Microsponges encapsulate the
dirt when being brushed into the carpet. The MicroSponges can then be vacuumed up leaving the
carpet dry. The brushes also help to raise the pile of the carpet, giving it a lush groomed appearance.
YOUR DEALER
OVERVIEW
-2.1-

IMPORTANT SAFETY INSTRUCTIONS
When using an electrical appliance, basic precaution
must always be followed, including the following:
READ ALL INSTRUCTIONS BEFORE USING THIS MACHINE.
WARNING
This machine is for commercial use.
To reduce the risk of fire, electric shock, or injury:
Connect to a properly grounded/earthed outlet. See Grounding and Earthing Instructions.
Do not leave the machine unattended. Unplug machine from power outlet when not in use and
always before maintenance or service.
Do not allow machine to be used as a toy. Close attention is necessary when used by or near
children.
Use only as described in this manual. Use only manufacturer’s recommended components and
attachments.
Do not use damaged electrical cord or plug. Follow all instructions in this manual concerning
grounding/earthing the machine. If the machine is not working properly, has been dropped.
damaged, left outdoors, or dropped into water, return it to an authorized service centre.
Do not pull or carry machine by electrical cord, use as a handle, close a door on cord, or pull cord
around sharp edges or corners.
Do not run machine over cord or allow the rotating brushes to come in contact with the cord. Keep
cord away from heated surfaces.
Do not unplug machine by pulling on cord. To unplug, grasp the electrical plug, not the electrical cord.
Always use cable restraint provided and wind the cable around the cable holder on the handle. For
quick release of the electrical cable rotate the cable holder 180 degrees.
Do not handle the electrical plug or machine with wet hands.
Do not operate the machine with any openings blocked. keep openings free of debris that may
reduce airflow.
Machine is designed for indoor use only and must not be operated or stored outdoors in wet
conditions.
Turn off all controls before unplugging.
Machine can cause a fire when operating near flammable vapours or materials. Do not operate this
machine near flammable fluids, dust or vapours.
Only the brushes provided with the machine or those specified by the manufacturer can be used.
The intended use of the brushes is specifically for the cleaning of carpeting and should not be used
in any other way.
This machine is suitable for commercial use, for example in hotels, schools, hospitals,
factories, shops and offices.
Maintenance and repairs must be done by qualified personnel.
-3-
SAVE THESE INSTRUCTIONS

WARNING
CAUTION
The following symbols are used throughout this guide as indicated in their descriptions:
There are three levels of hazard intensity identified by signal words -WARNING and
CAUTION and FOR SAFETY. The level of hazard intensity is determined by the following
definitions:
WARNING - Hazards or unsafe practices which COULD result in severe personal injury or
product or property damage
CAUTION - Hazards or unsafe practices which could result in minor personal injury or
product or property damage.
FOR SAFETY: To identify actions which must be followed for safe operation of equipment.
Report machine damage or faulty operation immediately. Do not use the machine if it is not
in proper operating condition. Following is information that signals some potentially
dangerous
conditions to the operator or the equipment. Read this information carefully. Know when
these
conditions can exist. Locate all safety devices on the machine. Please take the necessary
steps
to train the machine operating personnel
FOR SAFETY:
NO NOT OPERATE MACHINE:
WHEN SERVICING MACHINE:
Avoid moving parts. Do not wear loose clothing; jackets, shirts, or sleeves when working
on the machine. Use envirodri approved replacement parts.
HAZARD INTENSITY LEVEL
HAZARD INTENSITY LEVEL
• Unless Trained and Authorized.
• Unless Operation Guide is Read and understood.
• In Flammable or Explosive areas.
• In areas with possible falling objects.
• In wet or outdoor areas.
-3.1-

THIS PRODUCT IS FOR COMMERCIAL
USE ONLY.
ELECTRICAL - USA:
In the USA this machine operates on a
standard 15 amp 115V, 60 Hz, A.C. power
circuit. The amp, hertz, and voltage are listed
on the data label found on each machine.
Using voltages above or below those
indicated on the data label will cause serious
damage to the motors:
EXTENSION CORDS:
If an extension cord is used, the wire size
must be at least one size larger than the
power cord on the machine, and must be
limited to 50 feet (15.5m) in length.
GROUNDING INSTRUCTIONS:
This appliance must be grounded. If it should
malfunction or break down, grounding
provides a path of least resistance for electric
current to reduce the risk of electric shock.
This appliance is equipped with a cord having
and equipment-grounding conductor and
grounding plug. The plug must be inserted
into an appropriate outlet that is properly
installed and grounded in accordance with all
local codes and ordinances.
This appliance is intended for use on a
nominal 120-volt circuit, and has a grounded
plug that looks like the plug in “Fig.A.”A
temporary adaptor that looks like the adaptor
in “Fig.C” may be used to connect this plug
to a 2-pole receptacle as shown in “Fig.B,” if
a properly grounded outlet is not available.
The temporary adaptor should be used only
until a properly grounded outlet (Fig. A)can
be installed by a qualified electrician. The
green colored rigid ear, lug, or wire extending
from the adaptor must be connected to a
permanent ground such as a properly
grounded outlet box cover. Be sure to fasten
the grounding tab with a metal faceplate
screw, whenever the adaptor is used
Improper connection of the equipment
grounding conductor can result in a risk
of electric shock. Check with a qualified
electrician or service person if you are in
doubt as to whether the outlet is properly
grounded. Do not modify the plug
provided with the appliance - if it will not
fit the outlet; have a proper outlet installed
by a qualified electrician.
EARTHING AND GROUNDING INSTRUCTIONS
Grounding Pin
Grounded
Outlet
GROUNDING CONNECTION
USING AN ADAPTOR
Metal Screw
Adaptor
Grounded Outlet Box
Fig. B
Fig. A
Tab for Grounding
Screw
ADAPTOR
Fig. C
Note: Adaptors are not allowed in Canada.
-3.2-

EARTHING AND GROUNDING INSTRUCTIONS
ELECTRICAL - UK:
In the UK this machine operates on a
standard 240 V, 50 Hz, A.C. power circuit.
The amp, herz, and voltage are listed on the
data label found on each machine. Using
voltages above or below those indicated on
the data label will cause serious damage to
the motors.
GROUNDING INSTRUCTIONS:
The UK machine is intended for use on a
nominal 240 V, and it has a grounded plug
with three rectangular prongs that form a
triangle, whick looks like the plug in “Fig D.”
This plug has been designed to be plugged
into Power Outlets similar to the one shown
in “Fig E.” It complies with the BS 1363
British Standard. The molded plug
incorporates a 10 Amps cartridge Fuse.
The Wire colour coding for the UK is as
follows:
> Neutral: Blue Wire
> Live: Brown Wire
> Earth: Green & Yellow
Do not use the UK ‘G’type plug in
conjunction with any type of adators
Only operate the GEN4 envirodri machine
with a Cord-set sertified and provided by
the manufacturer
WARNING
Neutral
(Blue)
Earth
(Green&Yellow)
Live
(Brown)
Fig.D
Fig.E
-3.2-

ELECTRICAL - EUROPE:
In Europe this machine operates on a
standard 230 V,50 Hz, A.C. power circuit.
The amp, herz, and voltage are listed on the
data label found on each machine. Using
voltages above or below those indicated on
the data label will cause serious damage to
the motors.
GROUNDING INSTRUCTIONS:
The European machine is intended for use on
a nominal 230 V, and it has a type‘F’ plug
with two round prongs and two grounding
clips on the side of the plug (Fig F). The
machine is intended to be plugged into outlets
that look like the one shown in “Fig. G.”
The Wire colour coding for Europe is as
follows:
> Neutral: Blue Wire
> Live: Brown Wire
> Earth: Green & Yellow
Do not use type ‘F’ plug in conjunction with any type of adaptors.
Only operate the GEN4 envirodri machine with a Cord-set certified
and provided by the manufacturer.
WARNING
EARTHING AND GROUNDING INSTRUCTIONS
Live
(Brown)
Earth
(Green&Yellow)
Neutral
(Blue)
Fig.F Fig.G
-3.2-

PRODUCT TECHNICAL SPECIFICATIONS
1.SPECIFICATION OF US MACHINES
2. SPECIFICATION OF UK AND EUROPEAN MACHINES
ITEM
ITEM
DIMENSION/CAPACITY
DIMENSION/CAPACITY
Electrical
Electrical
Nominal Power
Nominal Power
Rated Amperage
Rated Amperage
650W
550W (Nikoda motor: 3/4 HP)
7.5 Amps
3.5Amps
16 inches (40 cm)
16 inches (40 cm)
550 RPM
500 RPM
2 inches (5 cm) non-marking black
2 inches (5 cm) non-marking black
46 lbs. (21 kg)
46 lbs. (21 kg)
44 inches(112 cm)
44 inches(112 cm)
12 inches (30 cm)
Dimensions - Depth 12 inches (30 cm)
33 feet (10 m)
33 feet (10 m)
120V
230V
Power Cord
Power Cord
Dimensions - Depth
Dimensions - Depth
Dimensions - Height with handle
Dimensions - Height with handle
Dimensions - Weight
Dimensions - Weight
Wheels
Wheels
Brush RPM
Brush RPM
Brush Width
Brush Width
-4-

Congratulations!
You are nowthe proud owner of the GEN4 Dry
Carpet Cleaning Machine.
This machine is designed to maintain your carpet
using the envirodri Dry Carpet Cleaning System.
By using the envirodri MicroSponges you can
perform regular light cleaning and grooming of
your carpet very quickly, and have the carpet dry
and ready for use immediately.
The GEN4 handle detaches for easy
transportation and compact storage. The handle
has a 180 degree movement for maximum
flexibility and allows the machine to clean under
low furniture. There are foot operated On/Off
Switches and a handle lock keeping the handle in
an upright position when placed in the tray.
The tray is for machine storage when not in use
This will protect the brush bristles from being
crushed.
The brush guard protects the machine
brushes by preventing loose threads or wires
(telephone or electrical)getting caught-up in the
brushes.
This appliance conforms with the following
international and national safety directives:
›ANSY/UL 561 STD;
›CAN/CSA STD C22.2 NO 10-1965, R 2004;
›BS EN 60335 - 1:2002;
›BS EN 60335 - 2 - 10:2003.
The GEN4 Machine comes with a one year
warranty on all parts except for cords, switches,
gears, capacitors and brushes.
See envirodri New Machine Warranty Policy.
EARTHING AND GROUNDING INSTRUCTIONS
-4.1-

MACHINE OPERATION
PRE-RUN MACHINE INSPECTION
Perform a pre-run inspection to find possible
problems that could cause poor performance or
lost time from breakdown. Check the rating plate
to confirm voltage and frequency is the same as
the power supply. NOTE: A 10% variation in
voltage is acceptable.
STARTING MACHINE
NOTE: Perform pre-run machine check before
operating machine.
FOR SAFETY: Before stating machine, make
sure that all covers are in place and secured
properly.
After manually applying the envirodri
MicroSponges onto the carpet commence
cleaning following the steps below:
1. Take the machine out of the tray. Do this by
Leaning the machine back and applying
pressure on the end of the tray with your
foot. NOTE: Place the tray out of the way
when machine in use.
2. Connect the machine to a power supply.
3. Release the handle lock.
4. Depress the ‘ON’ foot switch to engage
machine as shown in the drawing provided.
5. Push and pull the machine slowing over the
carpet.
NB: Best results are obtained by moving the
machine in multiple directions and overlapping
strokes.
Flammable materials can cause an explosion or
fire. Do not use near flammable or
combustible substances or hot ashes or burning
objects of any kind.
Always ensure that the handle lock is released prior
to switching on the machine.
MACHINE SHUT-DOWN AND STORAGE
1. Depress the ‘OFF’ foot switch to power off
machine as shown in the drawing provided.
2. Lock handle in the upright position.
3. Disconnect the power cord from the power
supply. Wind the power cord around the
cable holder on the handle.
4. Remove the brushes for cleaning. See Brush
Cleaning and Maintenance section.
5. Once daily maintenance has been
Performed, place the machine back into the
tray.
The machine is now ready for storage until the
next use. Make sure to store your equipment in
a dry place to prolong the life of your machine.
Storage outdoors or if left unprotected could
cause damage to your machine or its internal
parts, therefore voiding your warranty.
When not in use or during interrupted cleaning,
the machine must always be placed in the tray
provided to prevent deformation of the brush
bristles. Deformation of brush bristles can
result in unbalanced running and excessive
vibrating or instability of the appliance.
WARNING
CAUTION
CAUTION
‘ON’ Foot
Switch
‘OFF’Foot
Switch
-4.2-
MACHINE OPERATION
MACHINE SAFETY DEVICE:
The GEM4 machine incorporates a Safety
device which prevents its operation when the
handle falls below 0˚ and/or 180˚
Should the handle fall bellow these points, the
machine power will be cut off. The power will
not be reset simply by tilting the handle to the
upright position.
In order to restart the machine after the power
has been cut off, tilt the handle back to the 90˚
position and turn the machine on by pressing the
‘ON’ switch.
HANDLE LOCKING POSITION
The handle must be locked for transport and
storage.
Lock the handle in an upright position(90˚)
following the steps below:
1. After having completed the cleaning
process, tilt the handle back to the 90˚
position.
2. Turn the machine Locking Button
(clockwise until the green dot aligns with
the Locked arrow).
HANDLE UNLOCKING POSITION
Follow the steps below in order to unlock the
handle:
1. Turn the machine Locking Buttong
clockwise until the green dot aligns with
the Unlocked arrow
Do not use the GEN4 wheels to transport it
over uneven surfaces. Only wheel the
machine on even surface. The machine
wheels have been for internal transportation
‘only’ on carpeted areas. Do not transport the
machine downstairs.
CAUTION
HandleLocked HandleUnlocked
-4.2-
0180
90
MAINTENANCE
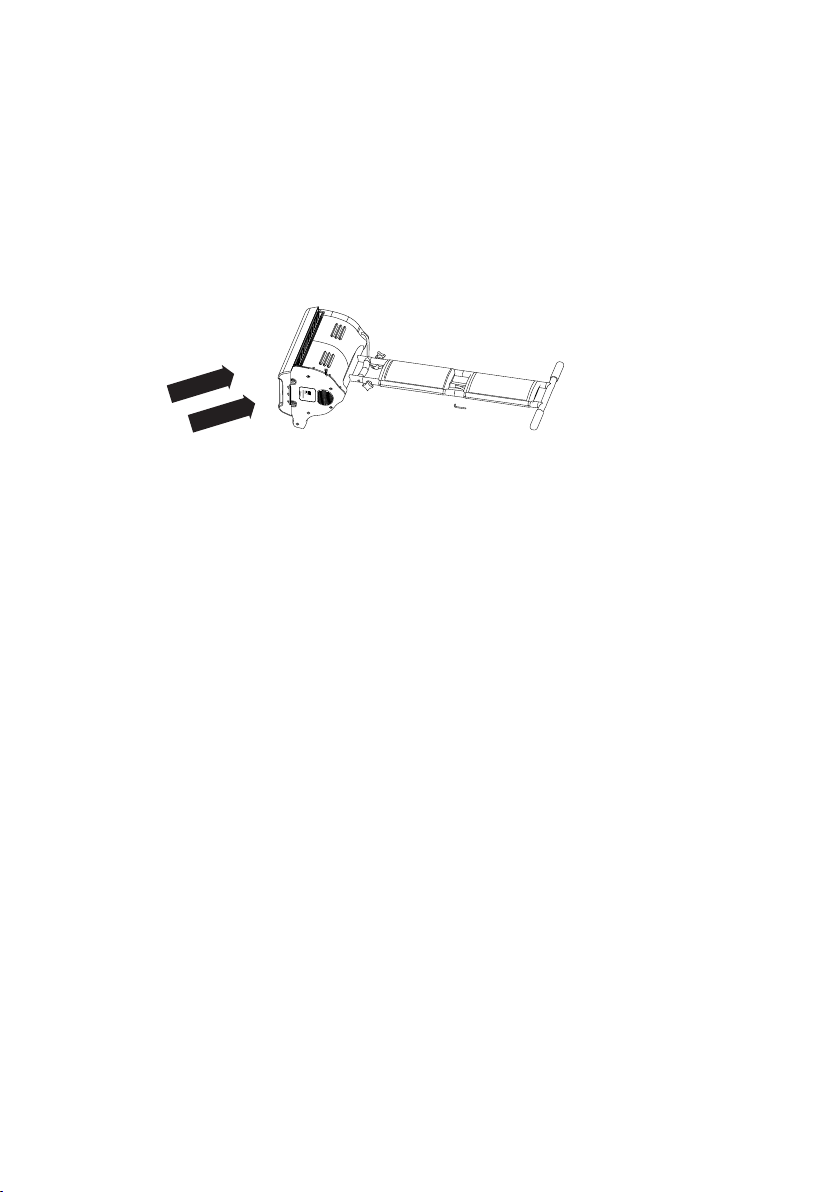
BRUSH CLEANING AND MAINTENANCE
After each session of carpet cleaning. the brushes and the brush housing should be
cleaned. Before
cleaning or changing the brushes, always unplug the machine from the power supply.
Brushes are removed without tools. Tilt and rest the machine on the handle. Push the brush shafts
through with your finger. Alternatively, use a screw driver. Once unlocked. pull the brush shafts through
the brushes and machine housings.
The brushes may be soaked in warm or hot water using mild detergent, and then rinsed with warm
water.
NOTE: Brushes with crushed bristles can often be restored to original condition by soaking in hot water.
Brushes should only be reassembled to the machine base when fully dry. Keep brushes clean and free
from debris. Rotate brushes regularly as this will increase the life span of the brushes and ensure even
wear.
Before reinstalling brushes, clean out machine brush housing by wiping with a clean damp cloth.
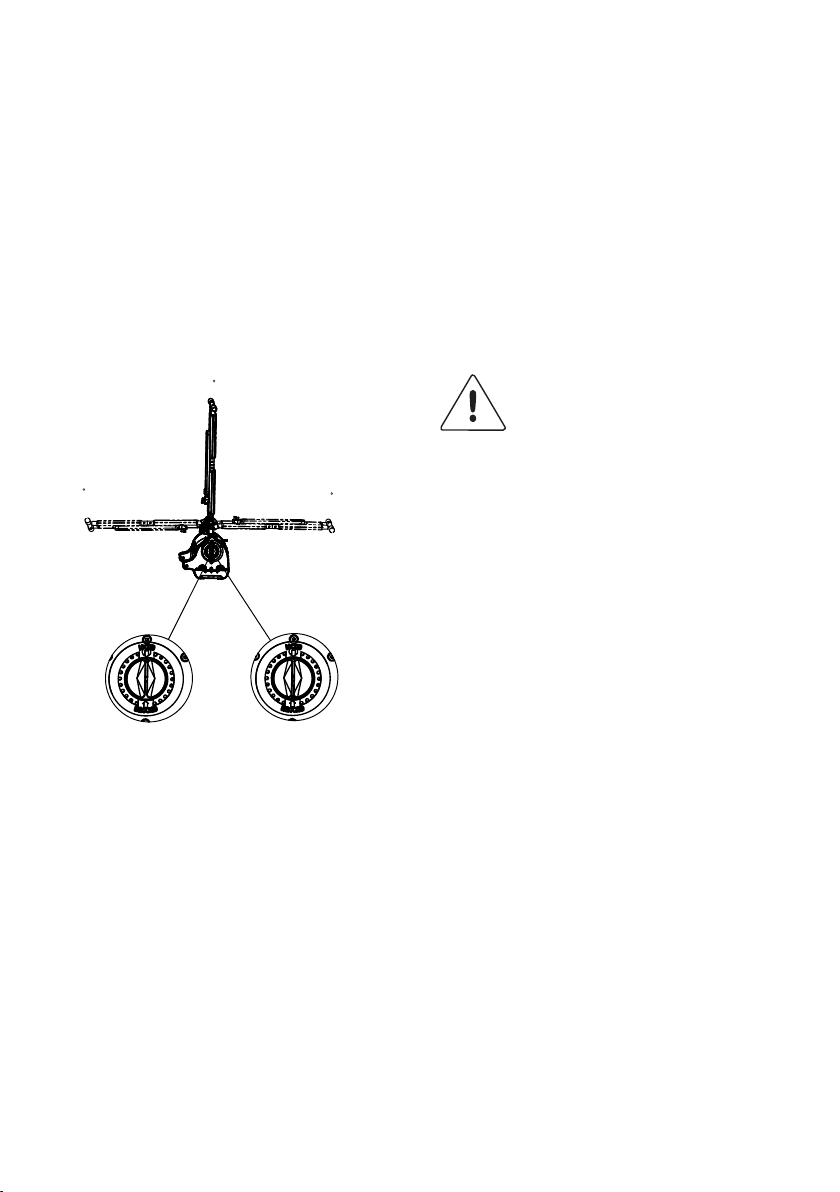
BRUSH ASSEMBLY
1- Push Components 4A and 4B towards component 2, until the ‘Internal Hex Profiles’ of both ends of
components 4A and 4B are aligned with the hex profiles of the ‘Top Brush Shaft
Housing’ and the Bottom Brush Shaft Housing’ of components 1 and 3. Assemble
components 4A and 4B following the illustration in image 1, which shows the position of the
bristles of components 4 A and 4B in relation to machine
2- Align components 5A and 5B with the ‘Top Brush Housing’
3- In order to complete the assembly of components 4A, 4B, 5A and 5B follow the steps below: Hold the
‘Brush Top’ with one hand and component 5A with the other.
Slowly push component %A through the ‘Top Brush Shaft Housing’ of component 1 until the ‘Locking
End’ of component 5A reaches the ‘Top Surface’ of component 4A.
Align component 5A with the ‘Top Internal Hex Profile’ of component 4A following the steps below:
> Slowly push component 5A into the ‘Top Internal Hex Profile’ of component 4A
-5-

MAINTENANCE
> As component 5 is being pushed into the ‘Top Internal Hex Profile’, move the ‘Brush Top’
away from and towards component 2 and simultaneously turn the ‘Brush Top’ clock and
anticlockwise. This will help to align and guide component 5A through the ‘Top Internal Hex
Profile’ of component 4A;
► Continue pushing component 5A through until it reaches the ‘Bottom Internal Hex Profile’ of
component 4A.
► Align component 5A with the ‘Bottom Internal Hex Profile’ of component 4A by following the
steps below:
►
> Slowly push component 5A towards th ‘Bottom Internal Hex Profile’ of component 4A.
> As component 5A is being pushed into the ‘Bottom Internal Hex Profile’, move the ‘Brush
Bottom’ away from and towards component 2 and simultaneously turn the ‘Brush Bottom’
clock and anticlockwise.
► Push component 5A through the ‘Bottom Internal Hex Profile’ once it has been properly aligned.
component 5A will reach the ‘Bottom Brush Shaft Housing’ as it goes through the ‘Bottom
Internal
Hex Profile’.
► Align component 5A(which has already been pushed through the ‘Top Brush Shaft Housing’,
the
‘Top Internal Hex Profile’ and the ‘Bottom Internal Hex Profile’) with the ‘Bottom Brush Shaft
Housing’ by following the steps below:
> Slowly push component 5A towards the ‘Bottom Brush Shaft Housing’ of component 4A
> As component 5A is being pushed into the ‘Bottom Brush Shaft Housing’, move the ‘Brush
Bottom’ away from and towards component 2 and simultaneously turn the ‘Brush Bottom’
clock and anticlockwise.
> Once component 5A is engaged with the ‘Bottom Brush Shaft Housing’, push it through the
Housing until the ‘Stop End’ of component 5A touches to surface of the ‘Top Brush shaft
Housing’.
► Repeat the previous steps for components 4B and 5B.
► Ensure the brushes are properly assembled by turning both brushes towards the direction of the
arrows shown in drawing 5.
Drawing 1 Drawing 2 Drawing 3 Drawing 4 Drawing 5
-5-

MAINTENANCE
MACHINE MAINTENANCE
The GEN4 machine requires very little
maintenance. Wipe down the machine periodically
with a clean cloth and ensure motor air vents are
not obstructed. DO NOT spray water directly over
the top of machine.
During interruptions of the cleaning process,
always place the machine into the tray or lay it on
its side (gear housing) to prevent deformation of
the brush bristles.
Deformation of the brush bristles can result in
unbalanced running and excessive vibrating
or instability of the appliance.
The machine motor is fitted with a thermal cut out
In the unlikely event of overloading, the motor cut
out will automatically trip. It can be reset after
approximately 30 seconds (or when the machine
cools down) by pushing the ON switch.
DAILY MAINTENANCE
1. Clean and inspect brushes.
2. Clean and inspect brush housing and
machine.
3. Inspect power cord for wear or damage.
To prevent electrical shock replace cords
that are frayed or have cracked insulation
immediately.
PERIODIC MAINTENANCE
1. Check all handles, switches, knobs,
electrical cables and connections on your
machine for damage. Repair or replace
immediately.
2. Inspect and/or replace brushes
3. Inspect and clean (if necessary) brush
guard of any outside debris
ANNUAL MAINTENANCE
1. Check all bearings for noise and wear.
2. Check motor for operation.
3. Check overall machine for operation.
CAUTION
-5-

MAINTENANCE
PROBLEM SOLUTION
CAUSE
No power to machine Dead electrical circuit breaker
in fuse box
Check building circuit breaker
Replace power cord
Replace power switch
Replace circuit breaker
Faulty power cord
Power switch failure
Faulty circuit breaker
Equipment not grounding Follow earthing and
grounding instructions
Have an electrician inspect
the building’s wiring
Receptacle not grounded
Faulty circuit breaker Replace circuit breaker
Test circuit breaker for
continuity. Higher amp draw
may indicate faulty parts. Find
parts not moving freely and
repair or replace
Mechanical problem
Faulty motor Replace motor
Replace gears not functioning
Replace brushes
Replace worn bearing
Gears worn
Brushes worn
Bearing squealing or grinding
in brush housing
Electrical Shock
Nuisance tripping of circuit
breaker
Brush not turning or scrubbing
Worn bearings
-5.1-

ExternalWiring
POWER CABLE
BLACK (12)
BLACK (13) Push Button Stop
(Normally Closed) Micro Switch
Push Button Start
(Normally Opened)
BLACK (11)
BLACK (10)
BLACK (14)
BLACK (15)
Internal Wiring
WHITE
BLUE
YELLOW
ORANGE
10m Cord-Set
BUTT SPLICE
GREEN
RED
BLACK
BROWN
BROWN
RUNNING
CAPACITOR
16uF
START
CAPACITOR
60uF
MOTOR
220~240V 50Hz
220~240V,
PCB
10 11 12 13 14 15 L2 143
(Nikoda Motor)
WHITE
BLACK
WHITE
BLACK
-5.2-
ELECTRICAL DIAGRAM

CLEANTEC INNOVATION LTD WARRANTY POLICY
CLEANTEC INNOVATION LTD -Limited Warranty
Cleantec Innovation Ltd warrants to the original purchaser only (ʺBuyerʺ) that each new envirodri Machine
shall be free from defect in material and workmanship upon delivery. Cleantec Innovation Ltd’ liability is
limited to repair or replacement of parts at the discretion of Cleantec Innovation Limited and/or the factory
authorised service centre.
A warranty registration card is to be completed and returned within 14 days of purchase to register the
purchases of your machine. Failure could result in any warranty claims not being undertaken.
Items not covered by warranty include, but are not limited to:
► Damage resulting from accidents abuse, misuse or acts of God(lightning/flood etc,)
► Damage in transit
► Rental units
► Failure due to lack of proper maintenance or care
► Relatively minor adjustments such as tightening of screws or bolts, etc. not connected with the
placement of parts.
► Repairs or alterations by a person or organisation other than the factory or authorised repair
centre.
► Normal wear items, handles, wheels, brushes**, gears**, power cords.
Cleantec Innovation Ltd equipment used in commercial applications has limited warranty of one year with
exception of electric motors with carbon brushes, being subject to wear, their durability depends on the
number of hours of use. It does not depend on the years of life of the machine. Example: In commercial
application, The eventual substitution of the motor under warranty will therefore be effected only in case
of tatal wear. If, after inspection of the returned machine or any part or parts, Cleantec Innovation Ltd in
connection with the replacement or repair or any parts there of shall be at the buyer’s responsibility.
Any parts returned to Cleantec Innovation Ltd for replacement shall become the property of Cleantec
Innovation Ltd. In no Event shall cleantec Innovation Ltd be liable for any indirect, special, incidental,
consequential or other damages including but not limited to damage or loss of property or equipment,
lost revenues or profits, claims of customers, or harm to goodwill or business reputation directly or
indirectly arsing from the safe, handling or use of the envirodri Machine, or from any other costs
relating thereto and Cleantec Innovation Ltd liability hereunder. Cleantec Innovation Ltd shall not be
liable to the buyer for any claims, damages, injuries, actions or causes of action whatsoever based on
negligence or strict liability. Cleantec Innovation Ltd Limited makes no warranty that its envirodri
Machines shall be merchantable or that such machine shall be fit for any particular purpose. Moreover,
Cleantec Innovation Ltd makes no expressed or implied warranties except for the limited warranty set
forth herein. In addition no representation or warranty, expressed or implied, made by any dealer, sales
representative, or field agent or Cleantec Innovation Ltd which is not specifically set forth herein shall
be binding on Cleantec Innovation Ltd.
Genuine envirodri replacement parts shall be free from defects in material and workmanship for a period of 90
days after ″installation″ and shall be subject in all respects to the limitations and exclusions of this limited
warranty.
Making a Claim
With each new machine sold a warranty card and Warranty Request Form will be supplied with the instruction
manual of the new machine, this is standard practice.
PLEASE RETURN YOUR CARD AS FAILURE TO DO SO COULD INVALIDATE YOUR WARRANTY.
Upon finding a fault with your machine which you believe to still have warranty the″envirodri Machine Warranty
Request Form(1)″ should be completed in full and faxed to 08707 337734.
Once we have received your form a representative from Cleantec Innovation Ltd will call you within 24 hours
to discuss the problem and arrange for collection of your machine if required. Bookings for collections are
normally made for the same day but you will be advised when to expect a courier.
-6-

SPARE PARTS LIST
MODEL GEN4
CONFIGURATIONS:
E00-4-9001-US Model
E00-4-9002-UK Model
E00-4-9003-Europe Model
E00-4-9004-China Model
NB:
▪ The Bearing Pack(Item 29) is composed of 5 of 35x17x10(6003) Bearings and 2 of
32x12x10 (6201) Bearings.
▪ The Machine Base Label Set (Item 43) is composed of the “ON” and “OFF” labels,
the LOCKED/UNLOCKED label and the CAUTION label.
▪ Item 47 refers to the Wiring Harness that connects the “ON” and “OFF” Switches to the
PCB.
▪ The Micro-Switch (Item 6) is cold with its Wiring Harness.
SHEET 1 OF 7
Other manuals for ENVIRODRI GEN4
1
Table of contents
Other Cleantec Innovation Vacuum Cleaner manuals


