Mi Mop 2 Pro User manual

尺寸:210×160mm
印刷+过哑油+折页+胶装+模
切
色相正确、印迹牢固、
套印准确、各色套印

不露杂色,套印误差≤ 0.1mm
模切走位≤±1mm
注:此页面非印刷内容
33470
BHR5044EU
小米扫拖机器人 2 Pro 欧规版 白色
6934177741852
MJST1SHW
34367
BHR5204EU
小米扫拖机器人 2 Pro 欧规版 黑色
6934177747236
MJST1SHW
专印刷

Mi Robot Vacuum-Mop 2 Pro User Manual · 01
Manual de usuario de Mi Robot Vacuum-Mop 2 Pro · 19
Manuel d’utilisation du Mi Robot Vacuum-Mop 2 Pro · 37
Manuale utente di Mi Robot Vacuum-Mop 2 Pro · 55
Руководство пользователя Робота-пылесоса Mi Robot Vacuum-Mop 2 Pro · 73
Odkurzacz z mopem Mi Robot 2 Pro —instrukcja obsługi · 92
Mi Staubsauger-Wischer-Roboter 2 Pro Benutzerhandbuch · 110
Mi Temizlik Robotu 2 Pro Kullanım Kılavuzu · 128
641Pro 2Mi
461Mi 2 Pro
Manual do utilizador do Aspirador robô com mopa Mi 2 Pro · 183
Посібник користувача Миючого робота-пилососа Mi 2 Pro · 201
Robotický vysavač s mopem Mi 2 Pro – Uživatelská příručka · 219
Ρομποτική σκούπα - σφουγγαρίστρα Mi Robot 2 Pro Εγχειρίδιο χρήστη · 237
Aspirator și mop robotic Mi 2 Pro – Manual de utilizare · 257
Brugervejledning til Mi Robotstøvsuger-moppe 2 Pro · 275
Bruksanvisning för Mi robotdammsugare och -mopp 2 Pro · 293
Mi 2 Pro -robotti-imurimopin käyttöohje · 311

Brukerhåndbok for Mi robotstøvsuger med mopp 2 Pro · 329
Gebruikershandleiding Mi Robotstofzuiger/dweilrobot 2 Pro · 347
Safety Instructions
Read this manual carefully before use, and retain it for future reference.
This product is for floor cleaning in a home environment only. Do not use it outdoors, on
non-floor surfaces, or in a commercial or industrial setting.
Usage Restrictions
•This appliance can be used by children aged from 8 years and above and persons with
reduced physical, sensory or mental capabilities or lack of experience and knowledge if
they have been given supervision or instruction concerning use of the appliance in a
safe way and understand the hazards involved. Children shall not play with the
appliance. Cleaning and user maintenance shall not be made by children without
supervision.
•The appliance is only to be used with the power supply unit provided with the
appliance.
•This appliance contains batteries that are only replaceable by skilled persons.
•Please keep the cleaning brush out of reach of children.

•Keep hair, loose clothing, fingers, and all parts of body away from openings and moving
parts.
•Do not use the vacuum-mop to clean any burning substances.
•Do not pick up the vacuum-mop by its laser radar cover.
•Make sure the vacuum-mop is turned off and the charging dock is unplugged
01
before cleaning or performing maintenance.
•This vacuum-mop is only intended to clean floors in a home environment. Please do not
use it outdoors such as on an open balcony or on a surface that is not a floor like a sofa,
or in a commercial or industrial setting.
•Do not use the vacuum-mop in an area suspended above ground level, such as a loft ,
open balcony, or on top of furniture, unless a protective barrier is present. • Do not use
the vacuum-mop at an ambient temperature above 35°C or below 0°C or on a floor with
liquids or sticky substances.
•Pick up any cables from the floor before using the vacuum-mop to prevent it from
dragging them while cleaning.
•Pick up any fragile or loose items from the floor, such as vases or plastic bags, to
prevent the vacuum-mop from being obstructed or bumping into them and causing
damage.
•Do not place children, pets, or any item on top of the vacuum-mop while it is stationary
or moving.
•Do not use the vacuum-mop to clean the carpet.

•Do not allow the vacuum-mop to pick up hard or sharp objects such as building
materials, glass, or nails.
•Do not spray any liquid into the vacuum-mop (make sure the dust compartment is
thoroughly dry before its reinstalling).
•Do not place the vacuum-mop upside down (laser radar housing should never touch the
ground).
02
•Only use this product as directed in the user manual. Users are responsible for any loss
or damage arising from improper use of this product.
•This product's laser radar meets the IEC 60825-1:2014 Standard for Class 1 laser product
safety and does not produce laser radiation hazardous to the human body.
Batteries and Charging
•WARNING: Do not use any third-party battery. Use only with CDZ1SHW charging dock.
•Do not attempt to disassemble, repair, or modify the battery or charging dock on your
own.
•Do not place the charging dock near a heat source.
•Do not use a wet cloth or wet hands to wipe or clean the dock’s charging contacts.

•If the vacuum-mop won’t be used for an extended period, fully charge it, then turn it off
and store in a cool, dry place. Recharge the vacuum-mop at least once every 3 months
to avoid over-discharging the battery.
•The lithium-on battery pack contains substances that are hazardous to the
environment. Before disposing of the vacuum-mop, please first remove the
03
battery pack, then discard, or recycle it in accordance with local laws and regulations of
the country or region it is uesd in.
•When removing the batteries from the product, it is better to use up the batteries and
make sure your product is disconnected from power. Uninstall the screw on the bottom,
then remove the cover.
•Unplug the battery connector, then remove the batteries. Do not damage the battery
case to avoid any risk of injuries.
•Return the batteries to a professional recycling organization.

Hereby, Xiaomi Communications Co., Ltd. declares that the radio equipment type
MJST1SHW is in compliance with Directive 2014/53/EU. The full text of the EU
declaration of conformity is available at the following internet address:
http://www.mi.com/global/service/support/declaration.html
For detailed e-manual, please go to www.mi.com/global/service/userguide
04
Product Overview
Note: Illustrations of product, accessories, and user interface in the user manual are for reference purposes only. Actual product and
functions may vary due to product enhancements.
Accessories List
Water Tank (Mop pad installed, Mop Pad Charging Dock Power Cord for vacuuming & mopping
mode) (Replacement)

Side Brush Cleaning Tool
(Replacement)
05
Cover
Indicator
Collision Sensor
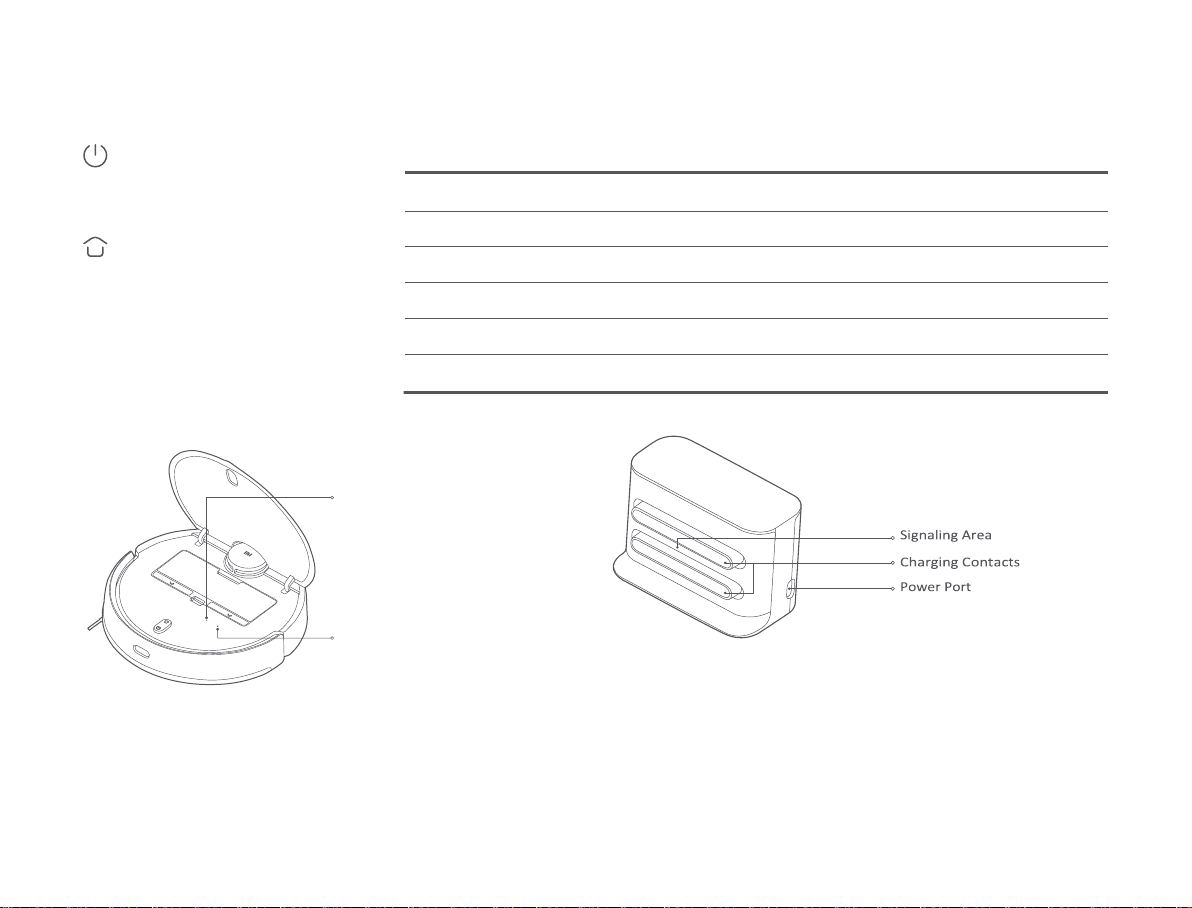
Power Button Indicator Status
Turn on/off: Press and hold for 3 seconds
Start/Pause: Press
Dock Button
Pause: Press when it is working
Start docking: Press when it is paused
Stop docking: Press when it is docking
06
Vacuum-Mop
Wi-Fi Indicator
Staying blue for 2 seconds then goes
off: Wi-Fi connected Blinking blue:
Connecting to
Wi-Fi/Updating firmware Blinking
yellow: Awaiting Wi-Fi connection
Reset Button
Press and hold for 3 seconds to
reset the system. Press and hold for
10 seconds to restore the system.
Charging Dock (Place against a Wall)
Yellow
Wi-Fi not connected
Breathing yellow
Charging (battery level < 15%)
Blinking yellow
Low battery/Error/Awaiting Wi-Fi connection
White
Turned on/Working normally/Fully charged/Wi-Fi connected/Downloading firmware
Blinking white
Returning to the dock to charge
Breathing white
Updating firmware/Charging (battery level ≥ 15%)

Dust Compartment
Note: The dust compartment must be installed for both vacuuming mode and
vacuuming & mopping mode, otherwise the vacuum-mop cannot be turned on.
Water Tank(Used for Vacuuming & Mopping Mode)
Note: The water tank may contain a small amount of residual water due to quality
inspection. This is normal.
07
Installation
Placing the charging dock against a wall and connecting it to an electrical
outlet
Note:
•Do not place the charging dock in an area with direct sunlight.
•Make sure there are more than 1.5 meters of clearance in front of the charging dock and more than
0.5 meters on either side of it.
•Tidy up any loose power cord to prevent the vacuum-mop from getting tangled, which could
accidentally move or unplug the charging dock.
Removing the protective strips
Before using the vacuum-mop, remove the protective strips from each side.
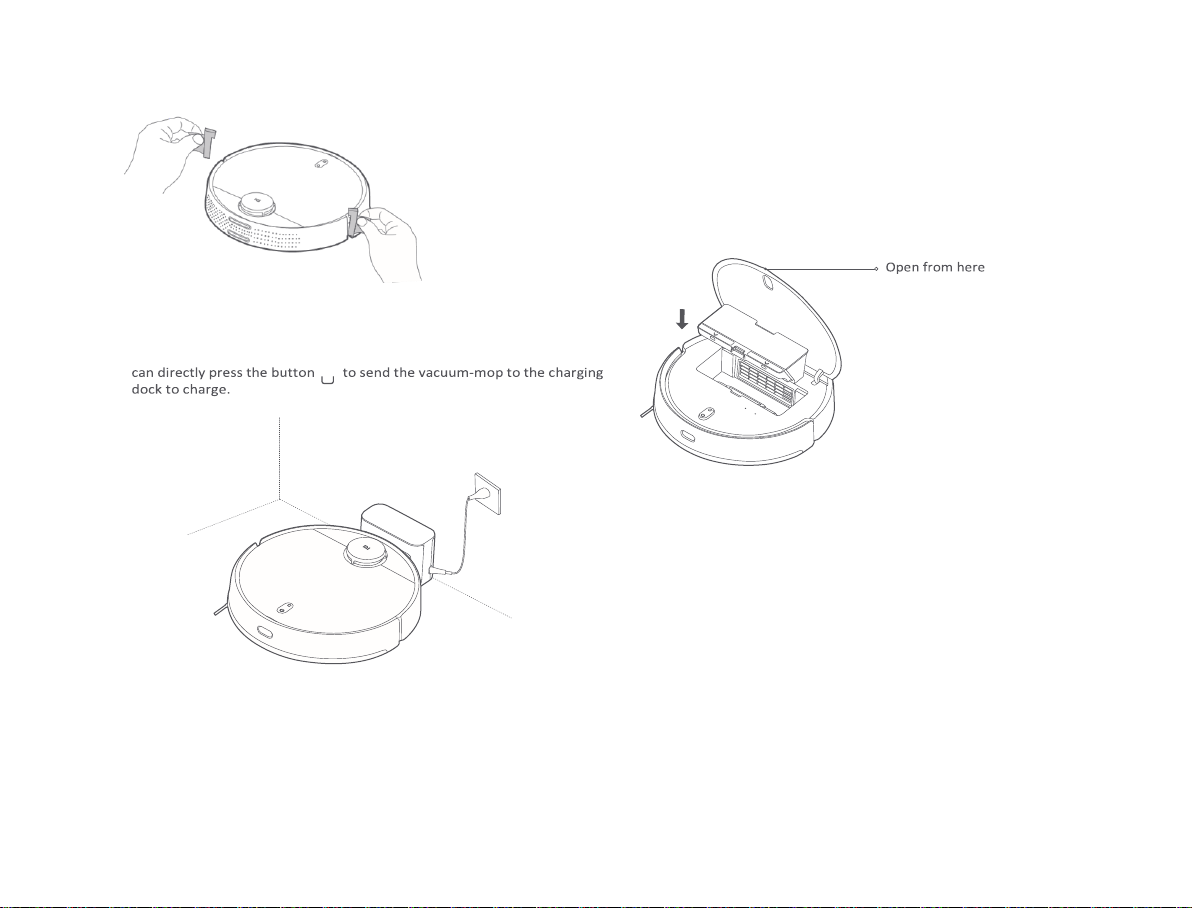
Charging
When using the vacuum-mop for the first time, manually place it against
the charging dock to charge. Ensure that the charging contacts on both the
vacuum-mop and the charging dock are aligned. During daily use, you
Note:
•If the vacuum-mop cannot be turned on due to a low battery, put it against the charging dock to
charge.
•The vacuum-mop will automatically turn on when it is on the charging dock, and cannot be
turned off while charging.
08
Installing accessories for the desired mode
Vacuuming mode (install dust compartment):
Open the cover of the vacuum-mop, and install the dust compartment into
the vacuum-mop until it locks into place.
Note: Regularly cleaning the dust compartment can prevent dirt from building up.
Otherwise, the performance of the vacuum-mop may be reduced.
Vacuuming & mopping mode (install dust compartment, water tank, and mop pad):
1. Slide the mop pad along the slot of the water tank, and then attach the pad
firmly onto the velcro.
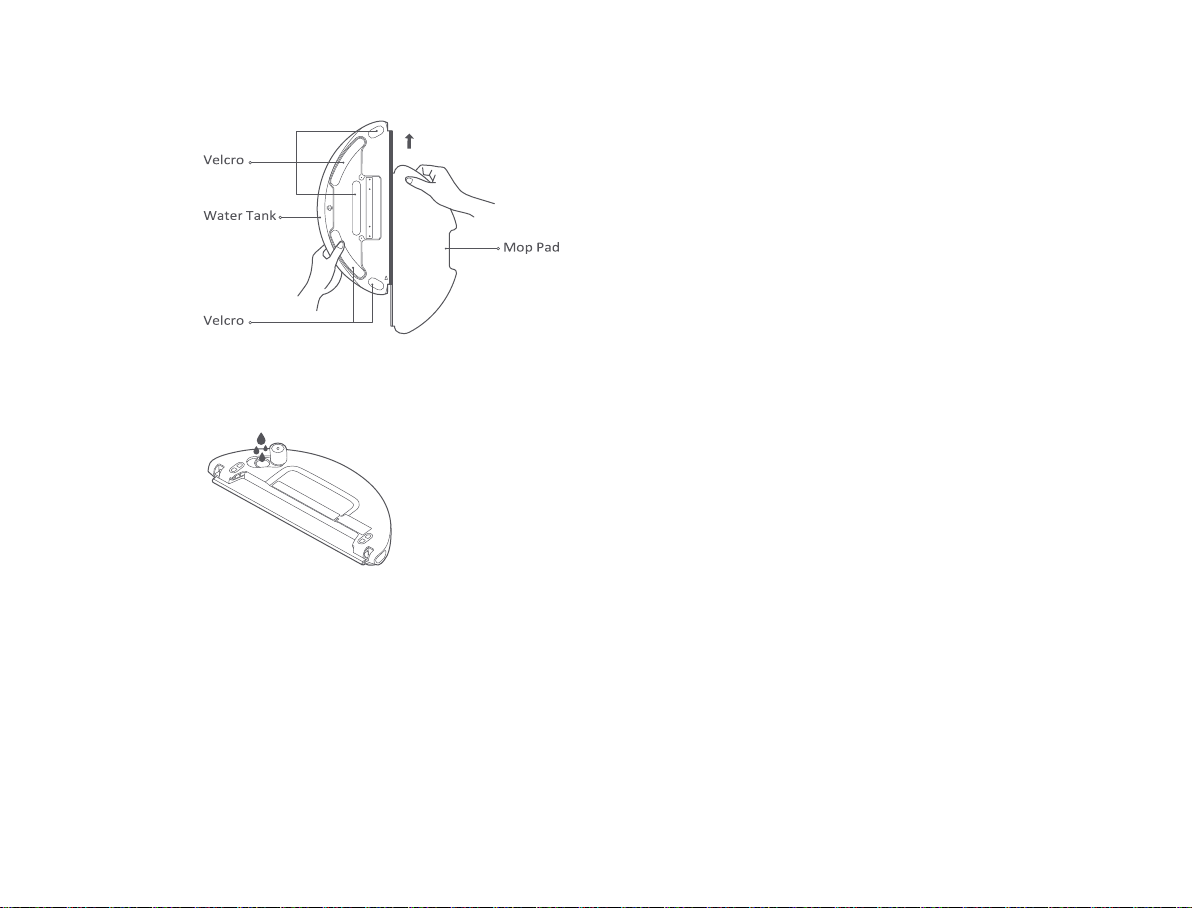
2. Open the water tank lid, fill the tank with water, and then reattach the
lid. It is strictly forbidden to immerse the water tank into water.
CAUTION:
•Do not rinse the water tank or immerse it in water. To avoid corrosion and damage, do
not use any detergent, disinfectant, solid cleaner, or other cleaning products on the
water tank.
•Do not add hot water to the water tank, as this may cause it to become deformed.
09

10
3. Slide the water tank horizontally into the bottom of the vacuum-mop until it
clicks into place.
Note:
•Before using, wipe the electrode plates of the water tank clean with a dry cloth.
•When mopping, set up virtual walls or restricted areas for the carpeted areas.
•Make sure the water tank is installed correctly, otherwise the vacuum-mop may spin in circles
or have difficulty crossing obstacles.
Connecting with Mi Home/Xiaomi
Home App
This product works with the Mi Home/Xiaomi Home app*. Use the Mi
Home/Xiaomi Home app to control your device, and to interact with other smart
home devices.
Scan the QR code to download and install the app. You
will be directed to the connection setup page if the
app is installed already. Or search "Mi Home/Xiaomi
Home" in the app store to download and install it.
Open Mi Home/Xiaomi Home app, tap "+" on the upper right, and then follow
prompts to add your device.
* The app is referred to as Xiaomi Home app in Europe (except for Russia). The name of the
app displayed on your device should be taken as the default.
Note:
•The version of the app might have been updated, please follow the instructions
based on the current app version.
•If the vacuum-mop's QR code cannot be scanned, you can search for its name to
add it.
•When connecting the vacuum-mop to the Mi Home/Xiaomi Home app using an
iOS device, follow the instructions in the app to connect to the vacuum-mop's hotspot "ijai-
vacuum-v3_miapXXXX".
How to Use
Turning on/off
Press and hold the button for 3 seconds until the indicator lights up, and the
vacuum-mop is turned on. When the vacuum-mop is paused and not being
charged, press and hold the button for 3 seconds to turn it off.
Quick map creation
When turning on the vacuum-mop for the first time, there is no map available
in the app. Place the vacuum-mop against the charging dock, and then select
"Quick map creation" in the app. The vacuum-mop will begin to create a map
without cleaning, and then it will automatically return to the charging dock to
complete and save the map. Note: During the map creation process, do not move the
vacuum-mop, and keep it out of reach of children and pets.
Vacuuming or vacuuming & mopping
Turn the vacuum-mop on, and press the button . Then the vacuum-mop will
automatically enter the vacuuming mode or vacuuming & mopping mode
according to the installed accessories.

11
Vibrating mopping mode
When mopping, the vibrating mopping mode is enabled by default to enhance
the mopping effect, and can better remove water stains compared with the
standard mopping mode. This mode can be disabled in the app. Once disabled,
the vacuum-mop will switch to the standard mopping mode. Pausing
When the vacuum-mop is working, press any button to pause it, and press the
button to resume the cleaning. Press the button to end the current
cleaning and send the vacuum-mop back to the charging dock.
Sleep mode
The vacuum-mop will automatically enter the sleep mode if it does not work
or be operated for more than 5 minutes in the non-charging state. Press any
button or use the app to wake it up. The vacuum-mop will automatically turn
off if it is in sleep mode for more than 6 hours. Note: The vacuum-mop will not
enter sleep mode while on the charging dock.
Adding water or cleaning mop pad during cleanup
If you need to add more water to the water tank or clean the mop pad during a
cleaning task, press any button to pause the vacuum-mop. Then you can remove
the water tank to add water or clean the mop pad. After adding water or cleaning
the mop pad, reinstall the water tank and mop pad, and press the button to
resume the cleaning.
Returning to the dock to charge
When the vacuum-mop is on, press the button to send the vacuum-mop to
the charging dock to charge. The vacuum-mop will automatically return to the
dock after finishing a cleaning task, and the indicator will blink white. If the
vacuum-mop starts running low on battery while cleaning, it will automatically
return to the dock to charge and resume the cleaning where it left off once it is
fully charged.
Resuming the cleanup
The vacuum-mop has the feature of resuming the cleanup. If the vacuum-mop
starts running low on battery during a cleaning task, it will automatically return to
the charging dock to charge. Once the vacuum-mop is fully charged, it will
resume the cleanup where it left off. If the cleanup is manually ended or if you
move or operate the vacuum-mop when it is being charged or returning to the
charging dock, the cleanup will not be resumed.
Resetting Wi-Fi
When switching to a new router or changing your Wi-Fi password, you will need
to reset the vacuum-mop's Wi-Fi connection. To do so, turn on the vacuum-mop,
then simultaneously press and hold the buttons and for 7 seconds until
you hear a voice saying "Resetting the Wi-Fi connection and entering network
configuration mode". Once the Wi-Fi connection is reset, you can reconnect the
vacuum-mop.
Note: Only 2.4 GHz Wi-Fi networks are supported.
Cleaning up all areas
If you choose to clean up all areas when no map is saved, the vacuum-mop will
clean square-shaped areas of 6 × 6 meters one by one. After a map has been
saved in the app and you select to clean up all areas, the vacuum-mop will
automatically clean each room according to the planned route. And it will return
to the charging dock after the cleaning is completed.
Resetting/Restoring the system
To reset the system: Use a pin to press and hold the reset button for 3 seconds
until you hear a voice saying "System reset successfully". Then the vacuum-mop
will automatically restart, and the settings such as scheduled cleanup and Wi-Fi
connection will be restored to their original factory settings.
To restore the system to the previous firmware version: Use a pin to press and
hold the reset button for 10 seconds until you hear a voice saying "System
restored successfully". Then the vacuum-mop will automatically restart, and the
settings such as scheduled cleanup and Wi-Fi connection will be restored to their
original factory settings.

12
Note: After resetting or restoring the system, the vacuum-mop needs to be reconnected to the
app, and the relevant settings in the app will be cleared.
Selecting modes/water levels
You can select different modes and water levels in the Mi Home/Xiaomi Home
app.
Do not disturb (DND) mode
In DND mode, the vacuum-mop will not resume the cleanup, perform scheduled
cleanup, or issue voice alerts. DND mode is enabled by default from 11:00 p.m. to
9:00 a.m. and can be disabled in the app. Note: In DND mode, the vacuum-mop's indicator
will go off after the vacuum-mop being charged for 1 minute.
Saving maps
After the vacuum-mop quickly creates a map or returns to the charging dock to
charge after completing a cleaning task, the updated map will be automatically
saved in the Mi Home/Xiaomi Home app. Once a map has been created, you can
use the app to split or merge areas, or customize room names. Edge cleanup
After you select the edge cleanup in the app, the vacuum-mop will automatically
identify the area to be cleaned and clean along the edges. After cleaning, the
vacuum-mop will automatically return to the charging dock to charge.
Zoned cleanup
You can set up a zoned cleanup in the app, and the vacuum-mop will clean the
areas you select.
Note: Zoned cleanup cannot completely keep the vacuum-mop inside the selected areas during
cleaning. Remove any obstacles around the areas prior to cleaning in case the vacuum-mop
goes out of the selected areas.
Clean there
You can use the clean there feature in the app to set a target point on the map.
The vacuum-mop will automatically navigate to the target point and clean a
square-shaped area of 2 × 2 meters with the target point as the center.
Scheduled cleanup
You can schedule cleaning times in the app. The vacuum-mop will automatically
start cleaning at the scheduled times, and return to the charging dock after the
cleaning is completed.
Note: If the DND mode is enabled, the vacuum-mop will not perform the scheduled cleanups
during the do-not-disturb periods.
Virtual walls/restricted areas
You can set up virtual walls and restricted areas in the app to prevent the
vacuum-mop from entering the areas that need not be cleaned. Note:
•Before using this feature, a map must be saved in the app.
•Moving the vacuum-mop or significantly changing the layout of your home may invalidate the
saved maps and make the virtual walls and restricted areas lost.
Care & Maintenance
Dust Compartment
1. Open the cover of the vacuum-mop, and press the dust compartment release
button to remove the dust compartment.

13
2. Open the dust compartment cover, and empty out the contents.
3. Remove the filter, and use the cleaning tool to clean the dust compartment and
the filter, and then wash them with clean water. Install the dust compartment
and the filter back after fully drying them.
Note: It is recommended to thoroughly clean the dust compartment at least once a week.
Make sure to fully dry the dust compartment and the filter before use (at least dry them for 24
hours).
Water Tank
Simultaneously press and hold both the release buttons of the water tank, and
then slide it out from the bottom of the vacuum-mop as illustrated.
Water Tank Release Button
Note: After mopping, immediately remove the water tank, empty out any remaining water, and
clean and dry the mop pad to prevent lingering odor and mildew.
Brush
1. Flip the vacuum-mop over and press and hold the two release buttons to
remove the brush cover.
2. Remove the brush upwards.
3. Pull out the brush bushing.

14
4. Rotate the brush holders until the alignment mark on each holder is aligned
with the unlocking mark, and then remove the brush holders from both ends of
the brush.
5. Use the blade of the cleaning tool to cut the hair tangled on the brush and
thoroughly clean the brush.
6. Reinstall the brush holders and the brush bushing.
7. Reinstall the brush and the brush cover, and press the brush cover securely
into place.
Cleaning the brush
Cut hair Remove dirt and debris
Note: It is recommended to replace the brush every 6–12 months for an optimal cleaning
effect.
Side Brush
1. Flip the vacuum-mop over and remove the screw that secures the side brush in
place.
2. Remove and clean the side brush.
3. Reinstall the side brush and tighten the screw.
Note: It is recommended to replace the side brush every 3–6 months for an optimal cleaning
effect.
Caster Wheel
1. Flip the vacuum-mop over and remove the caster wheel upwards.
2. Clean any hair, dirt, and debris from the caster wheel.
3. Reinstall the caster wheel.

15
Sensors
Use a soft, dry cloth to periodically clean the cliff sensors and the edge infrared
sensor.
Note: Do not use chemicals such as detergents or sprays to clean the sensors.
FAQ

16
The vacuum-mop cannot resume the cleanup.
Issue
Solution
The vacuum-mop cannot
be turned on.
The battery level is low. Recharge the vacuum-mop,
and try again.
The vacuum-mop cannot
start cleaning.
The battery level is low. Recharge the vacuum-mop,
and try again.
The vacuum-mop
cannot return to the dock
to charge.
There are too many obstructions around the
charging dock. Place the charging dock in a more
open area.
The vacuum-mop is too far away from the charging
dock. Move it closer to the charging dock and try
again.
The vacuum-mop is
malfunctioning.
Turn off the vacuum-mop, and then turn it on
again.
The vacuum-mop makes
unusual sounds.
A foreign object might be caught in the brush, side
brush, or the left/right wheel. Turn off the vacuum-
mop and remove any debris.
The vacuum-mop
cleans less efficiently
or leaves dust behind.
The dust compartment is full, please empty its
contents.
The filter is blocked, please clean it.
A foreign object is caught in the brush, please clean
it.
The vacuum-mop is
offline.
The Wi-Fi signal is weak. Make sure the vacuum-
mop is in an area with good Wi-Fi coverage.
Something is wrong with the Wi-Fi connection.
Reset the Wi-Fi and download the latest version of
the app, and try reconnecting.
Table of contents
Languages:
Other Mi Vacuum Cleaner manuals


