ClearClick HD Video Capture Box Silver User manual


2
Register Your Product
Make sure you register your product at:
www.ClearClick.tech
Browse All Our Products!
If you’re looking for fun, unique, and easy-to-use technology, we’ve got it!
Please visit our website to browse all of our products:
www.ClearClick.tech
Safety Precautions
1. Do not disassemble the unit.
2. Please note that the device and/or plugged in USB drives may become
very warm during use.
3. Do not operate the unit around water or rain. Do not operate the unit
around any kind of machines or appliances (other than computers).
4. Turn off and unplug the unit when not in use.
5. Use only the included accessories with the device.
6. Do not connect high powered, amplified audio outputs to the “in” ports
of the device.
7. Follow all copyright laws in your country. You are responsible for your
own use of this device.
8. Do not allow young children to handle or operate this device.
Full 1-Year Warranty
Your purchase comes with a full 1-year warranty. This means that if
anything goes wrong with the unit (other than accidental damage on the part
of the end user) within the first year of ownership, we will replace the unit for
free, 100% at our cost. Contact us at support@clearclick.tech with any
issues.

3
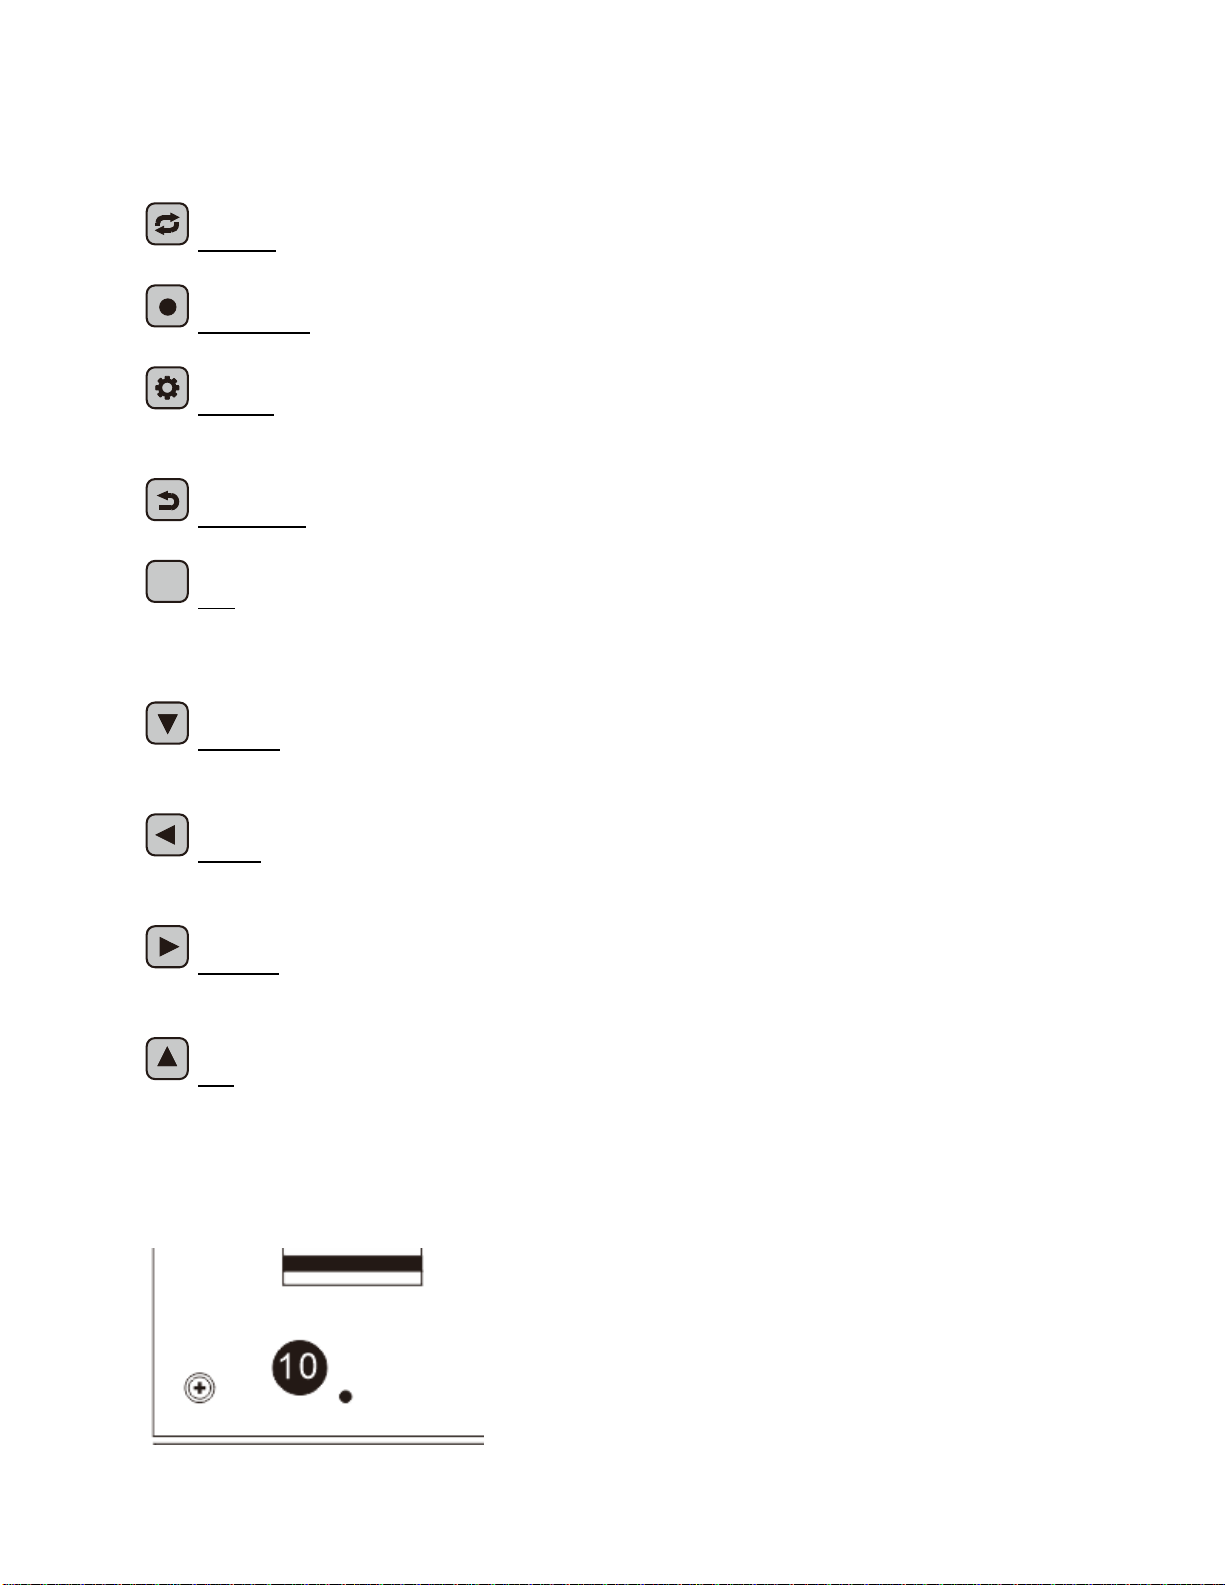
Device Diagram & Explanation(continued on next page)
1. USB/Power Port: Plug in the USB cable here to charge & power the device, or
connect to a computer to transfer recordings.
2. MicroSD Memory Card Slot: Insert a microSD memory card (not included) here.
Recordings will be saved on this memory card. Please use a “class 10” or higher
memory card (128 GB or smaller), formatted in FAT32 or exFAT.
3. HDMI IN Port: Connect your video source here with an HDMI cable (not
included).
4. HDMI OUT Port: Use this port to “pass through” the HDMI signal to a TV.
(Optional)
5. Microphone Jack: Plug in a 3.5mm microphone to overlay audio on top of your
video recordings. (Optional)
6. Headphone Jack: Plug in a 3.5mm pair of headphones to listen to audio while
you are recording. (Optional)
7. Mode Switch: Puts the device in “Recording” mode (left switch position) or
“Transfer/Off” mode (right switch position).
4
8. LCD Screen: Shows a preview of your video while recording or playing back.
9. Buttons:
MODE –Switch between “Recording” and “Playback” mode
RECORD –Press to start recording. Press again to stop recording.
MENU –Opens the setup/settings console (while not recording).
Turns on/off the LCD screen (while recording)
RETURN –Go back.
OKOK
OK –A) In a menu, press to confirm a selection.
B) In “Recording” mode, press to take a snapshot/thumbnail.
C) In “Playback” mode, press to pause or resume a playing.
DOWN –A) In a menu, press to go down.
B) In “Recording” mode, press to pause/resume recording.
LEFT –A) In a menu, press to go left.
B) In “Playback” mode, press to rewind a recording.
RIGHT –A) In a menu, press to go right.
B) In “Playback” mode, press to fast forward a recording.
UP –In a menu, press to go up.
10. Reset Hole/Button (back of device) –If the device has frozen, use an unfolded
paperclip to press the reset button. This will shut off the device. Then set the
“Mode Switch” on the top of the device to the right (“Transfer/Off” mode.) Finally,
set the “Mode Switch” on the device to the left (“Recording” mode).
5
Quick Start Guide
1. Connect the power adapter to the “DC/USB” port on the HD Video Capture Box.
Plug in the power adapter to any power outlet.
2. Turn on the HD Video Capture Box by setting the mode switch to the left –
“Recording” mode. (See #7 on the device diagram). If the device is already set to
“Recording” mode but is off, momentarily set the switch to the right, and then to the left.
3. Using an HDMI cable (not included), connect your video source (gaming system,
DVD player, etc.) to the HD Video Capture Box. Plug it into the HDMI IN port (see #3
on the device diagram).
4. If there is a signal from the HDMI cable, you should see video on the LCD screen.
If you want the HDMI signal to “pass through” to your TV, use another HDMI cable to
connect your TV to the HDMI OUT port (see #4 on the device diagram).
5. Plug in a MicroSD memory card into the memory card slot on the HD Video
Capture Box (see #2 in the device diagram). Make sure the gold contacts face down
and toward you. NOTE: Use a “Class 10” or higher card that is 128 GB or smaller.
6. To start recording, press the “Record” button on the HD Video Capture Box.
7. If you’d like to pause recording at any point, press the “Down” button. To
resume recording, press the “Down” button again.
8. To stop recording and save the file onto the memory card, press the “Record”
button again.
9. To play back recordings on your device, press the “Mode” button to go to
“Playback” mode. You can press the “OK”
OKOK
button to play or pause a recording.
You can use the “Right” and “Left” buttons to fast forward/rewind through the
recording.
10.To play back or transfer recordings to your PC or Mac, push the mode switch
on the top of the device to the right –“Transfer/Off” mode (see #7 on the device
diagram). Remove the USB cable from the power adapter and use it to connect the
device to your computer. The device will show up as a new storage drive on your
computer. Browse the drive and go to the “Video” folder to find your recordings.

6
Settings Menu
In “Recording” mode, you may open the device’s main menu by pressing the
“Settings/Menu” button. (Note: If you are actively recording, this button will turn
on/off the device’s LCD screen instead.)
Power Save –If enabled, this feature will automatically turn off the device
after the selected amount of time of no activity.
Quality –Sets the quality of the recording: Super Fine, Fine, or Normal.
(Bitrates of 22 Mbps, 17 Mbps, 14 Mbps respectively)
Date/Time –Sets the device date and time.
Language –Sets the language of the device.
Date Stamp –Turns on or off a date stamp on recorded videos.
Scheduled Recording –Schedules a one-time or daily recording.
System –Displays device and card info and allows you to do a factory reset.
Format –Allows you to format (completely erase) the inserted MicroSD card.
How To Switch To Recording/Playback/Transfer Modes
To switch to “Recording” mode:Make sure the switch at the top of the device is set to
“Recording” (left) mode. If the device is already on “Recording” mode but is off, first
move the switch to “Transfer” mode momentarily (move it all the way to the right).
Then, move the switch back to “Recording” mode (the left option) to turn on the device.
To switch to or from “Playback” mode: Have the device in “Recording” mode first. (See
above). Then press the “Mode” button to switch to “Playback” mode. Press the
“Mode” button again to return to “Recording” mode.
To switch to “Transfer” mode:To switch to “Transfer” mode (to transfer recordings to
your computer), set the switch at the top of the device to “Transfer” mode (the right-
most option). Then connect the device to your PC or Mac using the USB cable.

7
How To Transfer Recordings To Your PC or Mac
After you’ve made your recordings, here’s how to transfer them to your computer.
1. Set the switch at the top of the device to “Transfer” mode (the right-most option)
2. Then connect the device to your PC or Mac using the USB cable.
3. The device will show up as a new storage (USB/SD) device on your computer.
4. Browse the device/drive and go to the “Video” folder.
5. Click and drag the files onto a folder on your PC or Mac.
How To Delete Recordings
To delete a recording, first set the device to “Playback” mode (see previous page) and
browse the “Video” folder.
From the list of recordings, select the recording you’d like to delete and press the
“Settings/Menu” button. Follow the prompts on the screen.
How To Turn On/Off Screen While Recording
To turn on or off the screen while recording (i.e. to save battery power), press the
“Settings/Menu” button while the device is actively recording. The device will
continue to record in the background.
If enabled, the device’s “Auto Off” feature will automatically turn the device off after 10-
30 minutes of non-use (i.e. if you are not actively recording). To enable or disable this
function, press the “Menu/Settings” button in “Recording” mode (while not actively
recording).
Note: if the device has completely turned off and you’d like to turn it on again, move the
mode switch at the top of the device to the right and then back to the left.

8
Troubleshooting
1. The device is set to “Recording” mode, but the device is off. How do I turn the
device on?
Move the switch (on the top of the device) to “Transfer” mode momentarily (move it all
the way to the right).
Then, move the switch back to “Recording” mode (the left option) to turn on the device.
If this does not work, make sure the device is charged and/or plugged in.
2. The device appears to be on, but the LCD screen is completely blank.
Press the “Menu/Settings” button to turn the screen back on. (To save battery
power while recording, you can turn the screen off again by pressing the
“Menu/Settings” button again while recording to turn the screen off.)
3. The device LCD is on, and my video source is plugged in, but I just see a black
or blue screen –there is no preview of my video on the screen.
Please make sure the HDMI input is connected properly. Make sure your HDMI cable
is plugged into the “IN” port on the HD Video Capture Box (not the “OUT” port). Try
using a different HDMI cable and/or video source.
4. When I play back the videos on the device (on the LCD or to a TV), the video
quality isn’t very good.
The device plays back the recorded video at a limited quality. Once you transfer the
recording to your computer and view it there, the recording will appear in its full quality.
5. My recording split into several files, even though I made a single recording.
The device has a 4 GB file size limit and will automatically split recordings that are
larger than 4 GB into multiple files. If you’d like to combine these files into one, just
download this free software: www.mp4joiner.org

9
6. My MicroSD card isn’t recognized by the device or won’t work with it.
Make sure your MicroSD is under 128 GB and is rated “Class 10” or higher. Please try
another MicroSD card. We recommend using a fresh MicroSD card that has not been
used in other devices before.
7. The device is frozen.
If the device has frozen, use an unfolded paperclip to press the reset button inside the
reset hole in the back of the device. Then momentarily set the “Mode Switch” on the
top of the device to the right –(Transfer/Off mode). Finally, set the “Mode Switch” on
the top of the device back to the left –“Recording” mode.
8. The device isn’t recording.
Please make sure your video source is connected properly.
Please make sure a MicroSD memory card is inserted.
Please make sure you are in “Recording” mode.
9. My recordings don’t show up on my PC or Mac when I plug in the device by
USB.
Make sure the switch at the top of the device is set to “Transfer” mode (the right-most
setting). The device will appear as a new storage drive on your computer. Navigate to
the drive and go to the “Video” folder.
10. I have a question that isn’t listed here, or need further support.
No problem! Please email us at support@clearclick.tech with your order number, and
we will get back to you as soon as possible.

10
Technical Specifications
Connections
Interface
USB 2.0 / Power Adapter
Video Input
HDMI
Audio Input
3.5mm Microphone
Video Output
HDMI, 3.5” LCD Screen
Audio Output
HDMI, Speaker, 3.5mm Headphones
Hardware Information
Dimensions
5.9” x 2.6” x 0.9”
Weight
180 grams
Package Contents
Device
ClearClick® HD Video Capture Box Silver
Others
USB Cable, Power Adapter, Manual
Specifications
System Requirement
No Computer Required To Record/Playback
To Transfer Videos To Computer: PC (Windows) or Mac Required
Resolution
Input / Pass-through: 720 x 480 (60p), 720 x 576 (50p), 1280 x 720p(60p),
1920 x 1080 (50i), 1920 x 1080 (60i), 1920 x 1080 (50p), 1920 x 1080
(60p)
Capture: 720 x 480 (60p), 720 x 576 (50p), 1280 x 720p(60p), 1920 x 1080
(50p), 1920 x 1080 (60p)
Record Quality
Max 22 Mbps @ 1080P, 60 FPS
Record Format
H264 MP4
Max File
4 GB
Battery
3000mAh (lasts approximately 1 hour recording; 2 hours playing back)
DC/USB Power Input
5V 2A

11

Table of contents
Other ClearClick PCI Card manuals


