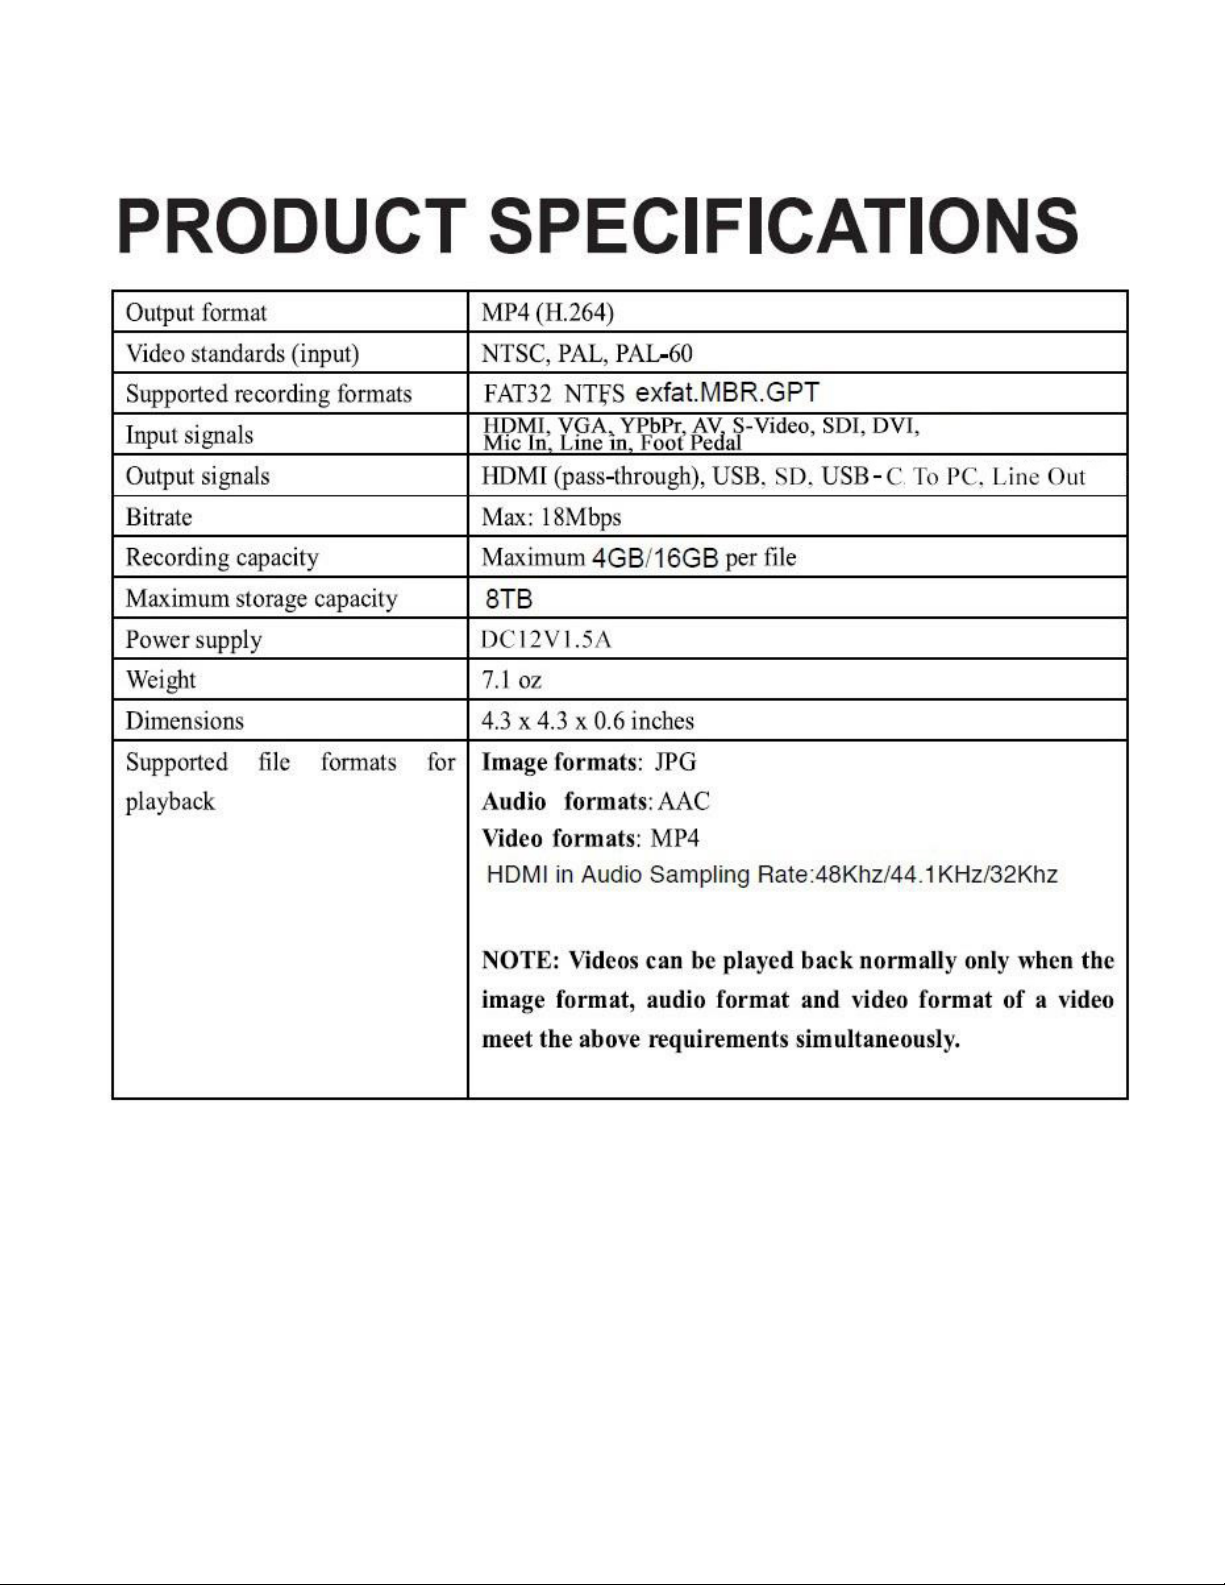
ClearClick HD Video Capture Box Ultimate 3.0 User manual


2
Browse All Our Products!
If you’re looking for fun, unique, and easy-to-use technology,
we’ve got it! Please visit our website to browse all of our products:
www.ClearClick.com
Safety Precautions
1. Do not disassemble the unit.
2. Please note that the device and/or plugged in USB drives
may become very warm during use.
3. Do not operate the unit around water or rain. Do not operate
the unit around any kind of machines or appliances (other
than computers).
4. Turn off and unplug the unit when not in use.
5. Use only the included accessories with the device.
6. Do not connect high powered, amplified audio outputs to the
“in” ports of the device.
7. Follow all copyright laws in your country. You are
responsible for your own use of this device.
3-Year Warranty
Your purchase comes with a 3-year warranty. This means that if
anything goes wrong with the unit (other than accidental damage
on the part of the end user) within the first year of ownership, we
will replace the unit for free, 100% at our cost. Contact us at
[email protected] with any issues.
Extend Your Warranty To 4 Years For FREE!
Get a FREE extra year of warranty just by registering your
product at: www.ClearClick.com/Register/

3
What’s In The Box?
• HD Video Capture Box Ultimate® 3.0
• Power Adapter
• HDMI Cable
• AV/MMI Input Cable (for AV, VGA, or YPbPr sources)
• Remote Control
• USB Cable (for Live Streaming to PC)
• Device Carrying Case
• Foot Pedal + red/white adapter/cable
• User’s Manual
OPTIONAL – NOT INCLUDED:
• External Main Batteries (The device does NOT include an internal battery or
external batteries)
Compatible Battery Models: Sony NP-F550, NP-F750, NP-F950, NP-
F960, NP-F970
• CR2032 Supplemental Battery
Used to keep the device date/time setting while turned off and
unplugged.
4
Device Diagrams & Explanations
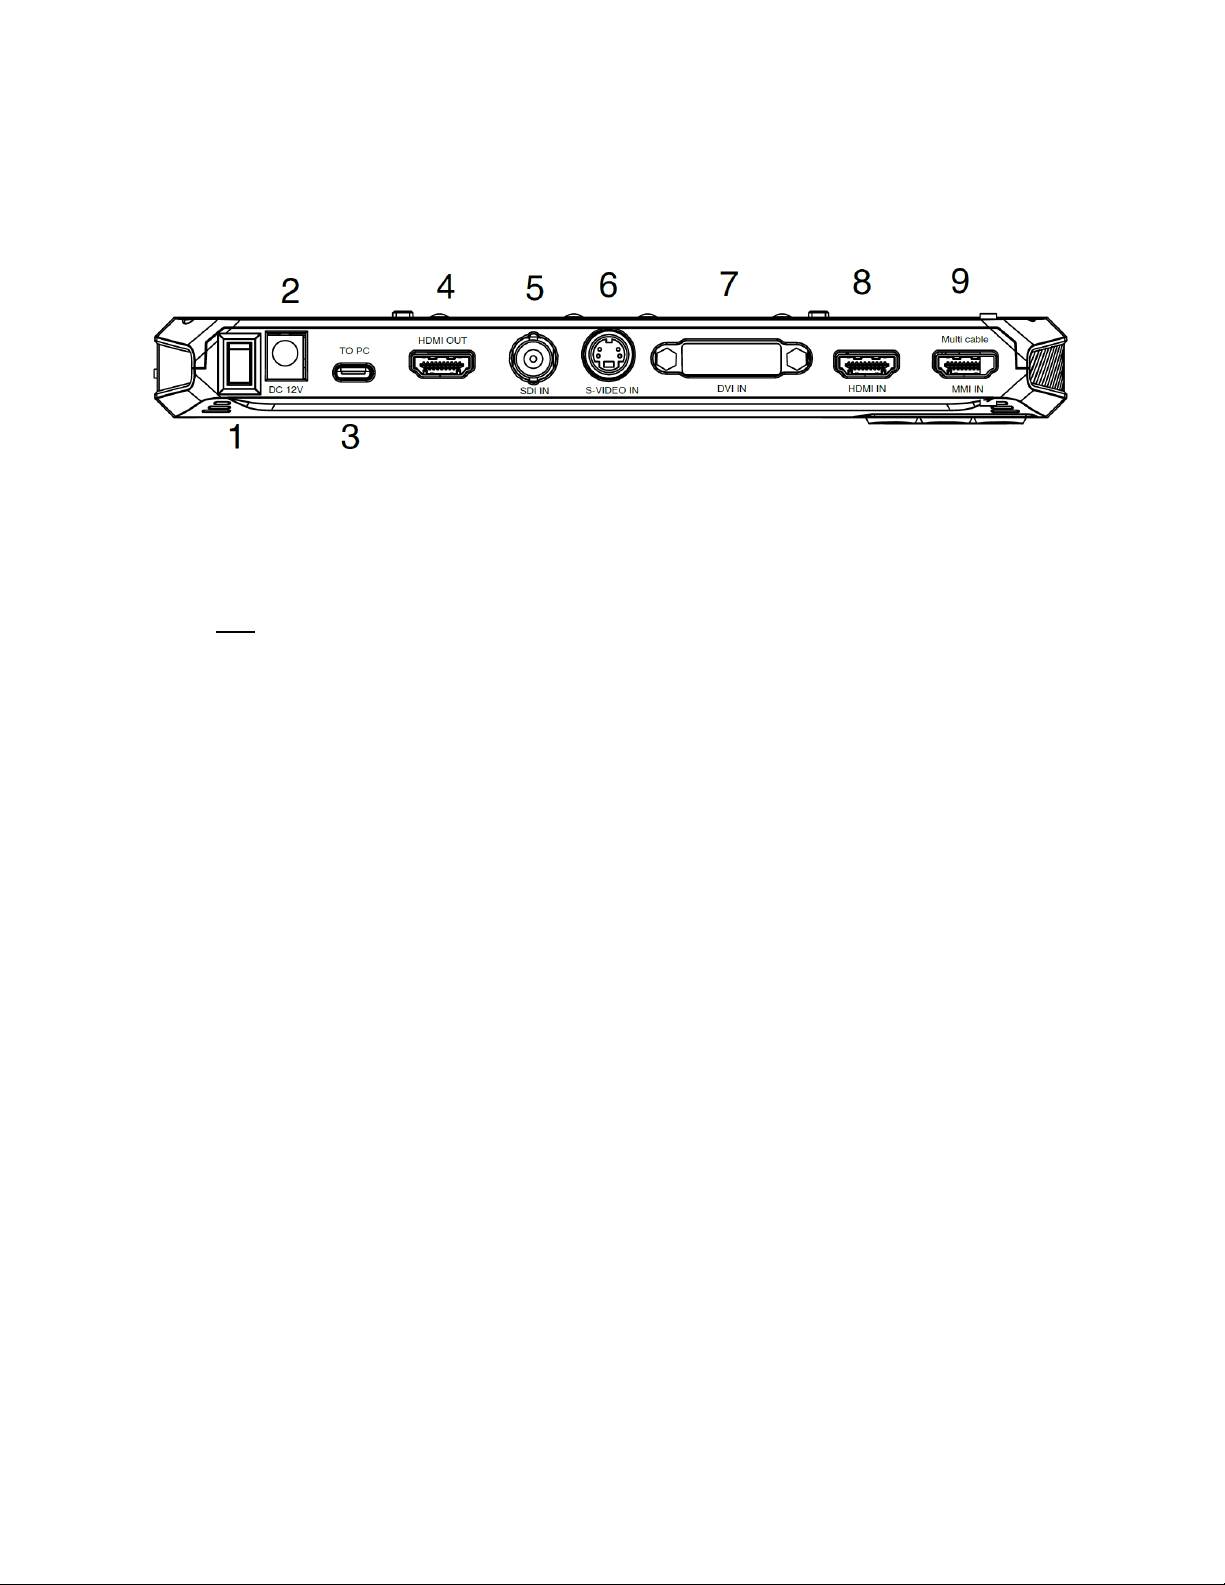
TOP OF DEVICE
1. ON/OFF Switch: Turn on or off the device.
2. 12V Power Port: Plug in the power adapter (NOTE: The device does
not contain a built-in battery. Compatible External Battery Models:
Sony NP-F550, NP-F750, NP-F950, NP-F960, NP-F970)
3. TO PC (USB-C) Port: Connect to PC for recording or live
streaming with OBS
4. HDMI OUT Port: Connect to a TV for HDMI pass through
5. SDI IN: SDI video input port (3G SDI MAX:1080p60)
6. S-VIDEO IN: S-Video video input port
7. DVI IN: DVI video input port (18+1 MAX:1080p and Single Channel)
8. HDMI IN Port: HDMI input port
9. MMI IN Port: MMI input (AV, VGA, YPbPr) port.
5
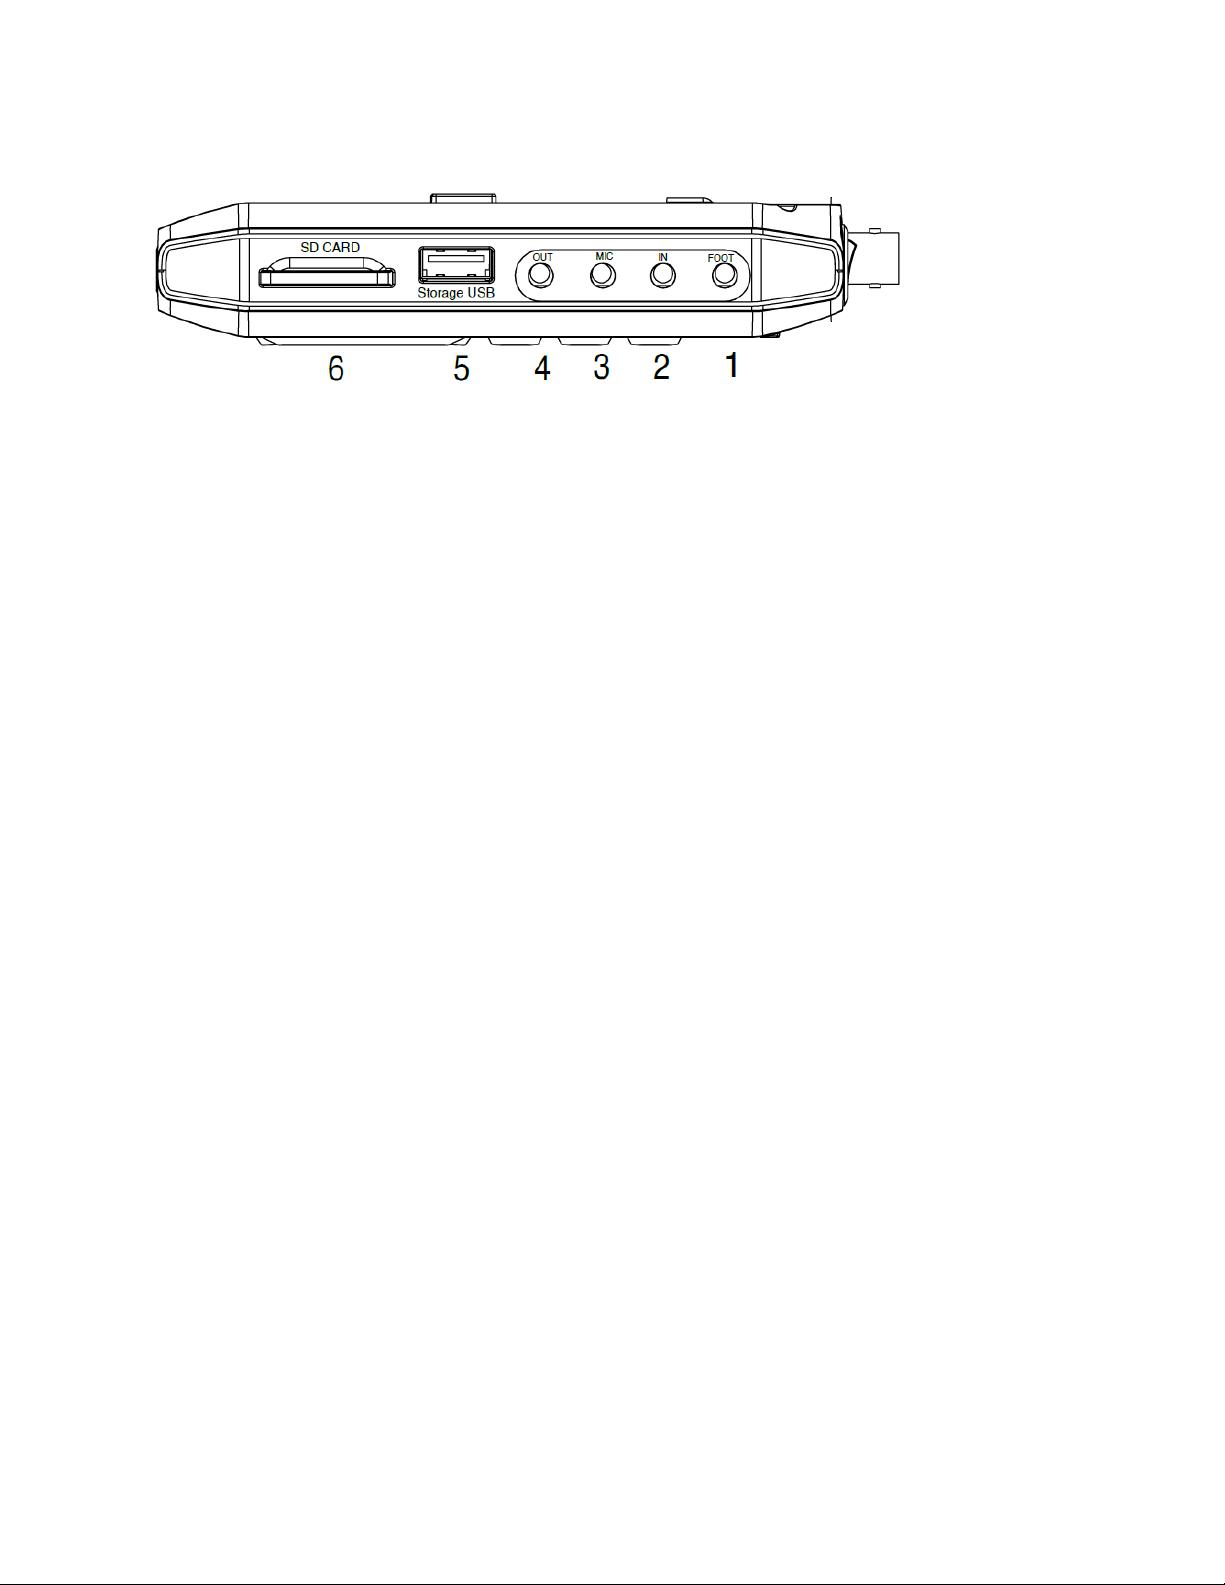
SIDE OF DEVICE
1. FOOT: Using the included red/white adapter cable, connect the foot
pedal to this port:
A. Connect to the RED connector on the red/white adapter cable if
you want the foot pedal to start/stop video recording.
B. Connect to the WHITE connector on the red/white adapter cable if
you want the foot pedal to take screenshots/still images.
2. IN: 3.5mm audio “line in” input (for audio overlay)
3. MIC: 3.5mm audio “mic in” input (for audio overlay)
4. OUT: 3.5mm audio output
5. Storage USB: Insert a USB drive (up to 512GB flash drive or 8TB
HDD).
6. SD CARD: Insert an SD card (up to 512GB) with the gold contacts
facing up.

6
BUTTON PANEL
Source Button: Press (repeatedly) to switch between input sources
(HDMI, AV, S-Video, DVI, etc.).
Display Button: Press to display info on the screen, such as video source,
recording time, etc.
Power Button: Push for 3 seconds to turn on/off device.
PLAY BACK Button: Press to playback video or image files.
Folder/Delete Button: Press to delete a file/recording in playback mode.
Camera Button: Press to capture a still photo (snapshot) of the current
frame.
Home Button: Press to open the device’s main menu.
Back Button: Press to exit current screen or return to capture mode.
REC/STOP Button: Press to start or stop recording.
OK/Arrow Buttons: Press to make a selection.

7
REMOTE CONTROL
Overall, the remote control included has the same functions as the buttons
on the device.
However, there are some useful shortcuts, such as shortcuts to selecting
the video source (HDMI/VGA/YPbPr/AV/S-Video/DVI/SDI) and for
scheduling a recording.
If you are recording an AV/S-Video video source, use the 16:9/4:3 button to
switch your aspect ratio. 4:3 will avoid stretching the video.
Additionally, you can control the volume of the microphone and built-in
speaker with the arrow keys.
8
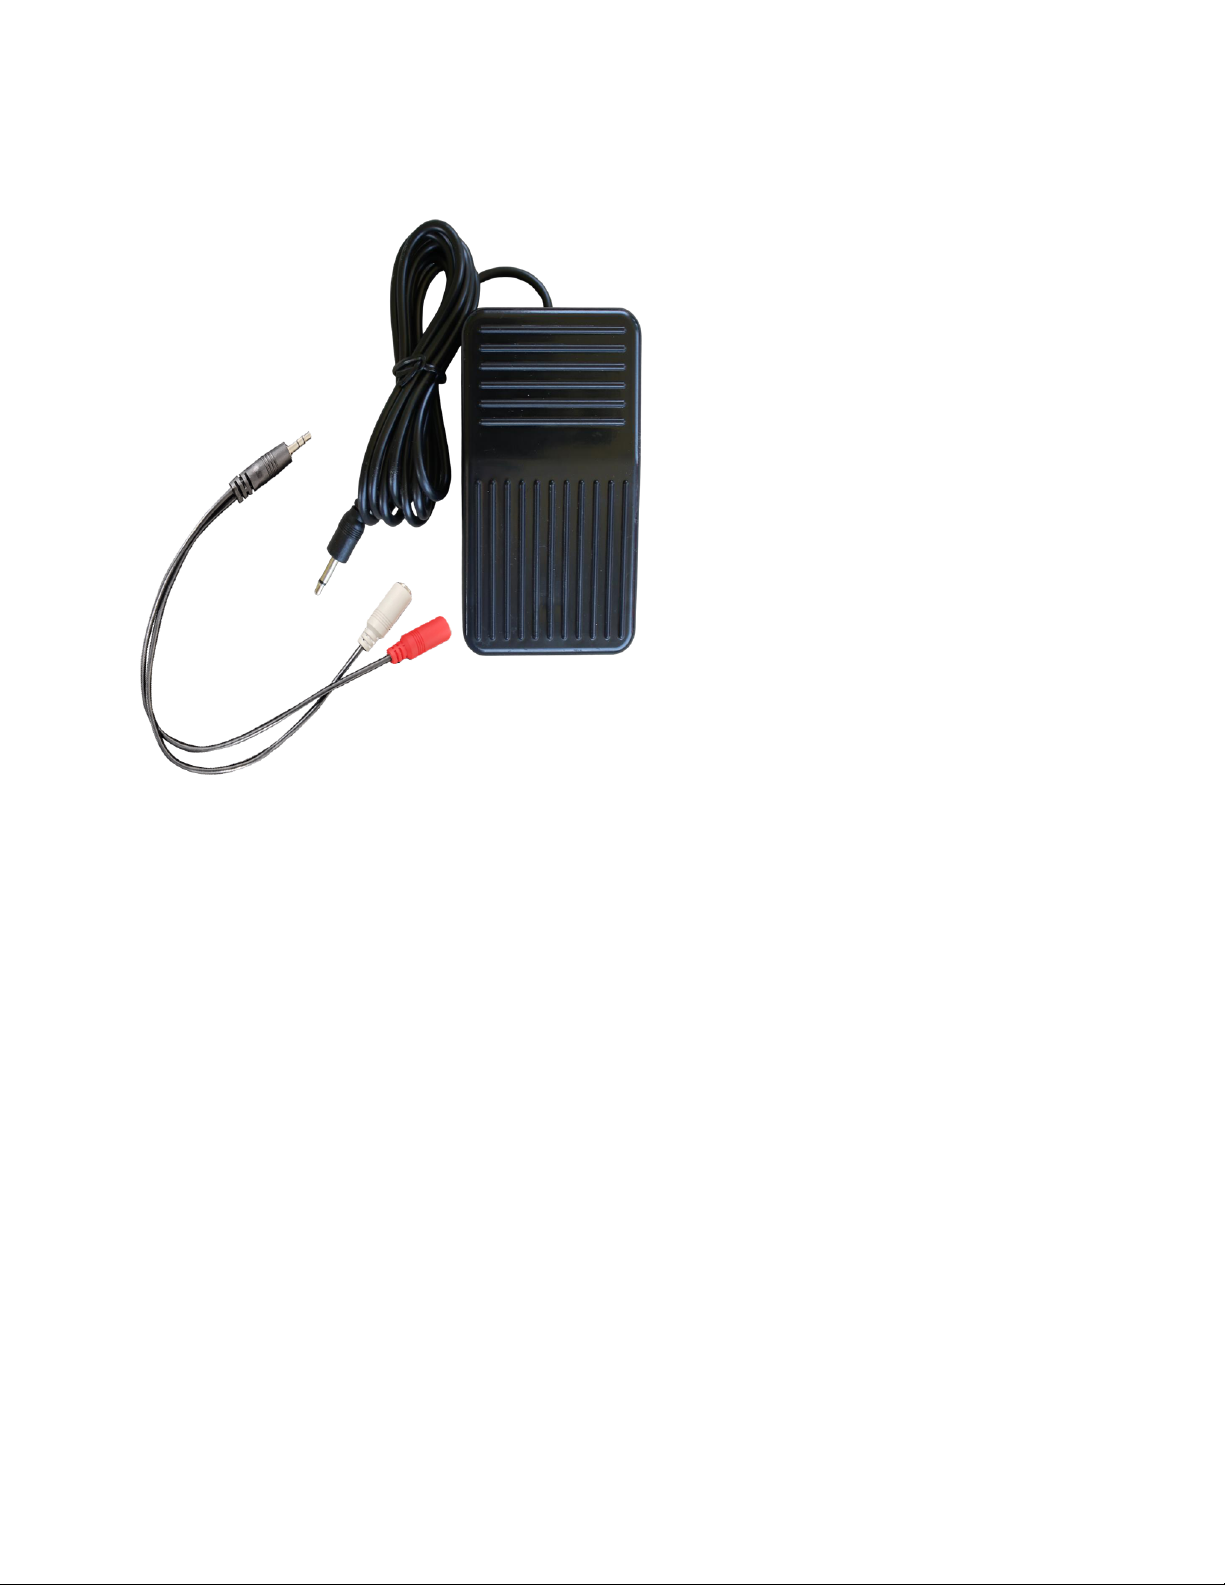
FOOT PEDAL
The included foot pedal is
a useful tool that allows
you to start/stop recording
or take a snapshot –
hands-free.
To use it, connect it to the
included red/white adapter
cable:
Connect to the RED
connector on the red/white
adapter cable if you want
the foot pedal to start/stop
video recording.
Connect to the WHITE connector on the red/white adapter cable if
you want the foot pedal to take screenshots/still images.
Plug the other end of the red/white adapter cable into the
“PEDAL” port on the HD Video Capture Box Ultimate 3.0.
Now, you will be able to start/stop recording or take still
screenshots/images using the foot pedal.

9
Many HDMI and DVI video sources are encrypted with content
protection called “HDCP,” even if the content is not copyrighted.
Complying with laws, the HD Video Capture Box Ultimate does
not disable or override content protection.
** Therefore, if you simply plug in a content-protected HDMI
or DVI video source to the HD Video Capture Box Ultimate, it
will not detect a signal or allow you to record/stream.
This does NOT mean the device is defective. This simply
means that this device complies with federal law and does
not record from content protected video sources.
For gaming systems and cameras, you may be able to turn
off HDCP in your system/camera’s settings. **
NOTE:
There are low-cost HDMI splitters available that disable “HDCP.” Passing
a 1080P/720P HDMI signal “through” a splitter such as this one, HDCP
sources could be recorded or streamed. (NOTE: This will only work for 4K
devices if your video source is “backwards compatible” and can output
1080P/720P instead.)
ViewHD VHD-1X2MN3D:
www.amazon.com/dp/B004F9LVXC
Important Disclaimer: We are NOT recommending or condoning the use of HDMI splitters, or
recommending that you record content-protected HDMI video sources. We are simply saying
that an HDMI splitter makes it theoretically possible, but this information is solely for educational
purposes. You are legally responsible for your own use of HDMI splitters. with this device.
Please follow all the copyright laws in your country.

10
Quick Start Guide
1. If you are recording HDMI or DVI sources, read the note on
previous page (page #9) before continuing.
2. Connect the power adapter to the “12V” power port of the HD
Video Capture Box Ultimate. Plug in the power adapter to any
power outlet.
(The device does not contain a built-in battery. External battery
sold separately. Compatible models: Sony NP-F550, NP-F750,
NP-F950, NP-F960, NP-F970. You can also add a CR2032
battery – not included – to preserve the time & date setting on the
device.)
3. Turn on the HD Video Capture Box Ultimate 3.0 by holding
down the power button for several seconds. (The power button is
located on the top of the device, on the right side.)
4. HDMI, SDI, DVI, or S-Video Sources: Connect your video
source to the appropriate “IN” port on top of the HD Video
Capture Box Ultimate 3.0.
AV Sources (VCR/camcorder/etc.): Plug in the MMI input
cable into the “MMI IN” port on the device (the first port from the
right). Connect your AV video source to the MMI cable using an
AV cable (not included).
VGA or YPbPr Sources: Plug in the MMI input cable into the
“MMI IN” port on the device (the first port from the right). Connect
your VGA or YPbPr video source to the MMI cable.
5. Set the device to the correct input (if necessary) by
pressing the “SOURCE” button one or more times. The factory

11
default input source is “HDMI.” Press the “SOURCE” button until
the correct input source (for example, “HDMI,” “AV,” “VGA,” etc.,
appears at the bottom of the screen).
5. If there is a signal from your video source, you should see
video on the LCD screen.
!! IMPORTANT NOTE FOR HDMI SOURCES !! If your video
source has HDCP (content protection), the video will NOT
appear or be recordable. This does NOT mean the device is
defective. This simply means that this device complies with
federal law and does not record from content protected video
sources. For gaming systems and cameras, turn off HDCP in
your system/camera’s settings.
If you want the video signal to “pass through” to your TV, use
another HDMI cable (not included) to connect your TV to the
HDMI OUT port (the HDMI port on the left side of the device).
6.Plug in a 512GB or smaller USB drive or SD card (or 8TB or
smaller USB hard drive) into the bottom of the device. NOTE:
We highly recommend starting with a brand new, “SanDisk” brand
drive.
7. Press the “Rec/Stop” button on the HD Video Capture Box
(or use the remote control or foot pedal).
8. To stop recording, press the “Rec/Stop” button again (or use
the remote control or foot pedal).
9. To play back recordings on your device, press the
“PLAYBACK” button. The device will ask you to select “USB” or
“SD” for your playback source. Select a recording file and press
“OK” to play it.

12
To exit playback mode: Press the “ ” button repeatedly.
10. To play back or transfer recordings to your PC or Mac,
remove the USB drive or SD card from your HD Video Capture
Box Ultimate 3.0 and plug it into your computer. (NOTE: Make
sure you stop recording before removing the USB/SD drive, and
give the converter about 30 seconds to save the video file.)
Browse the drive and go to the “video” folder. You will find your
recordings in this folder.
11. (Optional) To live stream or record directly to your PC,
please see the steps on the following page.
12. (Optional) To use the included foot pedal or remote
control, please see the directions on pages 7-8.

13
How To Live Stream or Record Directly To Your
Computer (Windows/PC Only)
1.If you are recording HDMI sources, read the note on
previous page (page #9) before continuing.
2. Plug in the device to the power adapter.
3. Connect the included USB-C cable to the “TO PC” port on
the top of the HD Video Capture Box. Plug the other end into your
PC. (Macintosh not supported.)
4. Download & install the OBS software from
www.OBSproject.com.
5. Open the OBS software.
6. Click Scenes → Add Scene→ and enter a name.
7. Click Sources → Add Video Capture Device→ Device
Selection, and select “Video Streaming.”
8. Click Sources Add Audio Input Capture Device Device
and select Microphone (Audio Streaming)” to add the audio.
9. You may also need to click Settings → Audio → Desktop Audio
Device, and choose your PC’s speaker/sound card.
10.Now you can start recording or live streaming your HDMI
video source.

14
How To Control Volume of Input Source,
Microphone, and Speaker
Use the right and left buttons to adjust the volume of the input
source (i.e. HDMI, AV, etc.) This volume setting will affect the final
recording files.
Use the up and down buttons to adjust the input volume of the
microphone (optional).
To control the speaker volume, use the speaker volume setting in
the main menu, or on the buttons on the remote control. This
setting will not affect the volume level of the recording files.
How To Navigate Device Menu & Schedule
Recordings
Press the “Home” button to open the device main menu.
Press the right and left arrows to choose a setting category.
Press the up and down arrows to select a setting.
To select a new category of settings, press the back button.
To schedule recordings, choose the last setting category
(Schedule Recordings).
There are four categories of settings:
1. System Settings
2. Image Settings
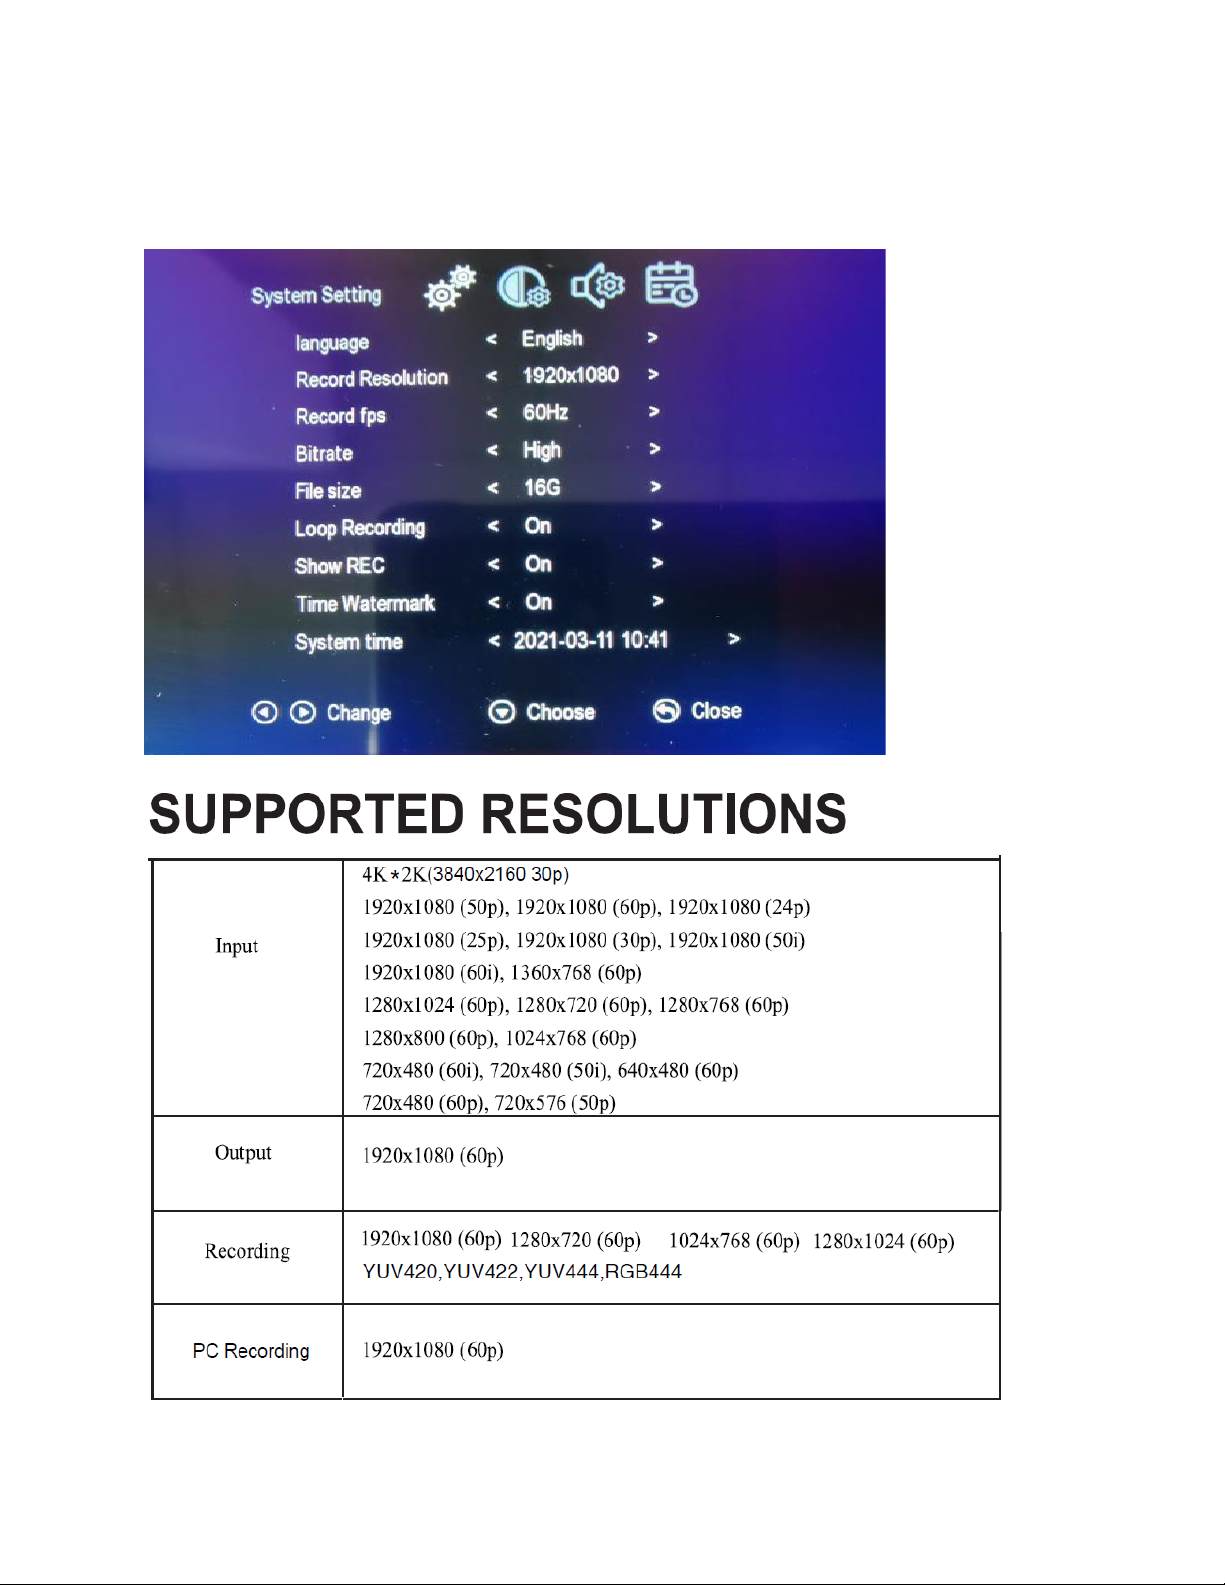
15
3. Audio Settings
4. Schedule Settings
16

17
Troubleshooting (FAQ’s)
1. My video doesn’t show up on the LCD / the LCD is black.
First, see the important notice on page #9 (HDMI/DVI sources only).
Please make sure the video source is connected properly.
Then, make sure you have selected the correct video “SOURCE” on the
HD Video Capture Box Ultimate 3.0.
Finally, make sure your HDMI cable is plugged into the “IN” port, not the
“OUT” port.
2. I made a recording, and when I plug in my USB drive/SD card to my
computer, the file is corrupted or missing.
Make sure you are stopping the recording by pressing REC/STOP and
allowing the converter 10-20 seconds to save the file correctly.
Also, we recommend starting with a new, unused USB 3.0 drive/SD card
that is “SanDisk” brand and 512GB or less. USB Hard Drives should be
8TB or less and “USB 3.0.”
3. My SD card or USB drive isn’t recognized by the device.
Please try another SD card or USB drive. We recommend using a fresh SD
card or USB drive that has not been used in other devices before.
4. I get the message “To PC Is Connected. Standalone Mode Is
Invalid.”
Unplug the USB cable from the TO PC port to use the device in standalone
mode.
5. The device is frozen.
Hold down the power button for a full 10 seconds to shut down the device.
18
6. The device isn’t recording.
First, see the important notice on page #9 (HDMI/DVI sources only).
Please make sure the proper source input is selected. (See FAQ #1)
Please make sure a storage device (USB drive or SD card) is inserted.
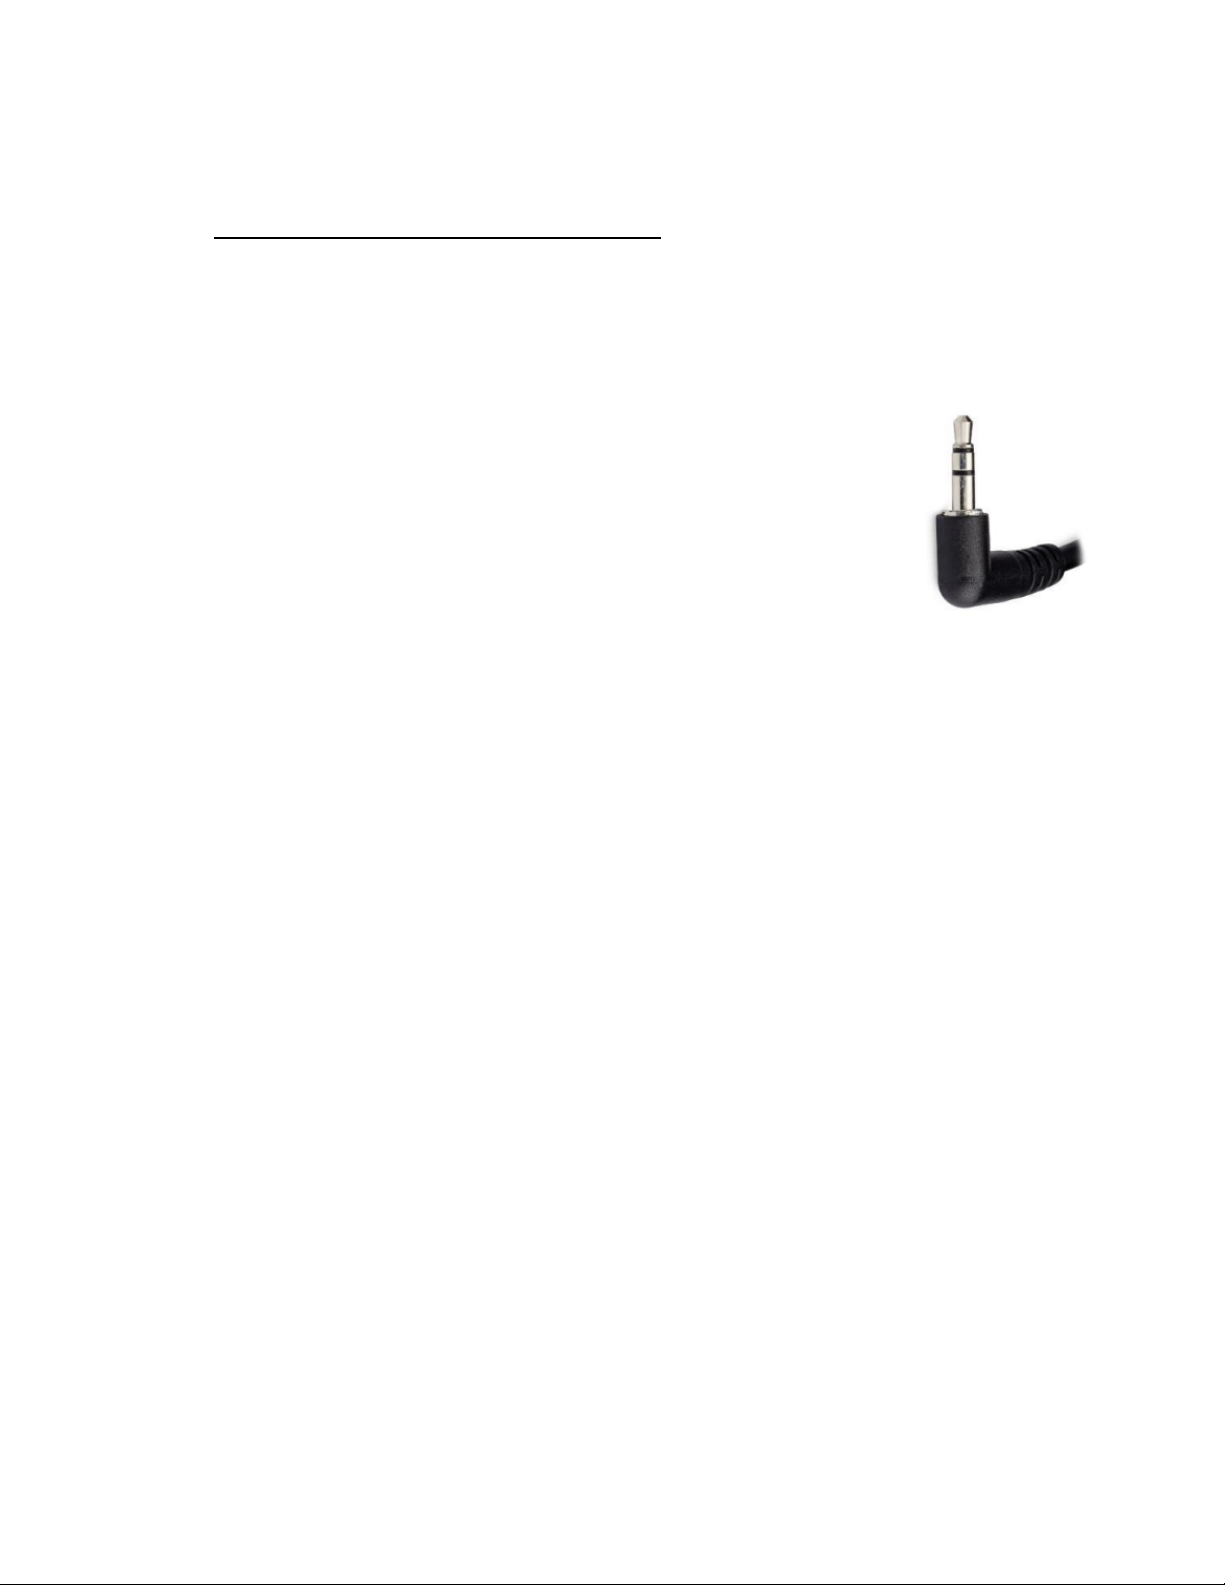
7. No sound from my headset/microphone and/or the
device speaker.
Please make sure the volume settings are up in the main
menu. Make sure your headset volume is properly
adjusted. Make sure your headset is a 3.5mm TRS type as
shown in the diagram on the right.
8. My recordings don’t show up on my PC or Mac when I plug in the
device by USB.
To view recordings, unplug your USB drive or SD card from the device and
plug it into your PC or Mac.
9. Live streaming to PC doesn’t work.
Make sure you have connected the power adapter to the device.
Make sure “Video Recording” and “Microphone/Audio Streaming”
devices have been selected as the Video/Audio input in your OBS
streaming software.
10. When live streaming or recording directly to the PC, the
audio/video is not synchronized.
The PC streamlining/direct recording feature is very resource heavy. In
other words, you may need a faster PC with a better graphics card to use
this feature, such as a gaming PC.

19
11. The audio and video seems to be out of sync on the device
screen.
The recorded files should not have this issue. Please play back the
recorded files on a PC or output to an HDMI device in Playback mode.
If your files still have this issue, please try a new USB 3.0 flash drive (512
GB or smaller/ SD card Class 10 or higher). We recommend “SanDisk”
brand drives.
12. The recorded files don’t play back smoothly on my PC or Mac.
The recorded files may be very large in size. Try playing them back on a
PC or Mac with a better CPU and graphics card.
13. I have a question that isn’t listed here, or need further support.
No problem! Please email us at [email protected] with your order
number, and we will get back to you as soon as possible.

Table of contents
Other ClearClick PCI Card manuals


 Hardware manual")


