clenaware Sovereign 45 MK5 User manual

1 of 35
Product Manual
Sovereign 45 & Sovereign 50 Glasswasher - MK5
Sovereign 45 & Sovereign 50
Glasswasher - MK5
Version: 3
Date Issued: 17/01/2019

2 of 35
Index
CS-A0001 - Sovereign 45 Glasswasher
CS-A0002 - Sovereign 50 Glasswasher
Sovereign Glasswasher Operating Instructions ................................................................... 3
Preparation.................................................................................................................... 3
Filling ............................................................................................................................ 4
Standby Mode............................................................................................................... 4
Washing Glass and Plastic.............................................................................................. 6
Renovate Cycle.............................................................................................................. 7
Closedown Cycle........................................................................................................... 8
Chemical Injection and Warnings................................................................................... 9
Spraybar Rotation Warning.......................................................................................... 10
Other Features............................................................................................................. 11
Daily Maintenance .......................................................................................................... 12
Vital Parts to Be Regularly Cleaned/Maintained ............................................................ 14
Caring For Your Sovereign Glasswasher........................................................................... 16
Simple Fault Finding ........................................................................................................ 18
Machine Errors................................................................................................................ 23
Sovereign Glasswasher Installation .................................................................................. 25
WEEE .......................................................................................................................... 30
Service and Warranty ...................................................................................................... 31
Warranty ..................................................................................................................... 31
Service......................................................................................................................... 33
Disclaimer.................................................................................................................... 33
3 of 35
Sovereign Glasswasher Operating
Instructions
Preparation
1. Ensure that the machine interior is clean and soil-free, and that the bottom Spraybar
rotates freely, Jets are clean and correctly located.
2. Check that the Upper Rinse Dome is in place.
3. Ensure that all four Filters are in position in the Wash Tank trough:
Primary Flat Disc Filters (2) are fitted to the wash and waste outlets. Secondary Drum
Filter fitted over the wash outlet (rear outlet). Main Tray Filter that encloses the Wash
Tank trough.
4. Check that the Detergent and Rinseaid containers have sufficient liquid level and that
the suction tubes are in their appropriate products. Blue tube for Rinseaid, and clear
tube for Detergent.
5. Switch on the water and electrical supplies to the machine. Close the Door.
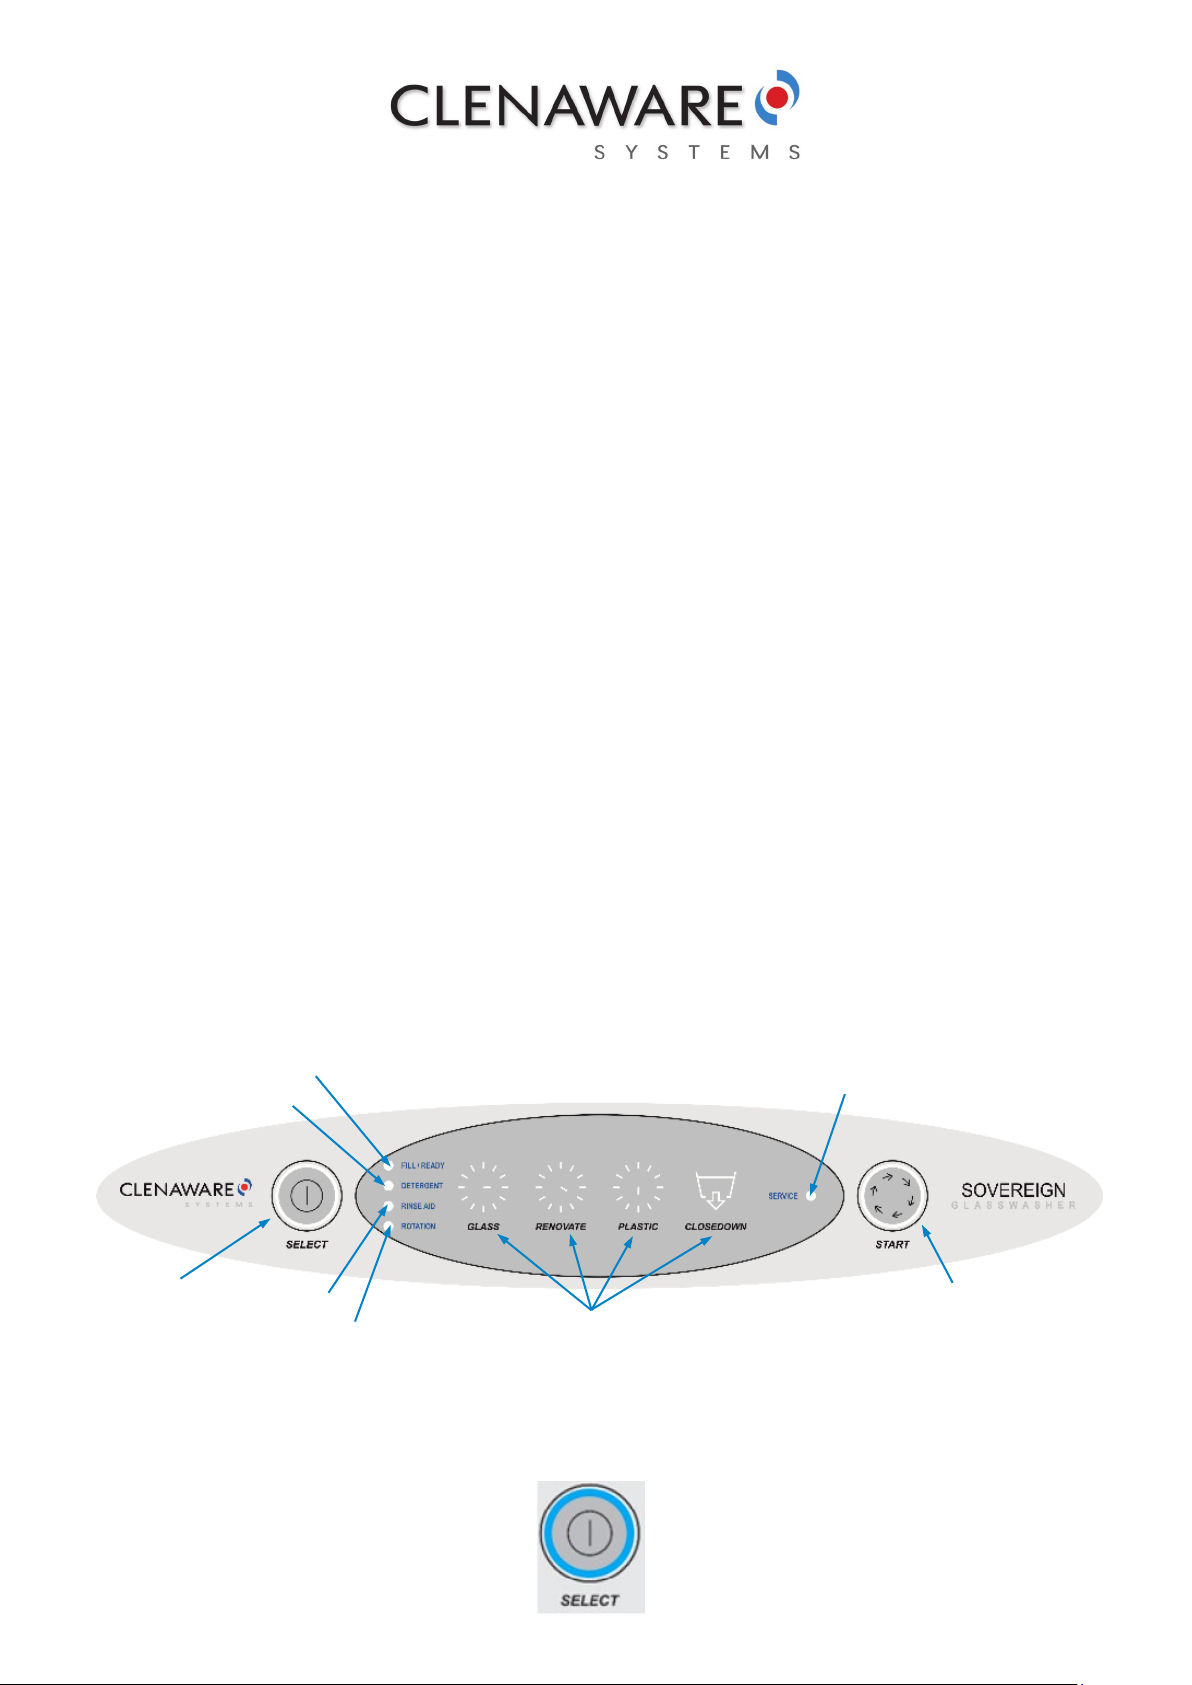
The Select Switch will be illuminated red.
Switch the Machine On
6. Press the Select Switch: The Select Switch will be illuminated blue.
Rotation
Rinseaid
Select Switch
Fill/Ready
Detergent
Start Switch
Cycle Types
Service

4 of 35
Filling
1. When the machine is switched on, a fill heat sequence will be performed as follows:
a) The Rinse Tank will fill with water
b) The Drain Pump will operate to vacate any water from the Wash Tank
c) The Fill/Ready Lamp will be illuminated orange
d) The Start Switch will be illuminated green (rotating)
e) Once the Rinse Tank is full, the water will be heated to 75°C
f) The Fill/Ready Lamp will flash orange during heating
g) Once up to temperature, the rinse water will be pumped into the Wash Tank
h) After the Fill/Heat sequence has been completed, the audible alarm will bleep
five times
i) The Fill/Ready Lamp and Start switch will be illuminated green
j) The Glass Cycle Lamp will be illuminated blue
k) The Rinse Tank will re-fill and heat to standby temperature
The machine will now be in Standby Mode, ready to operate wash cycles.
Note: If the machine has not been switched off using the Closedown Cycle (or
suffered a power failure) a short refreshment cycle will be performed at start-up
to ensure that all water is vacated from the machine. The Fill/Ready Lamp being
illuminated red indicates this.
To avoid this, and to ensure hygienic conditions, always use the Closedown Cycle at
the end of a session.
Standby Mode
1. Pressing the ‘Select Switch’ will step through the cycle options as follows:
Glass
Renovate
Plastic (only if enabled by an engineer)
Closedown
The appropriate indicator will be illuminated blue.

5 of 35
Glass Cycle
Is the default cycle and used for washing normal glassware.
Renovate Cycle
Is used in conjunction with Renovate Powder to recondition new and contaminated
glassware.
Plastic Cycle
If enabled, is used for washing plastic (polycarbonate etc) drinking vessels. Due to higher
temperatures and chemical usage, this cycle is not suitable for washing normal glassware.
Closedown Cycle
Is used at the end of a washing session to empty all tanks and flush the system clean.

6 of 35
Washing Glass And Plastic
Note that the Glass and Plastic cycles are very similar in operation. The differences are a
higher rinse temperature and increased Rinseaid dose on the plastic cycle.
1. Fill a basket with inverted glasses having first emptied out any liquid or solid waste
elsewhere. Open the Door and slide the basket into position. Close the Door.
Starting The Cycle
1. Select the cycle (Glass or Plastic) required and press the Start Switch to start the
chosen cycle:
a) The Start Switch will be illuminated green (rotating)
b) The Wash Pump will be energised for the initial 90 seconds of the cycle, re-
circulating the wash water via the rotating Spraybar
The Door must not be opened during the wash cycle.
2. During the wash period the rinse water will be heated to the correct operating
temperature.
If the rinse water is not up to temperature at the end of the 90 second wash period,
the machine will continue washing until the correct temperature is reached. The
Fill/Ready Lamp flashing green indicates this.
a) At the end of the wash period the Wash Tank will be emptied for 20
seconds
b) The cycle will conclude with a fresh water rinse (approx. 10 seconds)
c) At the end of the cycle, the audible alarm will bleep five times
d) The Fill/Ready Lamp and Start switch will be illuminated green
e) The Glass Cycle Lamp will be illuminated blue
f) The Rinse Tank will re-fill and heat to standby temperature
3. Open the Door and remove the basket of clean glasses. Close the Door.
The machine will now be in Standby Mode. Note that the Glass or Plastic cycle type
will remain selected.
Note: If the wash water temperature is too low, a short refreshment cycle will be performed
at the start of the cycle. The Fill/Ready Lamp will be illuminated orange to indicate this.

7 of 35
Renovate Cycle
This cycle is used for the preparation of new glassware, the renovating of stained or greasy
glassware, and is also recommended for cleaning the machine Wash Tank interior.
1. Open the Door and add a measure of renovate powder to the top of the Main Filter
(avoid contact with eyes, hands and face).
2. Fill a basket with inverted glasses to be renovated. Open the Door and slide the
basket into position. Close the Door.
3. Select the Renovate Cycle and press the Start Switch to start the cycle:
a) The Wash Pump will be energised for the initial 150 seconds of the cycle,
re-circulating the wash water via the rotating Spraybar. The Door must not
be opened during the wash cycle
b) At the end of the wash period the Wash Tank will be emptied for 20
seconds, followed by a fresh water rinse (approx 10 seconds)
c) The machine will then continue with a Glass Wash Cycle as described in
‘Starting the Cycle’ above
4. Open the Door and remove the basket of clean glasses. Close the Door.
The machine will now be in Standby Mode. Note that the cycle type will revert to Glass.

8 of 35
Closedown Cycle
1. From Standby Mode, select the Closedown Cycle and press the Start Switch to start
the cycle:
At any other time (during the fill/heat sequence, during a wash cycle, or whilst the machine
is in an error condition), press the Select Switch (the Closedown Lamp will flash) and press
the tart Switch. This will force a Closedown Cycle.
a) The Start Switch will be illuminated green (rotating)
b) The Drain Pump will be energised during the entire cycle, removing water
from the Wash Tank. The Door must not be opened during the closedown
cycle
c) The Rinse Pump will be energised for the initial 20 seconds of the cycle to
remove the water from the Rinse Tank
d) At the end of the 40 second cycle, the machine will switch off, with the Select
Switch illuminated red
e) Isolate the water and electrical supplies to the machine

9 of 35
Chemical Injection And Warnings
Detergent & Rinseaid
Detergent and Rinseaid is automatically injected during each washing cycle. The amount of
chemical injected is dependent on site conditions and can be adjusted by an engineer. The
default setting is 300:1 for Detergent and 3000:1 for Rinseaid. A bottle of Rinseaid will last
10 times longer (before replacement is required) than Detergent.
Detergent and Rinseaid is continuously monitored (by
conductivity) on entry into the machine.
If a chemical is detected, then the relevant lamp is
illuminated green.
If not detected, then the lamp is illuminated orange.
Note: In some cases, poor quality chemicals may not be detected.
If a chemical is low (orange warning lamp), then replace the relevant bottle.
For Rinseaid low, it is recommended to restart the machine to allow the Rinseaid to prime.
It is important that the correct chemical suction tube (colour coded) is connected to the
correct chemical.
Note: Operating the machine without the correct chemicals or with chemical tubes wrongly
connected to bottles will damage the ware and promote scale build-up.
Detergent
Rinseaid
Clear Tubing
Blue Tubing

10 of 35
Spraybar Rotation Warning
Poor wash quality will result from the lack of rotation of the Spraybar. The machine
incorporates a Spraybar rotation sensor and will highlight a problem by use of a warning
lamp.
Spraybar rotation is continually monitored during the wash and rinse periods of a wash
cycle.
If rotation is detected: The warning lamp will be illuminated green
If rotation not detected: The warning lamp will be illuminated red at the end of the cycle.
The reason for lack of rotation will normally be caused by soil build-up around the Wash
Arm bearing, blocked Filters, or by blocked Jets.
Remove the Spraybar assembly & Filters and clean thoroughly. Refit the parts. The Spraybar
should rotate freely. Check that the warning lamp responds to the rotations.
Note: Clean the machine thoroughly then start a wash cycle only call an engineer if the error
cannot be cleared.

11 of 35
Other Features
Energy Saving
In Standby Mode the rinse water temperature is held at a lower value than that required for
the cycle rinse. The shortfall in rinse temperature is made up during the wash part of a cycle.
In this way, energy is not needlessly wasted.
The standby temperature will depend on the model, the cycle type chosen, and whether the
machine is connected to 13 or 30 amps.
Data Fault
If for any reason the data within the control system becomes corrupted, this will be
indicated on the Control Panel with all indicator lamps flashing.
To re-load the default data, press the Start Switch.
If the problem persists, call an engineer.

12 of 35
Daily Maintenance
Important
Ensure that the electrical and water supplies are switched off while carrying out the
following procedures. This appliance must not be cleaned with a water jet.
Refer to Exploded Diagram below for help with maintenance and spares.
1. At the end of each session, open the machine Door and remove the basket.
2. Remove the top Rinse Arm and bottom Wash Arm by unscrewing their central
retaining fasteners and lifting away. Ensure that the mating surfaces around the
spindle areas are clear of debris.
Inspect the Spray Jet nozzles for blockages.
a) To clean blocked Jets, the affected nozzle can be sprung-off from the
Spraybar and flushed clear with running water
b) Do not dismantle the Spray Arms from the Hub
c) Ensure that all the Spray Jets are seated firmly on the Spraybar, and that all
the Jets have an o-ring attached. Note that the white wash Spray Jets are a
different size to the blue Rinse-Jets, so it is impossible to fit incorrectly
d) Damaged or missing Spray Jets and o-rings must be replaced for efficient
operation of the machine
e) Carefully remove any debris from the machine interior (protective gloves
are recommended)
f) Clean all internal surfaces of the Wash Tank with a nylon brush and wipe
with a clean damp cloth. Pay particular attention to the Door labyrinths
and hinge areas
Do not use a wire brush for cleaning.
3. Remove the Main Tray Filter which covers the Wash Tank trough, and the Drum Filter
which covers the wash outlet hole. Brush them clean under running water to ensure
that all particles and fibres are removed.
4. Use a damp cloth to wipe clean the Wash Tank trough.
5. Unscrew and remove the two Flat Disc Filters and brush clean under running water.

13 of 35
6. Re-assemble the fittings in reverse order, ensuring that all four Filters are in their
correct positions, and that both Spraybars rotate freely. Do not over tighten Spraybar
fixing screws - finger tight is sufficient.
7. Check and if necessary replace the Detergent and Rinseaid containers.
8. The regular use of renovate powder as a machine cleaner is recommended.

14 of 35
Vital Parts To Be Regularly Cleaned/Maintained
Rinse Arm & Spindle Assy
CS-B0704 (Sovereign 45)
CS-B0705 (Sovereign 50)
Rinse Jet Moulding - Blue
O-Ring CS-X0747
Wash Jet Moulding - White
O-Ring CS-X0747
Wash Arm & Spindle Assembly
CS-B0701 (Sovereign 45)
CS-B0702 (Sovereign 50)

15 of 35
Main Filter Moulding - SOV 45/50
CS-D0316
Secondary Filter Sub-Assy
CS-B0304
Wash Filter
CS-F0333
Drain Filter
CS-F0332

16 of 35
Caring For Your Sovereign Glasswasher
Observance of the following will ensure maximum efficiency from your machine:
Please “Do” The Following
Glass Preparation
1. Remove all solid material such as cocktail sticks, fruit peel and pips etc.
2. Ensure that glasses used for speciality coffees or other drinks containing cream or
fatty residues are pre-rinsed prior to washing. Greasy substances in the wash water
can coat glasses and greatly impair beer foam stability and gas release.
3. Ensure that all drink residues are disposed of, prior to washing.
Glass Racking And Stacking
1. Ensure that baskets are filled with inverted glasses to maximise capacity and minimise
risk of breakages.
2. Always store washed glasses in an inverted position on ventilated drip mats, or in
baskets.
Machine Preparation And Use
1. Ensure that the machine interior is thoroughly clean and free of debris.
2. Remove and thoroughly clean all Jets, Filters, Wash Arms etc… daily. Wash Filters
must be absolutely clean and located correctly for the machine to operate efficiently.
3. Ensure that the Jets are located correctly and check the Spraybars are free to rotate.
4. Ensure that the Detergent and Rinseaid containers are sufficiently full for the
anticipated use during the session. Use only quality Detergents and Rinseaids,
designed for glass washing.
5. Ensure that a water softener, where fitted, is regenerated regularly.
6. Ensure that the Fill/Ready Lamp is green before starting a cycle.

17 of 35
7. Ensure that a wash cycle is fully completed before removal of glasses. On completion
of a cycle, the Start Switch will stop rotating, and there will be five bleeps by the
audible alarm.
8. Operate a Closedown Cycle to drain the machine completely after every trading
session.
9. Leave the Door open at the end of session to ventilate the machine.
Please “Do Not” Do The Following
1. Put ashtrays, coffee cups or anything other than drinking glasses through the
machine.
2. Attempt to remove the basket of glasses before the Wash Cycle is completed.
3. Wash glasses with water only. Detergent and Rinseaid must be used.
4. Stack glasses on top of each other.
5. Leave washed glasses in the machine.
6. Handle glasses during the drying period or use a glass cloth. Allow the glasses to dry
naturally, or with the aid of an Airack.
7. Leave the Door open between cycles.
8. Isolate power without operating a Closedown Cycle.
9. Attempt to remove machine covers.

18 of 35
Simple Fault Finding
Should a problem develop with your Sovereign machine, please consult the following fault-
finding procedures before calling for assistance.
Service Lamp Flashes
1. The Sovereign machine is designed to keep operating regardless of most functional
errors that might occur. For example, for an internal Heater failure, the machine will
still operate, but with no internal heating.
2. In most cases, the machine will resolve the fault, but for some errors the machine will
be inoperative.
If you experience continued error flashes on the service lamp, or if the machine stalls, isolate
the electrical supply for 10 seconds, re-connect and attempt to re-start the machine.
3. If the problem persists, call for assistance.
Machine Will Not Switch On
1. Check the switch is "On" at the wall socket.
2. Isolate the electrical supply for 10 seconds, re-connect and attempt to re-start the
machine.
3. Check for operation of circuit breakers or fuses in distribution box.
4. Call for assistance.

19 of 35
Machine Does Not Fill
This fault usually generates a warning on the Control Panel.
The Service Lamp will flash with the frequency of 3 flashes and 1 pause.
1. Check that the water supply is switched on, and that a water supply is available.
2. Check that the Inlet Hose is not kinked.
3. If a water softener is fitted, check that the softener is not regenerating.
4. Call for assistance.
Machine Will Not Drain
1. Check for blocked Drain Filter.
2. Call for assistance.
Machine Filled Okay, But Wash Tank Is Empty
1. Check for water siphoning out of the machine due to the Drain Outlet Hose being
pushed too far down the waste up-stand.
2. Call for assistance.
Machine Will Not Operate A Wash Cycle
1. Check that the Fill/Ready Lamp is lit ‘green’, and that the Door is closed.
2. Call for assistance.
Glasses Remain Soiled
1. Ensure that glasses used for speciality coffees or other drinks containing cream or
fatty residues are pre-rinsed prior to washing.
2. Remove all drink residues and solid material such as cocktail sticks, fruit peel and pips
etc prior to washing.

20 of 35
3. Check that the Rotation lamp on the Control Panel is lit ‘green’. If lit ‘red’, check that
both Spraybars rotate freely, and that no Spray Jets are blocked or missing.
4. Check that the Detergent and Rinseaid lamps on the Control Panel are lit ‘green’. If lit
‘amber’, replace the relevant chemical.
5. Check that chemical suction tubes are correctly in position in the containers. The
‘clear’ tube should be fed by the Detergent container, and the ‘blue’ tube fed by the
Rinseaid container.
6. Ensure that quality chemicals designed for glasswashing are in use.
7. Check that the water softener (where fitted) is being regenerated with granular salt
at frequent intervals.
8. Call for assistance.
Glasses Not Shedding (“Spotty” In Appearance)
1. Ensure that the wash cycle has completed before removing the basket of washed
glasses from the machine.
2. Ensure that the glasses are not being polished with a cloth that has been treated with
fabric conditioner.
3. Check that the Detergent and Rinseaid lamps on the Control Panel are lit ‘green’. If lit
‘amber’, replace the relevant chemical.
4. Check that chemical suction tubes are correctly in position in the containers. The
‘clear’ tube should be fed by the Detergent container, and the ‘blue’ tube fed by the
Rinseaid container.
5. Ensure that quality chemicals designed for glasswashing are in use.
6. Check that the Rotation lamp on the Control Panel is lit ‘green’. If lit ‘red’, check that
both Spraybars rotate freely, and that no Spray Jets are blocked or missing.
7. Check that the water softener (where fitted) is being regenerated with granular salt
at frequent intervals.
8. Where plastic glasses are in use, always select the Plastics Wash Cycle.
This manual suits for next models
1
Table of contents
Other clenaware Dishwasher manuals


