Cleveland CycleWerks Tha Heist User manual
08-01-2011 REV 2
DO NOT RIDE IF YOU ARE UNDER THE AGE OF 16.
Always wear all necessary and properly fitting protective equipment when operating this
motorcycle.
WARNING
Toreducetheriskofinjury,the usermustreadandunderstandtheoperator's manual before
usingthis product.
This manualcontains important safety information and instructions which should be read carefully before operating this vehicle.
SAVE THIS MANUAL FOR FUTURE REFERENCE
Cemotorcyclenepeutetreconduitpardespersonnesageesdemoinsde16ans.Portertoujourstoutl'equipementdeprotection
necessaireetapproprie lorsdelaconduitedecemotorcycle.
AVERTISSEMENT
:
Pour reduire le risque de blessures, l'utilisateur doit lire et comprendre le manuel du conducteur avant
d'utiliser ce produit.
This manualcontains important safety information and instructions which should be read carefully before operating this vehicle.
CONSERVEZ CE MANUEL AUX FINS DE REFERENCE FUTURE
El requisito para usar este motorcycle es que elusuario tenga, como minimo,16afios.Use siempre todo el equipo de protecci6n
que sea necesario y que calce correctamente aloperar este motorcycle.
ADVERTENCIA:
Para reducirelriesgo de lesiones, el usuario debe leery comprender elmanual deloperador antes de usar
este producto.
This manualcontains important safety information and instructions which should be read carefully before operating this vehicle.
GUARDE ESTE MANUAL PARA FUTURAS CONSULTAS

•
Limited Warranty ...............................................................................................................................................................2
•
Rules for Safe Operation ....................................................................................................................................................3
•
Symbols.........................................................................................................................................................................4
•
Safety Labels.......................................................................................................................................................................5
•
Features.............................................................................................................................................................................6-8
•
Operation..........................................................................................................................................................................9-12
•
Maintenance...................................................................................................................................................................13-24
•
Troubleshooting...................................................................................................................................................................25
•
Emissions Warranty ...........................................................................................................................................................26
•
Noise Emission Warranty .................................................................................................................................................27
•
Product Specifications.........................................................................................................................................................27
•
Whole Bike Wiring Diagram..................................................................................................................................................28
•
Specific Wiring Schematics.................................................................................................................................................29
WHAT ISCOVERED:ClevelandCycleWerks LLC.warrantstothe originalretailpurchaserinthe UnitedStatesofAmerica,
thatthisproductisfreeofdefectsinmaterial andworkmanshipandagrees,atClevelandCycleWerksLLC.discretion,to
either repair,providereplacement partsfor,orreplace(withoutchargeforparts)anyproductorcomponentwithamaterial
defect for a periodof1yearfromthedateof purchase, except aslimitedbelow.Warranty serviceand replacementpartsare
warranted onlyforthedurationofthewarranty ontheoriginalproduct.Allreplaced partsandproductsbecometheproperty
ofCleveland CycleWerks LLC. Thisproductisalsocovered byanEmissionsControlSystemWarranty,whichisseparate
from and inadditiontothiswarranty.WHAT ISNOTCOVERED: Thiswarranty isdoes notcover anyconditions causedby
misuse,neglect,negligence,accidentoperationinanywaycontrarytotheoperatinginstructionsintheoperator'smanual,
normalwear,alteration,modification,improperorinadequatemaintenance,useofunauthorizedreplacementparts,orser-
viceprovidedbyanyoneotherthananAuthorized ClevelandCycleWerks LLC.ServiceCenter.Thiswarrantydoesnotcover
transportation costsforwarrantyservice. Without limitingtheabove,thiswarrantyisVOIDwithrespecttoanyproductthat
hasbeenusedforrentalorcommercialpurposesorthatsustainedthefollowingdamage:
Bent or broken frame due to abuse
Bent or broken wheelor wheels due to abuse
Bent or broken fender due to abuse
Racing is considered abuse
Any sign of impact, accident, jumping, spin-outs or roll over not caused by the condition for whichthe warranty coverage
issought.
TO GET SERVICE: please visit ClevelandCycleWerks.com and send us an email through our contact section. We will re-
spond within 48 hours. A copy of the sales receipt will be required as proof of purchase. Any approved warranty service will
be referred to an Authorized Cleveland CycleWerks LLC. Service Center. The cost of transporting the product to and from
the service center must be paid by the owner.
CLEVELAND CYCLEWERKS OBLIGATION UNDER THIS WARRANTY IS STRICTLY AND EXCLUSIVELY LIMITED TO
THE REPAIR OR REPLACEMENT OF DEFECTIVE PARTS AND CLEVELAND CYCLEWERKS DOES NOT ASSUME OR
AUTHORIZE ANYONE TO ASSUME FOR THEM ANY OTHER OBLIGATION. NO DEALER ISAUTHORIZED TO
MODIFY THIS WARRANTY
.
ALLIMPLIEDWARRANTIESARELIMITEDINDURATIONTOTHESTATEDWARRANTYPERIOD,ANDAREHEREBY
EXPRESSLY DISCLAIMED INTHEIR ENTIRETY AFTER THE EXPIRATION OF THE STATED 12MONTH WARRANTY
PERIOD.SOMESTATESDONOTALLOWLIMITATIONSONHOWLONGANIMPLIEDWARRANTYLASTS,SOTHE
ABOVE LIMITATION MAY NOTAPPLY TO YOU. CLEVELAND CYCLEWERKS ASSUMES NO RESPONSIBILITY FOR
INCIDENTAL,CONSEQUENTIALOROTHERDAMAGES.SOMESTATESDONOTALLOWTHEEXCLUSIONORLIMI-
TATIONOFINCIDENTALORCONSEQUENTIALDAMAGES,SOTHEABOVELIMITATIONOREXCLUSIONMAYNOT
APPLYTOYOU.
This warranty gives you specific legal rights,and you may also have other rights which vary from state to state.


SAFE OPERATION OF VEHICLE
!!
WARNING
!!
This operator's manual contains important safety and maintenance information. Read it
carefully and make sure you understand all included information before riding. Failing to
follow the warnings contained in this manual could result in SERIOUS INJURY or
DEATH.
READ ALL INSTRUCTIONS
It is important that this manual remain with the vehicle when you transfer itto another user or owner.
All information, illustrations,photographs and specifications contained in this manual are based on the latest
product information available at the time of publication.Due to improvements or other changes,there may be
some discrepancies in this manual. We reserve the right to make product changes at any time, without notice
and without incurring any obligation to make the same or similar changes to the vehicle previously built or sold.
Carefully read and understand this manual and all labels and follow the operating procedures described.
A Motorcycle Safety Foundation (MSF) instruction manual may also provided with this motorcycle. Read
andunderstandthecontentsofthatmanualbeforeoperatingthemotor-cycle.Ifthismotorcycleisresoldoroth-
erwisetransferredtoanewuseroroperator,theMSFinstructionmanualshouldremainwiththevehicle.
Always wear a helmet. The operator and passenger (if any) of this vehicle should always wear a helmet ap-
proved by agencies such as Department of Transportation (DOT), Safety Helmet Council of America (SHCA), or
Snell Memorial Foundation (SNELL). Most motorcycle accident fatalities are due to head injuries. The operator
should also wear face shields or goggles, boots or closed-toe shoes,gloves,and other appropriate protective
clothing.
Take time to get to know this vehicle. The operator's ability to operate this motorcycle safely is largely de-
pendent upon the operator's ability to exercise proper judgment. The operator must be of sufficient age, under-
standing,mental capacity,and physical capability to safely operate this vehicle. This vehicle should only be op-
erated after sufficient practice inan uncongested safe area. Safe operation includes responsibility for the safety
of a passenger (if any). We recommend that any inexperienced driver should take a certified course approved
by the Motorcycle Safety Foundation.
Ride defensively.A common accident happens when a car suddenly moves intoyour lane. Most motor-
cycle collisions happen when a car turns left infront of a motorcycle. Pay extra attention to other vehicles
around you. Never expect that they can see you.
Make yourself more visible by wearing bright reflective clothing. Use your horn when itwill help others see
you. Always use your turn signal before turning.
Do not ride beyond your abilities and never go faster than the posted speed limit.
Never operate this vehicle while under the influence of alcohol,drugs,or medication of any kind. Such op-
eration could be dangerous to yourself and/or others.
Keep your vehicle in a safe condition. Proper maintenance will help ensure a safe ride. Perform all recom-
mended maintenance and inspect your vehicle before each ride.Never modify your vehicle in any way to make
it unsafe.
NHTSA SAFETY NOTICE
If you believe your vehicle has a safety defect which could cause serious injury or death,you should immedi-
ately contact the National Highway Traffic Safety Administration (NHTSA) in addition to notifying Cleveland Cy-
cleWerks.
If NHTSA receives similar complaints, it may open an investigation and if it finds that a safety defect exists in a

group of vehicles, it may order a recall and remedy campaign.
However, NHTSA cannot become involved in any individual problems between you,your dealer, or Cleveland

4
damage.
A
DANGER:
A
WARNING
:
A
CAUTION:
SYMBOLS
The following signal words and meanings are intended to explain the levels of risk associated with this product.
SYMBOL SIGNAL MEANING
Indicates an imminently hazardous situation, which, if not avoided, will result in
death or serious injury.
Indicates a potentially hazardous situation, which, if not avoided,could result in
death or serious injury.
Indicates a potentially hazardous situation, which, if not avoided, may result in
minor or moderate injury.
CAUTION: (Without Safety Alert Symbol) Indicates a situation that may result in property
Some of the following symbols may be used on this product. Please study them and learn their meaning for safe opera-
tion of this product.
SYMBOL NAME EXPLANATION
A
Safety Alert
Indicates a potential personal injury hazard.
()
Read Operator's Manual
Toreducethe riskofinjury,user must readand understand
operator's manual before using this product.
e
Wear Eye Protection
Always wear eye protection with side shields (goggles)
marked to comply with ANSI Z87.1.
Wear Protective Gear
Always use an approved helmet and protective gear.
Drugs and Alcohol
Never use with drugs or alcohol.
@
Age Limit
Never permit children under the age of 16to operate this
motorcycle.
Toxic Fumes
Gas products emit carbon monoxide, an odorless, color-
less, poison gas.Breathing carbon monoxide can cause
nausea, fainting, or death.
Chemical Burns
Contains sulfuric acid.Avoid contact with skin,eyes,or
clothing.
><
Poison
Contains sulfuric acid. Do not ingest and avoid contact
with skin, eyes, or clothing.
*
Hula
Man, woman or child. Avoid eye contact, hula is
contagious. Steer clear of the hula.
5
La me
1
3
SYMBOLS
B
A
D
A
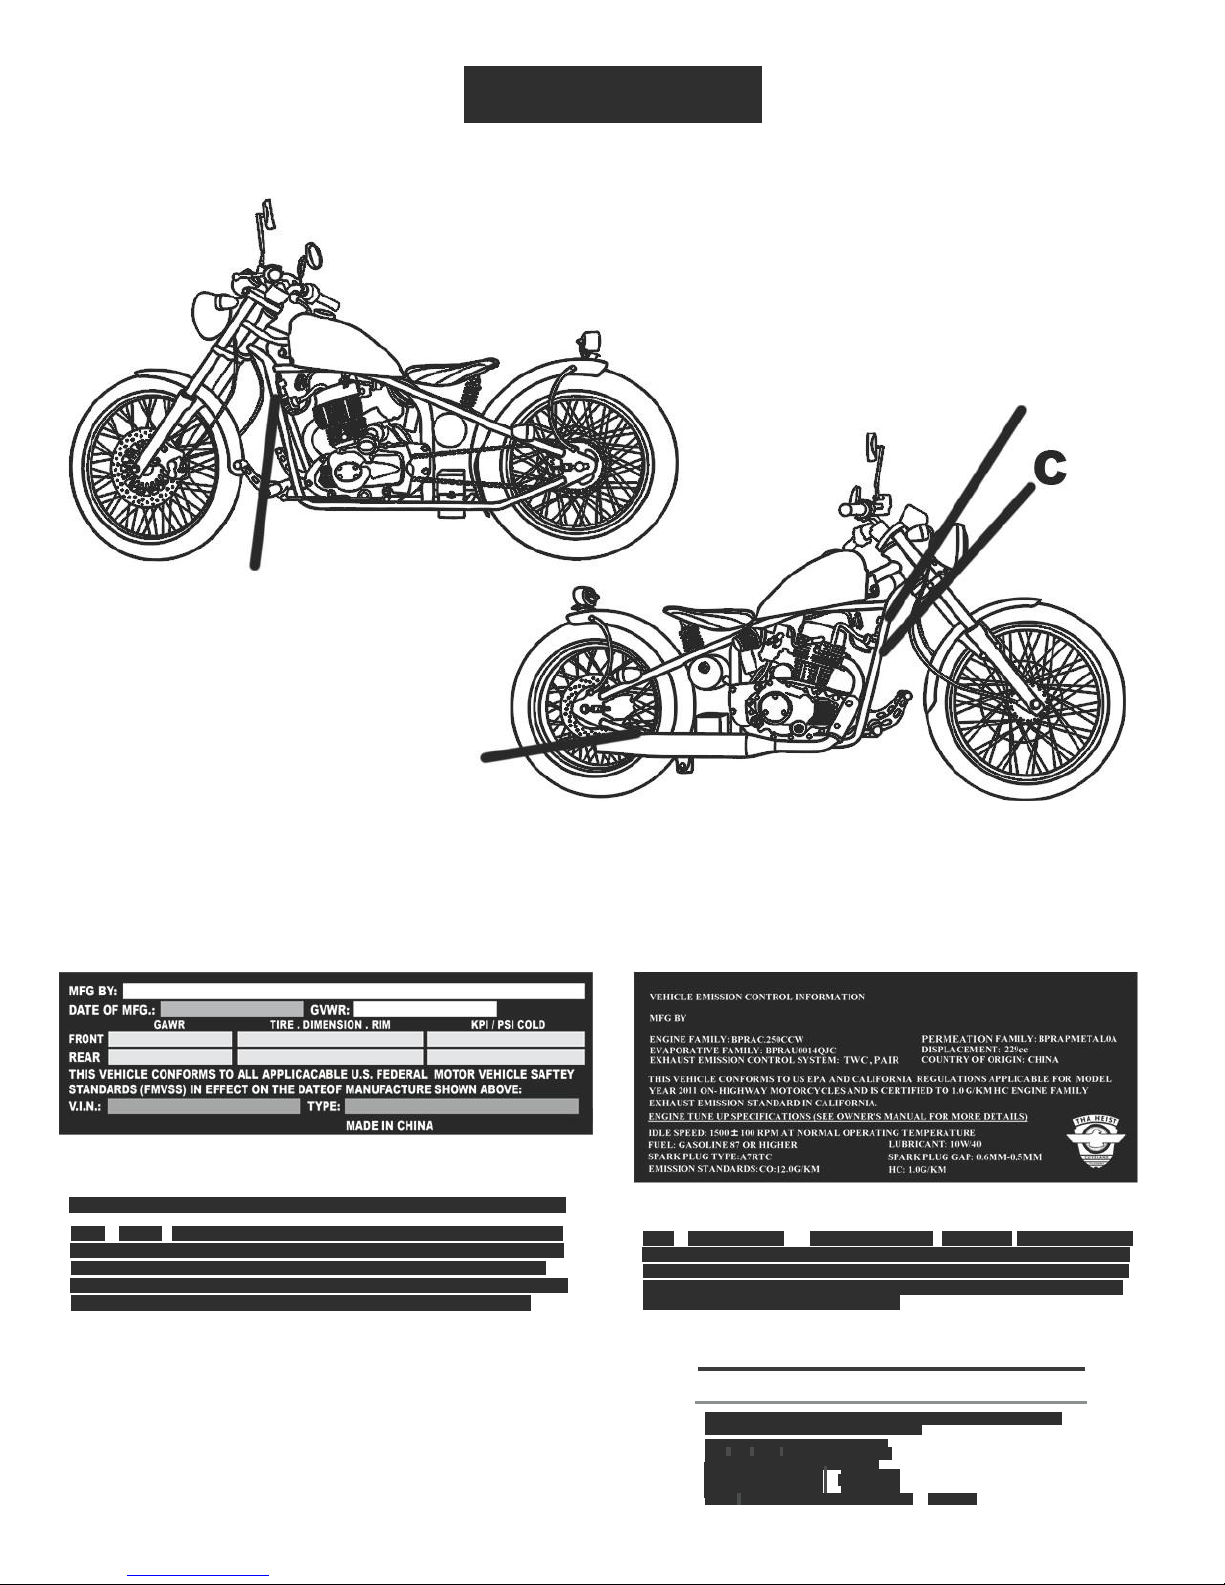
MOTORCYCLE NOISEEMISSIONS CONTROL INFORMATION
THIS
2011
CCW0010249 MOTORCYCLE CCW
001 "tha Heist",
MEETS EPA NOISE EMISSION REQUIREMENTS OF
80 dB(a)
AT
5500
RPMBYTHE FEDERALTESTPROCEDURE. MODIFICATIONSWHICH
CAUSETHISMOTORCYCLETO EXCEEDFEDERALNOISESTANDARDS
ARE PROHIBITED BY FEDERAL LAW
SEE OWNER'S MANUAL.
c
B
THIS CCW0010249 EXHAUSTSYSTEM CCW001 WHEN INSTALLED
WITHA LEGALMUFFLER MEETS EPANOISE EMISSION REQUIREMENTSOF
80dB(A) FORTHEFOLLOWINGMOTORCYCLES tha Heist INSTALLATION
OFTHIS EXHAUSTSYSTEMCOMPONENT ONMOTORCYCLE MODELS NOT
SPECIFIEDMAYVIOLATE FEDERALLAW
D
£WARNING £/llERTISSEEfT £ADVERTENCIA
Measurethe cham slack andad1ust 1fnecessary to behveen10mm·15mm slack
The measurement
1s
taken betweenthe sprockets
Mesurer la tensrnndelachame et a1uster
s1 necessa1re entre
les
mou
10mm·15mm
sure est prise enlre les
p1gnons
m r
nec ilWo
dee r ag,i1
l
·.
f
$mm
Lamed1crnnselomaenlrelasruedasdenladas 1o1smm
6
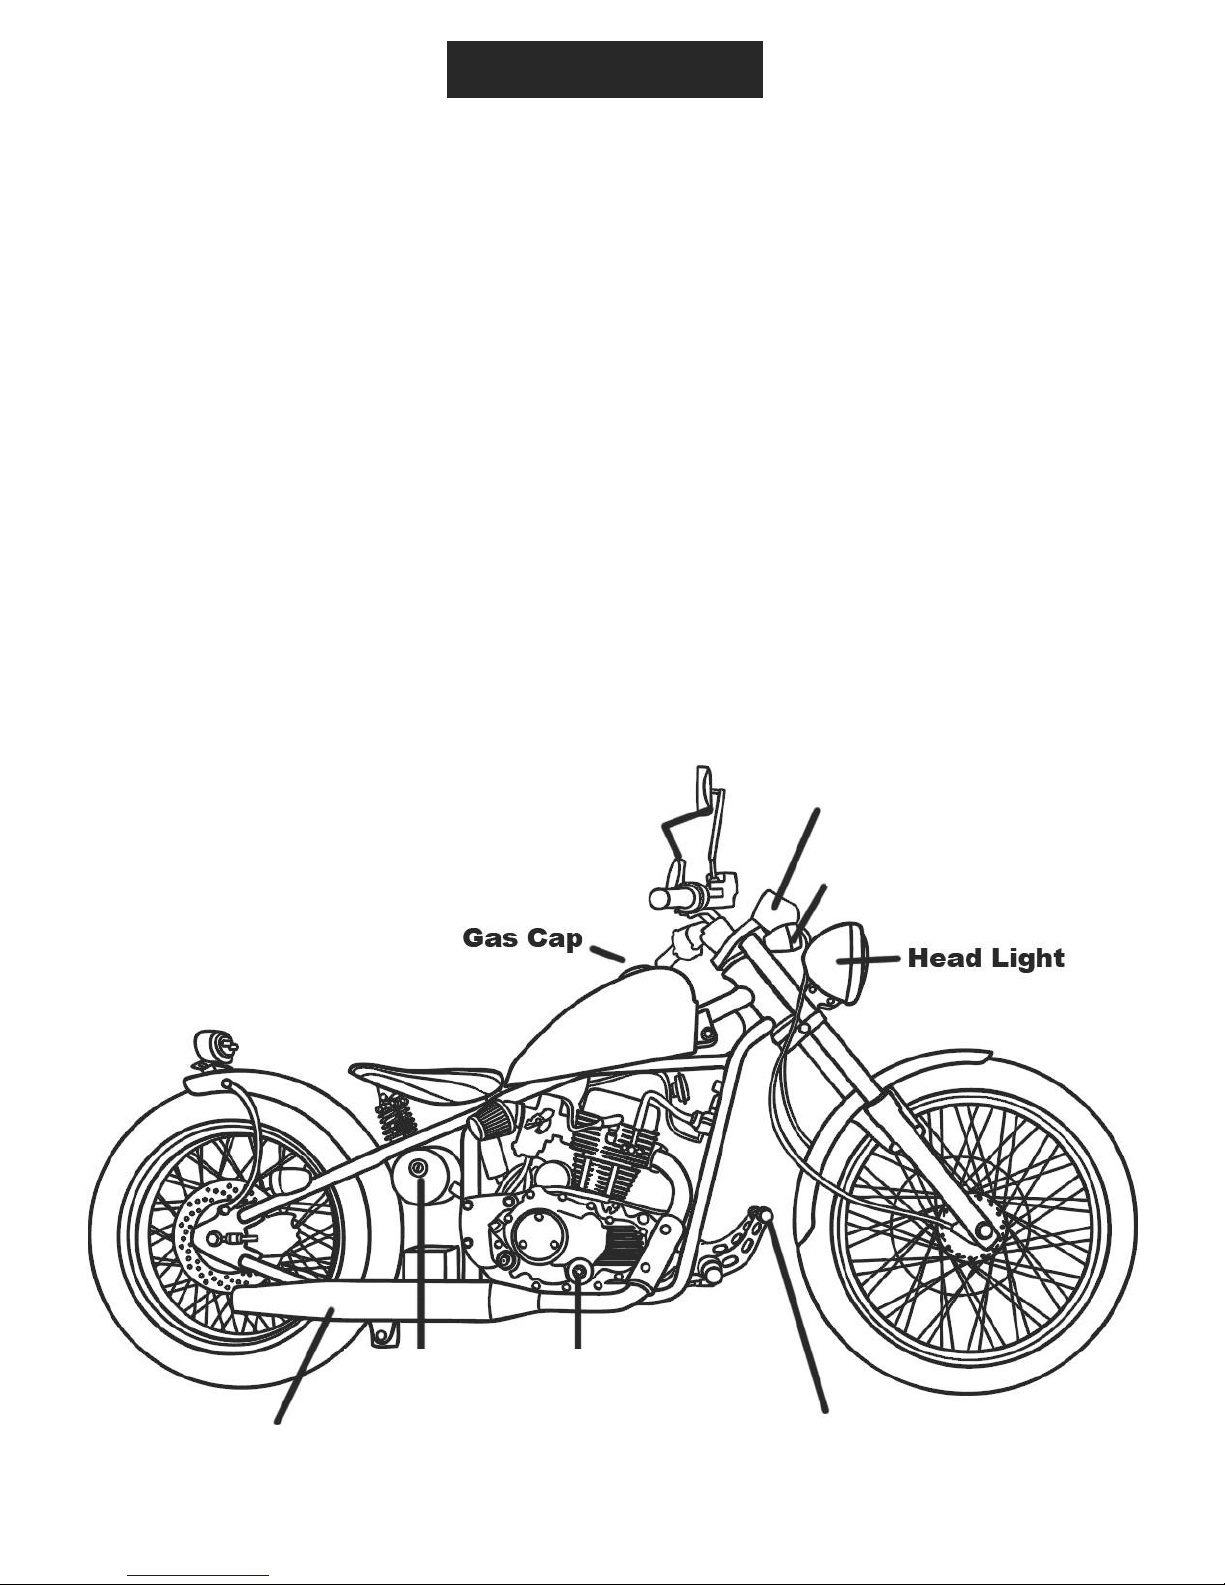
FEATURES
TheindicatorsonthemotorcyclehelpmakeyouawareofNeutralindicator
-
Illuminateswhen
transmission isinpossibleissues.Refertothemoften.neutral.
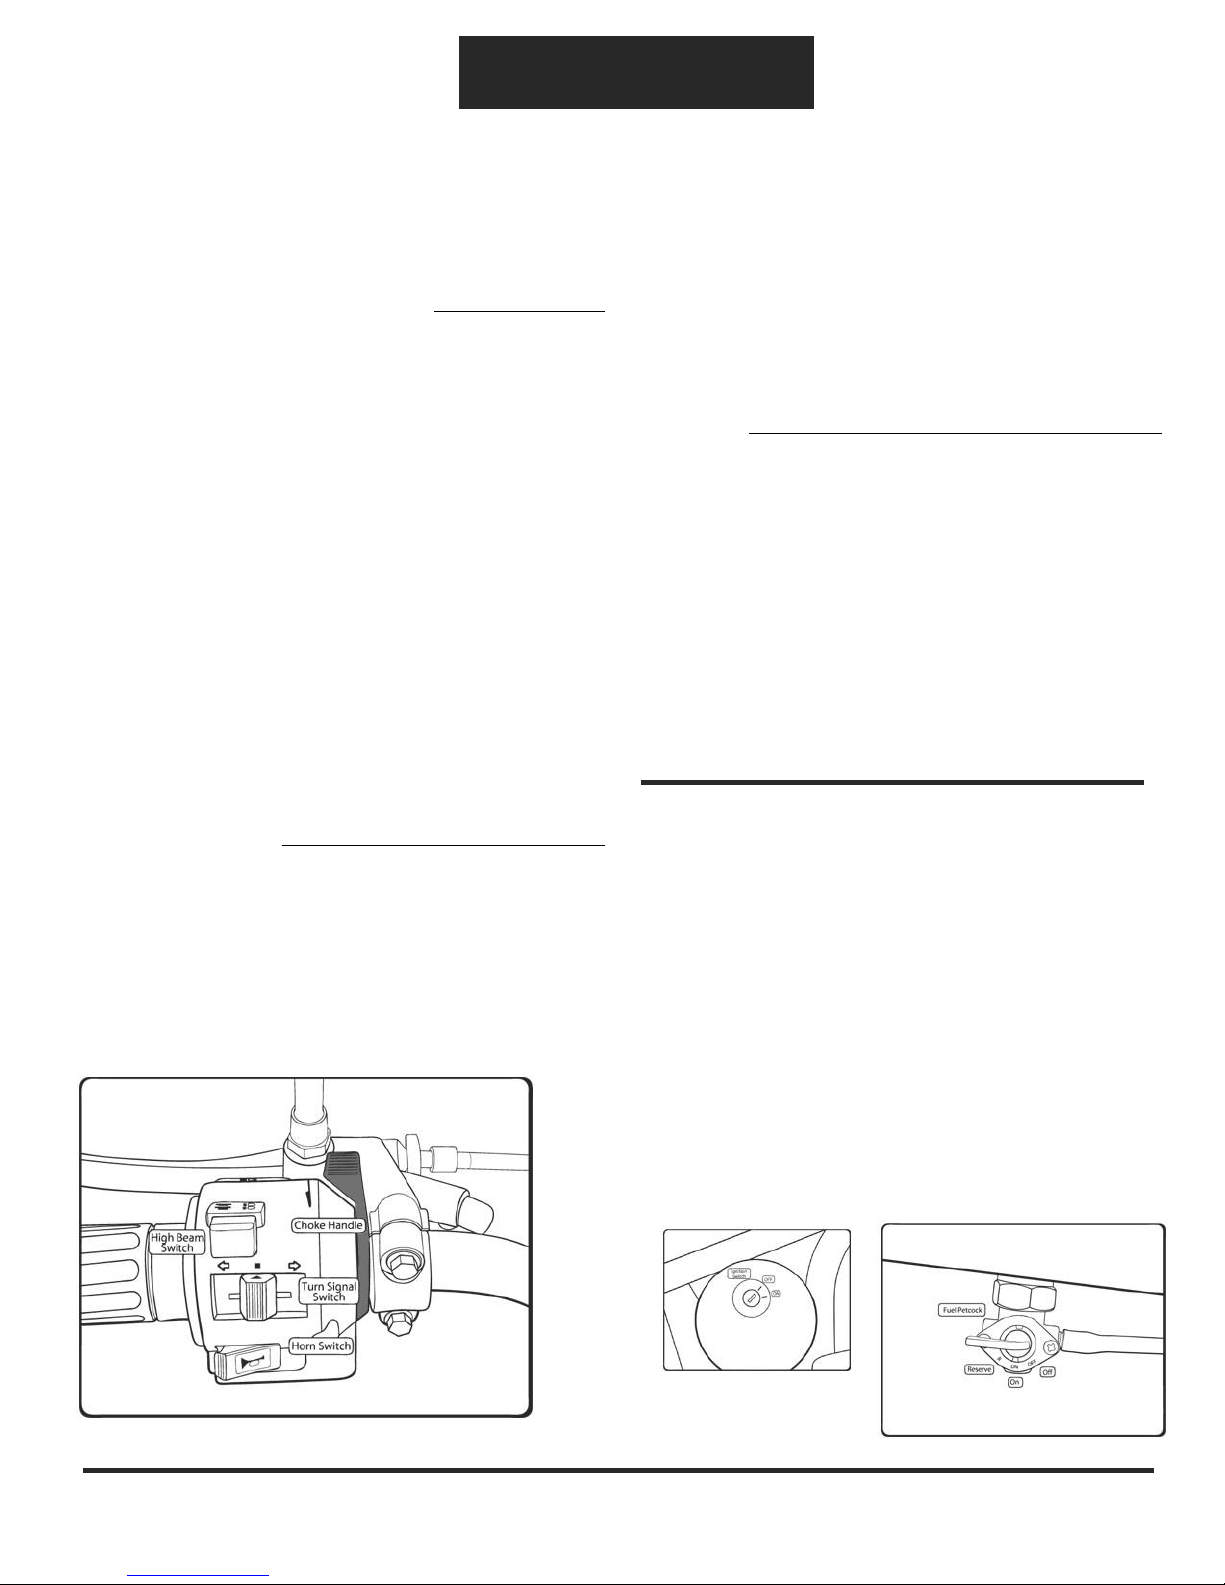
Choke Switch
-
The
choke maybeusedwhenstartingthe bike,ithelpsthe bike runwhen cold.
Electric Start Button-
positionand the ignition switch key inthe ON position,pressthe electric start button to start
the motorcycle.
Engine Stop Button
-
Place
this switch inthe OFF position to quickly cut power to the engine and make an emer-
gency stop.At allother times,this switch should remain inthe RUN( )position,evenwhen the engineisoff.
Fuel Valve
-
The
fuelvalve is used to control the flow of gasolinefrom the fuel tank to the carburetor.
FuelValve Reserve
-
Ifyourunoutoffuelstitchthepositiontoreserveandyouwill havemorefuelinreserve.
Highbeam
indicator
-
Illuminateswhenheadlightisonhighbeam.
Horn
-
The
horn is used to warn other motorists.
IgnitionSwitch
-
The
ignitionswitch
isusedfor
starting
the
engine.
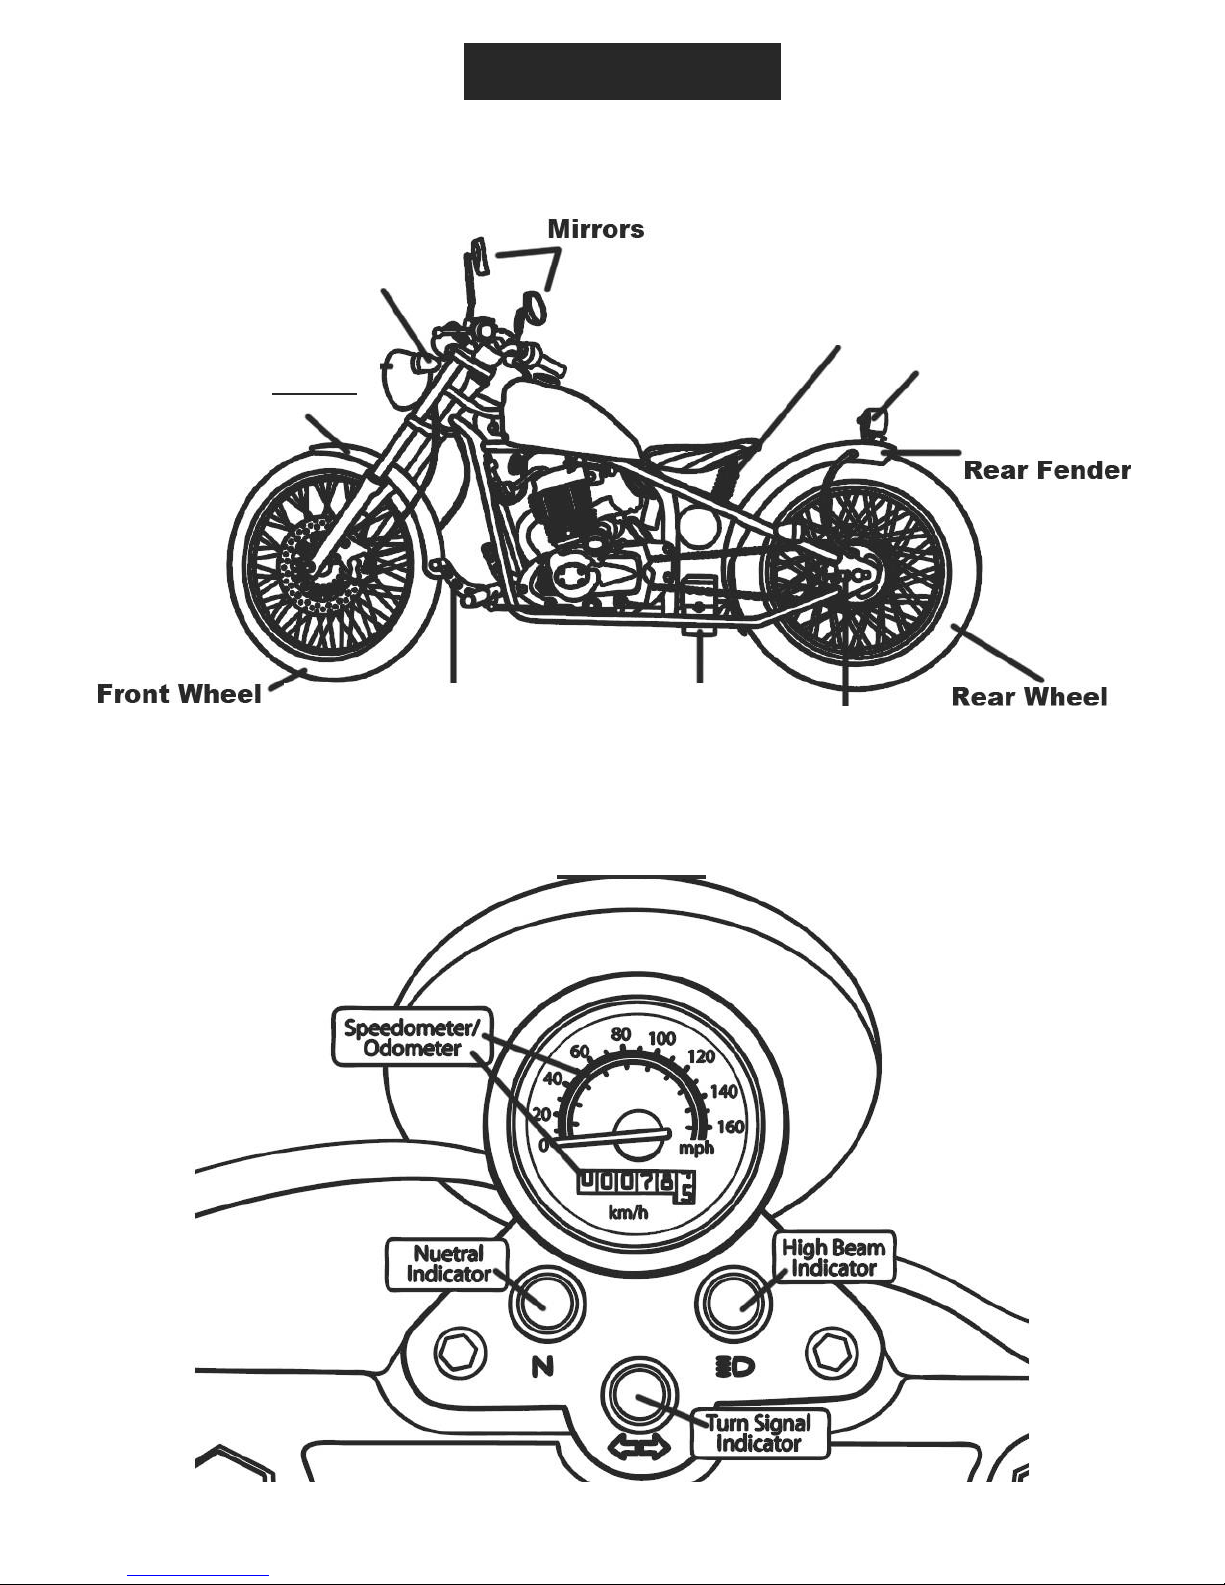
Speedometer -
Shows the speed you are travelingin miles
Turn Signal Indicator -
Flashes when left or right turn signal is on.
TurnSignalSwitch
-
Usethis
switchtosignalalane
change
or
turn.
Rear View Mirrors
Speedometer
Odometer
Front Turn Signal
Tail Light
I
Exhaust Ignition
OilSight Window
Rear Brake Lever
Key Switch
7
FEATURES
Rear View
Turn
Indicator
DOT I EMARK
Head Light
....,.
Front Fender
Adjustable Rear
Suspension
DOT I EMARK
Tail Light
Gear Selector Battery Box
Chain Tensioner
Wheel Adjuster

8
FEATURES
c
)
PmtngUght

A
WARNING:
OPERATION
A
WARNING:
Always wear appropriate protective clothing and acces-
sories:aproperlyfittinghelmet,eyeprotection(goggles),
gloves, over the ankle boots or closed-toe shoes, long-
sleeved shirt orjacket,and long pants.
A
WARNING:
Always wear eye protection with side shields (goggles)
marked to comply with ANSI Z87.1. Failure to do so could
result in objects being thrown into your eyes, resulting in
possible serious injury.
A
WARNING:
Do not allow familiarity with product to make you care-
less. Remember that a careless fraction of a second is
sufficient to inflict serious injury.
SAFETYGEAR
A DOT or Snell-approved motorcycle helmet is the most
important part of your safety gear because it can help pre-
vent a serious head injury.Choose a helmet that fits snugly.
Retailers can help in selecting a good quality helmet which
fits properly.
Always wear eye protection when you ride. Ifa rock or branch
hit your eyes, you could be severely injured. Wear shatter-
proof goggles or a face shield.
Helmet:
DOTor Snell approved onroadhelmet
Eye Protection:
Shatter proof ANSI Z87.1 compliant.
Gloves:
Abrasion resistant gloves for the street
Jacket:
Abrasion resistant riding jacket. Some
jackets have approved crash protection
for added protection incase of an incident.
Long Pants
I
Riding Pants:
Never wear shorts to ride a motorcycle.
Motorcycles can burn, or injure you while
riding, always wear long pants.
Boots:
Footwear should cover your ankles and
support them from rolling.
Notwearing ahelmetgreatly increases your chances of
serious headinjuriesordeath intheevent ofanaccident.
Ifyou are riding with a passenger, be sure they are also
wearing a helmet and eye protection
.
BEFORE YOU RIDE
Before you ride the motorcycle the first time, carefully read
and understand this manual and all labels and follow the
operating procedures described. Also know how to operate
all controls
.
Everytimeyou ride,first checkthe condition ofthe motorcycle
to make sure it does not have mechanical problems
.
PRE-RIDE INSPECTION
ITEMTO
CHECK
WHAT TO CHECK FOR
Tires
•
Check air pressure and add air if
needed.
•
Checkforexcessivewearontread
.
•
Check for any other tire damage.
•
Check rims and spokes for possible
damage.
Fluids
Check engine lubricant and brake
fluid levels. Add lubricant or fluid as
needed.
Lights
Besureheadlight,brakelight,taillight,
and turn signals are working properly.
Free play
Check clutch lever, brake pedal and
throttle grip.
Drivechain
Check the condition of the drive chain.
Adjust the slack and lubricate as nee-
essary.
Fuses
Replace fuses as needed.
Nuts & Bolts
Check all nutsand bolts andtighten as
neededtoappropriatetorquespecifica-
tions.
Hosesand
Cables
Check all hoses for leaks and cables
that may be loose.
A
WARNING:
Always inspect your motorcycle each time before riding
and make sure it is in a safe operating condition. Failure
to inspect the motorcycle before operating could increase
the chance of an accident, resulting in serious personal
injury or equipment damage.
!!!!!!
This bike not intended for passangers
!!!!!!!
•
Load limit
-
Make sure you do not exceed the load
limit.
•
Cargo
-
Thismotorcycle hasnocargo racksandisnot
designed for carrying cargo.
OPERATIONN
•
Rearsuspension
-
Thisisahardtailmotorcycle. The
rearsuspensiononlyhasminoradjustmentontheseat.
LOADING LIMITS AND GUIDELINES
This motorcycle is designed to only carry one rider. Do
not attempt to carry a passenger as it could damage
the motorcycle and injure both riders.
A
WARNING:
Follow all load limits.Improper loading oroverloading can
affect the stability of the motorcycle and may cause an
accident resulting in serious injury or death
.
•
Maximum loading capacity of this motorcycle is 350
lbs.
159 kg. Do not overload the motorcycle.
•
Do not affix anything to the motorcycle, especially
on the front as it may effect handling.
•
This Motorcycle not intended for a
passenger
FUELING/REFUELING THE
MOTORCYCLE
Use unleaded fuel with an octane of 86 or higher. Using
a lower octane gasoline can cause severe damage to the
engine. Never use stale or contaminated gasoline or an oil/
gas mixture.
This motorcycle has a capacity of 2.1 USgallons,including
the reserve.
A
WARNING:
Always shut off engine before fueling. Never add fuel
to a motorcycle with a running engine. Do not smoke or
allow flame or spark inthe vicinity while the unit is being
refueled.Always work inawell-ventilated area. Improper
handling of fuel could result in serious personal injury.
•
Clean surface around fuel cap to prevent
contamination .
•
Twist off fuelcap to fill, it is a screw type
filler
•
Add fuel to the bottom of the filler neck. Do not overfill.
A
WARNING:
Overfilling the fuel tank could behazardous.Ifyou overfill
the fuel tank,fuel may overflow when it expands due to
heat from engine or sun. Spilled fuel could catch fire or
explode, resulting in serious personal injury.
•
Replacefueltank cap and twist until it issecure
•
Ifthe fuel valve was inthe RESERVE position,turn itback
to ON.
A
WARNING:
Check for fuel leaks.A leakingfuel cap isafire hazardand
mustbereplacedwith anoriginal manufacturer's replace-
ment cap immediately.Ifyou find any leaks, correct the
problem before using the product. Failure to do so could
result in a fire that could cause serous personal injury.
STARTING THE ENGINE
•
Insert key into ignition and turn to ON (rJ
)
position.
•
Makesure transmission is in neutral.
•
Turn the engine stop switch to RUN(
rJ)
position.
•
Turn the fuel valve to ON.
•
Kickstand must be up in order for motor to start. This
Motorcycle is equipped with a kickstand safety switch.
Ifairtemperature isnormal
-
50-95°F(10-35°C)
•
Chokeisonthe left control,pullitbacktoengage
NOTE:
Extensiveuseofthechokecancausedamage
tothepiston
and cylinder wall.
•
Press and hold the electric start button until the engine
starts,then releasethe button. Do not holdthe button for
more than 15 seconds at a time.
NOTE: Do not open throttle while choke is on,as thiswill
flood the engine and make the unit difficult to start.
•
After the engine has started, push the choke tab forward
and slowly roll on the throttle to warm up the motor.
NOTE:
Fast idling for more than 5 minutes at normal air
temperature can cause exhaust pipe discoloration
.
!!! NOTE THIS BIKE IS EQUIPPED WITH A KICK STAND KILL SWITCH THE MOTOR WILL NOT START WHILE THE KICKSTAND IS DOWN !!!
::a.o

OPERATION
Ifairtemperatureishigh
-
Above95°F(35°C)
•
DO NOT TURN CHOKE ON.
•
Slightly open throttle.
•
Start engine.
Ifairtemperatureislow
-
Below95°F(35°C)
•
Turn choke lever on full choke untilmotor is warmed up
NOTE:
Extensive use of the choke can cause damage to
the piston and cylinder wall.
•
Start the engine, leaving throttle closed. Do not open
throttle while choke ison, asthiswill flood the engine and
make the unit difficult to start.
•
After RPMs pick up, leave choke ON to keep fast idle.
•
Allow motor to warm up and slowly turn choke lever
off. Motor should maintain smooth idle.
•
Open the throttle slightly to verify the engine is respond-
ing. If it dies, the engine was not sufficiently warm.
STOPPING THE ENGINE
•
Shift into neutral and turn the ignition switch OFF ( )
.
NOTE:
Failing toturn the ignition switch off will cause the
lights to stay on and will drain battery life.
•
DO NOT
turn the engine stop switch off.
Emergency Stop:
•
Ifanemergencystopisnecessary,movetheenginestop
switch to the OFF
(M)
position.
SHIFTING GEARS
The motorcycle is equipped with a cable-operated clutch.
It hasfive forward gears, one down and four up. Follow the
steps below to learn how to shift properly.
•
Always shift while moving ina straight line.
•
Release the throttle grip and pull in the clutch lever com-
pletely before shifting.
•
Recognizetheengaging pointwhen you releasetheclutch
lever.
•
Reduce the throttle or shifttoa higher gear before engine
RPMs get too high.
•
Shift to a lower gear before the engine RPMs get too
low.
•
When engine RPMs are too high, do not downshift to
slow the motorcycle. This could cause damage to the
engine.
•
Do not coast or tow the motorcycle for a long period of
time while the engine is off.
•
If your speed drops below 9 mph (15 km/h), pull in the
clutch lever and shift down to 1st gear to prevent stall-
ing.
11
I
i
-
ii

OPERATION
A
WARNING:
The following instructions are for general use in standard
operating conditions. Information in the MSF instruction
manual accompanying the vehicle takes precedence
over this information. In addition, all drivers should take
an accredited course.
BRAKING
This motorcycle is equipped with a hand-operated front hy-
draulic disc brake and a foot-operated rear disc brake.Apply
brakes in a progressive fashion to prevent wheel lock-up. As
a general rule,aim to brake 70% using the front brake lever.
By using both front and rear brakes, you will achieve faster,
more stable and effective braking.
To slow down or stop the motorcycle, apply the front and
rear brakeswhile downshifting. Slowly increase braking as
you feel your speed reduce.Inorder to prevent stalling,pull
inclutchleverbeforestoppingcompletely.
Ifyou apply the brakes too abruptly,you may lock the wheels,
slide, and loose control of the motorcycle. Ifthis should hap-
pen, release the brakes and steer straight until you have
completely regained control.
Never ride with your foot resting on the brake pedal or your
hand on the brake lever. This could cause your brakes to
overheat and will indicate false braking to other motorists.
TURNING
Before making a turn,reduce your speed. Do not apply the
brakes in the middle of a turn or you may cause the rear
wheel to lock-up and lose control of the motorcycle.
NOTE: DO NOT change the position of the clutch lever dur-
ing a turn.
DESCENDING
HILLS
When traveling down a steep grade, reduce your speed by
downshifting rather than braking.Applying your brakes for a
long period of time can reduce their effectiveness.
PARKING
When possible, park on level ground
.
If you have no paved
surface to park on, makesure the ground isfirm. Ifit is neces-
sary for you to park on a hill,position your rear wheel against
the curb at an angle and leave the transmission in gear.
While parked,use the side stand for support.
•
Use your foot to guide the side stand down.
•
Ifyou must park on a soft surface, put something solid
underthesidestand.
THEFT PREVENTION TIPS
•
Park the motorcycle in a garage, if possible. When not
possible,make certain to park inawell-lit area.
•
Never leave the ignition key with the motorcycle.
•
Always use the steering lock, even for a short period of
time.
•
Turn the handlebars left.
•
Insert the key into the lock on the headtube
•
Turn the key untilthe pinion engages with the lock
•Your handle bars are nowlocked andcan not beturned
•
Invest in a good quality anti-theft device that will secure
the motorcycle to a stationary object.
•
Keep the operator's manual, registration, and insurance
information with the motorcycle to help authorities find
you if it is stolen and recovered.

MAINTENANCE
INSPECTIONANDMAINTENANCESCHEDULE
Itisvery important to inspect and maintain your motorcycle regularly. Follow the guidelines inthe chart below.The intervals between
periodic services in months are shown. At the end of each interval, be sure to perform and document the maintenance listed.
Only an authorized Cleveland CycleWerks service center may maintain,replace, or repair emission control devices and systems.
A
WARNING:
Failing to perform recommended maintenance or performing maintenance improperly can lead to an accident and cause
serious personal injury,cause noncompliance to emissions regulations, and may void your warranty. If you are not sure
howto perform the maintenance items below,contact your CCW authorized service center or Cleveland CycleWerks.
Item
Weekly
Monthly
Quarterly
Yearly
Fuel Lines
I
L
I
Air Cleaner
c
c
I
I
Throttle Controls
I
A
I
A
Spark Plug
c
I
R
Valve Clearance
I
I
I
Engine Lubricant
During running-in period, replace every 150 miles.
After running-in period, replace every 600 miles.
Gearbox Lubricant
EngineLubricant
FilterScreen
c
c
I
I
Carburetor
c
c
c
c
DriveChain
I
A
L
Battery
I
BrakeShoe
I
BrakeSystem
I
I
Electric Parts
I
Bolts,Nuts, Fasteners
I
L
I
Gear in Gearbox
I
I
Fuel Tank
I
I
Tire Pressure Wear
I
Steering System
A
Chassis
L
I
I= Inspect and clean,adjust, lubricate,or replace as necessary
C = Clean R = Replace L= Lubricate A= Adjust
CAUTION:
Ifyou operate your motorcycle under severe conditions, it
will
need maintenance more often than shown inthe chart above. Severe
conditions include operating under frequent full throttle or in dusty,wet, sandy, or muddy areas,and may void your warranty. Ifyou have
questions regarding maintenance intervals for your motorcycle, contact your CCW authorized service center or Cleveland CycleWerks

MAINTENANCE
A
WARNING:
In the event of an accident, have an authorized service
center inspectALL parts,even ifthey appear to be undam-
aged. Failure to do so could result in an accident which
could cause injury or death
.
Followthese important safety precautions
:
•
Always turn the engine off before performing any
maintenanceorrepairs.
•
Let the engine cool before touching any related parts.
•
Do not touchy any moving parts while the engine is
running.
A
WARNING:
•
Make
sure you
have
the
tools
and
skills required before
attempting to perform any maintenance or repairs.
•
Use the side stand to prevent the motorcycle from falling
Before inspecting,cleaning,orservicing the motorcycle,
shut off engine, wait for all moving parts to stop, and dis-
connect and properly ground the spark plug wire.Failure
to follow these instructions can result inserious personal
injury or property damage.
Thissectioninstructsyouonhowtoperformsomeimportant
routine maintenance.You can perform many ofthese tasks
with the tools provided with the motorcycle. More difficult
tasks (such as wheel removal) should be performed by a
professionaltechnician.Ifyoudonotfeelcapableofperform-
ing any of the tasks, do not hesitate to contact your local
Service Center for help.
over.
•
Keep cigarettes , sparks , and flames away from all
fuel-
related parts. Use a non-flammable solvent when
cleaning
parts.
Your local Service Center is equipped with the proper tools
and knowledge to help service your motorcycle. Ifnecessary,
please contact them to ensure greater quality and reliability.
MAINTENANCE
RECORD
To ensure proper maintenance
,
keep records. If the mo-
torcycle is sold, be sure to include maintenance records.
All scheduled maintenance is considered normal operator
cost. If a Service Center performs these tasks,you will be
charged. Please use the tables below to keep track of all
maintenanceperformed
.
Miles (km)
Odometer
Date
Performed By
Notes
600 / 1000
3000 / 5000
6000 / 10000
9000 / 14500
12000
I
20000
15000
I
25000
18000
I
30000
21000
I
35000
24000
I
40000
27000
I
45000
30000
I
48000
33000
I
53000
36000
I
58000
39000
I
63000
42000
I
68000
14
CHANGING/ADDING ENGINE
LUBRICANT
Engine lubricant has a major influence on engine perfor-
mance and service life. Engine lubricant level should be
checked before each use ofthe motorcycle.
First oil change is before 600 miles as this is break in. We
recomend changing the oil at least every 3000-4000 miles.
Reference the chart below for the appropriate engine lubri-
cant to use based on the temperature range in your area. In
general, we recommend 1.12 quarts of SAE 1SW-40.
NOTE: In very cold weather [below 5°F (15°C)], use
SAE10W-50for goodstarting andsmooth operation.
ENGINE
LUBRICANT
CAUTION:
Donotoverfill. Overfilling may cause excessive smoke,
oil loss, and enginedamage.
To change engine lubricant:
Lubricantshouldbechangedwhiletheenginelubricantisstill
warm,but not hot.This allows the lubricant to drain quickly
and completely.
•
Park vehicle on level ground.
•
Start the engine and allow it to run for 3 to 5 minutes.
•
Turn the engine off and allow to cool for at least 3 min-
•
Removeoilcap.
•
Place a container underneath the oil drainage bolt to col-
lect used lubricant as itdrains.
•
Unscrew the oil drainage bolt and remove the bolt and
oc
TEMP.
-30 -20 -10 0 10 20 30
40
washer.
•
Allow lubricant to drain completely.
°F
-22 -4 14 32 50 68 86 104
Always use a 4-stroke motor lubricant that meets or exceeds
the requirements for API service classification SJ. Check
lubricant level before each use.
NOTE: Non-detergent or 2-stroke engine lubricantswill dam-
age the engine and should not be used.
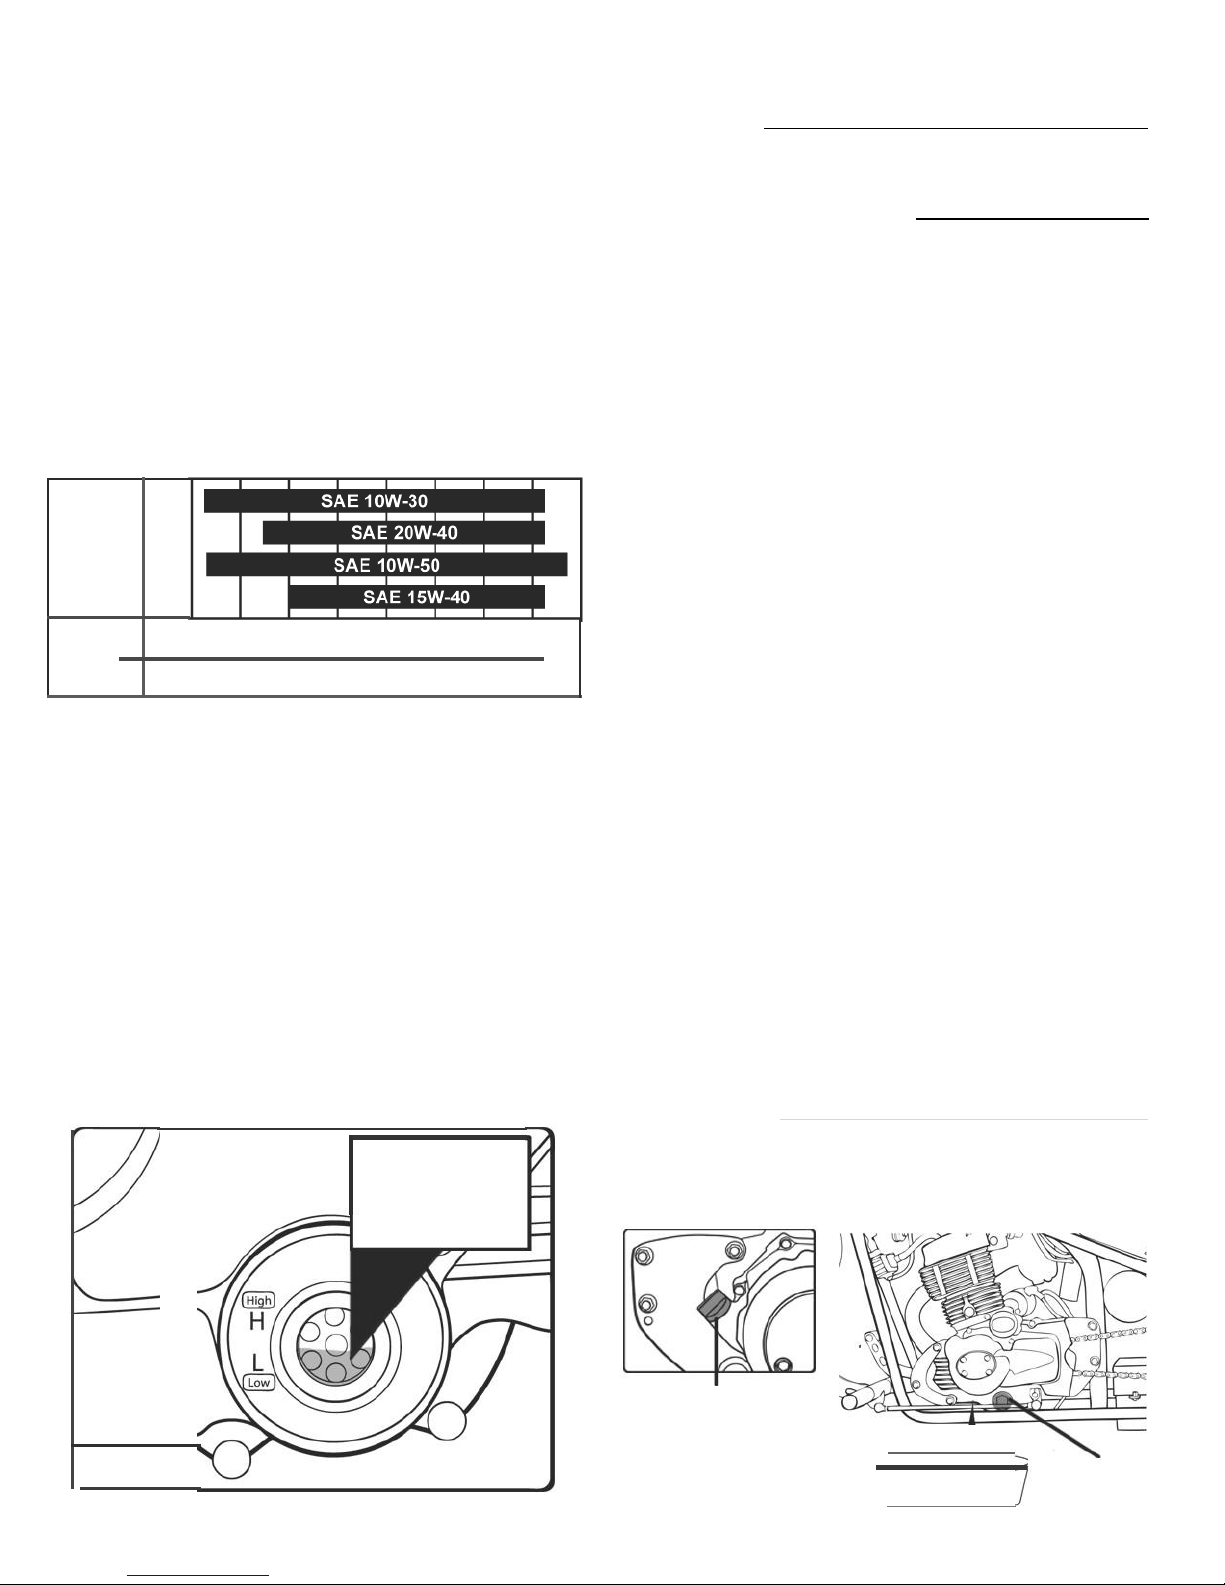
To check lubricant level:
•
Park vehicle on level ground and use the side stand for
support.
•
Startthe engine and allow itto run for 3to 5 minutes.
•
Turn the engine off and allow to cool for at least 3 min-
utes.
•
Hold the motorcycle upright.
•
Inspect the lubricant level.
•
If lubricant is below the top of the oil sight window,add
lubricant until level risestotop ofoil sight window.
GOOD
ADD
g
•
Inspectsealing washer and replaceifdamaged
.
NOTE:Thisshould bereplaced atleastevery othertime
the lubricant ischanged.
•
Reinstallwasherandoildrainagebolt.Torqueoildrainage
bolt to 18 ft.lbs. (13.3 Nm)
•
Fill crankcase with specified lubricant as described at the
beginning of this section.
•
Reinstall the oilcap.
•
Start the engine and allow it to run for 3 to 5 minutes.
•
Turn the engine off and allow to cool for at least 3 min-
utes.
•
Hold the motorcycle upright and recheck the lubricant
level.
•
Make sure there are noleaks.
NOTE: Used lubricant should bedisposed of at an approved
disposal site. See your local oil retailer for more informa-
tion.
CAUTION:
Attempting tostarttheenginebeforeithasbeenproperly
filled with lubricant will result inequipment failure
.
Oil Filler
Dip Stick
Oil Filter
15

AIR BOX DRAIN HOSE
Service the air box drain hose more often if you are riding at
full throttle or in rain.Alsoservice any timethere aredeposits
inthe transparent section of the drain tube.
•
Place a drain pan under the air box drain tube
plug.
•
Remove the plug and allow the tube to drain into the
pan.
•
Reinstall the air box drain tube
plug.
16

THROTTLE
•
Make sure all nuts and bolts are securely fastened and
the throttle assembly ispositioned correctly.
•
Check the full rotation ofthe throttle grip from all
steering positions.
•
Check the free play at the throttle grip. It should be 1/16
to 1/4 in. (2-6 mm). If needed, adjust as follows:
•
Loosen lock nut.
•
Turn the throttle cable adjuster.
•
Tighten the lock nut.
•
After any adjustments, recheck the full rotation of
the throttle grip from all steering positions.
A
WARNING:
Donotoperate the motorcycle ifthe throttle grip free play
distance is less than 1/16 in. (2 mm) or more than 1/4
in. (6 mm). Operating the vehicle with an incorrect
amount of
throttle grip free play could cause the rider to
losecontrol, resulting in serious personal injury.

CLUTCH
Theproper free play oftheclutchallows for agradual,smooth
engagement when shifting gears. Ifthe adjustment is incor-
rect, early wear may result. Free play should be between
3/8 in. and 13/16 in. (10-20 mm). If adjustment is needed,
perform the upper adjustment steps below. Ifyou are unable
to achieve the correct free play using these adjustments,
contact your local Service Center.
•
Loosen the lock nut and rotate the clutch cable adjuster
to the maximum free play possible.
•
Tighten the lock nut.
•
Start engine,hold inclutch lever,and shift intogear. Make
sure the engine does not stall and the motorcycle does
not move. Slowly release the clutch lever and open the
throttle.The motorcycle should accelerate gradually and
movesmoothly.
IDLESPEED
•
If the engine is cold, start it and run for 10 minutes of
stop-and-go riding, then turn the engine off.
CAUTION:
Make sure the engine is fully warm before adjusting the
idle speed. Adjusting the idle speed before the engine is
warm could result in excessive engine wear.
•
Park the motorcycle on a level surface and use the side
stand to support.
•
Connecttachometertotheengine
.
•
Shift into neutraland start the engine.
•
Adjust the idle speed as needed by turning the throttle
stop screw. Thecorrect idle speed (in neutral) should be
1500 ± 50 rpm.
SPARK PLUG
CAUTION:
Use only recommended spark plug: NGK D8TC or a
suitable equivalent. Using an incorrect spark plug in the
improper heat range for this engine could cause severe
engine damage and void the warranty.
To replace:
•
Clean any dirt around the spark plug base.
•
Disconnect the spark plug caps and make certain you do
not damage the wires.
•
Remove the spark plug using the spark plugwrench pro-
vided in the tool kit.
•
Inspect the electrodes on the spark plug for corrosion
and deposits. Replace if a large amount of corrosion is
present.
•
Using a wire-type feeler, check the gap on every new
spark plug. The proper gap is .024-.028 in. (.6-.7 mm).
•
Threadsparkpluginbyhandtopreventcross-threading
.
•
Tighten with the spark plug wrench. Rotate additiona
l
1/8 to 1/4turn (if reinstalling old spark plug) or 1/2 turn
(if
new spark plug) after plug seats.
•
Reinstall spark plug caps.
CAUTION:
Incorrect tightening of the spark plug can cause severe
damage tothe engine. Too loose can damage piston; too
tight can damage the threads
.
17
Table of contents
Other Cleveland CycleWerks Motorcycle manuals


