Cleveland CycleWerks Misfit 250 Gen II Assembly instructions

1
© 2017 Cleveland CycleWerks
Cleveland CycleWerks Misfit 250 Gen II
SAVE THIS MANUAL FOR FUTURE REFERENCE
REV.2017-09-11
OPERATOR’S INSTRUCTION MANUAL

2
Dear Customer,
Thank you for choosing Cleveland CycleWerks. We know you have many choices of motorcycles
that you could have chosen; your show of confidence in Cleveland is appreciated. Our designers,
engineers and entire staff have placed a considerable amount of passion and knowledge into the
development and manufacturing of the vehicle that you have chosen. We only manufacture bikes
that we want to ride!
We do our best to provide a trouble free and exceptional product from the factory. We
recommend that you strictly follow the instructions given in this manual, paying close attention to
the run-in period of this motor vehicle.
The instructions contained in this manual will help you make the most of your motorcycle’s
performance and operational life. This manual provides useful information on how to take care of
your vehicle, and also describes routine maintenance operations.
For any servicing or assistance that you may need, please contact our authorized dealer and/or
service centers.
Cleveland CycleWerks makes every attempt possible to verify the accuracy of our owner’s
manuals, we understand mistakes happen, as manuals are written during the development of the
vehicle, specifications and variations do occur between writing the manual and production, we
clearly state this and note that variations may happen between the manual and production. Every
country has a unique set of laws and statutes, your countries model may vary slightly from the
images or descriptions, due to each individual country’s compliance regulations.
The information contained herein is valid at the time of printing. Cleveland CycleWerks reserves
the right to make changes required by the future development of the above mentioned products.
We do our best to verify the accuracy of this manual, but mistakes do happen, no liability is
accepted for mistakes during the drafting of this manual.
For your safety and the reliability of your vehicle, use original
CLEVELAND CYCLEWERKS spare parts ONLY.

3
Owner’s Manual
This manual should be considered a permanent part of the motorcycle
and should remain with the motorcycle if it is resold.
No part of this publication may be reproduced without written
permission.
Cleveland CycleWerks reserves the right to modify any equipment, technical specifications, colors, materials, services
offered and rendered, and the like so as to adapt them to local conditions without previous announcement and without
giving reasons, or to cancel any of the above items without substituting them with others. It shall be acceptable to
stop manufacturing a certain model without prior notice. In the event of such modifications, please ask your local
Cleveland CycleWerks dealer for information.
IMPORTANT
PLEASE READ THIS MANUAL CAREFULLY AND COMPLETELY BEFORE GOING
ON YOUR FIRST RIDE. IT CONTAINS A GREAT DEAL OF INFORMATION AND
ADVICE, WHICH WILL HELP YOU USE AND HANDLE YOUR MOTORCYCLE
PROPERLY.
This vehicle has a minimum age requirement of 16.
Always wear necessary and properly fitting protective gear when operating this vehicle.
NOTICE
WARNING
Obtain, review and follow all laws and regulations pertaining to owning and operating a vehicle
before using this product.
4
IMPORTANT SAFETY INFORMATION
MODIFICATIUONS
ACESSORY INSTALLATION
FAMILIARIZE YOURSELF WITH THE VEHICLE
SAFETY LABEL LOCATION
WARRANTY INFORMATION
VEHICLE INDENTIFICATION
SERIAL NUMBER LOCATIONS
COMPONENT LOCATIONS
COMPONENT OVERVIEW
CONTROLS
HANDCONTROLS AND INSTRUMENTS
HANDLEBAR CONTROLS
FUEL CAP/IGNITION/FUEL VALVE
FOOT CONTROLS
WEIGHT CAPACITY
SUSPENSION ADJUSTMENT REAR
BEFORE RIDING
PROTECTIVE GEAR AND APPAREL
PRE RIDE INSPECTION
OPERATION AND RIDING
FUEL (GASOLINE)
REFUELING PROCEDURE
RUNNING IN A NEW ENGINE
SAFE RIDE PRECAUTIONS
STARTING PROCEDURE
STOPPING THE ENGINE
CLUTCH AND SHIFTING GEARS
BRAKING TECHNIQUE
PARKING
MAINTAINING YOUR CLEVELAND MOTORYCLE
IMPORTANT SAFETY PRECAUTIONS
MAINTENANCE SCHEDULE
MAINTENANCE
FUEL SYSTEM
EVAP CONTROL SYSTEM AND FUEL CAP
SECONDARY AIR SYSTEM
SPARK PLUG
VALVE CLEARANCE
ENGINE OIL
CHECKING & ADDING OIL
CHANGING OIL & CLEANING OIL FILTER
AIR FILTER
THROTTLE ADJUSTMENT
CARBURETOR CHOKE
CLUTCH
IDLE SPEED
DRIVE CHAIN
BATTERY
BRAKE SYSTEM
LIGHTING, HORN, SAFETY SWITCHES
NUTS, BOLTS. FASTENERS
WHEELS AND TIRES
STEERING HEAD BEARINGS
SUSPENSION
APPEARANCE CARE
TROUBLESHOOTING
ENGINE DOES NOT START
ENGINE STARTS BUT RUNS POORLY
CLUTCH TRANSMISSION
HANDLING
ELECTRICAL
BRAKES
DEALING WITH THE UNEXPECTED
GENERAL GUIDELINES
IF YOU HAVE A FLAT TIRE
IF YOU CRASH
DEAD BATTERY
SPECIFICATIONS
FASTENING TORQUE
WIRING SCHEMATIC
MAINTENANCE SCHEDULE RECORD
NOTES
CONTENTS
37
37
37-39
40
40-41
42
42
43
44
45
45
46-50
46-47
48
49
49
50
50
51-52
51
51
51
52
53-55
56
57
58
60
42
42
43
44, 45
5-8
7
8
8
9
10
11
11
12-13
12
14-17
13
14
15
16
17
17
18-19
18
19
20-24
20
20
20
21
22
22
23
24
24
25
25
26-27
28-45
28
28
28
29
30-31
32
33
34
35
35
36

5
This document provides directions on operating and maintaining your motorcycle. This
manual contains important safety information. Please read this manual over carefully before using
your motorcycle.
Your personal safety, and the safety of those around you, is extremely important. Operating
this motorcycle safely is an important responsibility. Cleveland CycleWerks has provided
operating procedures and other information on labels in this manual to help you make informed
decisions about safety. This information will alert you to potential hazards that could harm you or
others.
It is not practical or possible to warn you about all possible hazards associated with
operating and maintaining a motorcycle. You must use your own good judgment and common
sense. In many cases “common sense” seems to be less and less common. Please use solid
judgment, do not ride above your ability and respect the fact that you are a sack of water traveling
through space at a high rate of speed. Respect the bike, respect the road and use caution.
Safety information will come in a variety of different forms, including:
Safety Labels on the Motorcycle.
Safety Messages preceded by a safety symbol and one of these signal words below:
Sections of text in this manual, which are particularly important in terms of safety or possible
damage to the motorcycle, are marked with the following symbols:
You CAN be KILLED or SERIOUSLY INJURED if you do not follow instructions.
You CAN be KILLED or SERIOUSLY INJURED if you do not follow instructions.
You CAN be INJURED if you do not follow instructions.
Safety Headings such as important safety reminders and/or precautions.
Safety Section such as motorcycle safety.
Instructions how to use the motorcycle properly and safely.
This manual is filled with important safety information - please read it carefully.
IMPORTANT SAFETY INFORMATION
SAFETY SYMBOLS

6
If you take responsibility for safety, properly maintain your motorcycle and understand the
challenges you may encounter while riding, your Cleveland CycleWerks motorcycle will provide
many years of use and enjoyment. Listed below are some important safety measures you should
take when riding.
Before Riding. Carefully read this manual to familiarize yourself with the controls,
characteristics, functions and limits of the motorcycle.
Never attach a sidecar, a trailer or any other accessory to the motorcycle. Do Not
modify the vehicle in any way. Failure to observe this prescription may make the vehicle unstable
and cause serious accidents and/or injury.
Never Ride Without a Helmet. The following statement is a proven fact: “Helmets
significantly reduce the number and severity of head injuries.” Never ride your motorcycle
without a helmet. Even a crash at slow speed can result in a fatal head injury if you are not
wearing a helmet. Cleveland CycleWerks strongly recommends wearing a helmet that has been
certified for safety by helmet testing organizations that are independent from the helmet
manufacturer. We also recommend that you wear eye protection, boots, gloves, and other
protective gear such as riding pants.
Carrying a Passenger. This motorcycle has been designed for one rider and one
passenger. Riding with a passenger can interfere with your ability to operate and/or control the
motorcycle and may result in serious injury or death. Riding with a passenger also affects your
braking distance and control, please use caution when riding with a passenger.
Ride Within Your Limits. Never attempt to ride your motorcycle in a manner that is
beyond your skill level. It takes time to learn proper riding skills. Learn to ride your motorcycle step
by step. Start by practicing in safe areas at slow speeds and gradually build your skill level.
Instruction from an experienced rider(s) is highly recommended. Remember that alcohol, drug
use, fatigue and ignorance can reduce your ability to make good decisions and ride safely.
Be Alert for Hazards. The terrain or road in which you ride can present many
hazards. Always “scan” the terrain or road ahead of you continually. Watch for unexpected turns,
sand, water, potholes, debris and other hazards. Always maintain a speed slow enough to allow
you enough time to see and react to hazards. Vehicle operators often do not see motorcycles,
please use caution at intersections. Be alert to pedestrians that may be on or near the road.
Do Not Drink and Ride. Even one drink can impair your ability to ride a motorcycle
safely. Each additional drink will make the impairment worse. Do not drink and ride. Do not let
your friend’s drink and ride. You can be arrested and charged with Driving Under the Influence
(DUI) if you are riding a motorcycle while intoxicated. Many countries have a 0 drink policy for
operating a motor vehicle.
Maintain Your Motorcycle. To ensure maximum reliability and to maintain the
motorcycle in perfect working condition, it is essential to perform the service detailed in the
Maintenance Schedule and to follow the direction provided in this manual. For further information,
please contact your authorized dealer and/or service center that possess the necessary technical
skills to care for your vehicle.
IMPORTANT SAFETY INFORMATION

7
!!! DO NOT use the motorcycle or try to service it if you do not possess the necessary skills, if you
have never turned a wrench, please entrust your safety to a motorcycle service professional!!!
Full control of the motorcycle is necessary for safe riding. Concentration and good physical condition
are essential for riding a motorcycle. The road and weather conditions must also be taken in to
consideration, as speed and steering can be affected by all of the above.
ALWAYS wear a helmet, even if you go for a short ride.
Always wear suitable clothes, especially when traveling at night. (Motorcycle garments with reflective
bands are recommended for night riding).
When traveling during daytime, keep the low beam light on if allowed by local laws.
NEVER wear garments that could adversely affect control and handling of your motorcycle.
When refueling, switch off the engine, refrain from smoking, and avoid spilling fuel onto the tank and
the hot exhaust pipe.
When refueling, avoid inhaling harmful fuel vapors. If fuel comes in contact with skin or clothes,
immediately wash with soap and water and change the contaminated garments.
Some parts of the motorcycle become very hot during use. Avoid contact with these parts and keep the
motorcycle out of the reach of children, especially when hot. Always wear long trousers when riding.
Always park the motorcycle safely and avoid leaving it unattended while the ignition key is in the
ignition, on the motorcycle. Use the steering lock to deter theft.
Park the motorcycle where it is visible, and not in danger of passing traffic.
To prevent the vehicle from tipping over, never park on soft or uneven ground.
DO NOT start the motorcycle in an enclosed area. Exhaust fumes are toxic and can quickly saturate
the air causing potential death.
Before starting the engine in a closed place, ensure that the area is well ventilated.
While the vehicle is in motion, keep your feet on the appropriate foot pegs.
While riding, keep both hands on the handlebars at all times.
Maximum performance of the standard brake pads and tires is obtained on dry roads. Take caution
when riding on wet roads as adhesion is greatly reduced.
Any modifications made to the motorcycle (alteration(s) and/or removal of components) can make
the vehicle unsafe or unlawful. Modifying the motorcycle will immediately void the warranty offered and
implied by your local distributor, and relieves Cleveland CycleWerks, and our distribution partners of any
liability.
Modifying this motorcycle or using parts not manufactured by Cleveland CycleWerks can make
your motorcycle unsafe. Before you consider making any modifications or adding an accessory, please
read the following information carefully.
Improper accessories or modifications can cause a crash in which you can be seriously hurt or
killed. Follow all instructions in this owner’s manual regarding any accessories.
Cleveland CycleWerks strongly recommends that you do not remove any original equipment
or modify your motorcycle in any way that may alter the design and/or operation. Such a change could
drastically impair the stability, handling, acceleration, and braking capabilities of the motorcycle and cause
a crash. Do not make any modifications to the exhaust system, noise control system or emission
control components. This is illegal in every country that we sell motor vehicles.
IMPORTANT SAFETY INFORMATION
MODIFICATIONS
8
The use of non-genuine parts and/or accessories can make the vehicle unsafe by reducing
its handling, stability and the effectiveness of the braking system. For this reason, the installation
of any non-genuine accessory makes the warranty offered by your distributor void and relieves
Cleveland CycleWerks and its distribution partner of all liability.
The rider’s ability and their mechanical skills form the basis of riding safety. It is advisable
to practice riding in a closed course, to familiarize yourself with the vehicle, it’s operation, and
controls. Motorcycle riding is a learned skill, compounding over a long period of time. Valentino
Rossi did not become “The Doctor” overnight.
Remember: practice makes perfect, one solid turn leads to the next and in time you
become a better rider.
We highly recommend track day riding with instruction. Many riders may consider
themselves not eligible or experienced enough for track riding, but we have found the opposite to
be true. A rider at a proper track day event, with the proper classroom and on-course training will
make you a better rider on and off the track. You will learn valuable skills; such as, how to avoid
target fixation, proper throttle and braking controls, proper body position and how it affects the
motorcycles handling. Most importantly, you are learning these skills on a closed course, which is
controlled, and without fear of learning the skills on the street where pedestrians, gravel, dogs,
cars, intersections, etc., are distracting you from obtaining the skills necessary for proper vehicle
control. Get on the track, obtain proper training and enjoy a lifelong love affair with motorcycling!
! WARNING !
Operating, servicing and maintaining a passenger vehicle can expose you
to chemicals such as lead, phthalates, engine exhaust and carbon
monoxide that are known to the State of California cause cancer, birth
defects or other reproductive harm.
To minimize exposure, avoid breathing exhaust, service your vehicle in a
well-vented area and wear gloves or wash your hands frequently when
servicing your vehicle.
For more information go to:
www.P65Warnings.ca.gov/PassengerVehicle.
IMPORTANT SAFETY INFORMATION
ACCESSORY INSTALLATION
FAMILIARIZE YOURSELF WITH THE VEHICLE

9
This page will show you where to find the safety labels on your motorcycle. You will find
that some labels warn you of potential hazards. Others will provide important safety and
maintenance information. Please read them carefully and do not remove them. If your label wears
off from riding or becomes hard to read, contact your Cleveland CycleWerks dealer for a
replacement.
NOTE: Some labels may not be in the exact location indicated.
SAFETY LABEL LOCATIONS
Tire
Information
Compliance Label
Chain Adjustment Label
Emissions and Noise Label
Warning Labels
GVWR Label
Gear Shift Label

10
EMISSIONS CONTROL SYSTEMS
Tampering with noise & emissions control systems is prohibited
Owners are warned that the law prohibits:
A. The removal or rendering inoperative by any person other than for purposes of maintenance,
repair or replacement, of any device or element of design incorporated into any new vehicle for
the purpose of noise and/or emissions control prior to its sale or delivery to the ultimate
purchaser or while it is in use; and
B. The use of the vehicle after such devise or element of design has been removed or rendered
inoperative by any person.
:IMPORTANT WARRANTY INFORMATION:
YOUR WARRANTY IS OFFERED AND SERVICED DIRECTLY BY THE IMPORTER / DISTRIBUTOR
WITHIN EACH COUNTRY. CLEVELAND CYCLEWERKS DOES NOT SERVICE OR EXTEND A
WARRANTY DIRECTLY TO CUSTOMERS, YOU MUST GO THROUGH YOUR DISTRIBUTOR.
WARRANTY PROCESS: CUSTOMER > CONTACT DEALER > DEALER CONTACTS DISTRIBUTOR.
This document does not express, extend, or imply that Cleveland CycleWerks is directly or indirectly
offering a warranty for the product in your country. All warranties are offered and have to go through the
distributor in each respective country.
Cleveland CycleWerks Distributor / Importer of Record, warrants that this product is free of defects in
material and workmanship.
PLEASE REFERENCE YOUR WARRANTY AND SERVICE BOOKLET FOR
MORE INFORMATION & EMISSIONS WARRANTY
TO RECIEVE SERVICE: Contact your nearest Cleveland CycleWerks service center and/or
dealer. The cost of transportation of the product to and from the service center and/or
dealer must be paid by the owner.
No service center and/or dealer is authorized to modify this warranty.
WARRANTY INFORMATION
11
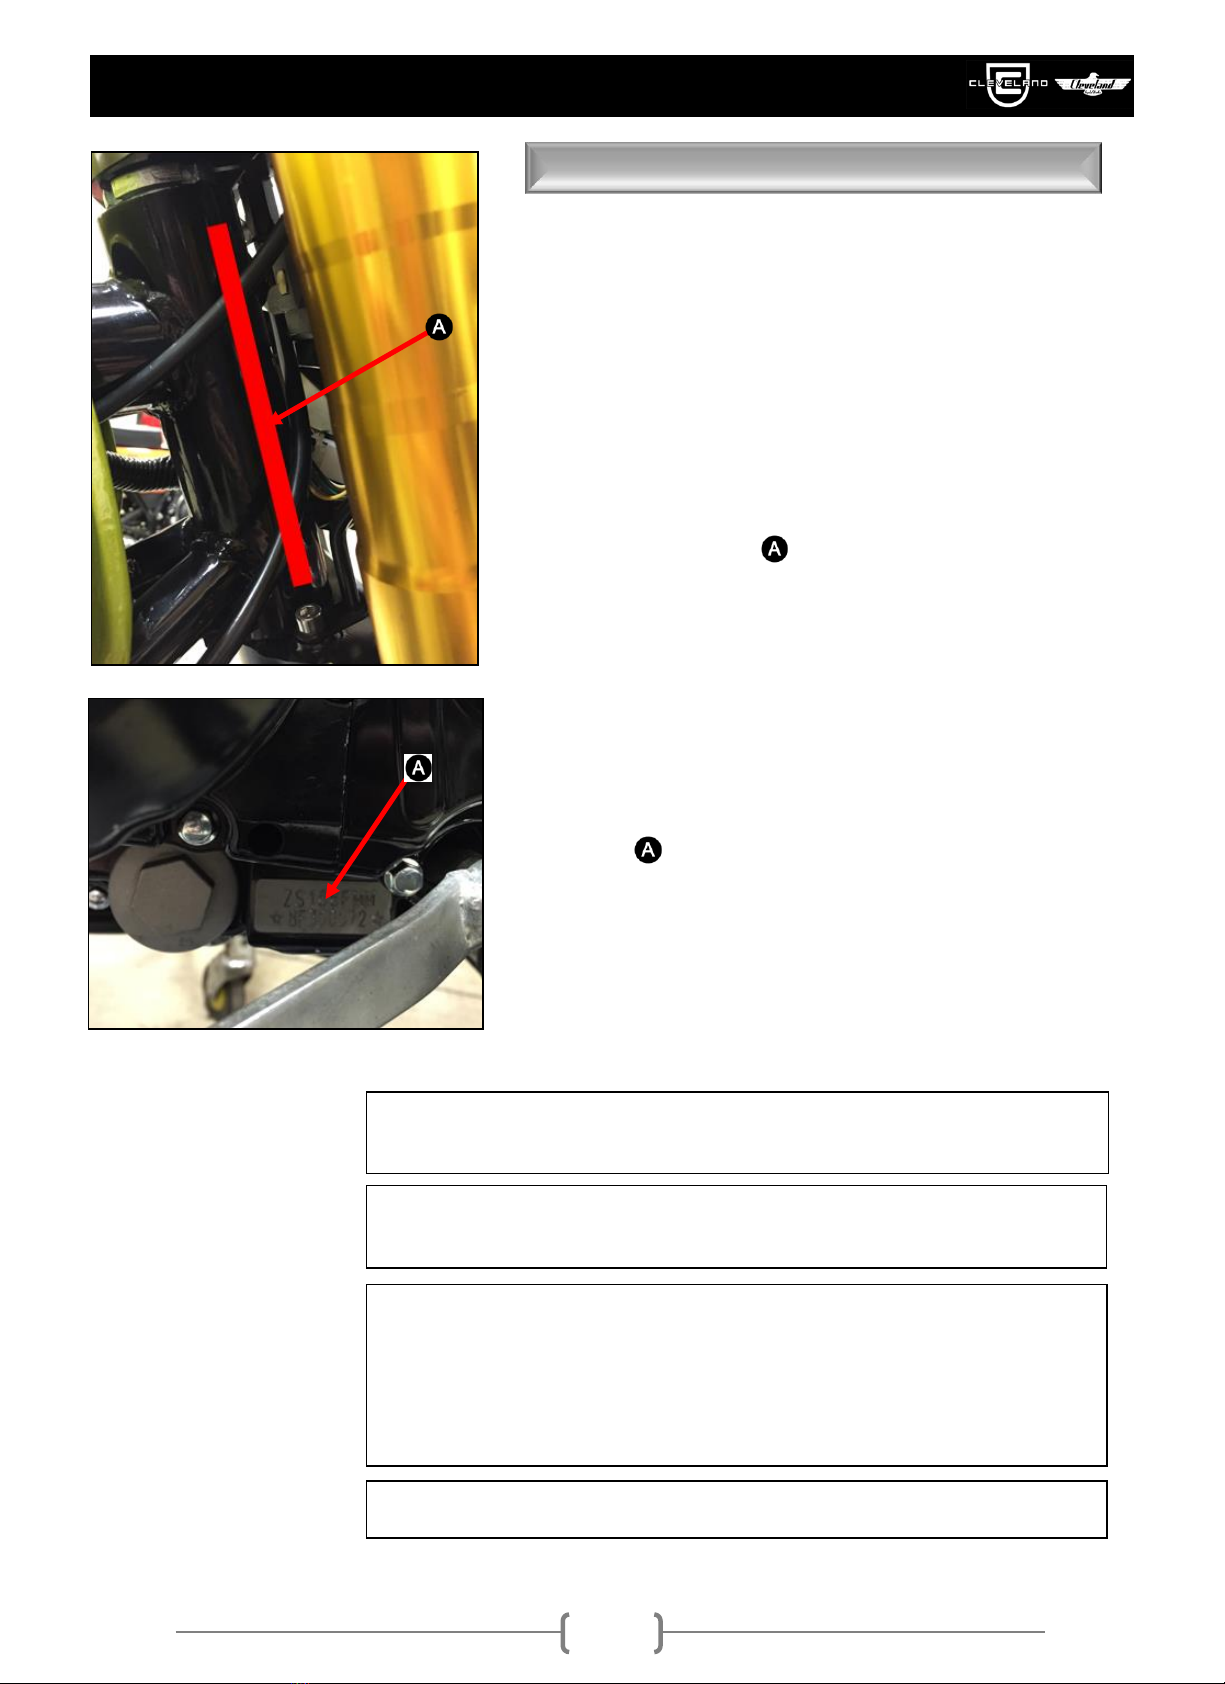
VIN –Chassis Number
The VIN number identifies the motorcycle. When placing
orders for spare parts, you may be required to provide
the VIN, engine serial number and the color of the
motorcycle.
The VIN number is located in one of three places on the
chassis.
1. Right side of frame on compliance sticker.
2. Left side of frame on compliance sticker.
3. Steering head tube right side of frame.
Engine Model & Serial Number
The engine model number and serial number is stamped
on the left side of the engine below the countershaft
sprocket.
For future reference, please write the information of
your motorcycle in the boxes below:
Chassis (VIN) Number
Engine Number
Dealer
Body Color
VEHICLE IDENTIFICATION
SERIAL NUMBER LOCATIONS
12
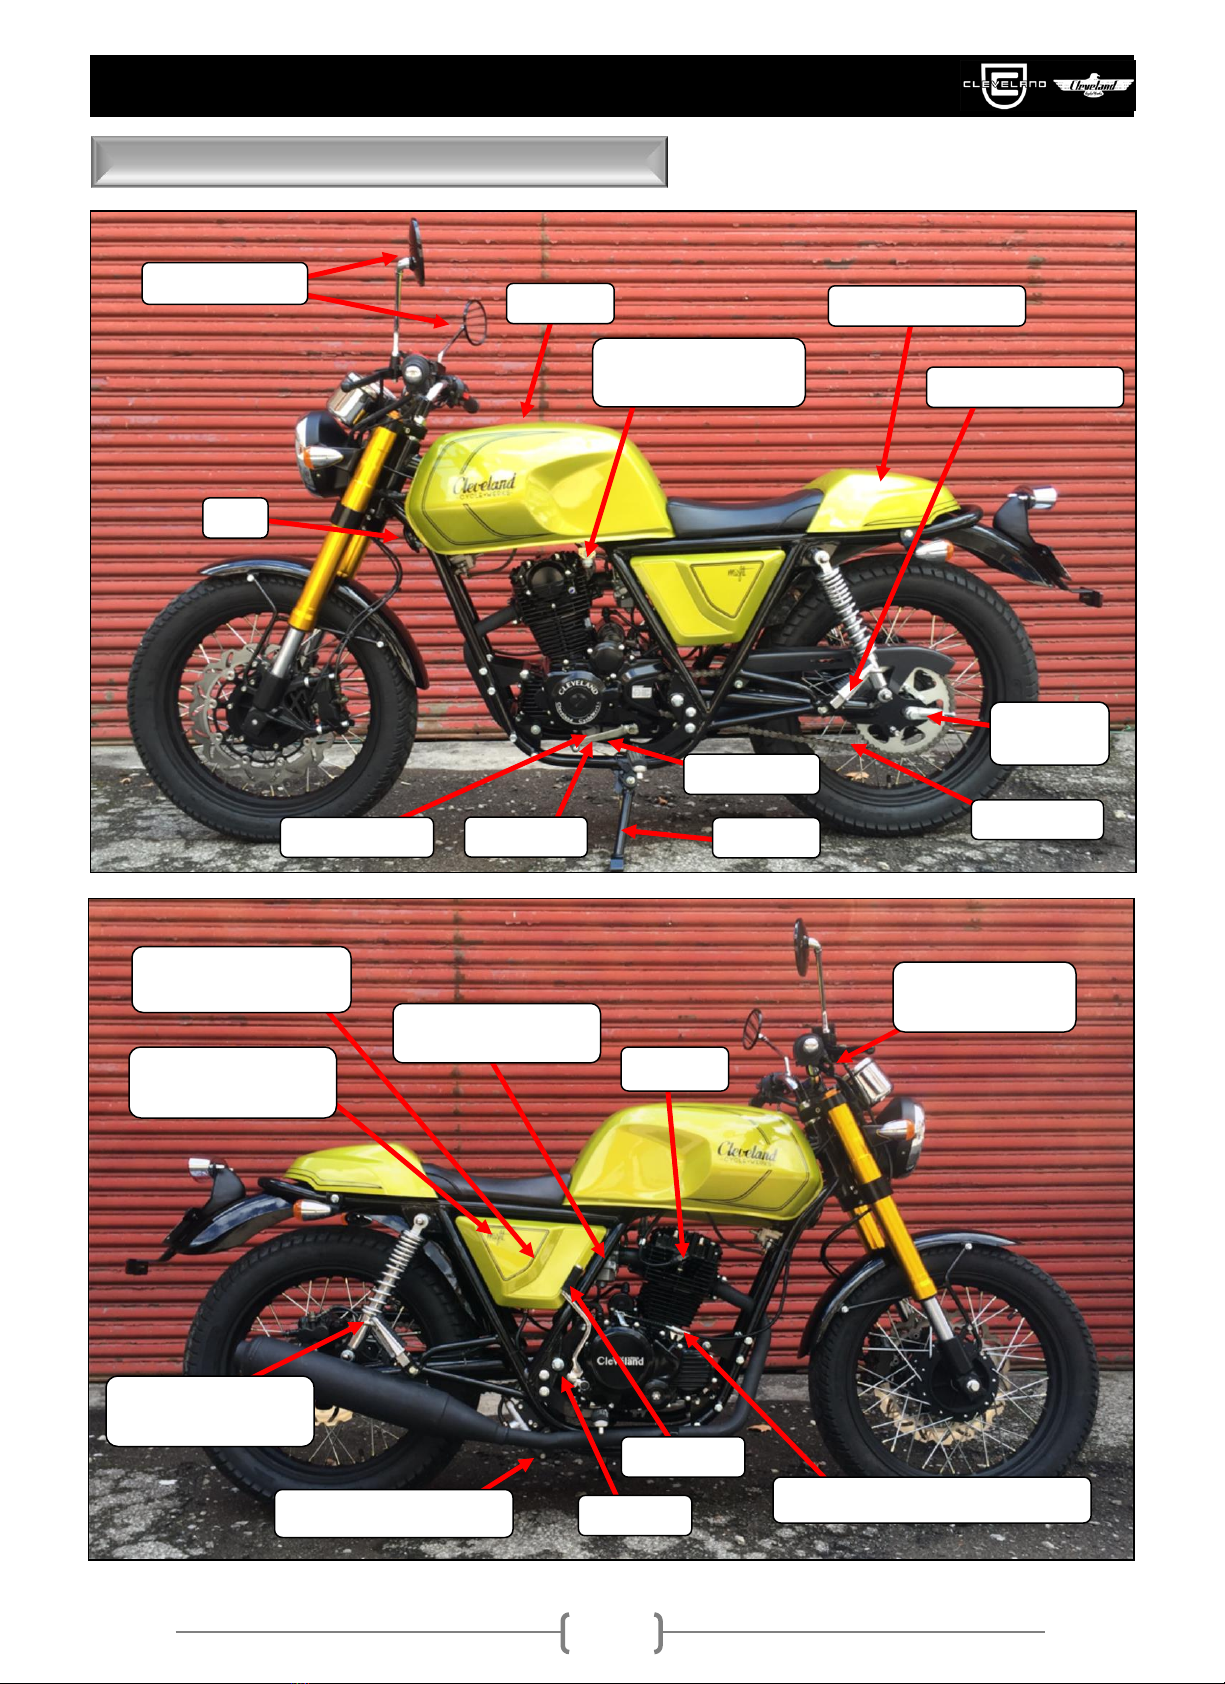
COMPONENT LOCATIONS
CDI Box / Fuse
Underneath Side Cover
Kick Starter
Side Stand
Fuel Cap
Engine Number
Air Filter Underneath the
Side Cover
Removable Seat Cowl
Drive Chain
Fuel Valve (Petcock):
On / Off / Reserve
Throttle Free Play
Adjuster
Clutch Cable Housing Adjustment
Carburetor Idle
Adjustment Screw
Rear Brake Height Adjuster
Pre-Load Adjustment
for Rear Suspension
Engine Oil Filter
Horn
Drive Chain
Adjuster
COMPONENT OVERVIEW
Shift Lever
Passenger Foot Pegs
Oil Dipstick
Spark Plug
Adjustable Mirrors
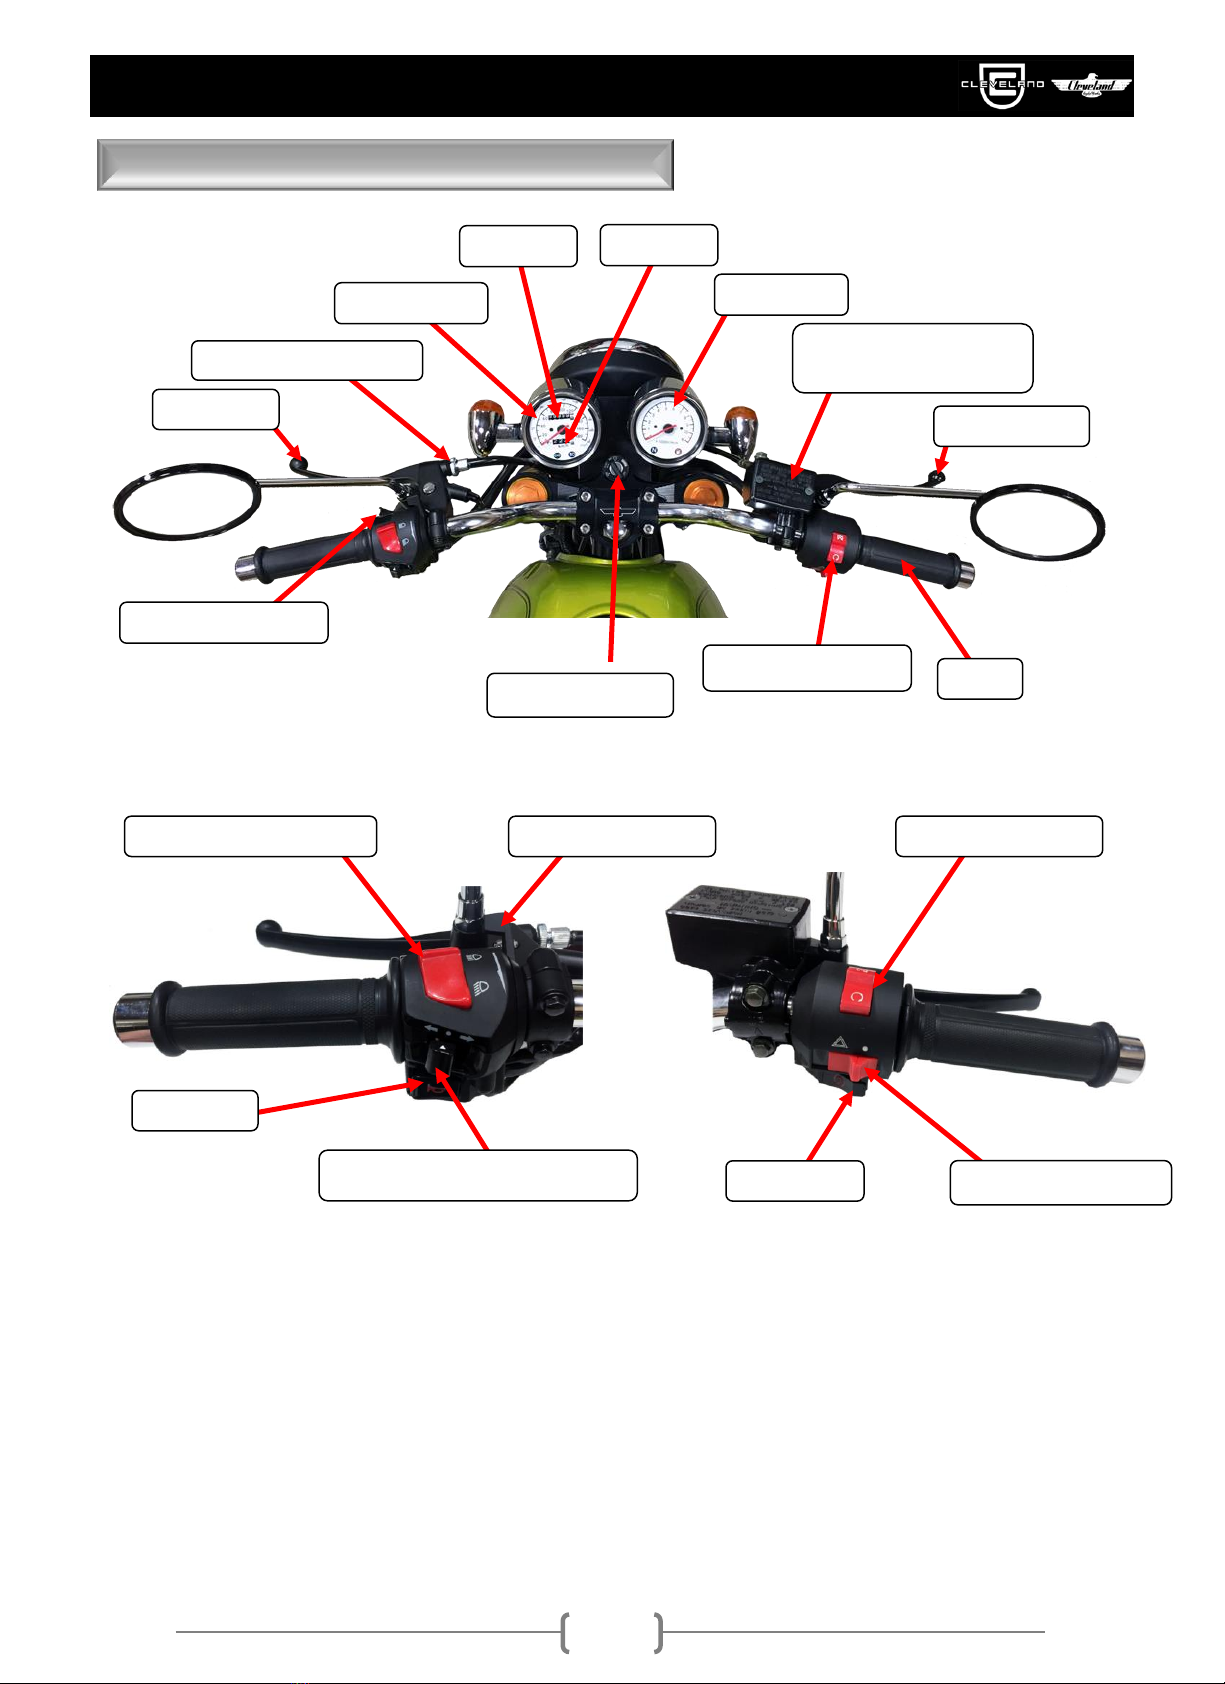
13
Engine Stop / Run Switch
Front Brake Master Cylinder
& Reservoir
Throttle
Clutch Free Play Adjuster
Keyed Ignition Switch
Speedometer
Tachometer
Carburetor Choke Lever
High Beam / Low Beam Switch
Horn Switch
Starter Switch
Emergency Flasher Switch
Engine Stop / Run Switch
COMPONENT LOCATIONS
HAND CONTROLS AND INSTRUMENTS
Odometer
Headlight Flasher Switch
Clutch Lever
Front Brake Lever
Turn Left / Turn Off / Turn Right Switch
Trip Meter

14
Choke Lever
When the choke lever is forward, the choke is OFF.
When the lever is in the rear position, the choke is ON.
When pulled rearward, the butterfly valve in the carburetor is
closed. The engine takes in additional fuel resulting in a rich
fuel and air mixture ratio, which is needed for a cold start.
When releasing the choke lever forward, the cylinder is open
again. The choke should be released once the motor is
warm. DO NOT RIDE WITH THE CHOKE ON!
Clutch Lever
The Clutch lever is located on the left side of the
handlebar.
Headlight Switches
The high beam flasher flashes the high beam temporarily
to get the attention unatentive vehicles, or to temporarily see
an item in your pathway. The toggle switch, will toggle
between high and low beam.
Engine Start / Stop Switches
The stop switch turns off the engine. When this
button is pressed forward, it will turn off the running
motor, and prevent it from starting. When in the rear
position, the motor can run.
Emergency Flasher Switch
When parked on the side of the road, or you are in need of
extra visability, push this switch to the left, for the flashers
to illuminate.
Engine Start Switch
Press this button momentarily to turn over the
engine for starting. Do not hold this switch down for
more than 10 seconds at a time.
Hand Brake Lever & Throttle
The front brake lever and throttle are mounted
on the right side of the handlebar.
HANDLEBAR CONTROLS
CONTROLS

15
Fuel Cap
To Open: Insert ignition key and turn clockwise.
To Close: Turn the key clockwise and push down on
the cap, it should sit flush when closed completely.
NOTE: Do not fill the gas tank to the top
of the fuel cap. This motorcycle is equipped with an
EVAP system. Overfilling will cause this system to
flood and potentially cause damage, poor
performance, and stalling issues from vapor lock.
Keyed Ignition Switch
The ignition key is used to supply power from the
battery to the electrical components of the motorcycle
in the “ON” position . Turn the switch to the “OFF”
position when you are finished riding, or if you
wish to stop the engine.
This motorcycle is equipped with a steering lock.
Turn the handlebars full right or left, push the key IN
and turn to position to lock the steering for
security.
Fuel Valve (Petcock)
Location: bottom of gas tank, riders left side.
OFF - In this position, the fuel valve is closed. No fuel
flows from tank to the carburetor. The lever will be
parallel to the ground when off
ON - In this position, the fuel valve in open. Fuel flows
from the tank to the carburetor. The fuel tank empties
down to the reserve level. The Arrow will be pointing
up, towards the sky. In this position, you are as free
as a bird!
RESERVE - In this position, you will have extra fuel in
the case that you run out, or forget to fill up. Never
begin your ride with the reserve on, this would
remove your safety net, and you do not want to get
stranded. Down towards the earth, the gas gods are
telling you to refill: listen to the gas gods.
FUEL CAP / IGNITION / PETCOCK
CONTROLS
Fuel ON
Throttle
Fuel OFF
Fuel RESERVE
16
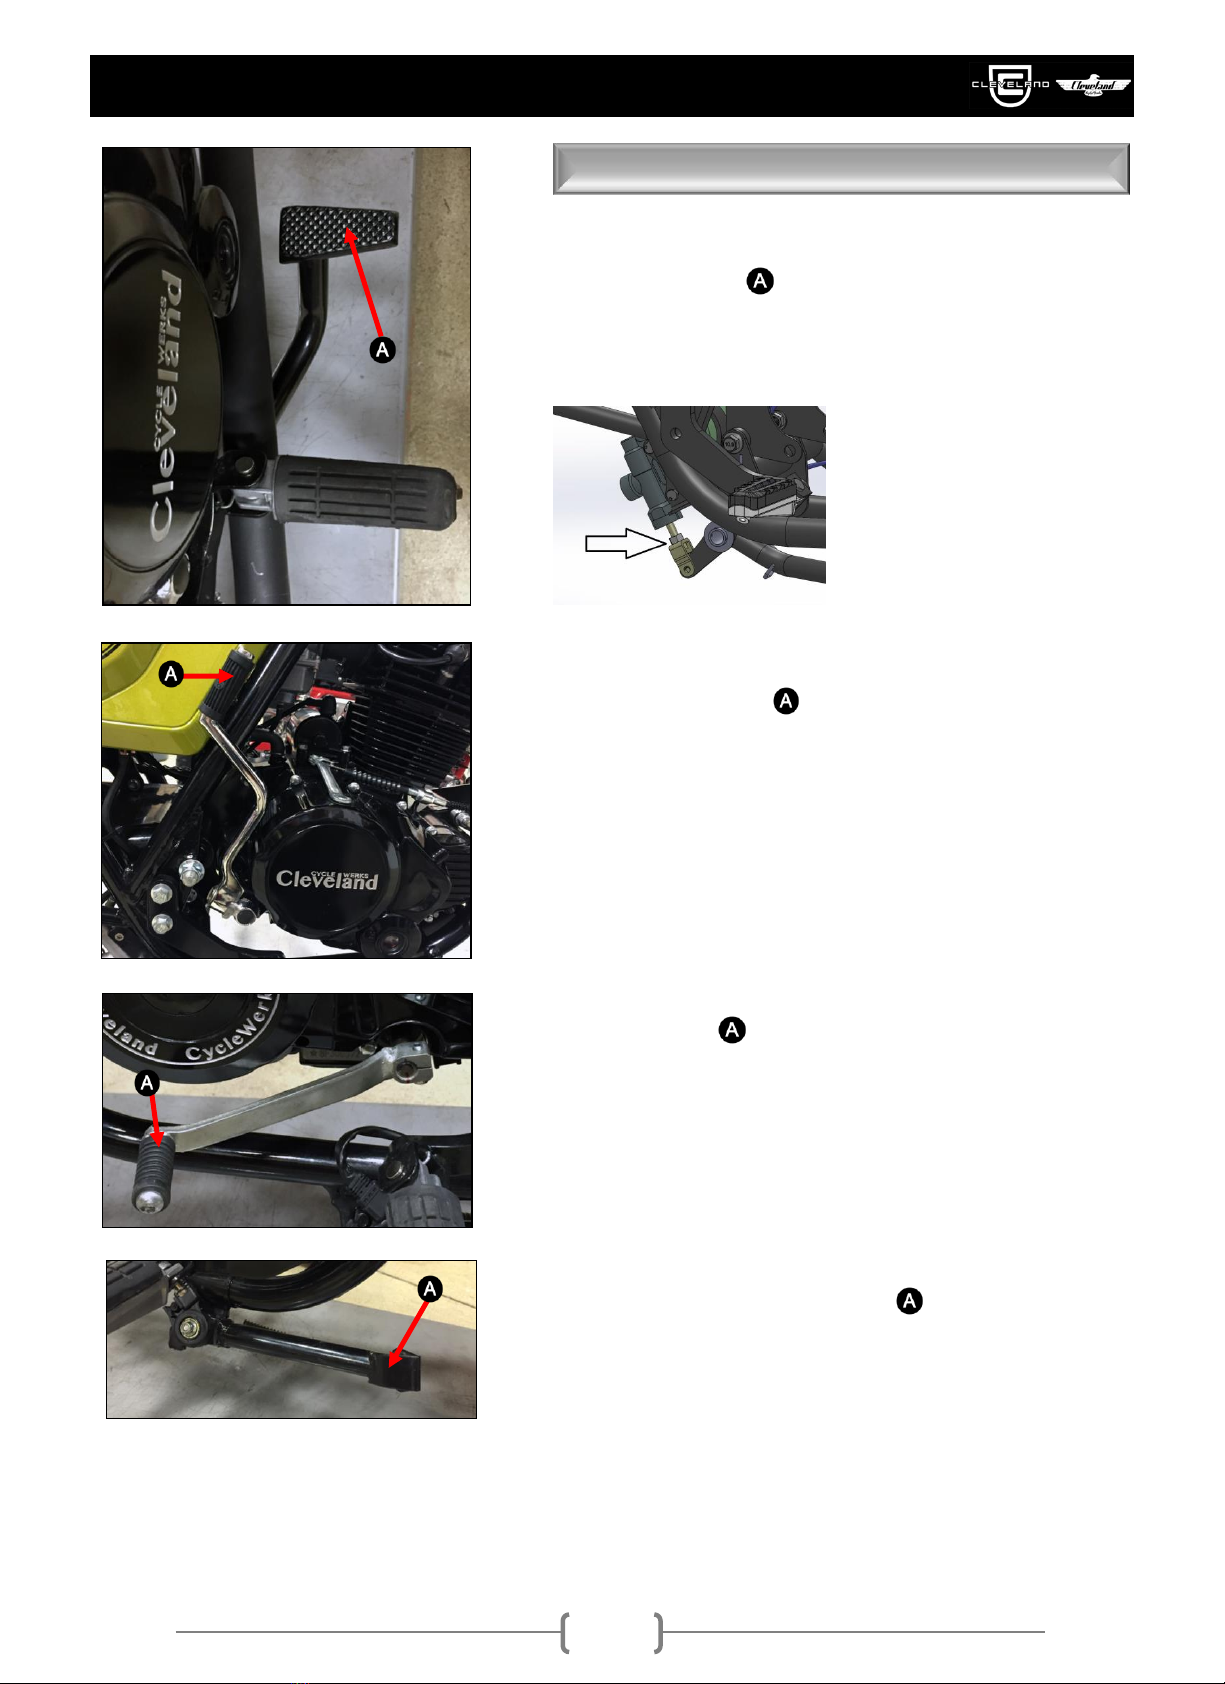
Foot Brake Pedal
The brake Pedal is located on the rider’s right side
of the motorcycle. Depress to apply the rear brake to
slow or stop the motorcycle. Small adjustments to the
height of the pedal may be made at the adjuster:
Kick Start Lever
The kick start lever is mounted on the right side of
the engine. All bikes are equipped with an electric
starter. If you want to do your best James Dean
impression have at it. Also useful to turn over the
bike when you forget to turn off your headlight at the
Café’ you’re racing to.
Shift Lever
The shift lever is on the rider’s left side of the
motorcycle. The gear positions are shown in the
illustration in the Clutch and Shifting Gears section
page 23.
Side Stand
To deploy, push the side stand to the ground and
tilt the motorcycle to rider’s left. Make sure the bike is
on solid ground and the position is secure.
NOTE: The motorcycle has a side stand safety
switch that will not allow the bike to start in gear with
the side stand down!
FOOT CONTROLS
CONTROLS
17
How much weight you put on your motorcycle, and how you load it, are important to your safety.
Anytime you ride with a passenger or cargo, you should be aware of the following information.
Maximum weight capacity: (Gross Vehicle weight Rating) GVWR 324Kg/ 714 lbs.
Maximum weight capacity: 145kg. /320 lbs.
(Includes the weight of the rider, passenger, all cargo, and all accessories)
Your motorcycle is primarily intended for transporting you and a passenger. Riding with excessive
weight can adversely affect the handling, acceleration and braking performance of the motorcycle.
Do not exceed the recommended maximum weight capacity of the motorcycle:
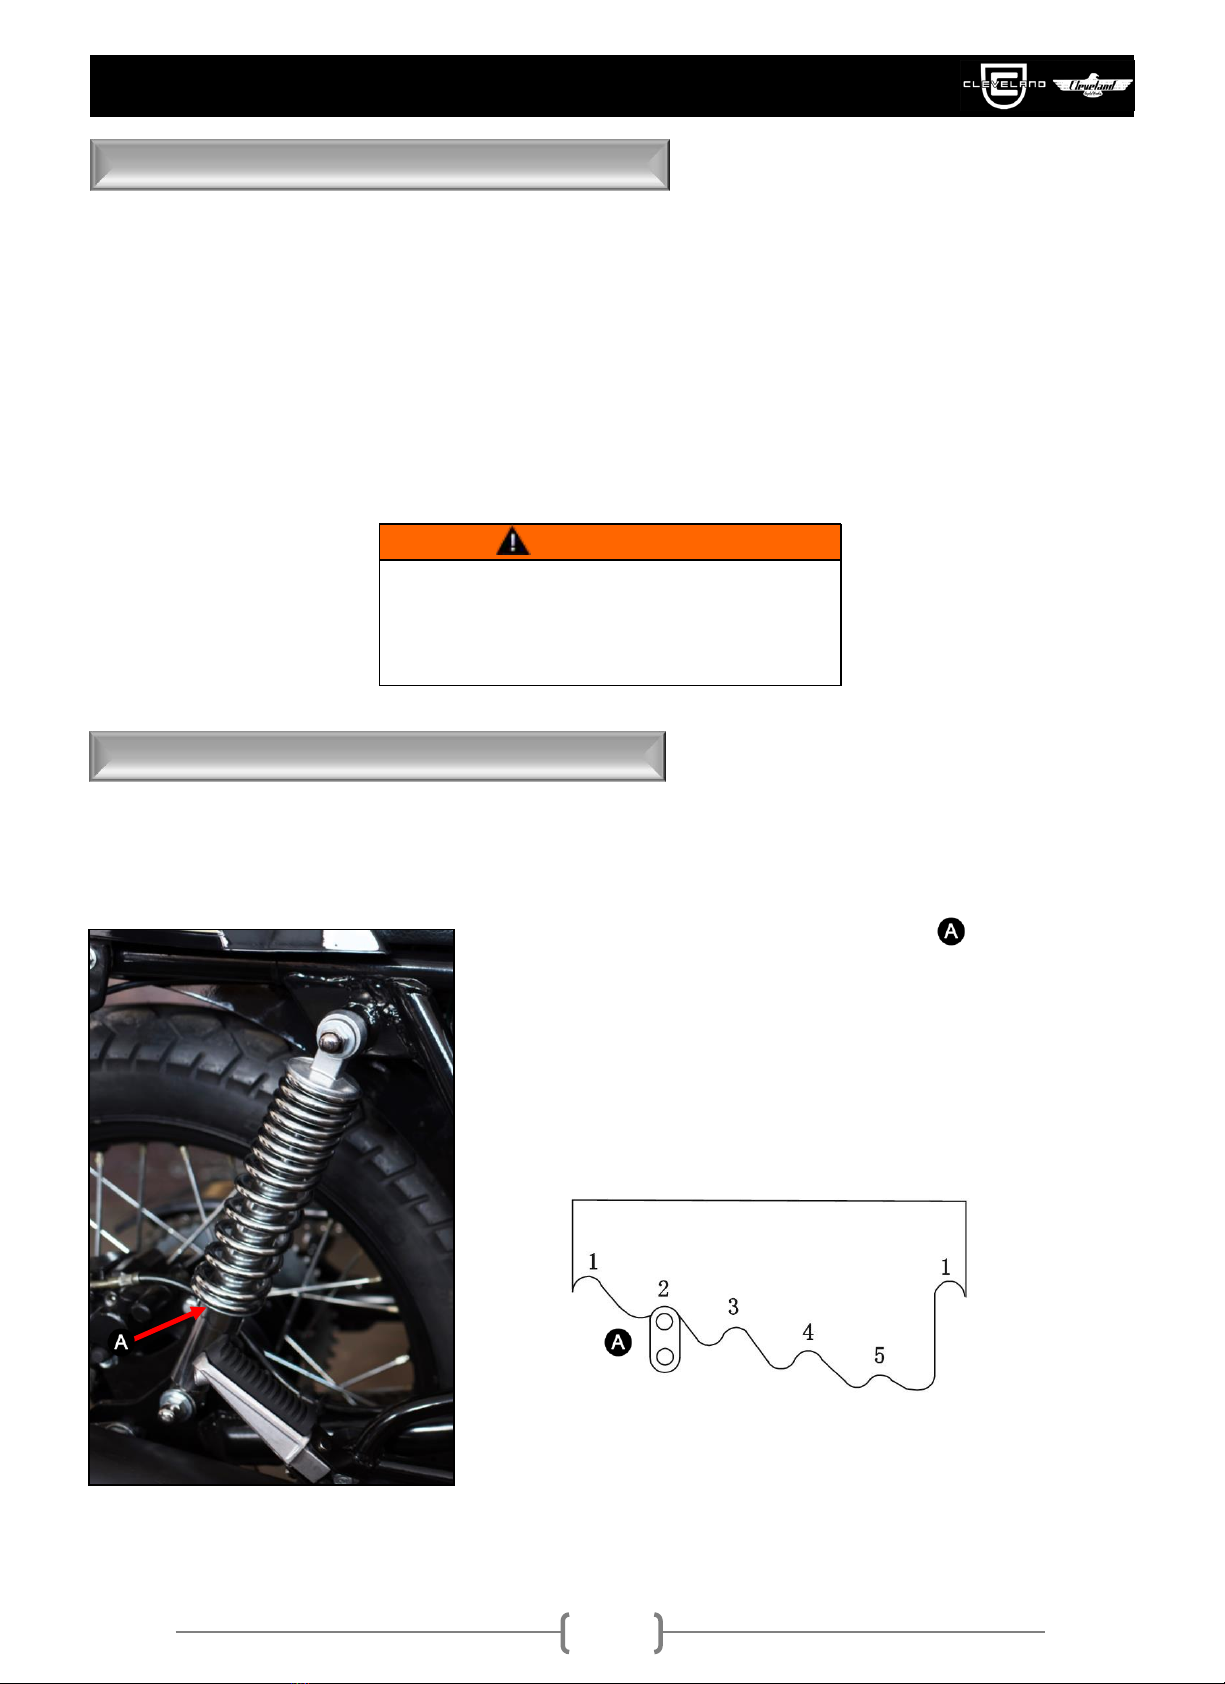
The rear suspension of your motorcycle has adjustment for spring preload. More preload will give
a higher ride height for heavy loads; less preload will be a softer ride for lighter loads.
When adjusting the spring preload , you are
moving the spring seat. This will decrease or increase
the initial spring force, which will lower or raise the
motorcycle rear ride height.
1. Use a C-spanner and move the spring platform to
one of five positions.
2. Turn clockwise to increase the preload.
3. Turn counterclockwise to decrease the preload.
CONTROLS
WEIGHT CAPACITY
SUSPENSION ADJUSTMENT (REAR)
Overloading or improper loading can cause a crash
and you can be seriously hurt or killed.
Follow all load limits and other loading guidelines in
this manual.
WARNING

18
Before you ride, you must be absolutely sure that you and your motorcycle are ready to
ride. To help you prepare, this section of the manual will discuss how to evaluate your
riding readiness and how to perform our recommended pre-ride inspection of your
motorcycle
Are You Ready to Ride?
Before you ride your motorcycle for the first time, we strongly recommend the following:
1. Completely read this manual.
2. Be sure that you have read and understand all the safety messages and labels.
3. Be sure that you understand how to operate all of the motorcycle’s controls.
Before each ride, we strongly recommend the following:
1. The rider is in good physical and mental condition.
2. The rider is free of alcohol and other drugs.
3. The rider is wearing an approved motorcycle helmet with a tight chin strap, eye protection and
protective clothing.
For your safety, we strongly recommend that you always wear an approved helmet, eye
protection, boots, gloves, long trousers and a long sleeved shirt or jacket whenever you ride.
Although complete protection is not possible, wearing the proper gear can reduce the chance of
and severity of injuries when you ride.
Helmets & Eye Protection –Your helmet is your most important piece of riding gear because it
offers the best protection against head injuries. A good helmet will be approved by a testing
organization independent of the helmet manufacturer and will have a chin strap that can be
tightened securely. Open-face helmets offer some protection, but a full-face helmet offers the
most protection. When purchasing a helmet, regardless of style, look for DOT (Department of
Transportation) sticker (USA only) or SNELL, or ECE approval. If the helmet has been tested by
an independent organization such as the Snell Institute, you will usually find their logo on a tag
inside the padding of the helmet, or on the outside of the shell, located on the rear of the helmet.
Additional Riding Gear –In addition to your helmet and eye protection, we also recommend:
1. Sturdy motorcycle boots to help protect your feet, ankles and lower legs.
2. Good quality motorcycle gloves to protect your hands and wrists.
3. Sturdy riding trousers, do not wear shorts.
BEFORE RIDING
NOT WEARING A HELMET INCREASES THE CHANCE
OF SERIOUS INJURY OR DEATH IN A CRASH. BE
SURE YOU ALWAYS WEAR YOUR HELMET AND
OTHER PROTECTIVE APPAREL WHEN YOU RIDE.
WARNING
PROTECTIVE GEAR & APPAREL

19
Before each and every ride you take, it is extremely important that you inspect the motorcycle and
make sure any problems you find are corrected. A pre-ride inspection is a must because riding,
especially in rough road conditions (Cleveland roads) can be very tough on a motorcycle and you
do not want to injure yourself, or break down far from help. A pre-ride inspection is essential!
Check the following items before you get on the motorcycle:
Tires –Use a tire pressure gauge to check the air pressure. Inflate or deflate as needed. Also
check for signs of damage, dry rotting or excessive wear.
Spokes & Rims –Make sure all of the spokes are tight. Inspect the rims to be sure they are not
bent.
Leaks –Look under the motorcycle for signs of leaking fluids such as engine oil or gasoline.
Engine Oil –Check the level of engine oil and add if needed.
Fuel –Check the level of fuel in the fuel tank and add fuel if needed. Be sure the fuel cap is
closed securely.
Drive Chain –Inspect the drive chain condition and slack. Adjust and lubricate if needed. Also
check the chain guide for wear and replace if and when it is worn. For detailed instructions on
drive chain slack adjustment, see the Maintenance section of this manual.
Brake Hoses –Inspect the brake hoses for leaks and replace if needed.
Nuts & Bolts –Inspect all accessible nuts and bolts. Tighten them if it is needed.
Spark Plug & Cap –Check the spark plug for looseness. Tighten if needed. Be sure the cap is
pushed on the spark plug and it is tight.
Check the following items after you get on the motorcycle:
Throttle –Check the throttle free-play and adjust if needed. Rotate the throttle to be sure it moves
easily and freely. Make sure that it snaps back to its closed position automatically when you
release it in all steering positions.
Brakes –Step on the rear brake pedal and pull in the front brake lever to be sure the brakes are
working properly.
Clutch –Check that the clutch lever disengages the transmission when pulled in towards the
handle bar.
Remember; be sure to correct any problems you find or have your Cleveland CycleWerks
dealer correct it before you ride.
Improperly maintaining your motorcycle or failing to
correct a problem before riding can cause a crash in
which you can be seriously hurt or killed. Always
perform a pre-ride inspection before any ride and
correct any problem.
WARNING
BEFORE RIDING
PRE-RIDE INSPECTION

20
This section of the manual gives basic information on how to begin riding your motorcycle. In this
section, we will cover how to start and stop the engine, how to use the throttle and brakes, how to
use the clutch and shift gears, and tasks you need to perform when you are finished riding.
Fuel Recommendation –
The engine in your motorcycle has been designed to run on unleaded gasoline with a pump
octane rating of 87 (AKI USA) / 91 (RON/EU) or higher for the best performance. Most service
stations will display the octane rating above each pump. Cleveland CycleWerks recommends use
of gasoline with an 87 (AKI USA) / 91 (RON/EU) or higher to ensure maximum performance and
reliability.
Use of a lower octane gasoline can cause pre-detonation in the engine. When this occurs,
you will hear a persistent “pinging” or “spark knock” which can cause engine damage. If pinging
occurs, typically heard first under a heavy load, switch brands of gasoline and be sure you are
using the proper octane rating. Use of leaded fuel is forbidden, as it will render useless the
exhaust catalysts and cause high exhaust emissions.
Ethanol content in the fuel may harm the rubber gaskets and cause water corrosion in the
fuel system. Avoid using fuel mixed with ethanol, if possible. Mixture ratios of up to 10% ethanol
(E10) can be used without damage to the engine
Never use stale or contaminated gasoline. Never use gasoline that has been mixed with oil.
Avoid getting dust, dirt and water into the fuel tank.
1. Before refueling your motorcycle, check around the fuel tank, fuel valve (petcock) and
carburetor for leaks, repair as necessary. Do not ride the motorcycle with a fuel leak.
2. Inspect the fuel hose. Replace the fuel hose if it is dry rotted, cracked or if there are signs of
deterioration.
3. Insert the key and turn clockwise to open the fuel cap.
4. Add fuel to the tank until the level reaches about 1 inch (30mm) below the bottom of the
filler neck of the tank. Do not overfill the fuel tank, fuel expands when the fuel tank is
heated by the engine, sunlight or ambient air, this expansion can cause a spill or
overflow condition.
5. ONCE AGAIN, DO NOT OVERFILL THE FUEL TANK. All US and EU Models are equipped
with a EVAP system, and overfilling the fuel tank will allow gasoline to enter this system,
causing stalling, poor operation, and potential system damage. Do not overfill the fuel tank.
6. Push down on the fuel cap until it is fully closed and remove the key.
OPERATION & RIDING
Gasoline is highly flammable and explosive. You
can be burned or seriously injured when handling
gasoline. Always stop the engine. Only handle
gasoline outdoors. Clean all spills immediately.
WARNING
REFUELING PROCEDURE
FUEL (GASOLINE)
Other manuals for Misfit 250 Gen II
1
Table of contents
Other Cleveland CycleWerks Motorcycle manuals


