Clever Chek TD-3250 User manual

Version 2 2006/07/04

Table of Contents
BEFORE YOU START 04
Warnings and Precautions 04
Intended Use 05
Health Information 06
ABOUT THIS SYSTEM 08
Content of the System 08
Device Overview 09
Button Function & Pressure Cuff 11
LCD Display Description 13
Test Strip Description 14
PREPARATIONS BEFORE USE 16
Battery Installation and Replacement 16
Setting the Monitor 18
HOW TO MEASURE BLOOD GLUCOSE 20
Important Information and Possible Interferences 21
Coding the Monitor 22
Checking the Code 23
Testing With Control Solution 24
Getting a Drop of Blood 27
Taking a Reading 29
Comparing With Laboratory Results 31
HOW TO MEASURE BLOOD PRESSURE 32
Suggestions before Measuring 33
Applying the Pressure Cuff 34
Proper Measurement Position 35
Taking a Reading 36
HOW TO USE THE MEMORY FEATURES 37
Viewing Memory in the Monitor 37
Viewing Results on a Personal Computer 38
2

Deleting memory 39
HOW TO TAKE CARE OF YOUR MONITOR 40
Cleaning 40
Storage 40
ERROR MESSAGE 41
TROUBLESHOOTING 42
SPECIFICATIONS 44
SYMBOLS INFORMATION 45
3
* Before testing, please read all instructions and practice the test.
* Be sure to keep this manual for future reference.

Warnings and Precautions
The CLEVER CHEK TD-3250 System is designed for
use on individuals age 16 and above. It shall NOT be
used:
1. to diagnose newborns with diabetes.
2. on infants or persons who cannot communicate.
This device does not serve as a cure of any symptoms
or disease. The data measured are only for reference.
Always consult your physician to have the results
interpreted.
This device is not able to measure in the presence of
common arrhythmia, such as arterial or ventricular
premature beats or arterial fibrillation. It may produce
reading error.
Use of the device near a mobile phone or microwave
oven may cause inaccurate results.
Do not use the device for purposes other than
measuring blood glucose and blood pressure for
humanbeings.
Do not wrap the pressure cuff on anything besides your
arm.
4
BEFORE YOU START

Intended Use
What it is:
The CLEVER CHEK TD-3250 system is a 2 in 1 system designed to measure
blood glucose outside of human body and to measure blood pressure
non-invasively. The system performs only one function at a time to avoid any
interference problems. The system consists of the CLEVER CHEK TD-3250
monitor, test strips, and check & code strip. The system also comes with
control solutions for quality control.
How it works:
Blood glucose is tested using an Amperometric Biosensor. Capillary action at
the absorbent hole of the test strip draws a small amount of blood into the
reaction chamber, and then the reading is displayed after 10 seconds.
Blood pressure is measured non-invasively at the upper arm based on the
oscillometric method.
This user’s manual contains important information that you must know about
your system. Please read it carefully.
For other questions regarding this system, please contact:
U.S.A. representative
Chunming Shih
4331 Stevens Battle Lane,
Fairfax, VA 22033
Customer Care Line: (703) 591-4934
Hours of Operation: 9 am- 4 p.m. EST (14:00 - 21:00 GMT)
At all other times, you should contact your health care
professional for assistance.
A warranty registration card is included with your system.
Please complete it and mail it to us; if you prefer to fill it
out online, please visit http://www.taidoc.com
5
BEFORE YOU START

Health Information
Blood Glucose
Blood glucose monitoring plays an important role in diabetes control. A
long-term study shows that keeping blood glucose levels close to normal can
reduce the risk of diabetes complications by up to 60 %.*
The results you get with the CLEVER CHEK TD-3250 can help you and your
healthcare professional monitor and adjust your treatment plan to gain better
control of your diabetes. The American Diabetes Association (ADA)
recommends that you keep your blood sugar levels at:
Time of day ADA recommendation
Before
meals
80-120 mg/dL / 4.5-6.7
mmol/L
1-2 hours
after meals
Less than 180 mg/dL /
10 mmol/L
Bedtime 100-140 mg/dL /
5.6-7.8 mmol/L
Source: American Diabetes Association (2005). Standards of medical care in diabetes.
Clinical Practice Recommendations 2005. Diabetes Care, 28(Suppl): S4–S36.
*Reference: American Diabetes Association: Position Statement on the
Diabetes Control and Complications Trial (1993).
6
BEFORE YOU START

Blood Pressure
Clinical studies show that the adult diabetes is often accompanied by elevated
blood pressure. People with diabetes can reduce their heart risk by managing
their blood pressure along with diabetes treatment*.
Knowing your routine blood pressure trend tells whether your body is in good
condition or not. Human blood pressure naturally increases after reaching
middle age. This symptom is a result of continuous aging of the blood vessel.
Further causes include obesity, lack of exercise, and cholesterol (LDL)
adhering to the blood vessels. Rising of blood pressure accelerates hardening
of the arteries, and the body becomes more susceptible to apoplexy and
coronary infarction. The WHO (world health organization) published the
guideline of blood pressure range:
Source: 1999 WHO/ISH guidelines for the management of hypertension
*Reference: American Diabetes Association: The Diabetes-Heart Disease Link
Surveying Attitudes, Knowledge and Risk (2002)
7
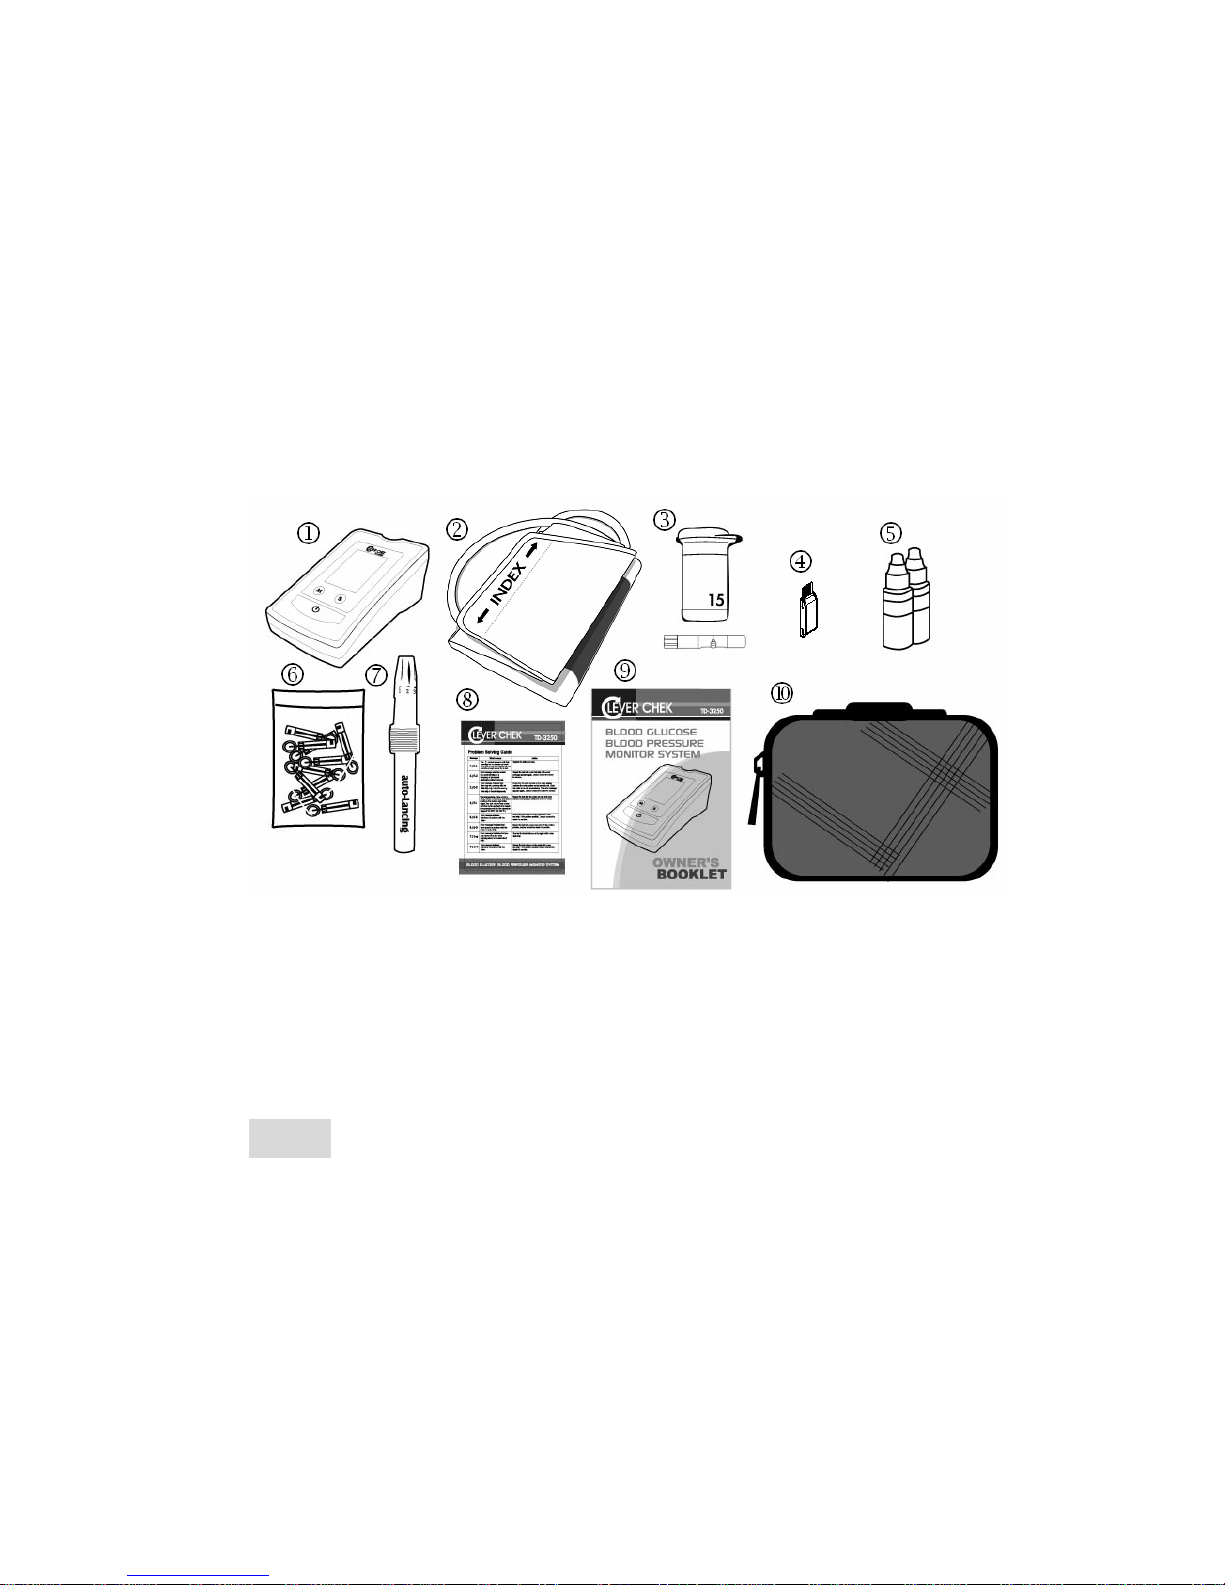
Content of the System
1Blood glucose andblood pressure monitor
x1 6
Sterile lancets X25
2Pressurecuff x1 7
Lancing device x1
3Teststrip X25 8
Quick guide x1
4Check & code strip X1 9
User’s manual x1
5Taidoc control solutions X2
Sporty bag x1
These products have been designed, tested, and proven to work together as a
system to produce accurate blood glucose test results. Use only CLEVER
CHEK TD-3250 test strips and control solution with your CLEVER CHEK
TD-3250 Monitor.
Caution!
Check your system to be sure that it is unopened prior to use and that it
contains all parts listed above. If either of these conditions occurred, please
return your system to the place of purchase.
ABOUT THIS SYSTEM

8

Device Overview
Three subtype of TD-3250 were developed and the difference of function
among them is simply in data transmission.
Subtype of TD-3250 Data transmission function
TD-3250A
No
, you can only view results on the monitor itself.
TD-3250B
Yes
, you can view results on the PC through
cable connection.
TD-3250C
Yes
, you can view results on the PC through
wireless connection using Bluetooth technology.
Five features are included in TD-3250:
Feature 1. Blood glucose test:
Test Slot is the ONLY place you need to use when testing
blood glucose. For detailed procedures, please see page 20.
Note: If you try to measure blood pressure and press
button during blood glucose test, the monitor will turn off
automatically with beeping sound.
ABOUT THIS SYSTEM

9
Feature 2. Blood pressure test:
Button is the ONLY button you need when measuring
blood pressure. For detailed procedures, please see page 32.
This is also the main power button of this monitor. When the
monitor is on, no matter what function it is in, pressing
Button will turn it off instantly.
Note: If you insert test strip during blood pressure test, there
will be no action.
Feature 3. Memory recall
M Button helps you when you want to see previous data. For
detailed procedures, please see page 37.
Feature 4. Monitor setting
S Button helps you set up year, month, date, time, and units.
For detailed procedures, please see page 18.
Feature 5. Cable connection
Data port is the unique part for model TD-3250B which is used
to connect the monitor to the personal computer through
RS232 cable for data transmission. For detailed procedures,
please see page 38.

Feature 6. Wireless connection
BT Button and Bluetooth indicator, only in model TD-3250C,
assist you to transmit data wirelessly. For detailed procedures,
please see page 38.
10

11
Button Function & Pressure Cuff
LCD Display
Test results are
displayed with
symbols and
simple messages.
Test Slot
For Feature1 Blood
glucose test
Bluetooth
Indicator
(ONLY for model TD-3250C)
For Feature6
Wireless
Connection
Set Button
For Feature4
Monitor setting
Memory Button
For Feature3
Memory Recall
Power Button
For Feature2
Blood pressure test
For both model TD-3250A
and TD-3250B ONLY for model TD-3250C
BlueTooth Button
For Feature6
Wireless connection
Data Port
(ONLY for model TD-3250B)
For Feature5
Cable connection
ABOUT THIS SYSTEM

12
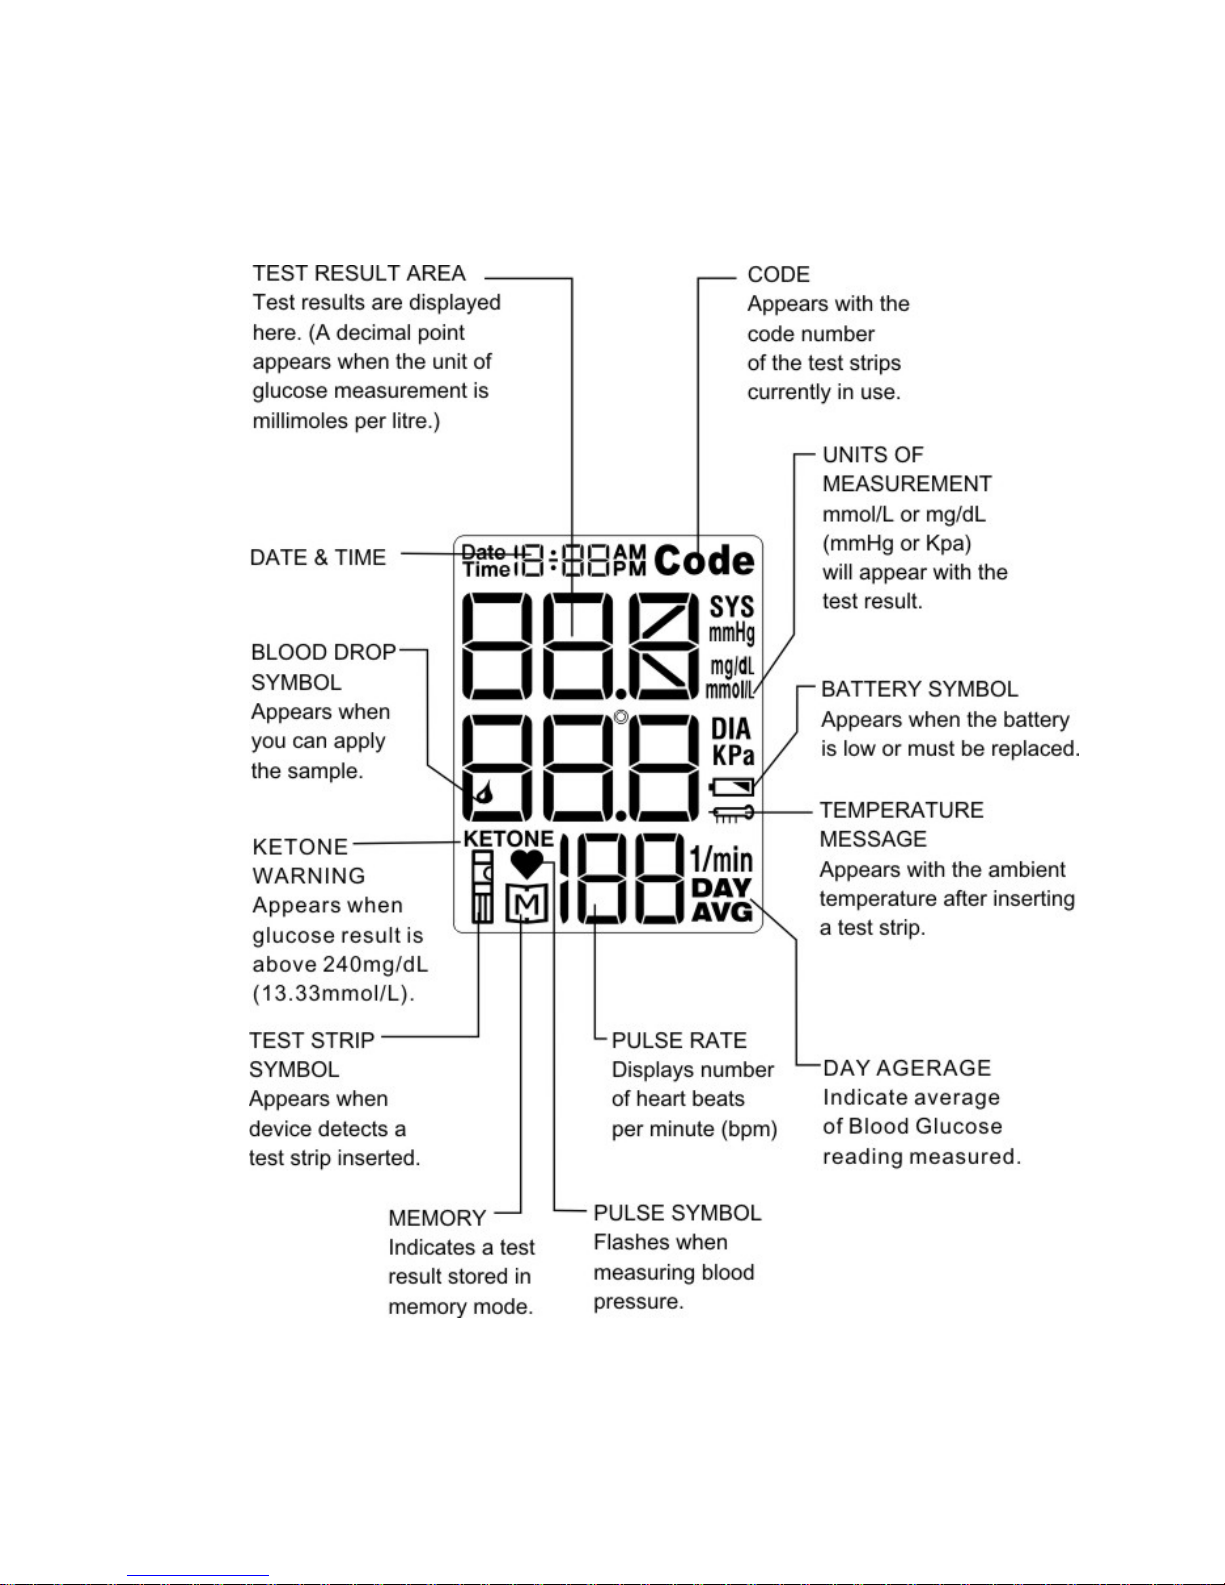
LCD Display Description
13
ABOUT THIS SYSTEM
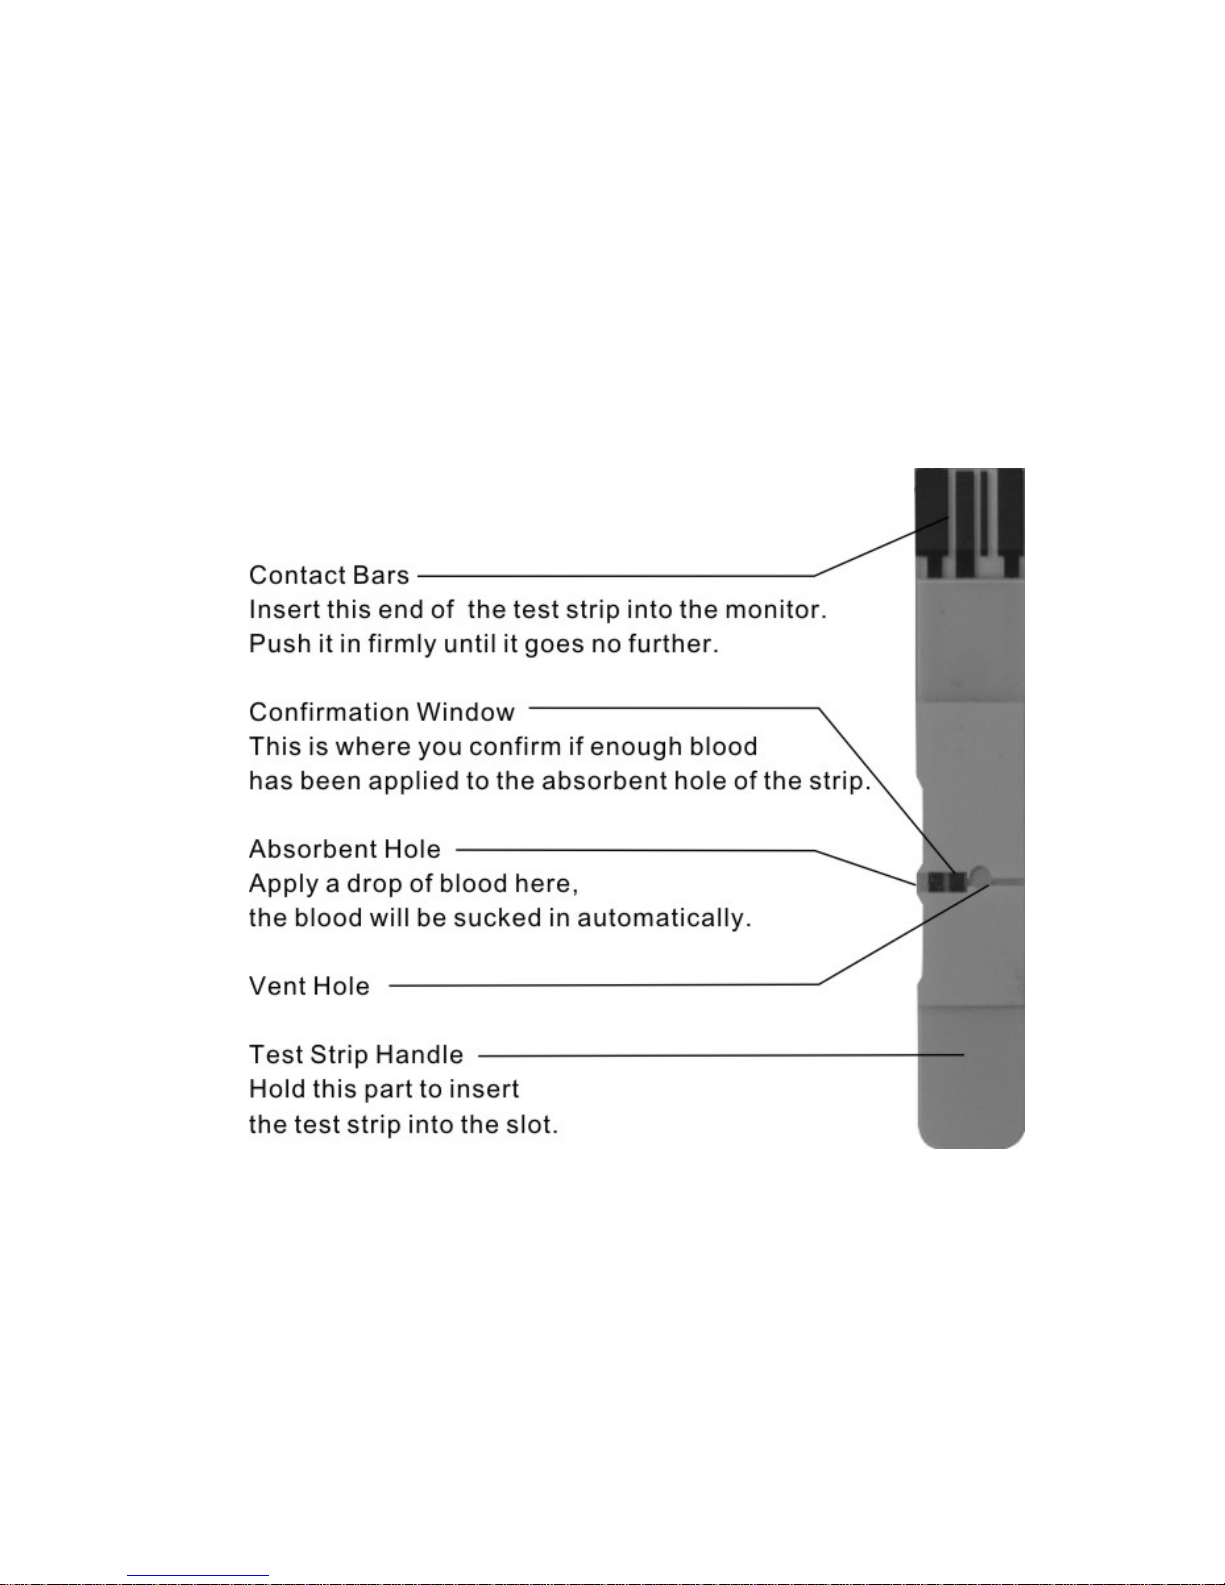
Test Strip Description
Your system measures the amount of sugar (glucose) in whole blood. Blood is
applied to the absorbent hole of the test strip and is automatically drawn into
the reaction chamber where the reaction takes place.
The test strip consists of the following parts:
14
ABOUT THIS SYSTEM

Important usage information
When you get a new vial of test strips:
Check the expiry date on the vial. Do not use test strips beyond the expiry
date since they may cause inaccurate results.
Write the discard date on the vial when you first open it.
When you use a test strip:
Touch the test strip with clean and dry hands.
Tightly close the vial cap immediately after removing a test strip.
Use each test strip immediately after removing it from the vial.
Do not bend, cut or alter a test strip in any way.
Apply only blood sample to the absorbent hole. Applying other substances to
the absorbent hole will cause inaccurate results.
When you store your test strips:
Store your test strips in their original vial only; do not transfer them to a new
bottle or any other container.
Store test strip packages in a cool and dry place between 4 oC (39oF) and
40oC (104oF). Keep away from direct sunlight and heat.
Discard remaining test strips and the vial three months after first opening
date.
Warning!
Keep the test strip vial away from children. The cap is a choking hazard. The
vial contains a pouch filled with drying agents that may be harmful if inhaled or
swallowed and may cause skin or eye irritation.
15

(Fig. 1)
(Fig. 2)
Battery Installation and Replacement
Your monitor comes with batteries already installed.
When replacing, use ONLY 1.5V AA size alkaline batteries for best
performance and longest life.
Low Power Signal
The monitor will remind you when the power is getting low by displaying two
different messages:
1. Battery Symbol appears while you perform tests. (Fig. 1)
This means it is about time to change the batteries although still
30 more measurements can be made.
2. Battery Symbol flashes by itself and the monitor cannot
perform any measurement.
(Fig. 2) This means you must change the batteries before
making any measurements.
16
PREPARATIONS BEFORE USE
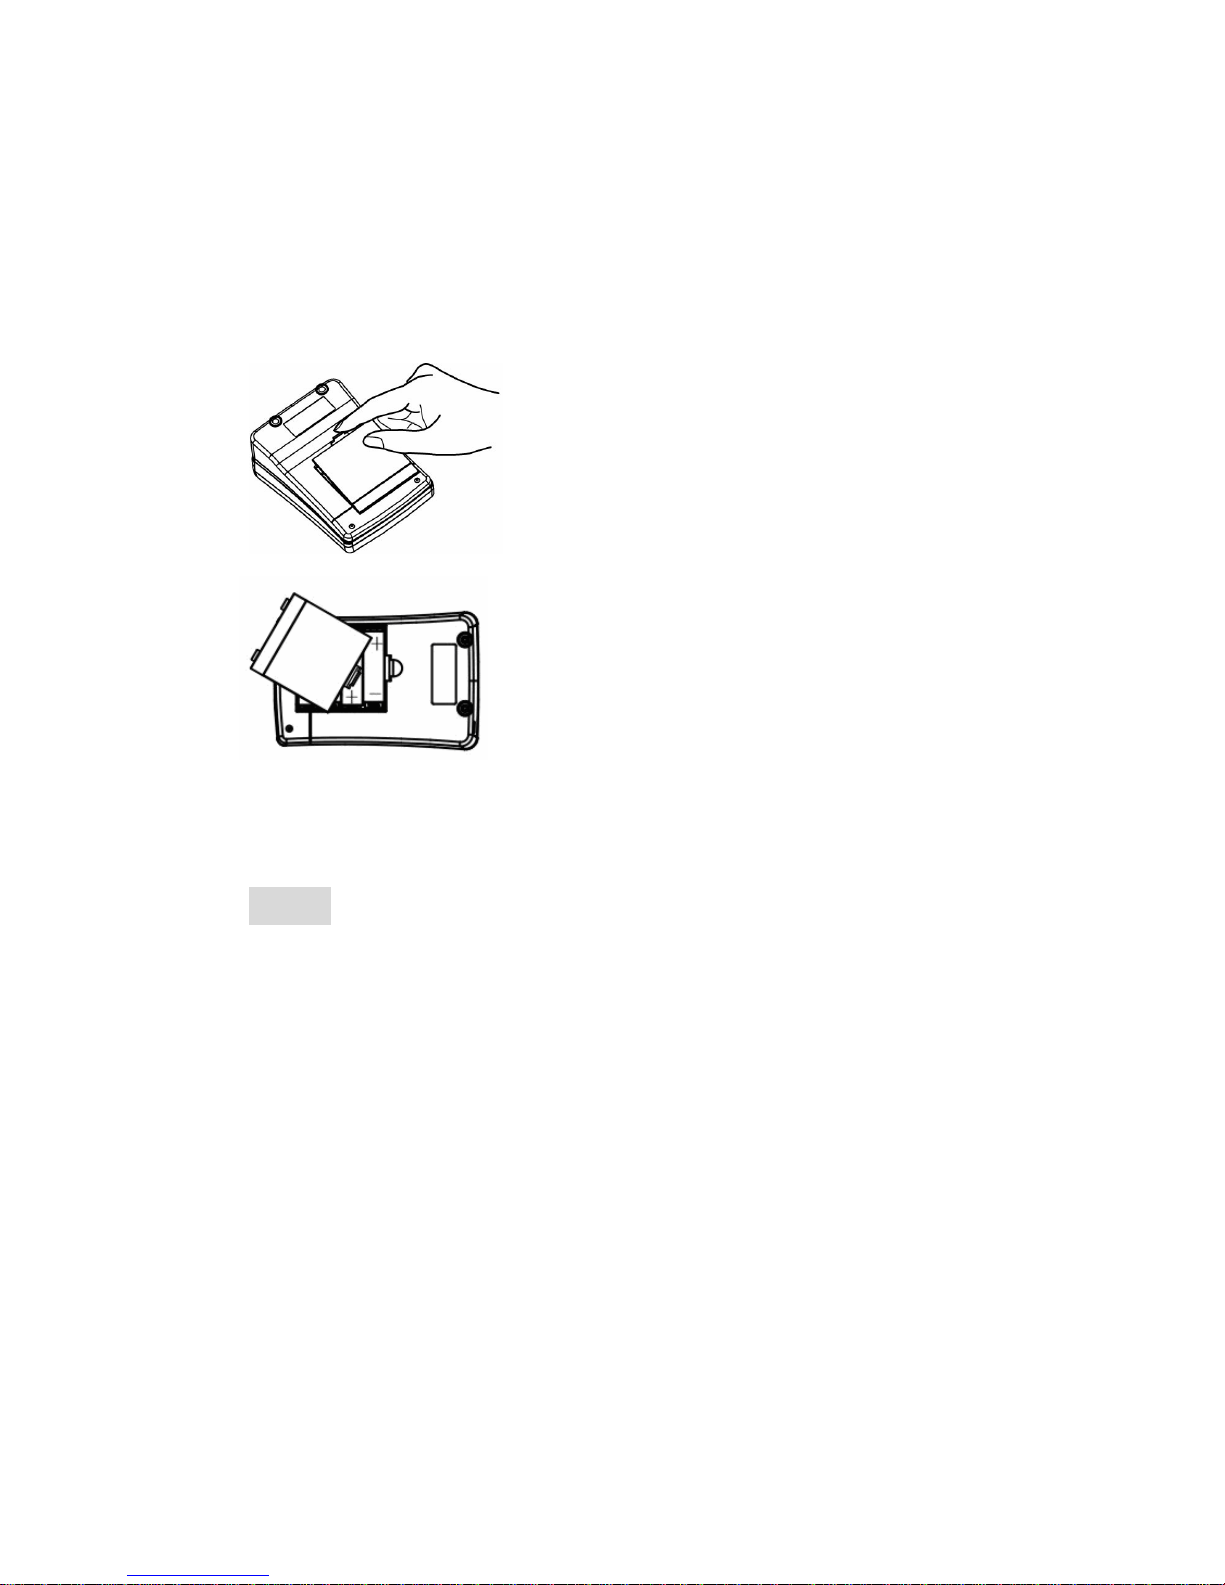
Battery Replacement
To replace the batteries, make sure the monitor is turned off.
Step1- Press the edge of the battery cover
and pull up. (Fig. 3) Lift the battery cover and
remove the batteries inside.
Step2- Insert four 1.5V AA size alkaline
batteries. Make sure the + (positive) and
–(negative) marks match as indicated
in the battery compartment. (Fig. 4) If
inserted correctly, you will hear a "beep".
Caution!
Do not use different type, date or brand name batteries together. Use only
new batteries of the required size and type.
Replacing the batteries does not affect previous test results stored in the
monitor. But you may need to update the settings.
Batteries might leak chemicals if not used for a long time. Remove the
batteries if you are not going to use the device for an extended period (i.e., 3
months or more).
17
(Fig. 3)
(Fig. 4)

(Fig. 6)
Setting the Monitor
Your monitor comes with the time, date, and units preset. These options may
be changed any time to fit your needs. They also need to be set again when
you change the batteries.
How to set the monitor?
Step 1- Start with the meter turned off.
Press the "S" button to enter the Setting Mode.
Step 2- Select and make changes.
Press the "S" button to select what you would like to change. The selected one
will be flashing. Press the "M" button to make the change.
Step 3- Save the Changes.
Press the "S" Button to save the changes you made and move on to next step.
Let’s see the year setting for example:
1. Press “S” button and the year will appear first, with the
number flashing. (Fig. 5)
2. Press and release the M button to advance one year.
To move the number faster, hold the M button down.
3. Press the Set button and the year will be set. At the same
time, the date will appear on the display with the month segment
flashing. (Fig. 6)
Set the month, day, hour, minute, and units in the same way.
18
(Fig. 5)
PREPARATIONS BEFORE USE
Table of contents


