Cleyver CC90UC User manual

CC90UC
User Manual


User Manual
1. WELCOME 5
2. Overview 6
3. Where To Position 7
4. How To Charge 9
7
3.1 Small Meeting Room
8
3.2 Desk
9
4.1 USB Charging
9
4.2 Automatic Power Off
10
4.3 Battery Status
5. How To Connect 11
11
5.1 Connect To PC (Bluetooth)
12
5.2 Connect To PC (USB-C Cable)
12
5.3 Connect To Smartphone
6. How To Use 13
13
6.1 Button Visibility
14
6.2 Typical Use
15
6.3 The LED Light-Ring Status
16
6.4 Voice assistant button

7. Software 17
8. Support 18
18
8.1 How To Care For Your CLEYVER Device
17
7.1 UC Manager
17
7.2 Update Firmware

1. WELCOME
Thank you for using the CC90UC. We hope you will enjoy it !
Immersive sound for calls and music
Intuitive plug and play connectivity - connect to laptop, smartphone and tablet via USB or
Integrated Busylight
Bluetooth
Light weight design, protective travel pouch, and 15 hours of battery life
Flexible and scalable for small meetings
Interact with your voice assistant with the one-touch voice assistant button
Compatible with Avaya, Cisco Jabber and Skype for Business for a plug-and-play experience
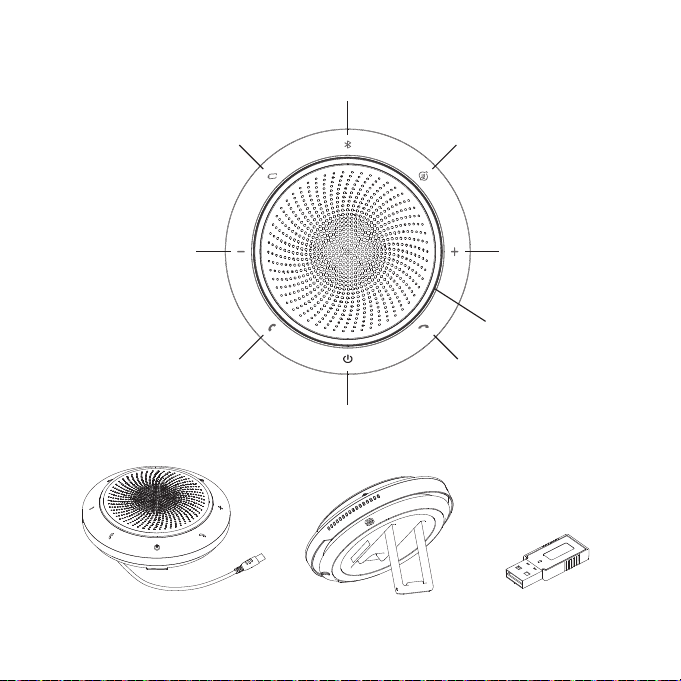
CC90UC features
5
2. Overview
6
Bluetooth
Battery Status Mute/Voice assistant
Answer Call End Call
USB-C Cable
Power On/Off
Volume Down Volume Up
Table Stand USB Dongle
(Optional)
Busylight

3. Where to position
Position the speakerphone in the center of the table, up to 2m/6ft from each participant. A single
CC90UC is ideal for up to 6 people.
7
2m/6ft
3.1 Small meeting room

When using the CC90UC at your desk it is recommended to put the speakerphone into an
upright position using the table stand. This will better direct the audio towards you.
8
3.2 Desk
4. How to charge
Plug the CC90UC into a USB-C power source using the attached USB-C cable. The CC90UC
battery lasts for up to 15 hours of talk time and takes approx. 3 hours to be fully charged.
4.1 USB charging
To preserve battery while unplugged, the CC90UC will automatically power off when it has not
been connected to a bluetooth device for 15 minutes.
4.2 Automatic power off
9

To view the current battery status, press the Battery status button. Then the LED light of the
battery is on, When the battery is full, the LED is Green, when the battery is medium, the LED
is Blue, When the battery is low, the LED is Red, When the battery is very low, the Red LED
is flashing.
Full battery
Medium battery
Low battery
4.3 Battery status
10

11
5. How to connect
Plug the USB Dongle into a USB port on your PC. The CC90UC and the USB Dongle are pre-paired
For the CC90UC to work correctly you may need to set the USB Dongle as the audio device in your
operating system’s audio settings.
To manually pair the CC90UC with the USB Dongle, please use UC Manager.
and ready to use out of the box. The bluetooth range is 30m.
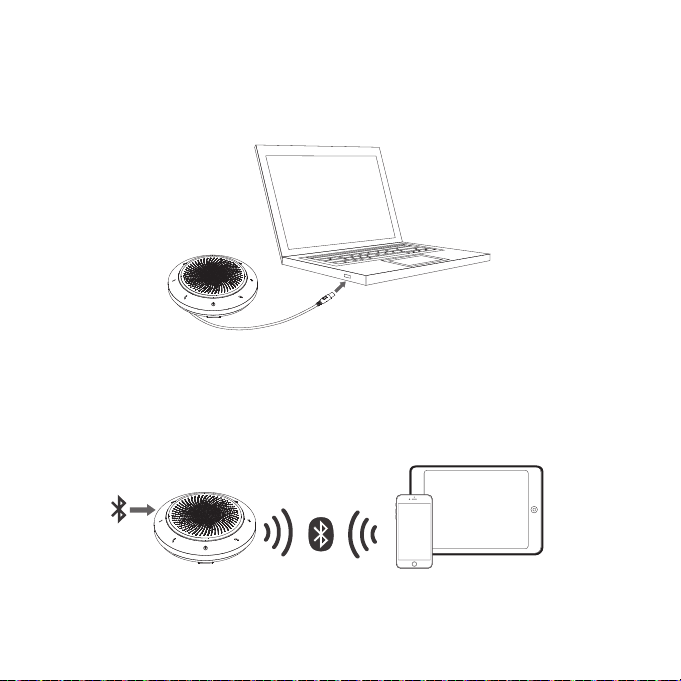
5.1 Connect to PC (Bluetooth)
30m/100ft
12
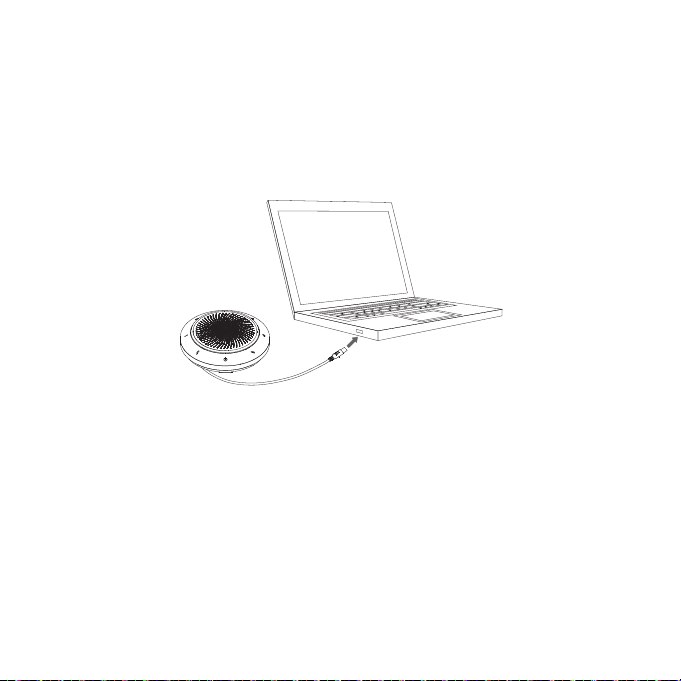
Plug the CC90UC into a USB-C port on your PC. You may need to set the CC90UC as the
playback device in your operating system’s audio settings.
5.2 Connect to PC (USB-C cable)
Hold the Bluetooth button for 2 seconds and follow the voice-guided instructions to pair to your
To disconnect or reconnect, Double tap the Bluetooth button again.
smartphone. The bluetooth range is 10m.
5.3 Connect to smartphone
10m/30ft

13
6. How to use
The buttons are backlit and only visible when the speakerphone is powered on. After 20 seconds
of inactivity the buttons will fade, and can be reactivated by tapping the area where the buttons
are located.
The Voice assistant button, and Mute button will only be visible under certain conditions (e.g. the
Voice assistant button is only visible when the CC90UC is connected to smart phone and not on
call).
6.1 Button visibility
Bluetooth
Battery Status Mute/Voice assistant
Answer Call End Call
Power On/Off
Volume Down Volume Up
Busylight
14
6.2 Typical use
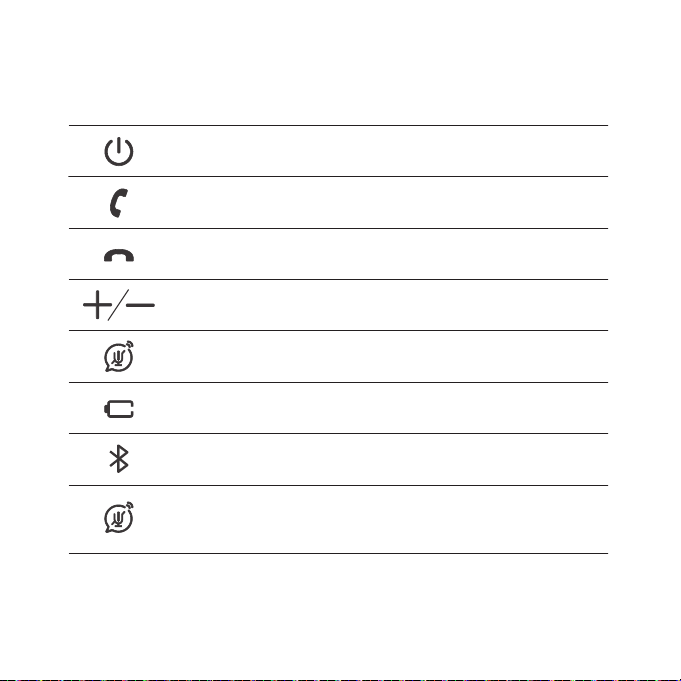
Power on or off Hold (2 secs) the Power button
Answer call Press the Answer call button
End or reject call Press the End call button
Mute / unmute
microphone Press the Mute button
Battery status Press the Battery status button
Paring and Connect
Bluetooth device Press the Bluetooth status button
Voice assistant
(Smartphones)
Press the Voice assistand button
(only visible when connected to a
Smartphone)
Volume up / down Press the Volume up or Volume down
button
WHAT HOW

15
6.3 The LED Light-Ring Status
Power on or off The LED light-ring flashes Green,
Blue and Red
Incoming call The LED light-ring Green breathing
On call The LED light-ring glow Red
Low Battery The LED light-ring flashes Red
Mute The LED light-ring red breathing
WHAT HOW
16
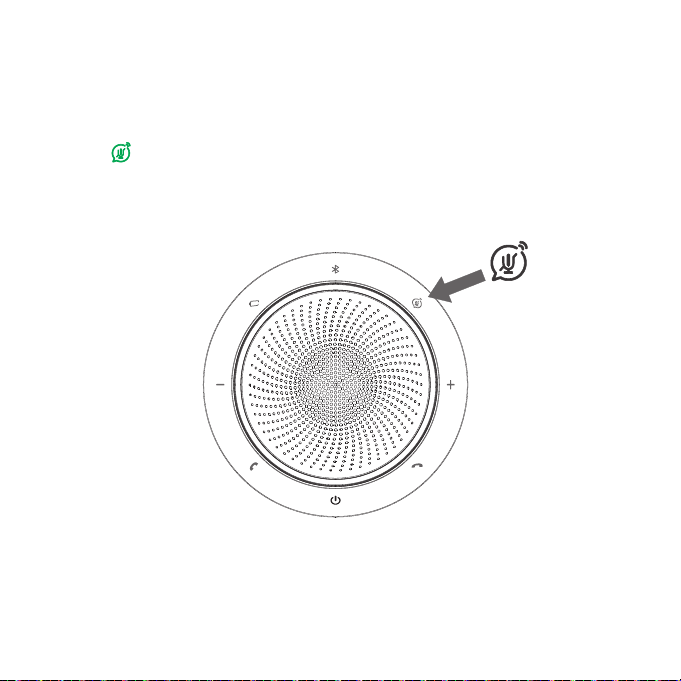
By default, the voice assistant button will activate your smartphone’s voice assistant (Siri
®
,
Cortana
TM
, Xiaoai, Xiaoyi). When you press the voice assistant button, the button light will
turn Green , and it will awaken the voice assistant.
6.4 Voice assistant button

17
7. Software
UC Manager is PC software designed to support, manage and enable optimal functionality for
CLEYVER devices.
7.1 UC Manager
Firmware updates improve performance or add new functionality to CLEYVER devices.
1. Connect the CC90UC to a PC using the USB cable.
2. Install UC Manager on your PC.
3. Use UC Manger to check for the latest firmware updates.
7.2 Update firmware

The CC90UC is for indoor use only.
Avoid storage at extreme temperatures (above 65°C/149°F or below -30°C/-22°F).
Do not expose the CC90UC to rain or other liquids.
Do not cover the CC90UC with stickers or labels.
18
8. Support
8.1 How to care for your CLEYVER device

19
FCC Warning
This device complies with Part 15 of the FCC Rules. Operation is subject to the following two
conditions:
(1) This device may not cause harmful interference, and (2) this device must accept any
interference received, including interference that may cause undesired operation.
- Reorient or relocate the receiving antenna.
- Increase the separation between the equipment and receiver.
-Consult the dealer or an experienced radio/TV technician for help.
NOTE 2: Any changes or modifications to this unit not expressly approved by the party
responsible for compliance could void the user's authority to operate the equipment.
-Connect the equipment into an outlet on a circuit different from that to which the receiver is
connected.
NOTE 1: This equipment has been tested and found to comply with the limits for a Class B
digital device, pursuant to part 15 of the FCC Rules. These limits are designed to provide
reasonable protection against harmful interference in a residential installation. This equipment
generates uses and can radiate radio frequency energy and, if not installed and used in
accordance with the instructions, may cause harmful interference to radio communications.
However, there is no guarantee that interference will not occur in a particular installation. If
this equipment does cause harmful interference to radio or television reception, which can be
determined by turning the equipment off and on, the user is encouraged to try to correct the
interference by one or more of the following measures:

Made in China
MODEL: CC90UC
Designed and engineered in China
Table of contents


