Cocoon TERRA User manual

Operating Manual
• COCOON TERRA •
STANDING MODEL
Corresponding Model Codes:
CFTB, CTSS
PLEASE READ THESE INSTRUCTIONS CAREFULLY AND COMPLETELY BEFORE OPERATING THIS PRODUCT
®

1
info@cocoonfires.com www.cocoonfires.com
INDEX PAGE
INDEX PAGE
Page 1
WARNINGS AND SAFEGUARDS
Page 2
PARTS NAMES AND DESCRIPTIONS
Page 3-4
ADDITIONAL PARTS NAMES AND DESCRIPTIONS
Page 5
COMBUSTION CHMABER PARTS NAMES AND DESCRIPTIONS
Page 6
SAFETY & CLEARANCE
Page 7-8
TERRA - STANDING MODEL INSTALLATION & ADJUSTMENTS
Page 9-13
TROUBLESHOOTING AND OPERATIONAL TIPS
Page 14
OPERATING THE COCOON BURNER
Page 15
PROCEDURE IF BURNER IS OVERFILLED AND CAUTION
Page 16
IGNITING THE COMBUSTION CHAMBER
Page 17
REGULATING AND EXTINGUISHING THE FLAME
Page 18
TO REFILL THE COMBUSTION CHAMBER
Page 19
WARNING
Page 20

2
info@cocoonfires.com www.cocoonfires.com
SAVE THESE INSTRUCTIONS
Cocoon Fires is very safety conscious and we have taken every care in designing, manufacturing
ring and assembling your Cocoon Fires Burner to ensure it operates effectively, efficiently and safely. Please
exercise care when using this product and follow the instructions below. Cocoon Fires cannot be held
responsible for any damage or injury caused if the information supplied in this manual are not adhered to.
WARNING - IMPORTANT SAFEGUARDS
Read all instructions and warnings before installation and use.
•NEVER LEAVE THE APPLIANCE UNATTENDED DURING OPERATION OR WHEN A FLAME IS PRESENT.
•DO NOT IGNITE THE COMBUSTION CHAMBER WHEN IT IS IN A HOT STATE.
•THIS PRODUCT IS TO BE USED ONLY IN ROOMS ACCORDING TO THE MANUAL.
•KEEP AWAY FROM CHILDREN.
•STORAGE OF YOUR FUEL IS TO BE DONE IN ACCORDANCE WITH NATIONAL AND/OR REGIONAL
REGULATIONS.
•THIS PRODUCT IS FOR DECORATIVE AND DOMESTIC USE ONLY.
•NOT SUITABLE FOR CONTINUOUS OPERATION.
•OPERATION OF SEVERAL APPLIANCE IN ONE ROOM IS ONLY ALLOWED IF THE POWER OUTPUT IS EQUAL TO
OR LOWER THAN 4,5 kW/h AND ADDITIONAL VENTILATION IS REQUIRED IF THIS IS EXCEEDED.
•DO NOT OVERFILL THE BURNER’S INTENDED CAPACITY.
•OVERFILLING WILL CAUSE THE APPARATUS TO BURN AT HIGHER TEMPERATURE RATES RESULTING IN THE
APPARATUS BEING DIFFICULT TO TURN OFF.
•DO NOT INSTALL INTO AN AREA WHERE THERE IS A DRAFT WHICH CAN AFFECT THE FLAME.
•USE ONLY THE FUEL FOR WHICH THE COMBUSTION CHAMBER IS INTENDED.
•DO NOT TOUCH THE EXTERIOR OF THE CHIMENEA AND THE BURNER DURING OR AFTER BURNING.
•PARTS OF THIS CHIMENEA AND ESPECIALLY THE COMBUSTION CHAMBER CAN REACH HIGH TEMPERATURES
DURING OPERATION.
•DO NOT COVER NOR MOVE THE COMBUSTION CHAMBER OR CHIMENEA DURING OPERATION.
•DO NOT HAVE COMBUSTIBLE OBJECTS IN CLOSE PROXIMITY TO THE CHIMENEA.
•NEVER POSITION THE BURNER WITHIN RANGE OF COMBUSTIBLE ITEMS THAT CAN BE MOVED/BUMPED BY
ACCIDENT OR BLOWN BY THE WIND. e.g. CURTAINS, PAPERS & BLANKETS.
•ONLY USE THE CHIMENEA IN AREAS WITH GOOD VENTILATION.
•DRAFT AREAS WILL CAUSE THE APPARATUS TO BURN AT HIGHER TEMPERATURE RATES RESULTING IN THE
APPARATUS BEING DIFFICULT TO TURN OFF, THEREFORE THE APPARATUS SHOULD NOT BE USED IN A DRAFT
AREA.
•DO NOT COVER THE CHIMENEA VENT WITH ANY DECORATIVE ITEMS WHETHER THEY ARE COMBUSTIBLE OR
NON-COMBUSTIBLE, INCLUDING BUT NOT LIMITED TO ARTIFICIAL LOGS, STONES, PEBBLES, GLASS BEADS etc.
•THIS APPARATUS HAS NOT BEEN TESTED WITH AN UNVENTED GAS LOG SET, TO REDUCE THE RISK OF FIRE OR
INJURY, DO NOT INSTALL AN UNVENTED GAS LOG SET INTO THIS APPLIANCE.
•WARNING: FILLING AN ALCOHOL FUELLED DEVICE WHILE LIT HAS CAUSED SEVERE BURNS AND DEATHS. YOU
MUST REMOVE THE FUEL TANK FROM THE DEVICE BEFORE REFILLING. WHEN REFILLING FIRST CHECK THE
FLAME IS EXTINGUISHED AND THAT THE DEVICE IS COOL.
•NEVER FILL OR REFILL THE BURNER OVER OR NEAR AN OPEN FLAME.
CAUTION
•Make sure you have read and understood this manual before using this product.
•If fuel is spilt onto the surface WIPE IT IMMEDIATELY WITH A DRY CLOTH AND LEAVE TO DRY BEFORE LIGHTING THE
BURNER.
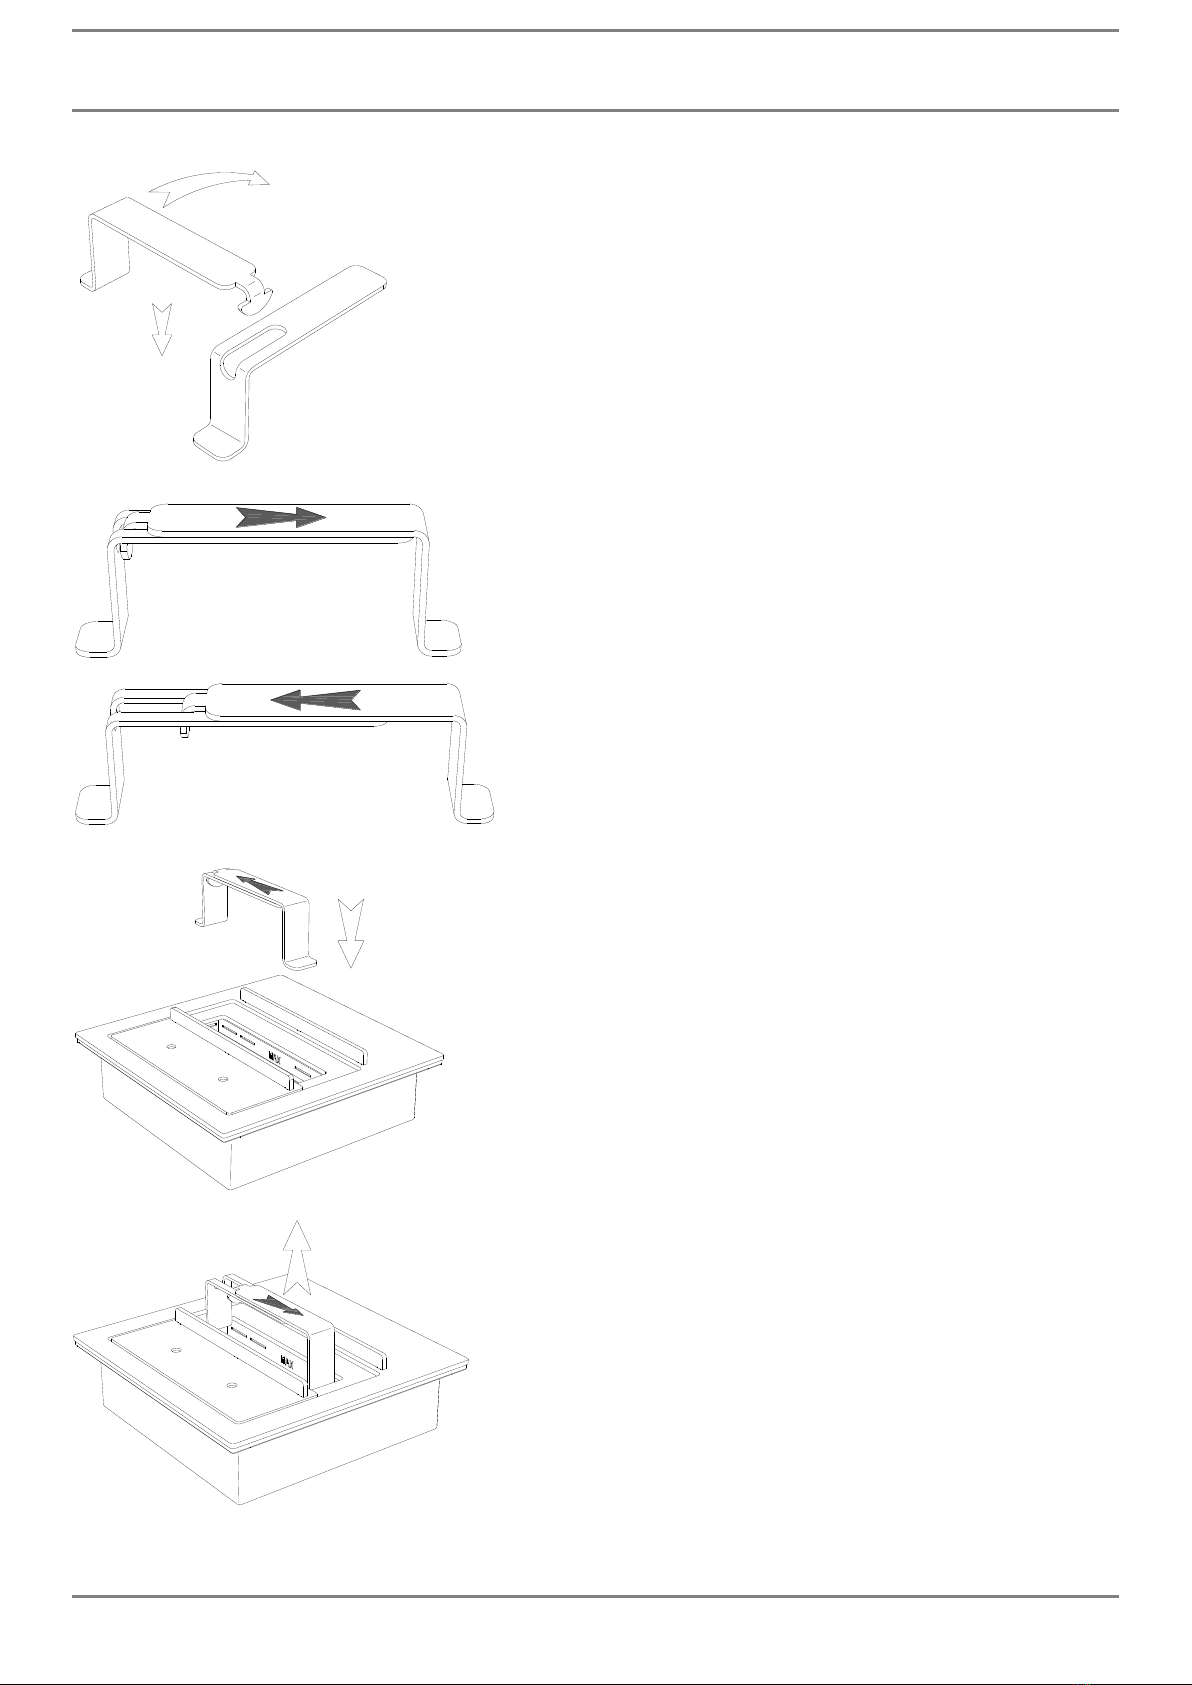
•If the Burner is accidentally overfilled, follow the steps in the manual to rectify.
•In Australia is it mandatory for all products to be supplied with a Fuel Canister which has a flame arrestor. Cocoon
Fires supplies a fuel cannister with a flame arrestor in the Australian market. We recommend in all markets to use a
fuel cannister with a flame arrestor.
•To refill, wait until the Burner is at the room temperature after the flame has been turned off.
•NOTE: the flame may not be visible to the naked eye in daylight and must be cool before filling.
•NEVER refill over or near an open flame and use a decanter with a flame arrestor only.
•Remove all plastic & packaging before using the fireplace.

3
info@cocoonfires.com www.cocoonfires.com
PARTS NAMES AND DESCRIPTIONS
Combustion
chamber
Mount
Plate
Removable
Tray
Bracket
Main
Body
Legs
For standing model:
- 3 security hex nuts to secure legs to main body.
Combustion
Chamber

4
info@cocoonfires.com www.cocoonfires.com
PARTS NAMES AND DESCRIPTIONS
Main Body or Chimenea Dimensions:
38 cm - 14,96 in
37,4 cm - 14,72 in
75,5 cm - 29,69 in
60 cm - 23,6 in
Additional Parts & Accessories:
The Sliding Lid Handle is used to adjust the intensity of the flame by sliding the Sliding Lid
backwards and forwards, and also to extinguish the flame by sliding the Sliding Lid into the closed
position.
The Lifting Handles are supplied in order to remove the Combustion Chamber for refilling. They
should never be used while there is still a flame in the Combustion Chamber or at high
temperature. Wait 45 minutes after the Combustion chamber has been turned off before using
the handles for refilling: see next page for how to operate.

5
info@cocoonfires.com www.cocoonfires.com
PARTS NAMES AND DESCRIPTIONS
1
2
A
B
CLOSED
OPEN
The Lifting Handle is used to take the
Combustion Chamber in and out of
the Mount Plate inside the Main
Body for filling and cleaning. Step 1 is
to join Part A and Part B as shown to
the left. Once you have placed the
tag of Part A into the slot of Part B,
then twist it 90 degrees to lock them
as one handle.
Once both parts of the handle are
clipped together as shown on the previous
image, the handle can be slid into an
open or a closed position as shown on the
left. To use the handle correctly to lift the
Combustion Chamber in and out of the
Mount Plate inside the Main Body, follow
the instructions below. It is very important
than when handling the Combustion
Chamber with the Lifting Handles, that the
combustion chamber be kept as level as
possible to avoid spilling of fuel.
With the handle in the closed position,
lower the flat tabs at the bottom of the
Lifting Handle into the Burner Vent
opening of the Combustion Chamber.
When the flat ends of the Lifting Handles
are all the way inside the Combustion
Chamber, slide the handle into the open
position as far as it will go. Grip the handles
Parts A and Part B firmly with one hand in
the fully open position, then lift and insert
the Combustion Chamber inside the
Mount Plate.

6
info@cocoonfires.com www.cocoonfires.com
COMBUSTION CHAMBER PARTS NAMES AND DESCRIPTIONS
Combustion Chamber:
Top Plate
Sliding Lid
Burner Vent
Filling Line
Fuel Tank
Handle Holes
Vent Plate
Filling Line

7
info@cocoonfires.com www.cocoonfires.com
SAFETY & CLEARANCE
C
B
A
Finished Floor Level
Ceiling
Wall
D
WARNING:
- Aim opening away from flammable objects or surfaces.
- Floor mounting surface must be load bearing and be able to support a
minimum mass of 150 kg / 330 lb or more. Total product weight is 30 kg / 66.1 lb
- Floor surface must be solid, true and level. The legs must not wobble.
MINIMUM DISTANCES:
A - 10,2 cm - 4 in –min to non-combustible material
B - 102 cm - 40 in - min
C - 102cm - 40 in - min distance to combustible items
D - 3,8 cm - 1,5 in –min to non-combustible wall
Chiminea ↑ Opening, ensure no combustible materials within 1 meter of opening!

8
info@cocoonfires.com www.cocoonfires.com
SAFETY & CLEARANCE
NOTE: In all cases, the Chimenea must:
•be installed onto load bearing material ONLY;
•be installed in low traffic areas to avoid injury to persons moving around and to avoid the
Chimenea being bumped which may cause fuel to spill.
•have all gas connections or pipelines near Chimenea installation must be disconnected and
made safe by an appropriately qualified professional prior to installation;
•be installed onto a load bearing, level and secure position before filling, lighting and
operating;
•be installed in a position that limits relocation requirements to eliminate the risk of accidents
caused by fuel spillage. This Chimenea is designed to be relocated but Combustion Chamber
must be removed from the Main Body before relocating to avoid fuel spillage;
•NOT be installed directly beside or near wallpaper, laminate, veneer or any surface that has
not been fire rated and considered combustible.
•A minimum of 102 cm radius to any combustible material.
•NOT be within the reach of any objects that are not fixed in position and can be moved by
the wind or bumped over easily i.e. curtains, blankets, newspapers etc.
KEEP HANDY A CLASS ABE FIRE EXTINGUISHER!
USE CORRECT FUEL –BIOETHANOL
FUEL IS TO BE STORED IN A FIRE SAFE AREA AND IS TO BE DONE IN ACCORDANCE WITH NATIONAL AND/OR
REGIONAL REGULATIONS.
WARNING:
In a house of typical construction, that is, one that is not of unusually tight
construction due to heavy insulation and tight seals against air infiltration, an
adequate supply of air for combustion and ventilation is provided through
infiltration. However, if the unvented decorative appliance is used in a small room
where less than 200 cubic feet (5,7 m³) of air space is provided for each 1000 Btu
per hour of unvented decorative appliance rating (considering the maximum
burner adjustment), the door(s) to adjacent room(s) should be kept open or a
window to the outside should be opened at least 1 inch (2,4 cm) to guard against
potential build-up of indoor air pollution. Do not use the unvented decorative
appliance in a bathroom, a room(s) where sleeping accommodation is provided
or any other small room(s).
MINIMUM ROOM SIZE 60m3

9
info@cocoonfires.com www.cocoonfires.com
TERRA - STANDING MODEL INSTALLATION & ADJUSTMENTS
NOTE: The Cocoon Terra may only be used on a load bearing surface. The standing
model may not stand on any movable surfaces and may not be moved while there is a
flame present in the Combustion Chamber and may not be moved when in a hot state.
The surface on which the Legs stands must be a rigid surface that is flat, level and secure.
hex
nut
hex
nut
With the Legs securely
attached to the Main
Body, place the
Removable Tray Bracket
over the threaded stud
at the base of the Main
Body, and then tighten in
place with the hex nut
supplied to be "finger
tight". Now follow the
adjustment procedures
on the following pages
before securing with an
appropriate tool.
Screw the three
Legs from the
bottom of the Main
Body and secure
Legs from the inside
of the Main Body
with the three hex
nuts.

10
info@cocoonfires.com www.cocoonfires.com
TERRA - STANDING MODEL INSTALLATION & ADJUSTMENTS
NOTE: adjustment instructions on the following page showing relative positions of (A) and
(B) shown above are critical to the airflow inside the Main Body and therefore critical to
the proper functioning of the Combustion Chamber.
With the Removable Tray Bracket and hex type nut loosely in place, adjust the Removable Tray
Bracket backwards or forwards so that the front edge of the Mount Plate (A) sits just below the
front bottom lip of the opening in the Main Body (B). Once this adjustment is done, then tighten
the hex type nut to secure the Removable Tray Bracket in place.
B
A

11
info@cocoonfires.com www.cocoonfires.com
TERRA - STANDING MODEL INSTALLATION & ADJUSTMENTS
NOTE: adjustment instructions on the following page showing relative positions of (A) and
(B) shown above are critical to the airflow inside the Main Body and therefore critical to
the proper functioning of the Combustion Chamber.
B
A
By finely adjusting the Removable Tray Bracket backward and forward (1) allows for the necessary
adjustment in height (2) of the Mount Plate.
NOTE: the front edge of the Mount Plate (A) must be just below the front bottom lip of the opening
in the Main Body (B).
1
2 2
A
B

12
info@cocoonfires.com www.cocoonfires.com
TERRA - STANDING MODEL INSTALLATION & ADJUSTMENTS
Safety Tank
Mount Plate
Hex Nuts
Further adjustment to the position of the Mount Plate can be achieved by loosening the 6 hex
nuts below the Mount Plate and sliding the Safety Tank front to back slightly. Always make sure
that the Safety Tank below the Mount Plate is properly secured after this adjustment.
NOTE: every time you fill the Combustion Chamber, this Safety Tank should be checked for residual
fuel to ensure that there is no fuel leaking from the Fuel Tank.

13
info@cocoonfires.com www.cocoonfires.com
TERRA - STANDING MODEL INSTALLATION & ADJUSTMENTS
With the Mount Plate in the correct position and secured in place with the hex
nut, the Combustion Chamber can now be placed inside and taken off the Mount
Plate opening using the Lifting Handles supplied as shown on the previous pages.
Your Cocoon Burner is now ready to use, follow the steps on the following pages to correctly and
safely fill, ignite, adjust, shut off and refill the Combustion Chamber. Always make sure the Lifting
Handles are removed from the Combustion Chamber as shown above when it is not in use
otherwise these parts will become too hot to touch and may cause injury.

14
info@cocoonfires.com www.cocoonfires.com
TROUBLESHOOTING AND OPERATIONAL TIPS
•The first fill will take longer as the material inside the Fuel Tank will absorb the fuel. Subsequent
filling should be quicker. Take care to not fill the Combustion Chamber at a faster rate than
what the material inside can absorb the fuel.
•If the fire does not extinguish the first time by closing the Sliding Lid follow these steps and
repeat if necessary.
oCheck that the surface below the Sliding Lid is clean and free from obstruction.
oUsing the Sliding Lid Handle, apply downward force and in one quick motion move
the Sliding Lid towards the closed position. If the flame is still visible repeat this step as
a double motion still applying strong downward force in quick succession.
•Never blow on the flame whilst the Sliding Lid is in an open position.
•If after some time you find the Sliding Lid has become ‘sticky’ when attempting to move it
then remove the Sliding Lid from its housing and rub the underside using the green side of a
Scotch Bright scouring pad. Take care to only scrub in the direction of the brushing lines of the
stainless steel.
•Make sure you keep your Combustion Chamber clean especially the surface that the Sliding
Lid slides on and ensure that any excess fuel on the surface of the Combustion Chamber is
wiped off before use.
•MAKE SURE THAT ALL PARTS HAVE COOLED OFF COMPLETELY BEFORE CLEANING:
oTo clean dust, wipe with a dry cloth or sponge.
oTo clean stainless steel parts, use bioethanol or Acetone.
oMake sure the Sliding Lid for the Combustion Chamber slides correctly and fully after
cleaning and that any excess cleaning product has been wiped off completely.

15
info@cocoonfires.com www.cocoonfires.com
OPERATING THE COCOON BURNER
NOTE: Overfilling will cause the apparatus to burn at higher temperature rates resulting in the apparatus
being difficult to turn off.
IMPORTANT: Please ensure the burner is removed from the Main Body before filling with
fuel.
Filling Line
Filling Line
bends where
horizontal base
becomes vertical sides
Fuel Capacity
Thermal Output kW
Heats on Average
Consumption
Burning Time
1.5L
3.02
35m2
0.39 L/H
3-5 Hours
To fill the Combustion Chamber, remove it from the Main Body using the Lifting Handles and pour fuel inside
the Vent Opening being careful not to spill. Fill up to the fill line as indicated in red with no more than 1.5L of
fuel (3-5 hrs burning time). After filling is done, wipe away any spilled or excess fuel before returning the
Combustion Chamber to the Mount Plate opening.
NOTE: after filling the Combustion Chamber, place the fuel dispenser used to fill it with and any
other forms of fuel or combustible items at a safe distance away before proceeding to start the
fireplace.
DO NOT FILL
WHILE OPERATING!
DO NOT FILL
WHEN HOT!

16
info@cocoonfires.com www.cocoonfires.com
PROCEDURE IF BURNER IS OVERFILLED:
In case of accidental overfilling of the Fuel Tank, follow these steps:
•NEVER ignite the Combustion Chamber if it is filled past the "MAX " filling line shown above
Remove the Combustion Chamber from the Chimenea, using the lifting Handles.
•Empty the excess fuel into a suitable container.
•Wipe off all excess fuel that may have dripped on the outside of the Combustion Chamber
during emptying and allow any residual fuel to evaporate. Leave for 1 hour.
•Place the Combustion Chamber back into Chimenea.
•Ignite the Combustion Chamber only once all residual fuel outside the Combustion Chamber
has completely evaporated and the container used to fill it has been sealed and moved to a
safe distance from the Combustion Chamber.

17
info@cocoonfires.com www.cocoonfires.com
IGNITING THE COMBUSTION CHAMBER
Once all spilled or residual fuel has been wiped clean, and all other forms of fuel have
been sealed and moved to a safe distance from the Combustion Chamber, and the
Combustion Chamber has been placed back inside the Chimenea as indicated above, it
is safe to consider igniting the Combustion Chamber.
Using a long arm fire lighter and standing at a safe distance from the Combustion
Chamber carefully introduce a flame as indicated above to ignite the Combustion
Chamber. Always make sure there is a Class ABE fire extinguisher close at hand when
igniting the Combustion Chamber.

18
info@cocoonfires.com www.cocoonfires.com
REGULATING AND EXTINGUISHING THE FLAME
To regulate the flame, insert the tips of the Sliding Lid Handle into the holes of the Sliding
Lid of the Combustion Chamber and slide backwards or forwards to regulate the flame
size.
To extinguish the flame, insert the tips of the Sliding Lid Handle into the holes of the Sliding
Lid of the Combustion Chamber and slide all the way forward until the flame is
extinguished. Should the flame not extinguish with the first try please repeat until
extinguished. It should be a swift action coupled with downward pressure.
-
+

19
info@cocoonfires.com www.cocoonfires.com
TO REFILL THE COMBUSTION CHAMBER
NEVER REFILL OR IGNITE THE COMBUSTION CHAMBER WHEN IT IS IN A HOT STATE.
When refilling the Combustion Chamber, simply follow the same procedure indicated in
the section headed “OPERATING THE COCOON BURNER” taking note of the CAUTION and
WARNING on this page. It is critical to the proper functioning of the Combustion Chamber
that you do not overfill the fuel tank as indicated before.
Filling Line
Filling Line
bends where
horizontal base
becomes vertical sides
Maintenance & Periodic Servicing:
IMPORTANT: The Matt Black Cocoon Fires Models are designed for indoor use only.
1. Periodic cleaning of unvented decorative appliance combustion surfaces is
recommended as per section called TROUBLESHOOTING & OPERATIONAL TIPS.
2. Checking operation of Sliding Lid shutoff device should be done regularly.
3. Make sure the Sliding Lid from the Combustion Chamber slides correctly, smoothly, and fully every
time before igniting the Combustion Chamber.
Cleaning:
Make sure the fireplace has cooled completely before cleaning!
•Black Models: To clean dust, wipe with a dry cloth. It is very important never to use a damp cloth or
any liquid to clean the matt black parts.
•Stainless Steel Models: To clean dust, wipe with a dry cloth. To clean stainless steel parts, use
bioethanol or Acetone.
CAUTION
To refill wait at least 45
minutes for the burner
to cool down after the
flame has turned off.
To fill remove
Combustion Chamber
from Main Body and
pour fuel inside. Fill up
to fill line of 1,5 liters.
After filling is done
return the Combustion
Chamber inside the
Main Body.
This manual suits for next models
2
Table of contents
Other Cocoon Indoor Fireplace manuals
Popular Indoor Fireplace manuals by other brands

Illuminations Electric Fireplace
Illuminations Electric Fireplace 4915 Illuminations LED owner's manual

Valor
Valor L1 Series Installer Checklist

Napoleon
Napoleon TORCH GT8P Installation and operation manual

Coleman
Coleman DVF32TMHPN PENINSULA installation instructions

Archgard
Archgard Pele 345 Series Installation, operation and maintenance manual

Quadra-Fire
Quadra-Fire 21M-ACC owner's manual