Coemar Panorama Cyc Power User manual


Panorama Cyc Power
numero di serie/serial number
data di acquisto/date of purchase
fornitore/retailer
indirizzo/address
cap/città/suburb
provincia/capital city
stato/state
tel./fax/
Prendete nota, nello spazio apposito, dei dati relativi al modello e al rivenditore del vostro
Panorama Cyc
Power
: in caso di richiesta di informazioni, pezzi di ricambio, servizi di riparazione o altro ci permetteranno di
assistervi con la massima rapidità e precisione.
Please note in the space provided above the relative service information of the model and the retailer from
whom you purchased your
Panorama Cyc Power
: This information will assist us in providing spare parts,
repairs or in answering any technical enquiries with the utmost speed and accuracy.
ATTENZIONE: la sicurezza dell’apparecchio è garantita solo con l’uso appropriato delle presenti istruzioni, per-
tanto è necessario conservarle.
WARNING: the security of the fixture is granted only if these instructions are strictly followed; therefore it is
absolutely necessary to keep this manual.
www.audiovias.com

English
Index
1.Packaging
2.Transportation
3.Important safety information
4.Lamp: installation and replacement
5.Operating frequency and voltage
5.1 Slecting the operating voltage and frequency of the lamp
5.2 Selecting the operating voltage of the transformer
6.Installing the unit
6.1 Installing the unit in weather-protected areas
6.2 Installing the unit in exposed areas
7.Mains connection
8.Signal connection
8.1 Automated operation
8.2 Using DMX 512 signal
8.3 Synchronising Panoramas without DMX 512 signal
9.Powering up
10.DMX addressing
11.DMX 512 signal
12.Automated operation
13.Synchronising several Panoramas without DMX 512 signal
13.1 Setting up a “master” unit
13.2 Setting up a “slave” unit
14.Display panel functions
15.Mechanical adjustments
15.1 Tilt adjustment
15.2 Adjusting fan shrouds
15.3 Altering beam angles by inserting diffusion filters
15.4 Barndoor adjustment
16.Thermal protection
17.Maintenance
18.Electronic motor alignment
19.Spare parts
www.audiovias.com

English
Congratulations on having purchased a coemar product. You have assured yourself of a fixture of the highest quality, both
in componentry and in the technology used. We renew our invitation to you to complete the service information on the
previous page, to expedite any request for service information or spares (in case of problems encountered either during, or
subsequent to, installation). This information will assist in providing prompt and accurate advice from your coemar service
centre.
Following the instructions and procedures outlined in this manual will ensure the maximum efficiency of this product for
years to come.
Open the packaging and ensure that no part of the equipment has suffered damage in transit. In case of damage to the
equipment, contact your carrier immediately by telephone or fax, following this with formal notification in writing.
packing list
Ensure the packaging contains:
1 Panorama Cyc Power
1 instruction manual
The Panorama Cyc Power should be transported in its original packaging or in a coemar approved flight case.
In order to manufacture a suitable flight case, we recommend the following simple procedure be followed, which will stop
movement of the Panorama Cyc Power during transportation
2. Transportation
1. Packaging
www.audiovias.com

Fire prevention:
1. Panorama Cyc Power utilses two Philips MSR 575/2 or MSD 575 lamps; the use of any other lamps may damage the
unit and will automatically void the warranty.
2. Never install the unit on flammable surfaces.
3. Minimum distance from flammable materials: 0,5 m.
4. Minimum distance from subject being illuminated: 2 m.
5. Replace any blown or damaged fuses only with those of identical values. Refer to the schematic diagram if there is any
doubt.
6. Connect the projector to mains power via a thermal magnetic circuit breaker.
Prevention of electric shock:
1. High voltage is present in the internals of the unit. Isolate the projector from mains supply prior to performing any func-
tion which involves touching the internals of the unit, including lamp replacement.
2. For mains connection, adhere strictly to the guidelines outlined in section 6 of this manual
3. The level of technology inherent in the Panorama Cyc Power requires the use of specialised personnel for all service
applications; refer all work to your authorised coemar service centre.
4. A good earth connection is essential for proper functioning of the projector.
Never operate the unit without proper earth connection.
Protection against ultraviolet radiation:
1. Never turn on the lamp if the lense, the filters or the aluminium housing is damaged; they will only work effectively if the are
in good condition.
Never look directly into the light beam when the lamp is on.
Safety:
1. The projector should alwasy be installed with bolts, clamps, and other fixings which are suitably rated to support te wei-
ght of the unit.
2. Always use a secondary safety chaing of a suitable rating to sustain the weight of the unit in case of the failure of the pri-
mary fixing point.
3. The external surface of the unit, at various points, may exceed 150°C. Never handle the unit until at least 8 minutes have
elapsed since the lamp was turned off.
4. Always replace the lamps if any physical damage is evident.
5. Never install the fixture in an enclosed area lacking sufficient air flow; the ambient temperature should not exceed 35°C.
6. A hot lamp may explode. always wait for at least 8 minutes to elapse after the unit has been turned off prior to attemp-
ting to replace the lamp.
Always wear suitable hand protection when handling the lamp.
3. Important safety information
English
www.audiovias.com

English
Panorama Cyc Power utilses two Philips 575/2 MSR or MSD 575 da 575W with GX 9,5 lamp bases.
The lamps are available from your authorised coemar sales agent.
The fixture’s internal temperature can reach 250° C after 5 minutes, with a maximum peak of 350° C; ensure that the lamp
is cold prior to attempting removal. The fixture should be allowed to stand and cool for 10 minutes prior to its removal.
MSR and MSD lamps are part of the mercury vapour family of discharge lamps and must be handled with great care. The
lamp operates at hight pressure, and the slight risk of explosion of the lamp exists if operated over their recommended life.
installing the lamps
1) Using a Philips head screwdriver, remove the 14 screws (A) which affix the rear housing (B) of the projector .
2) Using the attached handle, remove the rear housing (B) of the projector, to which the lamp assembly is attached.
3) Identify the two lamp assemblies, right and left, and, using a Philips
head screwdriver, remove the three screws (C) which affix the
lamp assembly.
Attention!
Remove mains power prior to opening up the unit.
coemar cod. 105245/2
power 575 w
luminous flux 49.000 lm
colour temperature 7.200° K
lampbase GX 9,5
approximate lamp life 1000 hours
coemar cod. 105215
power 575 w
luminous flux 43.000 lm
colour temperature 6.000° K
lampbase GX 9,5
approximate lamp life 3000 hours
4. Lamp: Installation and replacement
www.audiovias.com
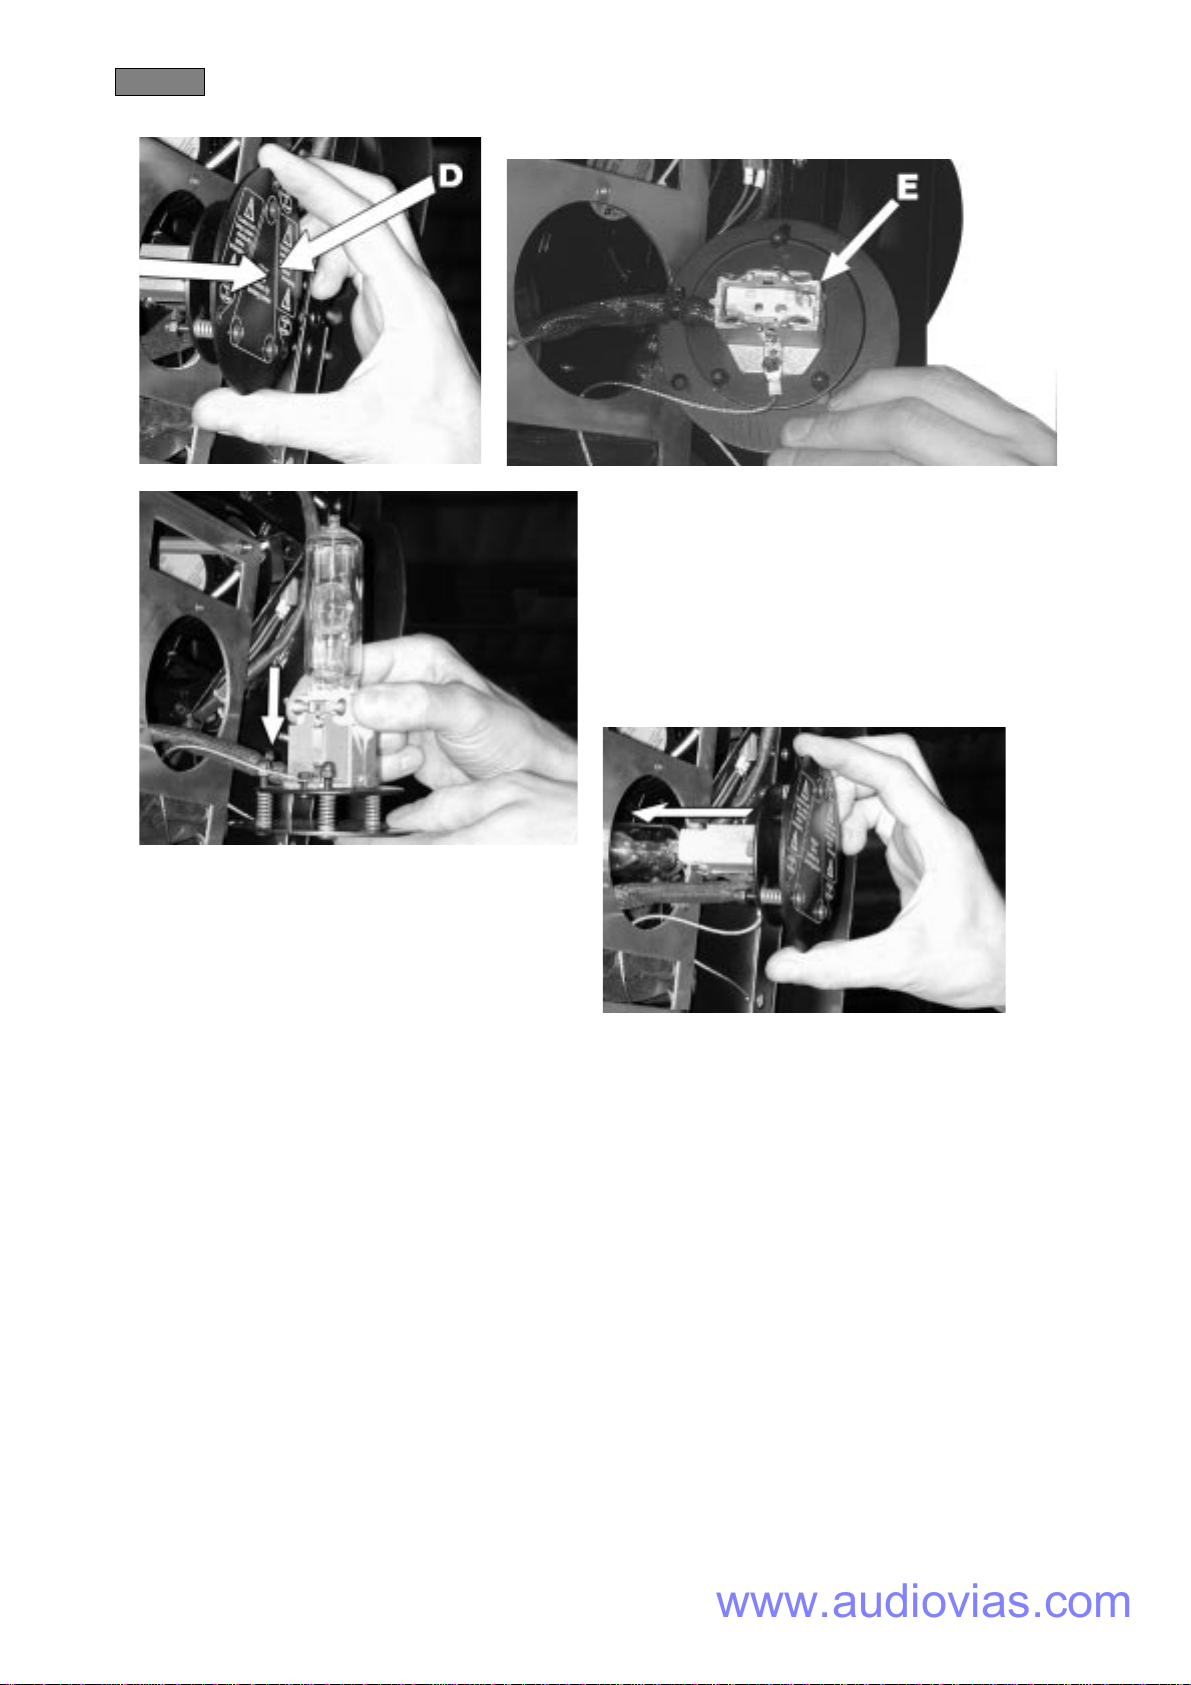
4) Remove the lamp assembly (D). 5) Locate the lampholders (E)
6) The lamps used are manufactured from quartz glass and
should be handled with care; always adhere to the instruc-
tions supplied in the packaging. Never touch the glass direc-
tly, use the tissue provided in the lamp’s packaging.The GX
9,5 lampbase is symmetrical in construction so the lamp may
be positioned easily. Insert the lamps into the lampholders.
DO NOT USE UNDUE FORCE. In case of difficulty, simply
rotate the lamps and repeat the procedure.
7) Reposition the lamp assembly and replace the 3 screws remo-
ved previously.
8) The procedure described above is appliable for installation of either one or of both lamps.
Attention: DO NOT secure the rear housing on the projector without first undertaking the realignment of the lamps in the
respective optical trains. This ensures that no internal parts are overheated due to incorrect focusing. Refer to section 13 of
this manual for instructions regarding lamp alignment.
English
www.audiovias.com
English
The projector may operate at 208, 230 or 240 V.at 50 or 60 Hz.
coemar factory presets (barring specific requests), a voltage of 230v and a frequency of 50Hz.
The operating voltage and frequency of the unit is noted in the appropriate space on the lable affixed to the base of the
projector
If the operating voltage or frequency does not match that of the country in which you are operating the unit, proceed as
follows.
The operating voltage and frequency must be set both on the ballast (lamp voltage) and the transformer (electronics volta-
ge).
An error in setting the correct operating voltage or frequency may cause serious damage to the unit.
5.1Selecting an operating voltage and frequency for the lamp to other than that preset
by coemar (this procedure is reserved for technical personnel)
This procedure will determine the operating current drawn by the lamps after they have been ignited; the correct value is 6,95
Amps. You must set the operating voltage or frequency suitable for the country in which the projector is being used.
1) Using a Philips head screwdriver, remove the 4 screws which affix the housing cover located on the side of the unit’s base.
2) Remove the cover.
60Hz
230V
208V
50Hz
240V
factory set
main at:
5. Operating voltage and frequency
www.audiovias.com
3) Locate the terminal strip marked with a sticker showing 208/230/240 V and 50 or 60Hz; the cables attached here at those
which you will need to move.
4) Cables 33 and 18 determine operating voltage, move these to either the 208, 230 or 240V terminals of the ballast.
5) Cables 31 and 29 determine operating frequency, move these to either the 50 or 60Hz terninals of the ballast..
6) After having moved the cables to the required position for the operating voltage and frequency you require for the
lamps, follow the instructions located in the next section below for selection of the operating voltage of the transformer.
5.2Selecting an operating voltage for the transformer (this procedure is reserved for
technical personnel)
The selection determines the operating voltage for the projector’s electronics and movement motors.
You must set the operating voltage suitable for the country in which the projector is being used.
3) Locate the terminal strip identified in the diagram below.
4) The cable marked 16 determine operating voltage, move these to either the 208, 230 or 240V terminals.
5) After having moved the cables to the required position, re-close the basse of the projector as per its original condition.
To maintain the protection rating of the unit, the 4 screws need to be refastened gradually and firmly to ensu-
re that they seal the unit but do not damage the seal.
208V 230V 240V
Main
voltage setting
T 10A
T 10A T 2A
16
33
31
208V 230V 240V
60Hz 50Hz
18
29
208V 230V 240V
60Hz 50Hz
English
www.audiovias.com

English
Panorama Cyc Power,due to its high protection rating, may be mounted in any position either sheltered from or expo-
sed to the elements.
6.1 Installing the unit in weather-protected areas
Panorama Cyc Power may be situated in any mounting
position when operated in sheltered areas.
So that it can be used in a variety of positions, the Panorama
Cyc Power is fitted with four rubber feet on its base which
may, as you will note, be removed should you wish to perma-
nently install the unit by affixing the base to solid surface.
When hanging the unit, ensure that the suspending structure is able to safely take the weight of the unit. Suspending the
unit via clamps is particularly simple when using the optional mounting plate, as shown in the diagram it offers a secure and
safe mounting method.
6.2 Installing the unit in exposed areas
Panorama Cyc Power may be situated in several mounting positions when installed in an exposed area, thanks to its IP
44 protection rating. To ensure proper installation, however, there is a simple guideline to follow:
Installing the unit incorrectly may cause damage to occur and will immediately void the warranty.
safety chain
When hanging the Panorama Cyc Power we recommend the use of a safety chain (cod. 069), afffixed to both the base
of the Panorama Cyc Power and to the suspension device.
This secondary safety attachment should be done using either a metal wire rope or a metal chain, both suitably rated for the
purpose.
risk of fire
Every projector produces head, and should therefore be installed in a well-ventilated position. The minimum distance from
flammable materials: 0,5m. The minimum distance from the object being illuminated: 2 m.
Attention!
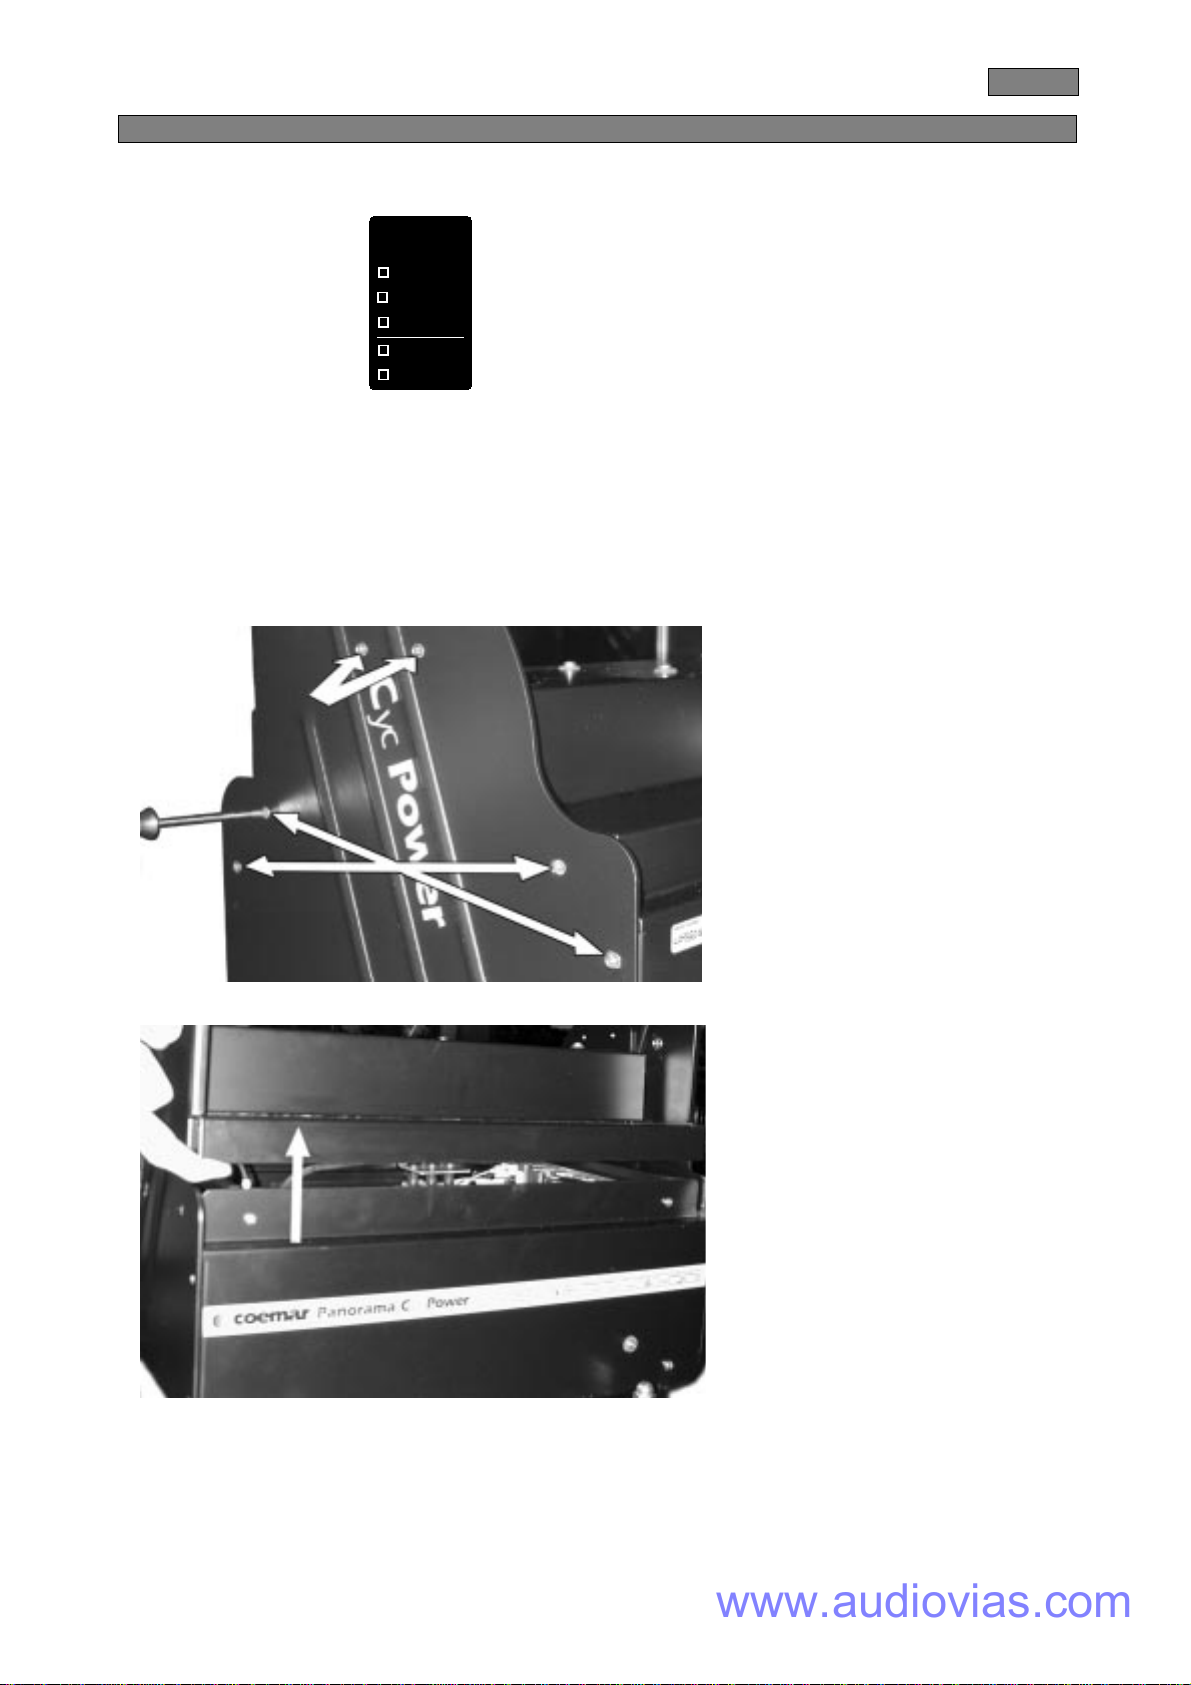
As indicated in the diagram, the base of the unit must always be facing the ground.
The lamp head of the Panorama Cyc Power may be adjusted from -35° to +75° without having to move any other
component except the head of the fixture.
Installation in any position other than with the base down, will cause the projector to not perform with its maximum protection
rating, although, with adequate covering, it may operate in almost any position.
6. Installing the unit
www.audiovias.com

cabling
The mains cable provided is thermally resistant, complying to the most recent international standards. It meets or exceeds the VDE and
IEC norms, IEC 331, IEC 332 3C,CEI 20 35.
NB: In case of cable replacement, similar cable with comparable thermal resistant qualities must be used exclusively (cable 3x1.5
ø external 10 mm, rated 300/500V, tested to 2KV, operating temperature -40° +180°, coemar cod. CV5309).
mains connection
Panorama Cyc Power can operate at voltages from 208V-230V-240V at 50 or 60Hz (operating voltage and frequency
can be selected as described in section 5 of this manual).
Prior to connecting the unit to your mains supply, ensure that the model in your possession correctly matches the mains
supply available to you.
For connection purposes, ensure your plug is of a suitable rating: 10 amps during startup and 9 amps during normal opera-
tion.
Locate the mains cable which exits the ballast and connect as shown below:
protection
The use of a thermal magnetic circuit breaker is recommended for each Panorama Cyc Power..
A good earth connection is essential for the correct operation of the fixture. Strict adherance to regulatory norms is strongly
recommended.
Panorama Cyc Power must be earthed; never install the unit unless the yellow/green earth cable is
securely connected.
serial number
off
on nodmx
dmxok
Individual channel assignement pin1: gnd
pin2: data-
pin3: data+
3
2
1
60Hz
230V
Attenzione!
Altatensione all'interno dell'apparecchio. Togliere tensione primadi effettuare qualsiasi
operazione.Una buona connessione di terra e' essenziale. Contenitore molto caldo.
Noninstallare su superficie infiammabile. Le lampade possono essere
riaccesesolo dopo 8 minuti dall'ultimo spegnimento.
Nontentare mai la riaccensione a caldo. I filtri le prese d'aria
devonoessere puliti almeno una volta al mese.
Primadi accendere l'apparecchio e' indispensabile leggere il
manualedi istruzioni; importanti informazioni di sicurezza.
Warning!
Highvoltage inside. Disconnect from power supply before opening.
Agood ground connection is essential. Case is very hot. Do not
installon flammable surfaces. The lamps can be re-ignited only
after8 minutes. Do not attempt hot restrike. Air filters must
becleaned at least monthly. Important safety information,
seeinstruction manual before use.
AUto autosequence
MA.SL linkbetween fixture
AUSP autospeed
ProG program
diMM dimmer
coLr colourspeed
FAn fans control
LAMP lampfunction
HoUr totalworking lamps time (in hour)
LiFE lamplife (in hours)
tESt singlech. test function
rESE reset
Htot totalworking time (in hour)
rAtE DMXspeed
on
MASt master
0000 timespeed
PrG1 program1
Strd standard
Strd standard
Strd standard
LEFt leftlamp
LEFt leftlamp
LEFt leftlamp
DiMMtest dimmer
oFF
slav slave
01 to...
PrG2 program2
SLoU slow
SLoU slow
on permanentlyon
rIGH lampright
rIGH lampright
rIGH lampright
..... toYELL
Set functions (function display)
menu enterenter
FASt fast
FASt fast
Strdstandard on permanently on
enter
Set dmx 512 address 6 channel for fixture
A505
1dimmer
2 cyan 3 magenta
4yellow 5lampright
6lampleft/reset
DMX OUT DMX IN
madein italy by
coemarspa
CastelGoffredo (mn)
entermenu
factory set
main at:
208V
50Hz
240V
dmx 512
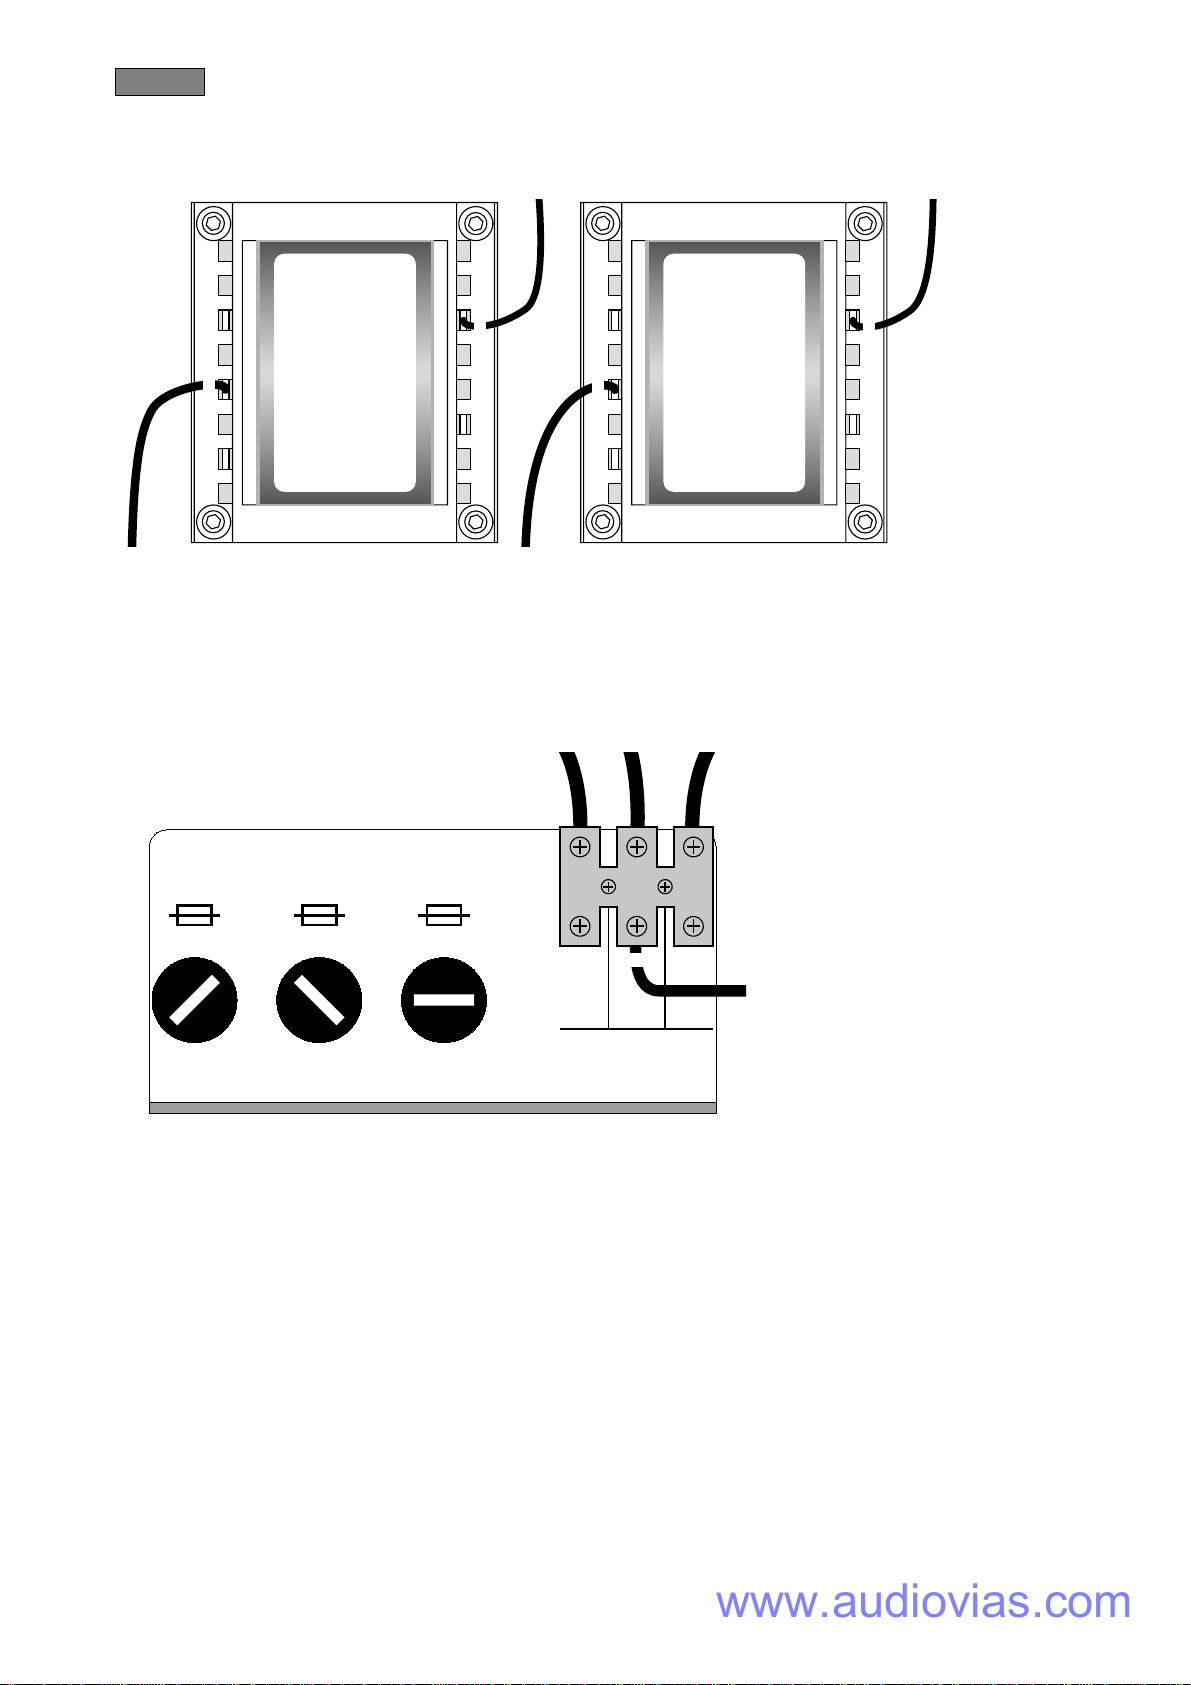
marrone - brown
blu - blue
giallo/verde - yellow/green
marrone - brown
blu - blue
giallo/verde - yellow/green
marrone - brown
blu - blue
giallo/verde - yellow/green
massa
ground
neutro
neutral
fase
live
Alimentazione
main
7. Mains connection
English
www.audiovias.com

English
Panorama Cyc Power may operate in 3 different modes:
8.1 Automated operation
8.2 Using DMX 512 signal
8.3 Synchronising Panoramas without DMX 512 signal.
Follow the instructions below which relate to your particular application:
8.1 Automated operation
Panorama Cyc Power may operate in stand alone mode in the absence of control signal, using pre-programmed
colour changing sequence which can be activated by the multi-function panel on the unit.
No incoming signal to the XLR3 sockets should be connected.
We recommend that the XLR 3 sockets be isolated by using suitably sheathed weather-proof dummy plugs.
This ensures that the weather rating of the Panorama Cyc Power is maintained.
8.2 Using DMX 512 signal
Control signal is digital, and is transmitted via two pair screened ø0.5mm cable.
Connection is serial, utilising the XLR 3 sockets located on the base of the Panorama Cyc Power.
coemar vi fornisce, nella dotazione standard, una coppia di connettori XLR 3 con grado di protezione IP 67; utilizzate solo
un connettore identico per la trasmissione e ricezione del segnale per non perderete le caratteristiche di resistenza alle
intemperie che sono una prerogativa di Panorama Cyc Power.
We recommend that the last link in the DMX chain be isolated by using suitably sheathed weather-proof dummy plugs.
This ensures that the weather rating of the Panorama Cyc Power is maintained. coemar supplies two XLR 3, IP 67 rated
plugs for this purpose.
signal connection
Connection is to international standards:
pin 1= gnd
pin 2= data –
pin 3= data +
Ensure that all data conductors are isolated from one another and the metal housing of the connector.
Note: the housing of the XLR 3 must be isolated.
Should your DMX 512 contoller output via an XLR 5 socket, the polarity of pins 1, 2 and 3 must be maintained and pins 4 and 5
should remain unconnected.
serial number
off
on nodmx
dmxok
Individual channel assignement pin1: gnd
pin2: data-
pin3: data+
3
2
1
60Hz
230V
Attenzione!
Altatensione all'interno dell'apparecchio. Togliere tensione primadi effettuare qualsiasi
operazione.Una buona connessione di terra e' essenziale. Contenitore molto caldo.
Noninstallare su superficie infiammabile. Le lampade possono essere
riaccesesolo dopo 8 minuti dall'ultimo spegnimento.
Nontentare mai la riaccensione a caldo. I filtri le prese d'aria
devonoessere puliti almeno una volta al mese.
Primadi accendere l'apparecchio e' indispensabile leggere il
manualedi istruzioni; importanti informazioni di sicurezza.
Warning!
Highvoltage inside. Disconnect from power supply before opening.
Agood ground connection is essential. Case is very hot. Do not
installon flammable surfaces. The lamps can be re-ignited only
after8 minutes. Do not attempt hot restrike. Air filters must
becleaned at least monthly. Important safety information,
seeinstruction manual before use.
AUto autosequence
MA.SL linkbetween fixture
AUSP autospeed
ProG program
diMM dimmer
coLr colourspeed
FAn fans control
LAMP lampfunction
HoUr totalworking lamps time (in hour)
LiFE lamplife (in hours)
tESt singlech. test function
rESE reset
Htot totalworking time (in hour)
rAtE DMXspeed
on
MASt master
0000 timespeed
PrG1 program1
Strd standard
Strd standard
Strd standard
LEFt leftlamp
LEFt leftlamp
LEFt leftlamp
DiMMtest dimmer
oFF
slav slave
01 to...
PrG2 program2
SLoU slow
SLoU slow
on permanentlyon
rIGH lampright
rIGH lampright
rIGH lampright
..... toYELL
Set functions (function display)
menu enterenter
FASt fast
FASt fast
Strdstandard on permanently on
enter
Set dmx 512address 6 channel for fixture
A505
1dimmer
2 cyan 3 magenta
4yellow 5lampright
6lampleft/reset
DMX OUT DMX IN
madein italy by
coemarspa
CastelGoffredo (mn)
entermenu
factory set
main at:
208V
50Hz
240V
dmx 512
5 pin XLR 5/M
3 pin XLR 3/F
in
out
out
in
serial number
off
on nodmx
dmxok
Individual channel assignement pin1: gnd
pin2: data-
pin3: data+
3
2
1
60Hz
230V
Attenzione!
Altatensione all'interno dell'apparecchio. Togliere tensione primadi effettuare qualsiasi
operazione.Una buona connessione di terra e' essenziale. Contenitore molto caldo.
Noninstallare su superficie infiammabile. Le lampade possono essere
riaccesesolo dopo 8 minuti dall'ultimo spegnimento.
Nontentare mai la riaccensione a caldo. I filtri le prese d'aria
devonoessere puliti almeno una volta al mese.
Primadi accendere l'apparecchio e' indispensabile leggere il
manualedi istruzioni; importanti informazioni di sicurezza.
Warning!
Highvoltage inside. Disconnect from power supply before opening.
Agood ground connection is essential. Case is very hot. Do not
installon flammable surfaces. The lamps can be re-ignited only
after8 minutes. Do not attempt hot restrike. Air filters must
becleaned at least monthly. Important safety information,
seeinstruction manual before use.
AUto autosequence
MA.SL linkbetween fixture
AUSP autospeed
ProG program
diMM dimmer
coLr colourspeed
FAn fans control
LAMP lampfunction
HoUr totalworking lamps time (in hour)
LiFE lamplife (in hours)
tESt singlech. test function
rESE reset
Htot totalworking time (in hour)
rAtE DMXspeed
on
MASt master
0000 timespeed
PrG1 program1
Strd standard
Strd standard
Strd standard
LEFt leftlamp
LEFt leftlamp
LEFt leftlamp
DiMMtest dimmer
oFF
slav slave
01 to...
PrG2 program2
SLoU slow
SLoU slow
on permanentlyon
rIGH lampright
rIGH lampright
rIGH lampright
..... toYELL
Set functions (function display)
menu enterenter
FASt fast
FASt fast
Strdstandard on permanently on
enter
Set dmx 512address 6 channel for fixture
A505
1dimmer
2 cyan 3 magenta
4yellow 5lampright
6lampleft/reset
DMX OUT DMX IN
madein italy by
coemarspa
CastelGoffredo (mn)
entermenu
factory set
main at:
208V
50Hz
240V
dmx 512
Controller
DMX 512
OUT
3
2
1
Ad altri Panorama Cyc Power
Connect to other Panorama Cyc Powe
r
8. Signal connection
www.audiovias.com
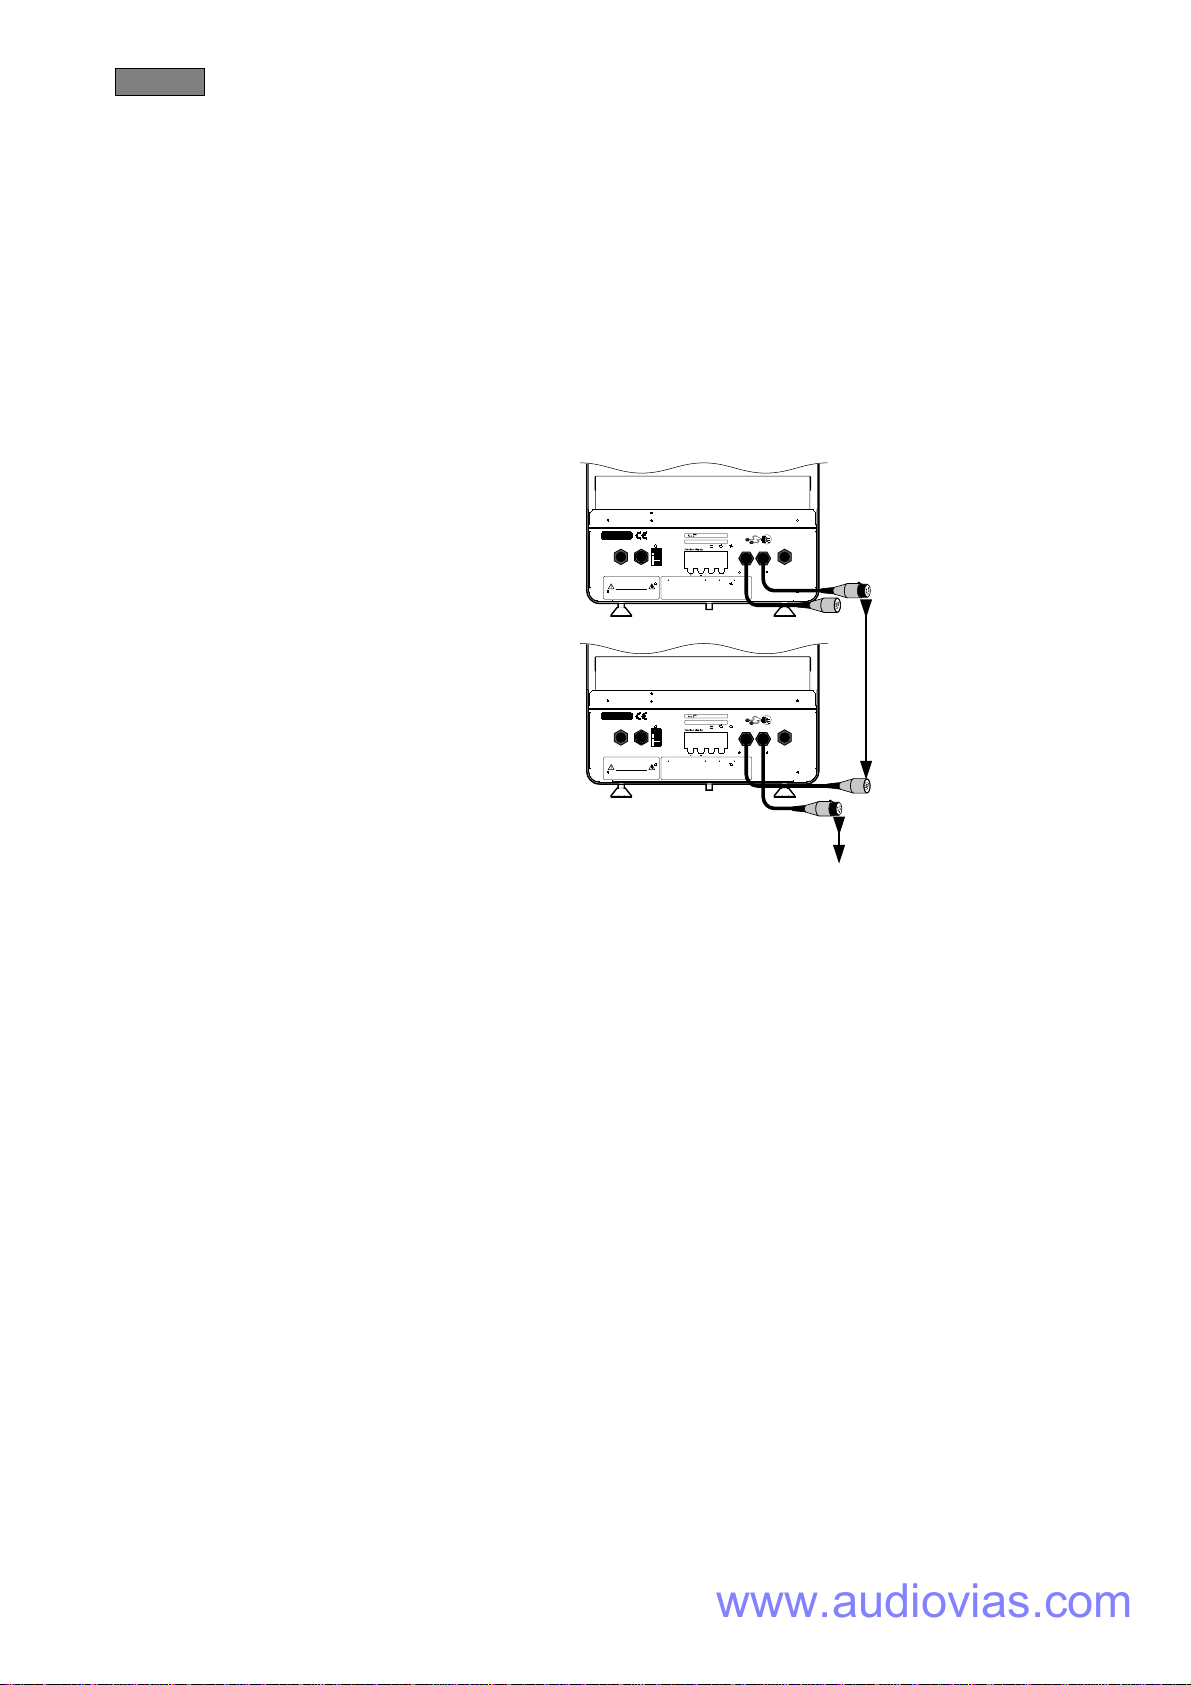
8.3 Synchronising Panoramas without DMX 512 signal
Multiple Panorama Cyc Power units may be interconnected in the absence of DMX 512 signal, operating simply via the
inbuilt programs within the Panorama Cyc Power
All the Panorama Cyc Powers thus connected will operate simultaneously with one unit acting as MASTER and all sub-
sequent units as a SLAVE.
Determine which of the Panorama Cyc Power will act as master, usually by the criterion of ease of access:
Using XLR 3 connectors, daisy-chain the units with the master connected to the first slave, and then slave to slave, up to a
maximum of 10 units in total.
Should you need to connect more than 10 units we recommend that you use a suitable dmx splitter box to achieve this.
These units are usually opto-isolated and may amplify and repeat the signal as required.
Attention! We recommend that any unused sockets be terminated to preserve the weather protection rating of the units.
We recommend that these links in the DMX chain be isolated by using suitably sheathed weather-proof dummy plugs.
This ensures that the weather rating of the Panorama Cyc Power is maintained; coemar supplies two XLR 3, IP 67 rated
plugs for this purpose.
Connection is to international standards:
pin 1= gnd
pin 2= data –
pin 3= data +
Ensure that all data conductors are isolated from one
another and the metal housing of the connector.
Note: the housing of the cannon XLR 3 must be
isolated.
in
out
out
in
master
slave
serial number
off
on nodmx
dmxok
Individual channel assignement pin1:gnd
pin2:data-
pin3:data+
3
2
1
60Hz
230V
Attenzione!
Altatensione all'interno dell'apparecchio. Togliere tensione primadieffettuare qualsiasi
operazione.Una buona connessione di terra e' essenziale. Contenitore molto caldo.
Noninstallare su superficie infiammabile. Le lampade possono essere
riaccesesolo dopo 8 minuti dall'ultimo spegnimento.
Nontentare mai la riaccensione a caldo. I filtri le prese d'aria
devonoessere puliti almeno una volta al mese.
Primadi accendere l'apparecchio e' indispensabile leggere il
manualedi istruzioni; importanti informazioni di sicurezza.
Warning!
Highvoltage inside. Disconnect from power supply before opening.
Agood ground connection is essential. Case is very hot. Do not
installon flammable surfaces. The lamps can be re-ignited only
after8 minutes. Do not attempt hot restrike. Air filters must
becleaned at least monthly. Important safety information,
seeinstruction manual before use.
AUto autosequence
MA.SL linkbetween fixture
AUSP autospeed
ProG program
diMM dimmer
coLr colourspeed
FAn fanscontrol
LAMP lampfunction
HoUr totalworking lamps time (in hour)
LiFE lamplife (in hours)
tESt singlech. test function
rESE reset
Htot totalworking time (in hour)
rAtE DMXspeed
on
MASt master
0000 timespeed
PrG1 program1
Strd standard
Strd standard
Strd standard
LEFt leftlamp
LEFt leftlamp
LEFt leftlamp
DiMMtest dimmer
oFF
slav slave
01 to...
PrG2 program2
SLoU slow
SLoU slow
on permanentlyon
rIGH lampright
rIGH lampright
rIGH lampright
..... toYELL
Set functions (function display)
menu enterenter
FASt fast
FASt fast
Strdstandard on permanentlyon
enter
Set dmx 512address 6 channel for fixture
A505
1dimmer
2cyan 3 magenta
4yellow 5lampright
6lampleft/reset
DMX OUT DMX IN
madein italy by
coemarspa
CastelGoffredo (mn)
entermenu
factory set
main at:
208V
50Hz
240V
dmx 512
Ad altri Panorama Cyc Power
Connect to other Panorama Cyc Power
English
www.audiovias.com
English
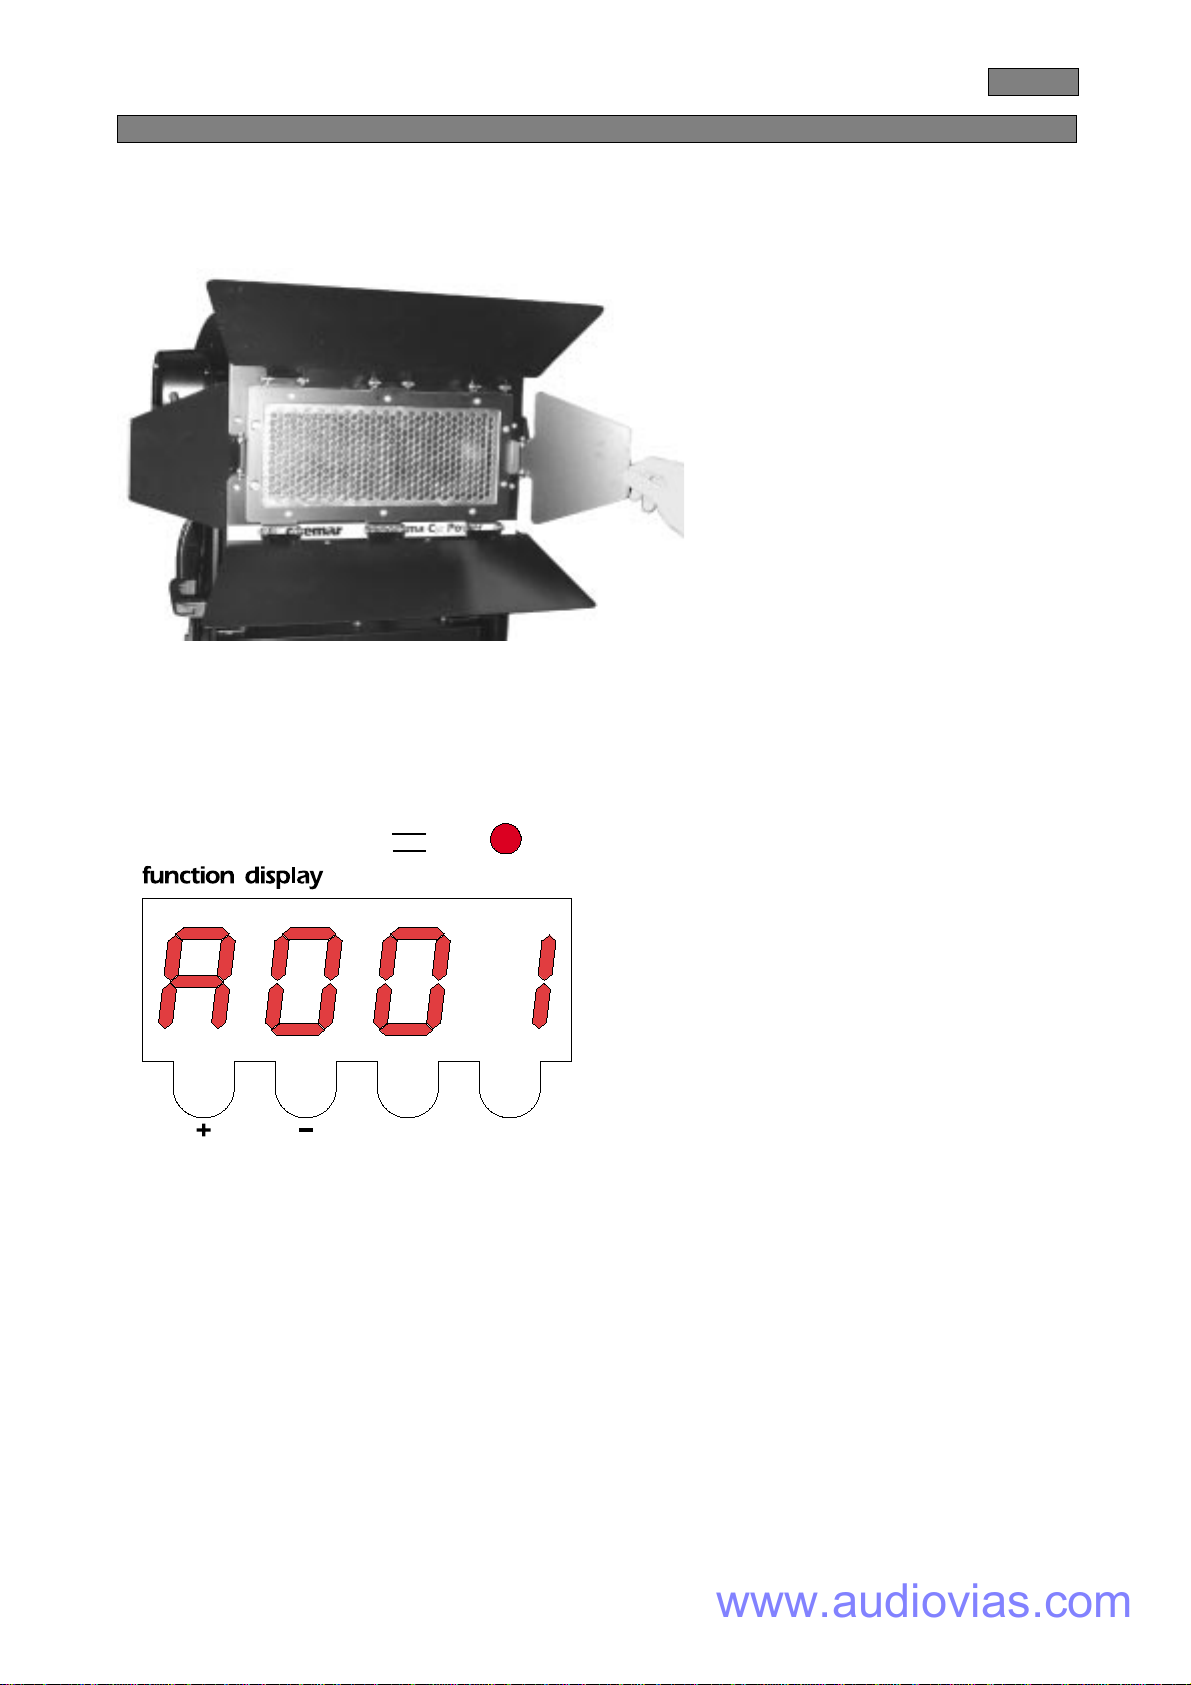
Panorama Cyc Power is supplied with 4 barndoors which are supplied fitted to the unit in the closed postion to reduce
packaging dimensions.
Attention! The barndoors should always be opened out prior to turning on the lamp. Failure to do so may
result in dangerous overheating of the projector and possible damage to its compnents.
After having followed the preceding steps, turn on the DMX 512 controller which will be used to control the Panorama
Cyc Power. Following this, turn on the power to the unit, and turn on the unit’s power switch.The fixture will perform a
reset function on its internal motors. This will last some few seconds, after which it will be subject to the external signal from
the controller.
led DMX
The DMX led will be static on to indicate that DMX 512 signal is being correctly received.
If the led is off, the projector is not receiving signal. check the cabling and the functioning of the controller.
off
on no dmx
dmx ok
entermenu
9. Powering up
www.audiovias.com

Each Panorama Cyc Power utilises 6 channels of DMX 512 signal for complete control.
To ensure that each unit accesses the correct signal, it is necessary to correctly address each fixture. Any number between 1
and 506 can be generated via the multifunction panel of the Panorama Cyc Power.
This procedure must be carried out on every Panorama Cyc Power being used.
When powered up initially, each projector will show A001 which indicates DMX address 1; a projector thus addressed
will respond to commands on channels 1to 6from the DMX 512 controller. A second projector should be addressed as
7a third as 12 and so on until the final unit has been addressed.
Altering dmx addreses
1) Press the +or -buttons until the display shows the DMX address required. The characters in the display panel will flash to
indicate that the selection is not stored in memory.
2) Press the enter button to confirm your selection; the display will stop flashing and the projector will now respond to the
new DMX 512 settings.
3) To better understand the functions of each DMX 512 we refer you to section 11 “Control channel functions from
a DMX 512 controller”.
Important Note: Keeping the +or -button pressed will cause the display to alter at increase speed, allowing a faster
selection to be effected.
entermenu
10. DMX addressing
English
www.audiovias.com

English
Panorama Cyc Power may be operated using DMX 512 signal, connection is described in section ”8.1 Using DMX512
signal”.
If you have followed all instructions correctly to this point, the 6 channels of your DMX 512 controller will have control of
all the functions of the Panorama Cyc Power as shown in the following table:
Note To remotely control lamp ignition for the 2 lamps, you must position the respective channel to between 141 and 255, or
you may use the display panel to ignite the lamps as described in section ”14 Display panel functions”.
channel function type of control effect decimal
1 dimmer step closed 0-7
proportional from close to open 8-255
2 cyan proportional
proportional cyan control from white to cyan 0-255
3 magenta proportional
proportional magenta control from white to magenta 0-255
4 Yellow proportional
proportional yellow control from white to yellow 0-255
5 Lamp right on/off step lamp off 0-140
lamp on 141-255
6
Lamp left on/off/ reset step lamp off 0-10
Park (no function) 11-114
cmy and dimmer reset (only once) 115-140
lamp on 141-255
Back panel can inhibit lamp off function
note 1: 2 or 4 numbers close to the end limit levels cannot be used as unstable levels
note 2: lamp ON/off/reset functions has a delay time of 6 second to prevent accidental activation.
note 3 :on/off lamp mode is not affected unless an opposite value is received
11. DMX 512 signal
www.audiovias.com

Panorama Cyc Power may operate without external signal, executing two pre-programmed colour changes as discussed
in section ”8.1 Automated operation”.
To engage the automated programs, after having turned on power to the unit, use the four buttons on the multi-function
display to select from the options available:
1- Activate the automated colour changing programs (AUTO ON)
2- Select from the two programs available; the 1° program (PRO1) utilses a 32 colour sequence, the 2° program (PRO2) utilises 55.
3- Adjust the hold time for each colour in the sequence, if you wish to alter from the 0 set as the coemar default.
4-Adjust the fade time between the colours, if you wish to alter from the STRD set as coemar default.
Note: Projectors in automated mode will have the lamp turn on immediately and will be unable to have control of their
dimmer modified.
AOO1 COLRcolour changer speed
Colour changing system operating
time speed on DMX signal variation.
(selection between standard and slow)
STRD
standard speed
SLOU
low speed
☞
menu ☞
+o–☞
enter ☞
+o–
☞
+o–
☞
enter
☞
enter
AOO1 AUSPcolour changing
program speed execution
Stay time and adjustment of one colour
in the beam (program 1 or 2).
☞
menu ☞
+o–☞
enter ☞
+o–
☞
+o–
☞
enter
☞
enter
from -–000
minimum speed
to -–661
maximum speed
AOO1 PROGprogram
Program selection in auto mode
(2 selections available)
☞
menu ☞
+o–PRO1
program n°1
PRO2
program n°2
☞
enter ☞
+o–
☞
+o–
☞
enter
☞
enter
AOO1 AUTOautomatic movement
to activate colour changing effects
without using an external control signal
☞
menu ☞
+o–☞
enter ☞
+o–☞
enter
ON
to enable the function
12. Automated functions
English
www.audiovias.com

English
Multiple Panorama Cyc Power units may be used in synchronised mode to use the automated preset programs without
the need for an external control signal by completing the following procedure.
Panorama Cyc Power units connected together will operate in a master/slave mode.
The units may be synchronised to operate simultaneously or may be operated so that the “slave” units , as selected, operate
with independent time delays:
To set up automated mode, complete the procedure described in section ”8.3 Synchronising Panoramas without
using DMX 512 signal”, then set up the automated function with the four multi-function display buttons.
13.1 Setting up a “master”
Only one projector may be set up as “Master” the initial projector in the dmx daisy chain and the only one with its “DMX IN”
socket empty.
1- Set up a unit as master (MAST).
2- Activate the automated program (AUTO ON)
3- Select from the two programs available; the 1° program (PRO1) utilses a 32 colour sequence, the 2° program (PRO2) utili-
ses 55.
4- Adjust the hold time for each colour in the sequence, if you wish to alter from the 0 set as the coemar default.
5- Adjust the fade time between the colours, if you wish to alter from the STRD set as coemar default.
Note: Projectors in automated mode will have the lamp turn on immediately and will be unable to have control of their
dimmer modified.
AOO1 COLRcolour changer speed
Colour changing system operating
time speed on DMX signal variation.
(selection between standard and slow)
STRD
standard speed
SLOU
low s
p
eed
☞
menu ☞
+o–☞
enter ☞
+o–
☞
+o–
☞
enter
☞
enter
AOO1 AUSPcolour changing
program speed execution
Stay time and adjustment of one colour
in the beam (program 1 or 2).
☞
menu ☞
+o–☞
enter ☞
+o–
☞
+o–
☞
enter
☞
enter
from -–000
minimum speed
to -–661
maximum speed
AOO1 PROGprogram
Program selection in auto mode
(2 selections available)
☞
menu ☞
+o–PRO1
program n°1
PRO2
program n°2
☞
enter ☞
+o–
☞
+o–
☞
enter
☞
enter
AOO1 AUTOautomatic movement
to activate colour changing effects
without using an external control signal
☞
menu ☞
+o–☞
enter ☞
+o–☞
enter
ON
to enable the function
MA.SLmaster or slave
to assign a code to the projectors as
master (generator) or slave (receiver).
☞
menu ☞
+o–☞
enter MAST
projector master ☞
enter
☞
+o–
AOO1
13. Synchronising several Panoramas without using DMX 512 signal
www.audiovias.com

13.2 Setting up “slave” units
All units being operated from the “Master” unit must be set to “Slave” mode.
They must be connected correctly in the dmx daisy chain, see section 8.3 Synchronising Panorams without DMX
512 signal
Projectors set up as ““Slave”” are recognisable as they are the only ones with both dmx in and out sockets connected (with
the exception of the last in the series which has only its “DMX IN” socket utilised.)
The procedure for setting up a unit as a “Slave” is as follows:
1- Set up the unit as “Slave” (SLAV).
When the display show -SL- you have correctly set the projector as a Slave which will follow the signal sent to it by the
Master unit.
The display options now offered by the Panorama are much simplified to those of the master.
2- At this point, you may alter the delay time of the individual slave unit to that of its Master
The delay may be altered from 0 to 55 and relates to the point at which the Slave will commence its colour change
sequence with respect to that being generated by the Master.
For example:
Synchronising two projectors with AUDL= 20.
When the Master reaches the 20th colour in its colour change sequence, the Slaves set to AUDL20 will begin with the first
colour.
The synchronising continues until the projectors are turned off.
The AUDLfunction thereby allows different areas of your lighting subject to be in lit in diverse colors whilst maintaining the
sequence amongst them (as set by the Master).
☞
menu ☞
+o–☞
enter
-–S L-– AUDLdelayed synchronization
To set the delay time on synchronization
of colour changing program set on master device.
This function can be seen and activated only
on slave unit -SL- slave..
from OOOO
no delay
to 0055
maximum delay
☞
enter
☞
+o–
MA.SLmaster or slave
to assign a code to the projectors as
master (generator) or slave (receiver).
☞
menu ☞
+o–-–S L-–
☞
enter SLAV
projector slave ☞
enter
☞
+o–
AOO1
English
www.audiovias.com

English
On display panel of Panorama Cyc Power are shown all the functions available; it is possible to change some of those
parameters and to add some functions.
Changing the setting made by coemar can vary the functions of the device that will not respond to the DMX 512 mixer
used to control it. Please carefully follow the instructions, before applying any variations or selections.
NOTE: the symbol ☞ shows which key has to be pushed to obtain the function desired.
A
OO1 D IMMdimmer speed
Mechanical dimmer operating time speed on DMX
signal variation. (selection between standard and slow)
COLRcolour changer speed
Colour changing system operating time speed on DMX
signal variation (selection between standard and slow)
FAN fans control
Fans function controlled through PCB (Strd)
Fans always on (on).
DISPreverse display
Reverse reading display depending on mounting position
(ground mounted or suspended)
LED display control
To disable display visualisation
LAMSlamps switching control
To deactivate the two lamps switching on/off control
through DMX signal.
LAMPswitching on control
To independently deactivate the switching
on/off control of lamps through DMX control
HOURworking time (lamp on)
Visualisation of unit's working time (lamp on)
(reset operation not possible)
LIFElamp life
Visualisation of lamp life (time covered by mains
supply from last reset operation)
TESTtest function
Device operation test without DMX signal
RESEreset
Reset function
HTOTtotal working time
Total visualisation of unit's working time (time covered
by mains supply) (reset operation not possible)
RATEDMX speed
DMX signal reception speed
-– -– -– -–
reset activation
24.S0
numeric value
0320
numeric value shown in hours
0520
numeric value
shown in hours
STRD
standard speed
SLOU
low speed
FAST
high speed
TO1
dimmer test
T04
yellow colour test
STRD
low speed
SLOU
low speed
FAST
high speed
☞
+o–
☞
+o–
☞
+o–
☞
+o–
☞
+o–
☞
+o–
☞
+o–
☞
+o–
☞
enter
☞
enter
☞
enter
☞
+o–
☞
+o–
☞
+o–
☞
+o–
☞
+o–
☞
enter
☞
enter
☞
enter
☞
enter
☞
enter
☞
enter
☞
enter
☞
enter
☞
menu
☞
+o–☞
enter
☞
+o–☞
enter
☞
enter
☞
+o–☞
enter
☞
+o–
☞
+o–STRD
ignition by DMX 512
ON
lamp always on
☞
+o–
☞
+o–STRD
ignition by DMX 512
ON
lamp always on
☞
enter ☞
+o–
☞
+o–
☞
enter
☞
enter
☞
+o–
☞
+o–
☞
+o–
☞
+o–
OFF
switching off display
(☞any key to re-activate it)
☞
+o–
AA
☞
enter
☞
enter
☞
enter
☞
enter
☞
+o–
☞
+o–
STRD
ignition by DMX 512
ON
lamps always on
☞
+o–
☞
+o–
☞
enter
☞
enter
☞
+o–
☞
+o–
0323
numeric value shown in hours
☞
+o–
☞
+o–LEFT
left lamp
RIGH
right lamp 0280
numeric value shown in hours
0275
numeric value shown in hours
LEFT
left lamp
RIGH
right lamp
☞
enter
☞
+o–
☞
+o–
☞
enter
☞
enter
☞
enter
☞
enter
AA
suspended position
reverse
☞
enter
STRD
automatic on/off
ON
fans always on
LEFT
left lamp
RIGH
right lamp
☞
+o–
14. Display panel functions
www.audiovias.com
Table of contents
Other Coemar Projector manuals


