CL100-M Video Light User Manual
Thank you for choosing COLBOR product. Please read this manual
carefully before use and follow all instructions mentioned herein.
Caring For Your COLBOR Product
Operation Instructions
Product Instructions
Keep corrosive chemicals, liquids and heat source away from the product to
prevent mechanics damage.
The product is not waterproof.
Do not leave the product unattended while in use. Keep out of reach of
children.
Must remove the protective cover before use.
Do not handle with wet hands. Do not touch hot COB surface.
Please do not block the ventilation and do not look at the light directly when
it is on.
Do not attempt to disassemble or modify the product. Doing so voids
warranty.
Please have the product checked or repaired by authorized technicians if any
malfunctions happened.
Disconnect from the power supply when it is not in use.
Malfunction may be caused by dropping, impact of external force.
Failure to follow all the instructions may result in mechanics damage.
Warranty does not apply to human errors.
If there is no operation for 10 seconds, the current settings are
automatically saved and the selection mode is exited.
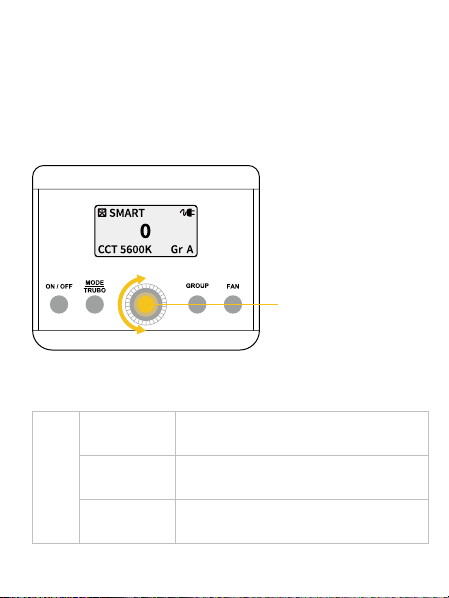
① Power Button
Short press to turn on/ o the light
② Mode Switch
Default Mode: CCT
Each press switches to next lighting mode
(CCT → EFF-FLASH → EFF-FAULTY BULB → EFF-WELDING → EFF-
LIGHTNING → EFF-PULSING → EFF-EXPLOSION → EFF-SOS)
Long press for 3 seconds to enter Overclock mode.
In overclock mode, the output power will be enhanced for 60s. At this time,
the fan runs at full speed with the fan status of "FULL". When the mode
ends, the previous fan status restores.
③ Adjustment Dial
Roll the dial to adjust brightness (0-100%)
Press the dial to preset brightness (25% → 50% → 75% → 100% → 25%)
④Group Option/ Remote Control Reset
1. Press the button to set group (Group A/B/C/D/E)
2. Long press for 3 seconds to reset Remote Control
⑤ Fan Option
Default Status: SMART
SMART-The xture will adjust the fan speed according to working temperature.
Press the Fan Option and switch to QUIET status.
QUIET-The fan runs at 30% speed, and the maximum brightness is limited to
80% for secure operation.
⑥ Fan Status
SMART / QUIET / FULL
⑦Power Status
Percentage icon means battery power is being used
Plug icon means AC power is being use
⑧ Brightness
⑨Color Temperature
Roll the dial to adjust brightness (0-100%), 5% stepping
Press the dial to preset brightness (25% → 50% → 75% → 100% → 25%)
EFF
FLASH
FAULTY BULB
WELDING
Specic brightness range: 30~100
Rate: 5 levels of icker frequency (05 ﹥ 04 ﹥
03 ﹥ 02 ﹥ 01)
Specic brightness range: 30~100
Rate: 5 levels of icker frequency (05 ﹥ 04 ﹥
03 ﹥ 02 ﹥ 01)
Specic brightness range: 30~100
Rate: 5 levels of icker frequency (05 ﹥ 04 ﹥
03 ﹥ 02 ﹥ 01)
CCT Mode
EFF Mode
1. Connect the xture with the power adapter, then plug it into an electricity
supply.
2. Press the Power Button to turn on the light.
Press to preset brightness
⑩Group
LIGHTNING
PULSING
EXPLOSION
SOS
Specic brightness range: 30~100
Rate: 5 levels of icker frequency (05 ﹥ 04 ﹥
03 ﹥ 02 ﹥ 01)
Specic brightness range: 30~100
Rate: 5 levels of icker frequency (05 ﹥ 04 ﹥
03 ﹥ 02 ﹥ 01)
Specic brightness range: 30~100
Rate: 5 levels of icker frequency (05 ﹥ 04 ﹥
03 ﹥ 02 ﹥ 01)
Specic brightness range: 30~100
Specic rate: ash international SOS signal
(three short, three long and three short)
EFF
Brightness Control / Rate Control:
Short press the Adjustment Dial to switch between rate control (“RATE”
ashes) and brightness control, then roll the dial to adjust.
If there is no operation for 5 seconds, the current settings are
automatically saved and the selection mode is exited.
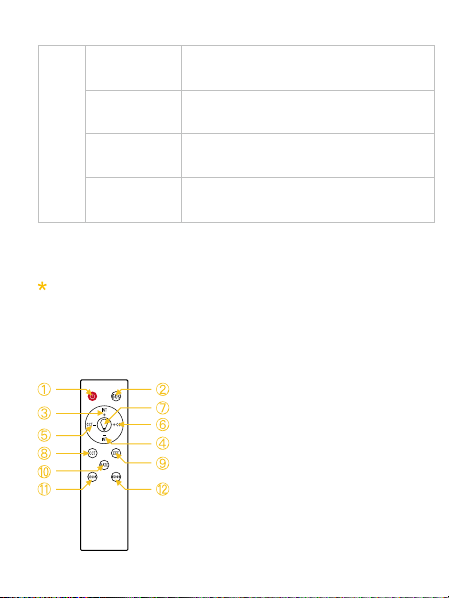
Remote Control Instructions
① Switch
② Overclock Mode
③ Brightness +
④ Brightness -
⑤ Color Temperature -
⑥ Color Temperature +
⑦ Fade In/ Fade Out
⑧ CCT Mode
⑨ EFF Mode/ Remote Pairing
⑩ Rate (Flicker Frequency)
⑪ Preset Color Temperature: 3200K
⑫ Preset Color Temperature: 6500K