Coleman Powersports 125DX 2020 User manual

READ THIS MANUAL CAREFULLY!
Provincial / Municipal governments have different regulations
pertaining to owning and operating an off-road vehicle, learn the
Model: 125DX
Always wear a helmet it could save your life!
Never allow any child under the age of 16 to operate this Dirt Bike
without continual adult supervision.
MANUAL CAREFULLY!
POWERSPORTS
(888) 405-8725 Coleman Powersports
Model 125DX
Always wear a Helmet, it could save your life!
Provincial / Municipal governments have different regulations
pertaining to owning and operating an off-road vehicle, learn the
regulations in your area.
REV# 031813
www.colemanpowered.com
OWNER’S MANUAL

Congratulations on your purchase of a Coleman Powersports Dirt Bike. This Owner’s/
Operator’s manual will provide you information regarding safe operation, operational
instructions, maintenance and care. Fully understanding this manual and following all
of the instructions herein will provide the knowledge needed to have safe and enjoyable
Dirt Bike operation.
For questions regarding operation and maintenance of this Dirt Bike, please call
Coleman Powersports toll free 888-405-8725.
Parents should consider their child’s age, size, ability and maturity
before allowing them to ride this dirt bike. All operators under the
age of 16 should be supervised continually by an adult.
THIS DIRT BIKE IS NOT A TOY AND COULD BE HAZARDOUS TO OPERATE.
Reading the Owner’s/ Operator’s Manual
It is important this manual is read from cover to cover carefully by the Dirt Bike owner and
all operators. Parents should review the manual carefully with their children. Never allow
anyone to operate the Dirt Bike without rst reading and understanding the
Owner’s/Operator’s manual.
This Owner’s/ Operator’s manual should be a permanent part of the Dirt Bike and should
remain with the vehicle at all times. The manual should also remain with the vehicle if
sold.
To the Owner
Safety - Notice to parents
II

To emphasize special important information in the manual, please note the following :
To emphasize important safety information, the word WARNING, with the alert symbol, has
special meaning.:
To emphasize important information, the word CAUTION has special meaning.:
To emphasize important information, the word NOTE has special meaning.:
This is the alert symbol. The symbol means ATTENTION!, BECOME ALERT!,
YOUR SAFETY IS INVOLVED.
!WARNING
Indicates a potential hazard that could result in
SEVERE INJURY or DEATH to the operator, bystander
or person inspecting or repairing the Dirt Bike.
!
CAUTION: Indicates special precautions that must be taken to
avoid damage to the Dirt Bike.
NOTE: Indicates key information to make procedures easier
or clearer to understand.
This manual is based on the latest product information available at the time
of publication. Coleman Powersports has a policy of continually improving its products.
Due to improvements, or other changes, there may be some discrepancies. We reserve
the right to make product changes at any time, without notice and without incurring any
obligation to make the same or similar changes to vehicles previously built or sold.
!WARNING
The rst part will identify a POTENTIAL HAZARD.
The second part will describe WHAT COULD HAPPEN if the warning or caution is
ignored.
The third part will describe HOW TO AVOID THE HAZARD.
CAUTION
or
Coleman Powersports is concerned about the environment and believes in conserving
and protecting all natural resources. For this reason , owners should recycle, trade in,
or dispose as appropriate, batteries, oil and tires.
III

The engine exhaust from this Dirt Bike
contains chemicals known to the state of
California to cause cancer, birth defects
or other reproductive harm.
California proposition 65
!WARNING
IV

TABLE OF CONTENTS
1
COLEMAN POWERSPORTS WARRANTY. 2
IMPORTANT SAFETY LABELS............... 4
LOCATION....................................... 4
WARNING LABELS.................... ....... 5
SAFETY .............................................. 6
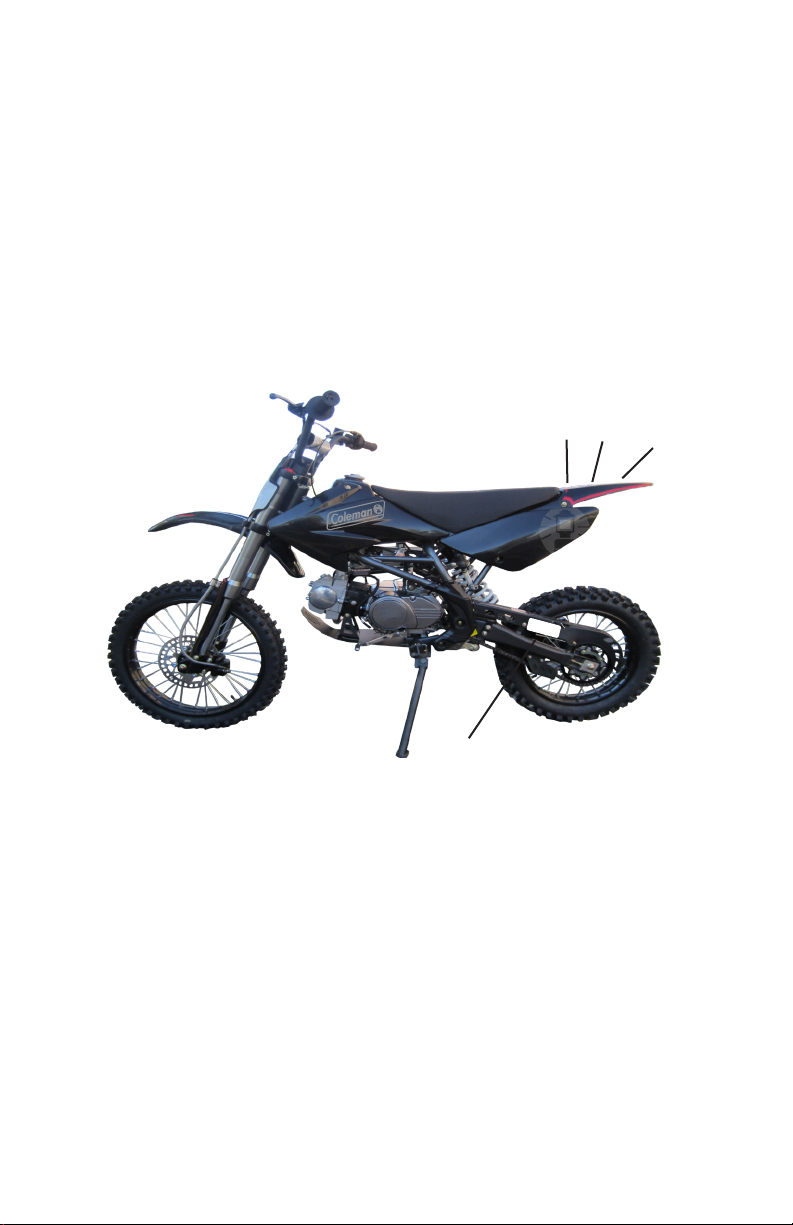
DESCRIPTION AND PART LOCATIONS... 7
DESCRIPTION AND PART FUNCTIONS.. 8
IGNITION KEY................................... 8
RIGHT SIDE HANDLEBAR FUNCTIONS8
RIGHT HAND BRAKE LEVER....8
RIGHT THROTTLE GRIP............8
LEFT SIDE HANDLEBAR FUNCTIONS..8
CLUTCH LEVER..................... 8
ENGINE STOP SWITCH.......... 8
CHOKE LEVER...................................9
GEAR SHIFT LEVER............................9
KICK START / FOOT BRAKE LEVERS...9
FUEL VALVE..................................... 10
FUEL CAP......................................... 10
OIL FILL PLUG/DIP STICK................. 10
FUEL AND OIL...................................... 11
FUEL................................................ 11
ENGINE OIL...................................... 11
BREAK IN............................................. 12
PRE RIDE INSPECTION.......................... 13
RIDING DIRT BIKE................................ 14
HELMET, EYE PROTECTION AND
PROTECTIVE CLOTHING.................... 14
STARTING THE ENGINE.................... 15
STARTING OFF AND SHIFTING......... 16
LOAD GUIDELINES............................ 17
AFTER MARKET PARTS.................... 17
MAINTENANCE.................................... 18
MAINTENANCE CHART..................... 19
MAINTENANCE RECORD................... 20
AIR FILTER....................................... 21
SPARK PLUG................................... 22
ENGINE OIL .................................... 23
CHECKING............................ 23
CHANGING........................... 23
IDLE SPEED ADJUSTMENT................ 24
THROTTLE CABLE ADJUSTMENT........ 24
BRAKES........................................... 25
BRAKE FLUID CHECK............ 25
BRAKE PAD INSPECTION....... 25
BLEEDING THE BRAKES......... 26
CLUTCH LEVER FREE PLAY.................27
FUEL HOSE INSPECTION.................. 27
VALVE CLEARANCE.......................... 27
CHAIN AND SPROCKET INSP............ 28
INSPECTION........................... 28
TENSION AND ADJUSTMENT..... 28
CLEANING AND LUBRICATION... 28
TIRES.............................................. 29
TIRE PRESSURES.................. 29
TIRE SIZE.............................. 29
REPLACING........................... 29
STORAGE............................................. 30
WASHING THE DIRT BIKE..................... 31
TRANSPORTING................................... 31
TROUBLE SHOOTING............................ 32
SPECIFICATIONS.................................. 33
FRAME AND ENGINE NUMBER
LOCATION........................................... 34
EMISSION CONTROL SYSTEM
WARRANTY.......................................... 35

Coleman Powersports LIMITED WARRANTY
This Warranty is NOT the Emissions Control Warranty
Please note this is a general Limited Warranty for this product. It IS NOT an Emissions
Control Warranty. Please see the Emissions Control Warranty in this manual for
warranties covering Emission components. The Emissions Control Warranty can be found
on page 35.
The Warranty
Coleman Powersports Inc offers the following warranty to the initial purchaser of this new
Coleman Powersports product. The initial purchaser is dened as the rst person to
purchase a new Coleman Powersports product from an Authorized Retailer.
The limited warranty period for this product is 90 days from the date of purchase shown
on the original sales receipt.
What is a Defect?
The Product is warranted to be free from manufacturing defects in material and work-
manship for a period of 90 days from the date of purchase shown on the sales receipt.
During this period of time Coleman Powersports will, at its option, either repair or replace
any original Coleman Powersports part which is covered by this warranty and is proven to
be defective in workmanship or material.
To qualify for this warranty the part:
1. Must have been purchase from Coleman Powersports or from an authorized Coleman
Powersports Retailer.
2. This warranty does not apply to any vehicle which is used in competition or used in
a manner not consistent with the normal and proper intended use for the vehicle. This
vehicle is not intended for rental or commercial use.
Who Can Perform Repairs Under this Warranty?
Repairs under this warranty should be performed by an authorized Coleman Powersports
retailer or comparable servicing dealer.
How to get service under this warranty
To get warranty service call Coleman Powersports at 888-405-8725 for the location of
your local servicing retailer / dealer. Please do not return the product to the retailer
where the product was purchased unless instructed to do so by Coleman Powersports.
The retailer of this product does not make any warranty of its own and has no authority
to implement this warranty on behalf of Coleman Powersports without the approval of
Coleman Powersports. A COPY OF YOUR SALES RECEIPT IS REQUIRED FOR WARRANTY
SERVICE.
2

What this Warranty Does Not Cover
This warranty does not cover the following
1. Damage due to lack or improper maintenance as described in this manual.
2. Damage which is caused by normal use and not caused by a defect in materials or
workmanship.
3. Use of the product which is not consistent with the intended use as described in the
operating instructions.
4. Any expendable maintenance item which need replacement or service as part of
normal maintenance, unless such items have defects in material or workmanship which
cause failure or premature wear.
5. Any product which has been altered or modied in a manner not consistent with the
original design of the product or in a manner not approved by Coleman Powersports.
6. Tires
7. Damage or failures due to abuse, neglect, or misuse of the product.
Limitations of this Warranty
This warranty does not cover and Coleman Powersports disclaims any responsibility for:
1. Loss of time or loss of use of the product.
2. Transportation costs to and from the authorized center.
3. Other loss or damage to other equipment or personal items.
Length of Implied Warranties
Any implied warranties are limited to the duration set forth in this warranty. Coleman
Powersports does not make any claim as to the merchantability or tness for a particular
purpose which would extend longer than the duration of this written warranty.
Check you State Laws as some State Laws do not allow limitations as to the duration of
an implied warranty. Some States may also not allow limitation or exclusions based on
incidental or consequential damages.
3

IMPORTANT SAFETY LABELS
4
LOCATION
123
4
Cold tire pressure:
Front: 32psi ± .5psi (225 ± 3.5kpa)
Rear: 36psi ± .5psi (250 ± 3.5kpa)
Maximum weight capacity is
185 lbs. (84 kg)

Warning Labels
5
1
2
3
1
WARNING
!
• NEVER operate this vehicle without
first reading and understanding the
owner’s manual and all labels.
• ALWAYS wear a DOT certified
motorcycle helmet, protective riding
gear and eye protection.
• NEVER operate this vehicle while
under the influence of drugs or
alcohol.
• NEVER operate this vehicle on public
roads or highways.
• NEVER carry a passenger
.
Cold tire pressure:
Front: 32psi ± .5psi (225 ± 3.5kpa)
Rear: 36psi ± .5psi (250 ± 3.5kpa)
Maximum weight capacity is
185 lbs. (84 kg)
WARNING
!
No one under the age of 16
should operate this vehicle
without adult supervision.
This vehicle is designed and
manufactured for OFF ROAD
use ONLY. Riding on public
roads or highways is illegal.
4
220 lbs. (99.79)

Never take drugs or alcohol before
or during operating this Dirt Bike.
Never traverse, climb or go down
a hill that is too steep. Avoid hills
with loose or slippery terrain.
Never attempt wheelies, jumps or
any other type of stunts on this Dirt
Bike.
Always follow the pre-ride
inspection procedures and
maintenance procedures located in
this manual before use.
Always go slow on terrain that is
not familiar, be alert, an obstacle
could come up unexpectedly.
Always keep both hands on the
handlebars and both feet on the
foot pegs. Keeping both hands on
the handlebars and both feet on
the foot pegs will help the
operator be ready for any
unexpected hazards.
Never operate this Dirt Bike at
night. Night is dened as 30
minutes before sunrise and 30
minutes after sunset.
All operators under the age of 16
should be supervised continually
by an adult. Some children, even
though they may be the correct
age to operate a Dirt Bike, may
not have the coordination or ability
to do so safely. It is the parents
responsibility to access the childs
abilities before allowing the child to
continue to ride.
Always wear a certied DOT
motorcycle type helmet that ts
properly, over the ankle boots, eye
protection, gloves, long sleeve shirt
and long pants while
operating this Dirt Bike.
Never allow a passenger on this Dirt
Bike. This Dirt Bike is designed for
one operator and no passengers.
Never operate this Dirt Bike on
paved surfaces and/or public
roads.
Always go slowly and pay attention
to unfamiliar terrain. Be alert to
changing terrain conditions when
operating the Dirt Bike.
SAFETY
6

1. Front Wheel
2. Front Brake Caliper
3. Front brake disc
4. Front Fender
5. Front Forks/Shocks
6. Fuel tank/cap
7. Seat
8. Rear Fender
9. Rear Wheel
10. Rear sprocket
11. Drive Chain
12. Kick Stand
13. Shift Lever
14. Fuel Valve
15. Ignition Key
16. Rear brake Caliper
17. Rear Brake disc
18. Mufer
19. Rear Fender
20. Carburetor
21. Spark Plug
22. Foot Brake lever
23. Oil ll plug/Dip stick
24. Kick start lever
25. Rear shock
26. Rear brake master
cylinder
27. Clutch Lever
28. Front brake master
cylinder
29. Front brake lever
30. Right throttle hand
grip
31. ON/OFF switch
1
2
3
4
5
678
9
10
12 11
13
14
15
16
17
18
19
20 21
22
23
24
25
27 28
26
DESCRIPTIONS AND PART LOCATIONS
7
29
30
31

DESCRIPTION AND PART FUNCTIONS
Right hand brake lever (2). Front brakes
are applied when the right hand brake
lever is pulled toward the hand grip.
Right Throttle Grip (3): The engine speed is
regulated by the position of the right
throttle grip. Throttle is increased by
turning the throttle grip toward the
operator. Engine speed is decreased by
turning the throttle grip away from the
operator.
Clutch Lever (4): Clutch is activated when
the Clutch lever is pulled toward the hand
grip.
Engine Stop Switch (5): Dirt Bike engine
can start when the Engine stop switch is
placed in the (on) position. Engine
will shut off and the engine will not start
when the switch is placed in the (off)
position.
Ignition Key (1) Before the engine will
start, the ignition key needs to be turned
clockwise to “ON” position.
2
3
Right side handlebar functions
8
Left side handlebar functions 4
5
Ignition Key 1
8

DESCRIPTION AND PART FUNCTIONS
Foot brake lever (5): To activate the rear
brakes, depress the foot brake lever
Kick start lever (3): To start the engine
kick the kick start lever down. Note:
Ignition key and the ON/OFF switch needs
to be placed in the (ON) position for engine
to start.
Gear shift lever (2): This Dirt bike has a 4
speed transmission which is operated by
the gear shift lever. For proper shifting
instructions, refer to shifting instructions
listed in the “Riding the Dirt bike” section
of this Manual.
Choke Lever (1): If the engine is cold, lift
the choke lever to the “ON” (up) position.
Once engine has warmed up , place choke
lever to the “OFF” (down) position.
Kick Start /Foot brake levers
2
Gear Shift Lever
1
Choke Lever
9
ON
OFF
34

DESCRIPTION AND PART FUNCTIONS
10
Fuel Valve The fuel valve has 2
positions: “OFF”and “ON”
“OFF”position (1): Fuel will not ow to the
carburetor in this position. Always turn
the fuel valve to the “OFF” position when
unit is not in use or is being transported.
”ON”position (2) This is the normal
operating position. The “ON” position
allows fuel to ow from the fuel valve to
the carburetor. Turn the fuel valve to
the”ON” position when ready to start and
ride your Dirt Bike.
Note: Fuel valve should always be placed
in the “OFF” position when the Dirt bike is
not in use.
Fuel Tank Cap (3)
To open the fuel tank cap , turn the cap
counter clockwise. To re-install the cap,
turn the cap clockwise until snug. Make
sure the vent tube is attached and the cap
is seated properly .
Oil Fill Plug/Dip Stick (4)
To open the Oil Fill Plug/Dip Stick, turn
the plug counter clockwise. To re-install
the Plug, turn the cap clockwise until snug.
OFF
ON
1
2
3
Fuel Valve operation
Fuel Cap
Oil Fill Plug/Dip Stick
4

FUEL AND OIL
FUEL
Never use leaded gasoline in this product.
It could affect the engine’s emissions and
damage the engine.
This dirt bike requires clean unleaded
regular gasoline with a minimum octane
rating of 87 or higher.
Gasoline/ Ethanol blends
A blend of unleaded gasoline with
Ethanol, also known as GASOHOL, at or
below 10% (E10 ) can be used in your Dirt
Bike. Ethanol greater than 10% can
damage your engine and will void your
warranty.
Gasoline/Methanol Blends
A blend of gasoline with Methanol of 5% or
less can be used in your Dirt Bike. Do not
use gasoline, under any circumstances,
containing more than 5% Methanol, doing
so will damage your engine and will void
the warranty.
ENGINE OIL
The recommended oil for this Dirt Bike
is SAE10W-40 motor oil, if this oil is not
available, any of the oils on the chart
below will work. Note the temperature
requirements for each of the oils.
Quantity of oil - .85qt. (.8L).
Overlling the fuel tank can cause
the fuel to expand which can cause
overow due to the heat from the
engine or sun. Spilled fuel can
catch re.
Never ll the fuel tank above the
bottom edge of the ller neck.
!WARNING
Fuel level
Filler neck
Fuel and fuel vapor are highly
ammable and toxic. You can be
burned or poisoned while refueling.
Before refueling make sure to fol-
low the procedures listed:
1 Shut off engine, Make sure
there are no ames, sparks or
heat sources close by.
2 Refuel only outdoors in a well
ventilated area.
3 Do not smoke while refueling.
4 Wipe up any spills immediately.
5 Avoid breathing any fuel vapors.
6 Keep children and pets away.
!WARNING
Fuel Filling
11

BREAK - IN
The initial 5 hours of operation is most im-
portant in the life of your Dirt Bike. Proper
operation during this break in period will
help assure maximum life of your Dirt Bike
engine.
The following guidelines will explain the
proper break in procedures.
1. During the rst 5 hours of operation,
do not apply more than 1/2 throttle.
2. During the next 5 hours of
operation do not apply more the 3/4
throttle
Vary the engine speed:
Make sure to vary the engine speed dur-
ing the break in period, this allows the
engine to load and unload which helps
the parts to seat properly. It is essential
to place some stress on the engine during
the break in process, however, too much
stress could cause damage to the engine
components. Be careful not to load the
engine too much.
Break in period
Allow oil to circulate before
riding.
Allow the Dirt Bike engine to warm up
before riding. This allows the oil to
circulate throughout the engine which
lubricates the components.
Observe your initial and most
critical maintenance service
The initial service( break in maintenance )
is the most important service for your Dirt
Bike. During the break-in time frame, all
of the engine components will have mated
together and seated. Maintenance
required as part of the initial service
includes correction of all adjustments,
tightening of all fasteners and replace-
ment of dirty oil. Timely performance of
this maintenance will help make sure your
Dirt Bike will have the best service life and
performance of the engine.
12

Performing maintenance and
checks while the engine is running
could be hazardous.
You could be severely injured by
moving parts or hot surfaces.
Never perform maintenance or
check procedures while the engine
is running with the exception of
checking the engine stop switch or
throttle.
!WARNING
Failing to inspect and maintain
your Dirt Bike could be hazardous.
Not following the pre-ride
inspection procedures could result
in loosing control of the Dirt Bike
resulting in an accident or damage
to the Dirt Bike
Always perform a Pre-ride
inspection before each ride.
PRE-RIDE INSPECTION
!WARNING
Inspecting and checking the condition of
the Dirt Bike before each ride is
important. Following the pre-ride check
list will help insure the you do not have
mechanical problems which could result in
injury or becoming stranded. Make sure
the Dirt Bike is in good operating
condition before each ride.
WHAT TO
CHECK
CHECK FOR
Steering • Smoothness
• No restriction of
movement
Brakes • Proper operation.
• Brake uid level
• Brake hoses, calipers
and master cylinders
show no signs of
leaking
Clutch
Lever
• Proper Free Play
• Works as intended
Tires • Proper tire pressure
• Proper tread depth
• Rubber has no cracks
Fuel Tank • Enough fuel for the ride
• Fuel cap secure
• Hoses have no signs of
cracks or leaks
Hand Grip
Throttle
• Hand grip throttle
snaps back to idle
when released
• Operates freely
• Has correct free-play
Engine
Stop
Switch
• Switch shuts off engine
when activated.
Engine
Oil
• Correct oil level
Gearshift
Lever
• No damage
• Operates as intended
Drive
Chain
• Proper tension
• Lubricated
• No excessive wear or
damage
General
Condition
• All nuts and bolts tight
• No rattles from engine
or frame while running
13

1
2
3
4
5
6
RIDING THE DIRT BIKE
HELMET, EYE PROTECTION,
PROTECTIVE CLOTHING
Always wear a DOT certied
motorcycle helmet (1). A helmet helps
protect against serious head injuries in the
event of an accident. A helmet is the most
important safety gear item you can wear.
Consult with a motorcycle dealer for the
correct size and type of motorcycle helmet
that is right for you.
Always wear eye protection when riding a
Dirt Bike such as a face shield or goggles
(2). While riding a Dirt Bike you can be hit
in the eyes by any of the following: dust,
branches, rocks, debris from other riders,
bugs, etc. Good eye protection as well as
a helmet and protective riding gear should
be mandatory when riding an Dirt Bike.
Wear protective clothing: Long sleeve shirt
(3), Gloves (4), Long pants (5), over the
ankle boots (6).
Riding a Dirt bike exposes the rider to
many hazards, wearing protective clothing
can help protect the rider from injury.
Riding a Dirt Bike without a helmet, eye
protection, and protective clothing can be
hazardous
Riding a Dirt Bike without a helmet
increases the chance of severe head injury
or death in the event of an accident.
Riding a Dirt Bike without eye protection
such as a face shield or goggles could
result in severe injury in the event of an
accident.
Riding a Dirt Bike without protective
clothing; over the ankle boots, long pants,
gloves, long sleeve shirt could result in
severe injury in the event of an accident.
Always wear a Helmet, eye protection, long
pants, long sleeve shirt, over the ankle
boots and gloves when riding a Dirt Bike
!WARNING
14

STARTING ENGINE
Before attempting to start the engine,
make sure to follow the pre-ride
inspection checklist in this manual.
1. Place the fuel valve (1) in the “ON”
position.
2. Place dirt bike in neutral by pulling in
the clutch lever and depressing the shift
lever (2) as many times as needed to get
into 1st gear. Once dirt bike is in rst gear,
pull up on the shift lever 1/2 the distance
required to up-shift into second gear, this
is the neutral position. Note: Do not pull
in the clutch lever to start engine. Engine
will not start if clutch lever is pulled in.
3. Turn the ignition key (3) to the “ON”
position .
4. Place the ON/OFF switch (4) located on
the handlebars to the (ON) position
5. If engine is cold, place the choke lever
(5) in the up position.
Note: If the engine is already warm the
choke will not be needed.
6. Start the engine by kicking down on the
kick start lever (6)
7. Once engine has warmed up for a few
minutes, place the choke lever (5)
back to the down position.
5
Starting or running the Dirt Bike in
an enclosed area such as a garage
or shed where there is no ventila-
tion is hazardous
Inhaling exhaust fumes from the
Dirt Bike can cause severe injury or
death
Never start or run the Dirt Bike in
an inclosed environment where
there is no ventilation. Always start
and run outdoors.
!WARNING
RIDING THE DIRT BIKE
4
15
2
3
1
6
ON
OFF

Operating this Dirt Bike at excessive
speeds could be hazardous.
Riding at excessive speeds increases your
chances of losing control of the
Dirt Bike, which could result in severe
injury or death.
Always go at a speed that is proper for the
terrain, visibility, operating conditions,
operator skill, and operator experience.
Always know the terrain before riding.
!WARNING
STARTING OFF AND SHIFTING
1. Once engine has warmed up in neutral,
place Dirt Bike in rst gear by pulling in
the clutch lever and depressing the shift
lever into rst gear.
2. Release brakes and apply throttle while
releasing clutch gradually.
3. Give the Dirt Bike throttle until the
RPMs are high enough to shift in 2nd gear
4. Let off the throttle, pull in the clutch
lever and lift up shift lever to 2nd gear.
5. Repeat steps for 3rd and 4th gears.
Note: It is important to operate the Dirt
Bike in the correct gear. If the Dirt Bike
engine starts to labor, shift to a lower gear.
If the Dirt Bike engine is revving too high,
shift to a higher gear.
Applying full throttle when starting off
could be hazardous.
The Dirt Bike could lurch forward causing
the front wheel to leave the ground
causing loss of control.
Always open the throttle and let off the
clutch lever gradually when taking off from
a stopped position.
!WARNING
RIDING THE DIRT BIKE
4
3
2
N
1
1
Shift Pattern
16
Shift Speed
1st to 2d gear
19 km/h (11.8 mi/h).
2d to 3d gear
33 km/h (20.5 mi/h).
3d to 4th gear
44 km/h (27.3 mi/h).
Table of contents
Other Coleman Powersports Motorcycle manuals

Coleman Powersports
Coleman Powersports RB100 2021 User manual

Coleman Powersports
Coleman Powersports CT200U-CL 2020 User manual

Coleman Powersports
Coleman Powersports CT200U-EX 2020 User manual

Coleman Powersports
Coleman Powersports RB200 Installation instructions

Coleman Powersports
Coleman Powersports CT200U User manual

Coleman Powersports
Coleman Powersports 70DX 2020 User manual

Coleman Powersports
Coleman Powersports B200R User manual