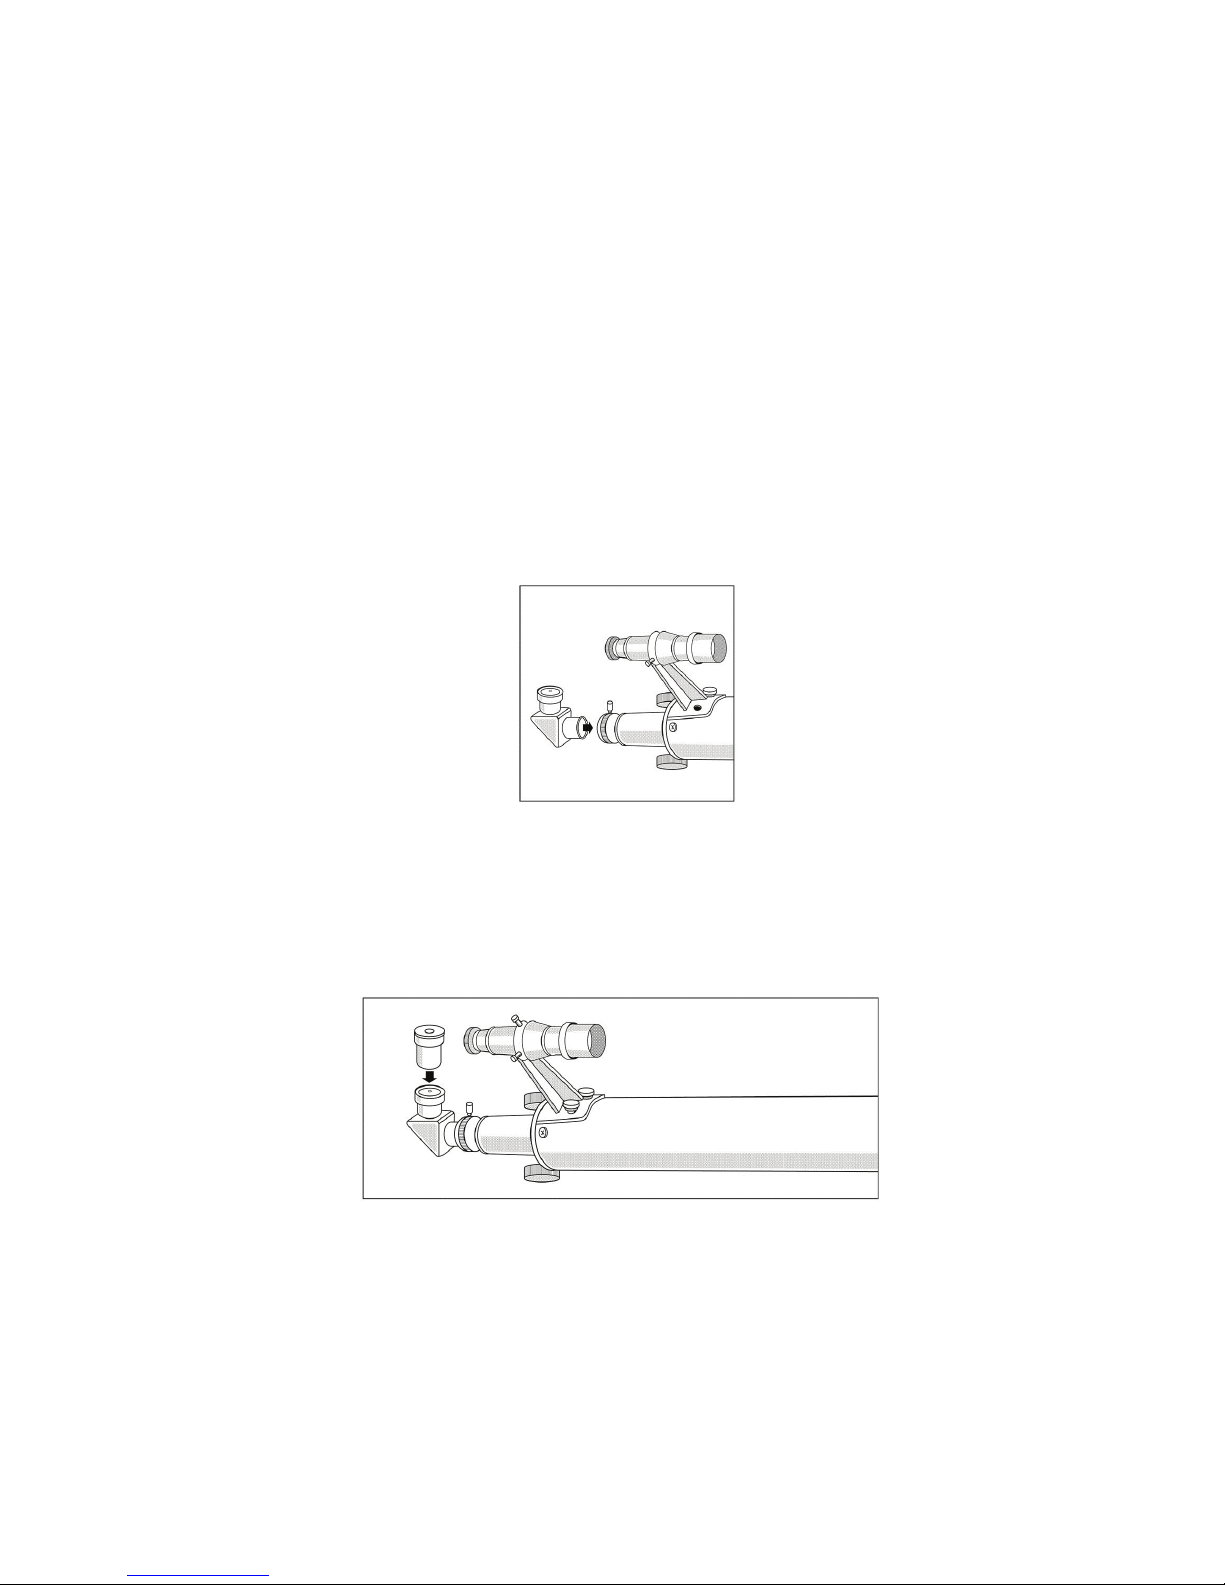
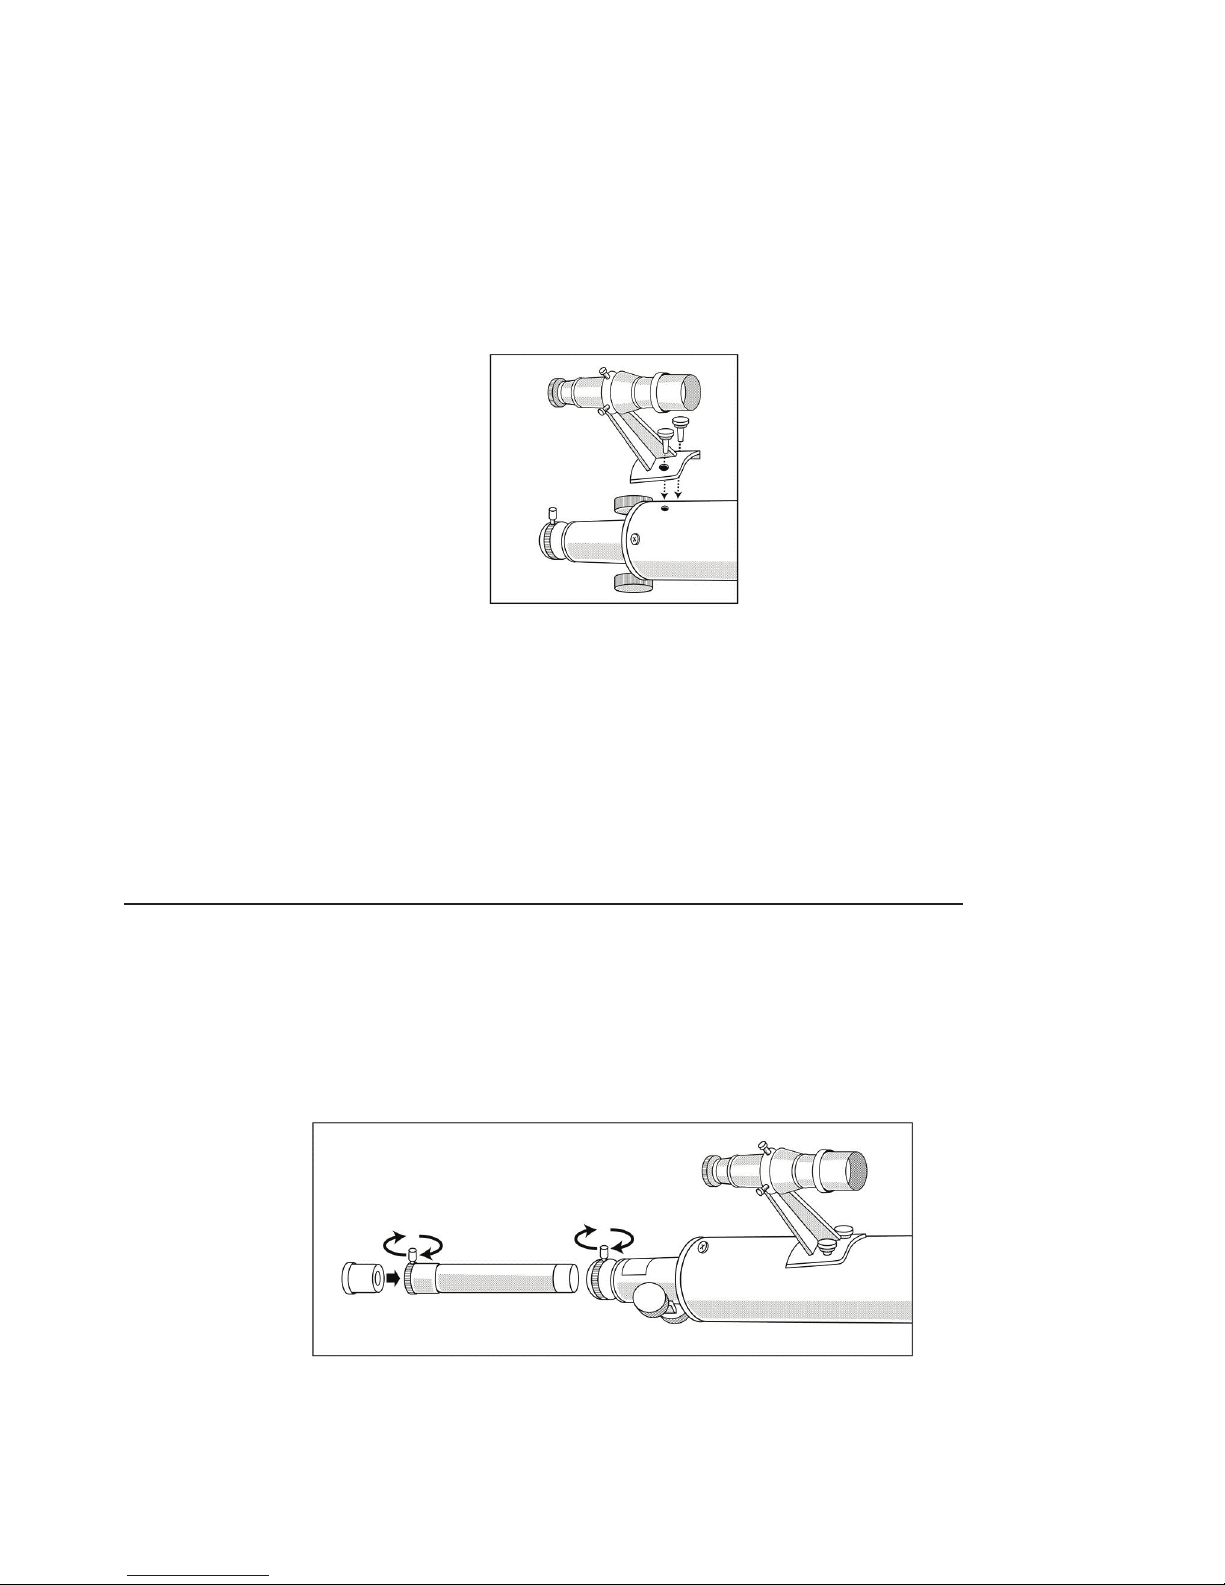
Coleman AT50 Quick start guide

Please retain the packaging and instructions for further reference, as they contain important information.
AT50
INSTRUCTIONS & OWNER’S MANUAL

INTRODUCTION:
Congratulations on your purchase of the precision crafted AT50 COLEMAN
telescope. With the proper care and handling of your telescope, you will enjoy
years of viewing pleasure.
As an astronomical device, the AT50 telescope has been designed for both a
beginner and advanced star gazer. It provides views of the moon and planets,
as well as dozens of galaxies, star clusters, and nebulae.
As a terrestrial (land) telescope, the AT50 brings the world’s natural wonders
closer. It delivers superb scenic views and allows for observation of animals
and landscapes from a distance. To obtain the best performance from your
telescope, please carefully read this manual.
For use by an adult or under the supervision of an adult
WARNING! DO NOT VIEW THE SUN THROUGH A TELESCOPE!
SERIOUS INJURY TO THE EYES MAY OCCUR

3
PARTS LIST FOR AT50 Telescope:
Specifications, colors, packaging, and/or contents of this manual are subject to change without notice.
!
WARNING!
CHOKING HAZARD
Small parts. Not suitable for
children under 3 years.

4
ASSEMBLY:
1) Carefully remove all parts from the cardboard cartons and lay them on a table, floor or
other flat surface in order to take an inventory of all the pieces. Keep your box for storage
or in case you ever need to ship your telescope.
2) Remove the tripod (1) from the box. Set the tripod on a level surface and fully spread
the legs.
3) Remove the telescope optical tube (7) from the box.
4) Position the telescope optical tube (7) on top of the tripod head, aligning it to the fixing
screw (9). Connect the telescope optical tube to the tripod and secure it in place by
tightening the fixing screw. DO NOT OVERTIGHTEN.
5) Remove the diagonal mirror (4) from the box. Insert it into the focusing tube (3). Secure
the diagonal mirror in place by tightening the set screw. (See Illustration 1)
(Illustration 1)
6) Remove either the H12.5 or SR4 eyepiece (5) from its protective case. Insert the
eyepiece into the diagonal mirror. Secure the eyepiece in place by tightening the set screw.
(See Illustration 2)
(Illustration 2)
7) Remove the accessory tray (12) from the box. Attach it to the tripod’s support brackets with
the included screw. The accessory tray may be used to hold the eyepieces and accessories
not in use at the time you are viewing an object.

5
8) Remove the finderscope and the finderscope bracket (6) from the box. Remove the two
knurled thumbscrews from the telescope main tube (See Illustration 3). Position the
finderscope bracket onto the telescope tube so that the holes in the base of the bracket line up
with the exposed holes in the telescope tube. Replace the two knurled thumbscrews and
tighten securely (See Illustration 3). Insert the finder scope into the bracket and tighten the
knurled thumbscrews to keep the finder scope securely in place.
(Illustration 3)
The basic assembly of your telescope is now complete and ready for observing far away
celestial and terrestrial objects. When using the telescope to observe terrestrial objects
(objects on earth), the image will appear reversed (mirror image) or upside down. This is
normal for any astronomical telescope. For viewing celestial objects, a mirror image is
acceptable, since there is no upside down or left to right in space. However, when viewing
terrestrial objects, you may wish to correct the image by inserting the 1.5X Erecting Lens (10)
in place of the diagonal mirror. See Section F.
NOTE: The diagonal mirror and 1.5X Erecting Lens cannot be used together.
9) A 3X Barlow lens (11) is supplied to triple the basic magnifying power provided by any of
the eyepieces. In viewing situations where very high magnifying powers are desired, insert the
3X Barlow lens between the eyepiece and the focusing tube.
(See Illustration 4)
(Illustration 4)

6
HOW TO USE YOUR COLEMAN AT50
A. FINDER SCOPE ALIGNMENT
Since a telescope by design has a narrow field of view, it can be challenging to locate the
particular object you wish to view. For this reason the telescope is fitted with a low-power,
wide-field miniature optical device called a finder scope. Always use your finder scope to first
locate the object you would like to view. The finder scope should be aligned with the main
telescope tube before you begin using the telescope, in order that both the telescope and
finder scope are positioned to provide exactly the same angle and view.
Note: Objects in the finder scope are upside down. This is normal and is common to
all astronomical telescopes.
B. COMPLETE THE FOLLOWING SETTINGS IN DAYLIGHT:
1) With either the SR4 or H12.5 eyepiece in the focusing tube, rotate the tripod head toward
an object you have selected to view. Direct the tripod head to an easily recognizable,
stationary object that is at least 200-300 feet away. You may insert the eyepieces directly into
the focusing tube or into the diagonal mirror that is inserted into the focusing tube.
2) When the telescope is pointing in the general direction of the object you wish to view,
adjust the elevation (up and down angle). This is done by loosening the fixing screw and
gently moving the telescope up or down until it is aligned with the object to be viewed.
3) Look through the finderscope (6) and refine the elevation as described above. Center the
object in the field of view. You may also adjust the finderscope by simply releasing one of the
small adjusting screws holding the finderscope and re-position the finder scope until the
object is centered within the X-shaped crosshairs.
4) All screws should be completely tightened as soon as the view through the finder scope
coincides with the view of the main telescope.
5) You may need to repeat this procedure to ensure a perfect alignment.
6) Look through the eyepiece and focus the image by slowly rotating the pinion focusing knob
(2).
7)
.
C. ABOUT MAGNIFICATION:
The magnification power of a telescope indicates how much an image is enlarged or how big
and close it appears to the viewer. The focal length of the eyepiece, combined with the focal
length of the telescope, determines the magnification power. To calculate the power of your
telescope with any particular eyepiece, simply divide the focal length of the telescope (625mm)
by the focal length of the eyepiece (indicated in “mm” on the eyepiece collar).
For the various telescope powers, please refer to the next section ABOUT MAGNIFICATION

7
Example: _ 625 mm focal length (tube)__
4mm focal length (eyepiece)
The 3X Barlow lens and interchangeable eyepieces provide the following magnification values:
POWER WITH POWER WITH
EYEPIECE POWER 1.5X ERECTINGLENS 3X BARLOW
SR4 156x 234x 468x
H12.5 50x 75x 150x
When you are looking at astronomical objects, you are looking through a column of air that
reaches to the edge of space, and that column of seldom stays still. Similarly, when viewing
over land (terrestrial viewing), you are often looking through heat waves radiating from the
ground, homes, buildings, etc. Your telescope may be able to provide very high
magnifications, but you often end up magnifying all the turbulence between the telescope and
the object you wish to view. The level of magnification required depends on the object
Optimal performance is obtained if the magnification is typically not more than about 30x for
every 10mm of objective lens diameter. Another good rule of thumb is that the usable
magnification of a telescope is about 3x per mm of the aperture (for the AT50, the aperture is
50mm) under good conditions. Thus, magnification of around 150x or less is ideal for a
telescope with a 50mm diameter objective mirror (aperture) and is best for observing most
celestial objects. A lower magnification power and a wider field of view are advisable for
observing galaxies and nebulae. The highest magnification power should be used for highly
detailed observations of the moon, Jupiter, Saturn, or any object that is quite bright.
The highest magnification power of the Barlow lens with a 4mm eyepiece combination should
only be used for large or bright objects such as the moon and the brightest planets.
D. ABOUT YOUR REFRACTOR TELESCOPE:
Your telescope has a refractor type optical design. It uses lenses to gather and focus light. The
combination of the front objective lens and eyepiece gathers more light than the human eye is
able to collect on its own, focus it, and present the viewer with a brighter, clearer, and
magnified virtual image. Light enters the open end of the telescope tube. The objective lens
refracts or bends the light. This refraction causes parallel light rays to converge at a focal
point, while those not parallel converge upon a focal plane. This results in a focused image
which is enlarged for viewing through the eyepiece.
The primary front objective lens is a precision ground and polished component that is precisely
positioned at one end of the optical tube, and is pre-aligned for maximum performance at the
factory and should not need any adjustment. Therefore, never tamper with or remove the
lens at this end of the optical tube. Doing so will void your warranty and affect or
damage the performance of your telescope.
TECHNICALSPECIFICATIONS:
Objective Lens Diameter: 50mm (2”) Focal Length: 625mm
Maxumum Magnification: 468x Erecting Eyepiece: 1.5x
Eyepieces: SR4mm, H12.5mm Barlow: 3x
Accessories: Diagonal Mirror, 5x20 Finderscope, Astronomy CD
=156X magnification power

8
E. USING YOUR TELESCOPE:
1) It is recommended to use your telescope outside or at times through open windows. Your
view can be distorted by reflections in the glass of a closed window or at times by air
currents of differing temperatures passing through an open window.
2) Let your telescope adjust to the outside temperature. Your telescope will perform
much better if the temperature of the mirrors, eyepiece lenses, and the air inside the
tube are the same as the outside temperature. It may take up to 30 minutes to
equalize the temperatures when the difference in temperatures is extreme.
3) Find a location far from glaring light. If you live in an urban area, your viewing will probably
improve the farther you move away from the city’s lights. The sky glow of a town or city can
dramatically reduce the telescope’s performance and viewing capabilities.
4) Remove the dust cap from the end of the telescope. The open end of the optical tube
should be pointed toward the subject you wish to observe.
5) Begin your viewing session by using only the H12.5 eyepiece. It will give you the widest
angle and the brightest, sharpest views. Adjust the angle and position of the telescope as
outlined in the previous sections.
When possible, avoid sudden temperature changes, as the moisture in the air will condense
on the mirrors and eyepiece lenses. Should this occur after bringing your telescope indoors,
remove the dust caps and allow the moisture to evaporate naturally. Point the telescope
downward to minimize the collection of airborne dust. Once all of the moisture has
evaporated, replace the dust caps.
F. A NOTE ON TERRESTRIAL VIEWING:
You may notice that when you observe a terrestrial object on land or water it appears upside
down.
To correct this, a 1.5x Image Erecting Lens (not included) may be used with your telescope.
This accessory is inserted in the eyepiece holder of the telescope between the eyepiece and
the telescope. With the image erecting lens, objects will appear in their proper orientation for
terrestrial and land observation. Please note that the diagonal mirror and 1.5X Erecting
Lens cannot be used together.
NOTE: Use of the 3X Barlow lens with this accessory is not recommended.
The image erecting lens provides 1.5x magnification, which means that the SR4 eyepiece will
magnify objects from 156x to 234x when used together with the image erecting lens.

9
G. CARE AND CLEANING OF THE OPTICS:
The optical components of a telescope will get dirty over time. Dirt or dust on a lens should be
removed with the utmost care. A considerable amount of dirt or dust would have to
accumulate on the optical surface before your view would be compromised.
1) Keeping dust caps on during storage and transport will reduce dust collection.
2) Condensation may collect on the optical surfaces when the telescope is not in use.
Remove the dust caps and allow the moisture to evaporate naturally. Point the telescope
downward to minimize the accumulation of airborne dust.
3) Once all moisture has evaporated, replace the dust caps.
4) Filtered, compressed air may be used to remove surface dust from lenses and mirrors.
Remove the dust cap. Once removed, point the can away from the lens and gently expel
some air and any condensation or dust that has accumulated on the discharge tube. Spray
the lens or mirror with short bursts of air to carefully remove the dust particles. Clean
eyepieces and optical surfaces with special lens paper only. Eyepieces should be handled
with care. Avoid touching optical surfaces.
DO NOT HOLD THE TRIGGER OF THE COMPRESSED AIR CAN FOR EXTENDED
PERIODS BECAUSE PROPELLANT MAY ESCAPE AND DAMAGE THE OPTICAL
SURFACES.
If, after several attempts, you cannot remove the particles, take the telescope to an optical
professional for cleaning.
If you keep the dust caps on your telescope when it is not in use and avoid handling the lenses
or mirrors, only minimal optical maintenance of your telescope should be required. Extensive
cleaning is usually only necessary every few years.
H. WHAT TO LOOK FOR IN THE NIGHT SKY:
There is a whole universe of objects you could view at night, so where do you start? We
recommend starting with the most prominent objects first.
The Moon
The moon is the easiest target to find at night. When the moon is in full position, it bathes the
night with a silvery light that washes the sky of all but the brightest objects. The best time to
view the moon is not when it is full, but rather when it is less than half full. The dividing line
between dark and light on the moon, called the terminator, shows the best detail in the craters
and mountains.
The Planets
The planets, our solar system companions, range in size and substance from moon-size rocky
bodies to giant gas balls, which could hold Earth 1,000 times over. To find the planets, you will
need information about their times of visibility. The included Astronomical Software CD or an
astronomy magazine will give you the locations of the planets as they change position from
month to month. The Internet is also an excellent source of information, offering star charts,
maps, and more!

10
The popular and more familiar constellations often provide the easiest landmarks to help find
the planet’s locations and paths of orbit. Most people have looked up at the sky at night and
seen some of the planets without even realizing it. A planet looks like a bright star but does not
twinkle like a star does; it looks like a tiny ball. Venus, Mars, Jupiter, and Saturn are the
easiest planets to view. Mercury is dimmer, usually below the horizon, and more challenging
to find.
Each of the planets provides interesting views. Venus is covered with clouds so all that is
visible is an extremely bright light, the brightest next to the moon. However, Venus, like the
moon, goes through phases. As it travels around the sun, different areas of its surface are
illuminated, producing crescent shapes of varying sizes. Mars is the red planet. When it is
above the horizon, it is noticeably red and stands out like a beacon in the night sky. The
apparent brightness of Mars varies as the planet orbits around the sun and throughout its
period of visiblity, it will look brighter or dimmer depending on its distance from Earth.
Jupiter is the largest planet in our solar system and the second brightest next to Venus. Jupiter
has many moons, four of which are often visible through your telescope when viewing
conditions permit. As you watch them throughout the evening, you will see that they change
position relative to each other and to Jupiter. It is possible with careful planning to actually see
one of the moons disappear either in front of or behind Jupiter as it orbits around the planet.
Another great feature of Jupiter is its cloud belt. Jupiter is alive with weather activity and its
clouds have formed over time into belts visible through telescopes in the right atmospheric
conditions.
Saturn, the second largest planet, is not as bright as Jupiter and so its moons are not as
visible through small telescopes. The large rings that encircle Saturn are spectacular to
observe, however. The planet and its rings appear pale yellow. The major division in the rings,
the Cassini division, is possible to see if you keep the telescope firmly in position.
Uranus and Neptune are the last of the solar system’s gas giants. They do not provide as
spectacular a sight as Jupiter or Saturn, but are nonetheless rewarding to see.
Beyond our solar system there are many more objects to be found. Galaxies, nebulae,
and star clusters abound!
I. ABOUT THE INCLUDED ASTRONOMY SOFTWARE CD:
With direct, easy to understand explanations and impressive visuals of all kinds of night sky
phenomena, the ASTROWATCH™Astronomy Pack software is the best way to share the
wonders of the universe with family and friends. You’ll never be “lost in space” with this
superb planetarium-in-a-box that will get you up and viewing in minutes.
Locate objects easily using the SmartFind feature, and the Daily Events Reminder lists the
celestial events visible at night from your backyard. Hear the correct pronunciation of the
constellations and hundreds of celestial objects, see the night sky from anywhere on Earth,
and learn to identify planets, stars, and constellations for every season.

11
With handy tips in the Sky Guide, printable star charts and 50 interactive guided tours for an
up-close, in-depth look at planets and stars in our solar system, the wonders of the universe
will be at your fingertips. The CD also features object descriptions of 400 popular deep space
objects -from double stars to lenticular galaxies, a comprehensive User’s Guide and much
more!
J. FREQUENTLY ASKED QUESTIONS:
1) How far can I see?
If you stand outside and look up at the night sky on a clear evening, you can see hundreds of
stars without the aid of your telescope. The telescope is a light-gathering instrument that
magnifies the view—providing significantly more detail and unveiling more stars, nebulae, and
celestial objects. With the aid of a telescope, you will be able to enjoy exciting views of
Saturn’s rings, Jupiter’s major moons, the Orion Nebula, and much more.
2) Why can’t I see anything through my telescope?
If you see only gray or black when looking through your telescope, even after searching for an
object to view, it is very likely that you are using an eyepiece that is too powerful. To solve this
problem always start with the lowest power eyepiece at first, and only insert the higher-power
eyepiece after you have located an object.
3) When I use my high-power eyepiece, everything looks much darker. Why?
As magnification in a telescope increases, brightness diminishes. Conversely, brightness
increases when magnification is reduced. If an image appears too dark or unclear, use a
lower-powered eyepiece. Views of small, bright objects are superior to those of large, dark, or
blurry ones! Atmospheric conditions, air currents, as well as light and air pollution also affect
viewing quality.
4) As I look through my telescope, why do objects in the sky appear to move?
The constant rotation of the Earth makes things appear to move. Lower-power eyepieces will
reduce this effect of movement considerably and allow you to observe an object for a longer
duration before you have to readjust your telescope.
6) Whom do I contact for more information and product questions?
For any inquiries, parts, warranty or service information, please contact:
Phone: 800-441-1100
212-947-7100
e-mail: customerservic[email protected] or support@elitebrands.com
Visit our website at www.colemanoptics.com

12
Elite Brands Inc.
499 Seventh Avenue
North Tower, 17th Flr.
New York, NY 10018
Tel: 1-800-441-1100
©2014 Elite Brands Inc., New York, NY 10018
©2014
Table of contents
Other Coleman Telescope manuals
Popular Telescope manuals by other brands

Celestron
Celestron FirstScope 114 instruction manual

SKY-WATCHER
SKY-WATCHER ESPRIT 80 ED Super APO instruction manual

KONUS
KONUS DIGIMAX - 90 instructions

Bresser
Bresser SKYLUX 60/700 AZ quick start guide

Spectrum
Spectrum ST-AZ60 Series instruction manual

KONUS
KONUS MAKSUTOV CASSEGRAIN Series Motormax instructions