COLORADO DR 2336 Service manual

Motorcycle Operator’s Handbook
PUBLISHED BY THE COLORADO DEPARTMENT OF REVENUE
COLORADO

Colorado Motorcycle Operator’s Handbook
1
DR 2336 (08/27/12)
This Motorcycle Operator’s Handbook has been
prepared to inform you of the basic knowledge
and skills necessary for the safe operation of a
2- or 3-wheel motorcycle.
This handbook is a supplement to the Colorado Driver
Handbook. For details on Colorado driving laws, please
refer to the Colorado Driver Handbook.
Motorcycling is fun and exciting. There is nothing like
seeing the world from behind the handlebars of your
own motorcycle, but you need to know what you are
doing. Unfortunately, many riders teach themselves
or rely on tips from friends. Even after several years
of riding, many do not have the knowledge and skills
to avoid a crash.
If you are thinking about buying a 2- or 3-wheel motor-
F\FOHIRUWKHÀUVWWLPHRULI\RXKDYHEHHQULGLQJIRUD
while, think about motorcycle rider education now!
The Motorcycle Operator Safety Training (MOST)
program is designed to prepare you to ride a
motorcycle in the safest possible manner. In the
Basic Rider Course you will learn motorcycling skills
through on-cycle training as well as in the classroom.
The curriculum used has been developed by the
Motorcycle Safety Foundation and is based upon 25
years of research.
The MOST program also offers the Advanced Rider
Course for experienced riders. In this course you
will learn advanced riding techniques and defensive
strategies. Call the telephone number listed on the back
cover of this manual or visit www.comotorcyclesafety.com
to locate a MOST training site near you.
This handbook also covers safe operation of a 3-wheel
motorcycle. It is important to understand there are
differences between 2- and 3-wheel motorcycles.
Three-wheel motorcycle rider education is available
in Colorado. The curriculum used has been developed
by Evergreen Safety Council Sidecar/Trike Education
Program. In the Novice course, you will learn 3-
wheeling skills through classroom instruction as well
as instruction on a 3-wheel vehicle. With theAdvanced
course, you will learn advanced techniques and
defensive strategies.
Keep this handbook for reference even after you have
become a licensed rider and refresh your knowledge
occasionally to assure yourself and others that you are
DTXDOLÀHGULGHU
For the purpose of this handbook, “motorcycle” will
refer to both 2- and 3-wheel motorcycles, except where
VSHFLÀFQRWDWLRQVRIZKHHOVDUHQRWHG
Cover photo courtesy Tomas Vojtek
www.mindandsoulimages.com

2
Colorado Motorcycle Operator’s Handbook
TABLE OF CONTENTS
1.
MOTORCYCLE OPERATOR LICENSING......
3
2. PREPARING TO RIDE ........................................ 3
2.1 Wear the Right Gear .............................................. 3
2.2 Check the Motorcycle............................................ 4
2.3 Become Familiar with the Motorcycle ............... 5
3. CONTROL FOR SAFETY.................................... 5
3.1 Body Position and Posture.................................... 5
3.2 Turning ................................................................... 5
3.3 Braking .................................................................... 6
3.4 Shifting Gears ......................................................... 6
4. SEE AND BE SEEN .............................................. 6
4.1 Using Your Mirrors ............................................... 7
4.2 Head Checks ........................................................... 7
4.3 Horns ...................................................................... 7
5. LANE POSITION ................................................. 7
6. KEEPING YOUR DISTANCE ........................... 8
6.1 Distance in Front ................................................... 8
6.2 Distance Behind ..................................................... 8
6.3 Distance to the Side ............................................... 8
7. SIPDE ..................................................................... 9
8. DANGEROUS SURFACES................................. 9
8.1 Slippery Surfaces.................................................... 9
8.2 Uneven Surfaces and Obstacles ..........................10
9.
RIDING AT NIGHT ............................................11
10. COLLISION AVOIDANCE...............................11
10.1 Quick Stops ..........................................................11
10.2 Swerving or Turning Quickly.............................11
10.3 Riding in a Curve ................................................12
10.4 Cornering ..............................................................12
11. MECHANICAL PROBLEMS............................12
11.1 Tire Failure ............................................................12
11.2 Stuck Throttle .......................................................12
11.3 Wobble ...................................................................13
11.4 Chain Problems ....................................................13
11.5 Engine Seizure ......................................................13
12. SPECIAL SITUATIONS ....................................13
12.1 Flying Objects .......................................................13
12.2 Animals..................................................................13
12.3 Getting Off the Road............................................13
12.4 Hills........................................................................13
13. CARRYING PASSENGERS AND CARGO..........14
13.1 Passengers ............................................................. 14
13.2 Carrying Loads.....................................................14
14. GROUP RIDING ....................................................14
14.1 Keep the Group Small .........................................14
14.2 Keep the Group Together....................................15
14.3 Keep Your Distance..............................................15
15. YOUR MOTORCYCLE...................................... 15
15.1 The Right Equipment ..........................................15
15.2 Motorcycle Care ..................................................16
16.
MOTORCYCLE OPERATOR SKILLS TEST
...
16
16.1 Sidecar/Trike Education Program
(S/TEP) Skills Test................................................
16
General Motorcycle Test Course....... Inside Back
Cover

3
Colorado Motorcycle Operator’s Handbook
1. MOTORCYCLE OPERATOR LICENSING
It is illegal for you to operate a motorcycle on a public street
or highway in Colorado unless you have a valid license that
VSHFLÀFDOO\DXWKRUL]HVWKHRSHUDWLRQRIVXFKYHKLFOHV7KH
JHQHUDOPRWRUF\FOHHQGRUVHPHQW´0µTXDOLÀHV\RXWRULGH
a 2- or 3-wheel motorcycle. Colorado also issues a separate
endorsement “3” that authorizes the operation of 3-wheel
motorcycles, only. Low-power scooters (engine size of 50cc
or less or 4476 watts or less, if electric. 40 mph max.) do not
qualify as motorcycles but Colorado law requires that you
have at least a basic driver’s license to operate a low-power
scooter on public streets.
The State of Colorado no longer issues new “Motorcycle
Only” licenses. The motorcycle endorsement will be part
of a regular or CDL license, only. The “M” will no longer be
issued as a separate class of license.
To add a general or 3-wheel motorcycle endorsement to your
existing Colorado driver’s license you must be at least 16
years of age and pass all required examinations:
'ULYLQJUHFRUGUHYLHZ
3K\VLFDODSWLWXGHUHYLHZ
9LVLRQWHVW
3DVVDPRWRUF\FOHZULWWHQWHVWSDVVWKHEDVLFZULWWHQWHVW
requirements if you do not have a valid driver’s license).
3DVVWKHPRWRUF\FOHRSHUDWRU·VGULYLQJVNLOOWHVWDWD6WDWH
'ULYHU·V/LFHQVH2IÀFHRUZLWKDFHUWLÀHGWKLUGSDUW\
WHVWHU6WDWH'ULYHU·V/LFHQVH2IÀFHVDUHHTXLSSHGWRWHVW
2/3-wheel motorcycles. If you pass a skills test on a three-
wheel motorcycle, the endorsement “3” will appear on
your license.
3D\WKHUHTXLUHGIHHV
Ifyouare under18yearsofage,yourparent orguardianmust
VLJQDQ$IÀGDYLWRI/LDELOLW\DQG*XDUGLDQVKLSIRU\RXWREH
issued your instruction permit. You must hold your motor-
cycle instruction permit for 12 months and be 16 years of age
before you can add the endorsement to your driver’s license.
If you are between 15 and 16 years of age, you must have
completed a Motorcycle Operator Skills Training (MOST)
program, and show proof of completion, prior to receiving
your instruction permit.
A motorcycle instruction permit allows you to oper-
ate a motorcycle while under the immediate, proximate
supervision of an adult who is at least 21 years of age
and holds a valid COLORADO license endorsed for
motorcycles. If you are under the age of 18, per Colorado Re-
vised Statute 42-2-106, if you are not riding with your MOST
LQVWUXFWRURUWKHSDUHQWRUJXDUGLDQZKRVLJQHG\RXU$IÀGDYLW
of Liability, you must have your parent or guardian’s permis-
sion to ride with another adult who meets the requirements
of having a valid driver’s license endorsed for motorcycles.
The driving test is the most important part of the
examination because it provides you with the opportunity to
demonstrate your ability to drive safely. You must provide a
properly registered and insured motorcycle to be used in the
test. Make certain you are familiar with it and all the controls.
For drivers under 18 years of age, the DR 2324, Drive Time
Log Sheet, required for a regular license, is not necessary for
the addition of the M or 3 endorsement.
2. PREPARING TO RIDE
As a rider, what you do before you start a trip goes a long
way toward determining whether or not you’ll get where
you want to go safely. Before taking a trip, a safe rider makes
a point to:
:HDUWKHULJKWJHDU
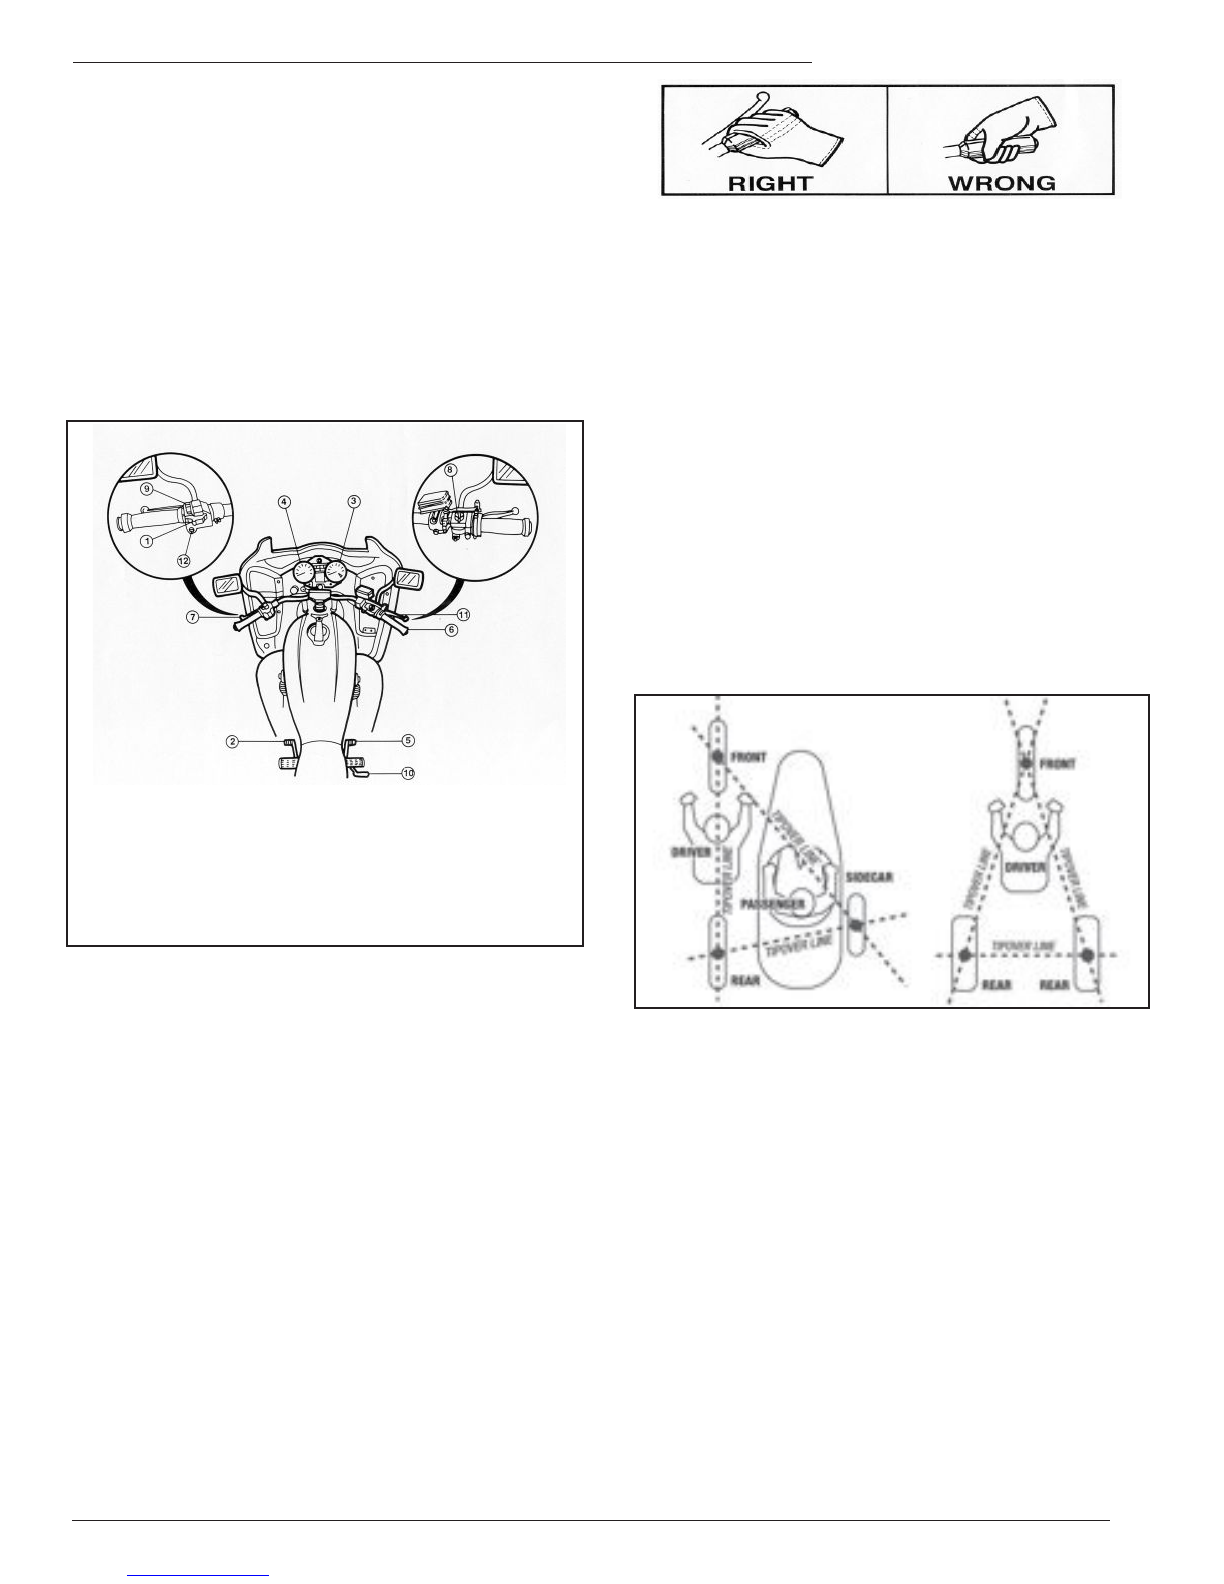
&KHFNWKHPRWRUF\FOHHTXLSPHQW
%HFRPHIDPLOLDUZLWKWKHPRWRUF\FOH
2.1 WEAR THE RIGHT GEAR: When you ride, your gear
is right if it protects you. In any crash, you have a far better
chance of avoiding serious injury if you wear:
$QDSSURYHGKHOPHW
)DFHRUH\HSURWHFWLRQ
3URWHFWLYHFORWKLQJ
HELMET: Crashes are not rare events-particularly among
EHJLQQLQJGULYHUV2QHRIHYHU\ÀYHPRWRUF\FOHFUDVKHV
reported results in head or neck injuries. Head injuries
are just as severe as neck injuries, and far more common.
Research shows that wearing a helmet reduces your risk of
neck or head injury. Colorado Revised Statute 42-2-1502 (4.5)
states that a person shall not operate or ride as a passenger on
a motorcycle or low-power scooter unless each person under
18 years of age is wearing an approved motorcycle helmet.
An approved helmet lets you see as far to the sides as neces-
sary. A study of more than 900 motorcycle crashes, where 40
SHUFHQWRIWKHULGHUVZRUHKHOPHWVIDLOHGWRÀQGHYHQRQH
case in which a helmet kept a rider from spotting danger.
0RVWFUDVKHVKDSSHQRQVKRUWWULSVOHVVWKDQÀYHPLOHVORQJ
just a few minutes after starting out.
Even low-speed crashes can be fatal. Most riders are going
slower than 30 M.P.H. when they get hurt. At these speeds,
helmets can cut both the number and the severity of head
injuries by half.
No matter what the speed, unhelmeted riders are three
times more likely to die of head injuries than are riders
who are wearing helmets at the time of the crash.

4
Colorado Motorcycle Operator’s Handbook
HELMET SELECTIONS: There are two primary types of
helmets, providing two different levels of coverage, three-
quarter and full face.
Whichever style you choose, you can receive the most
protection out of that type helmet by making sure it meets
U.S. Department of Transportation (DOT) standards. Hel-
mets with labels from the American National Standards
Institute (ANSI), or the Snell Memorial Foundation give
\RXDGGHGDVVXUDQFHRITXDOLW\,WVKRXOGÀWVQXJO\DOOWKH
way around and have no obvious defects such as cracks,
loose padding, or frayed straps.
Whatever helmet you decide on, make sure to keep it
securely fastened on your head when you ride. Otherwise,
LI\RXDUHLQYROYHGLQDFUDVKWKHKHOPHWLVOLNHO\WRÁ\RII
your head before it has a chance to protect you.
EYEAND FACE PROTECTION: A plastic face shield can
help protect your whole face in a crash. The helmet also
protects you from wind, dust, dirt, rain, insects, and stones
thrown up from cars ahead.
Goggles protect your eyes, but they won’t protect the rest
of your face the way a face shield does.Awindshield is no
substitute for a face shield or goggles. Most windshields
will not protect your eyes from wind.
Tinted eye protection should not be worn at night or any
other time when little light is available.
To be effective, eye or face shield protection must:
%HIUHHRIVFUDWFKHV
%HPDGHRIVKDWWHUSURRIPDWHULDO
*LYHDFOHDUYLHZWRHLWKHUVLGH
)DVWHQVHFXUHO\VRLWGRHVQRWEORZRII
$OORZDLUWRSDVVWKURXJKWRUHGXFHIRJJLQJ
$OORZHQRXJKURRPIRUH\HJODVVHVVXQJODVVHVLI
needed.
EYE PROTECTION FOR MOTORCYCLE
OPERATORS AND PASSENGERS IS REQUIRED BY
COLORADO LAW
CLOTHING:Adequate clothing can help protect you in a
crash.Incoldorwetweather, yourclothesshouldkeep you
warm and dry, as well as protect you from injury. You can-
not control a motorcycle well if you are numb from cold.
Riding for long periods in cold weather can cause severe
chill and fatigue. A winter jacket should resist wind and
ÀWVQXJO\DWWKHQHFNZULVWVDQGZDLVW*RRGTXDOLW\UDLQ
suits designed for riding resist tearing apart or ballooning
up at high speeds.
Jacket and pants should cover your arms and legs com-
SOHWHO\7KH\VKRXOGÀWVQXJO\\HWORRVHO\HQRXJKWRPRYH
freely. Leather offers the most protection, but heavy denim
does an adequate job in most cases. Sturdy synthetic mate-
rial provides a lot of protection as well. Wear a jacket even
inwarmweather. Manyjacketsare designedtoprotectyou
without getting you overheated, even on summer days.
Boots or shoes should be high enough to cover your ankles
and sturdy enough to give them support. Soles should be
made of hard, durable material. Heels should be short, so
they do not catch on rough surfaces. Tuck laces in so they
won’t catch on your motorcycle.
Gloves give you a better grip and help protect your hands
in a crash. Your gloves should be made of leather or heavy
cloth.
2.2 CHECK THE MOTORCYCLE: Make a complete
check of your motorcycle before you ride.
TIRES: Check the air pressure.
FLUIDS: Oil and fuel levels. Look under the motorcycle
for signs of oil and gas leaks.
HEADLIGHT AND TAILLIGHT: Test your dimmer
switch to make sure both high and low beams are working.
TURN SIGNALS: Turn on both right and left turn signals.
0DNHVXUHDOOIRXUOLJKWVÁDVK
BRAKE LIGHT: Try both controls and make sure each one
turns on the brake light.
CLUTCH AND THROTTLE: Make sure they work
smoothly. The throttle should snap back when you let go.
MIRRORS: Clean and adjust both mirrors before starting
out.
BRAKES: Try the front and rear brake one at a time. Make
VXUHHDFKRQHIHHOVÀUPDQGKROGVWKHPRWRUF\FOHZKHQ
the brake is fully applied.
HORN: Make sure the horn works.
2.3 BECOME FAMILIAR WITH THE MOTORCYCLE:
Make sure you are completely familiar with the motor-
cycle before you take it out on the street. Over half the
motorcycle accidents occur to riders with less than six
months experience on the cycle. If you are going to use
an unfamiliar motorcycle:

5
Colorado Motorcycle Operator’s Handbook
0DNHDOOWKHFKHFNV\RXZRXOGRQ\RXURZQF\FOH
)LQGRXWZKHUHHYHU\WKLQJLVSDUWLFXODUO\WKHWXUQ
signals, horn, headlight switch, fuel control valve and
HQJLQHFXWRIIVZLWFK0DNHVXUH\RXFDQÀQGDQGRSHU-
ate them without having to look for them.
.QRZWKHJHDUSDWWHUQ:RUNWKHWKURWWOHFOXWFKDQG
brakes a few times before you start riding.All controls
react a little differently.
5LGHPRUHFDXWLRXVO\XQWLO\RXEHFRPHPRUHIDPLOLDU
with the motorcycle.
3. CONTROL FOR SAFETY
This manual cannot teach you how to control direction,
speed or balance. That’s something you can learn only
through practice. Control begins with knowing your
abilities and riding within them and the rules of the road.
3.1 BODY POSITION AND POSTURE: Sit far enough
forward with your arms slightly bent when you hold
the handle grips so that you can use your arms to steer
the motorcycle rather than hold yourself up. Bending
your arms lets you turn the handlebars without having
to stretch.
+$1'6+ROGWKHKDQGOHJULSVÀUPO\.HHS\RXUJULS
over rough surfaces. Start with your right wrist down.
This will help you keep from accidentally using too much
throttle - especially if you need to reach for the brake
suddenly. Also, adjust the handlebars so your hands are
even with, or below your elbows. This allows you to use
the proper muscles for precision steering.
KNEES: Keep your knees against the gas tank. This will
help you keep your balance as the motorcycle turns. This
is not necessary on a 3-wheel motorcycle.
)((7.HHS\RXUIHHWÀUPO\RQWKHIRRWSHJVWRPDLQ-
tain balance. Don’t drag your feet. If your foot catches
on something, you could lose control of the motorcycle.
Keep your feet near the controls so you can get to the
controls quickly if needed.Also, don’t let your toes point
downward - they may get caught between the road and
foot peg.
BASIC 3-WHEEL VEHICLE CONTROL: Tipover lines.
It is possible when operating a 3-wheeler to have only
two wheels contacting the ground. This condition exists
whenever enough weight is transferred outside what are
NQRZQDV´WLSRYHUOLQHVµ7KHÀJXUHEHORZLOOXVWUDWHVWKH
tipover line on trikes and sidecar-equipped motorcycles.
3.2 TURNING: Riders often try to take curves or turns too
fast.Whentheycan’tholdtheturn,theyendupcrossinginto
DQRWKHUODQHRIWUDIÀFRUJRLQJRIIWKHURDGRUWKH\RYHUUHDFW
and brake too hard causing a skid and loss of control. Until
you learn to judge how fast you can safely take a curve, ap-
proach all turns with caution. Use the following four steps
for better control: SLOW, LOOK, LEAN, ROLL.
SLOW: Reduce speed before the turn by closing the
throttle and, if necessary, applying both brakes.
LOOK: Look through the turn to where you want to go.
Turn just your head, not your shoulders and keep your
eyes level with the horizon.
LEAN: To turn, the motorcycle must lean. To lean the
motorcycle, push on the handgrip in the direction of the
turn. Press left, lean left, go left. Press right, lean right,
go right.
1. Turn-Signal Switch
2. Gear-Change Lever
3. Tachometer
4. Speedometer
5. Rear Brake Pedal
6. Throttle
7. Clutch Lever
8. Engine Cut-Off Switch
9. Light Switch
10. Kick Starter
11. Front Brake Lever
12. Horn Button

6
Colorado Motorcycle Operator’s Handbook
In normal turns, the rider and motorcycle should lean
together. In slow tight turns, lean the motorcycle only and
keep your body straight. Higher speeds and/or tighter
turns require more lean.
Unique to a 3-wheel motorcycle is the need to
adjust your upper body position during cornering.
It is necessary to lean in the direction you intend to
turn to avoid raising the inside wheel and, possibly,
ÁLSSLQJRYHU/HDQLQJOLNHWKLVLVVRPHWLPHVUHIHUUHGWRDV
“hanging off.” This will be very important with a sidecar-
equipped motorcycle if the sidecar has no weight in it.
ROLL: Rollonthethrottlethroughthe turn. Maintain steady
speed or gradually accelerate. Avoid deceleration while in
the turn.
Three-wheel motorcycles CAN tip over. To turn a 3-wheel
motorcycle, you point the front wheel in the direction
you want to go, lean your body into the turn, roll on
the throttle to pull the 3-wheeler through the turn. On a
sidecar outfit, when accelerating, compensate for yaw
by steering towards the left. When decelerating,
compensate for yaw by steering to the right. Yaw is veer-
ing to the left or the right.
3.3 BRAKING: Your motorcycle has two brakes, one for
the front wheel and one for the rear wheel(s). Some side-
car rigs also have a brake on their wheel. Use both brakes
at the same time. The front brake on a 2-wheel motorcycle
and on a sidecar rig provides the most power, while the
rear brake provides the most power on a trike. The front
brake is safe to use if you use it properly.
Apply both brakes at the same time. Using both brakes
for even “normal” stops will permit you to develop the
properhabitor skill of using both brakesinanemergency.
To completelystopa motorcycle,rolloff the throttle, apply
the brakes and squeeze the clutch.
When leaning the motorcycle, some of the available trac-
tion is used for cornering. So if you use the brakes when
leaning, less traction is available for stopping.Askid can
occur when too much brake is applied. Some motorcycles
have integrated braking systems which link the front and
rear brakes together by applying the rear brake pedal.
Using the front brake incorrectly on a slippery surface
may be hazardous.
3.4 SHIFTING GEARS: Learning to use the gears
correctly when downshifting, turning, or starting on hills
is important for safe motorcycle operation.
Shift down through the gears as you slow down or stop.
5HPDLQLQÀUVWJHDUZKLOH\RXDUHVWRSSHGVR\RXFDQ
move out quickly if you need to.
Make certain you are going slowly enough when you
shift into a lower gear. If not, the motorcycle will lurch
and the rear wheel may skid. When riding downhill or
VKLIWLQJLQWRÀUVWJHDU\RXPD\QHHGWRXVHWKHEUDNHV
to slow down enough to downshift slowly.
It is best to change gears before entering a turn,
however, sometimes shifting in a turn is necessary. If so,
remember to do so smoothly.Asudden change in power
to the rear wheel can cause a skid.
4. SEE AND BE SEEN
A motorcycle’s outline is much smaller than a car ’s
out-
line. In crashes with motorcyclists, car drivers often
say
that they never saw the motorcycle. You can do many
things to make it easier for others to recognize you and
your cycle.
CLOTHING: Most crashes occur in daylight. Wear
bright clothing to increase your chances of being seen.
Remember, your body is half the visible surface area of
the rider/cycle unit.
Bright orange, yellow or green jackets, or vests are your
best bets for being seen. Your helmet can do more than
SURWHFW\RXLQDFUDVK%ULJKWO\FRORUHGKHOPHWVRUUHÁHF-
tive material can help others see you.
HEADLIGHT:Thebestway tohelp othersonthe roadsee
your motorcycle is to keep the headlight on at all times.
Use of the high beam in daylight increases the likelihood
that you will be seen by oncoming drivers.
SIGNALS: Use your signals anytime you plan to turn,
change lanes, or when using a freeway entrance/exit
ramp. Use them even when you think no one else is
around or even when what you plan to do is obvious.
Once you’ve made your lane change or turn, check your
signal to make sure it is off.
BRAKE LIGHT: Your motorcycle’s brake light is usually
not as noticeable as the brake lights on a car. Help others
QRWLFH\RXE\ÁDVKLQJWKHIRRWEUDNHOLJKWO\EHIRUH\RX
slow down, especially, when slowing more quickly than
others expect (e.g. turning off a highway, turning into
driveways, when others are following too closely).

7
Colorado Motorcycle Operator’s Handbook
4.1 USING YOUR MIRRORS: While it’s most important
to keep track of what’s happening ahead, you can’t afford
to ignore situations behind. Frequent mirror checks should
be part of your normal scanning routine. Make a special
point of using your mirrors in these situations:
:KHQ\RXDUHVWRSSHGDWDQLQWHUVHFWLRQZDWFKFDUV
coming up from behind. If the driver isn’t paying atten-
tion, he could be right on top of you before seeing you.
Before you change lanes make sure no one is about to
pass you.
%HIRUH\RXVORZGRZQFKHFNWRVHHLIWKHGULYHUEHKLQG
expects to slow or if he may be unsure about exactly
where you will slow. For example, he might see you
turn and think you plan to slow for a turn at a distant
intersection, rather than a nearby driveway.
Many motorcycles have rounded convex mirrors. These
JLYH\RXDZLGHUYLHZRIWKHURDGEHKLQGWKDQGRÁDW
mirrors. They also make cars seem farther away than they
really are. Practice with your mirrors until you become a
good judge of distance.
4.2 HEAD CHECKS: Motorcycles have blind spots like
cars. Before you change lanes, turn your head and look at
WUDIÀFWRWKHVLGHWRVSRWDFDUDERXWWRSDVV\RX
On a road with several lanes, make sure to check the far
lane as well as the one next to you. A driver in the far lane
may head for the same space you plan to take.
4.3 HORNS: Be ready to use your horn whenever you
need to get someone’s attention. It is a good idea to give a
quick beep before you pass anyone you think may move
into your lane. In an emergency, press the horn button
loud and long. Be ready to stop or swerve from the danger.
Here are some situations:
$GULYHULQWKHODQHQH[WWR\RXLVJHWWLQJWRRFORVHWR
the vehicle ahead and may want to pass.
$GULYHURSHQLQJDGRRURQDSDUNHGFDU
6RPHRQHLVULGLQJDELF\FOHRUZDONLQJLQWKHVWUHHW
5. LANE POSITION
You can make the size of the motorcycle work to your
advantage. A car driver has very little choice about
where he positions his car in a lane. However, each
marked lane gives a motorcyclist three possible paths
of travel as indicated in the diagram. Remember,
3-wheeled vehicles are larger than 2-wheel motorcycles
and require more space in a lane, similar to an automobile.
In general, there is no best position for riders to
be seen. Ride where it will be easiest for drivers to
see you. No portion of the lane need be avoided -
including the center. Unless the road is wet with rain, even
the average oily strip gives enough traction to ride safely.
Do not ride next to cars or trucks in other lanes if you do
not have to. A car in the next lane could switch into your
lane without warning. Do not ride in other vehicle’s blind
spots. Either pass the other vehicle or
drop back.
Let the driver ahead see you. When be-
hind a car, try to ride where the driver
can see you in his rearview mirror. Rid-
ing in the center portion of the lane
should put your image in the middle
of the rearview mirror, where it’s most
likely to be seen. Riding at the far side of a lane may let
you be seen in a side view mirror. But most drivers don’t
look at their side view mirrors nearly as often as they check
the rearview mirror.
As a motorcycle rider, you can put yourself in a position
to see things that a car driver cannot see.
CURVES: You can move from one portion of a lane to
another to get a better view through a curve. Moving to
the center portion of your lane before a curve, and staying
WKHUHXQWLO\RXFRPHRXWRIWKHFXUYHOHWV\RXVSRWWUDIÀF
coming toward you as soon as possible. This also allows
\RXWRDGMXVWIRUWUDIÀFWKDWLVFURZGLQJWKHFHQWHUOLQHRU
for debris that is blocking part of your lane. With a 3-wheel
motorcycle on a curve, follow a path of travel that makes
the most gradual turn.
ROADSIDE: Angle your motorcycle so that you can see
in both directions without straining and without having
any part of the cycle in the lane of travel. A clear view in
both directions is particularly important if you plan to turn
DFURVVDODQHRIWUDIÀF
6. KEEPING YOUR DISTANCE
The best protection you can have is distance, a cushion of
space - all around your cycle. If someone else makes a mis-
take, distance gives you time to react and room to maneuver.

8
Colorado Motorcycle Operator’s Handbook
6.1 DISTANCE IN FRONT: Usually motorcycles do not
need as much distance to stop as do cars. Use the two
second following rule as a guide. This leaves you enough
time to stop or swerve if the driver ahead of you stops
suddenly. It also gives you a better view of potholes and
other dangers in the road.
In some situations, you should open up a three-second
following distance. This larger cushion of space is needed
if your motorcycle will take longer than normal to stop
(i.e. if the pavement is slippery with rain) or if you cannot
see around the vehicle ahead.
Keep well behind the vehicle ahead even when you are
stopped. This will make it easier to get out of the way if
someone bears down on you from behind. It will also
give you a cushion of space if the vehicle ahead starts to
back up for some reason.
6.2 DISTANCE BEHIND: Ifsomeonetailgatesyou, don’t
try to lose them by speeding up. You’ll just end up being
tailgated at a higher speed.
A better way to handle tailgaters is to get them in front
of you. When someone is following too closely, change
lanes and let them pass. If you can’t do this, slow down
and open up extra space ahead of you. This will encour-
age them to pass. If they don’t pass, you will have given
yourself and the tailgaters more time and space to react
in case an emergency does develop.
6.3 DISTANCE TO THE SIDE: By shifting from one
portion of a lane to another you can keep a safe cushion
of space on both sides. An experienced rider changes
SRVLWLRQZLWKLQWKHODQHDVWUDIÀFFRQGLWLRQVFKDQJH+HUH
are some conditions that require changes in lane position.
PASSING:
5LGHLQWKHOHIWSRUWLRQRI
the lane at a safe follow-
ing distance to increase
your line of sight and
make you more visible.
Signal and check for on-
FRPLQJWUDIÀF8VH\RXU
mirrors and turn your
head to look for traffic
behind.
0RYHLQWRWKHOHIWODQHDQGDFFHOHUDWH6HOHFWDODQH
positionthatdoesn’tcrowdthecaryouare passingand
provides space to avoid hazards in your lane.
5LGHWKURXJKWKHEOLQGVSRWDVTXLFNO\DVSRVVLEOH
6LJQDODJDLQDQGFRPSOHWHPLUURUDQGKHDGFKHFNV
before returning to your original lane.
**Remember, passing must be completed within posted speed
limits, and only where permitted.
BEING PASSED: Whenyou are being passedfrombehind
or by an oncoming vehicle, stay in the center portion of
your lane. Do not move into the portion of the lane that
is furthest from the passing vehicle. It might invite the
other driver to cut back into your lane too early. If you
ride any closer to them, you could be hit by the other
vehicle, something thrown from the windows, extended
mirrors, or blasts of wind from large vehicles.
PARKED CARS: When passing parked cars, stay toward
the left of your lane. You can avoid problems caused by
doors opening, drivers getting out of cars, people step-
ping from between cars and cars pulling away from the
curb. A car making a sudden U-turn may cut you off
entirely, blocking the whole roadway and leaving you
with no place to go.
LANE SHARERS: Cars and motorcycles need a full lane
to operate safely. Don’t ride between rows of stopped
cars in the same lane. Discourage lane sharing by riding
in a center lane position whenever other drivers might
be tempted to squeeze by you. Drivers are most tempted
WRGRWKLVLQKHDY\WUDIÀFZKHQSDVVLQJZKHQ\RXDUH
preparing to turn and at freeway entrance and exit ramps.
MERGING CARS: Drivers on
an entrance ramp may not see
you on the highway. Give them
plenty of room. Change to an-
other lane, if it is open. If there is
no room for a lane change, adjust
speed accordingly to open up
space for the merging driver to
pull into.
7. SIPDE
Good experienced riders remain aware of what is going
on around them. They improve their riding strategy by
usingScan,Identify,Predict,DecideandExecute(SIPDE).
7KLVLVDÀYHVWHSSURFHVVXVHGWRPDNHMXGJPHQWVDQG
WDNHDFWLRQLQWUDIÀF

9
Colorado Motorcycle Operator’s Handbook
SCAN: Search aggressively ahead, to the sides and be-
hind to avoid potential hazards. Scanning provides you
with the information you need to make your decisions
in enough time to take action.
,'(17,)</RFDWHKD]DUGVDQGSRWHQWLDOFRQÁLFWV7KH
hazards you encounter can be divided into three groups
based on how critical their effect on you may be.
9HKLFOHVDQGRWKHUPRWRUF\FOHV0D\PRYHLQWR\RXU
path and increase collision impact.
3HGHVWULDQVDQGDQLPDOV$UHXQSUHGLFWDEOHDQGPDNH
short quick moves.
6WDWLRQDU\ REMHFWV 3RWKROHVJXDUGUDLOV EULGJHV
roadway signs, hedges, or rows of trees won’t
PRYHLQWR\RXUSDWKEXWPD\LQÁXHQFH\RXUULGLQJ
strategy.
PREDICT: Consider space and direction of a potential
hazard.Anticipating a vehicle moving away from you
is not as critical as a vehicle moving into your path.
Predict where a collision might occur. This is the “What
if...?” phase of SIPDE that depends on your knowledge
and experience.
DECIDE: Decide when, where, and how to act based on
types of hazards you encounter:
6LQJOH+D]DUG6WDWLRQDU\
0XOWLSOH+D]DUGV0RYLQJ
EXECUTE: In high potential risk situations, such as in-
tersections, cover the clutch and both brakes to reduce
the time you need to react. To create more space and
minimize risk from any hazard:
&RPPXQLFDWH\RXUSUHVHQFHZLWKOLJKWVDQGRUKRUQ
$GMXVW\RXUVSHHGE\DFFHOHUDWLQJVWRSSLQJRUVORZLQJ
$GMXVW\RXUSRVLWLRQDQGRUGLUHFWLRQ
Most motorcycle/automobile collisions occur at inter-
VHFWLRQV$QLQWHUVHFWLRQFDQEHDQ\ZKHUHRWKHUWUDIÀF
may cross your path of
travel. Your use of SIPDE
at intersections is critical.
Be especially alert at in-
tersection with limited
visibility. Be aware of vi-
suallybusysurroundings
that could camouflage
you and your motorcycle.
8. DANGEROUS SURFACES
Your chance of falling or being involved in a crash
increases whenever you ride across slippery surfaces,
uneven surfaces or obstacles, railroad tracks, grooves
and gratings.
8.1 SLIPPERY SURFACES: Motorcycles handle better
when ridden on surfaces with good traction. Surfaces
that provide poor traction include:
:HWSDYHPHQWSDUWLFXODUO\MXVWDIWHULWVWDUWVWRUDLQ
and before surface oil washes to the side of the road.
*UDYHOURDGVRUZKHUHVDQGDQGJUDYHOFROOHFW
0XGVQRZDQGLFH
/DQHPDUNLQJVVWHHOSODWHVDQGPDQKROHFRYHUVHV-
pecially when wet.
To ride safely on slippery surfaces:
5('8&(63(('6ORZGRZQEHIRUH\RXJHWWRDVOLS-
pery surface to lessen your chances of skidding. It is
particularly important to reduce speed before entering
wet curves.
$92,'68''(1029(6$Q\VXGGHQFKDQJHLQ
speed or direction can cause a skid. Be as smooth as
possible when you speed up, shift gears, turn or brake.
86(%27+%5$.(67KHIURQWEUDNHLVVWLOOPRUHHI-
fective than the rear brake, even on a slippery surface.
Apply it gradually and avoid locking up the front
wheel.
The center of a lane can become dangerous when wet.
When it starts to rain, ride in the tire tracks left by cars.
Often the left tire track will be the best position, depend-
LQJRQWUDIÀFDQGRWKHUURDGZD\FRQGLWLRQV:DWFKIRU
oil spots when you put your foot down to stop or park.
You may slip and fall.
Dirt and gravel collect along the sides of the road - espe-
ciallyoncurvesandramps leadingtoand fromhighways.
Stay away from the edge of the road, particularly when
making sharp turns at intersections and when getting on
or off freeways at high speed. Rain dries and snow melts
faster on some sections of a road than on others. Ride in
the least slippery part of the lane at all times.
VERY SLIPPERY SURFACES: Cautious riders steer clear
RIURDGVFRYHUHGZLWKLFHRUVQRZ<RXPD\ÀQG\RXUVHOI
on a road with scattered patches or ice or snow. Patches of
ice tend to develop in low or shaded areas and on bridges
andoverpasses.Ifyouencounterwetsurfacesorwetleaves
in the fall, these are just as slippery as an ice patch.
Avoid all of these surfaces if at all possible. If you can’t,
keep your bike straight up and proceed as slowly as pos-
sible, letting your feet skim along the surface so you can
catch yourself if the bike starts to fall. Be sure to keep off
the brakes and squeeze the clutch and coast while you
are on a very slippery surface.

10
Colorado Motorcycle Operator’s Handbook
An advantage of a 3-wheel motorcycle over a 2-wheel
motorcycle is the inherent stability.A3-wheel motorcycle
can slide sideways without falling down, similar to an
automobile. Slick pavement, unpaved roads or off-road
situations are quite manageable on a 3-wheel motorcycle.
8.2 UNEVEN SURFACES AND OBSTACLES: Watch
for uneven surfaces such as bumps, broken pavement,
potholes. If you have to ride over them, or obstacles such
as a piece of tire tread or tailpipe, slow down to reduce
the jolt, make sure the motorcycle is straight up and rise
slightly off the seat with your weight on the foot pegs so
you can absorb the shock with your knees and elbows.
Rising off the seat will cut your chances of being thrown
off the bike. However, controlling the throttle can be
somewhat tricky. Practice this technique in a safe area
(such as a deserted parking lot) before you try to do it
on-street.
If you ride over an object on the street, pull off the road
and check your tires and rims for damage before going
any further.
RAILROAD TRACKS: A motorcycle can cross tracks
DWDQDQJOHDVVKDUSDVGHJUHHVZLWKRXWGLIÀFXOW\
Changing your course to take tracks head-on can be
more dangerous than crossing at an angle (It may carry
\RXLQWRDQRWKHUODQHRIWUDIÀF
You do need to change direction, however, to cross some-
thing that runs in the same direction you are going. For
example, you may wish to cross trolley tracks, ruts in the
middle of the road, or pavement seams that run parallel
to your course.
To cross these safely, move far enough away to be able
to cross them at an angle as close to 90 degrees as pos-
sible. Then, make a quick, sharp turn across. Do not try
to edge across. The tracks or seam could catch your tires
and throw you off balance.
GROOVES AND GRATINGS: Riding over rain grooves
or metal bridge gratings will cause the motorcycle
to weave. It’s an uneasy feeling, but it’s generally not
dangerous. Relax, stay on course, maintain speed, and
ride straight across. Trying to cross these surfaces at an
angle may reduce the uneasy feeling, but it also forces
the rider to zigzag to stay in the lane. The zigzag is far
more dangerous than the weaving feeling.
9. RIDING AT NIGHT
At night it is harder for you to see and be seen. Other
drivers may have a hard time picking your headlight or
taillight out of the greater number of car lights around
you. To compensate you should:
REDUCE YOUR SPEED: Ride more slowly at night than
you would during the day, particularly on roads you
don’t know well.
INCREASE DISTANCE: Distances are harder to judge at
night than day. Your eyes rely upon shadows and light
contraststojudgebothhowfarawayan objectisandhow
fast you are approaching. These contrasts are missing
RUGLVWRUWHGXQGHUWKHDUWLÀFLDOOLJKWDWQLJKW2SHQXS
a three-second following distance. Allow more distance
in which to pass.
USE THE CARAHEAD: The headlights of the car ahead
can give you a better view of the road ahead than even
your high beam can. Taillights bouncing up and down
can alert you to bumps or rough pavement.
USE YOUR HIGH BEAM: Get all the light you can.
Use your high beam whenever you are not following
or meeting a car.
/$1(326,7,21%HÁH[LEOHDERXWODQHSRVLWLRQFKDQJ-
ing to whatever portion of the lane is best able to help
you see, be seen, and keep an adequate space cushion.
10. COLLISION AVOIDANCE
No matter how careful you are, there will be times when
\RXÀQG\RXUVHOILQDWLJKWVSRW<RXUFKDQFHVRIJHWWLQJ
out safely depend upon your ability to react quickly and
properly.
Knowing when and how to stop or swerve are two skills
criticaltoavoidingacollision.Itisnotalwaysdesirable or
possible to stop quickly to avoid an obstacle. Riders must
also be able to swerve around an obstacle. Determining
the skill necessary for the situation is important as well.
Studies show that most collision-involved riders un-

11
Colorado Motorcycle Operator’s Handbook
der brake the front tire and over brake the rear tire and
swerve at the same time.
10.1 QUICK STOPS: To stop quickly, apply both brakes
at the same time. Don’t be shy about using the front
brake, but don’t ‘grab’ at it, either. Squeeze the brake le-
YHUVWHDGLO\DQGÀUPO\DSSO\LQJWKHIURQWEUDNHDVIXOO\
as you can without locking the front wheel. At the same
time, apply the rear brake hard, without locking it.
If you are on a straight-away, even with a locked
rear wheel, keep it locked until you have completely
stopped. Even with a locked rear wheel, you can
control a 3-wheel motorcycle on a straightaway if it is
going in a straight line. Hard braking in a straight line is
less likely to result in a tipover. If you must stop quickly
while turning or riding in a curve, conditions may not
always permit you to straighten up the motorcycle and
then stop. Apply the brakes and start slowing the mo-
torcycle. As you slow down, you can reduce your lean
angleandapply more brakepressure until the motorcycle
is straight and maximum brake pressure is possible. If
you straighten the handlebar in the last few feet of stop-
ping, you know the motorcycle will be straight up and
in balance.
10.2 SWERVING OR TURNING QUICKLY: Some-
times, you may not have enough room to stop, even if
you use both brakes properly. An object might appear
suddenly in your path or the car ahead might suddenly
stop. The only way to avoid a collision would be to turn
quickly, swerve, or ride over the obstacle.
A swerve is any sudden change in direction. It can be
two quick turns, or a rapid shift to the side. Apply a
small amount of hand pressure to the handgrip in your
intended direction of escape. This will cause the motor-
cycle to lean quickly. The sharper the turn(s), the more
the bike must lean.
Keep your knees against the tank and your feet solidly
on the pegs. Let the bike move underneath you. Make
your escape route the target of your vision. Press on the
opposite handgrip, once you clear the obstacle to return
to your original direction of travel. To swerve to the left,
press left, then right to recover. To swerve to the right,
press right, then left.
Try to stay in your own lane. Change lanes only if you
have enough time to make sure there are no vehicles in
the other lane. You should be able to squeeze by most
obstacles without leaving your lane.
If braking is required, separate it from swerving. Brake
before or after, never while swerving. On a 3-wheel mo-
torcycle, you should be leaning your body into corners
normally; this may help to avoid a rollover when swerv-
ing with an empty sidecar.
10.3 RIDING A CURVE: A primary cause of single-
vehicle collisions is motorcyclists running wide in a curve
RUWXUQDQGFROOLGLQJZLWKWKHURDGZD\RUDÀ[HGREMHFW
Every curve is different. Be alert to whether a curve re-
mains constant, gradually widens, getstighter,orinvolves
multiple turns.
Ride within your skill level and posted speed limits.
Your best path may not always follow the curve of the
URDG&KDQJHODQHSRVLWLRQGHSHQGLQJRQWUDIÀFDQGURDG
FRQGLWLRQV,IQRWUDIÀFLVSUHVHQWDQG\RXUULGLQJDELOLWLHV
are up to it, you may choose to start at the outside of a
curvetoincreaseyourlineofsightand the effective radius
of the turn. As you turn, move toward the inside of the
curve, and as you pass the center, move to the outside to
exit. For 3-wheel motorcycles, following the center of the
lane may produce the greatest tipover forces.
Another alternative is to move to the center of your lane
before entering a curve, and stay there until you exit. This
SHUPLWV\RXWRVSRWDSSURDFKLQJWUDIÀFDVVRRQDVSRV-
VLEOH<RXFDQDOVRDGMXVWIRUWUDIÀFFURZGLQJWKHFHQWHU
line, or debris blocking part of your lane.
10.4 CORNERING: Cornering with a 3-wheel
motorcycle has unique characteristics that must be
considered. You must keep in mind that a 3-wheel
motorcycle can tip over if it is turned too sharply
when going too fast for the corner. It is essential that
the operator slow before entering a corner to avoid
this. When operating a sidecar-equipped motorcycle,

12
Colorado Motorcycle Operator’s Handbook
additional consideration needs to be given to the direction
of the turn and the amount of weight in the sidecar. Since
thesidecargenerallysits ontherightside ofthemotorcycle,
OHIWWXUQVDUHOHVVGLIÀFXOWEHFDXVHWKHVLGHFDUZKHHOEHDUV
the additional cornering forces or weight. A right-hand
turn, however, may cause the sidecar wheel to lift off the
JURXQGRU´Á\µLIWKHFRUQHULVWDNHQDWWRRJUHDWDVSHHG
or taken when braking. This is best avoided by slowing
before entering the turn, but can be controlled if the op-
erator understands how to steer a 2-wheel motorcycle.
The change from 3-wheel steering to 2-wheel steering
is called steering reversion. This happens if the sidecar
is high off the ground and the entire rig is at the balance
point. Turning the handlebars in the direction you want
to go turns 3-wheeled motorcycles, but 2-wheel turning is
accomplished by counter steering. To bring a sidecar that is
´Á\LQJµRUKDVLWVZKHHOLQWKHDLUWRWKHJURXQGWKHRS-
erator needs to counter-steer to the right or steer to the left.
Other unique characteristics of 3-wheel motorcycles in
corners are drifting and sliding. Both of these characteris-
tics are related to tires not holding traction or slipping on
the pavement. Sliding is the front tire slipping, resulting
in a loss of steering. Drifting is the slipping of the rear
wheel of the motorcycle and/or sidecar wheel. Drifting is
unique to sidecar-equipped motorcycles. To initiate drift-
ing, the operator shifts weight, rolls on the throttle while
applying some front brake while turning (off camber turn).
Done carefully, this technique may help to sharpen turns,
particularly in left turns. Caution must be used while at-
tempting to drift in a right turn since too much throttle
DQGRUEUDNLQJPD\FDXVHWKHVLGHFDUWRÁ\
11. MECHANICAL PROBLEMS
<RXFDQÀQG\RXUVHOILQDQHPHUJHQF\WKHPRPHQWVRPH-
thing goes wrong with your motorcycle. In dealing with
any mechanical problem, take into account the road and
WUDIÀFFRQGLWLRQV\RXIDFH+HUHDUHVRPHJXLGHOLQHVWKDW
can help you handle some mechanical problems safely.
11.1 TIRE FAILURE: Ifthe cyclestarts handlingdifferently,
pull off to check the tires. You will seldom hear a tire go
ÁDW<RXPXVWEHDEOHWRWHOOZKHQDWLUHKDVORVWDLUVXG-
denly from the way the cycle reacts.
,IWKHIURQWWLUHJRHVÁDWWKHVWHHULQJZLOOIHHO´KHDY\µ,I
WKHUHDUWLUHJRHVÁDWWKHEDFNRIWKHPRWRUF\FOHZLOOWHQG
to jerk from side to side.
,IHLWKHUWLUHJRHVÁDWZKLOHULGLQJ
+ROGWKHKDQGOHJULSVÀUPO\DQGNHHSDVWUDLJKWFRXUVH
,I\RXNQRZZKLFKWLUHLVÁDWJUDGXDOO\DSSO\WKH
other brake.
:KHQWKHPRWRUF\FOHVORZVHGJHWRWKHVLGHRIWKHURDG
and stop.
11.2 STUCK THROTTLE: Twist the throttle back and
forth, this may free it. If the throttle stays stuck, im-
mediately operate the engine cut-off switch and pull in
the clutch. This will remove power from the rear wheel
though engine noise may not immediately decline. Once
you have the motorcycle “under control,” pull to the side
of the road and stop.
After you have stopped, check the throttle cable carefully
WRÀQGWKHVRXUFHRIWKHWURXEOH0DNHFHUWDLQWKHWKURWWOH
works freely before you start to ride again.
11.3 WOBBLE: A wobble occurs when the front wheel
and handlebars suddenly start to shake from side-to-side
at any speed.
Most wobbles can be traced to improper loading, the use
of unsuitable accessories, or the use of incorrect tires or tire
pressure. If you are carrying a heavy load, lighten it. If you
can’t lighten the load, shift it. Center the weight lower to
the ground and farther forward on the cycle. Make sure
tire pressure, spring pre-load, air shocks, and dampersare
at the levels recommended by the manufacturer for carry-
ing that much weight. If you have a windshield or fairing,
make sure it is mounted properly.
In addition to the above items, other things that may
contribute to wobble are poorly adjusted steering, worn
steering parts, a front wheel that is bent, misaligned, or out
of balance, loose wheel bearings, loose spokes and swing
arm bearings.
DO NOT try to “accelerate” out of the wobble. That will
only make the cycle more unstable. Instead:
*ULSWKHKDQGOHEDUVÀUPO\EXWGRQ·WWU\WRÀJKWWKH
wobble.
&ORVHWKHWKURWWOHJUDGXDOO\DQGOHWWKHPRWRUF\FOHVORZ
down. Do not apply the brakes; braking could make the
wobble worse.
0RYH\RXUZHLJKWDVIDU IRUZDUGDQGGRZQDV
possible.
3XOORIIWKHURDGDV VRRQ DV \RXFDQWRIL[WKH
problem.
11.4 CHAIN PROBLEMS: If your chain slips or breaks
while you’re riding, it could lock the rear wheel and cause
your cycle to skid.
SLIPPAGE: If the chain slips when you try to speed up
quickly while riding uphill, pull off the road, and check
the chain sprockets. Tightening the chain may help. If
the problem is a worn or stretched chain or worn or bent
sprockets, replace the chain, the sprockets, or both before
riding again.
BREAKAGE: You’ll notice an instant loss of power to the
wheel. Close the throttle and brake to a stop.

13
Colorado Motorcycle Operator’s Handbook
11.5 ENGINE SEIZURE: Engine seizure means that the
engine locks or freezes. Engines seize when they are low
on oil. Without oil, the engine’s moving parts can’t move
smoothly against each other, and the engine overheats.
7KHÀUVWVLJQPD\EHDORVVRIHQJLQHSRZHURUDFKDQJH
in the engine’s sound.
Squeeze the clutch lever to disengage the engine from
the rear wheel. Pull off the road and stop. Let the engine
cool. You may be able to add oil and restart the engine.
12. SPECIAL SITUATIONS
12.1 FLYING OBJECTS: From time to time riders are
struck by insects, cigarettes thrown from cars, or rocks
kicked up by the tires of the vehicle ahead. If you aren’t
wearing face protection, you could be hit in the eye, face,
or mouth. If you are wearing face protection, it might get
VPHDUHGRUFUDFNHGPDNLQJLWGLIÀFXOWIRU\RXWRVHH
Whatever happens, keep your eyes on the road and your
hands on the handlebars.As soon as it is safe, pull off the
road and repair the damage.
12.2 ANIMALS: Naturally, you should do everything
you can to avoid hitting an animal. However, if you are
LQWUDIÀFGRQ·WVZHUYHRXWRI\RXUODQHWRDYRLGDVPDOO
animal. Hitting something small is less dangerous to you
than hitting something big, like a car.
Motorcycles seem to attract dogs. If you are chased, don’t
kick at the animal, shift down and approach the animal
slowly. As you reach it, speed up quickly. You will leave
the animal behind.
12.3 GETTING OFF THE ROAD Ifyouneedtoleave the
road to check the motorcycle (or just to rest for awhile),
be sure you:
&KHFNWKHURDGVLGH0DNHVXUHWKHVXUIDFHRIWKHURDG-
VLGHLVÀUPHQRXJKWRULGHRQ,ILWLVVRIWJUDVVORRVH
sand, or if you’re just not sure about it, slow
way down before you turn onto it.
6LJQDORWKHUV'ULYHUVEHKLQGPLJKWQRWH[SHFW
you to slow down. As soon as you can, give a clear
signal that you will be slowing down and changing
direction. Make sure to check your mirror and make
a head check before you take any action.
3XOOZHOORIIWKHURDG*HWDVIDURIIWKHURDGDV\RX
FDQ,WFDQEHYHU\GLIÀFXOWWRVSRWDPRWRUF\FOHE\WKH
side of the road.You don’t want someone else pulling
off at the same place you are.
12.4 HILLS: When riding uphill on a 3-wheel motor-
cycle, some weight will shift to the rear, causing the
front to be lighter. This weight shift means there is
less traction on the front tire for steering and braking.
Riding downhill means that gravity increases the
amount of braking force required to stop or slow a
3-wheel motorcycle. It is important to slow even earlier
for cornering or stopping.
13. CARRYING PASSENGERS AND CARGO
Only experienced riders should carry passengers or large
loads. The extra weight changes the way the motorcycle
handles, balances, turns, speeds up and slows down.
Before taking a passenger or heavy load on the street,
practice in a safe, off-road area.
13.1 PASSENGERS: To carry passengers safely you must
make sure your motorcycle is equipped and adjusted to
carry passengers.
$SURSHUVHDW7KHVHDWVKRXOGEHODUJHHQRXJKWRKROG
both you and your passenger without crowding. You
should not sit any further forward than
you usually do.
)RRWSHJV7KHSDVVHQJHUPXVWKDYHKLVRZQVHWRI
IRRWSHJV:LWKRXWDÀUPIRRWLQJ\RXUSDVVHQJHUFDQ
fall off and pull you off too.
3URWHFWLYHJHDU3DVVHQJHUVVKRXOGKDYHWKHVDPHW\SH
of protective gear and clothing recommended for op-
erators.
You should adjust the shocks to handle the extra weight.
While your passenger sits on the seat with you, adjust the
mirror and headlight to the change in the motorcycle’s
angle. It is a good idea to add a few pounds of pressure
to the tires if you carry a passenger. Then adjust the sus-
pension to handle the additional weight. (Check your
owner’s manual.)
INSTRUCT PASSENGERS: Even if your passenger is a
motorcycle rider, provide complete instructions before
you start. Instruct your passenger to:
*HWRQWKHPRWRUF\FOHDIWHU\RXKDYHVWDUWHGWKHHQJLQH
6LWDVIDUIRUZDUGDVSRVVLEOHZLWKRXWFURZGLQJ\RX
+ROGÀUPO\WR\RXUZDLVWKLSVRUEHOW
.HHSERWKIHHWRQWKHSHJVHYHQZKHQWKHPRWRUF\FOH
is stopped.
.HHSOHJVDZD\IURPWKHPXIÁHU
6WD\GLUHFWO\EHKLQG\RXOHDQLQJDV\RXOHDQ
$YRLGXQQHFHVVDU\WDONRUPRWLRQ
)RUZKHHOPRWRUF\FOHVNHHSKDQGVLQVLGHWKHVLGHFDU
RIDING WITH PASSENGERS: Tell your passenger
to tighten his/her hold when you approach surface
problems, or are about to start from a stop. Your mo-
torcycle will respond more slowly with a passenger on
board. The heavier your passenger, the longer it will take

14
Colorado Motorcycle Operator’s Handbook
to slow down, speed up or make a turn, especially on a
light cycle.
5LGHDOLWWOHVORZHU HVSHFLDOO\ ZKHQ WDNLQJFXUYHV
corners, or bumps.
6WDUWVORZLQJHDUOLHUDV\RXDSSURDFKDVWRS
2SHQXSDODUJHUFXVKLRQRIVSDFHDKHDGDQGWRWKH
sides.
:DLWIRUODUJHUJDSVZKHQ\RXZDQWWRFURVVHQWHURU
PHUJHZLWKWUDIÀF
:DUQ\RXUSDVVHQJHURIVSHFLDOFRQGLWLRQVDKHDGVXFK
as when you will pull out, stop quickly, turn sharply
or ride over a bump. Turn your head slightly to make
yourself understood, but keep your eyes on the road
ahead.
13.2 CARRYING LOADS: Most motorcycles are not de-
signed to carry much cargo, however, small loads can be
carried safely if they are positioned and fastened properly.
KEEP THE LOAD LOW: Fasten loads to the seat, or put
them in saddle bags. Placing a load high against a bar
or frame raises the cycle’s center of gravity and disturbs
its balance.
KEEP THE LOAD FORWARD: Place the load over or
in front of the rear axle. Tank bags keep loads forward,
but use caution when loading hard or sharp objects.
Mounting loads behind the rear axle can affect how the
motorcycle turns and brakes. It can also cause a wobble.
DISTRIBUTE THE LOAD EVENLY: Load saddle bags
with about the same weight. An uneven load can cause
the motorcycle to drift to one side.
SECURE THE LOAD: Fasten the load securely with
elastic cords (bungee cords). A loose load can catch in
the wheel or chain and the rear wheel may lock up and
skid. Do not use rope as it tends to stretch and knots come
loose, permitting the load to shift or fall off.
CHECK THE LOAD: Stop and check the load often to
make sure it has not worked loose or moved.
14. GROUP RIDING
If you ride with others, you must do it in a way that pro-
PRWHVVDIHW\DQGGRHVQ·WLQWHUIHUHZLWKWKHÁRZRIWUDIÀF
14.1 KEEP THE GROUP SMALL: A large group
WHQGVWRLQWHUIHUHZLWKWUDIÀF,WPDNHVLWQHFHVVDU\
for cars to pass a long line of motorcycles at a time.
Also, large groups tend to get separated easily by traf-
ÀFRUUHGOLJKWV7KRVHZKRDUHOHIWEHKLQGRIWHQULGH
unsafely trying to catch up. If your group is larger than
IRXURUÀYHULGHUVGLYLGHLWLQWRWZRRUPRUHVPDOOHU
groups.
14.2 KEEP THE GROUP TOGETHER:
PLAN AHEAD: The leader should look ahead for
changes. Give signals early so “the word” gets back in
plenty of time. Start lane changes early enough to allow
everyone to complete the change.
PUT BEGINNERS UP
FRONT: Place inexperi-
enced riders behind the
leader, where they can be
watched by more experi-
enced riders.
FOLLOW THOSE BE-
HIND: Let the tailrider set
the pace. Use your mirrors
to keep an eye on the per-
son behind. If a rider falls
behind slow down a little,
so the group will stay with
the tailrider.
KNOW THE ROUTE: Make sure everybody knows the
route. Then, if someone is separated for a moment, he or
she won’t have to hurry to avoid getting lost or taking
a wrong turn.
14.3 KEEP YOUR DISTANCE : Maintain close ranks at
a safe distance. A close group takes up less space on the
highway, is easier to see, and is less likely to be separated.
However, it must be done properly.
DON’T PAIR UP: Never operate directly alongside an-
other motorcycle rider. If one of you has to avoid a car
or something on the road, there would be no place to go.
To talk, wait until you are both stopped.
STAGGERED FORMATION: Riding in a staggered
formation is the best way to keep ranks close and yet
maintain an adequate space cushion. The leader rides
to the left side of the lane, while the second rider stays a
little behind and rides to the right side of the lane.Athird
rider would take the left position, a normal two-second
GLVWDQFHEHKLQGWKHÀUVWULGHU7KHIRXUWKULGHUZRXOGEH
a normal two-second distance behind the second rider.
This formation keeps the group close and keeps each
rider a safe distance from the others ahead, behind, and
to the sides.
A staggered formation can be used safely on an open
highway. However, it is best to move into a single
ÀOHIRUPDWLRQZKHQWDNLQJFXUYHVPDNLQJWXUQVRU
entering or leaving a highway.
PASSING INFORMATION: Riders in a staggered forma-
tion should pass one at a time. First, the lead rider should
pull out and pass when it is safe.After passing, the leader
should return to the left position and continue riding at

15
Colorado Motorcycle Operator’s Handbook
a passing speed until he has opened up room for the next
ULGHU:KHQWKHÀUVWULGHUKDVSDVVHGVDIHO\WKHVHFRQG
rider should move up the left position and watch for a
safe chance to pass.After passing, this rider should return
to the right position and open up room for the next rider.
NOTE: Some people suggest that the leader should move
to the right side after passing a vehicle. This is not a good
idea. It encourages the second rider to pass and cut back
in before a large enough cushion of space hasbeen opened
up in front of the passed vehicle. It’s simpler and safer if
each rider waits until there is enough room ahead of the
passed vehicle to allow the rider to move into the same
position held before the pass.
15. YOUR MOTORCYCLE
There are plenty of things on the highway that can cause
you trouble. Your motorcycle should not be one of them.
To make sure your motorcycle won’t let you down,
start with the right equipment, keep it in a safe riding
FRQGLWLRQDQGDYRLGDGGRQVRUPRGLÀFDWLRQVWKDWPDNH
your cycle harder to handle.
15.1 THE RIGHT EQUIPMENT: First, make sure your
PRWRUF\FOHLVULJKWIRU\RX,WVKRXOG´ÀWµ\RX<RXUIHHW
should be able to reach the ground while you are seated
on the cycle.
Accidents are fairly common among beginning riders,
HVSHFLDOO\LQWKHLUÀUVWVL[PRQWKVRIULGLQJ'RQ·WWU\D
“big bike” until you have a lot of riding experience. No
matter how experienced you may be, ride extra carefully
on any bike that’s new or unfamiliar to you. More than
half of all accidents occur on cycles their riders have used
for less than six months.
15.2 MOTORCYCLE CARE: A motorcycle needs
more frequent attention than a car. A minor mechanical
failure in a car seldom leads to anything more than an
inconvenience for the driver. When something goes wrong
with a motorcycle, it may cause an accident.
The only way to head off problems before they cause
trouble is to inspect your motorcycle carefully and often.
,I\RXÀQGVRPHWKLQJZURQJÀ[LWULJKWDZD\5HIHUWR
your owner’s manual for proper care and maintenance.
16. MOTORCYCLE OPERATOR SKILLS TEST
The Motorcycle Safety Foundation (MSF) is a state
approved Skill Test for both two and three wheel vehicles.
The test consists of exercises that evaluate your ability to
performbasicvehiclecontrol,ridingjudgment,andhazard
response skills.
Prior to being tested, you must show valid proof of
insurance and valid registration for the motorcycle you
will be using on the test.Asafety check of your motorcycle
will include; headlights, taillights, brake lights, turn
signals, mirrors, and tire tread depth. The engine size of
the motorcycle must be rated at over 50 C.C.
The test consists of six riding exercises that measure your
vehicle control and hazard response skills. You will be
scored on time and distance standards as well as path
violationsandfootdownviolations. Thetestmaybeended
for point accumulation, committing an unsafe act, stalling
the vehicle four times, or failure to understand or follow
instructions. You may stop the test at any time, but you
must complete the entire test to pass it.
You will be tested on the following exercises:
2-Wheel Motorcycle
&RQH:HDYH7KHUHDUHÀYHFRQHVVSDFHGIHHWDSDUW
in a straight line. Do not skip or touch any cones or put
your foot down.
1RUPDO6WRS0DNHDVPRRWKQRQVNLGGLQJVWRS
7XUQIURPD6WRS0DNHDULJKWWXUQEHWZHHQWKHERXQG-
ary lines. Do not touch either line or put a foot down.
/HIW87XUQ'RQRWSXW\RXUIRRWGRZQRUWRXFKWKH
solid line or dashed line (depending on the size of your
motorcycle).
4XLFN6WRS)URPDSSUR[LPDWHO\WR03+VWRS
the motorcycle safely but as quickly as you can. You
are not marked down if you skid, but will loose points
if you lose control.
2EVWDFOH6ZHUYH)URPDSSUR[LPDWHO\WR03+
swerve the motorcycle safely to the right or left of the
obstacle line, staying inside the indicated boundaries.
Do not touch the obstacle line or the boundaries.
3-Wheel Motorcycle
/HIW7XUQ0DUNDVKDUSOHIWWXUQEHWZHHQWKHRXWVLGH
boundary line and the cone marker. Do not touch the
outside line or the cone.
1RUPDO6WRS0DNHDVPRRWKQRQVNLGGLQJVWRSZLWK
your front tire inside the box (left front tire on vehicles
with two front tires).

16
Colorado Motorcycle Operator’s Handbook
&RQH:HDYH7KHUHDUHWKUHHFRQHVVSDFHGDWIHHW
apart in a straight line. Do not skip or touch any cones.
7XUQ)URP$6WRS0DNHDULJKWKDQGWXUQEHWZHHQWKH
outside boundary line and the cone. Do not touch the
outside boundary lines or the cone.
4XLFN6WRS)URPDSSUR[LPDWHO\WR03+VWRS
the motorcycle safely but as quickly as you can. You
are not marked down if you skid, but will loose points
if you lose control.
2EVWDFOH6ZHUYH)URPDSSUR[LPDWHO\WR03+
swerve the motorcycle safely to the right or left of the
obstacle line, staying inside the indicated boundaries.
Do not touch the obstacle line or the boundaries.
16.1 SIDECAR/TRIKE EDUCATION PROGRAM
(S/TEP) SKILLS TEST
This skills test is for 3-wheel motorcycles. Extra wide,
extra long custom 3-wheelers are not suitable for this test.
The S/TEP skills test is four parts and is administered
only by state-authorized, third-party testers. You will be
tested on the following:
Parts 1 and 2 – Offset Weave and Cornering
Objective: To demonstrate your ability to properly judge
the width of the vehicle, while steering through an offset
weave, and utilize proper cornering techniques.
Part 3 – Braking
Objective: To demonstrate your ability to perform a con-
trolled stop of the rig in the shortest distance.
Part 4 – Swerving
Objective: To demonstrate your ability to swerve the
RXWÀW
Do not touch the obstacle line or the boundaries.
Note: You must not stall the engine on any exercise.
Remember if at any time you feel an exercise is too
GLIÀFXOW\RXPD\VWRSWKHWHVWLQJ<RXDVWKHULGHU
are aware of your abilities and your experience on the
motorcycle. The examiner is not. However, for safety’s
sake, the examiner may also stop the testing if it becomes
apparent that you need more practice on the motorcycle.
Three-wheel motorcycle information was developed
throughthejointcooperationofEvergreen SafetyCouncil
and the Sidecar/Trike Education Program (S/TEP).

17
Colorado Motorcycle Operator’s Handbook
2-Wheel Motorcycle Test Course
Rider Skill Test –2 Wheel
r3.0
1 -Cone Weave, Normal Stop 2 -Turning from a
Stop, U-turn
3 -Quick Stop 4 -Obstacle
Swerve

18
Colorado Motorcycle Operator’s Handbook
3-Wheel Motorcycle Test Course
Rider Skill Test –3 Wheel
v3.0
1 -Left Turn, Normal Stop 2 -Cone Weave, Turn from a Stop
3 -Quick Stop 4 -Obstacle Swerve

19
Colorado Motorcycle Operator’s Handbook
Table of contents