Commercial CHEF CHIG14MB User manual

Page 1
User Manual
Grill
MODEL: CHIG14MB
1. READ these instructions carefully before installing and operating the
appliance. Keep them for further reference.
2. Record in the space below the “SERIAL/MODEL NUMBER” found on the back
or bottom of your appliance and retain this information for future reference.
SERIAL NUMBER:
MODEL NUMBER:
DATE OF PURCHASE:
Save and staple your sales receipt to your manual for warranty coverage.

Page 2

Page 3
SAFETY INFORMATION
IMPORTANT SAFETY INSTRUCTIONS
1. READ ALL INSTRUCTIONS BEFORE USE
2. Do not touch hot surfaces. Use handles or knobs.
3. To protect against risk of electric shock, do not immerse cord, plug or unit in
water or other liquid.
4. Close supervision is necessary when any appliance is used by or near children.
5. Unplug from outlet when not in use and before cleaning. Allow to cool before
putting on or taking off parts, and before cleaning appliance.
6. Do not operate any appliance with a damaged cord or plug or after the
appliance malfunctions or has been damaged in any manner. Return appliance to
the nearest authorized service facility for examination, repair or adjustment.
7. The use of accessory attachments not recommended by the manufacturer may
cause injuries.
8. Do not use outdoors.
9. Please do not let the power cord hang on the edge of the table or counter, or
touch any hot surface.
10. Please do not put it on hot coal gas or electric stoves, or in a heated oven.
11. Please do not use appliances for unexpected purposes.
12. Care should be taken when moving appliances containing hot oil or other hot
liquid.
13. Do not heat or preheat without two cooking trays in the grill.
14. To disconnect, make sure device is turned off, then remove plug from wall outlet.
SAVE THESE INSTRUCTIONS
HOUSEHOLD USE ONLY
DANGER
DANGER - Immediate hazards
which WILL result in severe
personal injury or death
WARNING
WARNING - Hazards or unsafe
practices which COULD result in
severe personal injury or death
CAUTION
CAUTION - Hazards or unsafe
practices which COULD result in
minor personal injury
WARNING
When using electrical appliances, basic safety precautions
should be followed, including the following

Page 4
SECURITY INSTRUCTION
1. Please do not leave the appliances unattended when using the machine.
2. Please do not place it in or near the corner of the wall to prevent electrical
appliances from overheating.
3. Please do not put hot baking trays in water or on fragile surfaces.
ELECTRICAL REQUIREMENTS
This appliance has a polarized plug (one blade is wider than the other). To reduce the
risk of electric shock, this plug is intended to t into a polarized outlet only one way.
If the plug does not t into the outlet, reverse the plug. If it still does not t, contact a
qualied electrician. Do not attempt to modify the plug in any way.
POWER SUPPLY CORD
1. A short power supply cord is provided to reduce the risk of becoming entangled in
or tripping over a longer cord.
2. If the power supply cord is too short, do not use an extension cord. Have a
qualied electrician or serviceman install an outlet near the appliance.
3. If it is absolutely necessary to use longer cord sets or an extension cord, extreme
care must be exercised.
a) The marked electrical rating of the cord set or extension cord must equal to or
be greater than the electrical rating of the appliance. The longer cord should be
arranged so that it will not drape over the counter top or table top where it can be
pulled on by children or tripped over unintentionally.
NOTE: Neither Commercial Chef nor the dealer can accept any liability for damage to
the product or personal injury resulting from failure to observe the electrical
connection procedures.
SAFETY INFORMATION

Page 5
PARTS & FEATURES
SET UP & USE
Rocker bar/lifting handle
Upper lid/upper grill
Oil drip tray
Control panel
Grill grates
Control panel
TECHNICAL DATA OF THE PRODUCT
• Rated voltage: 120V
• Rated frequency: 60 Hz
• Rated power: 1440W

Page 6
BEFORE USE
On rst use, there may be a slight odor and a little smoke during the rst few
minutes. In this case, open the window and wait until there is no more smoke or odor.
Place the grill on a clean, at surface. The grill can be positioned in three ways:
Closed position
Place the upper housing on the base. This position is
used to start and heat when using a contact grill.
Open position
Open the upper housing at 100°. To adjust the grill to
this position, you need to lift the rocker by hand until
you feel that the upper housing is locked in this position.
Once locked, release the handle to keep the upper lid
open until you are ready to close it.
Horizontal placement
The upper and lower grill grates can be placed
horizontally, and the upper and lower grates are arranged in a row to form a large
cooking area as a grill.
1. Adjust grill to open position.
2. While pressing the spring-loaded rocker lock button (shown in diagram above),
use the lifting handle to open the upper grill completely at level/180° open
position. To close lid, simply use the rocker bar/lifting handle to return upper lid
forward to closed position.
Remove the baking tray
1. When grill is not in use and cool to the touch, adjust it to the open position. Make
sure unit is OFF and unplugged.
a. Use the Tray Release button, located on the right side of
the base, to unlock the lower grill grate. Once unlocked, tilt
the front of the grate up 15° and slide out to remove.
b. Use the Tray Release button, located on the middle of
the upper housing, to unlock the upper grill grate. Once
unlocked, tilt the front of the grate down 15° and slide out
to remove.
2. Always grasp the grill with both hands when gently removing
them out of the reector.
SET UP & USE

Page 7
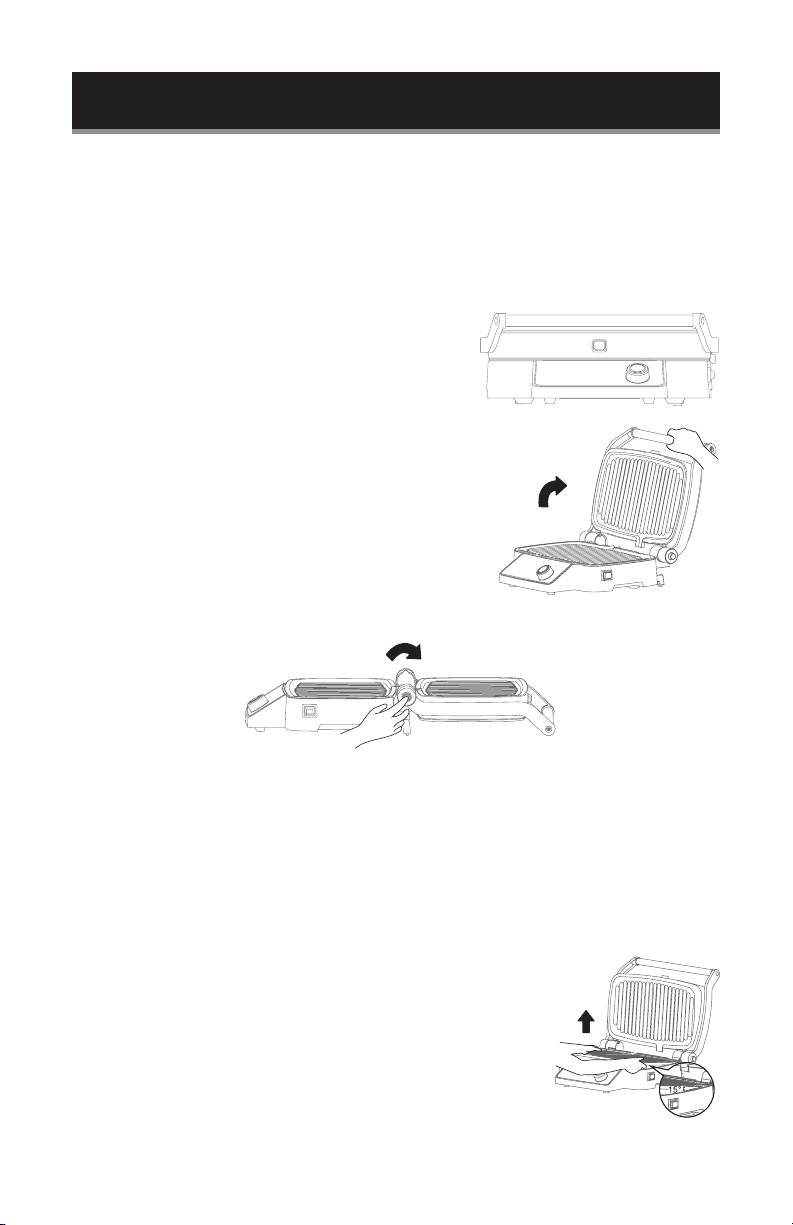
Remove oil drip tray
Make sure the oil tray slides into the center of the rear of
the base before use. Oil stains on the baking tray can ow
into the oil-receiving box through the oil receiving port.
When the machine is completely cooled down, the oil drip
tray can be removed and cleaned in the dishwasher.
Specic operation steps
1. Plug in the power supply and touch the “ ” button, grill will be in a standby state
and the indicator display shows “----”.
2. If the food is frozen, you need to put the food on the grill and close the upper
housing, then click the “ ” button to defrost.
3. Rotate function knob to select the desired function and press “ ”button to
preheat. If you choose pork, steak or fried sh, the progress bar will blink to remind
you to choose the maturity in the preheating process (Rare / Medium / Well-done)
by rotating the knob, select the progress bar corresponding to the maturity (Rare/
Medium/Well-done). Indicator light will blink “Preheat” while the grill is in the
preheating state. Once complete, the indicator display will stop blinking and show
“Preheat” to indicate that the process is nished.
4. Open the upper housing after preheating and put the food on the grate, then close
the upper housing and start cooking. Indicator light “Cooking”is on.
Note:
a. If the machine is on for a long time, the safety system will automatically shut
down the machine.
b. The machine can automatically identify the thickness of food and automatically
adjust the cooking time and temperature. The degree of cooking can be shown
by a display light.
c. To ensure proper operation, do not open the machine or raise the lid during
cooking/grilling.
d. Cylindrical food materials greater than 2” thick will need to be adjusted manually
during the process of closing the upper housing.
e. It is normal to have smoke when cooking.
5. When the food is cooked to your specication (Rare/Medium/Well-done), open
the upper housing and take out the food.
6. When the cooking is over, return to step 1. If you continue cooking, repeat step 2,
3, 4 and 5.
7. When the lid is opened, only DIY function is available to operate. Please do not
open the lid when it is preheating. It will turn to DIY function after 10 seconds when
the lid is opened.
SET UP & USE

Page 8
SET UP & USE
AUTOMATIC GRILL PROCEDURE
Item Doneness How to operate Results
Beef
Rare
1. Dry your meat with
kitchen paper in
35-41°F/2-5°C
2. Season well and
apply with melted
butter or extra
virgin olive oil
Makes the steak’s fat melt and causes
the butter to add avor with a moist
and juicy texture. A rare steak is red at
the very center, followed by a pink ring
around the center with brown crust on
the outside.
The steak will not have a red center
anymore and the red color will be
replaced by a pink color throughout. At
this level, the steak will retain a buttery
and avorful taste, just like the rare
level, but will have less juice and will
be less tender due to more moisture
evaporating.
Medium
Steak is done when it retains just a little
bit of pink color inside and will still be
tender. This temperature level will make
the steak become drier and less tender.
Well
Pork
Rare
1. Dry your pork with
kitchen paper in
35-41°F/2-5°C
2. Seasoned well and
broached with
melted butter or
extra virgin olive oil
Rare cooking temperature is not
recommended.
Pork is done when rm to the touch and
lightly pink inside. Inside will still be juicy
and tender.
Medium
Pork is done when rm to the touch and
juices run clear when pierced and meat is
no longer pink.
Well
Chicken
Well
1. Dry your chicken
with kitchen paper in
35-41°F/2-5°C
2. Seasoned well and
broached with
melted butter or
extra virgin olive oil
Chicken is done when rm to the touch,
and juices run clear when it is pierced
and meat is no longer pink.

Page 9
SET UP & USE
Item Doneness How to operate Results
Fish
Rare
1. Make your sh dry
with kitchen paper in
35-41°F/2-5°C
2. Seasoned well and
broached with
melted butter or
extra virgin olive oil
Surface is well sealed and brown and the
inner part kept juicy, completely tender and
easy to melt in mouth. Perfect for any type
of sh that has been frozen before cooking.
Surface is well sealed and brown and inside
is less juicy but almost completely cooked.
Recommended for well-cooked sh.
Medium
Well browned and completely cooked.
Inside is dry with little moisture.
Recommended for people who like dry sh.
Well
Shrimp
Rare 1. Make your shrimp
dry with kitchen
paper in 35-41°F/2-
5°C
2. Seasoned well and
broached with
melted butter or
extra virgin olive oil
It is not recommended to eat raw shrimp.
Almost all cooked, keeping moisture but no
raw parts.
Medium
Pink and rm to touch. Well prepared and
recommended to people who don’t like raw
seafood.
Well
Sandwich
Cook 1. Butter bread to get
better results and
good avors.
Good and even browning for all sized
sandwiches. Provides a well-toasted and
grilled sandwich and heats up sandwich
meats without burning your bread.
Sausage
Rare
1. Make your sausage
dry with kitchen
paper in 35-41°F/2-
5°C
2. Seasoned well and
broached with
melted butter or
extra virgin olive oil
Pinkish overall color with outer white
portion, juicy and tender. Perfect for cooking
pre Boiled sausages.
Medium Little pink color inside. Recommended for
cooking breakfast sausages.
Well Firm to touch. Recommended for raw
sausages that don’t have any precook
process.
Bacon
Rare
1. Preheat the
appliance and add
bacon.
Light cook, tempered bacon without burned
parts. Perfect for cured bacons.
Medium Well cooked with little moisture. Best choice
for parboiled bacons.
Well Well-cooked and crispy. Recommended for
people who like crispy strips of bacon.

Page 10
SET UP & USE
CLEANING AND MAINTENANCE
1. Please remove the grill grates to avoid damaging the surface of the grates
before cleaning. Oil trays and grill grates are dishwasher safe. If you don’t
want to put them in the dishwasher, you can use a small amount of detergent
to clean the grates, then rinse thoroughly and remove residues and wipe
thoroughly with a paper towel.
2. Appliances and power cord cannot be put into the dishwasher after removing
the baking tray. If the machine is dirty, please wait until completely cooled
before cleaning with a dry cloth.
Note:
a. Please do not try to clean any part of the grill with metal wash pads, steel
wire cotton, etc. Use only nylon or non-metal cleaning pads.
b. Do not immerse the grill in water or other liquids. Make sure the grill is dry
before storage. Any other servicing should be performed by an authorized
service representative.

Page 11
BEFORE YOU CALL FOR SERVICE
IF THE APPLIANCE FAILS TO OPERATE:
A) Check to make sure that the appliance is plugged in securely. If it is not, remove
the plug from the outlet, wait 10 seconds and plug it in again securely.
B) Check for a blown circuit fuse or a tripped main circuit breaker. If these seem to
be operating properly, test the outlet with another appliance.
IF NONE OF THE ABOVE SOLVES THE PROBLEM, CONTACT A QUALIFIED
TECHNICIAN. DO NOT TRY TO ADJUST OR REPAIR THE APPLIANCE YOURSELF.
CUSTOMER SERVICE
IMPORTANT
DO NOT RETURN THIS Appliance TO THE STORE
If you have a problem with this appliance, please contact the
W Appliance Co. Customer Satisfaction Center at 1-855-855-0294.
DATED PROOF OF PURCHASE, MODEL # AND DATE CODE
REQUIRED FOR WARRANTY SERVICE
TROUBLESHOOTING & WARRANTY

Page 12
TROUBLESHOOTING
TROUBLESHOOTING & WARRANTY
INDICATOR
DISPLAY REASON PROBABLE CAUSE CHECKPOINTS AND
EXCLUSIONS
E1 Open circuit of lower
baking tray sensor
Unplugged lower
baking tray sensor or
broken connection
wire
Deliver the appliance
to the authorized
Maintenance Department
E2 Short circuit of lower
baking tray sensor
Lower baking tray
sensor breakdown
or connection wire
melting adhesion
E3 Open circuit of upper
baking tray sensor
Unplugged upper
baking tray sensor or
broken connection
wire
E4 Short circuit of upper
baking tray sensor
Upper baking tray
sensor breakdown
or connection wire
melting adhesion

Page 13
TROUBLESHOOTING & WARRANTY
LIMITED WARRANTY
Commercial Chef brand is used under license.
Any repair, replacement, or warranty service,
and all questions about this appliance should
be directed to W Appliance Co. at 1 (855)
855-0294 from the USA or Puerto Rico.
W Appliance Co. warrants to the original purchaser
that the appliance will be free from defects in material,
parts and workmanship for the period designated for
this appliance. The warranty commences the day the
appliance is purchased and covers up to a period of
1 year (12 months) for labor/1 year (12 months) for
parts (manufacturing defects only).
W Appliance Co. agrees that it will, at its option,
replace the defective appliance with either a new or
remanufactured appliance equivalent to your original
purchase during the warranty period.
Exclusions: This warranty does not apply to the
below:
1. If the appearance or exterior of the
appliance has been damaged or
defaced, altered or modied in design or
construction.
2. If the appliance original serial number
has been altered or removed or cannot
be readily determined.
3. If there is damage due to power line
surge, user damage to the AC power
cord or connection to improper voltage
source.
4. If damage is due to general misuse,
accidents or acts of God.
5. If repair attempts are done by
unauthorized service agents, use of
parts other than genuine parts or parts
obtained from persons other than
authorized service companies.
6. On units that have been transferred
from the original owner.
7. On appliances that have been purchased
as refurbished, like new, second-hand, in
a “As-Is” or “Final Sale” terms.
8. To appliances used in a commercial or
rental setting.
9. To appliances used in settings other
than ordinary household use or used
other than in accordance with the
provided instructions.
10. To damages for service calls for
improper installations.
11. To glass parts and other accessory
items that are included with the unit.
12. Transportation and shipping costs
associated with the replacement of
the unit.
13. Food loss for loss due to appliance
failure or delay in service, repair or
replacement.
14. Service calls to instruct you how to use
your slow cooker.
15. Service calls to repair or replace the
house fuse, reset the circuit breaker or
correct the wiring in the house.
REPAIR OR REPLACEMENT AS PROVIDED UNDER
THIS WARRANTY IS THE EXCLUSIVE REMEDY OF
THE CUSTOMER; W Appliance Co. SHALL NOT BE
LIABLE FOR ANY INCIDENTAL OR CONSEQUENTIAL
DAMAGES FOR BREACH OF ANY EXPRESS OR
IMPLIED WARRANTY ON THIS Appliance, EXCEPT
TO THE EXTENT PROHIBITED BY APPLICABLE LAW.
ANY IMPLIED WARRANTY OF MERCHANTABILITY
OF FITNESS FOR A PARTICULAR PURPOSE ON THIS
Appliance IS LIMITED TO THE DURATION OF THE
WARRANTY.
Some states do not allow the exclusion or limitations
of incidental or consequential damages, or limitations
on how long the warranty lasts. In these cases the
above exclusions or limitations may not apply to you.
This warranty gives you specic legal rights and you
may also have other rights which vary from state to
state.
Obtaining Service: To obtain service, appliance
literature, supplies or accessories please call
1 (855) 855-0294 to create a ticket for exchange/
repair. Please make sure to provide the date of
purchase, model number and a brief description of the
problem. Our customer service representative
will contact you or send detailed return instructions.
W Appliance Co. does not warrant that the appliance will work
properly in all environmental conditions, and makes no warranty
and representation, either implied or expressed, with respect
to the quality, performance, merchantability, or tness for a
particular purpose other than the purpose identied within this
user’s manual. W Appliance Co. has made every effort to ensure
that this user’s manual is accurate and disclaims liability for any
inaccuracies or omissions that may have occurred. Information
in this user’s manual is subject to change without notice and
does not represent a commitment on the part of W Appliance
Co.. W Appliance Co. reserves the right to make improvements
to this user’s manual and/or to the appliances described in this
user’s manual at any time without notice. If you nd information
in this manual that is incorrect, misleading, or incomplete, please
contact us at 1- 855-855-0294.
W Appliance Co.,
1356 Broadway
New York, NY 10018

Page 14

Page 15
FRANÇAIS
Manuel de l’Utilisateur
Gril
MODÈLE: CHIG14MB
1. LISEZ ces instructions attentivement avant d’installer et d’utiliser l’appareil.
Gardez-les pour référence ultérieure.
2. Enregistrez dans l’espace sous le “NUMÉRO DE SÉRIE / MODÈLE” situé
à l’arrière ou au bas de votre appareil et gardez ces informations pour
référence future.
NUMÉRO DE SÉRIE:
NUMÉRO DE MODÈLE:
DATE D’ACHAT:
Gardez et agrafez votre reçu de vente dans votre manuel pour la couverture de
la garantie.

Page 16
FRANÇAIS

Page 17
FRANÇAIS
INFORMATION SUR LA SÉCURITÉ
CONSIGNES DE SÉCURITÉ IMPORTANTES
1. LISEZ TOUTES LES INSTRUCTIONS AVANT L’UTILISATION
2. Ne touchez pas les surfaces chaudes. Utilisez des poignées ou boutons.
3. Pour vous protéger contre les risques d’électrocution, ne plongez pas le cordon,
la che ou l’appareil dans l’eau ou tout autre liquide.
4. Une surveillance étroite est nécessaire lorsqu’un appareil est utilisé par ou à
proximité des enfants.
5. Débranchez de la prise quand vous ne l’utilisez pas et avant le nettoyage. Laissez
refroidir avant de mettre ou de retirer des pièces et avant de nettoyer l’appareil.
6. Ne faites pas fonctionner un appareil dont le cordon ou la che est endommagé
ou après un mauvais fonctionnement de l’appareil ou s’il a été endommagé
de quelque manière. Renvoyez l’appareil au centre de service autorisé le plus
proche pour examen, réparation ou réglage.
7. L’utilisation d’accessoires non recommandés par le fabricant peut provoquer des
blessures.
8. Ne pas utiliser à l’extérieur.
9. Veuillez ne pas laisser le cordon d’alimentation pendre sur le bord de la table ou
du comptoir, ni toucher une surface chaude.
10. Veuillez ne pas le mettre sur des cuisinières à gaz de charbon chaud ou
électriques, ou dans un four chauffé.
11. Veuillez ne pas utiliser d’appareils à des ns inattendues.
12. Des précautions doivent être prises lors du déplacement d’appareils contenant
de l’huile chaude ou un autre liquide chaud.
13. Ne chauffez pas et ne préchauffez pas sans deux plaques de cuisson dans le gril.
14. Pour déconnecter, assurez-vous que l’appareil est éteint, puis retirez la che de
la prise murale.
GARDEZ CES INSTRUCTIONS
UTILISATION DOMESTIQUE UNIQUEMENT
AVERTISSEMENT
Lors de l’utilisation d’appareils électriques, des précautions de sécurité de base
doivent être suivies, y compris les suivantes
DANGER
DANGER - Dangers immédiats
qui VONT entraîner des blessures
graves ou la mort
AVERTISSEMENT
AVERTISSEMENT - Dangers
ou pratiques dangereuses qui
POURRAIENT entraîner des
blessures graves ou la mort
ATTENTION
ATTENTION - Dangers ou pratiques
dangereuses qui POURRAIENT
entraîner des blessures légères

Page 18
FRANÇAIS
INSTRUCTION DE SÉCURITÉ
1. Veuillez ne pas laisser les appareils sans surveillance lors de l’utilisation de la
machine.
2. Veuillez ne pas le placer dans ou près du coin du mur pour éviter la surchauffe des
appareils électriques.
3. Veuillez ne pas mettre de plaques de cuisson chaudes dans l’eau ou sur des
surfaces fragiles.
EXIGENCES ÉLECTRIQUES
Cet appareil est équipé d’une che polarisée (une lame est plus large que l’autre).
Pour réduire le risque de choc électrique, cette che est conçue pour s’insérer dans
une prise polarisée dans un seul sens. Si la che ne rentre pas complètement dans la
prise, inversez la che. Si elle ne rentre toujours pas, contactez un électricien qualié.
Ne modiez pas la che de quelque manière.
ALIMENTATION ÉLECTRIQUE
1. Un cordon d’alimentation court est fourni pour réduire le risque de s’emmêler ou de
trébucher sur un cordon plus long.
2. Si le cordon d’alimentation est trop court, n’utilisez pas de rallonge. Demandez à un
électricien ou à un technicien qualié d’installer une prise à proximité de l’appareil.
3. S’il est absolument nécessaire d’utiliser des cordons plus longs ou une rallonge, il
faut faire preuve d’une extrême prudence.
a) La puissance électrique indiquée du cordon ou de la rallonge doit être égale ou
supérieure à la puissance électrique de l’appareil. Le cordon le plus long doit être
disposé de façon à ce qu’il ne se drape pas sur le comptoir ou sur la table où il
pourrait être tiré par des enfants ou trébuché involontairement.
REMARQUE: Ni Commercial Chef ni le marchand ne peuvent accepter aucune
responsabilité pour les dommages au produit ou les blessures
corporelles résultant du non-respect des procédures de connexion
électrique.
INFORMATION SUR LA SÉCURITÉ

Page 19
FRANÇAIS
PIÈCES ET CARACTÉRISTIQUES
CONFIGURATION ET UTILISATION
Barre à bascule /
poignée de levage
Couvercle supérieur /
grille supérieure
Bac collecteur d’huile
Panneau de commande
Grilles de gril
Panneau de
commande
DONNÉES TECHNIQUES DU PRODUIT
• Tension nominale: 120V
• Fréquence nominale: 60 Hz
• Puissance nominale: 1440W

Page 20
FRANÇAIS
AVANT UTILISATION
Lors de la première utilisation, il peut y avoir une légère odeur et un peu de fumée
pendant les premières minutes. Dans ce cas, ouvrez la fenêtre et attendez qu’il n’y ait
plus de fumée ou d’odeur. Placez le gril sur une surface plane et propre. Le gril peut
être positionné de trois façons:
Position fermée
Placez le boîtier supérieur sur la base. Cette position est
utilisé pour démarrer et chauffer lors de l’utilisation d’un
gril de contact.
Position ouverte
Ouvrez le boîtier supérieur à 100°. Pour régler la grille
dans cette position, vous devez soulever la bascule à la
main jusqu’à ce que vous sentiez que le boîtier supérieur
est verrouillé dans cette position. Une fois verrouillé,
relâchez la poignée pour maintenir le couvercle supérieur
ouvert jusqu’à ce que vous soyez prêt à le fermer.
Placement horizontal
Les grilles supérieure et inférieure du gril peuvent
être placées horizontalement, et les grilles
supérieure et inférieure sont disposées en rangée
pour former une grande zone de cuisson en guise
de gril.
1. Réglez le gril en position ouverte.
2. Tout en appuyant sur le bouton de verrouillage à bascule à ressort (illustré dans le
schéma ci-dessus), utilisez la poignée de levage pour ouvrir complètement la grille
supérieure en position ouverte de niveau / 180°. Pour fermer le couvercle, utilisez
simplement la barre à bascule / poignée de levage pour ramener le couvercle
supérieur en position fermée.
Retirez la plaque à cuisson
1. Quand le gril n’est pas utilisé et qu’il est froid au toucher, réglez-le en position
ouverte. Assurez-vous que l’appareil est éteint et débranché.
a. Utilisez le bouton de Déverrouillage Du Plateau, situé sur le
côté droit de la base, pour déverrouiller la grille inférieure du
gril. Une fois déverrouillée, inclinez l’avant de la grille vers le
haut de 15°et faites-la glisser pour la retirer.
b. Utilisez le bouton de Déverrouillage Du Plateau, situé
au milieu du boîtier supérieur, pour déverrouiller la grille
supérieure du gril. Une fois déverrouillée, inclinez l’avant de
la grille de 15°vers le bas et faites-la glisser pour la retirer.
2. Toujours saisir le gril avec les deux mains en les retirant
doucement du réecteur.
CONFIGURATION ET UTILISATION
Table of contents
Languages:
Other Commercial CHEF Grill manuals
Popular Grill manuals by other brands

Master Forge
Master Forge BG179A manual

KitchenAid
KitchenAid 720-0733D Installation Instructions and Use & Care Guide

Brinkmann
Brinkmann Series 6419 owner's manual

Backyard
Backyard GBC1707WT-C owner's manual

Cuisinart
Cuisinart CGG200 - 12000 BTU Compact Portable Gas... operating instructions

Klarstein
Klarstein Dr Beef III manual

Silvercrest
Silvercrest STGE 2000 A1 operating instructions

Cadac
Cadac ENTERTAINER 4 User instructions

Magma
Magma MARINE KETTLE 3 A10-207-3 owner's manual

Bakers Pride
Bakers Pride Dante CTB-60GS parts list

Brinkmann
Brinkmann Smoke 'N Pit OUTDOOR BARBECUE GRILL & SMOKER owner's manual

MPM
MPM MOP-23M user manual