Concorde A80 User manual

1
INTRODUCTION
Thank you for purchasing our newest phone with LCD display. This manual is designed to familiarize you with
this phone. To get maximum use from your new phone, we suggest that you read this Instruction Manual
carefully before operating it.
SAFETY INSTRUCTION
When using your telephone equipment, the following basic safety precautions should always be followed to
reduce the risk of fire, electric shock and injury to persons:
1. Read and understand all instructions.
2. Follow all warnings and instructions.
3. Unplug the product from the wall outlet before cleaning. Do not use liquid cleaners or aerosol cleaners.
Use damp clothe for cleaning.
4. Do not place this product on an unstable cart, stand or table. The product may fall, causing serious
damage to the product.
5. Do not overload wall outlets and extension cords as this can result in the risk of fire or electric shock.
6. Never push objects of any kind into this product through cabinet slots as they may touch dangerous
voltage points or short out parts that could result in a risk of fire or electric shock. Never spill liquid of any
kind on the product.
7. Avoid using this unit during an electrical storm, move or disconnect the unit, there may be a remote risk of
electronic shock from lightning and thunder.
FEATURES
FSK/DTMF system compatible
12-digit LCD display with calendar
35 incoming calls and 5 outgoing calls
3 one-touch memories
VIP number can be set
5-digit area code function
Pre-dial and edit function
Flash and pause functions
5 levels LCD contrast adjustable
8 kinds of ringing tone for selection
Special ringing tone for VIP calls
Hands free dialing and speakerphone
Redial and auto-redial function
Calculator function
Ringing volume high, middle and low switch adjustable
In use LED indicator

2
LOCATION DESCRIPTION

3
GETTING STARTED
1. Insert one end of the line cord to the line jack of the base and the other end to the wall outlet of exchanger.
The time and date will be display on the liquid crystal screen after the line cord is inserted.
2. If you want to keep incoming and outgoing calls information even when the line cord has lost the
connection, you can insert 3×1.5AA batteries.
3. Connect the handset and the unit with coiled line.
4. Setting the dialing mode to correct mode according to the directions from your local telecom.
5. Apply for the caller ID service from your local telecom office.
WALL MOUNT
The telephone can be used for desktop, and it can also be used as wall mount.
When use it as wall mount, please slid out the parking hook in the base, turned it 180 degrees and slid back in
the base. Place the handset on the cradle with the parking hook on the cradle arranged to fit in the parking
recess under the earpiece on the handset.
Fix the base unit on the wall by the screw according to the screw-hole position in the back of this phone base,
then hang it on the wall, and 53 mm between two screws.

4
RECEIVING CALLS
The unit will ring when a call comes, if you have subscribed caller ID service to your local telecom, LCD will
display month, date, time, serial No. of the incoming call and ”NEW” icon. If a missed call number comes twice
or more times, the “REP” icon will be displayed on the LCD.
From the handset
1. Pick up the handset and talk to the other end.
2. After finished, return the handset to the base.
Switch to speakerphone
1. When talking by handset, press key and return the handset to the base.
2. After finished, press key again.
From the speakerphone
1. When the telephone rings, press key and talk to the caller.
2. After finished, press key again.
Note: Generally telecom transmits the incoming message between the first ring and the second ring. So
please answer the telephone after the second ring.
MAKING A CALL
From the handset
1. Pick up the handset.
2. When hearing the dialing tone, dial the desired number. The LCD will start to time the conversation.
3. After finished, return the handset to the base.
From the speakerphone
1. Press key.
2. When hearing the dialing tone, dial the desired number. The unit will start to time the conversation.
3. After finished, press key again.
Redialing function
1. Pick up the handset, or press key.
2. Press REDIAL key, the number dialed will be dialed out again.
Pre-dialing function
1. In on-hook state.
2. Dial the desired number, if any mistake, use DEL key to delete.
3. Press REDIAL key, the number will be dialed out.
Auto-redial
1. Press key, dial a number, if you hear an engaged tone.
2. Press REDIAL key and the last dialed number will be redialed automatically at every 6 seconds until the
line is through.
While auto-redialing, pick up the handset or press key will end the dialing.
IN USE LED INDICATOR
In idle state, press key or pick up the handset, in use LED will light.
REVIEWING, CALLING BACK AND DELETING INCOMING CALL
When the memory is full, the earliest one (except VIP) will be replaced.
A secret number comes, LCD displays”….p….”
If incoming call is from an area without Call ID service, LCD displays”….o….”

5
Reviewing incoming call
1. In on-hook or off-hook state.
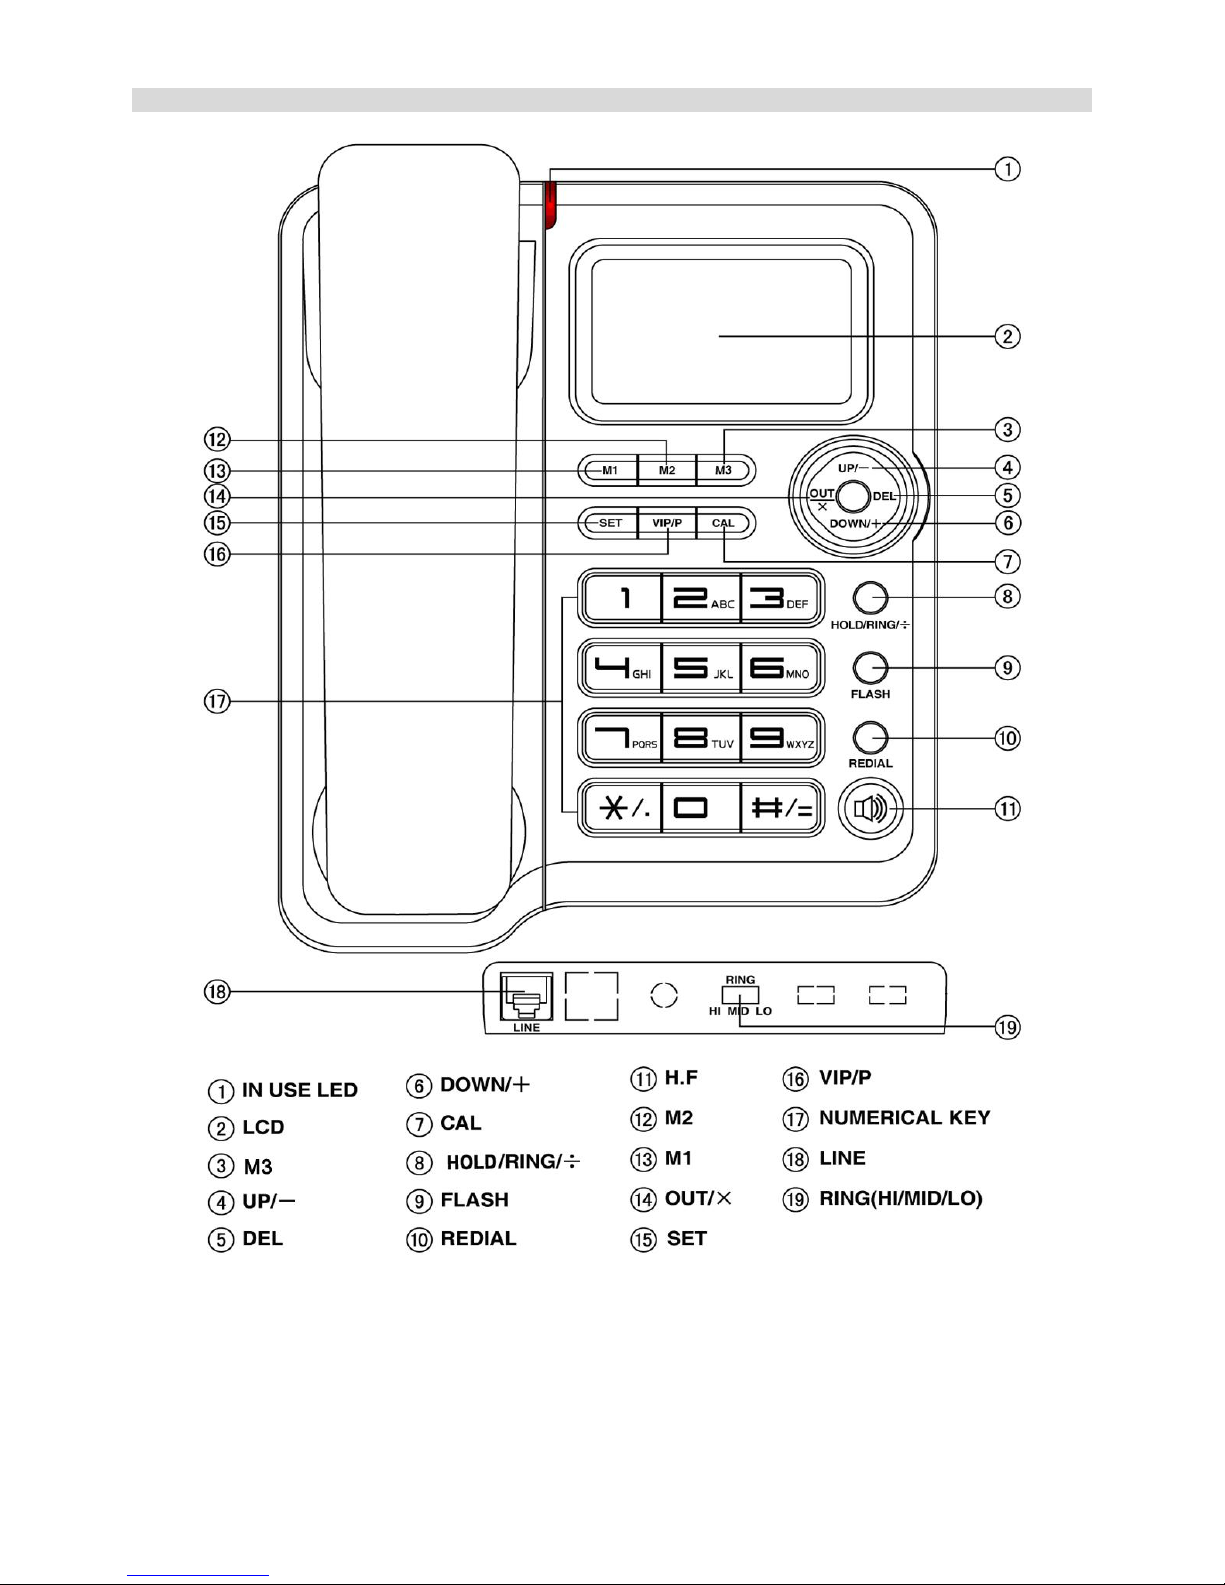
2. Press UP/- or key to review DOWN/+ the incoming messages.
3. When all records are checked, LCD displays …END…
Calling back incoming call
1. In on-hook or off-hook state, press UP/- or DOWN/+ key to check the desired number.
2. Press REDIAL key, the number is dialed out automatically.
3. Or press REDIAL key twice, the telephone auto-add “0” to long distance call number and dial it out.
Calling back the local area call: The telephone can auto filter local area code, after setting the local area
code (Refer to local area code setting).
Calling back the long distance call:
If LCD displays a number which is long distance call, press REDIAL key twice, the telephone will auto-add “0”
and dial out the number displayed on LCD. If the line is busy, press REDIAL key to dial out the number
repeatedly.
Deleting incoming call
1. Review the desired incoming number.
2. Press DEL key to delete the number, then LCD displays the next number.
Note: Press DELkey for 3 seconds, all the incoming message will be erased.
REVIEWING, CALLING BACK AND DELETING OUTGOING CALL
The phone can record 5 outgoing messages, sequence number and conversation time. You may review, call
back and delete outgoing calls. If over 5 outgoing calls, the earliest one will be replaced. When you review
outgoing call, LCD will not display real date and time, but display the conversation time.
Reviewing outgoing call
1. In on-hook or off-hook state.
2. Press OUT/× key, LCD displays the last dialed number.
3. Press OUT/× key continuously, LCD displays...END…after all outgoing numbers are reviewed.
Dial back outgoing call
1. In on-hook or off-hook state.
2. Press OUT/× key to check the desired number.
3. Press REDIAL key, the number will be dialed out automatically.
Deleting outgoing Call
1. In on-hook or off-hook state, press OUT/× key to check the number.
2. Press DEL key to erase it, and LCD displays the next number.
Note: Press DEL key for 3 seconds, all the outgoing calls will be erased.
SETTING A NUMBER AS VIP
In on-hook state, review the desired incoming or outgoing number,
1. Press VIP/P key to set the number as VIP number. There will be a “ ” icon displayed on LCD.
2. Press VIP/P key again, the VIP number will become to ordinary number and the “ ” icon will disappear.
3. The number set as VIP number can not be deleted, but when press DEL key for 3 seconds, all numbers
will be deleted including the VIP numbers.
Notes:
1. When the number stored full, the unit will auto-cover the earliest ordinary one except of VIP number.

6
2. But if the numbers are all set as VIP number and the memory is full, the unit will auto the earliest VIP
number.
3. It will ring a special ringing tone when a VIP call comes.
SETTING MENU
SETTING DATE AND TIME
1. In on-hook state, press SET key, LCD displays SET 1 DATE.
2. Press SET key, the last two digits of year flash.
3. Press UP/- or DOWN/+ key to edit the year, press SET key to confirm, by using the same method to set the
month, date, hour and minute.
4. Press DEL key to quit.
Note: Month: 1-12 Date: 1-31 Hour: 00-23 Minute: 00-59.
SETTING LOCAL AREA CODE
1. In on-hook state, press SET key and then press UP/- key, LCD will display SET 2 CODE
2. Press SET key again, LCD displays CODE - - - - -
3. Press UP/- or DOWN/+ key to set the first digit of local area code.
4. Press SET key to confirm and enter the second digit setting, follow same steps to set the last 4 digits.
5. Press DEL key to quit.
Note: If the local area code only 4 digits, the last digit can be left as “-”.
After set the local area code, unit will auto-filter the area code if the incoming call number with the first several
digits as same as the local area code.
SETTING PABX CODE
1. In on-hook state, press SET key and then press UP/- key 2 times, LCD will display SET 3 PCODE.
2. Press SET key to confirm, LCD displays PCODE --, the first “-“flash and indicate to set the first digit of
PABX code.
3. Press UP/- or DOWN/+ key to set the PABX code. Press SET key to confirm and enter the second digit
setting.
4. Following same steps to set the second digit.
Notes:
1. If only one digit of PABX code, left the second digit as“-“.
2. If set PABX code, when dialing back incoming call or pre-dial a number, and if the number is 6 digits or
more than 6 digits, the telephone will auto-add PABX code ahead the incoming number or the pre-dialing
number which is not lead by PABX code and then pause 1 second.
SETTING AUTO IP
In on-hook state, press SET key and then press UP/- key 3 times, LCD will display SET 4 AUTO IP.
Note: This function is unavailable, so the users do not need to set this item.
SETTING LCD CONTRAST FUNCTION
1. In on-hook state, press SET key and then press UP/- key 4 times, LCD displays SET 5 LCD
2. Press SET key to enter, LCD displays LCD 3, press SET to enter, LCD displays LCD 3, press UP/- or
DOWN/+ to select among 1~5 levels.
3. Press SET key to confirm and exit.
SETTING RINGING TONE
There are 8 kinds of ringing tone for selection:

7
1. In on-hook state, press HOLD/RING/÷ key, LCD display RING 01.
2. Press UP/- or DOWN/+ key to select ring tone.
Besides, you can also press HOLD/RING/÷ key repeatedly to select the ringer.
ONE-TOUCH MEMORY
Storing a number into one-touch memory
1. In on-hook state, pre-dial the desired number or review the incoming or outgoing list for the desired
number to store.
2. Press SET key, then press M1 –M3 key to store the number.
Make a call from one-touch memory
In on/off-hook situation, press M1 –M3 key to dial out the stored number. The telephone will add PABX code
ahead the number if the number is 6-digit or more than 6-digit.
FLASH FUNCTION
If you exchanger has some special function, for example, Call waiting or Conference, you can press FLASH
key to get it. This unit flash time is 100 ms.
PAUSE FUNCTION
If dial a number from PABX extension, press PABX number (normally “0” or “9”) + VIP/P + desired number.
When redial, need not dial PABX number and VIP/P key, just press REDIAL key.
CALCULATOR FUNCTION
In on-hook or off-hook state, press CAL key, LCD displays 0, the unit is in calculator state.
The unit is available for operation of “+.-.×.÷”, in the calculator state, #/=key is used as “=”and the */. key is
used as radix point, OUT/×and HOLD/RING/÷ are used as ×and ÷respectively. UP/- or DOWN/+ key is used
as sign of minus /plus.
E.g.1 (10+26) ÷2
1. In on-hook state, press CAL key.
2. Press (1, 0, +, 2, 6), ÷, 2, #/= keys.
3. After calculated, press DEL key to quit.
E.g.2 0.5× 0.6-1
1. In on-hook state, press CAL key.
2. Press 0, *., 5, ×, 0, *., 6, -, 1, #/= keys.
3. After calculated, press DEL key to quit.
SWITCH
Ring volume switch
Slide the RING switch to select ringing volume HI (high), MID (middle) or LO (low).
NOTES
Please unplug telephone line when install or replace batteries.
TROUBLE SHOOTING
No voice
Check if the handset is on the phone or line is broken.
Battery rust or leak
Replace the batteries.
Noise

8
Check if the circuit is broken, change the circuit.
Check if the connector is moist or rust, change the connector.
Ring once then disconnect when receive a call. Dialing function is available
Check if connector is in a moist environment.
Check if too many extensions are used together or the quality of extension is not good enough, change
the bad extension.
Most of the functions failed
Check if the battery is in low-battery state, change the battery.
Battery is in normal state, unplug the telephone line, remove the batteries, and reinstall after 10 minutes.
Table of contents