Connerton CSP-A Owner's manual

Fine Cooking Equipment For Over 70 Years
1. Preparation For Installation:
Z223.1
Installation must be made by a licensed plumber.
Initial setup must be made by a licensed service company.
2. Clearances And Ventilation:
Safe and satisfactory operation of the stove depends, to a great extent,
upon it’s proper installation. It should be installed in accordance with the National Fuel Gas Code
, these instructions, and applicable State and Local Codes.
A gas pressure regulator is supplied with your stove. The regulator must be installed before connecting
stove to gas supply line.
The stove and it’s individual shutoff valve must be disconnected from the gas supply piping system
during any pressure testing of that system at test pressures in excess of 1/2 psig (3.45 kPa).
The stove must be isolated from the gas supply piping system by closing it’s individual manual shutoff
valve during any pressure testing of the gas supply piping system at test pressures equal to or less
than 1/2 psig (3.45 kPa).
This stove is designed for installation in non-combustible locations with 0
inch clearance from sides and back.
Please note: air vent can plug with grease, thereby shutting gas supply off.
Install regulator in a drip-free area.
CSP-A STOCK POT STOVES
For Your Safety Warning!
Improper installation, adjustment, alteration, service or
maintenance can cause property damage, injury or death.
Read the installation, operation and maintenance
instructions thoroughly before installing or servicing this
equipment.
To Purchaser
After installation of your stove, immediately contact your local gas supplier to obtain information
in the event the user of your equipment smells gas. This information must be posted in a
prominent location.
To User
RETAIN THIS MANUAL FOR FUTURE USE
Installation,
Operation &
Maintenance
Instructions
Do NOT store or use gasoline or
other flammable vapors and liquids
in the vicinity of this, or any other
equipment.
Upon receipt of this stove, inspect it thoroughly for any damage which may have occurred during
shipment. If damage is observed, contact the delivery agency immediately.
The Connerton Company
1131 E. Wakeham Avenue, Santa Ana, CA 92705- 1 5
Telephone: (714) 547-921 Fax: (714) 547-1969
www.connertoncompany.com

Keep equipment area free and clear from combustibles.
3. Gas Piping:
Please note: air vent on regulator can plug with grease, thereby
shutting gas supply off. Install regulator in drip-free area.
ANSI Z21.69
ANSI Z21.41
IMPORTANT: Check all gas connections for leaks, using a soap and water solution.
DO NOT USE AN OPEN FLAME FOR CHECKING PURPOSES
4. Lighting And Relighting Of Stove:
A.
B.
C.
D.
E.
5. Care And Maintenance:
Please Note: Contact factory before any warranty repairs are made.
A.
B.
C.
The area in front of, and above the stove must be clear to avoid obstruction of flow of combustion and
ventilation air. Means must be provided for adequate air supply and adequate clearance for air
openings into the combustion chamber.
Adequate clearances must be provided in front and sides of the stove for servicing and proper
operation.
It is important that the stove be installed under an exhaust hood which is adequate to remove the
products of combustion and cooking vapors. Sufficient make-up air must also be provided to the
space where the stove is located to replace that removed through the exhaust hood.
Make sure the gas pressure regulator supplied with the stove is installed correctly. Connect
outlet side of regulator to stove. The regulator is set at 4 inches w.c. on natural gas and 11 inches w.c.
on propane gas. A 1/8” pressure tap is provided on the gas manifold at the front of the stove for
checking the gas pressure.
Connect stove to the gas supply line. Under no circumstances should the gas supply line be smaller
than the inlet pipe on the stove. A gas shutoff valve must be installed in the gas supply line upstream
of the stove for complete shutdown and service. Use pipe sealant on all pipe joints. Sealant must be
resistant to the action of L.P. gasses.
For proper performance, the stove must be level. If legs are provided, adjust feet at bottom of legs to
level stove. If legs are not provided, seal the base of the stove to the countertop with silicone.
If the stove is supplied with casters, the installation must be made with a connector that complies with
the Standard for Connectors for Movable Gas Appliances , and a quick-disconnect device
that complies with the Standard for Quick-Disconnect Devices for Use With Gas Fuel, .
Adequate means must be provided to limit the movement of the stove without depending on the
connector and the quick-disconnect device or it’s associated piping to limit the stove movement.
Restraining device should be connected to legs or back of body.
Turn all burner valves and lighter valves to “OFF”. Wait 5 minutes.
Turn on lighter valves and light pilots. Adjust flame height to approximately 1/2”.
Turn on burner valves to operate your stove.
For complete shutdown, turn off all valves and the gas shutoff valve located upstream of the stove.
To relight, repeat above procedures.
Contact factory, factory representative, or a local service company to perform maintenance and
repairs.
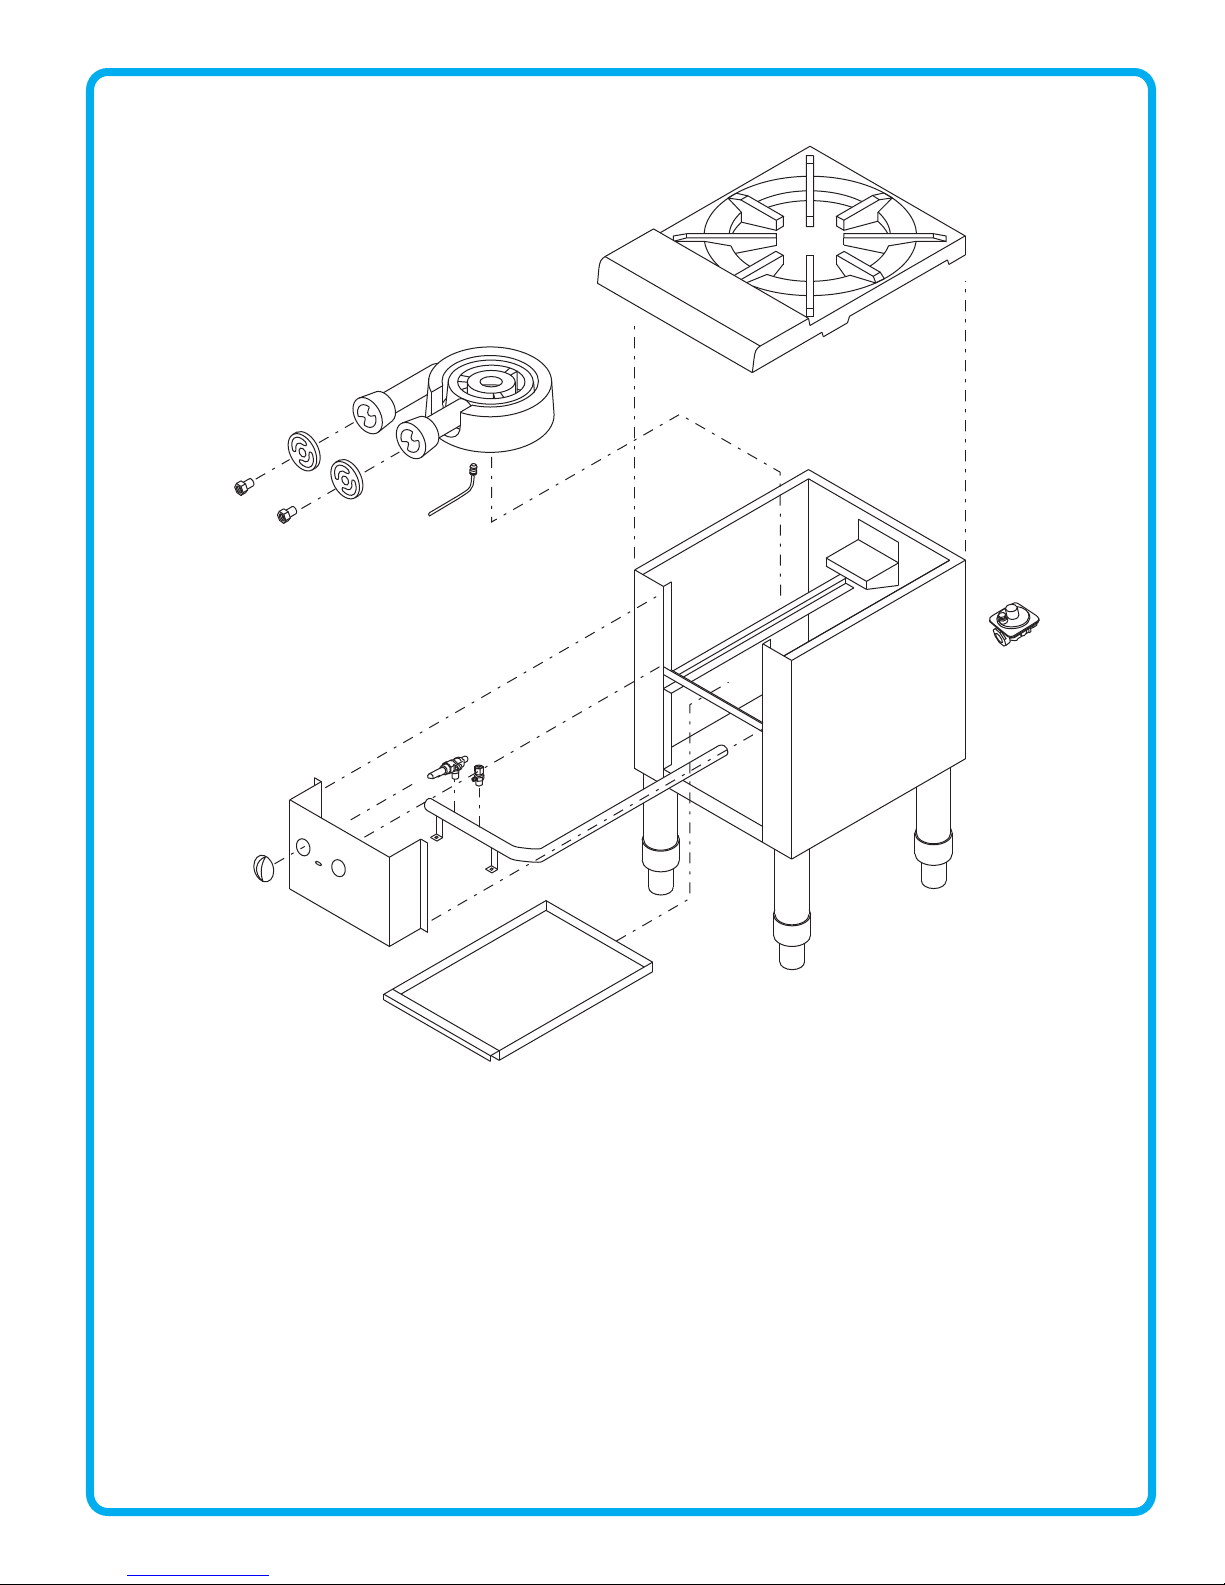
To clean top grate, use warm water, a mild cleanser and wire brush.
At least once per day, clean and empty drip pan.
Periodically, but not less than once every 3 months, clean burner orifices using warm water and wire
brush. Make sure equipment is cold before removing burners and orifices.

6
9,10*
7
8
1
2
3
13
12
11
5
4
14
15
CSP-A STOCKPOT STOVES
1. 40-100-00 Grate 9. 40-350-01
2. 45-400-00 Body 10.* 40-350-02 * Incorporated in #9
3. 40-425-00 Front Panel 11. 00-225-00
4. 45-450-00 Grease Pan 12. 00-250-00
5. 40-300-00 Gas Manifold 13. 00-500-00
6. 40-150-00 Burner 14. 00-275-01
7. 40-675-00 Air Shutter 00-275-02 Regulator - Propane
8. 40-200-01 Orifice Hood - Natural 15.
40-200-02 Orifice Hood - Propane
Pilot w/tubing - inner ring
Pilot Valve
Manual Control Valve
Chrome Knob
Regulator - Natural
00-495-02 Bullet Foot - Round Leg

The Connerton Company warrants to the original user for a period of one year from date of installation, not
to exceed 18 months from date of shipment by Connerton, that the equipment manufactured is free from
defects in material or workmanship.
Our obligation under this warranty shall be limited to furnishing without charge any part of said product
which, upon examination by The Connerton Company shall prove to be defective. Parts wear is not
considered a defect. The Connerton Company will not be responsible for labor or transportation charges
incidental to the replacement of same.
The Connerton Company assumes no responsibility for failure of the equipment to operate properly due to
improper installation or operation. This warranty applies to all equipment that has been unaltered, properly
installed and maintained in accordance with national and local codes and in accordance with the installation
and operating instructions included with this equipment.
This warranty does not extend to normal maintenance items, including but not limited to, air and gas
adjustments and adjustments to pilot flames. Proper installation, adjustments, and initial checkout is the
responsibility of the dealer, the owner-user or installer and not that of The Connerton Company.
TROUBLESHOOTING GUIDE
Small/no burner flame Regulator failure Unplug regulator vent hole or
replace regulator.
Plugged orifice hood Unplug hole or replace orifice.
Plugged burner port Unplug burner port(s).
Small/no pilot flame Pilot valve setting Adjust flame height.
Plugged pilot tip Unplug pilot ports.
Yellow burner flame Improper air shutter setting Increase air shutter setting until
flame is blue.
Enlarged orifice hood Replace w/correct orifice.
Flame lifts off burner Improper air shutter setting Decrease air shutter setting
until flame sits on burner.
Plugged orifice hood Unplug orifice hole or replace orifice.
Improper level setting Adjust level w/feet or shims.
Too hot/cold Improper control setting Adjust control setting or replace
control.
Improper level setting Adjust level w/feet or shims.
Condition Probable Cause Solution
LIMITED WARRANTY
Please fill out and refer to the following when contacting the factory:
Model # CSP-18-3-A Serial# Gas Type: Purchase Date:
Popular Stove manuals by other brands

Ravelli
Ravelli HRB160 brochure

MCZ
MCZ TEIA COMFORT AIR 10 UP!S2 OPERATION AND CLEANING

LISEO
LISEO CANARIA Air tight Installation and use manual

Sierra Products
Sierra Products EASYFIRE EF5001U Installation and operating instructions

Vistaflame
Vistaflame VF 100A owner's manual

Lacunza
Lacunza CM-300 Instruction book

Camplux
Camplux MS-7 instruction manual

WANDERS
WANDERS NORMANDIE Instructions For Use & Installation Manual

Nemaxx
Nemaxx P6 Original operating instructions

Moretti Design
Moretti Design AQUA TURBO COMPACT GLASS 16 manual

Horse Flame
Horse Flame HF-317 Artemis user guide

GAS ONE
GAS ONE B-3000H-1 owner's manual