Conrad DJ-Tech Vinyl Encoder 5 User manual

UPGRADE
Version 11/09
DJ TECH USB-PLATTENSPIELER
Best.-Nr. 30 49 62
Sehr geehrter Kunde,
bei der Aufnahme einer externen Audioquelle auf USB über den AUX-Eingang wird
das Audiosignal nicht über den angeschlossenen Verstärker wiedergegeben.
Um eine Kontrolle der Aufnahme zu ermöglichen, muss der Ausgang der externen
Audioquelle zusätzlich parallel an den Verstärker angeschlossen werden.
Hierzu kann der Audioausgang der Quelle z.B. über einen sogenannten Y-Adapter
sowohl an den AUX-Eingang des Plattenspielers, als auch an einen freien
Verstärkereingang angeschlossen werden.
Wir bitten um Beachtung.
Ihr Conrad-Team
MISE A NIVEAU
Version 11/09
PHONO DJ TECH USB
N° de commande 30 49 62
Chère cliente, cher client,
lors de l’enregistrement d’une source audio externe sur USB via l’entrée AUX, le
signal audio n’est par reproduit par l’amplificateur raccordé.
Pour permettre de contrôler l’enregistrement, la sortie de la source audio externe doit
être en plus être raccordé en parallèle à l’amplificateur.
Pour cela, la sortie audio de la source peut par ex. être raccordée par un adaptateur
Y aussi bien à l’entrée AUX du phono qu’à une entrée libre de l’amplificateur.
Veuillez en tenir compte.
Votre équipe Conrad
REMARQUE IMPORTANTE!!!
WICHTIGER HINWEIS!!!
UPGRADE
Version 1109
DJ TECH USB-RECORD PLAYER
Item-No. 30 49 62
Dear customer,
when recording from an external audio source to USB using the AUX input the audio
signal is not played back via the connected amplifier.
In order to allow control of the recording the output of the external audio source, in
addition, has to be connected to the amplifier in parallel.
To do so, the audio source output can be connected to the AUX input of the record
player as well as to a free amplifier input, using e.g. a so-called Y-adapter.
We kindly ask for your observance.
Your Conrad team
ACTUALISERING
Versie 11/09
DJ TECH USB-PLATENSPELER
Bestnr. 30 49 62
Geachte klant,
bij het opnemen vanaf een externe audiobron naar USB via de AUX-ingang wordt het
audiosginaal niet via de aangesloten versterker weergegeven.
Sluit - om de opname te kunnen regelen -de uitgang van de externe audiobron addi-
tioneel in parallel op de versterker aan.
Sluit daartoe de audiouitgang van de bron via een zogenaamde Y-adapter aan op
zowel de AUX-ingang van de platenspeler als op een vrije ingang van de versterker.
Wij danken u voor uw oplettendheid.
Uw Conradteam
BELANGRIJKE AANWIJZING!!!
IMPORTANT NOTE!!!

Full Automatic USB Turntable with Direct Encoding
Vi ny l E n c o d e r 5
USER MANUAL (ENGLISH) P01-08
MANUEL D’UTILISATION(FRANÇAIS) P09-15
BEDIENUNGSANLEITUNG (DEUTSCH) P16-22
GEBRUIKERSHANDLEIDING (NEDERLANDS) P23-29
MANUAL DE INSTRUCCIONES (ESPAÑOL) P30-36
MANUALE DI ISTRUZIONI (ITALIANO) P37-43

2
1. Read these Instructions.
2. Keep these Instructions.
3. Heed all Warnings.
4. Follow all Instructions.
5. Do not use this apparatus near water.
6. Clean only with a dry cloth.
7. Do not block any of the ventilation openings. Install in accordance with the manufacture’s instructions.
8. Do not install near any heat sources such as radiators, heat registers, stoves, or other apparatus (including
amplifiers) that produce heat.
9. Do not defeat the safety purpose of the polarized plug. The wide blade is provided for your safety. If the provided
plug does not fit into your outlet, consult an electrician for replacement of the obsolete outlet.
10. Protect the power cord from being walked on or pinched particularly at plug, convenience receptacles, and point
where they exit from the apparatus.
11. Only use attachments/accessories specified by the manufacturer.
12.
Use only with a cart, stand, tripod, bracket, or table specified by the manufacturer, or sold with the
apparatus. When a cart is used,
use caution when moving the cart/apparatus combination to avoid
injury from tip-over.
13. Unplug this apparatus during lighting storms or when unused for long periods of time.
14. Refer all servicing to qualified service personnel. Serving is required when the apparatus has been damaged in
any way, such as power-supply cord or plug is damaged, liquid has been spilled or objects have fallen into the
apparatus, the apparatus has been exposed to rain or moisture, does not operate normally, or has been dropped.
WARNING
To reduce the risk of the fire or electric shock, do not expose this apparatus to rain or moisture. The apparatus shall
not be exposed to dripping or splashing and that no objects filled with liquids, such as vases, shall be placed on the
apparatus.
CAUTION: To reduce the risk of electric shock, do not remove any
cover. No user-serviceable parts inside. Refer servicing to qualified
service personnel only.
The lightning flash with arrowhead symbol within the equilateral triangle is intended to alert the use to
the presence of un-insulated “dangerous voltage” within the product’s enclosure that may be of
sufficient magnitude to constitute a risk of electric shock.
The exclamation point within the equilateral triangle is intended to alert the user to the presence of
important operation and maintenance (servicing) instructions in the literature accompanying this
appliance.
CAUTION
To prevent electric shock, do not use this polarized plug with an extension cord, receptacle or other outlet unless the
blades can be fully inserted to prevent blade exposure.
ENGLISH
DEUTSCH FRANÇAIS
ESPAÑOL
DUTCH
ITALIANO
1 SAFETY INSTRUCTIONS
DO NOT OPEN
RISK OF ELECTRIC SHOCK
CAUTION

3
FEATURES
•
Built-in switchable stereo phono/line level pre-amplifier. Permits use of turntable with stereo systems
having either magnetic-phono inputs or “AUX” (line-level) inputs; also allows convenient use of
turntable with most powered speakers
•
Full automatic operation
•
2 speeds: 331/3rpm and 45 rpm
•
Professional turntable platter
•
Replaceable diamond stylus
•
Damped lift/cueing mechanism with front-panel control
•
Removable dust cover
Accessory:
Check for the following parts included in the package with the main unit
•
Instruction manual •
Slipmat
•
45 rpm adaptor •
Dust cover
•
Platter
ENGLISH
DEUTSCH FRANÇAIS
ESPAÑOL
DUTCH
ITALIANO
12
14
13
10
9
11
15
8
2 PART NAME AND FUNCTIONS

4
1. Play button - Engages the motor/platter and begins automatic operation.
2. Stop button - Disengages the motor/platter and returns tonearm to rest.
3. Cue up/down - Lifts and lowers tonearm for manual selection.
4. Aux in - Contect tape players, reel to reel or any other audio source to record.
5. Aux level - Adjust the audio source level, when the record level is over, the LED is grown red.
6. Rec. Select - To switch the record is from turntable or Aux in.
7. Record button - Press the “record” button and wait until the LED will flash (this may take several
seconds depending on the contents on the flash disk); press the “record” button again to stop the
recording process.
8. Phono/Line switch - Select Phono setting when you connect to the phono input on your home stereo.
Select the LINE when you connect to CD/AUX inputs of your home stereo.
9. 45rpm adaptor - Adapts 7" records with large center holes to fit center spindle.
10. Center spindle
11. USB slot - Insert a flash-disk to record.
12. Platter speed button - Select 33 rpm (button in high position) or 45 rpm (button in low position)
platter speed.
14. Tonearm / headshell ass’y - Tonearm is permanently attached to the headshell assembly.
15. Dust cover hinge holders - Attachment points for removable hinged dust cover.
ENGLISH
DEUTSCH FRANÇAIS
ESPAÑOL DUTCH
ITALIANO
1 2 3
4567
CUESTOP
PL AY
RECORDAUX I N
T.T
AUX
REC. SELECT UP
DOWN
AUX LEVEL
CLIP
SIGNAL
2 PART NAME AND FUNCTIONS
13. Size selector - Select the size of the record 30 or 17 cm.

5
Accessory the turntable
Fig. a Fig. b Fig. c
1. Carefully place the turntable platter on the center spindle, making certain the platter is fully seated
on the spindle.
2. While holding both ends of the red tape ribbon on the turntable belt, carefully pull the belt over the
motor pulley (Fig. a).
3. Once the belt is seated in the pulley's groove, carefully remove the ribbon. Make certain the belt is
not twisted
4. Place the slipmat on top of the turntable platter (Fig. b).
5. If desired, the hinged dust cover may be removed. Hold both sides of the dust cover and pull upward
gently and evenly to detach the cover from the turntable (Fig. c).
6. To re-install the dust cover, guide the dust cover hinges into the two hinge receptacles located at the
back of the turntable housing.
Setting the Pre-amp (Phono/Line) switch
c The Phono/Line switch is located on the back of the turntable. (Fig. d)
• If the stereo system you are using has a PHONO input, set the pre-amp selector switch to the
“PHONO” position.
• If your stereo system does not have a PHONO input, set the pre-amp selector switch to the “LINE”
position and connect the turntable's output cables to the AUX or other high-level input on your stereo
system.
d Connect the cable with the white plug to the (L) jack and red plug to the (R) jack.
e Connect the power cord plug to an AC outlet.
Fig. d
ENGLISH
DEUTSCH FRANÇAIS
ESPAÑOL DUTCH
ITALIANO
Red ribbon Motor spindle
Drive belt
3 SETUP AND OPERATION
LINE PHONO
AUX PHONO
Input
Jacks
Pre-amp
Selector
Switch
Stereo System
White
Red
AC
AC

6
Automatic Operation
• Remove the stylus guard from the stylus assembly (Fig.1)
• Put a slipmat on the turntable. If needed, use the 45rpm adaptor (Fig.2)
• Select the size selector to 30 or 17 cm (Fig.3)
• Select the speed button to 331/3 or 45 rpm (Fig.4)
•
Start: Gently push the PLAY button (Fig.5). The turntable will start and the tonearm automatically will
move to the lead-in groove. When the record has finished playing, the tonearm will automatically
return to the tonearm rest and the turntable will shut off
•
Stop: To stop playing the record before it reaches the end, press the STOP button (Fig.6). The
tonearm will lift and return to the tonearm rest, and the turntable will shut off
•
Cue up/down: To pause the record before it has completed playing, press the cue up button to
pause playing. Press the cue down button to continue playing the record (Fig. 7)
• Record:
Rec. select to AUX
Recording to your USB stick
a. Insert a flash-disk (e.g.memory stick, MP3 player) into the USB slot
b. Connect any audio source
c. Adjust the Aux level
d. Press the “RECORD” button and wait until the LED will flash (this may take several seconds
depending on the contents on the flash-disk)
e. Press the “RECORD” button again to stop the recording process
f. The track is now stored on the flash disk as an 192kbps MP3 file, tracks will be numbered in
sequence and placed into a folder called “audio”
ENGLISH
DEUTSCH FRANÇAIS
ESPAÑOL DUTCH
ITALIANO
3 OPERATION
Fig.1
Stylus ass’y
Stylus (”needle”)
Stylus guard
Fig.3
Fig.6 Fig.7
30
7
Fig.2 45rpm adaptor
Fig.5Fig.4

7
Automatic Operation
• Record:
Rec. select to TT
Recording to your USB stick
a. Insert a flash-disk (e.g.memory stick, MP3 player) into the USB slot
b. Position the stylus at the track you want to record
c. Press the “CUE UP” button to pause the record player
d. Press the “RECORD” button and wait until the LED will flash (this may take several seconds
depending on the contents on the flash-disk)
e. Press the “CUE DOWN” button and resume playing the track
f. Press the “RECORD” button again to stop the recording process
g. The track is now stored on the flash disk as an 192kbps MP3 file, tracks will be numbered in
sequence and placed into a folder called “audio”
Manual Operation
• Remove the stylus guard from the stylus assembly (Fig.1)
• Put a slipmat on the turntable. If needed, use the 45rpm adaptor (Fig.2)
• Select the size selector to 30 or 17 cm (Fig.3)
• Select the speed button to 331/3 or 45 rpm (Fig.4)
• Press cue up to raise the tonearm (Fig.7)
• Gently move the tonearm so the stylus is over the point on the record where play is desired to begin
• Press cue down button again to gently lower the tonearm and play record (Fig.7)
Replacing the Stylus
While holding the head of the tone arm, rotate the front of the stylus assembly in a forward and down
motion to remove it.
Make certain that the projection at the back of the assembly is fully seated in the cartridge body first,and
that the assembly “clicks” up into place, with no gap between its top edge and the front of the black
plastic tonearm head.
ENGLISH
DEUTSCH FRANÇAIS
ESPAÑOL DUTCH
ITALIANO
Engage in
body first
No gap here
3 OPERATION

8
Turntable does not operate
1. Make certain the turntable’s AC cord is plugged into an AC outlet,
and that the AC outlet is “live”
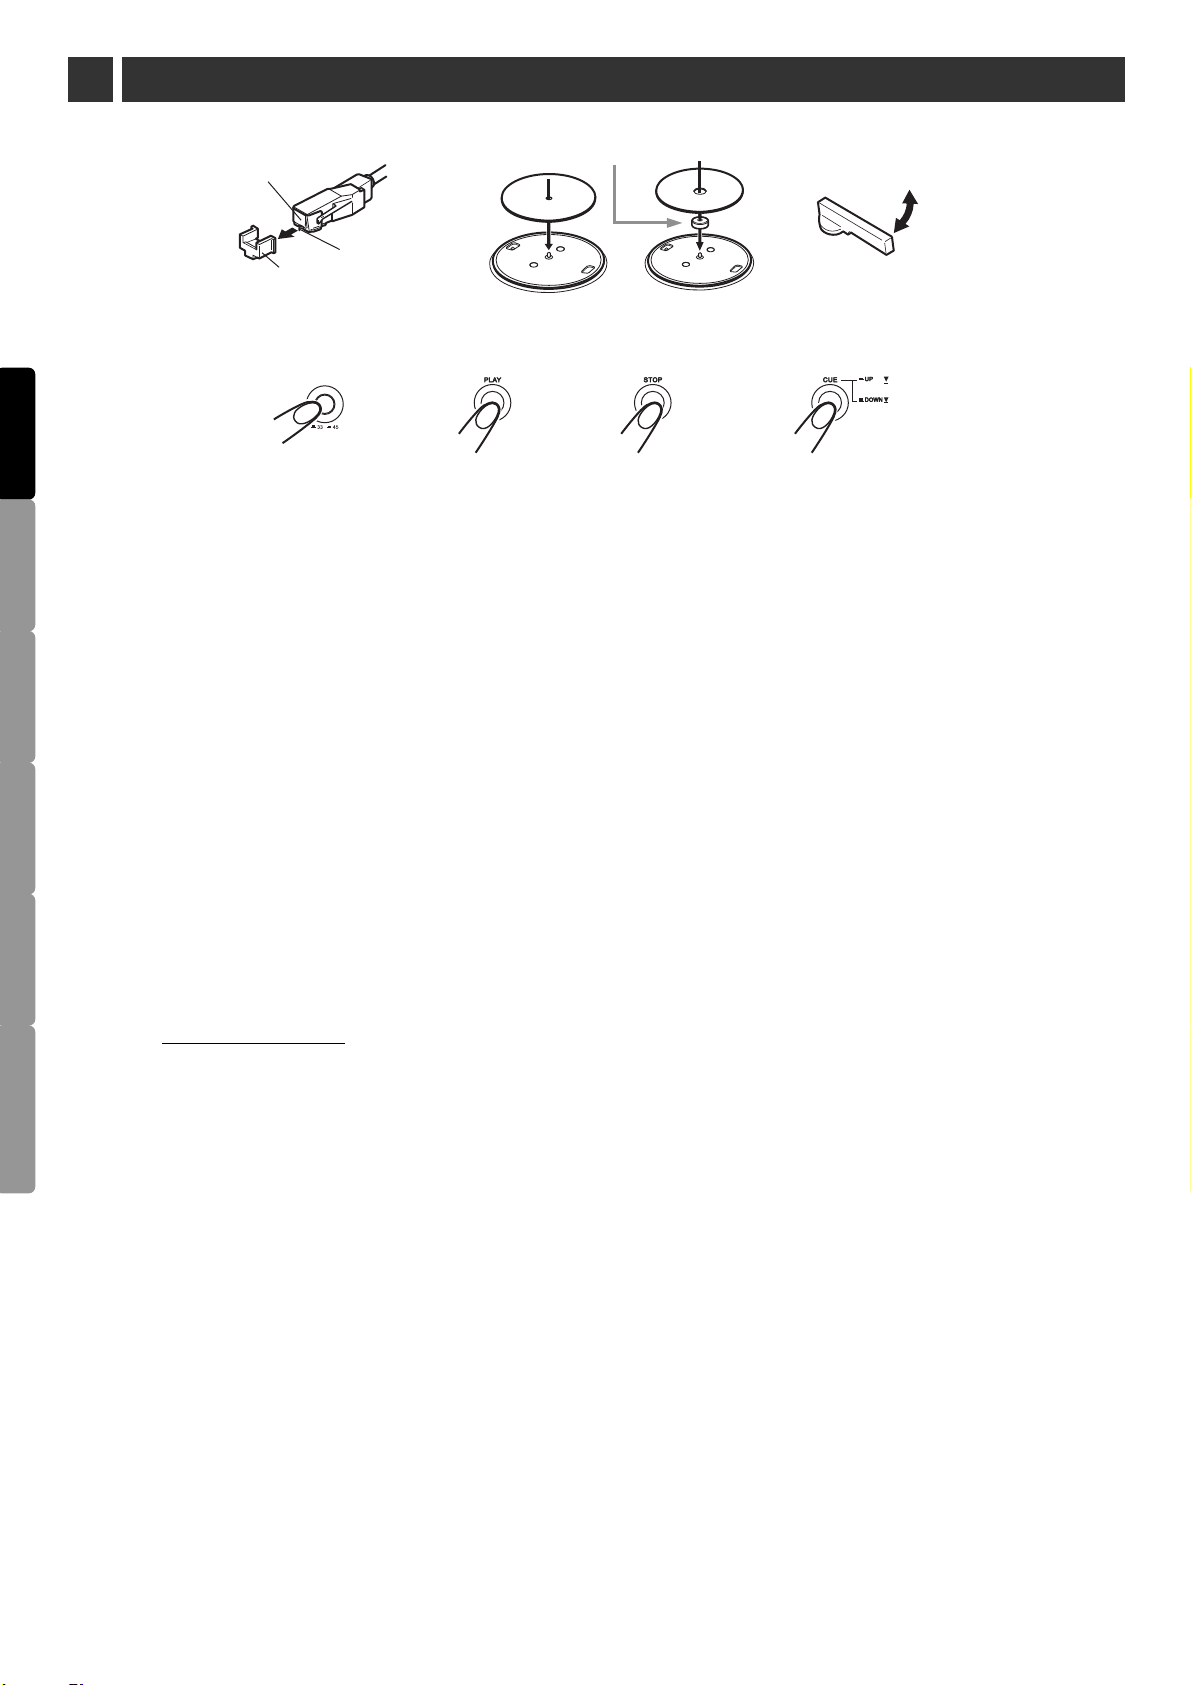
2. A) Remove the slipmat from the turntable (Fig. 1)
Through an opening in the turntable platter, visually inspect to see if the
drive belt is around the motor pulley (Fig. 2)
B) if the drive belt is not around the motor pulley: Lift and remove the
turntable. Place a thumb into each of the left and right openings on the
turntable platter; and, using the fingers to press down on the turntable
housing’s surface, pull the platter straight up (Fig. 3)
Avoid pressing on the tone arm
C) With the turntable platter bottom side up, place the belt along the
outside wall of the turntable platter's drive rim, making certain that the
belt is smooth and flat all the way around (Fig. 4)
D) Put the turntable back on the center spindle, make certain it is fully
seated, and align one of its openings over the motor pulley position
E) While holding both ends of the ribbon on the turntable belt, carefully
pull the belt over the motor pulley (Fig. 5) Make certain it does not
twisted
Turntable operates, but no sound at all
1. The stylus guard is still in place.
2. The tone arm Lift button is pressed in.
3. Amplifier controls set incorrectly.
4. Check the stylus on phono cartridge for correct placement.
Turntable operates, but no sound or sound not loud enough
1. If the turntable is connected to an AUX input. The Pre-amp
selector switch may be set to the “PHONO” position.
2. The input gain of the amplified speaker or similar device may be
too low.
3. The stylus assembly may not be fully seated in the cartridge body.
Sound is very distorted
Turntable connected to an amplifier’s PHONO input. If the pre-amp
switch is set to the “LINE” position, a phono input will be overloaded
Power supply AC230V, 50Hz
Power consumption 10W
Dimensions 420 x 363.4 x 94mm
Load Impedance 47K ohm
Output Voltage A. Connect with Equalizer
90-216mV at 1KHz 5cm/sec (HP-4005)
B. Connect without Equalizer
1.5-3.6mV at 1KHz 5cm/sec (HP-4005)
Weight 3.6kg
ENGLISH
DEUTSCH FRANÇAIS
ESPAÑOL
DUTCH
ITALIANO
4 TROUBLESHOOTING
5 SPECIFICATIONS
Drive belt
Motor pulley

9
1. Lisez les instructions.
2. Gardez le manuel d’utilisation.
3. Tenez compte de tous les avertissements.
4. Suivez toutes les instructions.
5. N’utilisez pas l’appareil près de l’eau.
6. Nettoyez uniquement avec un chiffon sec.
7. Ne bloquez pas les ouvertures de ventilation. Installez selon les instructions du fabricant.
8. N’installez pas près de source de chaleur, tels que les radiateurs, poêle ou tout autre appareil produisant de la chaleur.
9. Ne démontez pas la prise d’alimentation pour votre sécurité. Si la prise d’alimentation n’entre pas dans la prise secteur,
consultez un électricien pour le remplacement de la prise défectueuse.
10. Protégez votre cordon d’alimentation, ne marchez pas dessus ou ne l’écrasez pas en particulier lorsque l’appareil est
branché.
11. Utilisez uniquement les accessoires spécifiés par le fabriquant.
12. Utilisez uniquement un chariot, stand, trépied, support ou table spécifié par le fabricant ou livré avec
l’appareil.
13. Débranchez l’appareil lors des orages ou si vous ne l’utilisez pas pendant une longue période.
14. Référez vous à un personnel qualifié. Ce service est requis lorsque l’appareil est endommagé en aucune façon tels que
le cordon d’alimentation ou la prise est endommagé, liquide déversé ou objets tombés sur l’appareil, l’appareil exposé à
la pluie ou à la moisissure ou ne fonctionne pas normalement.
AVERTISSEMENT
Pour réduire les risques électriques, n’exposez pas l’appareil à la pluie ou à la moisissure.
ATTENTION: Pour réduire les chocs électriques, n’ouvrez pas le
couvercle. Ne remplacez pas les pieces. Référez vous à un personnel
qualifié.
Ce symbole alerte l’utilisateur de risqué de choc électrique.
Ce symbole alerte l’utilisateur des instructions de maintenance.
ATTENTION
Pour prévenir des chocs électriques, n’utilisez pas cette prise polarisée avec une rallonge électrique.
ENGLISH
DEUTSCH FRANÇAIS
ESPAÑOL DUTCH
ITALIANO
DO NOT OPEN
RISK OF ELECTRIC SHOCK
1 INFORMATIONS DE SECURITE

10
Caractéristiques
•
Le pré-ampli possède un commutateur phono/line intégré permettant l’utilisation de la platine avec
un système équipé d’une entré AUX ou d’une entrée PHONO
•
Fonctionnement entièrement automatique
•
2 vitesses : 33 tours et 45 tours
•
Tourne disque professionnel
•
Diamant remplaçable
•
Mécanisme amortisseur de montée/descente du bras contrôlé depuis le panneau avant
•
Couvercle de protection amovible
Accessoires:
Les pieces suivantes sont fournies
•
Manuel d’utilisateur •
Feutrine
•
Adaptateur 45 tours •
Couvercle de protection
•
Plateau
ENGLISH
DEUTSCH FRANÇAISESPAÑOL
DUTCH
ITALIANO
2 FONCTIONS
12
14
13
10
9
11
15
8

11
1. Bouton Play - Engage le moteur/plateau et commence à fonctionner automatiquement.
2. Bouton Stop - Désengage le moteur/plateau et retourne le bras au repos.
3. Cue up/down - Monte et descend le bras manuellement
4. Aux in - Entrée auxiliaire pour l’encodage d’une source audio extérieure.
5. Aux level - Ajuste le niveau de la source extérieure. La LED devient rouge si le niveau est trop élevé.
6. Rec. Select - Sélectionne la source à encoder, tourne disque ou source audio extérieure.
7. Bouton Record - Appuyez sur le bouton “record” et patientez jusqu’à ce que la LED clignote (cela
peut prendre plusieurs secondes selon le contenu de la clé USB), appuyez une seconde fois sur le
bouton « record » pour stopper le processus d’enregistrement.
8. Commutateur Phono/Line - Sélectionnez phono si vous vous connectez à l’entrée PHONO de votre
amplificateur, sélectionnez LINE si vous vous connectez à l’entrée CD/AUX de votre amplificateur.
9. Adaptateur 45 tours - Adaptateur pour les disques 7”.
10. Axe de rotation
11. Port pour périphérique USB (encodage direct)
12. Bouton de vitesse du plateau - Sélectionnez 33 tours ou 45 tours.
13. Sélecteur de taille - Sélectionnez la taille du disque 30 ou 17 cm.
14. Bras/cellule - Verrouillage du bras.
15. Couvercle de protection - Emplacements des charnières du couvercle de protection anti-poussière.
ENGLISH
DEUTSCH FRANÇAIS
ESPAÑOL
DUTCH
ITALIANO
2 FONCTIONS
1 2 3
4567
CUESTOP
PL AY
RECORDAUX I N
T.T
AUX
REC. SELECT UP
DOWN
AUX LEVEL
CLIP
SIGN AL

12
Montage
Fig. a Fig. b Fig. c
1. Placez soigneusement le plateau du tourne disque sur l’axe de rotation, vérifiez que le plateau soit
bien centré sur l’axe.
2. Tout en maintenant les deux extrémités du ruban rouge, tirez la courroie de la poulie du moteur
(Fig. a).
3. Une fois que la courroie est bien installée dans la rainure, enlevez soigneusement le ruban. Assurez
vous que la courroie n’est pas pliée.
4. Place la feutrine au-dessus du plateau du tourne disque (Fig. b).
5. Si vous le souhaitez le couvercle de protection anti-poussière peut-être retiré. Pour cela saisissez
les 2 côtés du couvercle et tirez doucement vers le hautde manière à détacher le couvercle de la
platine disque (Fig c).
6. Pour réinstaller le couvercle, guidez les deux charnières dans leurs logements situés à l’arrière de la
platine disque.
Réglage du pré ampli (Phono/Line)
Le commutateur PHONO/LINE est situé à l’arrière de la platine disque. (Fig. d)
• Si la chaîne stéréo que vous utilisez dispose d’une entrée phono, réglez le pré ampli sur la position
Phono.
• Si votre amplificateur ne dispose pas d’une entrée PHONO, placez le commutateur sur la position
LINE et connectez la platine disque à l’entrée CD/AUX de votre amplificateur.
Connectez le câble avec un câble RCA blanc (L) et un câble RCA rouge (R).
Connectez le câble d’alimentation au secteur.
Fig. d
ENGLISH
DEUTSCH FRANÇAIS
ESPAÑOL
DUTCH
ITALIANO
ENGLISH
DEUTSCH FRANÇAIS
ESPAÑOL DUTCH
ITALIANO
3 INSTALLATION ET FONCTIONNEMENT
Ruban rouge Axe
Courroie
LINIE PHONO
AUXILIAIRE PHONO
Entrées
Commutateur
Système stéréo
Blanc
Rouge
AC
AC
du pré-ampli

13
•
Retirez le cache de la cellule (Fig.1)
•
Mettez la feutrine sur le tourne disque. Si nécessaire, utilisez l’adaptateur 45 tours (Fig.2)
•
Sélectionnez la dimension 30 ou 17 cm (Fig.3)
•
Sélectionnez la vitesse 33 ou 45 tours (Fig.4)
•
Démarrage : Appuyez doucement sur le bouton PLAY (Fig.5). Le tourne disque commencera à
tourner et le bras se placera automatiquement dans le sillon. Lorsque le disque a fini sa lecture, le
bras retournera automatiquement à sa position initiale et le tourne disque s’éteindra.
•
Stop: Pour arrêter le disque avant la fin, appuyez sur le bouton STOP (Fig.6). le bras retournera en
position initiale, et le tourne disque s’arrête
•
Cue up/down: Pour faire une pause avant la fin de la lecture appuyez sur le bouton CUE pour
mettre en pause. Appuyez sur la touche CUE afin de continuer l’enregistrement (Fig. 7)
• Enregistrement:
Enregistrement d’une source audio extérieure (encodage sur votre clé USB)
a. Insérez une clef USB ou un lecteur MP3 dans le port USB
b. Connectez une source audio
c. Ajustez le niveau Aux
d. Appuyez sur le bouton “RECORD” et patientez jusqu’à ce que la LED clignote
e. Appuyez sur le bouton “RECORD” encore une fois pour arrêter le processus d’enregistrement
f. La piste est maintenant stockée sur la clé USB comme un fichier MP3 encodé au débit de
192kbps. Un répertoire « AUDIO » est crée automatiquement, et les fichiers sont nommés de
manière consécutive
ENGLISH
DEUTSCH FRANÇAIS
ESPAÑOL
DUTCH
ITALIANO
3 UTILISATION
Pointe
(haut)
(bas)
Fig.1
Cellule
Cache
Fig.3
Fig.6 Fig.7
30
7
Fig.2 Adaptateur 45 tours
Fig.5Fig.4

14
• Enregistrement:
Enregistrement de la platine disque (encodage sur votre clé USB)
a. Insérez une clé USB ou un lecteur MP3 dans le port USB
b. Positionnez la cellule sur la piste que vous voulez enregistrer
c. Appuyez sur « CUE UP » pour relever le bras de la platine disque
d. Appuyez sur le bouton “RECORD” et patientez jusqu’à ce que la LED clignote
e. Appuyez sur « CUE DOWN » pour abaisser le bras de la platine disque et reprendre la lecture
f. Appuyez sur le bouton “RECORD” encore une fois pour arrêter le processus d’enregistrement
g. La piste est maintenant stockée sur la clé USB comme un fichier MP3 encodé au débit de
192kbps. Un répertoire « AUDIO » est crée automatiquement, et les fichiers sont nommés de
manière consécutive
Operation manuelle
• Retirez le cache de la cellule (Fig.1)
•
Mettez la feutrine sur le tourne disque. Si besoin, utiisez l’adaptateur de 45 tours (Fig.2)
•
Sélectionnez la dimension du disque 30cm ou 17cm (Fig.3)
•
Sélectionnez la vitesse 33 ou 45 tours (Fig.4)
•
Appuyez sur cue up pour élever le bras (Fig.7)
•
Positionnez doucement le bras sur le disque où vous désirez que la lecture commence
•
Appuyez sur le bouton cue down encore pour la lecture (Fig.7)
Remplacez la cellule
Pour retirer la tête du bras, tirez la tête du bas vers l’avant
Vérifiez que la nouvelle cellule soit bien remise en place
ENGLISH
DEUTSCH FRANÇAIS
ESPAÑOL
DUTCH
ITALIANO
3 UTILISATION
Insérez d'abord
Il ne peut pas y
dans le corps
avoir d'espace ici

15
Le tourne disque ne fonctionne pas
1. Soyez sûr que l’appareil est bien branché à une prise d’alimentation,
Et que cette prise fonctionne
2. A) Retirez la feutrine du tourne disque (Fig. 1)
Au travers l’ouverture du plateau du tourne disque, vous pouvez
visualiser la courroie autour de la poulie du moteur (Fig. 2)
B) Si la courroie d’entrainement n’est pas dans la poulie,
replacez la: la remplacer Placez vos pouces à gauche et
à droite du plateau du tourne disque et utilisez vos index
pour presser la surface de logement et tirez le plateau (Fig. 3)
Évitez d’appuyer sur le bras
C) retournez le plateau, placez la courroie dans la rainure en dessous
de plateau, assurez vous que la courroie n’est pas tendue (Fig. 4)
D) Remettez le plateau en place sur l’axe de rotation, assurez vous qu’il
est correctement place et aligné l’une de ses ouvertures au dessus de la
poulie du moteur
E) Pendant que vous tenez les deux bouts du ruban qui tient la courroie,
tirez la courroie sur la poulie du moteur (Fig. 5) Assurez vous que la courroie
n’est pas tordue
Le tourne disque tourne, mais pas de son l
1. Le cache de la cellule est en place.
2. quelque chose presse le bras.
3. L’amplificateur n’est pas bien réglé.
4. Contrôlez que la cellule est bien placée.
Le tourne disque fonctionne, mais il n’y a pas de son ou pas assez
de son
1. Si le tourne disque est connecté sur l’entrée AUX. Le sélecteur Pré
amp est peut être réglé sur la position PHONO.
2. L’entrée gain des enceintes amplifiées ou appareil similaire est peut
Etre trop faible.
3. Vérifiez l’assemblage.
Le son est très déformé
Le tourne disque est connecté à l’entrée PHONO de l’amplificateur
Mettez sur la position LINE, une entrée PHONO sera chargée.
Alimentation AC230V, 50Hz
Consommation 10W
Dimensions 420 x 363.4 x 94mm
Impédance 47K ohm
Tension de sortie A. Commutateur PHONO/LINE sur LINE
90-216mV à 1KHz 5cm/sec (HP-4005)
B. Commutateur PHONO/LINE sur PHONO
1.5-3.6mV à 1KHz 5cm/sec (HP-4005)
Poids 3.6kg
ENGLISH
DEUTSCH FRANÇAIS
ESPAÑOL
DUTCH
ITALIANO
ENGLISH
DEUTSCH FRANÇAIS
ESPAÑOL
DUTCH
ITALIANO
4 DEPANNAGE
5 CARACTERISTIQUES TECHNIQUES
Courroie
Poulie de moteur

16
1. Bitte lesen Sie diese Bedienungsanweisung sorgfältig.
2. Bewahren Sie diese Bedienungsanleitung auf.
3. Beachten Sie alle Warnhinweise.
4. Befolgen Sie alle Instruktionen.
5. Betreiben Sie das Gerät nicht in der Nähe von Wasser.
6. Reinigen Sie das Gerät nur mit einem trockenen Lappen falls nötig.
7. Blockieren Sie keinesfalls die Lüftungsschlitze. Bauen Sie das Gerät unter Beachtung der Herstellerhinweise auf.
8. Betreiben Sie das Gerät nicht in Nähe einer Wärmequelle (Heizung, Ofen, Kerzen) oder neben Geräten, die Wärme absondern
können (z.B. Verstärker).
9. Verändern Sie nichts am Stecker für die Stromzuführung! Andernfalls gefährden Sie die Betriebssicherheit und damit sich
selbst! Falls der Stromstecker des Geräts sich nicht in die Steckdose stecken lässt oder nicht richtig steckt, kontaktieren Sie
einen Elektriker für die Reparatur der Steckdose.
10. Sorgen Sie dafür, dass niemand über das Kabel laufen kann. Quetschen und verdrehen Sie das Kabel nicht, schützen Sie
ebenfalls Stecker, Anschlüsse und Ausgänge.
11. Benutzen Sie nur vom Hersteller zugelassenes Zubehör (Originalzubehör).
12. Benutzen Sie das Gerät nur mit rollbaren Untersätzen, Stativen und Aufhängungen, die vom Hersteller
zugelassen oder im Lieferumfang enthalten sind. Seien Sie vorsichtig bei Benu tzung eines rollbaren
Untersatzes, um Verletzungen durch ein Umkippen zu vermeiden.
13. Trennen Sie das Gerät bei Gewitter oder längerer Nichtbenutzung vom Stromnetz.
14. Lassen Sie Reparaturarbeiten (bei Beschädigungen jeglicher Art, z.B. Kabelbruch, kaputter Stecker, Flüssigkeitseintritt,
Wasser- und Sturzschäden oder Funktionsstörungen ohne sichtbare Ursache) nur von qualifiziertem Fachpersonal
durchführen.
WARNUNG
Um das Risiko eines Stromschlags oder eines Feuers zu verhindern, setzen Sie dieses Gerät niemals Niederschlag oder
Feuchtigkeit aus. Stellen Sie keine flüssigkeitsgefüllten Gegenstände wie z.B. Vasen auf das Gerät.
ACHTUNG: Um das Risiko eines Stromschlags zu verhindern, öffnen Sie
keinesfalls das Gehäuse. Es befinden sich keine vom Benutzer zu wartenden
Teile im Inneren des Gerätes. Überlassen Sie Reparaturarbeiten nur
qualifiziertem Fach- Personal!
Das Dreieckszeichen mit dem Blitz warnt vor gefährlicher Spannung, die bei unsachgemäßen Umgang
mit dem Gerät einen Stromschlag zur Folge haben kann.
Das Dreieck mit dem Ausrufezeichen dient dazu, den Benutzer auf die Wichtigkeit des betreffenden
Bedienungshinweises/Servicehinweises in der Begleitliteratur aufmerksam zu machen.
ACHTUNG
Um einen elektrischen Schlag zu vermeiden, benutzen Sie den Gerätestecker nur mit Verlängerungskabeln oder
Steckerleisten, die den Stecker vollständig aufnehmen. Die Kontakte des Steckers dürfen im angeschlossenen
Zustand nicht freiliegen oder sichtbar sein!
ENGLISH
DEUTSCH FRANÇAIS
ESPAÑOL DUTCH
ITALIANO
DO NOT OPEN
RISK OF ELECTRIC SHOCK
CAUTION
1 WICHTIGE SICHERHEITSHINWEISE

17
Ausstattung
•
Eingebauter, umschaltbarer Stereo-Phono/Line-Vorverstärker. Zwei Funktionsarten des Geräts
nutzbar: Als reiner Plattenspieler (PHONO) oder zur Wiedergabe anderer Signalquellen (AUX); zum
Anschluss an jede beliebige Hifi-Anlage, sofern Anschlüsse vorhanden
•
Vollautomatisch
•
2 Geschwindigkeiten: 33 1/3 U/min und 45 U/min
•
Professioneller Plattenteller
•
Austauschbare Diamantnadel
•
Gedämpfter Lift/Cue-Mechanismus mit Frontplattensteuerung
•
Abnehmbare Schutz-Haube
Zubehör:
Überprüfen Sie, ob sich die folgenden Artikel im Lieferumfang befinden
•
Bedienungsanleitung •
Slipmat
•
45-rpm-Adapter •
Schutz-Haube
•
Plattenteller
ENGLISH
DEUTSCH FRANÇAIS
ESPAÑOL
DUTCH
ITALIANO
2 KOMPONENTEN UND FUNKTIONEN
12
14
13
10
9
11
15
8

18
1. Play - Schaltet den Motor ein und startet den Automatik-Modus.
2. Stop - Schaltet den Motor aus, der Tonarm geht in die Ruheposition zurück.
3. Cue up/down - Senkt oder hebt den Tonarm im manuellen Betrieb.
4. Aux-Eingang - Schließen Sie Kassettenspieler oder beliebige andere Signalquellen, um diese
aufzunehmen.
5. Aux-Pegel - Stellen Sie den Pegel der Audi-Quelle anhand der LED ein (wenn der PEgel zu hoch ist,
leuchtet die LED rot).
6. Rec. Select - Wählen Sie aus, ob vom Plattenspieler oder vom Aux-Eingang aufgenommen warden
soll.
7. Record - Drücken Sie “record” und warten Sie, bis die LED blinkt – je nachdem wieviel Platz sich auf
dem Speicher befindet, dauert dies einige Sekunden; drücken Sie nochmals “record”, um die
Aufnahme zu stoppen.
8. Phono/Line Umschalter - Wählen Sie Phono aus, wenn Sie den Plattenspieler an den
Phono-Eingang Ihres Hifi-Systems anschließen.
Wählen Sie LINE, wenn Sie das Gerät an den CD/AUX-Eingang Ihres Hifi-Systems anschließen.
9. 45rpm Adapter - Adapter für 7"-Vinyls.
10. Center spindle - Zentrierungspunkt
11. USB-Eingang- Stecken Sie hier Ihren USB-Stick ein.
12. Platter Speed - Wählen Sie die Geschwindigkeit des Plattentellers aus, entweder 33 rpm (Knopf in
normaler Position) oder 45 rpm (Knopf in gedrückter Position).
13. Size selector - Wählen Sie die Größe der Schalplatte aus, 30 oder 17 cm.
14. Tonearm / headshell - Der Tonarm ist mit dem System/der Nadel verbunden.
15. Aufnahmepunkte für die Staubschutzhaube.
ENGLISH
DEUTSCH FRANÇAIS
ESPAÑOL DUTCH
ITALIANO
ENGLISH
DEUTSCH FRANÇAIS
ESPAÑOL DUTCH
ITALIANO
1 2 3
4567
CUESTOP
PL AY
RECORDAUX I N
T.T
AUX
REC. SELECT UP
DOWN
AUX LEVEL
CLIP
SIGNAL
2 KOMPONENTEN UND FUNKTIONEN

19
Zusammenbau
Fig. a Fig. b Fig. c
1. Platzieren Sie den Plattenteller vorsichtig auf den Mittelpunkt.
2. Ziehen Sie den Riemen vorsichtig auf den Motor, indem Sie beide Enden des rotten
Kunststoffbands festhalten (Fig. a).
3. Wenn der Riemen richtig sitzt, entfernen Sie das Kunststoffband vorsichtig. Überprüfen Sie, ob sich
der Riemen verdreht hat
4. Legen Sie die Slipmat auf den Plattenteller (Fig. b).
5. Falls gewünscht, entfernen Sie die Staubschutzhaube. Öffnen Sie sie dazu, halten Sie sie an beiden
Seiten fest und ziehen Sie die Haube ab (Fig. c).
6. Um die Schutzhaube wieder aufzusetzen, lassen Sie die Aufnahmescharniere vorsichtig in die
Fassungen auf der Rückseite des Plattenspielers gleiten.
Einstellen des Pre-amp (Phono/Line)-Schalters
c Der Phono/Line-Schalter befindet sich auf der Rückseite des Plattenspielers (Fig. d)
• Benutzen Sie den PHONO-Eingang Ihres Stereo-Systems, stellen Sie den Schalter entsprechend auf
“PHONO”.
• Benutzen Sie den AUX/LINE-Eingang Ihres Stereo-Systems, stellen Sie den Schalter entsprechend
auf “AUX/LINE” und verbinden Sie die Ausgangskabel des Plattenspielers mit den
AUX-Eingangsbuchsen Ihrer HiFi-Anlage.
d Verbinden Sie das Kabel (weißer Stecker auf Links, roter Stecker auf Rechts).
e Verbinden Sie das Stromkabel mit der Steckdose.
Fig. d
ENGLISH
DEUTSCH FRANÇAIS
ESPAÑOL DUTCH
ITALIANO
3 AUFBAU & BEDIENUNGSHINWEISE
Rotes Kunststoffband
Antriebsmotor
Antriebsriemen
LINE PHONO
AUX PHONO
Eingangsbuchsen
Umschalter
Stereoanlage
Weiß
Rot
AC
AC
Phono/Line
Table of contents
Languages:
Other Conrad Turntable manuals
Popular Turntable manuals by other brands

Sanyo
Sanyo LC78626KE manual

Pioneer
Pioneer PL-71 Service manual

Pro-Ject Audio Systems
Pro-Ject Audio Systems Pro-Ject 6 PerspeX SuperPack Instructions for use

Clearaudio
Clearaudio Emotion SE user manual

Brooklyn
Brooklyn BTR9 instruction manual

ESOTERIC SOUND
ESOTERIC SOUND REK-O-KUT TROUBADOUR instructions