Continental Refrigerator PC150 User manual

SAFETY PRECAUTIONS
• Read instructions and identify all component parts before using the crimper and saw.
• Familiarize yourself with the safety and operating procedures for the crimper and saw before use.
• Use all safety precautions listed.
• Consult the Continental CrimpIQ™ Tablet for Crimp Specications for correct crimper settings
and crimp measurements.
• Always wear eye protection.
i
PC150 SHOP IN A BOX
Quick Start Guide
Updated: 09/22/2020 www.continental-industry.com
Continental QR Code
H: 2.25 in
W: 1.35 in
Use your smartphone to scan the Continental QR Code to
get full access to the operators manuals and training videos.

Initial Setup
2
Setting Up Accessories
Step #1. Position your new PC150 SHOP IN A BOX near to the appropriate electrical outlet. Check the voltage
tag attached to the power strip supply cord #1, PC150-2 crimper’s power cord #2 and HS-501 hose saw’s power
cord #4.
Note: Check electrical circuit to be certain that it matches the crimper and saw requirements shown on the voltage
tag attached to the power cord.
Locate the power strip supply cord #1 and plug it directly into a 110V outlet. Do not use an extension cord.
Plug in the CrimpIQ™ Controller’s power cord (3), and the light’s power cord (5) into the power strip supply cord
as shown in the picture.
Caution: Do not run the power strip, crimper, and saw on an extension cord, as low voltage can damage the
motors and/or electrical components.
Step #2. Familiarize yourself with the safety and operating procedures for the crimper and saw before use.
Use all safety precautions listed on the quick start guide.
Step #3. Locate the tooling box, it contains the accessories needed to nish setting up your Shop-in-a-box.
a. Connect air nozzle and Continental air hose to shop air supply.
b. Install hose saw handle and alignment pins as shown.
c. Note optional vacuum adapter is included if you want to connect see instructions in saw operating procedure.
Step # 2 Step # 3a
Step # 1
Step # 3b Step # 3c
2
3
4
5
1

3
Setting Up Accessories
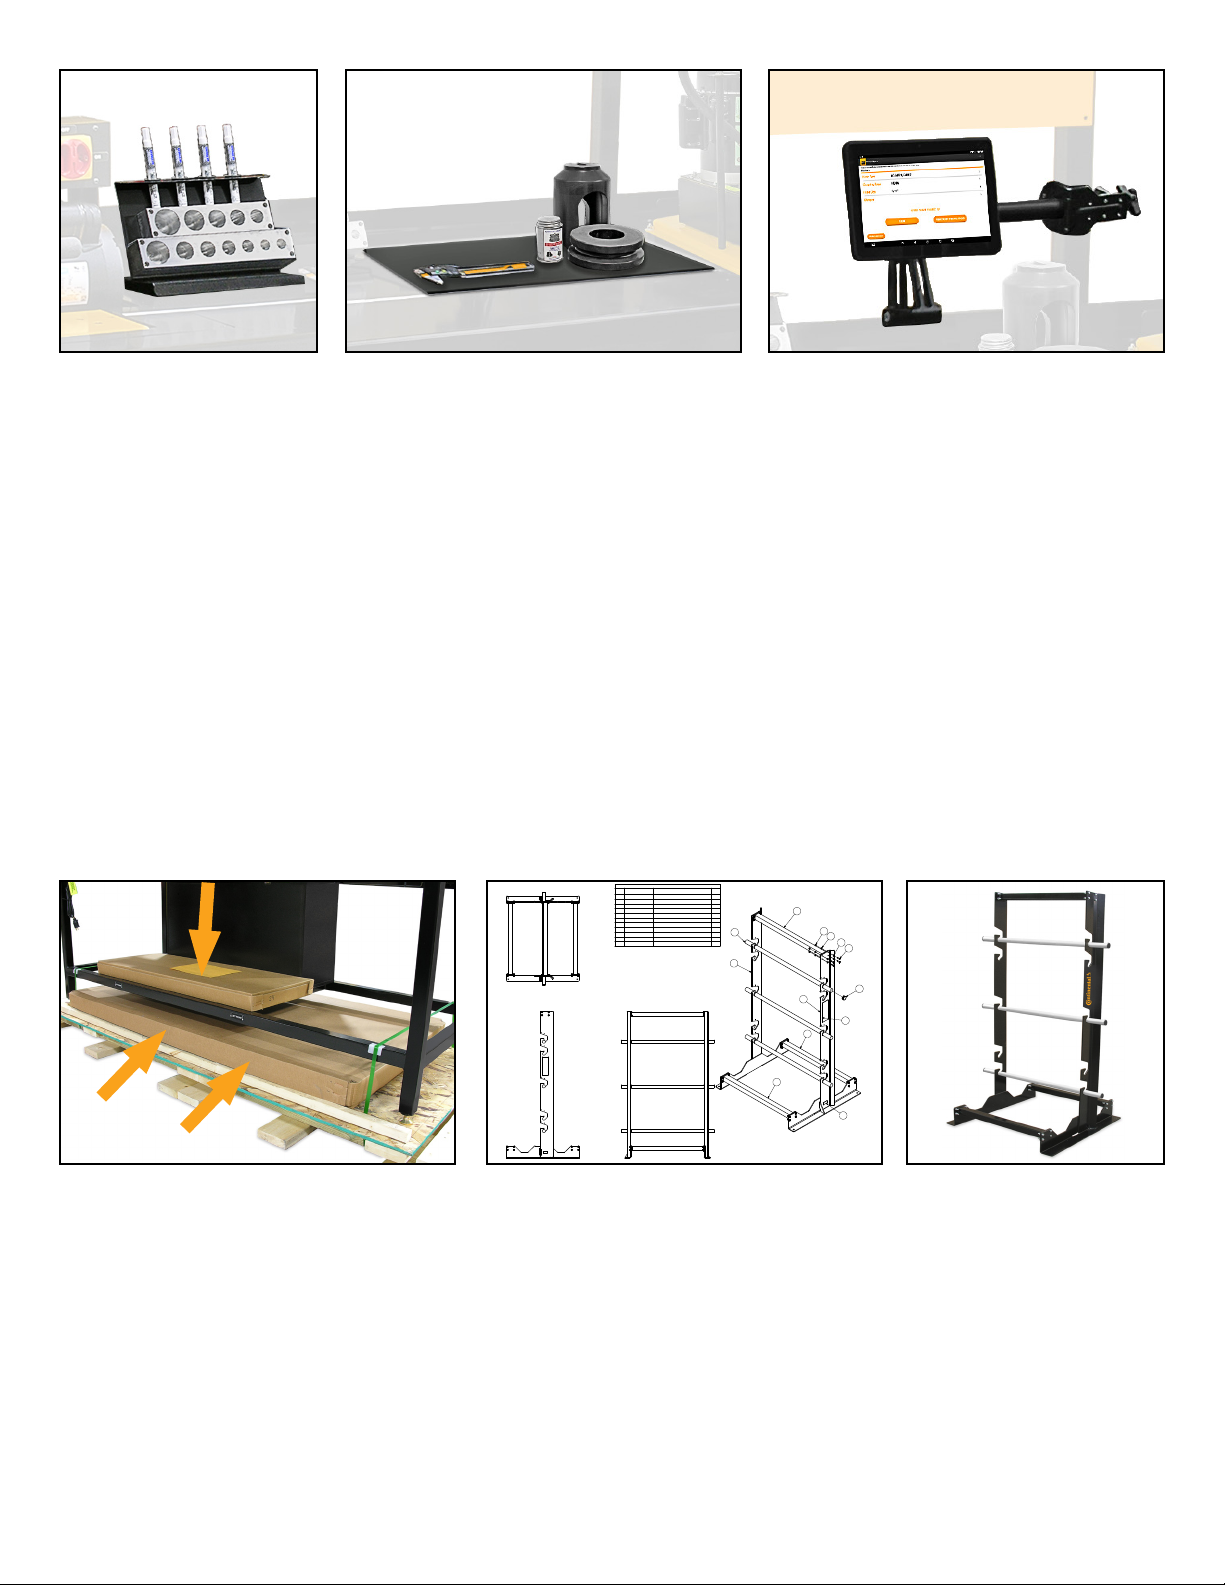
d. Place the inserting block assembly on the table as desired. Please note that this can go on the edge of
table if needed.
e. Removing tooling and lubrication and place on the rubber mat on table. Organize in a way you feel most
ecient.
f. Locate the tablet box, it contains the CrimpIQ™ tablet. This has the most recent Continental crimp specs
readily available. This can be mounted to either signpost as shown.
Step # 3d Step # 3e Step # 3f
36" Hose Reel Rack Instructions
Step #4. Locate the hose reel box.
Step #5. Locate the instructions on how to assemble your stand alone hose reel rack assembly.
Note: Hardware included.
Step #6. Hose reel rack is shown fully assembled.
Step #4 Step #5 Step #6
1
1
2
2
3
3
4
4
A A
B B
C C
D D
SIZE PART NO REV
SCALE SHEET OF
DRAWN
CHECKED
APPROVED
QA
MFG TITLE
104935-36
1 1
A
C
CUSTOM MACHINING SERVICES
VALPARAISO, INDIANA
JRI 4/24/2018
M:\Dwg\Hose Reel\AI-104935-36.iam
.1 : 1
36'' HOSE REEL RACK ASSEMBLY
HOSE REEL RACK 36'' WIDE BOM LIST
QTYDESCRIPTIONPART NUMBERITEM
1Left Upright Assembly104932-L1
1Right Upright Assembly104932-R2
2
36'' Spacer Bar
104934-363
136.5'' Spacer Bar104934-36.5
4
485/16 Flat Wash er91090A110
5
24
5/16-18 Nylon Locking Hex Nut
95615A1606
245/16-18 x 1'' HHCS92865A583
7
3Hose Reel Bar105058-45.58
6
Plastic End Cap
9283K169
2
Logo Sticker
10
1Serial Tag Sticker 11
2 PLC. DEC.
0.010
ANGULAR
1/2
FRACTIONAL
1/64
TOLERANCE UNLESS OTHERWISE NOTED:
3 PLC. DEC.
0.005
4 PLC. DEC.
0.0005
ALL DIMENS IONS ARE IN INCHE S [METRIC].
BREAK ALL SHARP EDGES .0 15"-.030".
FINISH ALL O VER 125 MICRO M AX.
REV DESCRIPTION
7
5
5
6
4
2
1
3
3
A
ADDED A GUSSET TO
BASE FOR STRENGTH
3/15/18 JRI
10
11
8
9

4
Continental QR Code
H: 2.25 in
W: 1.35 in
Scanning Continental QR Code
PC150 SHOP IN A BOX Identication Components
Step #7. Use your smartphone to scan the Continental QR Code to get full access to the operational manuals and
training videos.
Note: If you don’t have a QR code reader app installed in your smartphone, download it from your smartphone app
store.
Step #8. Read the crimper quick start guide before operation. Scanning the QR code will allow access to the full
operational manual.
Step #9. Read the hose saw quick start guide before operation. Scanning the QR code will allow access to the full
operational manual.
Step #7 Step #9Step #8
3
11
13
12
15
14
10
9
8
7
6
5
4
1
2
1. 36" Hose Reel Rack
(Hose spools not included)
2. 6' LED Light Kit
3. 6' Continental Sign
4. Hose Helper
5. 10' Continental Air Hose
with Nozzle
6. HS-501 Hose Saw
(Handle, Vacuum Port, and
Alignment Pins)
7. Insertion Block Assembly
(B2 and SG blocks, (5) Paint
Markers)
8. CrimpIQ™ Tablet and
Mounting Arm
9. Tape Measure
10. PC150-2 Tooling Box
and Tooling Mat
11. PC150-2 Crimper
(Dies, Shelf, and Tooling Box)
12. 5' 110V Power Strip
13. 4 Drawer Cabinet with
Small and Large Bins
14. PC150 Die Shelf
15. Adjustable Feet
Other manuals for PC150
2
Table of contents